horn CHEVROLET HHR 2011 1.G Owners Manual
[x] Cancel search | Manufacturer: CHEVROLET, Model Year: 2011, Model line: HHR, Model: CHEVROLET HHR 2011 1.GPages: 430, PDF Size: 4.57 MB
Page 9 of 430

Black plate (3,1)Chevrolet HHR Owner Manual - 2011
A.Outlet Adjustment on page 4‑20.
B. Cruise Control
on page 4‑8(If Equipped).
C. Turn Signal/Multifunction Lever on page 4‑4.
D. Instrument Panel Cluster on page 4‑23.
E. Windshield Wipers on page 4‑5.
Windshield Washer on page 4‑6.
F. Instrument Panel Storage on page 3‑42.
G. Traction Control System (TCS)
on page 5‑8(If Equipped).
Electronic Stability Control (ESC). See Electronic
Stability Control (ESC) on page 5‑6.
H. Passenger Airbag Status Indicator on page 4‑27.
I. Rear Side Cargo Door Buttons (If Equipped). See Rear Side Cargo Door on page 3‑11.
J. Hood Release on page 6‑13.
K. Driver Information Center (DIC) Buttons. See Driver Information Center (DIC) on page 4‑38.
L. Data Link Connector (DLC). See Malfunction
Indicator Lamp on page 4‑33. M.
Horn on page 4‑3.
N. Audio Steering Wheel Controls
on page 4‑79(If Equipped).
O. Instrument Panel Brightness on page 4‑14.
P. Audio System(s) on page 4‑50.
Q. Climate Control System on page 4‑18.
R. Rear Window Wiper/Washer on page 4‑7.
S. Shift Lever (Manual Shown). See Manual
Transmission Operation
on page 3‑29and
Automatic Transmission Operation on page 3‑26.
T. Accessory Power Outlet(s)
on page 4‑15(If Equipped).
Cigarette Lighter (If Equipped). See Ashtray(s)
and Cigarette Lighter on page 4‑17.
U. Fog Lamps
on page 4‑13(If Equipped).
V. Hazard Warning Flashers on page 4‑3.
W. Glove Box on page 3‑42.
1-3
Page 111 of 430
Black plate (5,1)Chevrolet HHR Owner Manual - 2011
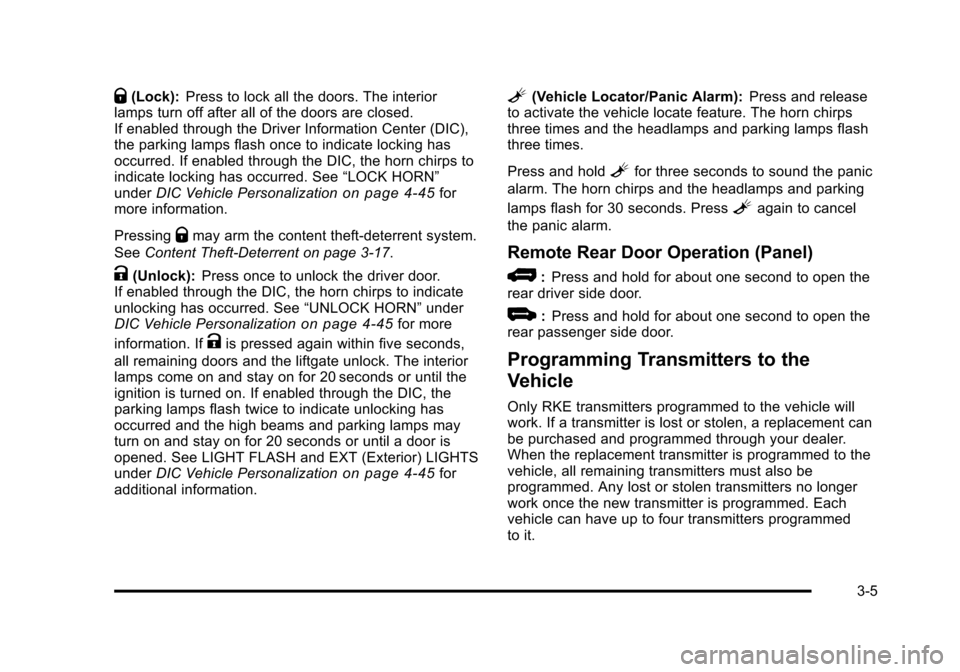
Q(Lock):Press to lock all the doors. The interior
lamps turn off after all of the doors are closed.
If enabled through the Driver Information Center (DIC),
the parking lamps flash once to indicate locking has
occurred. If enabled through the DIC, the horn chirps to
indicate locking has occurred. See “LOCK HORN”
under DIC Vehicle Personalization
on page 4‑45for
more information.
Pressing
Qmay arm the content theft-deterrent system.
See Content Theft-Deterrent on page 3‑17.
K(Unlock): Press once to unlock the driver door.
If enabled through the DIC, the horn chirps to indicate
unlocking has occurred. See “UNLOCK HORN”under
DIC Vehicle Personalization
on page 4‑45for more
information. If
Kis pressed again within five seconds,
all remaining doors and the liftgate unlock. The interior
lamps come on and stay on for 20 seconds or until the
ignition is turned on. If enabled through the DIC, the
parking lamps flash twice to indicate unlocking has
occurred and the high beams and parking lamps may
turn on and stay on for 20 seconds or until a door is
opened. See LIGHT FLASH and EXT (Exterior) LIGHTS
under DIC Vehicle Personalization
on page 4‑45for
additional information.
L(Vehicle Locator/Panic Alarm): Press and release
to activate the vehicle locate feature. The horn chirps
three times and the headlamps and parking lamps flash
three times.
Press and hold
Lfor three seconds to sound the panic
alarm. The horn chirps and the headlamps and parking
lamps flash for 30 seconds. Press
Lagain to cancel
the panic alarm.
Remote Rear Door Operation (Panel)
*: Press and hold for about one second to open the
rear driver side door.
+: Press and hold for about one second to open the
rear passenger side door.
Programming Transmitters to the
Vehicle
Only RKE transmitters programmed to the vehicle will
work. If a transmitter is lost or stolen, a replacement can
be purchased and programmed through your dealer.
When the replacement transmitter is programmed to the
vehicle, all remaining transmitters must also be
programmed. Any lost or stolen transmitters no longer
work once the new transmitter is programmed. Each
vehicle can have up to four transmitters programmed
to it.
3-5
Page 124 of 430
Black plate (18,1)Chevrolet HHR Owner Manual - 2011
The system will arm after either of the following occur:
.30 seconds after all the doors are closed.
.60 seconds with any door open.
Press the lock button on the RKE transmitter a second
time, while all the doors are closed, to immediately arm
the system. The system still arms in 60 seconds if a
door is open. When the open door is closed, it
also arms.
The security light turns on to indicate that arming has
been initiated. Once the system is armed, the security
light flashes once every three seconds.
If the security light flashes twice per second, a door
is open.
Locking the vehicle with the manual lock knobs on the
doors will not arm the system.
Disarming the System
Disarm the system by doing any one of the following:
.Press the RKE transmitter unlock button.
.Turn the ignition on.
Once the system is disarmed, the security light stops
flashing.
How the System Alarm is Activated
If the system is armed, it can be activated by either:
.Opening the driver's door or tailgate. This causes a
10 second pre-alarm chirp followed by a 30 second
full alarm of horn and lights.
.Opening any other door. This immediately causes
a full alarm of horn and lights for 30 seconds.
When an alarm event has finished, the system re-arms
itself automatically.
How to Turn Off the System Alarm
To turn off the system alarm, do one of the following:
.Press the lock button on the RKE transmitter. The
system will then re-arm itself.
.Press the unlock button on the RKE transmitter.
This will also disarm the system.
.Insert the key in the ignition and turn it on. This will
also disarm the system.
How to Detect a Tamper Condition
The content theft security system alarm was previously
activated if three chirps sound when you press the lock
or unlock buttons on the RKE transmitter.
3-18
Page 157 of 430
Black plate (1,1)Chevrolet HHR Owner Manual - 2011
Section 4 Instrument Panel
Instrument Panel Overview. . . . . . . . . . . . . . . . . . . . . . . .4-3
Hazard Warning Flashers . . . . . . . . . . . . . . . . . . . . . . . 4-3
Horn . . . . . . . . . . . . . . . . . . . . . . . . . . . . . . . . . . . . . . . . . . . . 4-3
Tilt Wheel . . . . . . . . . . . . . . . . . . . . . . . . . . . . . . . . . . . . . . . 4-3
Turn Signal/Multifunction Lever . . . . . . . . . . . . . . . . . . 4-4
Turn and Lane-Change Signals . . . . . . . . . . . . . . . . . 4-4
Headlamp High/Low-Beam Changer . . . . . . . . . . . . 4-5
Flash-to-Pass . . . . . . . . . . . . . . . . . . . . . . . . . . . . . . . . . . . 4-5
Windshield Wipers . . . . . . . . . . . . . . . . . . . . . . . . . . . . . . 4-5
Windshield Washer . . . . . . . . . . . . . . . . . . . . . . . . . . . . . 4-6
Rear Window Wiper/Washer . . . . . . . . . . . . . . . . . . . . 4-7
Cruise Control . . . . . . . . . . . . . . . . . . . . . . . . . . . . . . . . . . 4-8
Headlamps . . . . . . . . . . . . . . . . . . . . . . . . . . . . . . . . . . . . 4-11
Wiper Activated Headlamps . . . . . . . . . . . . . . . . . . . 4-12
Headlamps on Reminder . . . . . . . . . . . . . . . . . . . . . . 4-12
Daytime Running Lamps (DRL) . . . . . . . . . . . . . . . . 4-12
Automatic Headlamp System . . . . . . . . . . . . . . . . . . 4-13
Fog Lamps . . . . . . . . . . . . . . . . . . . . . . . . . . . . . . . . . . . . 4-13
Instrument Panel Brightness . . . . . . . . . . . . . . . . . . . 4-14
Dome Lamp . . . . . . . . . . . . . . . . . . . . . . . . . . . . . . . . . . . 4-14
Entry/Exit Lighting . . . . . . . . . . . . . . . . . . . . . . . . . . . . . 4-14
Reading Lamps . . . . . . . . . . . . . . . . . . . . . . . . . . . . . . . . 4-14
Electric Power Management . . . . . . . . . . . . . . . . . . . 4-15
Battery Run-Down Protection . . . . . . . . . . . . . . . . . . 4-15
Accessory Power Outlet(s) . . . . . . . . . . . . . . . . . . . . . 4-15
Ashtray(s) and Cigarette Lighter . . . . . . . . . . . . . . . 4-17 Climate Controls
. . . . . . . . . . . . . . . . . . . . . . . . . . . . . . . . . . 4-18
Climate Control System . . . . . . . . . . . . . . . . . . . . . . . . 4-18
Outlet Adjustment . . . . . . . . . . . . . . . . . . . . . . . . . . . . . . 4-20
Passenger Compartment Air Filter . . . . . . . . . . . . . 4-21
Warning Lights, Gauges, and Indicators . . . . . . . .4-22
Instrument Panel Cluster . . . . . . . . . . . . . . . . . . . . . . . 4-23
Speedometer and Odometer . . . . . . . . . . . . . . . . . . . 4-24
Tachometer . . . . . . . . . . . . . . . . . . . . . . . . . . . . . . . . . . . . 4-24
Safety Belt Reminders . . . . . . . . . . . . . . . . . . . . . . . . . 4-25
Airbag Readiness Light . . . . . . . . . . . . . . . . . . . . . . . . 4-26
Passenger Airbag Status Indicator . . . . . . . . . . . . . 4-27
Charging System Light . . . . . . . . . . . . . . . . . . . . . . . . 4-28
Up-Shift Light . . . . . . . . . . . . . . . . . . . . . . . . . . . . . . . . . . 4-28
Brake System Warning Light . . . . . . . . . . . . . . . . . . . 4-29
Antilock Brake System (ABS) Warning Light . . . 4-30
Enhanced Traction System (ETS) Indicator/ Warning Light . . . . . . . . . . . . . . . . . . . . . . . . . . . . . . . . 4-30
Electronic Stability Control (ESC)/Traction Control System (TCS) Indicator/Warning
Light . . . . . . . . . . . . . . . . . . . . . . . . . . . . . . . . . . . . . . . . . 4-31
Engine Coolant Temperature Warning Light . . . . 4-32
Engine Coolant Temperature Gauge . . . . . . . . . . . 4-32
Tire Pressure Light . . . . . . . . . . . . . . . . . . . . . . . . . . . . 4-33
Malfunction Indicator Lamp . . . . . . . . . . . . . . . . . . . . 4-33
Oil Pressure Light . . . . . . . . . . . . . . . . . . . . . . . . . . . . . 4-36
Security Light . . . . . . . . . . . . . . . . . . . . . . . . . . . . . . . . . . 4-36
4-1
Page 159 of 430
Black plate (3,1)Chevrolet HHR Owner Manual - 2011
Instrument Panel Overview
Hazard Warning Flashers
|(Hazard Warning Flasher):Press this button
located on the instrument panel, to make the front and
rear turn signal lamps flash on and off. This warns
others that you are having trouble.
Press
|again to turn the flashers off.
Horn
To sound the horn, press the horn symbols located on
the steering wheel.
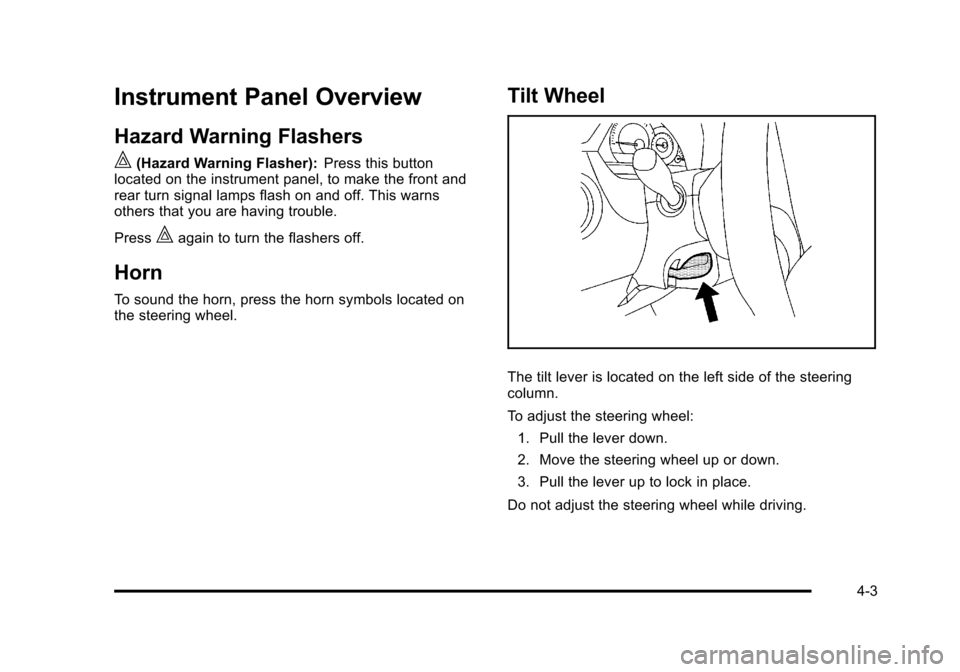
Tilt Wheel
The tilt lever is located on the left side of the steering
column.
To adjust the steering wheel:
1. Pull the lever down.
2. Move the steering wheel up or down.
3. Pull the lever up to lock in place.
Do not adjust the steering wheel while driving.
4-3
Page 202 of 430
Black plate (46,1)Chevrolet HHR Owner Manual - 2011
To change feature settings, use the following procedure:
Entering Personalization Menu
1. Turn the ignition on while the vehicle is stopped.To avoid excessive drain on the battery, it is
recommended that the headlamps are turned off.
2. Press and hold the information and reset buttons at the same time for one second, then release to
enter the personalization menu.
If the vehicle speed is greater than 2 mph (3 km/h),
only the UNITS menu will be accessible.
3. Press the information button to scroll through the available personalization menu modes.
Press the reset button to scroll through the
available settings for each mode.
If you do not make a selection within ten seconds,
the display will go back to the previous information
displayed.
Personalization Menu Modes
OIL LIFE RESET
When this feature is displayed, you can reset the
engine oil life system. To reset the system, see Engine
Oil Life System
on page 6‑19. See “OIL LIFE” under
DIC Operation and Displayson page 4‑38for more
information.
UNITS
This feature allows you to select the units of
measurement in which the DIC will display the vehicle
information. When UNITS appears on the display, press
and hold the reset button for at least one second to
scroll through the available settings:
ENGLISH (default in United States): All information
will be displayed in English units.
METRIC (default in Canada): All information will be
displayed in metric units.
To select a setting and move on to the next feature,
press the information button while the desired setting is
displayed on the DIC.
LOCK HORN
This feature, which allows the vehicle's horn to chirp
every time the lock button on the Remote Keyless Entry
(RKE) transmitter is pressed, can be enabled or
disabled. When LOCK HORN appears on the display,
press and hold the reset button for at least one second
to scroll through the available settings:
OFF (default): The horn will not chirp on the first press
of the lock button on the RKE transmitter. The horn will
still chirp on the second press.
4-46
Page 203 of 430
Black plate (47,1)Chevrolet HHR Owner Manual - 2011
ON:The horn will chirp on the first press of the lock
button on the RKE transmitter.
See Remote Keyless Entry (RKE) System Operation
on
page 3‑4for more information.
To select a setting and move on to the next feature,
press the information button while the desired setting is
displayed on the DIC.
UNLOCK HORN
This feature, which allows the vehicle's horn to chirp on
the first press of the unlock button on the Remote
Keyless Entry (RKE) transmitter, can be enabled or
disabled. When UNLOCK HORN appears on the
display, press and hold the reset button for at least
one second to scroll through the available settings:
OFF (default): The horn will not chirp when the unlock
button on the RKE transmitter is pressed.
ON: The horn will chirp on the first press of the unlock
button on the RKE transmitter.
See Remote Keyless Entry (RKE) System Operation
on
page 3‑4for more information.
To select a setting and move on to the next feature,
press the information button while the desired setting is
displayed on the DIC.
LIGHT FLASH
This feature, which allows the vehicle's exterior hazard/
turn signal lighting to flash every time the lock or unlock
button on the Remote Keyless Entry (RKE) transmitter
is pressed, can be enabled or disabled. When LIGHT
FLASH appears on the display, press and hold the reset
button for at least one second to scroll through the
available settings:
OFF: The exterior hazard/turn signal lighting
will not flash when the lock or unlock button on
the RKE transmitter is pressed.
ON (default): The exterior hazard/turn signal lighting
will flash when the lock or unlock button on the
RKE transmitter is pressed.
See Remote Keyless Entry (RKE) System Operation
on
page 3‑4for more information.
To select a setting and move on to the next feature,
press the information button while the desired setting is
displayed on the DIC.
4-47
Page 335 of 430
Black plate (59,1)Chevrolet HHR Owner Manual - 2011
TPMS Sensor Matching Process
Each TPMS sensor has a unique identification code.
Any time you replace one or more of the TPMS sensors
or rotate the vehicle's tires, the identification codes
need to be matched to the new tire/wheel location. The
sensors are matched, to the tire/wheel locations, in the
following order: driver side front tire, passenger side
front tire, passenger side rear tire, and driver side rear
tire using a TPMS diagnostic tool. See your dealer for
service.
The TPMS sensors can also be matched to each tire/
wheel position by increasing or decreasing the tire's air
pressure. When increasing the tire's pressure, do not
exceed the maximum inflation pressure indicated on the
tire's sidewall. To decrease the tire's air-pressure use
the pointed end of the valve cap, a pencil-style air
pressure gauge, or a key.
You have two minutes to match each tire and wheel
position. If it takes longer than two minutes to match
any tire and wheel position, the matching process stops
and you need to start over.
The TPMS matching process is outlined below:1. Set the parking brake.
2. Turn the ignition switch to ON/RUN with the engine off. 3. Press and hold the Remote Keyless Entry (RKE)
transmitter's LOCK and UNLOCK buttons, at the
same time, for about five seconds to start the
TPMS learn mode. The horn sounds twice
indicating the TPMS receiver is ready and in
learn mode.
4. Start with the driver side front tire. The driver side front turn signal also comes on to indicate that
corner's sensor is ready to be learned.
5. Remove the valve cap from the tire's valve stem. Activate the TPMS sensor by increasing or
decreasing the tire's air pressure for about
eight seconds. The horn chirp, can take up to
30 seconds to sound. It chirps one time and then
all the turn signals flash one time to confirm the
sensor identification code has been matched to the
tire/wheel position.
6. The passenger side front turn signal comes on to indicate that corner sensor is ready to be learned.
Proceed to the passenger side front tire and repeat
the procedure in Step 5.
7. The passenger side rear turn signal comes on to indicate that corner sensor is ready to be learned.
Proceed to the passenger side rear tire and repeat
the procedure in Step 5.
6-59
Page 336 of 430
Black plate (60,1)Chevrolet HHR Owner Manual - 2011
8. The driver side rear turn signal comes on toindicate that corner sensor is ready to be learned.
Proceed to the driver side rear tire, and repeat the
procedure in Step 5.
9. After hearing the single horn chirp for the driver side rear tire, two additional horn chirps sound to
indicate the tire learning process is done. Turn the
ignition switch to LOCK/OFF.
If no tires are learned after entering the TPMS
learn mode, or if communication with the receiver
stops, or if the time limit has expired, turn the
ignition switch to LOCK/OFF and start over
beginning with Step 2.
10. Set all four tires to the recommended air pressure level as indicated on the Tire and Loading
Information label.
11. Put the valve caps back on the valve stems.
Tire Inspection and Rotation
We recommend that you regularly inspect your
vehicle's tires, including the spare tire, for signs of
wear or damage. See When It Is Time for New
Tires
on page 6‑62for more information. Always remove the tires if any of the following
statements are true:
.You can see the indicators at three or more
places around the tire.
.You can see cord or fabric showing through
the tire's rubber.
.The tread or sidewall is cracked, cut,
or snagged deep enough to show cord or
fabric.
.The tire has a bump, bulge, or split.
.The tire has a puncture, cut, or other damage
that cannot be repaired well because of the
size or location of the damage.
Tires should be rotated every 12 000 km
(7,500 miles). See Scheduled Maintenance
on
page 7‑3
.
The purpose of a regular tire rotation is to achieve
a uniform wear for all tires on the vehicle. This will
ensure that your vehicle continues to perform
most like it did when the tires were new.
6-60
Page 381 of 430
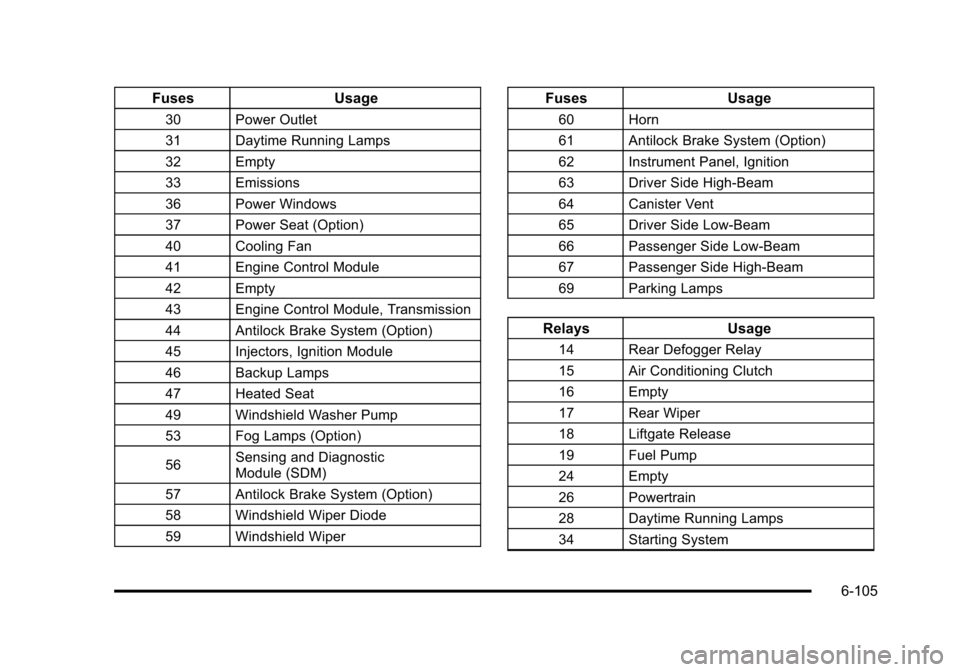
Black plate (105,1)Chevrolet HHR Owner Manual - 2011
FusesUsage
30 Power Outlet
31 Daytime Running Lamps
32 Empty
33 Emissions
36 Power Windows
37 Power Seat (Option)
40 Cooling Fan
41 Engine Control Module
42 Empty
43 Engine Control Module, Transmission
44 Antilock Brake System (Option)
45 Injectors, Ignition Module
46 Backup Lamps
47 Heated Seat
49 Windshield Washer Pump
53 Fog Lamps (Option)
56Sensing and Diagnostic
Module (SDM)
57 Antilock Brake System (Option)
58 Windshield Wiper Diode
59 Windshield Wiper
Fuses Usage
60 Horn
61 Antilock Brake System (Option)
62 Instrument Panel, Ignition
63 Driver Side High-Beam
64 Canister Vent
65 Driver Side Low-Beam
66 Passenger Side Low-Beam
67 Passenger Side High-Beam
69 Parking Lamps
Relays Usage
14 Rear Defogger Relay
15 Air Conditioning Clutch
16 Empty
17 Rear Wiper
18 Liftgate Release
19 Fuel Pump
24 Empty
26 Powertrain
28 Daytime Running Lamps
34 Starting System
6-105