AUX CHEVROLET IMPALA 2003 8.G Owners Manual
[x] Cancel search | Manufacturer: CHEVROLET, Model Year: 2003, Model line: IMPALA, Model: CHEVROLET IMPALA 2003 8.GPages: 408, PDF Size: 2.75 MB
Page 123 of 408
Instrument Panel Overview...............................3-4
Hazard Warning Flashers................................3-6
Other Warning Devices...................................3-6
Horn.............................................................3-7
Tilt Wheel.....................................................3-7
Turn Signal/Multifunction Lever.........................3-7
Exterior Lamps.............................................3-14
Interior Lamps..............................................3-17
Accessory Power Outlets...............................3-19
Auxiliary Power Connection
(Power Drop)............................................3-20
Ashtrays and Cigarette Lighter........................3-21
Climate Controls............................................3-22
Dual Climate Control System..........................3-22
Outlet Adjustment.........................................3-25
Passenger Compartment Air Filter...................3-26
Warning Lights, Gages and Indicators.............3-28
Instrument Panel Cluster................................3-29
Speedometer and Odometer...........................3-31
Tachometer.................................................3-32
Safety Belt Reminder Light.............................3-32
Air Bag Readiness Light................................3-33
Brake System Warning Light..........................3-34Anti-Lock Brake System Warning Light.............3-35
Traction Control System (TCS) Warning Light . . .3-35
Engine Coolant Temperature Gage..................3-36
Malfunction Indicator Lamp.............................3-37
Cruise Control Light......................................3-39
Fuel Gage...................................................3-40
Message Center.............................................3-40
Service Traction System Warning Message......3-41
Traction Active Message................................3-41
Battery Warning Message..............................3-42
Hot Coolant Temperature Warning Message.....3-42
Low Oil Pressure Message............................3-43
Low Engine Oil Level Message.......................3-43
Change Engine Oil Message..........................3-44
Low Tire Message........................................3-44
Door Ajar Warning Message...........................3-45
Trunk Ajar Warning Message.........................3-45
Security Message.........................................3-46
Low Washer Fluid Warning Message...............3-46
Low Fuel Warning Message...........................3-47
Low Brake Fluid Warning Message.................3-47
Service Vehicle Soon Message.......................3-48
Highbeam Out Warning Message....................3-48
Section 3 Instrument Panel
3-1
Page 142 of 408
Auxiliary Power Connection
(Power Drop)
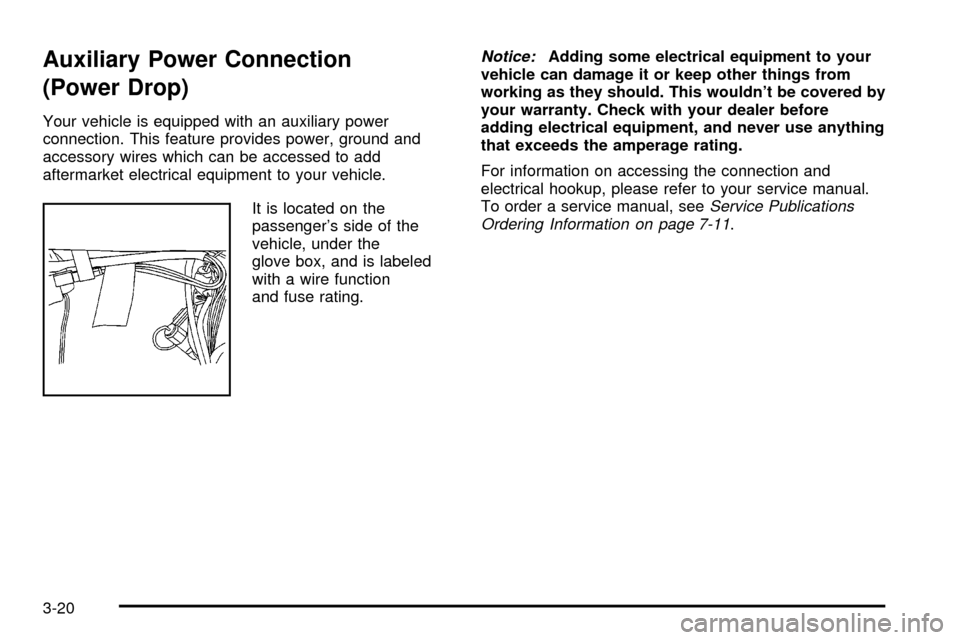
Your vehicle is equipped with an auxiliary power
connection. This feature provides power, ground and
accessory wires which can be accessed to add
aftermarket electrical equipment to your vehicle.
It is located on the
passenger's side of the
vehicle, under the
glove box, and is labeled
with a wire function
and fuse rating.
Notice:Adding some electrical equipment to your
vehicle can damage it or keep other things from
working as they should. This wouldn't be covered by
your warranty. Check with your dealer before
adding electrical equipment, and never use anything
that exceeds the amperage rating.
For information on accessing the connection and
electrical hookup, please refer to your service manual.
To order a service manual, see
Service Publications
Ordering Information on page 7-11.
3-20
Page 185 of 408
pressed more than once, the player will continue
moving forward or backward through the tape. SEEK
and a positive or a negative number will appear on the
display.
BAND:Press this button to listen to the radio when a
tape is playing. The tape will stop but remain in the
player.
TAPE AUX (Auxiliary):Press this button to play a
cassette tape when listening to the radio.
ZEJT (Eject):Press this button to eject a tape.
Eject may be activated with the radio off. Cassette tapes
may be loaded with the radio off if this button is
pressed ®rst.
Cassette Tape Messages
CHK TAPE (Check Tape):If this message appears on
the radio display, the tape won't play because of one
of the following errors.
·The tape is tight and the player can't turn the tape
hubs. Remove the tape. Hold the tape with the
open end down and try to turn the right hub
counterclockwise with a pencil. Turn the tape over
and repeat. If the hubs do not turn easily, your
tape may be damaged and should not be used in
the player. Try a new tape to make sure your player
is working properly.
·The tape is broken. Try a new tape.
·The tape is wrapped around the tape head. Attempt
to get the cassette out. Try a new tape.
CLEAN:If this message appears on the display, the
cassette tape player needs to be cleaned. It will still play
tapes, but you should clean it as soon as possible to
prevent damage to the tapes and player. See
Care
of Your Cassette Tape Player on page 3-91.
If any error occurs repeatedly or if an error can't be
corrected, contact your dealer.
CD Adapter Kits
It is possible to use a portable CD player adapter kit
with your cassette tape player after activating the bypass
feature on your tape player.
To activate the bypass feature, use the following steps:
1. Turn the radio off.
2. Press and hold the TAPE AUX button for ®ve
seconds. READY will appear on the display for
®ve seconds, indicating the feature is active.
3. Insert the adapter into the cassette slot. It will
power up the radio and begin playing.
The override feature will remain active until EJT
is pressed.
3-63
Page 196 of 408
6 RDM (Random):Press this pushbutton to hear the
tracks in random, rather than sequential, order. RDM ON
will appear on the display. RDM T and the track
number will appear on the display when each track
starts to play. Press RDM again to turn off random play.
RDM OFF will appear on the display.
qSEEKr:Press the left arrow to go to the start of
the current or of the previous track. Press the right
arrow to go to the start of the next track. If either of the
arrows is held or pressed more than once, the player
will continue moving backward or forward through
the CD.
DISPL (Display):Press this knob to see how long the
current track has been playing. ET and the elapsed
time will appear on the display. To change the default
on the display (track or elapsed time), press the
knob until you see the display you want, then hold the
knob for two seconds. The radio will produce one
beep and selected display will now be the default.BAND:Press this button to listen to the radio when a
CD is playing. The CD will stop but remain in the player.
CD AUX (Auxiliary):Press this button to play a CD
when listening to the radio.
ZEJT (Eject):Press this button to eject a CD. Eject
may be activated with either the ignition or radio off.
CDs may be loaded with the radio and ignition off if this
button is pressed ®rst.
3-74
Page 353 of 408
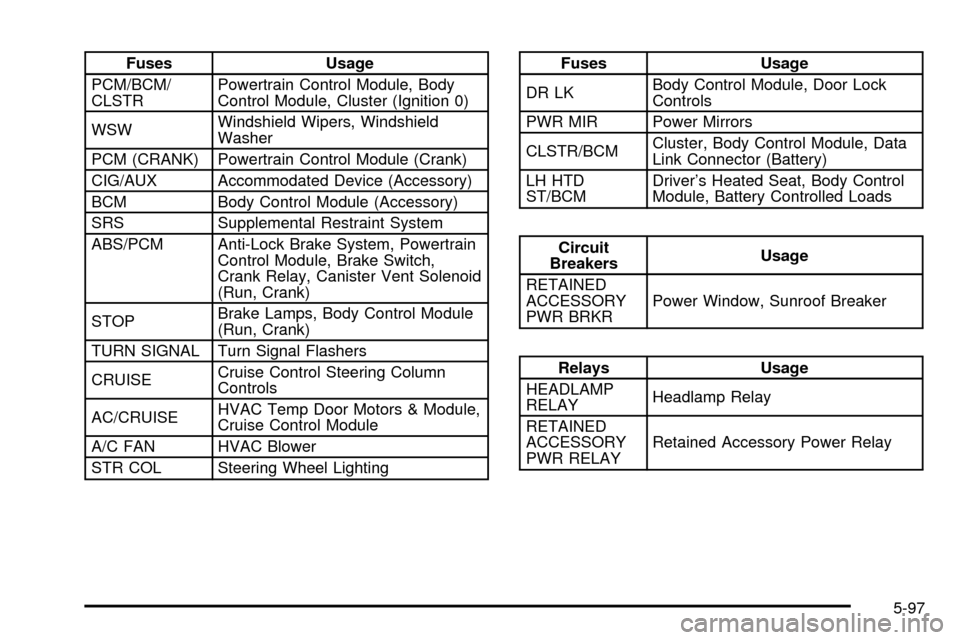
Fuses Usage
PCM/BCM/
CLSTRPowertrain Control Module, Body
Control Module, Cluster (Ignition 0)
WSWWindshield Wipers, Windshield
Washer
PCM (CRANK) Powertrain Control Module (Crank)
CIG/AUX Accommodated Device (Accessory)
BCM Body Control Module (Accessory)
SRS Supplemental Restraint System
ABS/PCM Anti-Lock Brake System, Powertrain
Control Module, Brake Switch,
Crank Relay, Canister Vent Solenoid
(Run, Crank)
STOPBrake Lamps, Body Control Module
(Run, Crank)
TURN SIGNAL Turn Signal Flashers
CRUISECruise Control Steering Column
Controls
AC/CRUISEHVAC Temp Door Motors & Module,
Cruise Control Module
A/C FAN HVAC Blower
STR COL Steering Wheel LightingFuses Usage
DR LKBody Control Module, Door Lock
Controls
PWR MIR Power Mirrors
CLSTR/BCMCluster, Body Control Module, Data
Link Connector (Battery)
LH HTD
ST/BCMDriver's Heated Seat, Body Control
Module, Battery Controlled Loads
Circuit
BreakersUsage
RETAINED
ACCESSORY
PWR BRKRPower Window, Sunroof Breaker
Relays Usage
HEADLAMP
RELAYHeadlamp Relay
RETAINED
ACCESSORY
PWR RELAYRetained Accessory Power Relay
5-97
Page 355 of 408
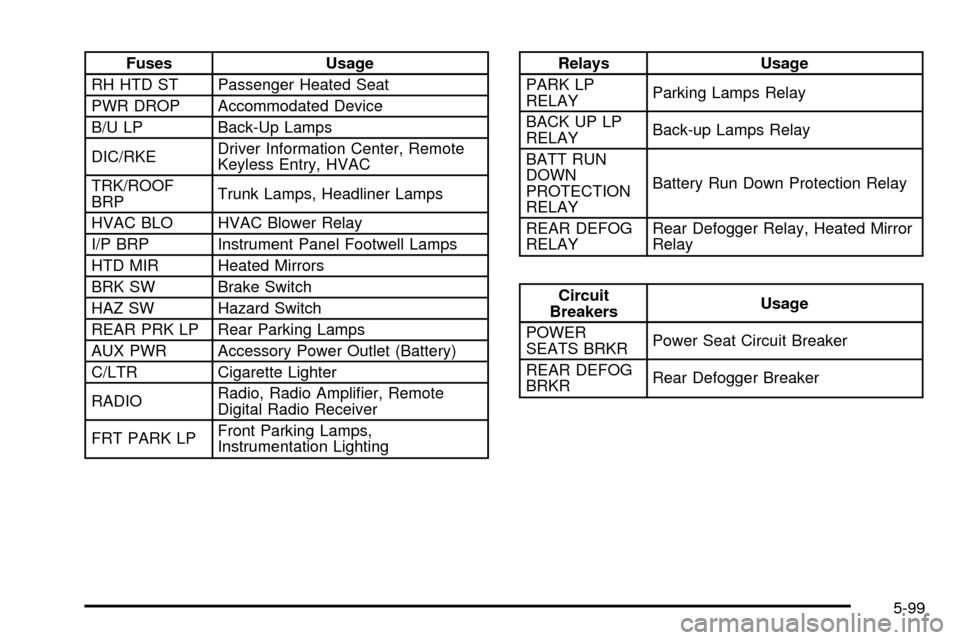
Fuses Usage
RH HTD ST Passenger Heated Seat
PWR DROP Accommodated Device
B/U LP Back-Up Lamps
DIC/RKEDriver Information Center, Remote
Keyless Entry, HVAC
TRK/ROOF
BRPTrunk Lamps, Headliner Lamps
HVAC BLO HVAC Blower Relay
I/P BRP Instrument Panel Footwell Lamps
HTD MIR Heated Mirrors
BRK SW Brake Switch
HAZ SW Hazard Switch
REAR PRK LP Rear Parking Lamps
AUX PWR Accessory Power Outlet (Battery)
C/LTR Cigarette Lighter
RADIORadio, Radio Ampli®er, Remote
Digital Radio Receiver
FRT PARK LPFront Parking Lamps,
Instrumentation LightingRelays Usage
PARK LP
RELAYParking Lamps Relay
BACK UP LP
RELAYBack-up Lamps Relay
BATT RUN
DOWN
PROTECTION
RELAYBattery Run Down Protection Relay
REAR DEFOG
RELAYRear Defogger Relay, Heated Mirror
Relay
Circuit
BreakersUsage
POWER
SEATS BRKRPower Seat Circuit Breaker
REAR DEFOG
BRKRRear Defogger Breaker
5-99
Page 394 of 408
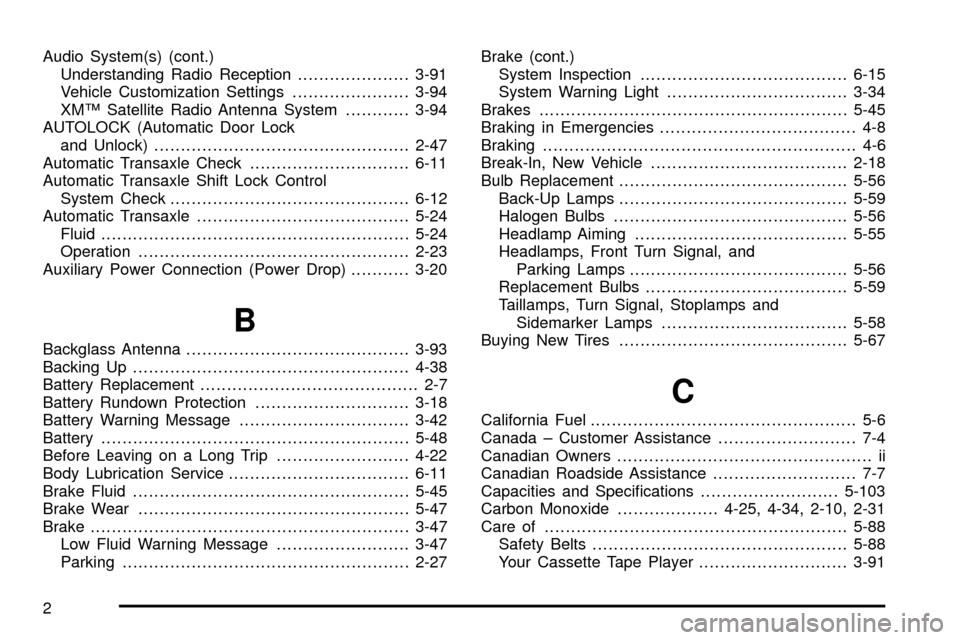
Audio System(s) (cont.)
Understanding Radio Reception.....................3-91
Vehicle Customization Settings......................3-94
XMŸ Satellite Radio Antenna System............3-94
AUTOLOCK (Automatic Door Lock
and Unlock)................................................2-47
Automatic Transaxle Check..............................6-11
Automatic Transaxle Shift Lock Control
System Check.............................................6-12
Automatic Transaxle........................................5-24
Fluid..........................................................5-24
Operation...................................................2-23
Auxiliary Power Connection (Power Drop)...........3-20
B
Backglass Antenna..........................................3-93
Backing Up....................................................4-38
Battery Replacement......................................... 2-7
Battery Rundown Protection.............................3-18
Battery Warning Message................................3-42
Battery..........................................................5-48
Before Leaving on a Long Trip.........................4-22
Body Lubrication Service..................................6-11
Brake Fluid....................................................5-45
Brake Wear...................................................5-47
Brake............................................................3-47
Low Fluid Warning Message.........................3-47
Parking......................................................2-27Brake (cont.)
System Inspection.......................................6-15
System Warning Light..................................3-34
Brakes..........................................................5-45
Braking in Emergencies..................................... 4-8
Braking........................................................... 4-6
Break-In, New Vehicle.....................................2-18
Bulb Replacement...........................................5-56
Back-Up Lamps...........................................5-59
Halogen Bulbs............................................5-56
Headlamp Aiming........................................5-55
Headlamps, Front Turn Signal, and
Parking Lamps.........................................5-56
Replacement Bulbs......................................5-59
Taillamps, Turn Signal, Stoplamps and
Sidemarker Lamps...................................5-58
Buying New Tires...........................................5-67
C
California Fuel.................................................. 5-6
Canada ± Customer Assistance.......................... 7-4
Canadian Owners................................................ ii
Canadian Roadside Assistance........................... 7-7
Capacities and Speci®cations..........................5-103
Carbon Monoxide...................4-25, 4-34, 2-10, 2-31
Care of.........................................................5-88
Safety Belts................................................5-88
Your Cassette Tape Player............................3-91
2
Page 403 of 408
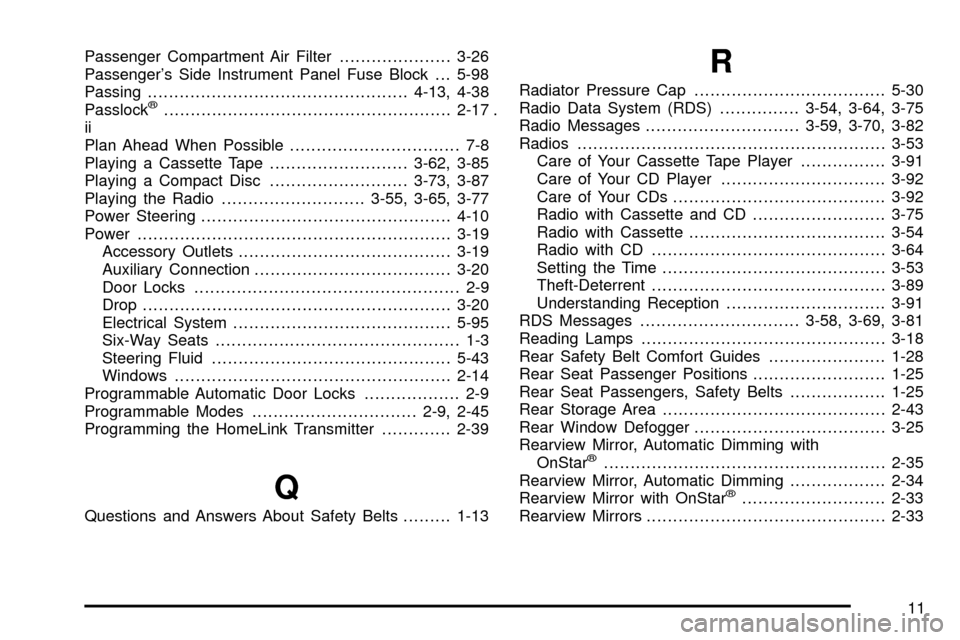
Passenger Compartment Air Filter.....................3-26
Passenger's Side Instrument Panel Fuse Block . . . 5-98
Passing.................................................4-13, 4-38
Passlock
ž......................................................2-17 .
ii
Plan Ahead When Possible................................ 7-8
Playing a Cassette Tape..........................3-62, 3-85
Playing a Compact Disc..........................3-73, 3-87
Playing the Radio...........................3-55, 3-65, 3-77
Power Steering...............................................4-10
Power...........................................................3-19
Accessory Outlets........................................3-19
Auxiliary Connection.....................................3-20
Door Locks.................................................. 2-9
Drop..........................................................3-20
Electrical System.........................................5-95
Six-Way Seats.............................................. 1-3
Steering Fluid.............................................5-43
Windows....................................................2-14
Programmable Automatic Door Locks.................. 2-9
Programmable Modes...............................2-9, 2-45
Programming the HomeLink Transmitter.............2-39
Q
Questions and Answers About Safety Belts.........1-13
R
Radiator Pressure Cap....................................5-30
Radio Data System (RDS)...............3-54, 3-64, 3-75
Radio Messages.............................3-59, 3-70, 3-82
Radios..........................................................3-53
Care of Your Cassette Tape Player................3-91
Care of Your CD Player...............................3-92
Care of Your CDs........................................3-92
Radio with Cassette and CD.........................3-75
Radio with Cassette.....................................3-54
Radio with CD............................................3-64
Setting the Time..........................................3-53
Theft-Deterrent............................................3-89
Understanding Reception..............................3-91
RDS Messages..............................3-58, 3-69, 3-81
Reading Lamps..............................................3-18
Rear Safety Belt Comfort Guides......................1-28
Rear Seat Passenger Positions.........................1-25
Rear Seat Passengers, Safety Belts..................1-25
Rear Storage Area..........................................2-43
Rear Window Defogger....................................3-25
Rearview Mirror, Automatic Dimming with
OnStar
ž.....................................................2-35
Rearview Mirror, Automatic Dimming..................2-34
Rearview Mirror with OnStar
ž...........................2-33
Rearview Mirrors.............................................2-33
11