trunk CHEVROLET IMPALA 2003 8.G Owners Manual
[x] Cancel search | Manufacturer: CHEVROLET, Model Year: 2003, Model line: IMPALA, Model: CHEVROLET IMPALA 2003 8.GPages: 408, PDF Size: 2.75 MB
Page 13 of 408

Rear Seats
Split Folding Rear Seat
If your vehicle has this feature you can fold either side
of the seatback down for more cargo space. Make
sure the front seat isn't reclined. If it is, the rear seatback
won't fold down all the way.
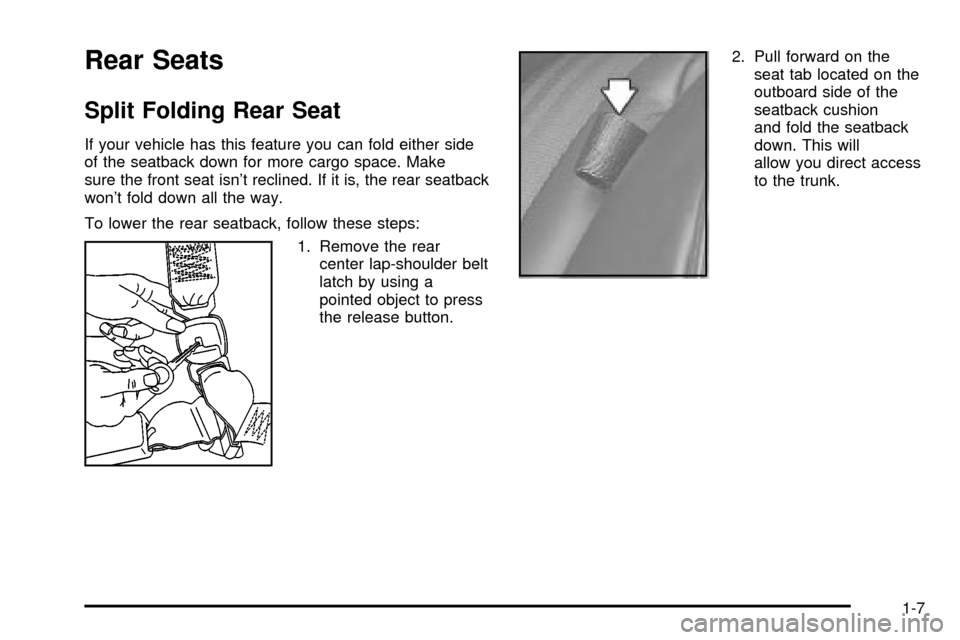
To lower the rear seatback, follow these steps:
1. Remove the rear
center lap-shoulder belt
latch by using a
pointed object to press
the release button.2. Pull forward on the
seat tab located on the
outboard side of the
seatback cushion
and fold the seatback
down. This will
allow you direct access
to the trunk.
1-7
Page 69 of 408

Keys...............................................................2-2
Remote Keyless Entry System.........................2-3
Remote Keyless Entry System Operation...........2-4
Doors and Locks.............................................2-8
Door Locks....................................................2-8
Power Door Locks..........................................2-9
Programmable Automatic Door Locks................2-9
Lockout Protection........................................2-10
Leaving Your Vehicle....................................2-10
Trunk..........................................................2-10
Windows........................................................2-13
Power Windows............................................2-14
Sun Visors...................................................2-15
Theft-Deterrent Systems..................................2-16
Content Theft-Deterrent.................................2-16
Passlock
ž....................................................2-17
Starting and Operating Your Vehicle................2-18
New Vehicle Break-In....................................2-18
Ignition Positions..........................................2-18
Starting Your Engine.....................................2-19
Engine Coolant Heater..................................2-22
Automatic Transaxle Operation.......................2-23
Parking Brake..............................................2-27
Shifting Into Park (P).....................................2-27Shifting Out of Park (P).................................2-30
Parking Over Things That Burn.......................2-31
Engine Exhaust............................................2-31
Running Your Engine While You Are Parked. . . .2-32
Mirrors...........................................................2-33
Manual Rearview Mirror.................................2-33
Manual Rearview Mirror with OnStar
ž..............2-33
Automatic Dimming Rearview Mirror................2-34
Automatic Dimming Rearview Mirror with
OnStar
ž...................................................2-35
Outside Power Mirrors...................................2-36
Outside Convex Mirror...................................2-36
OnStar
žSystem.............................................2-37
HomeLinkžTransmitter...................................2-39
Programming the HomeLinkžTransmitter.........2-39
Storage Areas................................................2-43
Glove Box...................................................2-43
Front Storage Area.......................................2-43
Center Console Storage Area.........................2-43
Rear Storage Area........................................2-43
Convenience Net..........................................2-43
Sunroof.........................................................2-44
Vehicle Personalization...................................2-45
Section 2 Features and Controls
2-1
Page 72 of 408

At times you may notice a decrease in range. This is
normal for any remote keyless entry system. If the
transmitter does not work or if you have to stand closer
to your vehicle for the transmitter to work, try this:
·Check the distance. You may be too far from your
vehicle. You may need to stand closer during
rainy or snowy weather.
·Check the location. Other vehicles or objects may
be blocking the signal. Take a few steps to the
left or right, hold the transmitter higher, and
try again.
·Check to determine if battery replacement or
resynchronization is necessary. See ªBattery
Replacementº and ªResynchronizationº under
Remote Keyless Entry System Operation on
page 2-4.
·If you are still having trouble, see your dealer or a
quali®ed technician for service.
Remote Keyless Entry System
Operation
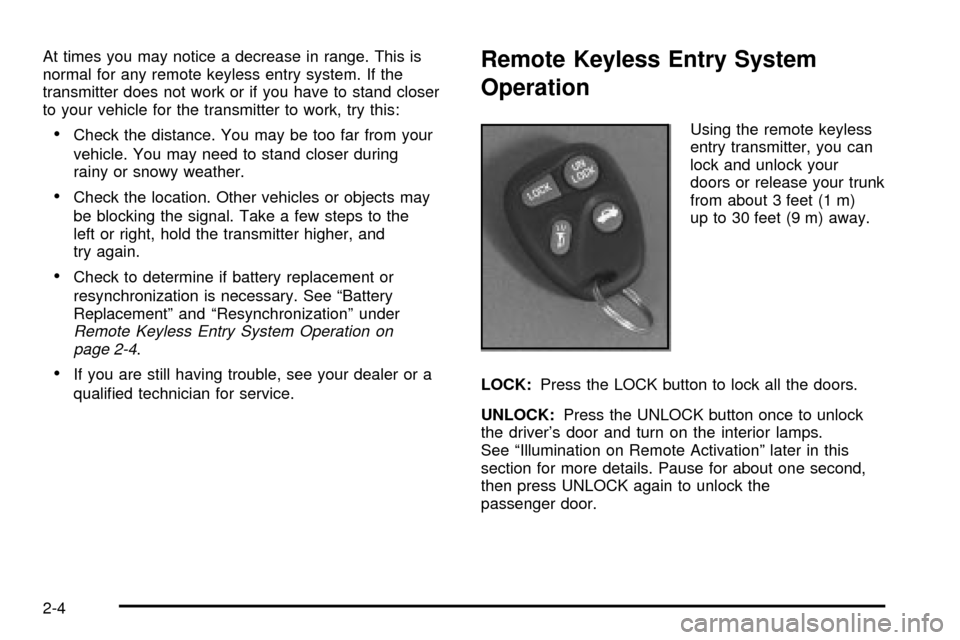
Using the remote keyless
entry transmitter, you can
lock and unlock your
doors or release your trunk
from about 3 feet (1 m)
up to 30 feet (9 m) away.
LOCK:Press the LOCK button to lock all the doors.
UNLOCK:Press the UNLOCK button once to unlock
the driver's door and turn on the interior lamps.
See ªIllumination on Remote Activationº later in this
section for more details. Pause for about one second,
then press UNLOCK again to unlock the
passenger door.
2-4
Page 73 of 408

L(Remote Alarm):Press this button to activate an
alarm. The ignition must be in OFF or ACC for the
remote alarm to work. When you press the remote
button, the headlamps will ¯ash, the horn will sound
repeatedly and your interior lamps will turn on attracting
attention if you need it. The alarm will continue until
one of the following occurs:
·The remote alarm button is pressed a second time,
·the vehicle's ignition is turned to ON or
·an alarm period of 110 seconds has elapsed.
V(Trunk Release):Press the button to release
the trunk.
Operating the remote keyless entry transmitter may
interact with the content theft-deterrent system, if your
vehicle has this option. See
Content Theft-Deterrent
on page 2-16.
Transmitter Veri®cation
This feature provides feedback that a command has
been received by the vehicle. The headlamps and
back-up lamps will ¯ash on every lock and on the ®rst
unlock command. The horn will also sound once
for every lock and twice for the ®rst unlock command.
Silent operation and other options may be selected
for this feature. See
Vehicle Personalization on
page 2-45.
If your vehicle has the optional content theft-deterrent
system, the ®rst time the remote unlock is received,
three ¯ashes from the headlamps will be seen and three
chirps will be heard to indicate an alarm condition has
occurred since last arming. See
Content Theft-Deterrent
on page 2-16.
2-5
Page 74 of 408

Illumination on Remote Activation
The interior lamps will come on when either the
UNLOCK, the trunk release or the remote alarm button
is pressed. The interior lamps will remain on for
40 seconds or until the ignition is turned to ON or LOCK
is pressed. Locking the doors with the power door
locks will also cause the lamps to turn off. If a door is
opened during the 40 second period, the interior
lamps will remain on while the door is open.
Matching Transmitter(s) to Your
Vehicle
Each remote keyless entry transmitter is coded to
prevent another transmitter from unlocking your vehicle.
If a transmitter is lost or stolen, a replacement can
be purchased through your dealer. Remember to bring
any remaining transmitters with you when you go to
your dealer. When the dealer matches the replacement
transmitter to your vehicle, any remaining transmitters
must also be matched. Once your dealer has coded the
new transmitter, the lost transmitter will not unlock
your vehicle. Each vehicle can have a maximum of four
transmitters matched to it.
If you prefer, you can complete this procedure yourself.
See
Vehicle Personalization on page 2-45for more
information.
2-6
Page 78 of 408

Disconnecting the battery for up to a year will not
change the programmed mode of the programmable
automatic power door locks.
Lockout Protection
To protect you from locking your key in the vehicle, this
feature stops the power door locks from locking while
the key is in the ignition and a door is open.
If a power lock switch is pressed while a door is open
and the key is in the ignition, all of the doors will
lock and then the driver's door will unlock. A chime will
sound continuously until all doors are closed.
Leaving Your Vehicle
If you are leaving the vehicle, take your keys, open your
door and set the locks from inside. Then get out and
close the door.
Trunk
{CAUTION:
It can be dangerous to drive with the trunk lid
open because carbon monoxide (CO) gas can
come into your vehicle. You can't see or smell
CO. It can cause unconsciousness and even
death. If you must drive with the trunk lid open
or if electrical wiring or other cable
connections must pass through the seal
between the body and the trunk lid:
·Make sure all other windows are shut.
·Turn the fan on your heating or cooling
system to its highest speed and select the
control setting that will force outside air
into your vehicle. See ªClimate Control
Systemº in the Index.
·If you have air outlets on or under the
instrument panel, open them all the way.
See ªEngine Exhaustº in the Index.
2-10
Page 79 of 408

Trunk Lock
To unlock the trunk from the outside, insert the key in
the lock and turn it. You can also press the car
symbol on your remote keyless entry transmitter, if
equipped.
Remote Trunk Release
You can also unlock the trunk from inside the vehicle.
Press the button located
below the exterior lamps
control on the underside of
the dashboard. The shift
lever must be in PARK (P)
for the remote trunk
release button to work.
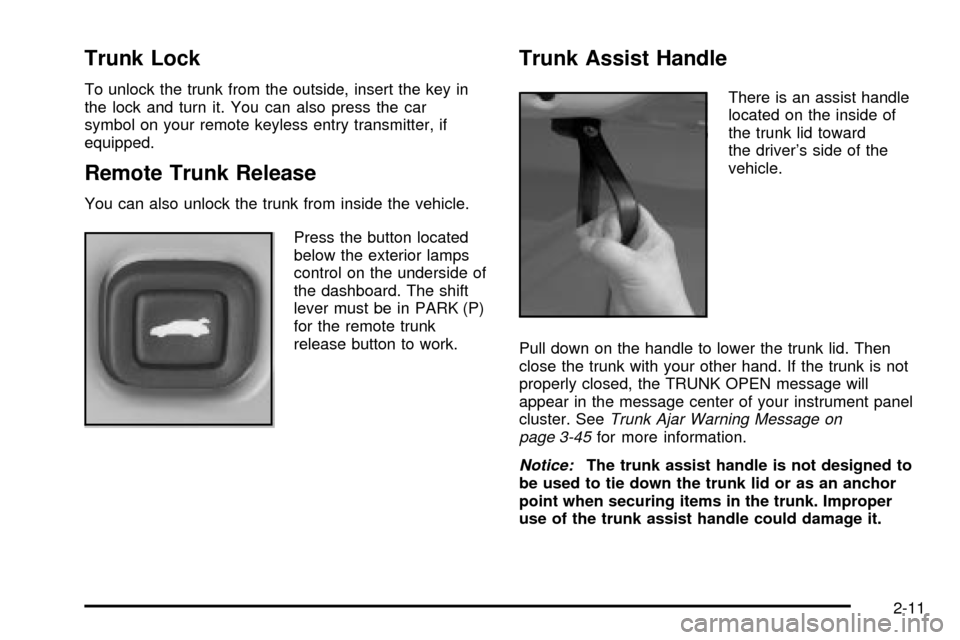
Trunk Assist Handle
There is an assist handle
located on the inside of
the trunk lid toward
the driver's side of the
vehicle.
Pull down on the handle to lower the trunk lid. Then
close the trunk with your other hand. If the trunk is not
properly closed, the TRUNK OPEN message will
appear in the message center of your instrument panel
cluster. See
Trunk Ajar Warning Message on
page 3-45for more information.
Notice:The trunk assist handle is not designed to
be used to tie down the trunk lid or as an anchor
point when securing items in the trunk. Improper
use of the trunk assist handle could damage it.
2-11
Page 80 of 408

Emergency Trunk Release HandleThere is a glow-in-the-dark trunk release handle located
inside the trunk on the latch. This handle will glow
following exposure to light. Pull the release handle up to
open the trunk from the inside.
Notice:The emergency trunk release handle is not
designed to be used to tie down the trunk lid or
as an anchor point when securing items in the trunk.
Improper use of the emergency trunk release
handle could damage it.
2-12
Page 84 of 408

Theft-Deterrent Systems
Vehicle theft is big business, especially in some cities.
Although your vehicle has a number of theft-deterrent
features, we know that nothing we put on it can make it
impossible to steal.
Content Theft-Deterrent
Your vehicle may have the optional content
theft-deterrent alarm system.
With this system, a light on the radio will ¯ash.
This light reminds you to activate the theft-deterrent
system. Here's how to do it:
1. Open the door.
2. Lock the door with the power door lock switch or
the remote keyless entry transmitter. The light on
the radio should come on and stay on. If you
are using the remote keyless entry transmitter, the
door does not need to be open.
3. Close all doors. The light on the radio will slowly
¯ash once the system is armed.
Once armed, the alarm will go off if someone tries to
enter the vehicle (without using the remote keyless entry
transmitter or a key) or turns the ignition on with anincorrect key. The horn will sound and the headlamps
and back-up lamps will ¯ash for approximately
two minutes.
When the alarm is armed, the trunk may be opened
with the remote keyless entry transmitter. If you use the
key to open the trunk, the alarm will sound. The
power door lock switches are also disabled. You must
use your remote keyless entry transmitter or your key to
unlock the doors when the system is armed.
Arming with the Power Lock Switch
Your alarm system will arm when you use either power
lock switch to lock the doors while any door or the
trunk is open and the key is removed from the ignition.
The light on the radio ¯ashes quickly to let you know
when the system is ready to arm with the power
door lock switches. The light on the radio will stop
¯ashing and stay on when you press the bottom of the
power lock switch, to let you know the system is
arming. After all doors and the trunk are closed and
locked, the light on the radio will ¯ash slowly to let you
know the system is armed.
2-16
Page 85 of 408

Arming with the Remote Keyless Entry
Transmitter
Your alarm system will arm when you use your remote
keyless entry transmitter to lock the doors, if the key
is not in the ignition. The light on the radio will turn on to
let you know the system is arming. After all doors and
the trunk are closed and locked, the light on the
radio will begin ¯ashing at a very slow rate to let you
know the system is armed.
Disarming with the Remote Keyless
Entry Transmitter
Your alarm system will disarm when you use your
remote keyless entry transmitter to unlock the doors.
The light on the radio will go off to let you know
the system is no longer armed.
The ®rst time a remote UNLOCK command is received,
three ¯ashes will be seen and three horn chirps
heard to indicate an alarm condition has occurred since
last arming.
Disarming with Your Key
Your alarm system will disarm when you use your key
to unlock the doors. The light on the radio will go
off to let you know the system is no longer armed.
Passlockž
Your vehicle is equipped with the Passlockž
theft-deterrent system.
Passlock
žis a passive theft-deterrent system. Passlockž
enables fuel if the ignition lock cylinder is turned with
a valid key. If a correct key is not used or the ignition
lock cylinder is tampered with, fuel is disabled and
the engine will not start.
During normal operation, the SECURITY message will
be displayed after the key is turned to the ON ignition
position. See
Security Message on page 3-46.
If the engine stalls and the SECURITY message
¯ashes, wait until the light stops ¯ashing before trying to
restart the engine.
If the engine is running and the SECURITY message
comes on, you will be able to restart the engine if
you turn the engine off. However, your Passlock
ž
system is not working properly and must be serviced by
your dealer. Your vehicle is not protected by Passlockž
at this time. You may also want to check the fuse.
SeeFuses and Circuit Breakers on page 5-95. See your
dealer for service.
In an emergency, contact Chevrolet Roadside
Assistance. See
Roadside Assistance Program on
page 7-5for more information.
2-17