engine CHEVROLET KODIAK 2009 Owner's Guide
[x] Cancel search | Manufacturer: CHEVROLET, Model Year: 2009, Model line: KODIAK, Model: CHEVROLET KODIAK 2009Pages: 376, PDF Size: 5.39 MB
Page 110 of 376
Diesel Particulate Filter
The vehicle has a Diesel Particulate Filter (DPF) as part
of the exhaust system to reduce vehicle emissions. The
DPF requires a unique exhaust tailpipe with an exhaust
cooler. The exhaust cooler mixes air with the exhaust to
lower the temperature before it leaves the tailpipe.
The DPF, the tailpipe, or other exhaust system
components must not be altered. Inspect regularly and
clean any mud or dirt from the exhaust cooler,
especially where the exhaust cooler connects to the
tailpipe and the openings where fresh air enters
the cooler. See “Exhaust System Inspection” underAt
Least Twice a Year on page 6-27.
The DPF will clean itself as part of normal operation.
Several factors including fuel consumed, hours of engine
operation and miles driven are monitored by the Engine
Control Module (ECM). The self cleaning occurs
approximately once per tank of fuel.
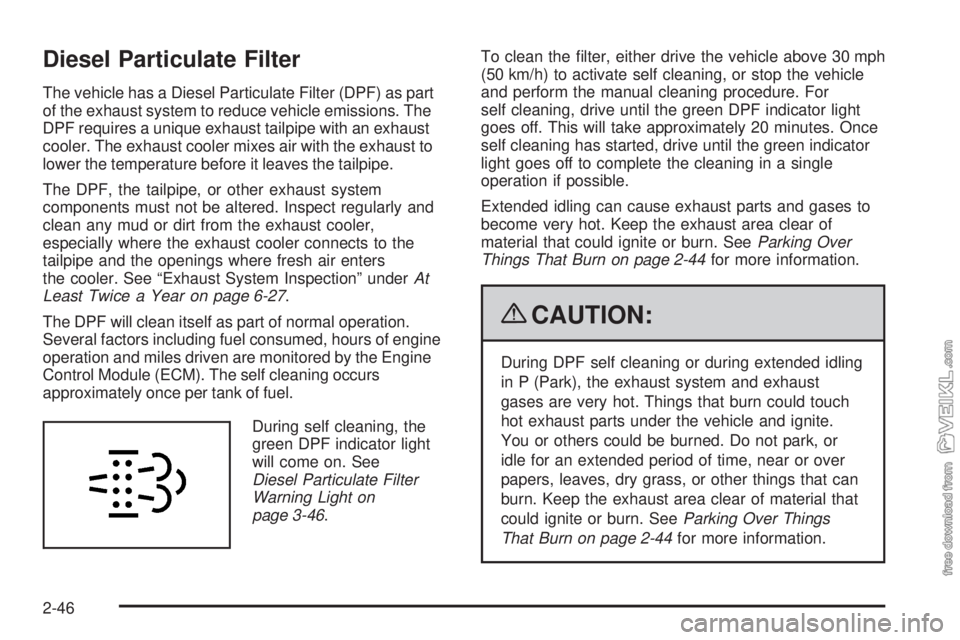
During self cleaning, the
green DPF indicator light
will come on. See
Diesel Particulate Filter
Warning Light on
page 3-46.To clean the filter, either drive the vehicle above 30 mph
(50 km/h) to activate self cleaning, or stop the vehicle
and perform the manual cleaning procedure. For
self cleaning, drive until the green DPF indicator light
goes off. This will take approximately 20 minutes. Once
self cleaning has started, drive until the green indicator
light goes off to complete the cleaning in a single
operation if possible.
Extended idling can cause exhaust parts and gases to
become very hot. Keep the exhaust area clear of
material that could ignite or burn. SeeParking Over
Things That Burn on page 2-44for more information.
{CAUTION:
During DPF self cleaning or during extended idling
in P (Park), the exhaust system and exhaust
gases are very hot. Things that burn could touch
hot exhaust parts under the vehicle and ignite.
You or others could be burned. Do not park, or
idle for an extended period of time, near or over
papers, leaves, dry grass, or other things that can
burn. Keep the exhaust area clear of material that
could ignite or burn. SeeParking Over Things
That Burn on page 2-44for more information.
2-46
Page 111 of 376
Notice:Extended idle should be avoided because
the DPF system is not capable of self cleaning at
idle. During extended idle operation, monitor the
instrument panel telltale lights and Driver Information
Center for messages and take appropriate indicated
action. Continued idling with the warning light/
message on could cause irreversible damage to the
DPF requiring repair and possible replacement that
might not be covered by the vehicle warranty.
When the yellow DPF indicator comes on, the filter is
dirty and needs cleaning. You will also notice a change
in the exhaust sound and engine idle speed. This is
normal. If you continue to drive and the exhaust filter is
not cleaned as required, the DPF indicator will change
from yellow to red. Continuing to drive the vehicle
with the red indicator can cause filter damage.
Vehicles with DPF have specific fuel and engine oil
requirements. SeeWhat Fuel to Use on page 5-8and
Engine Oil (DURAMAX Diesel Engine) on page 5-24
orEngine Oil (Caterpillar Diesel Engine) on page 5-27or
Engine Oil (Isuzu Diesel Engine) on page 5-28or
Engine Oil (Gasoline Engine) on page 5-32for more
information on those requirements.Notice:Permanent damage can occur to the DPF
or related components if the required Ultra Low
Sulfur Diesel (15 ppm sulfur maximum) or low ash
CJ-4 engine oil is not used. This damage would
not be covered by the vehicle warranty.
For vehicles with Power Take-Off (PTO), monitor the
instrument panel cluster for lights related to the DPF.
All engines consume some amount of engine oil. Ash
is the by-product of engine oil consumption. The ash will
become trapped in the DPF over the life of the vehicle.
Eventually, the buildup of ash will restrict the exhaust
gases and the DPF will need to be cleaned or replaced.
SeeAccessories and Modifications on page 5-3for
important information if you are considering adding
accessories or modifying the vehicle.
2-47
Page 112 of 376

Manual Cleaning Procedure
{CAUTION:
During DPF self cleaning, the exhaust system and
exhaust gases are very hot. Stay clear of the
tailpipe area and do not park over things that burn.
You or others could be burned or the vehicle could
catch fire. SeeParking Over Things That Burn on
page 2-44.
If the yellow or red DPF indicator is on, you can clean
the DPF by performing a manual cleaning.When it is safe to do so, stop the vehicle. Perform DPF
manual cleaning in a well ventilated area. DPF Manual
cleaning must be performed outdoors, as follows. Once
manual cleaning is started, complete the manual cleaning
in a single operation if possible. If manual cleaning is not
completed, as indicated by the green DPF indicator going
off, and the yellow or red indicator light remains on, self
cleaning might not be allowed until the vehicle is stopped
and manual cleaning is performed until completed.
1. Check engine oil and engine coolant levels to be
sure they are at proper operating levels.
2. To prevent running out of fuel during manual
cleaning, make sure there is at least a quarter of a
tank of fuel.
3. Check to make sure the area near the exhaust
tailpipe and under the exhaust system are clear
of any materials that could catch fire. Keep people
away from the area of the exhaust system and
exhaust gases.
2-48
Page 113 of 376
4. Fully set the parking brake.
5. Shift the transmission to P (Park) or N (Neutral).
6. Idle the engine. If you used the idling control knob to
increase the engine speed, restore it all the way to
the left to reduce the engine speed.
7. If the vehicle has a Power Take Off (PTO), turn the
PTO off. SeePower Take-Off (PTO) on page 2-30.
8. Press the DPF switch in the instrument panel
switchbank. SeeInstrument Panel Switchbank
on page 3-18. The green DPF indicator light comes
on, the exhaust gas control valve operates,
engine idle speed automatically increases, and DPF
cleaning begins. Do not leave the vehicle
unattended during manual cleaning.9. When both the green and the yellow or red DPF
indicator lights go off, cleaning is completed.
Manual cleaning is normally completed in about
30 minutes.
Under certain operating conditions, manual cleaning
might not be able to be performed, even if the soot level
in the DPF requires cleaning. This can occur because of
low coolant temperature, low battery voltage, high
exhaust temperature or immediately after starting the
vehicle. When manual cleaning is requested and coolant
temperature is low, an engine warm-up cycle is started.
The green indicator light will come on, the exhaust gas
control valve operates, and engine rpm increases to help
raise engine coolant temperature. When operating
conditions allow, cleaning will begin.
2-49
Page 114 of 376
Running the Vehicle While Parked
It is better not to park with the engine running. But if you
ever have to, here are some things to know.
{CAUTION:
Idling a vehicle in an enclosed area with poor
ventilation is dangerous. Engine exhaust may
enter the vehicle. Engine exhaust contains Carbon
Monoxide (CO) which cannot be seen or smelled.
It can cause unconsciousness and even death.
Never run the engine in an enclosed area that has
no fresh air ventilation. For more information, see
Engine Exhaust on page 2-45.
{CAUTION:
It can be dangerous to get out of the vehicle if the
automatic transmission shift lever is not fully in
P (Park) with the parking brake firmly set. The
vehicle can roll. Do not leave the vehicle when the
engine is running unless you have to. If you have
left the engine running, the vehicle can move
suddenly. You or others could be injured. To be
sure the vehicle will not move, even when it is on
fairly level ground, always set the parking brake
and move the automatic transmission shift lever to
P (Park), or the manual transmission shift lever to
Neutral.
Follow the proper steps to be sure the vehicle will
not move.
2-50
Page 119 of 376
Instrument Panel Overview...............................3-4
Hazard Warning Flashers................................3-6
Horn .............................................................3-6
Tilt Wheel.....................................................3-6
Turn Signal/Multifunction Lever.........................3-7
Turn and Lane-Change Signals........................3-7
Headlamp High/Low-Beam Changer..................3-8
Windshield Wipers..........................................3-8
Windshield Washer.........................................3-9
Cruise Control..............................................3-10
Exterior Lamps.............................................3-14
Headlamps on Reminder................................3-14
Daytime Running Lamps (DRL).......................3-15
Marker Lamps..............................................3-16
Instrument Panel Brightness...........................3-16
Dome Lamps ...............................................3-16
Entry Lighting...............................................3-17
Reading Lamps............................................3-17
Instrument Panel Switchbank..........................3-18
Accessory Power Outlet(s).............................3-19
Ashtray(s) and Cigarette Lighter......................3-19Climate Controls............................................3-20
Climate Control System.................................3-20
Outlet Adjustment.........................................3-22
Rear Heating System....................................3-23
Warning Lights, Gages, and Indicators............3-23
Instrument Panel Cluster................................3-24
Speedometer and Odometer...........................3-25
Trip Odometer..............................................3-25
Tachometer.................................................3-25
Engine Speed Limiter....................................3-25
Safety Belt Reminders...................................3-26
Airbag Readiness Light..................................3-27
Airbag Off Light............................................3-28
Charging System Light
..................................3-29
Voltmeter Gage............................................3-30
Service Transmission Warning Light................3-30
Range Inhibit Warning Indicator......................3-31
Brake System Warning Light..........................3-31
Antilock Brake System (ABS) Warning Light........3-33
Trailer Antilock Brake System Warning Light.......3-34
Engine Coolant Temperature Gage..................3-34
Section 3 Instrument Panel
3-1
Page 120 of 376
Low Coolant Warning Light............................3-35
Wait to Start Light........................................3-35
Malfunction Indicator Lamp.............................3-36
Oil Pressure Gage........................................3-38
Low Oil Level Light.......................................3-39
Change Engine Oil Light................................3-39
Engine Overspeed Warning Light....................3-40
Engine Shutdown Warning Light.....................3-40
Transmission Temperature Gage.....................3-40
Exhaust Brake Indicator Light.........................3-41
Differential Lock Indicator Light.......................3-41
Reduced Engine Power Light.........................3-42
Highbeam On Light.......................................3-42
Daytime Running Lamps (DRL)
Indicator Light...........................................3-42
Low Washer Fluid Warning Light.....................3-43
Power Take-Off Light (PTO)...........................3-43Check Gages Warning Light...........................3-43
Fuel Gage...................................................3-44
Water in Fuel Warning Light...........................3-45
Change Fuel Filter Warning Light....................3-45
Diesel Particulate Filter Warning Light..............3-46
Air Filter Restriction Indicator..........................3-46
Air Pressure Gage........................................3-47
Hourmeter Gage...........................................3-47
Audio System(s).............................................3-48
Setting the Clock..........................................3-48
Radio(s)......................................................3-49
Theft-Deterrent Feature..................................3-57
Radio Reception...........................................3-58
Fixed Mast Antenna......................................3-58
Chime Level Adjustment................................3-58
Section 3 Instrument Panel
3-2
Page 136 of 376
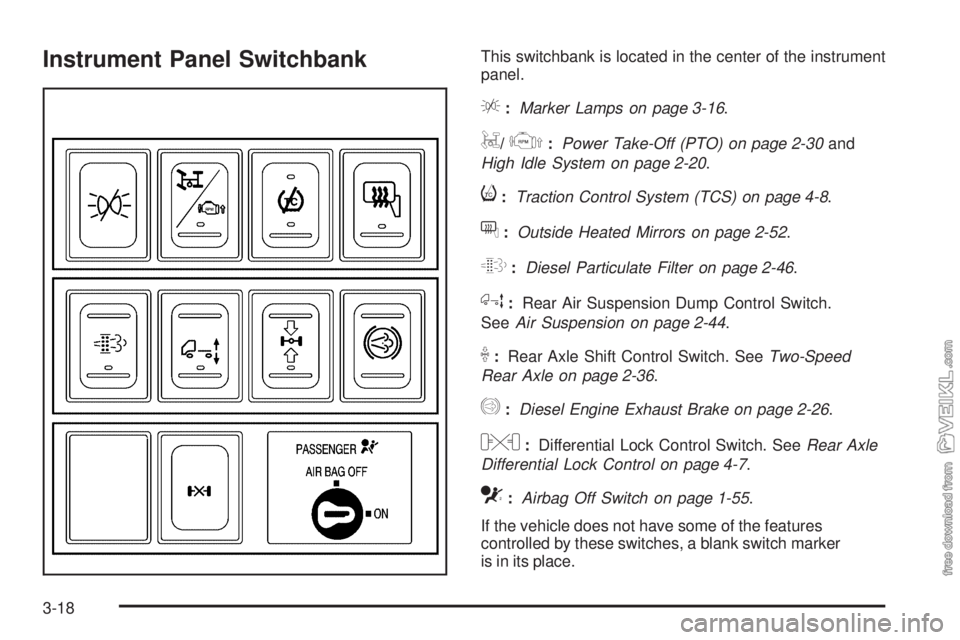
Instrument Panel SwitchbankThis switchbank is located in the center of the instrument
panel.
e:Marker Lamps on page 3-16.
g/j:Power Take-Off (PTO) on page 2-30and
High Idle System on page 2-20.
i:Traction Control System (TCS) on page 4-8.
f:Outside Heated Mirrors on page 2-52.
L:Diesel Particulate Filter on page 2-46.
h:Rear Air Suspension Dump Control Switch.
SeeAir Suspension on page 2-44.
k:Rear Axle Shift Control Switch. SeeTwo-Speed
Rear Axle on page 2-36.
q:Diesel Engine Exhaust Brake on page 2-26.
l:Differential Lock Control Switch. SeeRear Axle
Differential Lock Control on page 4-7.
c:Airbag Off Switch on page 1-55.
If the vehicle does not have some of the features
controlled by these switches, a blank switch marker
is in its place.
3-18
Page 140 of 376

Rear Window Defogger
For vehicles with a rear window defogger, a warming
grid is used to remove fog or frost from the rear window.
The rear window defogger only works when the
ignition is in ON/RUN.
<(Rear):Press to turn the rear window defogger on
or off. An indicator light comes on to show that the
rear window defogger is on. Be sure to clear as much
snow from the rear window as possible.
The rear window defogger turns off several minutes
after the button is pressed. The defogger can also be
turned off by turning off the engine.
Notice:Do not use anything sharp on the inside of
the rear window. If you do, you could cut or damage
the warming grid, and the repairs would not be
covered by the vehicle warranty. Do not attach a
temporary vehicle license, tape, a decal or anything
similar to the defogger grid.
Outlet Adjustment
The vehicle has air outlets on the instrument panel that
adjust the direction and amount of airflow inside the
vehicle.
Move the lever on the outlet up or down to direct the
airflow. Increase or reduce the amount of airflow by
opening and closing the louvers. The outlets can be
moved side-to-side to direct the airflow.
Operation Tips
•
Keep the hood and front air inlets free of ice, snow,
or any other obstruction (such as leaves). The
heater and defroster will work far better, reducing
the chance of fogging the inside of the windows.
•Keep the air path under the front seats clear of
objects. This helps air to circulate throughout
the vehicle.
•Adding outside equipment to the front of the
vehicle, such as hood-air deflectors, may affect the
performance of the heating and air conditioning
system. Check with your dealer/retailer before
adding equipment to the outside of the vehicle.
3-22
Page 141 of 376

Rear Heating System
If the vehicle has a crew
cab and has a rear heater,
the thumbwheel for this
feature is located on
the headliner.
To increase and decrease the flow of heated air to the
rear floor vents, turn the thumbwheel to the desired
fan speed. To turn the fan off, turn the thumbwheel all
the way down.
Warning Lights, Gages, and
Indicators
Warning lights and gages can signal that something is
wrong before it becomes serious enough to cause
an expensive repair or replacement. Paying attention to
the warning lights and gages could prevent injury.
Warning lights come on when there may be or is a
problem with one of the vehicle’s functions. Some
warning lights come on briefly when the engine is started
to indicate they are working.
Gages can indicate when there may be or is a problem
with one of the vehicle’s functions. Often gages and
warning lights work together to indicate a problem with
the vehicle.
When one of the warning lights comes on and stays on
while driving, or when one of the gages shows there
may be a problem, check the section that explains what
to do. Follow this manual’s advice. Waiting to do
repairs can be costly and even dangerous.
3-23