fuel pressure CHEVROLET KODIAK 2009 Owners Manual
[x] Cancel search | Manufacturer: CHEVROLET, Model Year: 2009, Model line: KODIAK, Model: CHEVROLET KODIAK 2009Pages: 376, PDF Size: 5.39 MB
Page 4 of 376
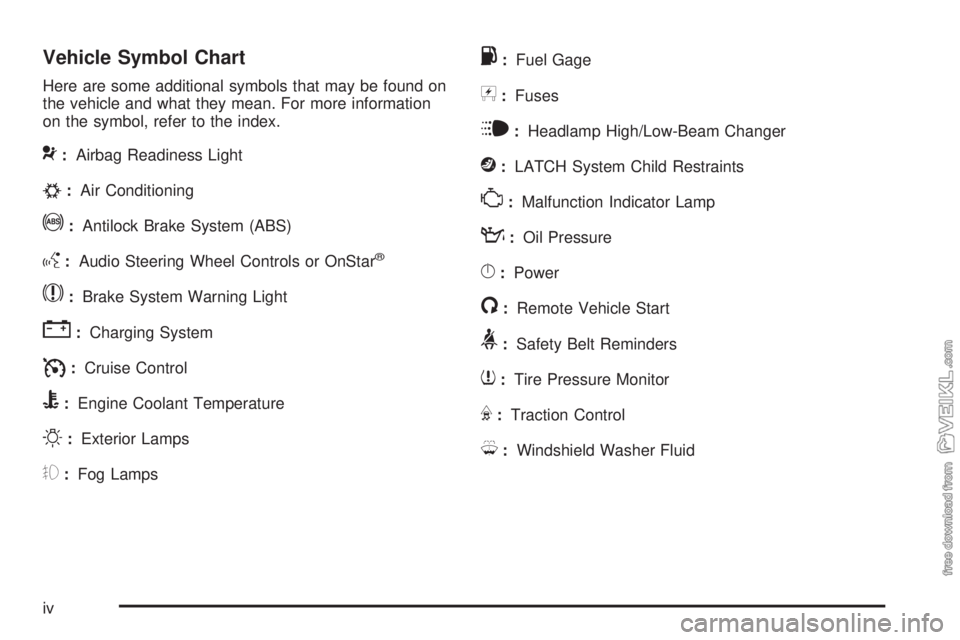
Vehicle Symbol Chart
Here are some additional symbols that may be found on
the vehicle and what they mean. For more information
on the symbol, refer to the index.
9:Airbag Readiness Light
#:Air Conditioning
!:Antilock Brake System (ABS)
g:Audio Steering Wheel Controls or OnStar®
$:Brake System Warning Light
":Charging System
I:Cruise Control
B:Engine Coolant Temperature
O:Exterior Lamps
#:Fog Lamps
.:Fuel Gage
+:Fuses
i:Headlamp High/Low-Beam Changer
j:LATCH System Child Restraints
*:Malfunction Indicator Lamp
::Oil Pressure
}:Power
/:Remote Vehicle Start
>:Safety Belt Reminders
7:Tire Pressure Monitor
F:Traction Control
M:Windshield Washer Fluid
iv
Page 79 of 376
Notice:If the wait to start light stays on after
starting the vehicle, the vehicle may not run
properly. Have the vehicle serviced right away.
3. If the engine does not start after 15 seconds
of cranking, turn the ignition key to OFF. Wait one
minute for the starter to cool, then try the same
steps again.
If you are trying to start the engine after you have run
out of fuel, seeRunning Out of Fuel on page 5-17.
When the engine is cold, let it run for a few minutes
before you move the vehicle. This lets oil pressure build
up. The engine will sound louder when it is cold.
Notice:If you are not in an idling vehicle and the
engine overheats, you would not be there to see the
overheated engine indication. This could damage
the vehicle. Do not let the engine run when you are
not in the vehicle.
Cold Weather Starting
If the vehicle has the 6.6L DURAMAX®Diesel Engine or
the Isuzu 6H Diesel Engine, the following notice applies:
Notice:The diesel engine has an electric air intake
heater system which reduces white smoke and
helps start the engine in cold weather. Do not spray
starting fluid into the air intake where it can
contact the heater elements.If you do not have the GM Automatic Ether Injection
System, do not use starting fluid or you could
damage the engine. If you have the GM system, use
only GM approved starting fluid that has been tested
to establish compatibility with the air inlet heater
system.
The following tips will help with engine starting in cold
weather.
•Use the recommended engine oil when the outside
temperature drops below freezing. SeeEngine Oil
(DURAMAX Diesel Engine) on page 5-24or
Engine Oil (Caterpillar Diesel Engine) on page 5-27
orEngine Oil (Isuzu Diesel Engine) on page 5-28
orEngine Oil (Gasoline Engine) on page 5-32.
When the outside temperature drops below
0°F (−18°C), use of the optional engine coolant
heater is recommended.
•If you experience longer cranking times, notice an
unusual amount of exhaust smoke or are at
higher altitudes (over 7,000 ft. or 2 135 m), you may
use the optional engine coolant heater. See
Engine Coolant Heater on page 2-25.
•SeeWhat Fuel to Use on page 5-8for information
on what fuel to use in cold weather.
2-15
Page 120 of 376
Low Coolant Warning Light............................3-35
Wait to Start Light........................................3-35
Malfunction Indicator Lamp.............................3-36
Oil Pressure Gage........................................3-38
Low Oil Level Light.......................................3-39
Change Engine Oil Light................................3-39
Engine Overspeed Warning Light....................3-40
Engine Shutdown Warning Light.....................3-40
Transmission Temperature Gage.....................3-40
Exhaust Brake Indicator Light.........................3-41
Differential Lock Indicator Light.......................3-41
Reduced Engine Power Light.........................3-42
Highbeam On Light.......................................3-42
Daytime Running Lamps (DRL)
Indicator Light...........................................3-42
Low Washer Fluid Warning Light.....................3-43
Power Take-Off Light (PTO)...........................3-43Check Gages Warning Light...........................3-43
Fuel Gage...................................................3-44
Water in Fuel Warning Light...........................3-45
Change Fuel Filter Warning Light....................3-45
Diesel Particulate Filter Warning Light..............3-46
Air Filter Restriction Indicator..........................3-46
Air Pressure Gage........................................3-47
Hourmeter Gage...........................................3-47
Audio System(s).............................................3-48
Setting the Clock..........................................3-48
Radio(s)......................................................3-49
Theft-Deterrent Feature..................................3-57
Radio Reception...........................................3-58
Fixed Mast Antenna......................................3-58
Chime Level Adjustment................................3-58
Section 3 Instrument Panel
3-2
Page 196 of 376
Tow Hooks
{CAUTION:
These hooks, when used, are under a lot of force.
Always pull the vehicle straight out. Never pull on
the hooks at a sideways angle. The hooks could
break off and you or others could be injured from
the chain or cable snapping back.
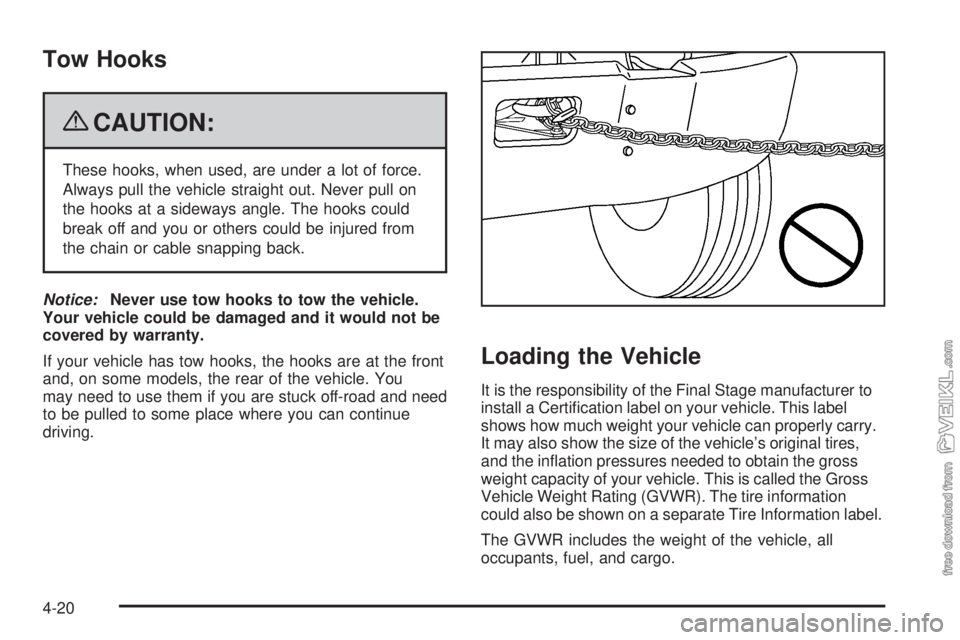
Notice:Never use tow hooks to tow the vehicle.
Your vehicle could be damaged and it would not be
covered by warranty.
If your vehicle has tow hooks, the hooks are at the front
and, on some models, the rear of the vehicle. You
may need to use them if you are stuck off-road and need
to be pulled to some place where you can continue
driving.
Loading the Vehicle
It is the responsibility of the Final Stage manufacturer to
install a Certification label on your vehicle. This label
shows how much weight your vehicle can properly carry.
It may also show the size of the vehicle’s original tires,
and the inflation pressures needed to obtain the gross
weight capacity of your vehicle. This is called the Gross
Vehicle Weight Rating (GVWR). The tire information
could also be shown on a separate Tire Information label.
The GVWR includes the weight of the vehicle, all
occupants, fuel, and cargo.
4-20
Page 203 of 376
Service............................................................5-3
Accessories and Modifications..........................5-3
California Proposition 65 Warning.....................5-4
California Perchlorate Materials Requirements.....5-4
Doing Your Own Service Work.........................5-5
Engine Fan Breakage.....................................5-6
Fuel................................................................5-6
Gasoline Octane............................................5-6
Gasoline Specifications....................................5-7
Additives.......................................................5-7
Diesel Engine Fuel.........................................5-8
What Fuel to Use...........................................5-8
Very Cold Weather Operation.........................5-11
Water in Fuel...............................................5-11
Running Out of Fuel.....................................5-17
Fuel Filter Replacement.................................5-18
Fuels in Foreign Countries.............................5-19
Filling the Tank............................................5-20
Filling a Portable Fuel Container.....................5-22
Checking Things Under the Hood....................5-22
Hood Latches...............................................5-23
Engine Oil (DURAMAX Diesel Engine).............5-24
Engine Oil (Caterpillar Diesel Engine)..............5-27
Engine Oil (Isuzu Diesel Engine).....................5-28
Engine Oil (Gasoline Engine)..........................5-32
Engine Oil Life System (Gasoline Engine)........5-35Engine Oil Life System (DURAMAX/Isuzu
Diesel Engines).........................................5-36
Engine Oil Life System (Caterpillar
Diesel Engine)..........................................5-38
Engine Air Cleaner/Filter................................5-38
Automatic Transmission Fluid.........................5-42
Manual Transmission Fluid.............................5-42
Cooling System............................................5-43
Engine Coolant (Caterpillar Diesel Engines)......5-47
Coolant Surge Tank Pressure Cap..................5-47
Engine Overheating.......................................5-48
Engine Fan Noise.........................................5-49
Power Steering Fluid.....................................5-49
Windshield Washer Fluid................................5-50
Brakes........................................................5-52
Battery........................................................5-61
Jump Starting...............................................5-62
Rear Axle.......................................................5-67
Rear Axle Shift Motor....................................5-68
Four-Wheel Drive............................................5-68
Front Axle......................................................5-69
Noise Control System.....................................5-70
Tampering with Noise Control System
Prohibited.................................................5-70
Bulb Replacement..........................................5-71
Section 5 Service and Appearance Care
5-1
Page 204 of 376
Windshield Wiper Blade Replacement..............5-71
Other Service Items........................................5-72
Fuel Filter....................................................5-72
Primary Fuel Filter and Water Separator..........5-73
Secondary Fuel Filter and Water Separator/
Heater (Caterpillar Diesel)............................5-74
Front Wheel Bearings with
Oil-Filled Hubs..........................................5-75
Tires..............................................................5-76
Inflation - Tire Pressure.................................5-77
Wheel Loading.............................................5-78
Dual Tire Operation.......................................5-78
When It Is Time for New Tires.......................5-78
Buying New Tires.........................................5-79
Wheel Alignment and Tire Balance..................5-80
Tightening the Wheel Nuts.............................5-80
Wheel Replacement......................................5-84
If a Tire Goes Flat........................................5-85
Appearance Care............................................5-87
Interior Cleaning...........................................5-87
Fabric/Carpet...............................................5-88
Instrument Panel, Vinyl, and Other
Plastic Surfaces........................................5-89
Care of Safety Belts......................................5-89
Weatherstrips...............................................5-89
Washing Your Vehicle...................................5-90Cleaning Exterior Lamps/Lenses.....................5-90
Finish Care..................................................5-90
Windshield and Wiper Blades.........................5-91
Aluminum or Chrome-Plated Wheels
and Trim..................................................5-92
Tires...........................................................5-92
Sheet Metal Damage.....................................5-93
Finish Damage.............................................5-93
Underbody Maintenance................................5-93
Chemical Paint Spotting.................................5-93
Vehicle Identification
......................................5-94
Vehicle Identification Number (VIN).................5-94
Service Parts Identification Label.....................5-94
Electrical System............................................5-95
Add-On Electrical Equipment..........................5-95
Headlamp Wiring..........................................5-95
Windshield Wiper Fuses................................5-95
Fusible Links................................................5-95
Power Windows and Other Power Options..........5-96
Fuses and Circuit Breakers............................5-96
Instrument Panel Fuse Block..........................5-96
Underhood Fuse Block..................................5-99
Capacities and Specifications........................5-102
Normal Maintenance Replacement Parts.........5-108
Maintenance Replacement Parts...................5-108
Engine Drive Belt Routing............................5-110
Section 5 Service and Appearance Care
5-2
Page 274 of 376
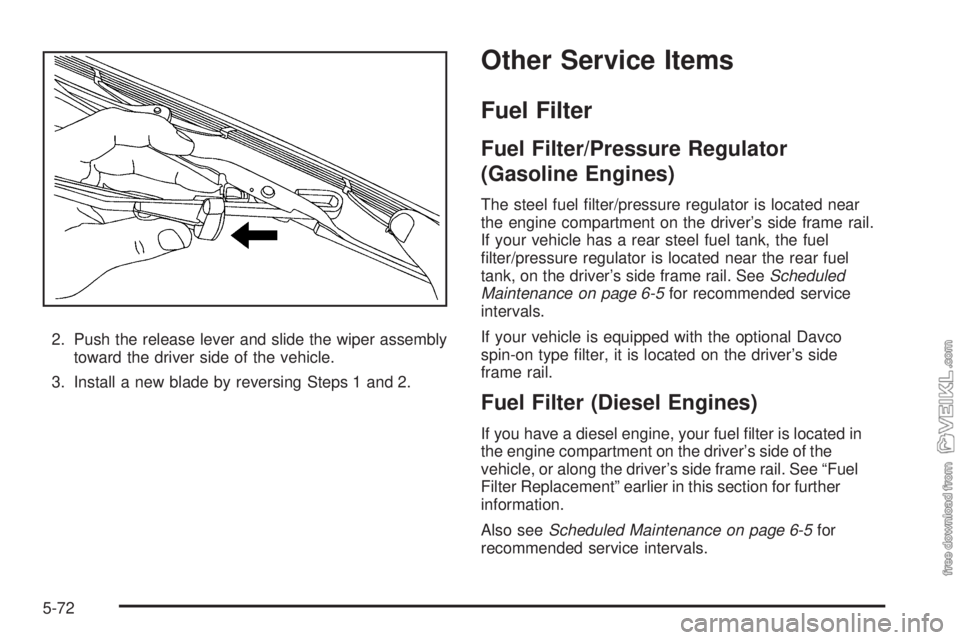
2. Push the release lever and slide the wiper assembly
toward the driver side of the vehicle.
3. Install a new blade by reversing Steps 1 and 2.
Other Service Items
Fuel Filter
Fuel Filter/Pressure Regulator
(Gasoline Engines)
The steel fuel filter/pressure regulator is located near
the engine compartment on the driver’s side frame rail.
If your vehicle has a rear steel fuel tank, the fuel
filter/pressure regulator is located near the rear fuel
tank, on the driver’s side frame rail. SeeScheduled
Maintenance on page 6-5for recommended service
intervals.
If your vehicle is equipped with the optional Davco
spin-on type filter, it is located on the driver’s side
frame rail.
Fuel Filter (Diesel Engines)
If you have a diesel engine, your fuel filter is located in
the engine compartment on the driver’s side of the
vehicle, or along the driver’s side frame rail. See “Fuel
Filter Replacement” earlier in this section for further
information.
Also seeScheduled Maintenance on page 6-5for
recommended service intervals.
5-72
Page 279 of 376
Inflation - Tire Pressure
Tires need the correct amount of air pressure to operate
effectively. The Certification or Tire Information label
shows the correct inflation pressures for your tires
when they are cold. Cold means your vehicle has been
sitting for at least three hours or driven no more than
1 mile (1.6 km).
Notice:Do not let anyone tell you that
under-inflation or over-inflation is all right. It is
not. If your tires do not have enough air
(under-inflation), you can get the following:
•Too much flexing
•Too much heat
•Tire overloading
•Premature or irregular wear
•Poor handling
•Reduced fuel economy
If your tires have too much air (over-inflation),
you can get the following:
•Unusual wear
•Poor handling
•Rough ride
•Needless damage from road hazards
When to Check
Check your tires once a month or more.
Also, check the tire pressure of the spare tire if your
vehicle has one.
How to Check
Use a good quality pocket-type gage to check tire
pressure. You cannot tell if your vehicle’s tires are
properly inflated simply by looking at them. Radial
tires may look properly inflated even when they are
underinflated. Check the tire’s inflation pressure when
the tires are cold. Cold means your vehicle has been
sitting for at least three hours or driven no more than
1 mile (1.6 km).
Remove the valve cap from the tire valve stem. Press
the tire gage firmly onto the valve to get a pressure
measurement. If the cold tire inflation pressure matches
the recommended pressure on the Certification or Tire
Information label, no further adjustment is necessary.
If the inflation pressure is low, add air until you reach the
recommended amount. If you overfill the tire, release air
by pushing on the metal stem in the center of the tire
valve. Re-check the tire pressure with the tire gage.
Be sure to put the valve caps back on the valve stems.
They help prevent leaks by keeping out dirt and moisture.
5-77
Page 331 of 376
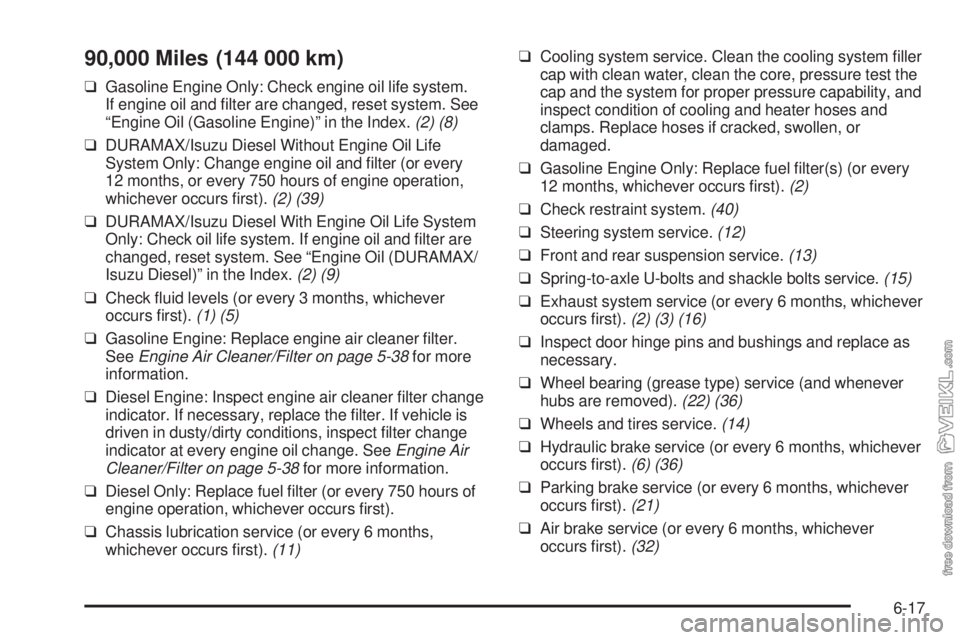
90,000 Miles (144 000 km)
❑Gasoline Engine Only: Check engine oil life system.
If engine oil and filter are changed, reset system. See
“Engine Oil (Gasoline Engine)” in the Index.(2) (8)
❑DURAMAX/Isuzu Diesel Without Engine Oil Life
System Only: Change engine oil and filter (or every
12 months, or every 750 hours of engine operation,
whichever occurs first).(2) (39)
❑DURAMAX/Isuzu Diesel With Engine Oil Life System
Only: Check oil life system. If engine oil and filter are
changed, reset system. See “Engine Oil (DURAMAX/
Isuzu Diesel)” in the Index.(2) (9)
❑Check fluid levels (or every 3 months, whichever
occurs first).(1) (5)
❑Gasoline Engine: Replace engine air cleaner filter.
SeeEngine Air Cleaner/Filter on page 5-38for more
information.
❑Diesel Engine: Inspect engine air cleaner filter change
indicator. If necessary, replace the filter. If vehicle is
driven in dusty/dirty conditions, inspect filter change
indicator at every engine oil change. SeeEngine Air
Cleaner/Filter on page 5-38for more information.
❑Diesel Only: Replace fuel filter (or every 750 hours of
engine operation, whichever occurs first).
❑Chassis lubrication service (or every 6 months,
whichever occurs first).(11)❑Cooling system service. Clean the cooling system filler
cap with clean water, clean the core, pressure test the
cap and the system for proper pressure capability, and
inspect condition of cooling and heater hoses and
clamps. Replace hoses if cracked, swollen, or
damaged.
❑Gasoline Engine Only: Replace fuel filter(s) (or every
12 months, whichever occurs first).(2)
❑Check restraint system.(40)
❑Steering system service.(12)
❑Front and rear suspension service.(13)
❑Spring-to-axle U-bolts and shackle bolts service.(15)
❑Exhaust system service (or every 6 months, whichever
occurs first).(2) (3) (16)
❑Inspect door hinge pins and bushings and replace as
necessary.
❑Wheel bearing (grease type) service (and whenever
hubs are removed).(22) (36)
❑Wheels and tires service.(14)
❑Hydraulic brake service (or every 6 months, whichever
occurs first).(6) (36)
❑Parking brake service (or every 6 months, whichever
occurs first).(21)
❑Air brake service (or every 6 months, whichever
occurs first).(32)
6-17
Page 338 of 376

(24)= Evaporative Control System Service, if equipped:
Check all fuel and vapor lines and hoses for proper
connections and correct routing (or every 24 months,
whichever occurs first). Replace parts as needed.
(25)= Replace spark plugs. Inspect wires for damage.
Check the wire boot and boot heat shield fit at spark
plugs and coil. Replace parts as needed.
(26)= Check the fuel tank, fuel cap and fuel lines for
damage which could cause leakage. Inspect fuel cap for
correct sealing ability and any indications of damage.
Check fuel cap gasket for even filler neck imprint.
Replace parts as needed.
(27)= Check Exhaust Gas Recirculation (EGR) system
as described in the service manual. SeeService
Publications Ordering Information on page 7-10.
(28)= Inspect Electronic Vacuum Regulator Valve
(EVRV) filter for excessive contamination or plugging.
If needed, clean filter with solution of soap and water, let
dry and install.
(29)= Drain, flush, and refill cooling system. This service
can be complex; you should have your dealer/retailer
perform this service. SeePart C: Recommended Fluids
and Lubricants on page 6-31for what to use. Inspect
hoses. Clean radiator, condenser, pressure cap, and
neck. Pressure test cooling system and pressure cap.
For Caterpillar
®diesel engines, always refer to the
Caterpillar®Diesel Engine Operation & Maintenance
Manual for coolant recommendations and change
intervals.(30)= Change the lubricant. SeePart C: Recommended
Fluids and Lubricants on page 6-31.
(31)= Front axle service: Re-pack upper kingpin roller
bearing.
(32)= Air brake service:
•Inspect brake lines and hoses for proper hook-up,
binding, leaks, cracks, chafing, etc. Inspect drum
brake linings for wear or cracks. Inspect other brake
parts at each wheel, including drums and wheel
speed sensor wiring. Check brake pedal for
excessive free play or travel (or every 6 months,
whichever occurs first) and have serviced if needed.
Check brakes more often if driving habits and
conditions result in frequent braking. Replace air
dryer cartridge only if excessive oil or moisture is
present. A small amount of oil in the system is normal
and should not be considered as a reason to replace
the cartridge.
•Test air lines for leaks; tighten as needed. Replace
compressor filter.
•Inspect air parking brake chamber for leaks and
damage. Inspect lines and hoses for leaks, cracks,
chafing, etc. Also check all attachments for tightness,
wear, or damage. Note: The spring brake section of
the rear brake diaphragms are non-serviceable.
6-24