light CHEVROLET KODIAK 2009 Owners Manual
[x] Cancel search | Manufacturer: CHEVROLET, Model Year: 2009, Model line: KODIAK, Model: CHEVROLET KODIAK 2009Pages: 376, PDF Size: 5.39 MB
Page 1 of 376
Seats and Restraint System............................. 1-1
Front Seats
............................................... 1-2
Rear Seats
..............................................1-10
Safety Belts
.............................................1-11
Child Restraints
.......................................1-28
Airbag System
.........................................1-48
Restraint System Check
............................1-59
Features and Controls..................................... 2-1
Keys
........................................................ 2-2
Doors and Locks
....................................... 2-6
Windows
.................................................. 2-8
Starting and Operating Your Vehicle
...........2-10
Mirrors
....................................................2-51
Storage Areas
.........................................2-53
Instrument Panel............................................. 3-1
Instrument Panel Overview
.......................... 3-4
Climate Controls
......................................3-20
Warning Lights, Gages, and Indicators
........3-23
Audio System(s)
.......................................3-48
Driving Your Vehicle....................................... 4-1
Your Driving, the Road, and the Vehicle
....... 4-2
Towing
...................................................4-23Service and Appearance Care.......................... 5-1
Service
..................................................... 5-3
Fuel
......................................................... 5-6
Checking Things Under the Hood
...............5-22
Rear Axle
...............................................5-67
Four-Wheel Drive
.....................................5-68
Front Axle
...............................................5-69
Noise Control System
...............................5-70
Bulb Replacement
....................................5-71
Windshield Wiper Blade Replacement
.........5-71
Other Service Items
..................................5-72
Tires
......................................................5-76
Appearance Care
.....................................5-87
Vehicle Identification
.................................5-94
Electrical System
......................................5-95
Capacities and Specifications
...................5-102
Normal Maintenance Replacement Parts
....5-108
Maintenance Schedule..................................... 6-1
Maintenance Schedule
................................ 6-2
Customer Assistance Information.................... 7-1
Customer Assistance and Information
........... 7-2
Reporting Safety Defects
............................ 7-9
Vehicle Data Recording and Privacy
...........7-11
Index................................................................ 1
2009 Chevrolet Kodiak Owner ManualM
Page 4 of 376
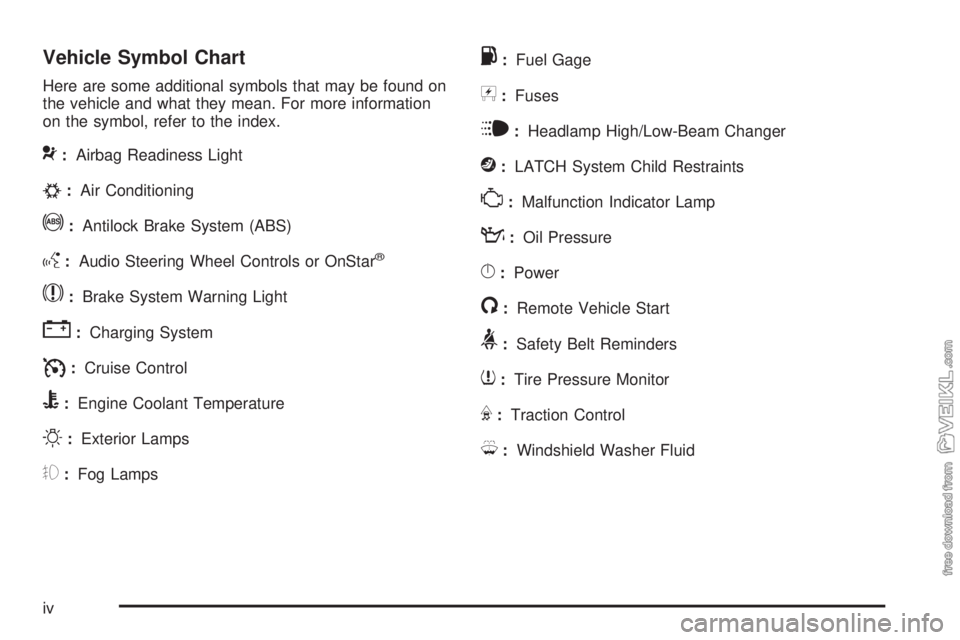
Vehicle Symbol Chart
Here are some additional symbols that may be found on
the vehicle and what they mean. For more information
on the symbol, refer to the index.
9:Airbag Readiness Light
#:Air Conditioning
!:Antilock Brake System (ABS)
g:Audio Steering Wheel Controls or OnStar®
$:Brake System Warning Light
":Charging System
I:Cruise Control
B:Engine Coolant Temperature
O:Exterior Lamps
#:Fog Lamps
.:Fuel Gage
+:Fuses
i:Headlamp High/Low-Beam Changer
j:LATCH System Child Restraints
*:Malfunction Indicator Lamp
::Oil Pressure
}:Power
/:Remote Vehicle Start
>:Safety Belt Reminders
7:Tire Pressure Monitor
F:Traction Control
M:Windshield Washer Fluid
iv
Page 28 of 376
Lap-Shoulder Belt
All seating positions in the vehicle have a lap-shoulder
belt except for the center passenger positions (if
equipped), which have a lap belt. SeeLap Belt on
page 1-27for more information.
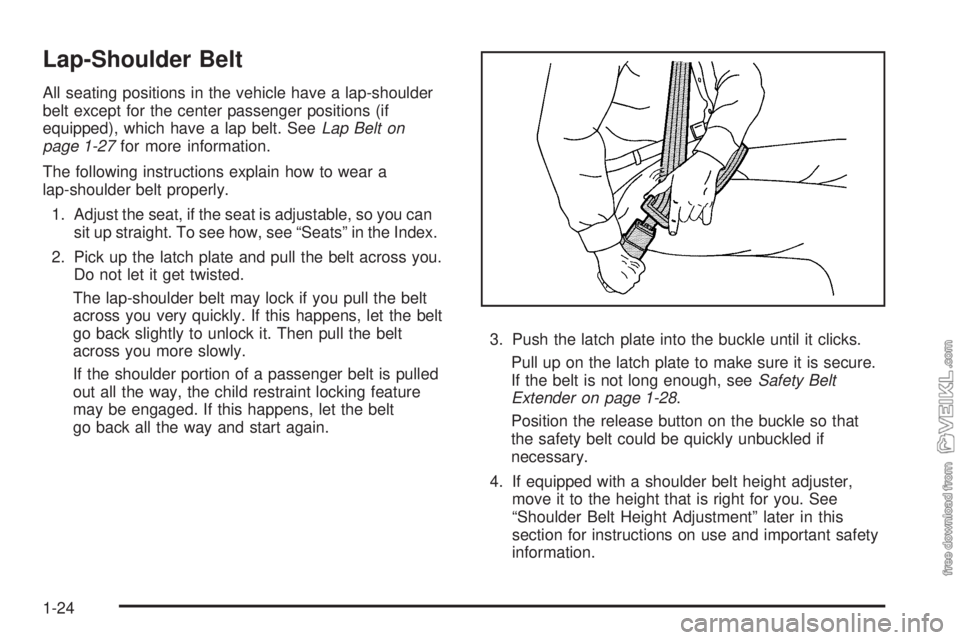
The following instructions explain how to wear a
lap-shoulder belt properly.
1. Adjust the seat, if the seat is adjustable, so you can
sit up straight. To see how, see “Seats” in the Index.
2. Pick up the latch plate and pull the belt across you.
Do not let it get twisted.
The lap-shoulder belt may lock if you pull the belt
across you very quickly. If this happens, let the belt
go back slightly to unlock it. Then pull the belt
across you more slowly.
If the shoulder portion of a passenger belt is pulled
out all the way, the child restraint locking feature
may be engaged. If this happens, let the belt
go back all the way and start again.3. Push the latch plate into the buckle until it clicks.
Pull up on the latch plate to make sure it is secure.
If the belt is not long enough, seeSafety Belt
Extender on page 1-28.
Position the release button on the buckle so that
the safety belt could be quickly unbuckled if
necessary.
4. If equipped with a shoulder belt height adjuster,
move it to the height that is right for you. See
“Shoulder Belt Height Adjustment” later in this
section for instructions on use and important safety
information.
1-24
Page 49 of 376
{CAUTION:
A child in a rear-facing child restraint can be
seriously injured or killed if the right front
passenger airbag inflates. This is because the
back of the rear-facing child restraint would be
very close to the inflating airbag. A child in a
forward-facing child restraint can be seriously
injured or killed if the right front passenger airbag
inflates and the passenger seat is in a forward
position.
Even if the airbag switch has turned off the right
front passenger frontal airbag, no system is
fail-safe. No one can guarantee that an airbag will
not deploy under some unusual circumstance,
even though it is turned off.
Secure rear-facing child restraints in a rear seat,
even if the airbag is off. If you secure a
forward-facing child restraint in the right front seat,
always move the front passenger seat as far back
as it will go. It is better to secure the child restraint
in a rear seat.
{CAUTION:
If the airbag readiness light ever comes on when
you have turned off the airbag, it means that
something may be wrong with the airbag system.
The right front passenger’s airbag could inflate
even though the switch is off. If this ever happens,
do not let anyone whom the national government
has identified as a member of a passenger airbag
risk group sit in the right front passenger’s position
(for example, do not secure a rear-facing child
restraint in the right front passenger’s seat) until
you have your vehicle serviced. SeeAirbag Off
Switch on page 1-55andAirbag Readiness Light
on page 3-27for more on this, including important
safety information.
If the vehicle does not have a rear seat that will
accommodate a rear-facing child restraint, a rear-facing
child restraint should not be installed in the vehicle,
even if the airbag is off.
1-45
Page 50 of 376
Do not secure a child restraint in a position without a
top tether anchor if a national or local law requires that
the top tether be anchored, or if the instructions that
come with the child restraint say that the top strap must
be anchored.
In Canada, the law requires that forward-facing child
restraints have a top tether, and that the tether be
attached.
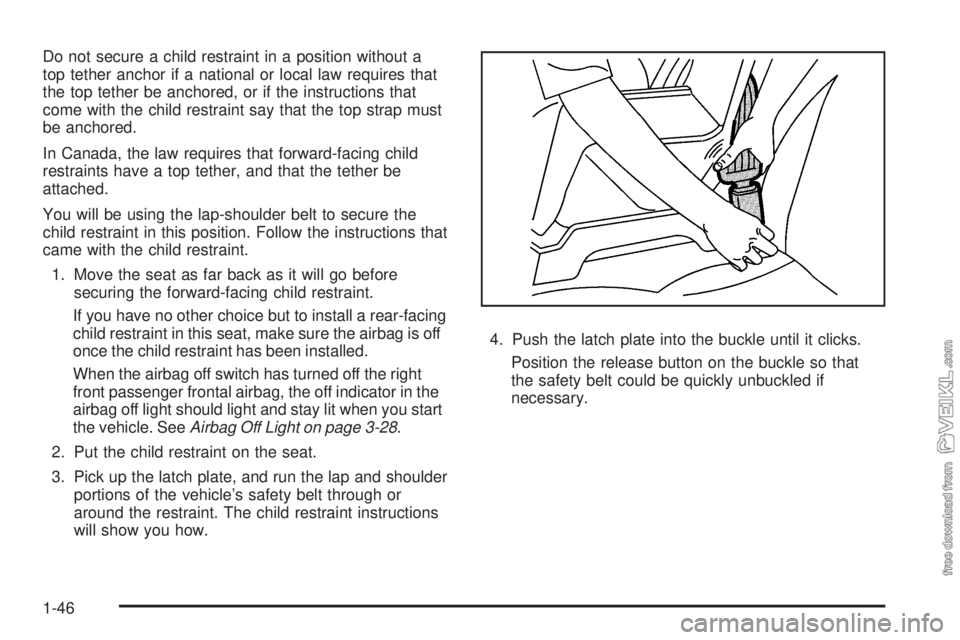
You will be using the lap-shoulder belt to secure the
child restraint in this position. Follow the instructions that
came with the child restraint.
1. Move the seat as far back as it will go before
securing the forward-facing child restraint.
If you have no other choice but to install a rear-facing
child restraint in this seat, make sure the airbag is off
once the child restraint has been installed.
When the airbag off switch has turned off the right
front passenger frontal airbag, the off indicator in the
airbag off light should light and stay lit when you start
the vehicle. SeeAirbag Off Light on page 3-28.
2. Put the child restraint on the seat.
3. Pick up the latch plate, and run the lap and shoulder
portions of the vehicle’s safety belt through or
around the restraint. The child restraint instructions
will show you how.4. Push the latch plate into the buckle until it clicks.
Position the release button on the buckle so that
the safety belt could be quickly unbuckled if
necessary.
1-46
Page 54 of 376
{CAUTION:
Children who are up against, or very close to, any
airbag when it inflates can be seriously injured or
killed. Airbags plus lap-shoulder belts offer
protection for adults and older children, but not for
young children and infants. Neither the vehicle’s
safety belt system nor its airbag system is
designed for them. Young children and infants
need the protection that a child restraint system
can provide. Always secure children properly in
your vehicle. To read how, seeOlder Children on
page 1-28orInfants and Young Children on
page 1-32.
There is an airbag
readiness light on the
instrument panel cluster,
which shows the airbag
symbol.The system checks the airbag electrical system for
malfunctions. The light tells you if there is an electrical
problem. SeeAirbag Readiness Light on page 3-27
for more information.
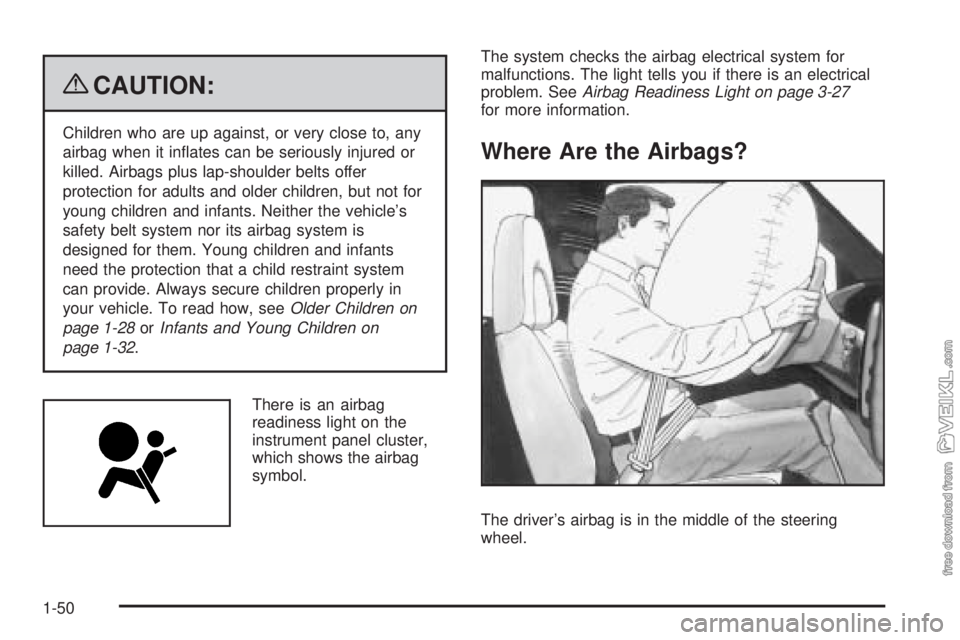
Where Are the Airbags?
The driver’s airbag is in the middle of the steering
wheel.
1-50
Page 60 of 376
Medical Condition.A passenger has a
medical condition which, according to his or
her physician:
•
Causes the passenger airbag to pose a special risk
for the passenger; and
•Makes the potential harm from the passenger
airbag in a crash greater than the potential
harm from turning off the airbag and allowing the
passenger, even if belted, to hit the dashboard
or windshield in a crash.
{CAUTION:
If the right front passenger’s airbag is turned off
for a person who is not in a risk group identified
by the national government, that person will not
have the extra protection of an airbag. In a crash,
the airbag will not be able to inflate and help
protect the person sitting there. Do not turn off the
passenger’s airbag unless the person sitting there
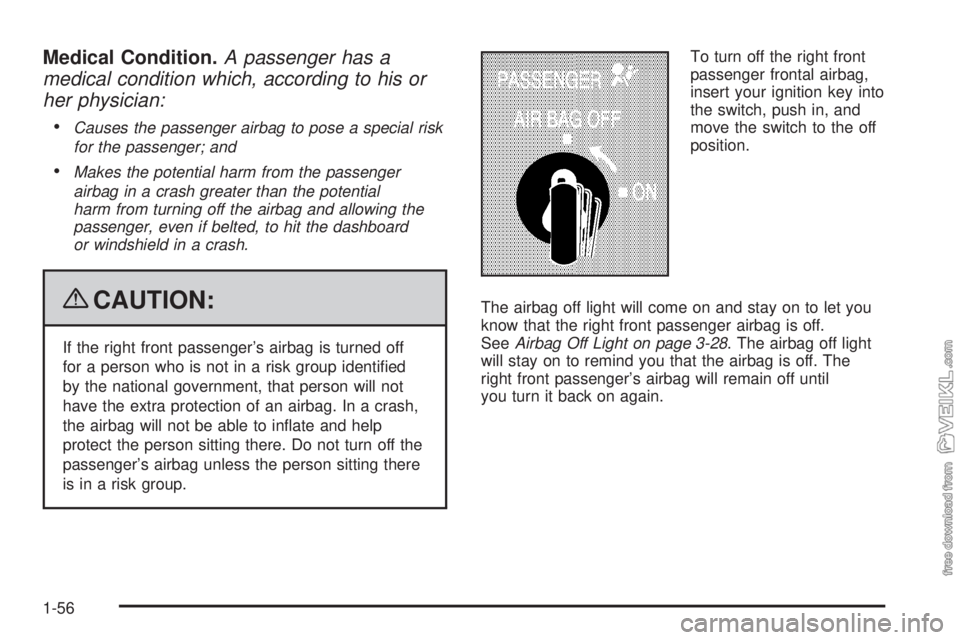
is in a risk group.To turn off the right front
passenger frontal airbag,
insert your ignition key into
the switch, push in, and
move the switch to the off
position.
The airbag off light will come on and stay on to let you
know that the right front passenger airbag is off.
SeeAirbag Off Light on page 3-28. The airbag off light
will stay on to remind you that the airbag is off. The
right front passenger’s airbag will remain off until
you turn it back on again.
1-56
Page 61 of 376
{CAUTION:
If the airbag readiness light ever comes on and
stays on, it means that something may be wrong
with the airbag system. For example, the right
front passenger airbag could inflate even though
the airbag on-off switch is turned off.
To help avoid injury to yourself or others, have the
vehicle serviced right away. SeeAirbag Readiness
Light on page 3-27for more information, including
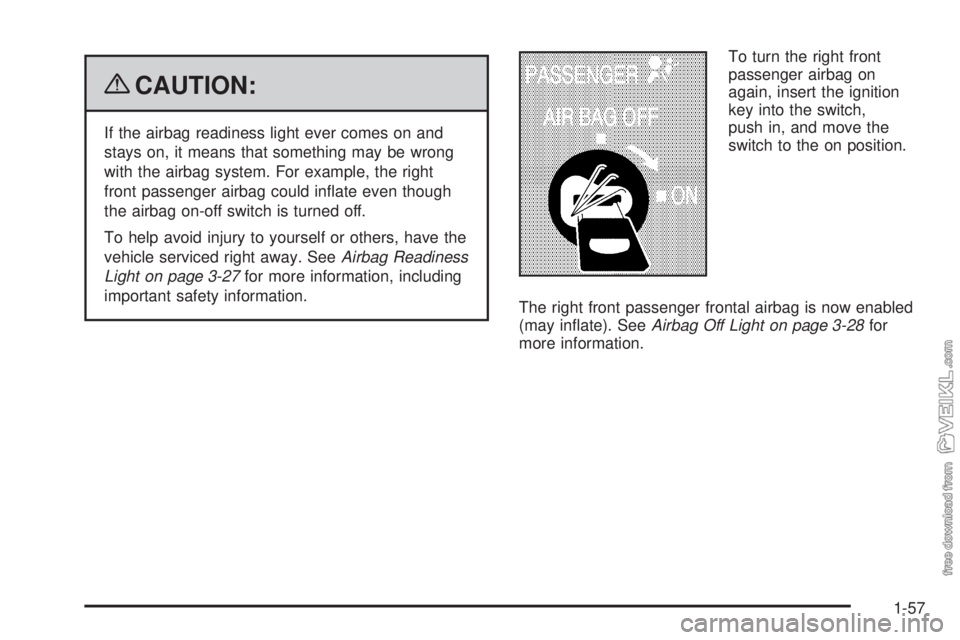
important safety information.To turn the right front
passenger airbag on
again, insert the ignition
key into the switch,
push in, and move the
switch to the on position.
The right front passenger frontal airbag is now enabled
(may inflate). SeeAirbag Off Light on page 3-28for
more information.
1-57
Page 63 of 376
Q:Because I have a disability, I have to get my
vehicle modified. How can I find out whether
this will affect my airbag system?
A:If you have questions, call Customer Assistance.
The phone numbers and addresses for Customer
Assistance are in Step Two of the Customer
Satisfaction Procedure in this manual. See
Customer Satisfaction Procedure on page 7-2.
In addition, your dealer/retailer and the service manual
have information about the location of the airbag sensors,
sensing and diagnostic module and airbag wiring.
Restraint System Check
Checking the Restraint Systems
Safety Belts
Now and then, check the safety belt reminder light,
safety belts, buckles, latch plates, retractors, and
anchorages are all working properly.
Look for any other loose or damaged safety belt system
parts that might keep a safety belt system from doing
its job. See your dealer/retailer to have it repaired.Torn or frayed safety belts may not protect you in a
crash. They can rip apart under impact forces. If a belt
is torn or frayed, get a new one right away.
Make sure the safety belt reminder light is working. See
Safety Belt Reminders on page 3-26for more
information.
Keep safety belts clean and dry. SeeCare of Safety
Belts on page 5-89.
Airbags
The airbag system does not need regularly scheduled
maintenance or replacement. Make sure the airbag
readiness light is working. SeeAirbag Readiness Light
on page 3-27for more information.
Notice:If an airbag covering is damaged, opened,
or broken, the airbag may not work properly. Do
not open or break the airbag coverings. If there are
any opened or broken airbag covers, have the
airbag covering and/or airbag module replaced. For
the location of the airbag modules, seeWhat
Makes an Airbag Inflate? on page 1-53. See your
dealer/retailer for service.
1-59
Page 75 of 376
Ignition Positions
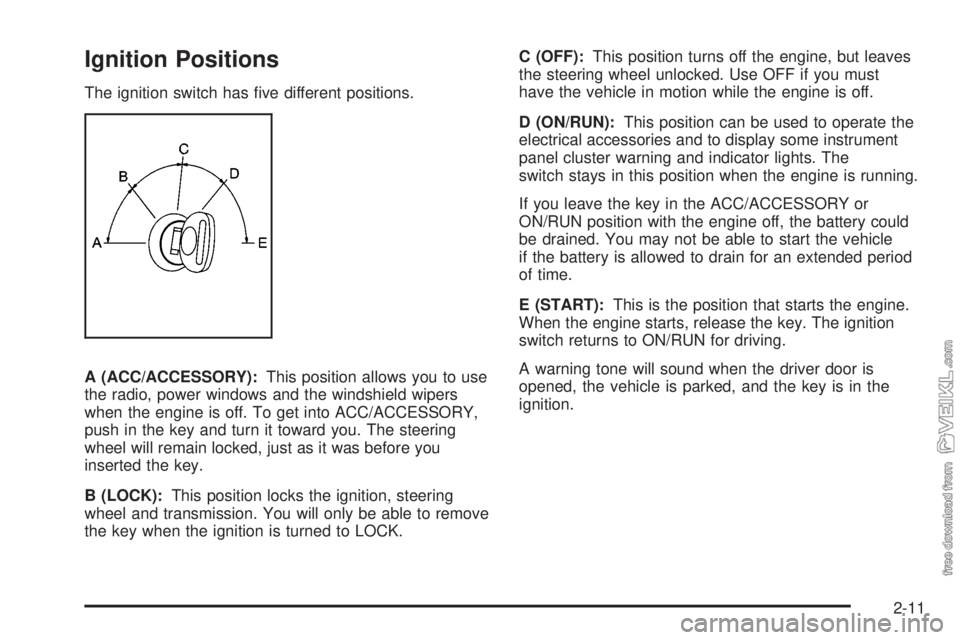
The ignition switch has five different positions.
A (ACC/ACCESSORY):This position allows you to use
the radio, power windows and the windshield wipers
when the engine is off. To get into ACC/ACCESSORY,
push in the key and turn it toward you. The steering
wheel will remain locked, just as it was before you
inserted the key.
B (LOCK):This position locks the ignition, steering
wheel and transmission. You will only be able to remove
the key when the ignition is turned to LOCK.C (OFF):This position turns off the engine, but leaves
the steering wheel unlocked. Use OFF if you must
have the vehicle in motion while the engine is off.
D (ON/RUN):This position can be used to operate the
electrical accessories and to display some instrument
panel cluster warning and indicator lights. The
switch stays in this position when the engine is running.
If you leave the key in the ACC/ACCESSORY or
ON/RUN position with the engine off, the battery could
be drained. You may not be able to start the vehicle
if the battery is allowed to drain for an extended period
of time.
E (START):This is the position that starts the engine.
When the engine starts, release the key. The ignition
switch returns to ON/RUN for driving.
A warning tone will sound when the driver door is
opened, the vehicle is parked, and the key is in the
ignition.
2-11