ABS CHEVROLET MALIBU 2011 7.G Owner's Manual
[x] Cancel search | Manufacturer: CHEVROLET, Model Year: 2011, Model line: MALIBU, Model: CHEVROLET MALIBU 2011 7.GPages: 382, PDF Size: 5.81 MB
Page 222 of 382
Black plate (28,1)Chevrolet Malibu Owner Manual - 2011
9-28 Driving and Operating
While using the DSC feature the
transmission will have firmer shifting
and sportier performance. You can
use this for sport driving or when
climbing hills to stay in gear longer
or to downshift for more power or
engine braking.
The transmission will only allow you
to shift into gears appropriate for the
vehicle speed and engine
revolutions per minute (RPM):
.The transmission will not
automatically shift to the next
higher gear if the vehicle speed
or engine RPM is too low.
.The transmission will not allow
shifting to the next lower gear if
the vehicle speed or engine
RPM is too high. Second or Third Gear Start
Feature
When accelerating the vehicle from
a stop in snowy and icy conditions,
you may want to shift the gear
select tap switch into Second or
Third gear. A higher gear allows you
to gain more traction on slippery
surfaces.
With the DSC feature, the vehicle
can be set to pull away in Second or
Third gear.
1. Move the shift lever from
D (Drive) into the
M (Manual Mode).
2. With the vehicle stopped, press (+) end of the button to
select Second or Third gear. The
vehicle will start from a stop
position in Second or Third gear.
3. Once moving select the desired drive gear.
Brakes
Antilock Brake
System (ABS)
This vehicle has the Antilock Brake
System (ABS), an advanced
electronic braking system that helps
prevent a braking skid.
When the engine is started and the
vehicle begins to drive away, ABS
checks itself. A momentary motor or
clicking noise might be heard while
this test is going on, and it might
even be noticed that the brake
pedal moves a little. This is normal.
If there is a problem with ABS, this
warning light stays on. See Antilock
Brake System (ABS) Warning Light
on page 5‑19.
Page 223 of 382
Black plate (29,1)Chevrolet Malibu Owner Manual - 2011
Driving and Operating 9-29
If driving safely on a wet road and it
becomes necessary to slam on the
brakes and continue braking to
avoid a sudden obstacle, a
computer senses that the wheels
are slowing down. If one of the
wheels is about to stop rolling, the
computer will separately work the
brakes at each wheel.
ABS can change the brake pressure
to each wheel, as required, faster
than any driver could. This can help
the driver steer around the obstacle
while braking hard.
As the brakes are applied, the
computer keeps receiving updates
on wheel speed and controls
braking pressure accordingly.
Remember: ABS does not change
the time needed to get a foot up to
the brake pedal or always decrease
stopping distance. If you get tooclose to the vehicle in front of you,
there will not be enough time to
apply the brakes if that vehicle
suddenly slows or stops. Always
leave enough room up ahead to
stop, even with ABS.
Using ABS
Do not pump the brakes. Just hold
the brake pedal down firmly and let
ABS work. You might hear the ABS
pump or motor operating and feel
the brake pedal pulsate, but this is
normal.
Braking in Emergencies
ABS allows the driver to steer and
brake at the same time. In many
emergencies, steering can help
more than even the very best
braking.
Parking Brake
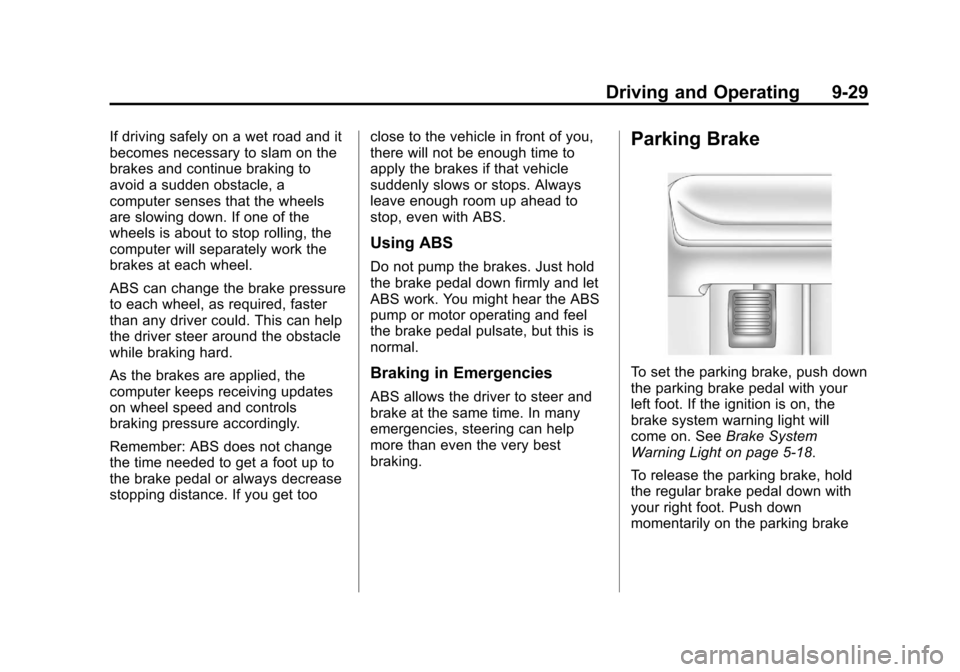
To set the parking brake, push down
the parking brake pedal with your
left foot. If the ignition is on, the
brake system warning light will
come on. See
Brake System
Warning Light on page 5‑18.
To release the parking brake, hold
the regular brake pedal down with
your right foot. Push down
momentarily on the parking brake
Page 224 of 382
Black plate (30,1)Chevrolet Malibu Owner Manual - 2011
9-30 Driving and Operating
pedal with your left foot until you
feel the pedal release. If the parking
brake is not released when you
begin to drive, the brake system
warning light comes on and a chime
sounds as a warning that the
parking brake is still on.
The PUSH PARK PEDAL message
will also display in the Driver
Information Center (DIC) as a
reminder to release the parking
brake. SeeDriver Information
Center (DIC) on page 5‑23.
Notice: Driving with the parking
brake on can overheat the brake
system and cause premature
wear or damage to brake system
parts. Make sure that the parking
brake is fully released and the
brake warning light is off before
driving.
If you are towing a trailer and are
parking on a hill, see Driving
Characteristics and Towing Tips
on
page 9‑43.
Brake Assist
This vehicle has a brake assist
feature designed to assist the driver
in stopping or decreasing vehicle
speed in emergency driving
conditions. This feature uses the
stability system hydraulic brake
control module to supplement the
power brake system under
conditions where the driver has
quickly and forcefully applied the
brake pedal in an attempt to quickly
stop or slow down the vehicle. The
stability system hydraulic brake
control module increases brake
pressure at each corner of the
vehicle until the ABS activates.
Minor brake pedal pulsation or
pedal movement during this time is
normal and the driver should
continue to apply the brake pedal as
the driving situation dictates. The
brake assist feature will
automatically disengage when the
brake pedal is released or brake
pedal pressure is quickly
decreased.
Ride Control Systems
Traction Control
System (TCS)
The vehicle may have a Traction
Control System (TCS) that limits
wheel spin. This is especially useful
in slippery road conditions. The
system operates only if it senses
that the front wheels are spinning
too much or are beginning to lose
traction. When this happens, the
system works the front brakes and
reduces engine power by closing
the throttle and managing engine
spark to limit wheel spin.
This light will flash when the traction
control system is limiting wheel spin.
Page 226 of 382
Black plate (32,1)Chevrolet Malibu Owner Manual - 2011
9-32 Driving and Operating
message if it senses either of the
front wheels are spinning or
beginning to lose traction while
driving. For more information on the
LOW TRACTION message, see
Ride Control System Messages
on
page 5‑28.
Notice: If the wheel(s) of one axle
are allowed to spin excessively
while the ESC/TCS, ABS and
Brake warning lights and the
SERVICE ESC and/or SERVICE
TRACTION messages are
displayed, the differential could
be damaged. The repairs would
not be covered by the vehicle
warranty. Reduce engine power
and do not spin the wheel(s)
excessively while these lights and
this message are displayed.
Notice: When traction control is
turned off, it is possible to lose
traction. If you attempt to shift
with the front wheels spinning
with a loss of traction, it is
possible to cause damage to the transmission. Do not attempt to
shift when the front wheels do not
have traction. Damage caused by
misuse of the vehicle is not
covered. See your warranty book
for additional information.
The traction control system may
activate on dry or rough roads or
under conditions such as heavy
acceleration while turning or
abrupt upshifts/downshifts of the
transmission. When this happens, a
reduction in acceleration may be
noticed, or a noise or vibration may
be heard. This is normal.
If the vehicle is in cruise control
when the system activates, the
ESC/TCS light will flash and the
cruise control will automatically
disengage. The cruise control
may be re-engaged when road
conditions allow. See
Cruise Control
on page 9‑34. Adding non‐dealer/non‐retailer
accessories can affect the vehicle's
performance. See
Accessories and
Modifications
on page 10‑3for
more information.
Electronic Stability
Control (ESC)
The vehicle has an Electronic
Stability Control (ESC) system
which combines antilock brake,
traction and stability control systems
and helps the driver maintain
directional control of the vehicle in
most driving conditions.
When you first start the vehicle and
begin to drive away, the system
performs several diagnostic checks
to ensure there are no problems.
The system may be heard or felt
while it is working. This is normal
and does not mean there is a
problem with the vehicle. The
system should initialize before the
vehicle reaches 32 km/h (20 mph).
Page 240 of 382
Black plate (46,1)Chevrolet Malibu Owner Manual - 2011
9-46 Driving and Operating
3. When the wheel chocks are inplace, release the brake pedal
until the chocks absorb the load.
4. Reapply the brake pedal. Then apply the parking brake and shift
into P (Park).
5. Release the brake pedal.
Leaving After Parking on a Hill
1. Apply and hold the brake pedal.
2. Start the engine.
3. Shift into a gear.
4. Release the parking brake.
5. Let up on the brake pedal.
6. Drive slowly until the trailer is clear of the chocks.
7. Stop and have someone pick up and store the chocks.
Maintenance When Trailer
Towing
The vehicle needs service more
often when pulling a trailer. See this
manual's Maintenance Schedule or
Index for more information. Things
that are especially important in
trailer operation are automatic
transmission fluid, engine oil, axle
lubricant, belts, cooling system and
brake system. Inspect these before
and during the trip.
Check periodically to see that all
hitch nuts and bolts are tight.
Engine Cooling When Trailer
Towing
The cooling system may temporarily
overheat during severe operating
conditions. See Engine Overheating
on page 10‑19.
Trailer Towing
Before pulling a trailer, there are
three important considerations that
have to do with weight:
.The weight of the trailer.
.The weight of the trailer tongue.
.The total weight on your
vehicle's tires.
Weight of the Trailer
How heavy can a trailer safely be?
It should never weigh more than
454 kg (1,000 lbs). But even that
can be too heavy.
It depends on how the rig is used.
For example, speed, altitude, road
grades, outside temperature and
how much the vehicle is used to pull
a trailer are all important. It can
depend on any special equipment
on the vehicle, and the amount of
tongue weight the vehicle can carry.
See“Weight of the Trailer Tongue”
later in this section for more
information.
Page 257 of 382
Black plate (15,1)Chevrolet Malibu Owner Manual - 2011
Vehicle Care 10-15
3. Inspect or replace the engine aircleaner/filter.
4. Align the filter correctly using the alignment tab.
5. Install the cover by guiding the tabs on the rim of the top cover
into the bottom hinges and turn
the cover down to close it.
6. The spring clips will engage easily, if the cover is properly
seated.
{WARNING
Operating the engine with the air
cleaner/filter off can cause you or
others to be burned. The air
cleaner not only cleans the air; it
helps to stop flames if the engine
backfires. Use caution when
working on the engine and do not
drive with the air cleaner/filter off.
Notice: If the air cleaner/filter is
off, dirt can easily get into the
engine, which could damage it.
Always have the air cleaner/filter
in place when you are driving.
Cooling System
The cooling system allows the
engine to maintain the correct
working temperature.
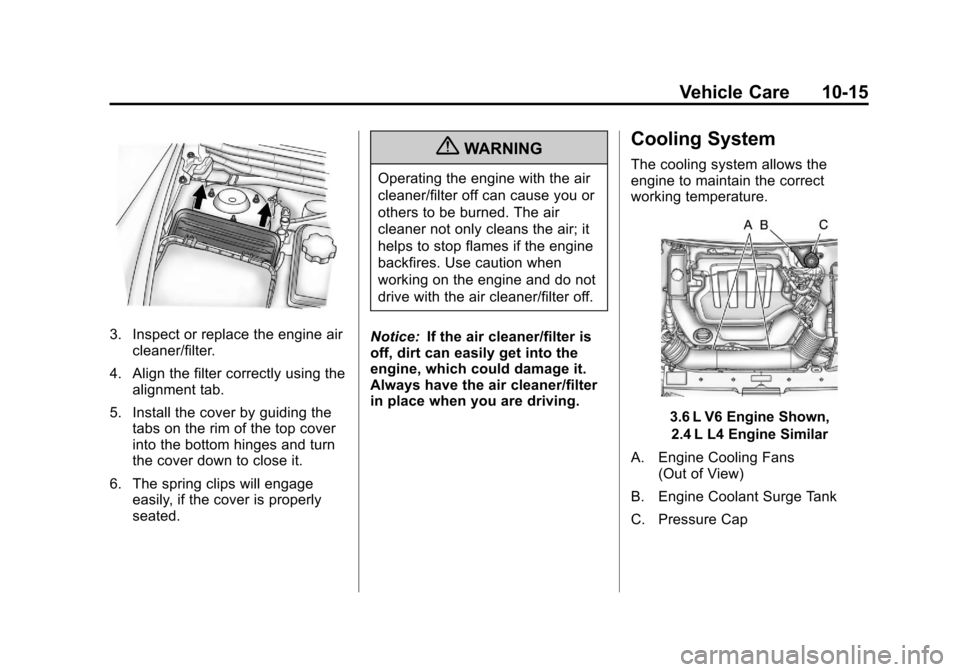
3.6 L V6 Engine Shown,
2.4 L L4 Engine Similar
A. Engine Cooling Fans (Out of View)
B. Engine Coolant Surge Tank
C. Pressure Cap
Page 333 of 382
Black plate (91,1)Chevrolet Malibu Owner Manual - 2011
Vehicle Care 10-91
cleaning, gently remove as much of
the soil as possible using one of the
following techniques:
.For liquids: gently blot the
remaining soil with a paper
towel. Allow the soil to absorb
into the paper towel until no
more can be removed.
.For solid dry soils: remove as
much as possible and then
vacuum.
To clean:
1. Saturate a lint-free, clean white cloth with water or club soda.
2. Remove excess moisture.
3. Start on the outside edge of the soil and gently rub toward the
center. Continue cleaning, using
a clean area of the cloth each
time it becomes soiled.
4. Continue to gently rub the soiled area. 5. If the soil is not completely
removed, use a mild soap
solution and repeat the cleaning
process with plain water.
If any of the soil remains, a
commercial fabric cleaner or spot
lifter may be necessary. Test a small
hidden area for colorfastness before
using a commercial upholstery
cleaner or spot lifter. If the locally
cleaned area gives any impression
that a ring formation may result,
clean the entire surface.
A paper towel can be used to blot
excess moisture from the fabric or
carpet after the cleaning process.
Leather
Leather, and lighter colored leather
in particular, will need more frequent
cleaning to prevent the buildup of
dust, dirt, and colors transferred
from other items so that these do
not become permanent stains. To remove dust, a soft cloth
dampened with water can be used.
If a more thorough cleaning is
necessary, a soft cloth dampened
with a mild soap solution can be
used. Your dealer has a GM
approved leather cleaner available
that provides superior cleaning
performance when used regularly
on finished automotive leathers.
Allow the leather to dry naturally. Do
not use heat, steam, spot lifters or
spot removers, or shoe polish on
leather. Many commercial leather
cleaners and coatings that are sold
to preserve and protect leather may
permanently change the
appearance and feel of the leather
and are not recommended. Do not
use silicone or wax-based products,
or those containing organic solvents
to clean the vehicle's interior
because they can alter the
appearance by increasing the gloss
in a non-uniform manner.
Page 371 of 382

Black plate (1,1)Chevrolet Malibu Owner Manual - 2011
INDEX i-1
A
Accessories andModifications . . . . . . . . . . . . . . . . . 10-3
Accessory Power . . . . . . . . . . . . . . 9-19
Add-On Electrical Equipment . . . . . . . . . . . . . . . . . . . 9-48
Adding Equipment to the
Airbag-Equipped Vehicle . . . . . 3-36
Adjustments Lumbar, Front Seats . . . . . . . . . . . 3-4
Air Cleaner/Filter, Engine . . . . . 10-14
Air Vents . . . . . . . . . . . . . . . . . . . . . . . 8-9
Airbag System
Check . . . . . . . . . . . . . . . . . . . . . . . . 3-37
How Does an AirbagRestrain? . . . . . . . . . . . . . . . . . . . 3-29
Passenger Sensing System . . . . . . . . . . . . . . . . . . . . . . 3-31
What Makes an Airbag Inflate? . . . . . . . . . . . . . . . . . . . . . . 3-28
What Will You See After an Airbag Inflates? . . . . . . . . . . 3-29 Airbag System (cont.)
When Should an Airbag
Inflate? . . . . . . . . . . . . . . . . . . . . . . 3-27
Where Are the Airbags? . . . . . . 3-25
Airbags Adding Equipment to theVehicle . . . . . . . . . . . . . . . . . . . . . . 3-36
Passenger Status Indicator . . . 5-14
Readiness Light . . . . . . . . . . . . . . 5-14
Servicing Airbag-Equipped Vehicles . . . . . . . . . . . . . . . . . . . . . 3-35
System Check . . . . . . . . . . . . . . . . 3-23
Alarm System Anti-Theft . . . . . . . . . . . . . . . . . . . . . 2-12
AM-FM Radio . . . . . . . . . . . . . . . . . . . 7-6
Antenna Satellite Radio . . . . . . . . . . . . . . . . 7-13
Anti-Theft
Alarm System . . . . . . . . . . . . . . . . 2-12
Antilock Brake System (ABS) . . . . . . . . . . . . . . . . 9-28
Warning Light . . . . . . . . . . . . . . . . . 5-19 Appearance Care
Exterior . . . . . . . . . . . . . . . . . . . . . 10-85
Interior . . . . . . . . . . . . . . . . . . . . . . 10-89
Assistance Program, Roadside . . . . . . . . . . . . . . . 13-7, 13-9
Audio Players . . . . . . . . . . . . . . . . . 7-14 CD . . . . . . . . . . . . . . . . . . . . . . . . . . . 7-14
Audio System Backglass Antenna . . . . . . . . . . . 7-13
Radio Reception . . . . . . . . . . . . . . 7-12
Theft-Deterrent Feature . . . . . . . . 7-2
Automatic Door Locks . . . . . . . . . . . . . . . . . . . . 2-9
Headlamp System . . . . . . . . . . . . . 6-3
Automatic Climate Control System . . . . . . . . . . . . . . . . . . . . . . . . 8-5
Automatic Transmission . . . . . . . 9-25 Fluid . . . . . . . . . . . . . . . . . . . . . . . . 10-13
Manual Mode . . . . . . . . . . . . . . . . . 9-27
Automatic Transmission Shift Lock Control
Function Check . . . . . . . . . . . . . 10-26
Auxiliary Devices . . . . . . . . . . . . . . 7-18
Page 376 of 382

Black plate (6,1)Chevrolet Malibu Owner Manual - 2011
i-6 INDEX
I
Ignition Positions . . . . . . . . . . . . . . 9-18
Ignition Transmission LockCheck . . . . . . . . . . . . . . . . . . . . . . . 10-26
Immobilizer . . . . . . . . . . . . . . . . . . . . 2-13
Infants and Young Children, Restraints . . . . . . . . . . . . . . . . . . . . 3-40
Instrument Cluster . . . . . . . . . . . . . 5-10
Instrument Panel Storage Area . . . . . . . . . . . . . . . . . . 4-1
Introduction . . . . . . . . . . . . . . . . . . .iii, 7-1
J
Jump Starting . . . . . . . . . . . . . . . . . 10-78
K
Key and Lock Messages . . . . . . . 5-28
Keyless Entry
Remote (RKE) System . . . . . . . . 2-3
Keyless Entry System . . . . . . . . . . 2-2
Keys . . . . . . . . . . . . . . . . . . . . . . . . . . . . 2-2
L
Labeling, Tire Sidewall . . . . . . . . 10-40
Lamp Messages . . . . . . . . . . . . . . . 5-28
Lamps
Daytime Running (DRL) . . . . . . . 6-3
Dome . . . . . . . . . . . . . . . . . . . . . . . . . . 6-5
Exterior Controls . . . . . . . . . . . . . . . 6-1
Exterior Lamps OffReminder . . . . . . . . . . . . . . . . . . . . 6-2
License Plate . . . . . . . . . . . . . . . 10-29
Malfunction Indicator . . . . . . . . . 5-16
Reading . . . . . . . . . . . . . . . . . . . . . . . 6-5
Lap-Shoulder Belt . . . . . . . . . . . . . 3-17
LATCH System Replacing Parts After aCrash . . . . . . . . . . . . . . . . . . . . . . . 3-54
Latch, Lower Anchors and Tethers for Children . . . . . . . . . . 3-47
Lighting Entry/Exit . . . . . . . . . . . . . . . . . . . . . . 6-6
Illumination Control . . . . . . . . . . . . 6-5
Parade Dimming . . . . . . . . . . . . . . . 6-6 Lights
Airbag Readiness . . . . . . . . . . . . . 5-14
Antilock Brake System
(ABS) Warning . . . . . . . . . . . . . . 5-19
Charging System . . . . . . . . . . . . . 5-15
Cruise Control . . . . . . . . . . . . . . . . 5-23
Engine Coolant Temperature Warning . . . . . . . 5-20
Engine Oil Pressure . . . . . . . . . . 5-22
Flash-to-Pass . . . . . . . . . . . . . . . . . . 6-3
High-Beam On . . . . . . . . . . . . . . . . 5-23
High/Low Beam Changer . . . . . . 6-2
Safety Belt Reminders . . . . . . . . 5-13
Security . . . . . . . . . . . . . . . . . . . . . . 5-22
Tire Pressure . . . . . . . . . . . . . . . . . 5-21
Locks
Automatic Door . . . . . . . . . . . . . . . . 2-9
Delayed Locking . . . . . . . . . . . . . . . 2-8
Door . . . . . . . . . . . . . . . . . . . . . . . . . . . 2-7
Lockout Protection . . . . . . . . . . . . . 2-9
Power Door . . . . . . . . . . . . . . . . . . . . 2-8
Safety . . . . . . . . . . . . . . . . . . . . . . . . . 2-9
Loss of Control . . . . . . . . . . . . . . . . . 9-6
Low-Profile Tires . . . . . . . . . . . . . . 10-39