air filter CHEVROLET MALIBU 2013 8.G Owners Manual
[x] Cancel search | Manufacturer: CHEVROLET, Model Year: 2013, Model line: MALIBU, Model: CHEVROLET MALIBU 2013 8.GPages: 436, PDF Size: 7.43 MB
Page 207 of 436
Black plate (1,1)Chevrolet Malibu Owner Manual - 2013 - CRC - 6/6/12
Climate Controls 8-1
Climate Controls
Climate Control Systems
Climate Control Systems . . . . . . 8-1
Dual Automatic Climate ControlSystem . . . . . . . . . . . . . . . . . . . . . . 8-3
Air Vents
Air Vents . . . . . . . . . . . . . . . . . . . . . . 8-7
Maintenance
Passenger Compartment AirFilter . . . . . . . . . . . . . . . . . . . . . . . . . 8-8
Service . . . . . . . . . . . . . . . . . . . . . . . 8-9
Climate Control Systems
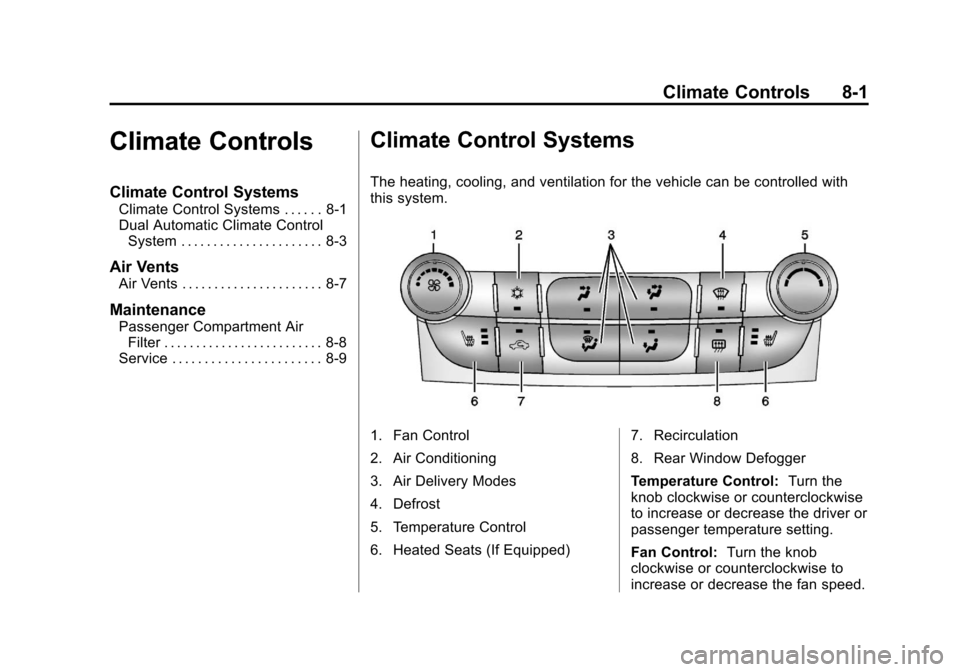
The heating, cooling, and ventilation for the vehicle can be controlled with
this system.
1. Fan Control
2. Air Conditioning
3. Air Delivery Modes
4. Defrost
5. Temperature Control
6. Heated Seats (If Equipped) 7. Recirculation
8. Rear Window Defogger
Temperature Control:
Turn the
knob clockwise or counterclockwise
to increase or decrease the driver or
passenger temperature setting.
Fan Control: Turn the knob
clockwise or counterclockwise to
increase or decrease the fan speed.
Page 214 of 436
Black plate (8,1)Chevrolet Malibu Owner Manual - 2013 - CRC - 6/6/12
8-8 Climate Controls
Operation Tips
.Keep all outlets open whenever
possible for best system
performance.
.Keep the paths under all seats
clear of objects to help circulate
the air inside the vehicle more
effectively.
.Use of non-GM approved hood
deflectors can adversely affect
the performance of the system.
.Do not attach any devices to the
air vent louvers. This restricts
airflow and may cause damage
to the air vents.
Maintenance
Passenger Compartment
Air Filter
The filter removes dust, pollen, and
other airborne irritants from outside
air that is pulled into the vehicle.
The filter should be replaced as part
of routine scheduled maintenance;
seeMaintenance Schedule on
page 11β2. To find out what type of
filter to use, see Maintenance
Replacement Parts on page 11β14.
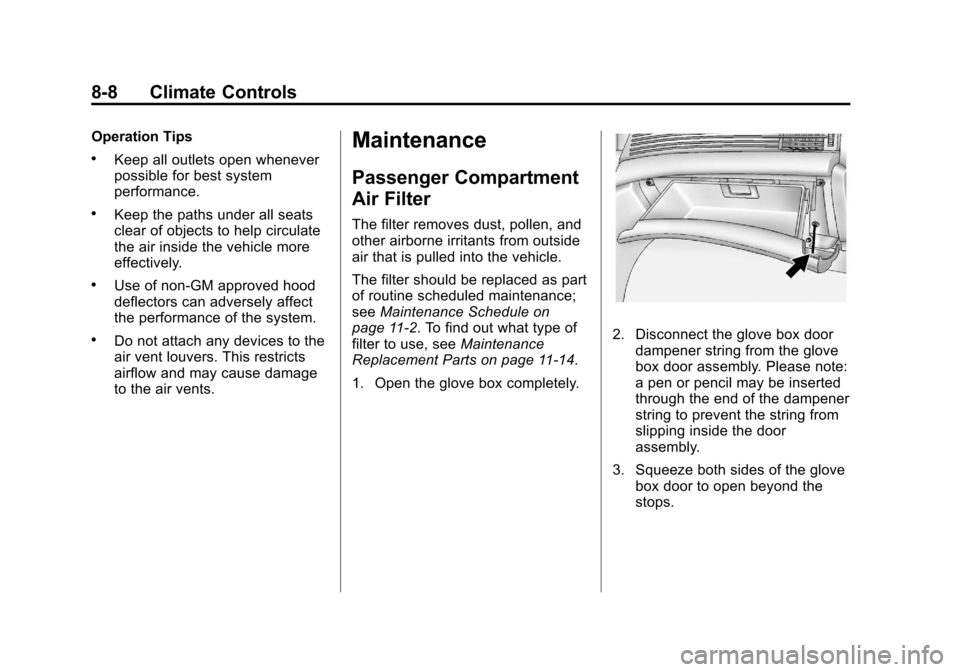
1. Open the glove box completely.
2. Disconnect the glove box door
dampener string from the glove
box door assembly. Please note:
a pen or pencil may be inserted
through the end of the dampener
string to prevent the string from
slipping inside the door
assembly.
3. Squeeze both sides of the glove box door to open beyond the
stops.
Page 215 of 436
Black plate (9,1)Chevrolet Malibu Owner Manual - 2013 - CRC - 6/6/12
Climate Controls 8-9
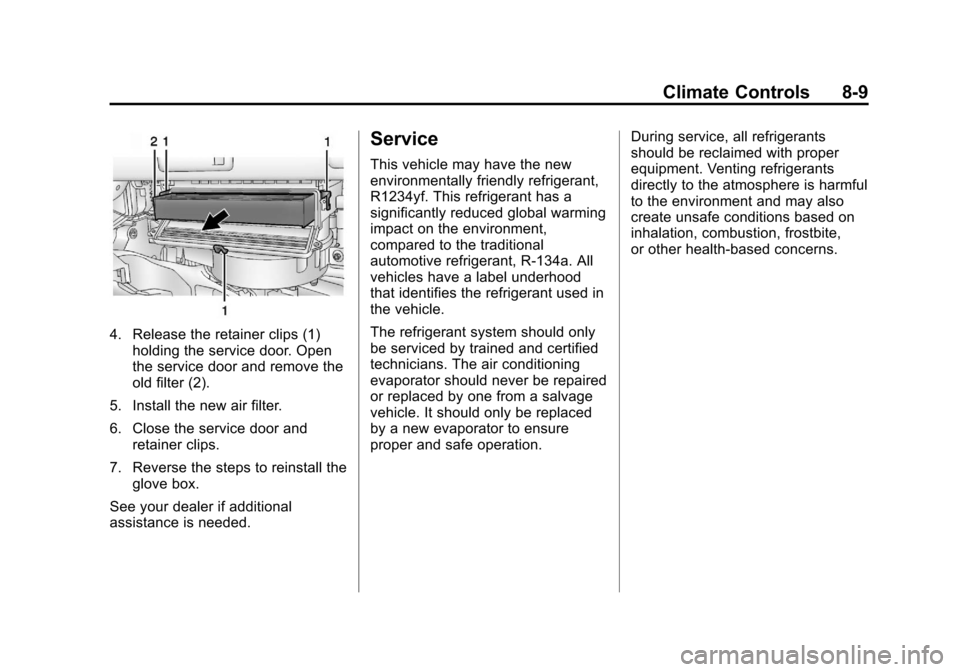
4. Release the retainer clips (1)holding the service door. Open
the service door and remove the
old filter (2).
5. Install the new air filter.
6. Close the service door and retainer clips.
7. Reverse the steps to reinstall the glove box.
See your dealer if additional
assistance is needed.
Service
This vehicle may have the new
environmentally friendly refrigerant,
R1234yf. This refrigerant has a
significantly reduced global warming
impact on the environment,
compared to the traditional
automotive refrigerant, R-134a. All
vehicles have a label underhood
that identifies the refrigerant used in
the vehicle.
The refrigerant system should only
be serviced by trained and certified
technicians. The air conditioning
evaporator should never be repaired
or replaced by one from a salvage
vehicle. It should only be replaced
by a new evaporator to ensure
proper and safe operation. During service, all refrigerants
should be reclaimed with proper
equipment. Venting refrigerants
directly to the atmosphere is harmful
to the environment and may also
create unsafe conditions based on
inhalation, combustion, frostbite,
or other health-based concerns.
Page 267 of 436
Black plate (1,1)Chevrolet Malibu Owner Manual - 2013 - CRC - 6/6/12
Vehicle Care 10-1
Vehicle Care
General Information
General Information . . . . . . . . . . 10-2
California Proposition65 Warning . . . . . . . . . . . . . . . . . 10-3
California Perchlorate Materials Requirements . . . . 10-3
Accessories and Modifications . . . . . . . . . . . . . . . 10-3
Vehicle Checks
Doing Your OwnService Work . . . . . . . . . . . . . . . 10-4
Hood . . . . . . . . . . . . . . . . . . . . . . . . 10-5
Engine Compartment Overview . . . . . . . . . . . . . . . . . . . 10-6
Engine Oil . . . . . . . . . . . . . . . . . . 10-11
Engine Oil Life System . . . . . 10-13
Automatic Transmission Fluid . . . . . . . . . . . . . . . . . . . . . . 10-14
Engine Air Cleaner/Filter . . . . 10-15
Cooling System . . . . . . . . . . . . 10-16
Engine Coolant . . . . . . . . . . . . . 10-18
Engine Overheating . . . . . . . . 10-20
Washer Fluid . . . . . . . . . . . . . . . 10-22
Brakes . . . . . . . . . . . . . . . . . . . . . 10-22
Brake Fluid . . . . . . . . . . . . . . . . . 10-23 Battery . . . . . . . . . . . . . . . . . . . . . 10-25
Starter Switch Check . . . . . . . 10-26
Automatic Transmission Shift
Lock Control Function
Check . . . . . . . . . . . . . . . . . . . . . 10-26
Ignition Transmission Lock Check . . . . . . . . . . . . . . . . . . . . . 10-26
Park Brake and P (Park) Mechanism Check . . . . . . . . 10-27
Wiper Blade Replacement . . . . . . . . . . . . . . 10-27
Headlamp Aiming
Headlamp Aiming . . . . . . . . . . 10-28
Bulb Replacement
Bulb Replacement . . . . . . . . . . 10-28
Halogen Bulbs . . . . . . . . . . . . . . 10-28
High Intensity Discharge(HID) Lighting . . . . . . . . . . . . . 10-29
LED Lighting . . . . . . . . . . . . . . . 10-29
Headlamps, Front Turn Signal, Sidemarker, and
Parking Lamps . . . . . . . . . . . . 10-29
Fog Lamps . . . . . . . . . . . . . . . . . 10-32
Taillamps, Turn Signal, Stoplamps, and Back-Up
Lamps (LS and LT) . . . . . . . . 10-33 Taillamps, Turn Signal,
Stoplamps, and Back-Up
Lamps (LTZ) . . . . . . . . . . . . . . 10-34
License Plate Lamp . . . . . . . . 10-35
Replacement Bulbs . . . . . . . . . 10-36
Electrical System
High Voltage Devices and Wiring . . . . . . . . . . . . . . . . . . . . . 10-37
Electrical System Overload . . . . . . . . . . . . . . . . . . 10-37
Fuses . . . . . . . . . . . . . . . . . . . . . . 10-38
Engine Compartment Fuse Block . . . . . . . . . . . . . . . . . . . . . 10-38
Instrument Panel Fuse Block . . . . . . . . . . . . . . . . . . . . . 10-42
Wheels and Tires
Tires . . . . . . . . . . . . . . . . . . . . . . . . 10-44
All-Season Tires . . . . . . . . . . . . 10-45
Winter Tires . . . . . . . . . . . . . . . . 10-45
Summer Tires . . . . . . . . . . . . . . 10-46
Tire Sidewall Labeling . . . . . . 10-46
Tire Designations . . . . . . . . . . . 10-48
Tire Terminology andDefinitions . . . . . . . . . . . . . . . . 10-49
Tire Pressure . . . . . . . . . . . . . . . 10-52
Tire Pressure for High-Speed Operation . . . . . . . . . . . . . . . . . 10-53
Page 273 of 436

Black plate (7,1)Chevrolet Malibu Owner Manual - 2013 - CRC - 6/6/12
Vehicle Care 10-7
1.Engine Air Cleaner/Filter on
page 10β15.
2. Engine Cover.
3. Engine Oil Fill Cap. See Engine
Oil on page 10β11.
4. Engine Oil Dipstick. See Engine
Oil on page 10β11. 5. Engine Cooling Fans (Out of
View). See Cooling System on
page 10β16.
6. Brake Fluid Reservoir. See Brakes on page 10β22.
7. Coolant Surge Tank and Pressure Cap. See Engine
Coolant on page 10β18. 8.
Battery on page 10β25.
9. Engine Compartment Fuse
Block on page 10β38.
10. Windshield Washer Fluid Reservoir. See Washer Fluid
on page 10β22.
Page 275 of 436

Black plate (9,1)Chevrolet Malibu Owner Manual - 2013 - CRC - 6/6/12
Vehicle Care 10-9
1.Engine Air Cleaner/Filter on
page 10β15.
2. Engine Cover.
3. Engine Cooling Fans (Out of View). See Cooling System on
page 10β16.
4. Engine Oil Dipstick. See Engine
Oil on page 10β11.
5. Engine Oil Fill Cap. See Engine
Oil on page 10β11. 6. High Voltage Cable (Orange
Color).
7. Transmission Fluid Cap (Out of View). See Automatic
Transmission Fluid on
page 10β14.
8. Brake Fluid Reservoir. See Brakes on page 10β22.
9. Battery (Under Cover). See Battery on page 10β25. 10. Coolant Surge Tank and
Pressure Cap. See Engine
Coolant on page 10β18.
11. Engine Compartment Fuse
Block on page 10β38.
12. Windshield Washer Fluid Reservoir. See Washer Fluid
on page 10β22.
Page 277 of 436
Black plate (11,1)Chevrolet Malibu Owner Manual - 2013 - CRC - 6/6/12
Vehicle Care 10-11
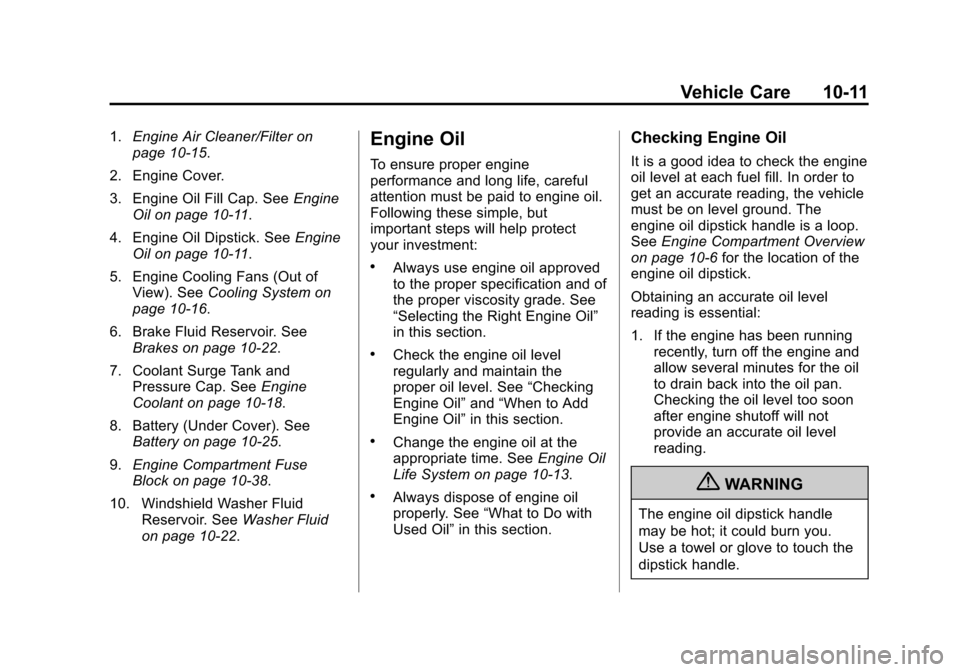
1.Engine Air Cleaner/Filter on
page 10β15.
2. Engine Cover.
3. Engine Oil Fill Cap. See Engine
Oil on page 10β11.
4. Engine Oil Dipstick. See Engine
Oil on page 10β11.
5. Engine Cooling Fans (Out of View). See Cooling System on
page 10β16.
6. Brake Fluid Reservoir. See Brakes on page 10β22.
7. Coolant Surge Tank and Pressure Cap. See Engine
Coolant on page 10β18.
8. Battery (Under Cover). See Battery on page 10β25.
9. Engine Compartment Fuse
Block on page 10β38.
10. Windshield Washer Fluid Reservoir. See Washer Fluid
on page 10β22.Engine Oil
To ensure proper engine
performance and long life, careful
attention must be paid to engine oil.
Following these simple, but
important steps will help protect
your investment:
.Always use engine oil approved
to the proper specification and of
the proper viscosity grade. See
βSelecting the Right Engine Oilβ
in this section.
.Check the engine oil level
regularly and maintain the
proper oil level. See βChecking
Engine Oilβ andβWhen to Add
Engine Oilβ in this section.
.Change the engine oil at the
appropriate time. See Engine Oil
Life System on page 10β13.
.Always dispose of engine oil
properly. See βWhat to Do with
Used Oilβ in this section.
Checking Engine Oil
It is a good idea to check the engine
oil level at each fuel fill. In order to
get an accurate reading, the vehicle
must be on level ground. The
engine oil dipstick handle is a loop.
SeeEngine Compartment Overview
on page 10β6 for the location of the
engine oil dipstick.
Obtaining an accurate oil level
reading is essential:
1. If the engine has been running recently, turn off the engine and
allow several minutes for the oil
to drain back into the oil pan.
Checking the oil level too soon
after engine shutoff will not
provide an accurate oil level
reading.
{WARNING
The engine oil dipstick handle
may be hot; it could burn you.
Use a towel or glove to touch the
dipstick handle.
Page 280 of 436
Black plate (14,1)Chevrolet Malibu Owner Manual - 2013 - CRC - 6/6/12
10-14 Vehicle Care
It is possible that, if driving under
the best conditions, the oil life
system might indicate that an oil
change is not necessary for up to a
year. The engine oil and filter must
be changed at least once a year
and, at this time, the system must
be reset. Your dealer has trained
service people who will perform this
work and reset the system. It is also
important to check the oil regularly
over the course of an oil drain
interval and keep it at the proper
level.
If the system is ever reset
accidentally, the oil must be
changed at 5 000 km (3,000 mi)
since the last oil change.
Remember to reset the oil life
system whenever the oil is changed.How to Reset the Engine Oil
Life System
Reset the system whenever the
engine oil is changed so that the
system can calculate the next
engine oil change. To reset the
system:
1. Turn the ignition to ON/RUN withthe engine off.
2. Press the DIC MENU button on the turn signal lever to enter the
Vehicle Information Menu. Use
the thumbwheel to scroll through
the menu items until you reach
REMAINING OIL LIFE.
3. Press the SET/CLR button to reset the oil life at 100%.
4. Turn the ignition to LOCK/OFF.
The system is reset when the
CHANGE ENGINE OIL SOON
message is off and the REMAINING
OIL LIFE 100% message is
displayed. If the CHANGE ENGINE OIL SOON
message comes back on when the
vehicle is started, the engine oil life
system has not been reset. Repeat
the procedure.
Automatic Transmission
Fluid
It is not necessary to check the
transmission fluid level.
A transmission fluid leak is the only
reason for fluid loss. If a leak
occurs, take the vehicle to your
dealer and have it repaired as soon
as possible.
Change the fluid and filter at the
intervals listed in
Maintenance
Schedule on page 11β2, and
be sure to use the fluid listed in
Recommended Fluids and
Lubricants on page 11β12.
Page 281 of 436
Black plate (15,1)Chevrolet Malibu Owner Manual - 2013 - CRC - 6/6/12
Vehicle Care 10-15
Engine Air Cleaner/Filter
The engine air cleaner/filter is in the
engine compartment on the
passenger side of the vehicle. See
Engine Compartment Overview on
page 10β6for more information on
location.
When to Inspect the Engine Air
Cleaner/Filter
Inspect the air cleaner/filter at the
scheduled maintenance intervals
and replace it at the first oil change
after each 80 000 km (50,000 mi)
interval. See Maintenance Schedule
on page 11β2. If you are driving in
dusty/dirty conditions, inspect the
filter at each engine oil change.
How to Inspect the Engine Air
Cleaner/Filter
To inspect the air cleaner/filter,
remove the filter from the vehicle
and lightly shake the filter to release
loose dust and dirt. If the filter
remains covered with dirt, a new
filter is required. To inspect or replace the engine air
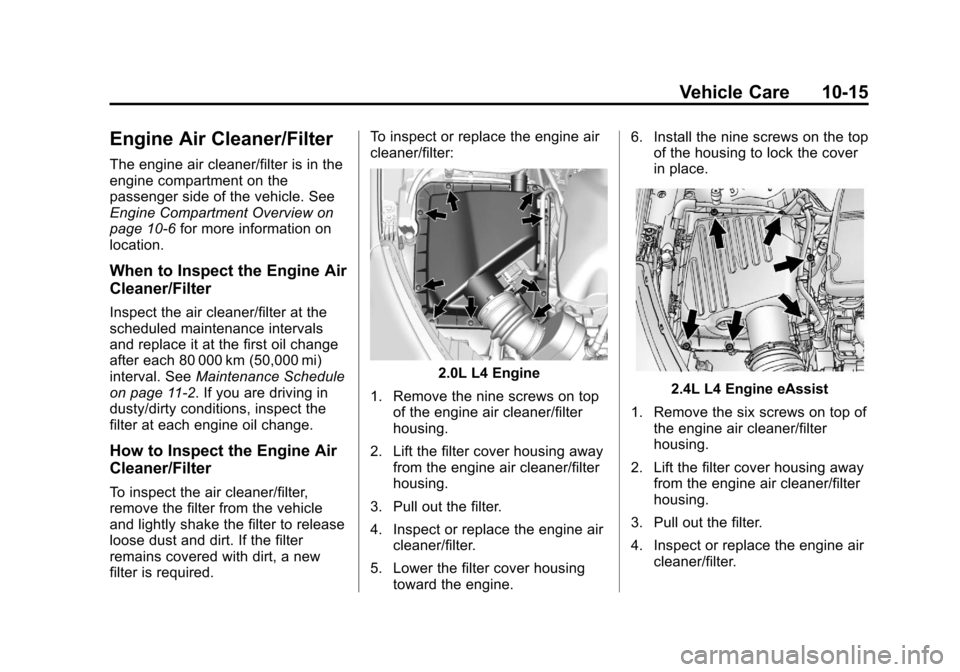
cleaner/filter:
2.0L L4 Engine
1. Remove the nine screws on top of the engine air cleaner/filter
housing.
2. Lift the filter cover housing away from the engine air cleaner/filter
housing.
3. Pull out the filter.
4. Inspect or replace the engine air cleaner/filter.
5. Lower the filter cover housing toward the engine. 6. Install the nine screws on the top
of the housing to lock the cover
in place.2.4L L4 Engine eAssist
1. Remove the six screws on top of the engine air cleaner/filter
housing.
2. Lift the filter cover housing away from the engine air cleaner/filter
housing.
3. Pull out the filter.
4. Inspect or replace the engine air cleaner/filter.
Page 282 of 436
Black plate (16,1)Chevrolet Malibu Owner Manual - 2013 - CRC - 6/6/12
10-16 Vehicle Care
5. Lower the filter cover housingtoward the engine.
6. Install the six screws on the top of the housing to lock the cover
in place.
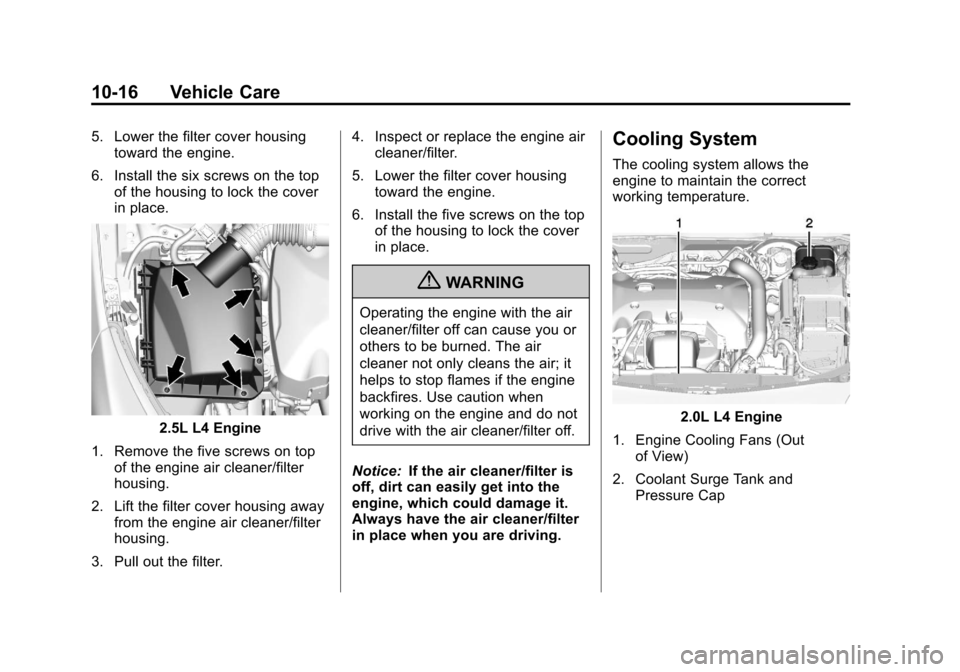
2.5L L4 Engine
1. Remove the five screws on top of the engine air cleaner/filter
housing.
2. Lift the filter cover housing away from the engine air cleaner/filter
housing.
3. Pull out the filter. 4. Inspect or replace the engine air
cleaner/filter.
5. Lower the filter cover housing toward the engine.
6. Install the five screws on the top of the housing to lock the cover
in place.
{WARNING
Operating the engine with the air
cleaner/filter off can cause you or
others to be burned. The air
cleaner not only cleans the air; it
helps to stop flames if the engine
backfires. Use caution when
working on the engine and do not
drive with the air cleaner/filter off.
Notice: If the air cleaner/filter is
off, dirt can easily get into the
engine, which could damage it.
Always have the air cleaner/filter
in place when you are driving.
Cooling System
The cooling system allows the
engine to maintain the correct
working temperature.
2.0L L4 Engine
1. Engine Cooling Fans (Out of View)
2. Coolant Surge Tank and Pressure Cap