CHEVROLET MALIBU 2016 8.G Owners Manual
Manufacturer: CHEVROLET, Model Year: 2016, Model line: MALIBU, Model: CHEVROLET MALIBU 2016 8.GPages: 420, PDF Size: 7.86 MB
Page 101 of 420
Chevrolet Malibu Owner Manual (GMNA-Localizing-U.S./Canada/Mexico-
9087641) - 2016 - crc - 9/3/15
100 Storage
Storage
Storage Compartments
Storage Compartments . . . . . . . 100
Glove Box . . . . . . . . . . . . . . . . . . . . 100
Cupholders . . . . . . . . . . . . . . . . . . . 100
Center Console Storage . . . . . . 101
Umbrella Storage . . . . . . . . . . . . . 101
Additional Storage Features
Cargo Tie-Downs . . . . . . . . . . . . . 101
Convenience Net . . . . . . . . . . . . . 101
Storage
Compartments
{Warning
Do not store heavy or sharp
objects in storage compartments.
In a crash, these objects may
cause the cover to open and
could result in injury.
Glove Box
Pull the handle up to open.
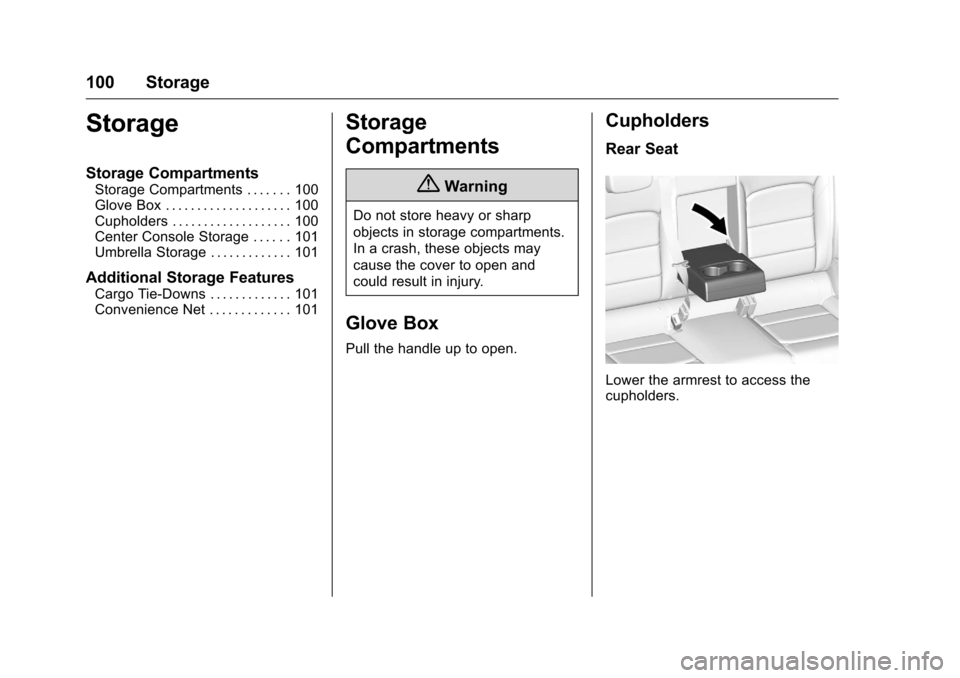
Cupholders
Rear Seat
Lower the armrest to access the
cupholders.
Page 102 of 420
Chevrolet Malibu Owner Manual (GMNA-Localizing-U.S./Canada/Mexico-
9087641) - 2016 - crc - 9/3/15
Storage 101
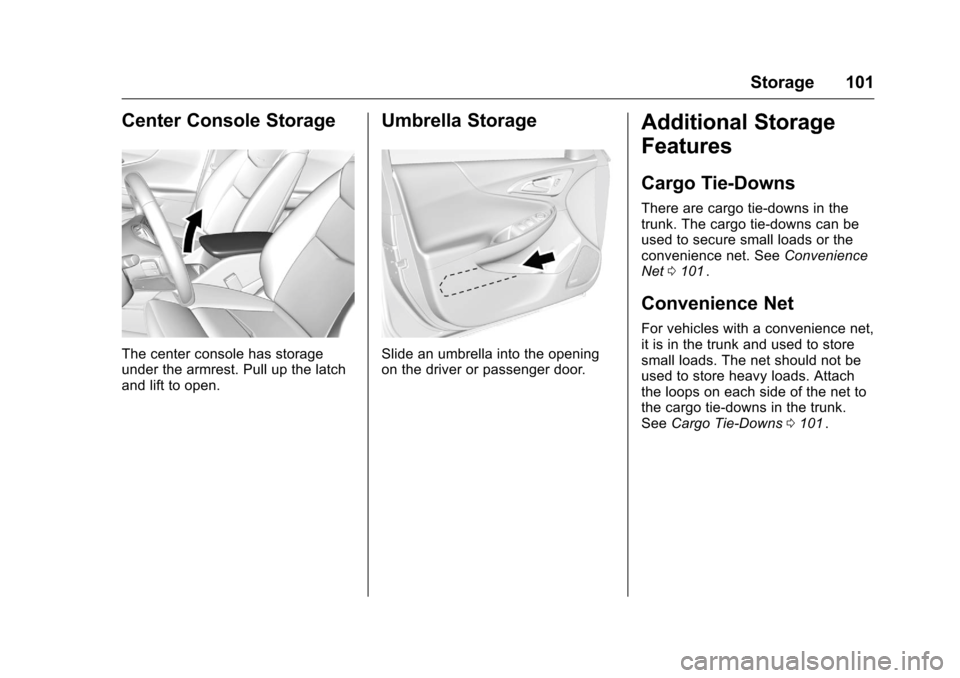
Center Console Storage
The center console has storage
under the armrest. Pull up the latch
and lift to open.
Umbrella Storage
Slide an umbrella into the opening
on the driver or passenger door.
Additional Storage
Features
Cargo Tie-Downs
There are cargo tie‐downs in the
trunk. The cargo tie‐downs can be
used to secure small loads or the
convenience net. SeeConvenience
Net 0101
ii.
Convenience Net
For vehicles with a convenience net,
it is in the trunk and used to store
small loads. The net should not be
used to store heavy loads. Attach
the loops on each side of the net to
the cargo tie-downs in the trunk.
See Cargo Tie-Downs 0101
ii.
Page 103 of 420
Chevrolet Malibu Owner Manual (GMNA-Localizing-U.S./Canada/Mexico-
9087641) - 2016 - crc - 9/3/15
102 Instruments and Controls
Instruments and
Controls
Controls
Steering Wheel Adjustment . . . 103
Steering Wheel Controls . . . . . . 103
Heated Steering Wheel . . . . . . . 104
Horn . . . . . . . . . . . . . . . . . . . . . . . . . . 104
Windshield Wiper/Washer . . . . 104
Compass . . . . . . . . . . . . . . . . . . . . . 105
Clock . . . . . . . . . . . . . . . . . . . . . . . . . 106
Power Outlets . . . . . . . . . . . . . . . . 107
Wireless Charging . . . . . . . . . . . . 108
Warning Lights, Gauges, and
Indicators
Warning Lights, Gauges, andIndicators . . . . . . . . . . . . . . . . . . . 109
Instrument Cluster (Base Level) . . . . . . . . . . . . . . . . . . . . . . . 110
Instrument Cluster
(Uplevel) . . . . . . . . . . . . . . . . . . . . 112
Speedometer . . . . . . . . . . . . . . . . . 115
Odometer . . . . . . . . . . . . . . . . . . . . . 115
Trip Odometer . . . . . . . . . . . . . . . . 115
Tachometer (Non-Hybrid) . . . . . 115
Fuel Gauge . . . . . . . . . . . . . . . . . . . 116
Power Indicator Gauge (Hybrid) . . . . . . . . . . . . . . . . . . . . . 116 Engine Coolant Temperature
Gauge . . . . . . . . . . . . . . . . . . . . . . 117
Safety Belt Reminders . . . . . . . . 117
Airbag Readiness Light . . . . . . . 118
Passenger Airbag Status Indicator . . . . . . . . . . . . . . . . . . . . . 118
Charging System Light . . . . . . . 119
Malfunction Indicator Lamp (Check Engine Light) . . . . . . . . 120
Brake System Warning Light . . . . . . . . . . . . . . . . . . . . . . . . 122
Electric Parking Brake Light . . . . . . . . . . . . . . . . . . . . . . . . 122
Service Electric Parking Brake Light . . . . . . . . . . . . . . . . . . . . . . . . 122
Antilock Brake System (ABS) Warning Light . . . . . . . . . . . . . . . 123
Lane Keep Assist (LKA) Light . . . . . . . . . . . . . . . . . . . . . . . . 123
Vehicle Ahead Indicator . . . . . . 123
Pedestrian Ahead Indicator . . . 124
Traction Off Light . . . . . . . . . . . . . 124
StabiliTrak
®OFF Light . . . . . . . . 124
Traction Control System (TCS)/ StabiliTrak
®Light . . . . . . . . . . . 125
Tire Pressure Light . . . . . . . . . . . 125
Engine Oil Pressure Light . . . . 125
Low Fuel Warning Light (Uplevel) . . . . . . . . . . . . . . . . . . . . 126
Low Fuel Warning Light (Base Level) . . . . . . . . . . . . . . . . . . . . . . . 126 Security Light . . . . . . . . . . . . . . . . . 127
Vehicle Ready Light
(Hybrid) . . . . . . . . . . . . . . . . . . . . . 127
High-Beam On Light . . . . . . . . . . 127
Lamps On Reminder . . . . . . . . . 127
Cruise Control Light . . . . . . . . . . 127
Door Ajar Light (Uplevel) . . . . . 128
Information Displays
Center Stack Display . . . . . . . . . 128
Power Flows (Hybrid) . . . . . . . . . 128
Energy Information (Hybrid) . . . . . . . . . . . . . . . . . . . . . 129
Driver Information Center (DIC) (Base Level) . . . . . . . . . . . . . . . . 129
Driver Information Center (DIC) (Uplevel) . . . . . . . . . . . . . . . . . . . . 132
Vehicle Messages
Vehicle Messages . . . . . . . . . . . . 136
Battery Voltage and Charging
Messages . . . . . . . . . . . . . . . . . . . 136
Brake System Messages . . . . . 136
Compass Messages . . . . . . . . . . 137
Cruise Control Messages . . . . . 137
Door Ajar Messages . . . . . . . . . . 138
Engine Cooling System Messages . . . . . . . . . . . . . . . . . . . 138
Engine Oil Messages . . . . . . . . . 139
Engine Power Messages . . . . . 139
Fuel System Messages . . . . . . . 139
Page 104 of 420
Chevrolet Malibu Owner Manual (GMNA-Localizing-U.S./Canada/Mexico-
9087641) - 2016 - crc - 9/3/15
Instruments and Controls 103
Key and Lock Messages . . . . . 139
Lamp Messages . . . . . . . . . . . . . . 140
Object Detection SystemMessages . . . . . . . . . . . . . . . . . . . 140
Ride Control System
Messages . . . . . . . . . . . . . . . . . . . 142
Airbag System Messages . . . . 143
Security Messages . . . . . . . . . . . 143
Service Vehicle Messages . . . . 143
Steering System Messages . . . . . . . . . . . . . . . . . . . 143
Starting the Vehicle Messages . . . . . . . . . . . . . . . . . . . 143
Tire Messages . . . . . . . . . . . . . . . . 144
Transmission Messages . . . . . . 144
Vehicle Reminder Messages . . . . . . . . . . . . . . . . . . . 145
Window Messages . . . . . . . . . . . 145
Vehicle Personalization
Vehicle Personalization . . . . . . . 145
Universal Remote System
Universal Remote System . . . . 157
Universal Remote System Programming . . . . . . . . . . . . . . . 157
Universal Remote System Operation . . . . . . . . . . . . . . . . . . . 159
Controls
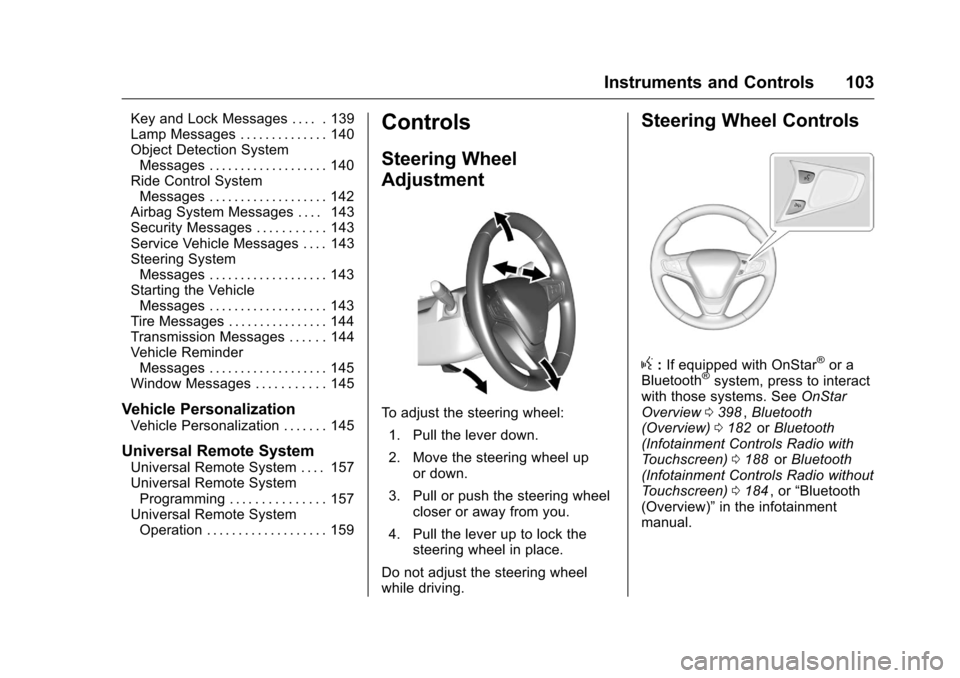
Steering Wheel
Adjustment
To adjust the steering wheel:
1. Pull the lever down.
2. Move the steering wheel up or down.
3. Pull or push the steering wheel closer or away from you.
4. Pull the lever up to lock the steering wheel in place.
Do not adjust the steering wheel
while driving.
Steering Wheel Controls
g: If equipped with OnStar®or a
Bluetooth®system, press to interact
with those systems. See OnStar
Overview 0398
ii,Bluetooth
(Overview) 0182iior Bluetooth
(Infotainment Controls Radio with
Touchscreen) 0188
iior Bluetooth
(Infotainment Controls Radio without
Touchscreen) 0184
ii, or “Bluetooth
(Overview)” in the infotainment
manual.
Page 105 of 420
Chevrolet Malibu Owner Manual (GMNA-Localizing-U.S./Canada/Mexico-
9087641) - 2016 - crc - 9/3/15
104 Instruments and Controls
c:Press to reject an incoming
call or end a current call. Press to
mute or unmute the infotainment
system when not on a call.
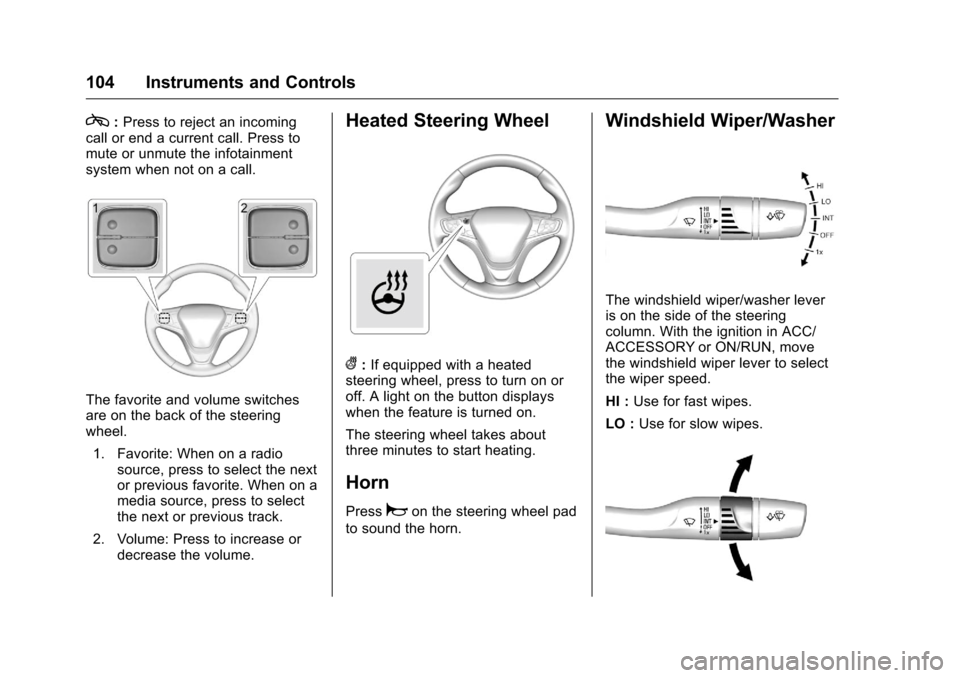
The favorite and volume switches
are on the back of the steering
wheel.
1. Favorite: When on a radio source, press to select the next
or previous favorite. When on a
media source, press to select
the next or previous track.
2. Volume: Press to increase or decrease the volume.
Heated Steering Wheel
(:If equipped with a heated
steering wheel, press to turn on or
off. A light on the button displays
when the feature is turned on.
The steering wheel takes about
three minutes to start heating.
Horn
Pressaon the steering wheel pad
to sound the horn.
Windshield Wiper/Washer
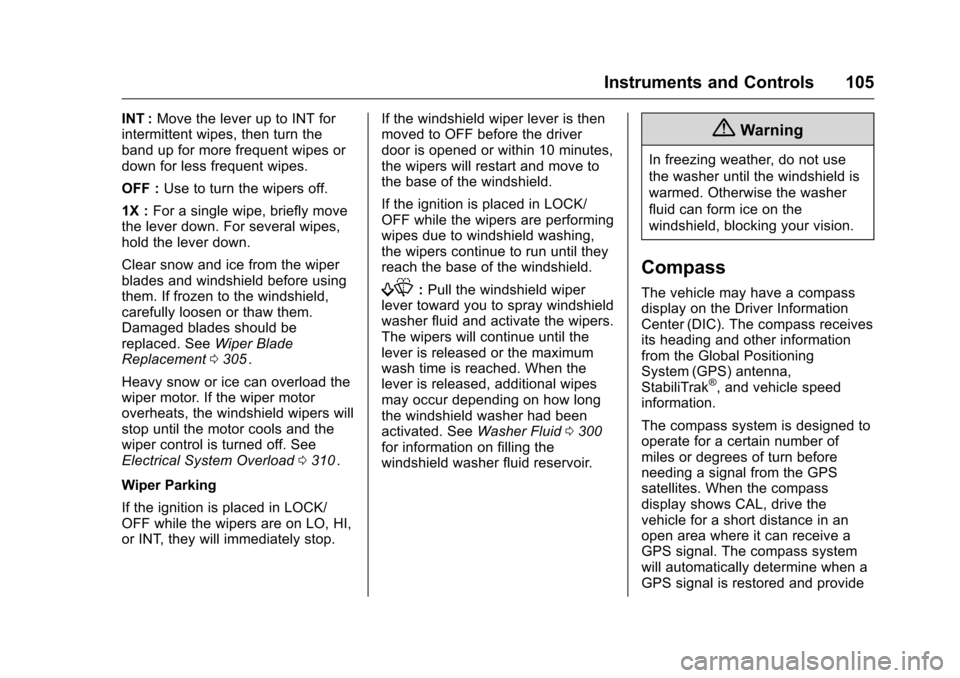
The windshield wiper/washer lever
is on the side of the steering
column. With the ignition in ACC/
ACCESSORY or ON/RUN, move
the windshield wiper lever to select
the wiper speed.
HI : Use for fast wipes.
LO : Use for slow wipes.
Page 106 of 420
Chevrolet Malibu Owner Manual (GMNA-Localizing-U.S./Canada/Mexico-
9087641) - 2016 - crc - 9/3/15
Instruments and Controls 105
INT :Move the lever up to INT for
intermittent wipes, then turn the
band up for more frequent wipes or
down for less frequent wipes.
OFF : Use to turn the wipers off.
1X : For a single wipe, briefly move
the lever down. For several wipes,
hold the lever down.
Clear snow and ice from the wiper
blades and windshield before using
them. If frozen to the windshield,
carefully loosen or thaw them.
Damaged blades should be
replaced. See Wiper Blade
Replacement 0305
ii.
Heavy snow or ice can overload the
wiper motor. If the wiper motor
overheats, the windshield wipers will
stop until the motor cools and the
wiper control is turned off. See
Electrical System Overload 0310
ii.
Wiper Parking
If the ignition is placed in LOCK/
OFF while the wipers are on LO, HI,
or INT, they will immediately stop. If the windshield wiper lever is then
moved to OFF before the driver
door is opened or within 10 minutes,
the wipers will restart and move to
the base of the windshield.
If the ignition is placed in LOCK/
OFF while the wipers are performing
wipes due to windshield washing,
the wipers continue to run until they
reach the base of the windshield.
f:
Pull the windshield wiper
lever toward you to spray windshield
washer fluid and activate the wipers.
The wipers will continue until the
lever is released or the maximum
wash time is reached. When the
lever is released, additional wipes
may occur depending on how long
the windshield washer had been
activated. See Washer Fluid0300
iifor information on filling the
windshield washer fluid reservoir.
{Warning
In freezing weather, do not use
the washer until the windshield is
warmed. Otherwise the washer
fluid can form ice on the
windshield, blocking your vision.
Compass
The vehicle may have a compass
display on the Driver Information
Center (DIC). The compass receives
its heading and other information
from the Global Positioning
System (GPS) antenna,
StabiliTrak
®, and vehicle speed
information.
The compass system is designed to
operate for a certain number of
miles or degrees of turn before
needing a signal from the GPS
satellites. When the compass
display shows CAL, drive the
vehicle for a short distance in an
open area where it can receive a
GPS signal. The compass system
will automatically determine when a
GPS signal is restored and provide
Page 107 of 420
Chevrolet Malibu Owner Manual (GMNA-Localizing-U.S./Canada/Mexico-
9087641) - 2016 - crc - 9/3/15
106 Instruments and Controls
a heading again. SeeCompass
Messages 0137iifor the messages
that may be displayed for the
compass.
Clock
Radio without Touchscreen
The infotainment system controls
are used to access the time and
date settings through the menu
system. See Operation0173
iion
how to use the menu system.
Setting the Time and Date
1. Press MENU, then select Settings
2. Select Time and Date.
3. Select Set Time or Set Date.
4. Turn MENU to change the value.
5. Press MENU to select the next value.
6. Turn MENU to change the value. 7. To exit without saving, press
BACK at any time or to save
and return to the Time and
Date menu, press MENU
multiple times.
Auto Set
When Auto Set is enabled, the time
cannot be manually set.
From the Set Time or Set
Date menu:
1. Press the preset button under Auto Set.
2. Turn MENU to select Off (Manual) or On-Cell Network,
then press MENU to select it
and return to the Time and
Date menu.
3. To exit without saving, press BACK at any time.
Setting the 12/24 Hour Format
From the Set Time menu:
1. Press the preset button under 12-24 HR to change between
12 hour and 24 hour modes.
2. To return to the Time and Date menu, press BACK at any time.
Radio with Touchscreen
The infotainment system controls
are used to access the time and
date settings through the menu
system. See Operation0173
iion
how to use the menu system.
Setting the Time and Date
When Auto Set is enabled the time
cannot be manually set.
1. Press
{, then touch Settings.
2. Touch Time and Date, then Set Time or Set Date.
3. Touch + or −to adjust the
value.
4. Touch
RorQto adjust AM or
PM for 12 hour format.
5. Touch
0to return to the
Time and Date menu.
Auto Set
1. Press{, then touch Settings.
2. Touch Time and Date, then Auto Set.
3. Select from the available selections.
Page 108 of 420
Chevrolet Malibu Owner Manual (GMNA-Localizing-U.S./Canada/Mexico-
9087641) - 2016 - crc - 9/3/15
Instruments and Controls 107
4. Touch0to return to the
Time and Date menu.
Setting the 12/24 Hour Format
1. Press{, then touch Settings.
2. Touch Time and Date, then select 12h or 24h format.
3. Touch
0to return to the
Time and Date menu.
Setting the Month and Day
Format
1. Press{, then touch Settings.
2. Touch Time and Date, then Set Date Format.
3. Select DD/MM/YYYY (day/ month/year), MM/DD/YYYY
(month/day/year), or YYYY/
MM/DD (year/month/day)
format.
4. Touch
0to return to the
Time and Date menu.
Power Outlets
Power Outlet 12 Volt Direct
Current
The accessory power outlets can be
used to plug in electrical equipment,
such as a cell phone or MP3 player.
There are two accessory power
outlets:
. One on the center stack below
the climate control system.
. One on the rear of the center
floor console.
The outlet is powered when the
ignition is in ON/RUN or ACC/
ACCESSORY, or until the driver
door is opened within 10 minutes of
turning off the vehicle. See Retained
Accessory Power (RAP) 0231
ii.
Open the protective cover to use the
accessory power outlet.
Certain electrical accessories may
not be compatible with the
accessory power outlets and could
overload vehicle or adapter fuses.
If there is a problem, see your
dealer. When adding electrical equipment,
be sure to follow the installation
instructions included with the
equipment. See
Add-On Electrical
Equipment 0278
ii.
Caution
Hanging heavy equipment from
the power outlet can cause
damage not covered by the
vehicle warranty. The power
outlets are designed for
accessory power plugs only, such
as cell phone charge cords.
Always unplug electrical equipment
when not in use and do not plug in
equipment that exceeds the
maximum 20 amps rating.
Power Outlet 110/120 Volt
Alternating Current
If equipped with this power outlet it
can be used to plug in electrical
equipment that uses a maximum
limit of 150 watts.
Page 109 of 420
Chevrolet Malibu Owner Manual (GMNA-Localizing-U.S./Canada/Mexico-
9087641) - 2016 - crc - 9/3/15
108 Instruments and Controls
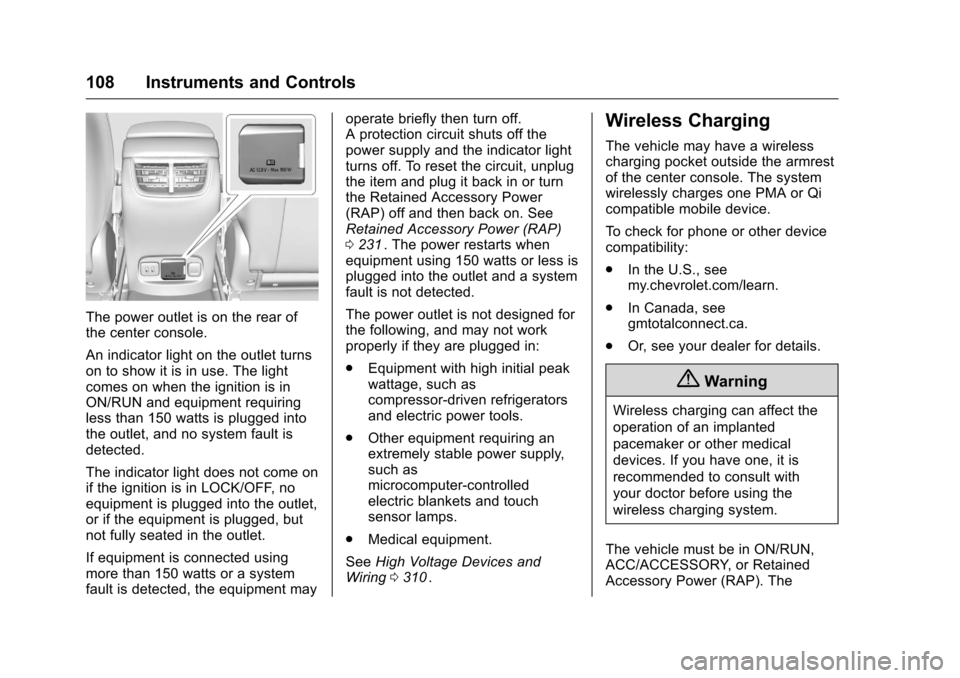
The power outlet is on the rear of
the center console.
An indicator light on the outlet turns
on to show it is in use. The light
comes on when the ignition is in
ON/RUN and equipment requiring
less than 150 watts is plugged into
the outlet, and no system fault is
detected.
The indicator light does not come on
if the ignition is in LOCK/OFF, no
equipment is plugged into the outlet,
or if the equipment is plugged, but
not fully seated in the outlet.
If equipment is connected using
more than 150 watts or a system
fault is detected, the equipment mayoperate briefly then turn off.
A protection circuit shuts off the
power supply and the indicator light
turns off. To reset the circuit, unplug
the item and plug it back in or turn
the Retained Accessory Power
(RAP) off and then back on. See
Retained Accessory Power (RAP)
0
231
ii. The power restarts when
equipment using 150 watts or less is
plugged into the outlet and a system
fault is not detected.
The power outlet is not designed for
the following, and may not work
properly if they are plugged in:
. Equipment with high initial peak
wattage, such as
compressor-driven refrigerators
and electric power tools.
. Other equipment requiring an
extremely stable power supply,
such as
microcomputer-controlled
electric blankets and touch
sensor lamps.
. Medical equipment.
See High Voltage Devices and
Wiring 0310
ii.
Wireless Charging
The vehicle may have a wireless
charging pocket outside the armrest
of the center console. The system
wirelessly charges one PMA or Qi
compatible mobile device.
To check for phone or other device
compatibility:
.
In the U.S., see
my.chevrolet.com/learn.
. In Canada, see
gmtotalconnect.ca.
. Or, see your dealer for details.
{Warning
Wireless charging can affect the
operation of an implanted
pacemaker or other medical
devices. If you have one, it is
recommended to consult with
your doctor before using the
wireless charging system.
The vehicle must be in ON/RUN,
ACC/ACCESSORY, or Retained
Accessory Power (RAP). The
Page 110 of 420
Chevrolet Malibu Owner Manual (GMNA-Localizing-U.S./Canada/Mexico-
9087641) - 2016 - crc - 9/3/15
Instruments and Controls 109
wireless charging feature may not
correctly indicate charging when the
vehicle is in RAP. SeeRetained
Accessory Power (RAP) 0231
ii.
The operating temperature is −20 °C
(−4 °F) to 60 °C (140 °F) for the
charging system and 0 °C (32 °F) to
35 °C (95 °F) for the mobile device.
{Warning
Remove all metal objects from
charging pocket before charging
your mobile device. Metal objects,
such as coins, keys, rings,
or paper clips, between the phone
and the charger will become very
hot. On the rare occasion that the
charging system does not detect
a metal object, and the object
gets wedged between the phone
and the charger, remove the
phone and allow the metallic
object to cool before removing it
from the charging pocket, to
prevent burns.
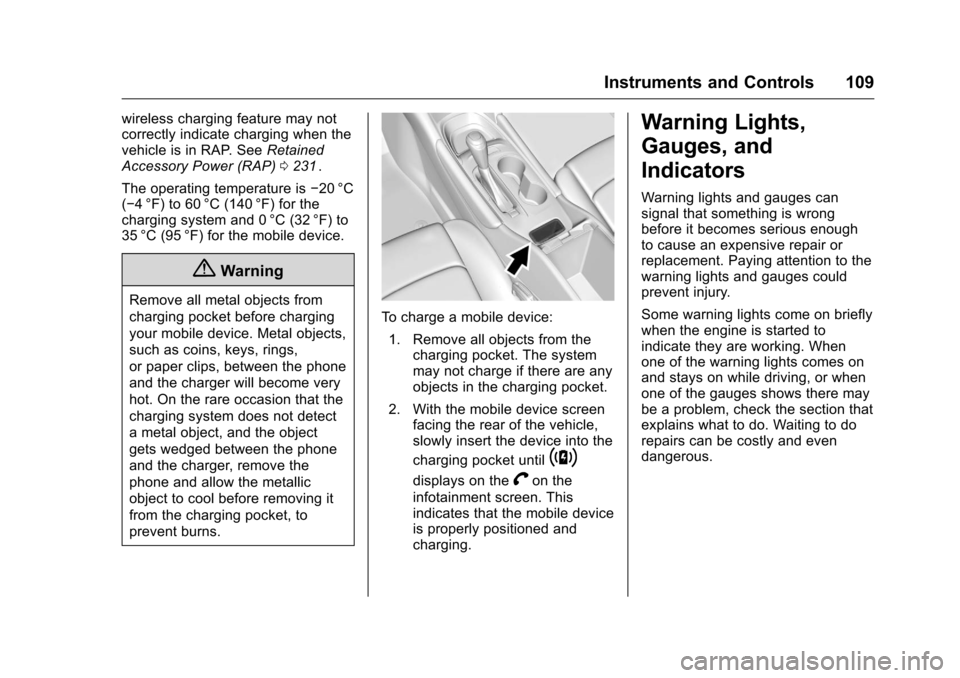
To charge a mobile device:
1. Remove all objects from the charging pocket. The system
may not charge if there are any
objects in the charging pocket.
2. With the mobile device screen facing the rear of the vehicle,
slowly insert the device into the
charging pocket until
~
displays on theVon the
infotainment screen. This
indicates that the mobile device
is properly positioned and
charging.
Warning Lights,
Gauges, and
Indicators
Warning lights and gauges can
signal that something is wrong
before it becomes serious enough
to cause an expensive repair or
replacement. Paying attention to the
warning lights and gauges could
prevent injury.
Some warning lights come on briefly
when the engine is started to
indicate they are working. When
one of the warning lights comes on
and stays on while driving, or when
one of the gauges shows there may
be a problem, check the section that
explains what to do. Waiting to do
repairs can be costly and even
dangerous.