CHEVROLET MONTE CARLO 1981 4.G User Guide
Manufacturer: CHEVROLET, Model Year: 1981, Model line: MONTE CARLO, Model: CHEVROLET MONTE CARLO 1981 4.GPages: 104, PDF Size: 23.92 MB
Page 11 of 104
Downloaded from www.Manualslib.com manuals search engine •
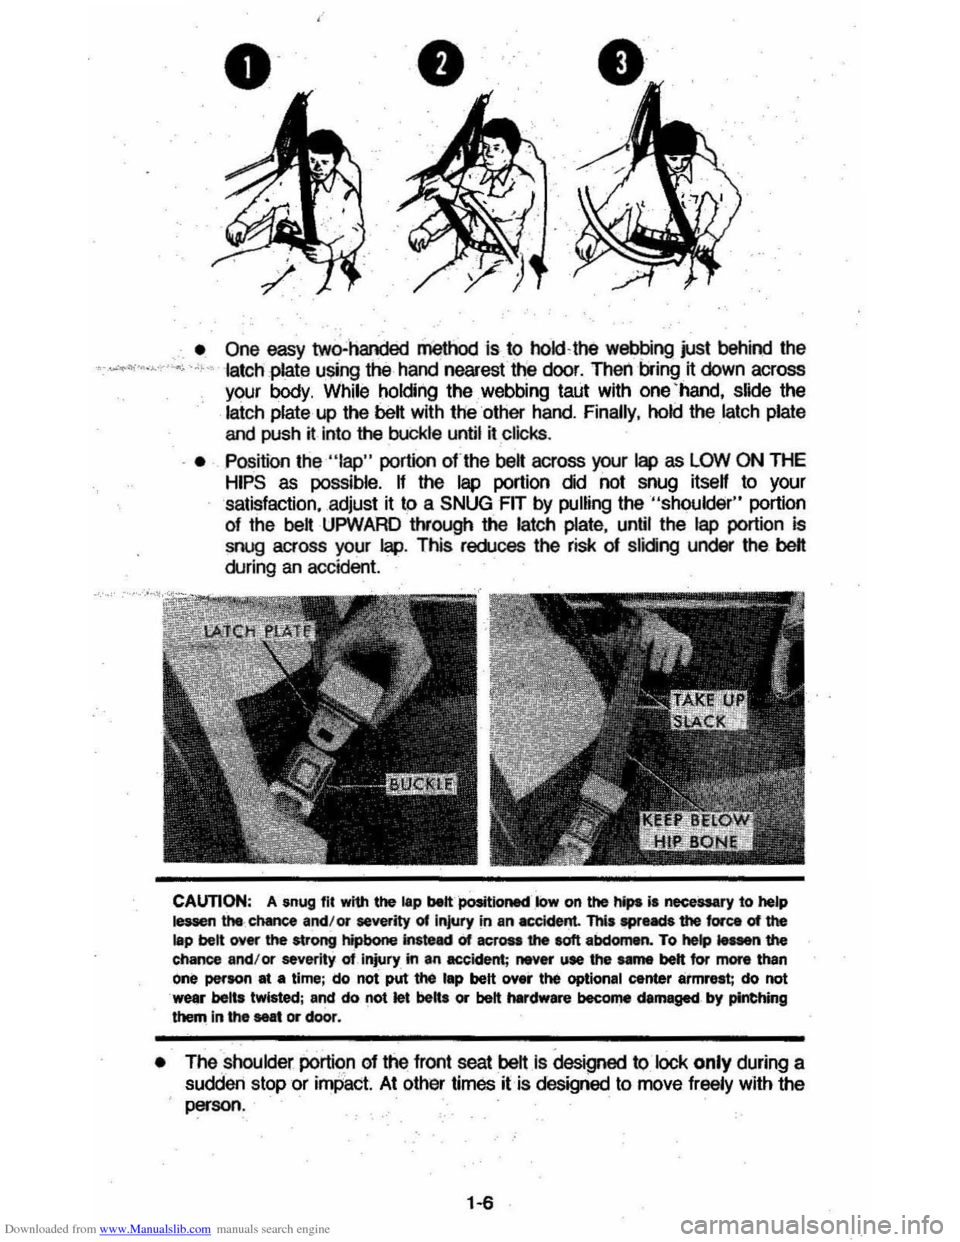
• One easy two'handed method is to hokUM webbing just behind the "",,'-",.,'-' latch plate using \he hand nearest the door. Theil bring it down across
your body. While
holding the webbing taut with one 'hand , slide the
latch plate up the beH with the other hand. Finally. hold the latch plate
and push
~ into \he buckle until ~ clicks .
• Position the "lap" portion ofthe belt across your lap as LOW ON THE HIPS as possible. If the lap portion did not snug itsen to your
satisfaction. adjust it
to a SNUG FIT by pulling the "shoulder " portion
of the beH UPWARD through the latch plate, until the lap portion is snug across your lap. This rewces the risk 01 slicing under the baH
during an accident.
CAUTION: A snug fll with the lap belt positioned low on the hips is neceSsary to help Iesaen tl'Ml· chMlce and /or severity 01 Injury in an .c:cktent. This •• acts the force 01 the lap bett oyer the strOO9 hipbone instead of acrou the 10ft .txtomen.. To he1p .....,. the chance and/or severity of injury in an accident ; never ute the ..".. belt for more than One per.an at • time; do not put the lap ben over the optional center armrest; do not wear belts twisted; and do not let ben. or belt hIIrdware become damaged by pinthing them in the seat or doOr.
• The shoulder porti
impact At other times ilis designed to move freely with the person .
1·6
Page 12 of 104
Downloaded from www.Manualslib.com manuals search engine ·'i.
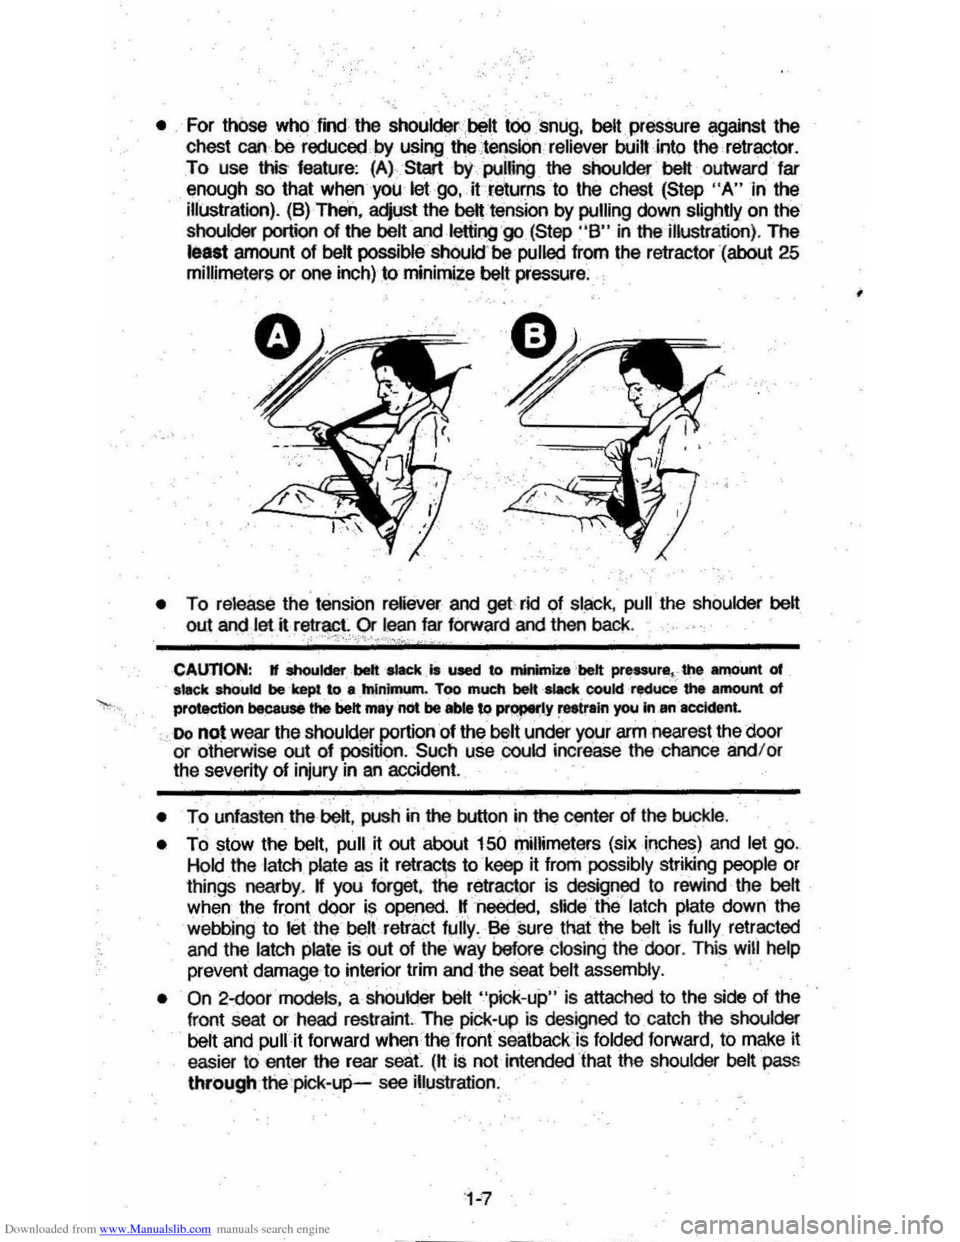
• For thOse who .find the shoulck!r ,belt tciQsnug, belt pressure against the
chest can , be reduced by using thetensiorl reliever built into the, retractor,
To use this' feature: (A) , Start bypulfing the shoulder belt outward far
enough so that when
yoU let go, it returns to the chEl$t (Step "A" in the illustration), (8) Then, adjust the belt tension by pulling down slightly on the
shoulder
portion of the belt and letiing'go (Step "8" in the illustration) , The
least amount of belt possible ShOuld be pulled from the retractor '(about 25
millimeters or one inch) to minimize belt pressure :
• To release the'tension reliever and get'rid of slack , pull the shoulder belt
out and let it retrl!Cl Or I,ean far forward and then bacK '. '·~·;.;·'i'·'""i''';'
CAUTION: If shoulder __ belt .sack_IS uRd to minimize 'belt pressure ,· the amount of steck shoukl be -kept to a tninknum . Too much belt -stack could reduce the amount of protection ~use the belt may not be able to prqpen.y ~tr.in you klan -accident.
"Do not wear the shoulder portion of the belt under your arm nearest the door or otherwise out of position, Such use could increase the chance andlor the severity of injury in an accident '
•
To unfasten the beIt,push in the button in the center of lhe buckle ,
•
To stow the belt, pull ,it out about 150 millimeters (six inches) and let go.
Hold the latch' plate as it retracts to keep it from' possibly striking people or
things nearby. K you forget , the retractor is designed to rewind, tl)e belt
when the front door
is, opened. ,Kneaded, slide, the ' latch plate down the
webbing to lei the belt retract fully. Be sure that the belt is fully retracted
and the latch
plate is out of lhe way batore closing the door. This will help
prevent damage to interior trim and the seat belt assemb ly. .
• On 2-door models , a shoulder belt "pick-up" is attached to the side of the
front seat or head
restraint The pick-up is designed to catch the shoulder
belt and pull it forward Whenthe 'f,ont seatbackis folded forward, to make it
easier ti:> enter the rear seat. (It is not intended 'ihat the shoulder belt pass
through the'pick-Uli-see illustration .
•
Page 13 of 104
Downloaded from www.Manualslib.com manuals search engine -_. .••.• ,-.1., ...... ,.,--.-
Restraint Of Pregnant Women
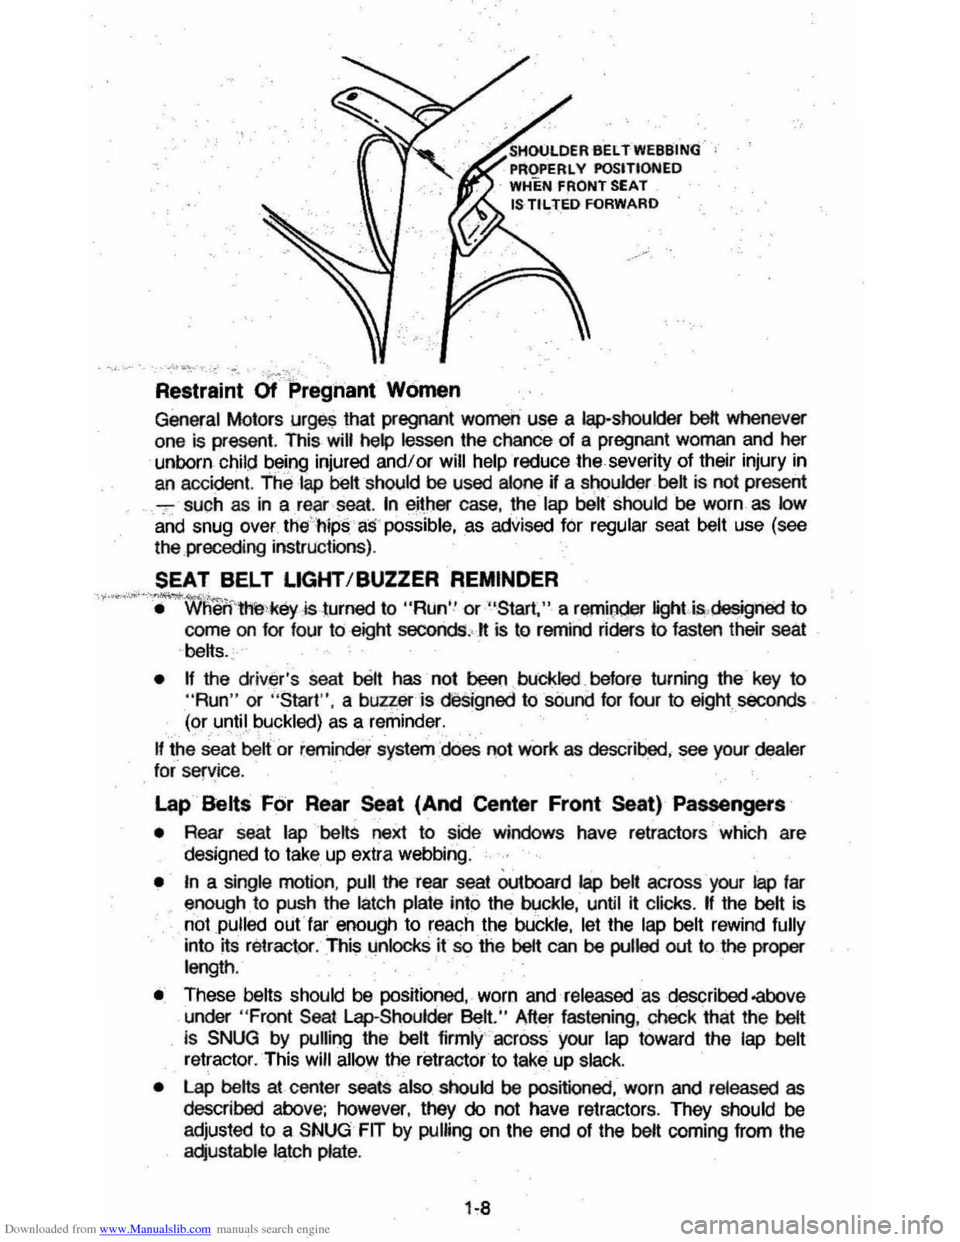
General Motors urges that pregnant women use a lap-shoulder belt whenever one is present. This will help lessen the chance of a pregnant woman and her
unborn
chil .d being injured andlor will help reduce the severity of their injury in an acc ident. The tap belt should be used alone if a shoulder ben is not present
7: such as in a rear ·seat. In eitlJer case, the lap belt should be worn as low and snug over th.(hips a! f possible , as advised for regular seat belt use (see
the .preced i
ng instructions) .
SEAT BELT LIGHT/BUZZER REMINDER
,.".,." ·;t "W h'eii '1hI>'key ·is .turned to "AUn" or "Start ," a remi!)der IightilLdesigned to
corne
on for four to eight secondS,." is to remind riders to fasten their seat
. belts.
•
If the driver's seat belt has not been buCkled. before turning the key to "Aun " or "Start ", a b uzzeri. diiSigned to sOund for four to eight seconds
(or
until buckled) as a reminder.
~ the seat belt or reminder system does not work as descri~. see your dealer
tor service.
Lap Belts For Rear Seat (And Center Front Seat) Passengers
• Aear seat lap belts next to side windows have retractors which are
designed to take . up extra webbing.
• In a single motion, pull the rear seat outboard lap ben across your lap lar enough to push the latch plate Into the buckle, until it clicks . If the belt is
not
pulled outter enough to reach the buckle , let the lap belt rewind fully
into its retractor . This .unlocks it so the belt can be pulled out to the proper
length .
• These belts should be positioned , worn and released as described -above under "Front Seal LapoShouider Belt ." After fastening , check that the belt
is
SNUG by pulling the belt firmly across your lap toward the lap belt retractor . This will allow the retractor to take up slack.
• Lap belts at center seats also should be positioned, worn and released as described above : however, they do not have retractors . They should be
adjusted to a SNUG FIT by pulling on the end of the belt coming from the
adjustable latch plate.
Page 14 of 104
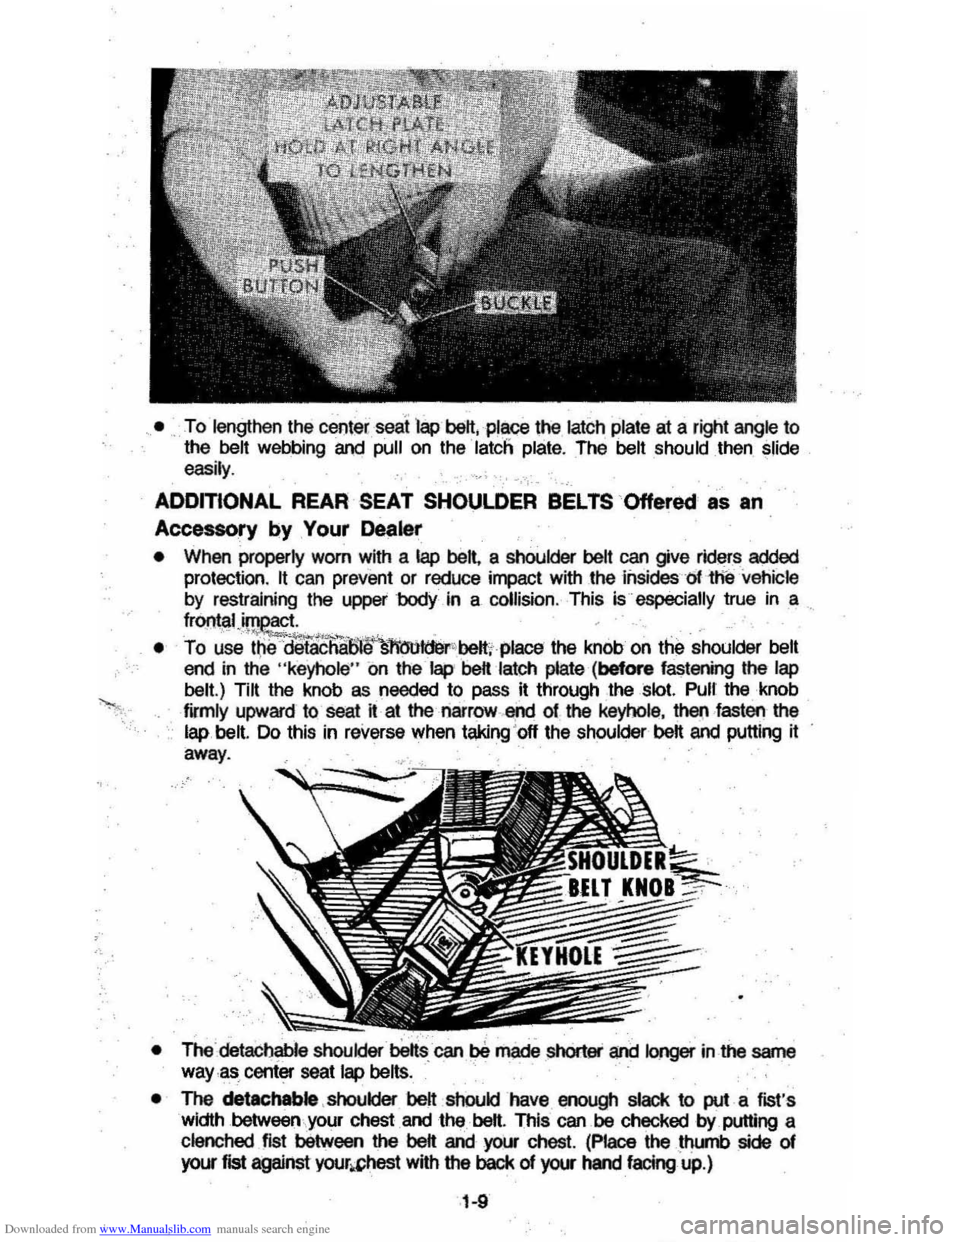
Downloaded from www.Manualslib.com manuals search engine • To lengthen the center seai lap bett,place the latch plate at a right angle to
the belt webbing and pull on the latcn plate. The belt should then slide
easily .
...,
ADDITIONAL REAR SEAT SHOULDER BELTS Offered as an
Accessory by ,Your Dealer
• When properly worn with a lap bett, a shoulder belt can give riders added protection . It can prevent or reduce impact with the iilsidesof the vehicle
by restraining the upper 'body in a collision. This is especially true in a
frO!ltal'~';".,'k '~ " ','" ' , • , ' "
• To use t~e detach8lJ1lf~Ider'belt .. place the knob on the shoulder belt end in the "keyhole " On the lap' belt latch plate (before fastening the lap
belt.)
Tilt the knob as needed to pass it through the Slot. Pull the, knob
firmly upward to seat n at theoarrow· EI/ld of the keyhole , thet;l·fasten the lap ,belt. Do this in reverse when taking'off the shoulder bett and putting it .
away.
• The 'detachable shouidElI'bilfts,can way ,as center seat lap belts.
•
The de1achable , shoulder belt should have enough slack to put a fist's
width between your chest ,and the, bett . This can be checked by putting a clenched fist between the bett and your chest. (Place the thumb side of
your fist against your.&hest with the back of your hand facingu·p.)
, 1-9
Page 15 of 104
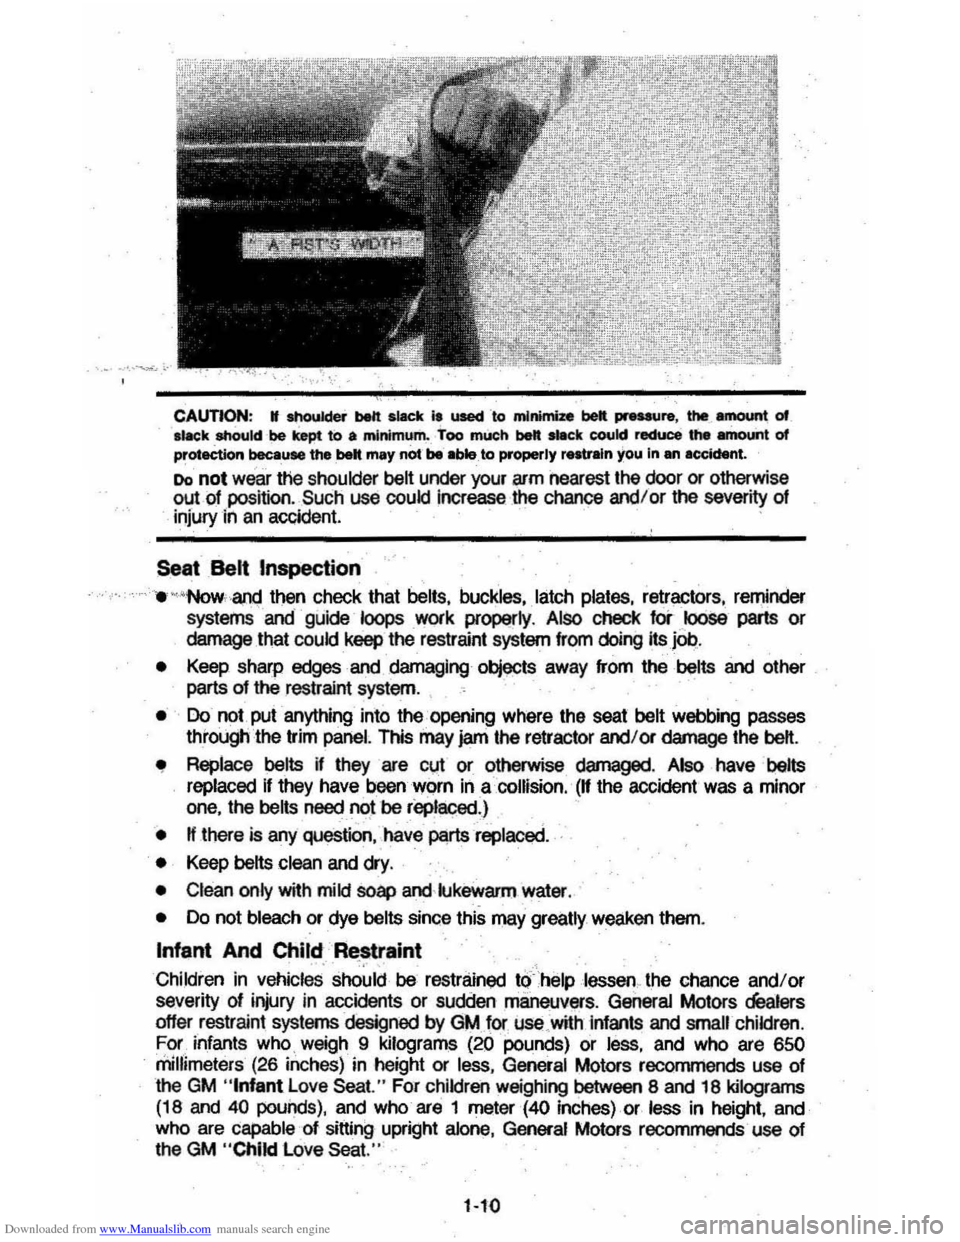
Downloaded from www.Manualslib.com manuals search engine CAUTION: • shoulder belt slack ia used to minimize belt pJeUUre , the amount of alack ShoUld be kept to • minimum. Too much bel slack could reduce the .mount of protection becaUN thebe" may not be able to properly restrain you in an accident.
Do not wear the shoulder belt under your arm nearest the door or otherwise out of position. Such use could Increase the chance and/or the seventy of
injury in an accident. .
Seat Belt Inspection
• "Now.anQ then check that belts, buckles, latch plates, retractors, reminder
systems and guide loOps work properly . AlsO check foCloose parts or
damage that could keep the restraint system from doing its joI:!.
• Keep sharp edges and damaging objects away from the belts and other parts of the restraint system. .
• Do not. put anything into the, opening where the seat belt webbing passes through the trim panel. This may jam the retractor and/or demege the belt.
• Replace belts if they are cut or otherwise damaged. Also have belts
replaced if they have . been worn in a collision. (W the accident was a minor
one, the belts need no) be replaced .)
• W there is any question, have p!!rtsreplaced.
•
Keep belts clean and dry.
• Clean only with mild soap and·lUkewarm water.
• Do not bleach or dye belts since this maY greatly weaken them.
Infant And Child Restraint
Chi.ldren in vehicles should be restrained tc)helpl!lSSen .. the chance and/or
severity of injury in accidents or sudden maneuvers. General Motors dealers
offer restraint systems designed by G~for use.with infants and small children. For. infants who. weigh 9 kilograms (20 pounds) or less. and who are 650
millimeters
(26 inches) in height or less. General Motors recommends use of the GM "Infant Love Seat. " For children weighing between 8 and 18 kilograms
(18 and
40 pounds), and who are 1 meter (40 inches) or less in height, and
who are capable of
sitting upright alone, General Motors recommends use of
the GM "Child Love Seat. "
1-10
Page 16 of 104
Downloaded from www.Manualslib.com manuals search engine The GM Child Love Seat is not recommended for use in the center front
seating position of this vehicle because it may Interfere with quick access
to all front seat belt buckles in an emergency.
To make it easier
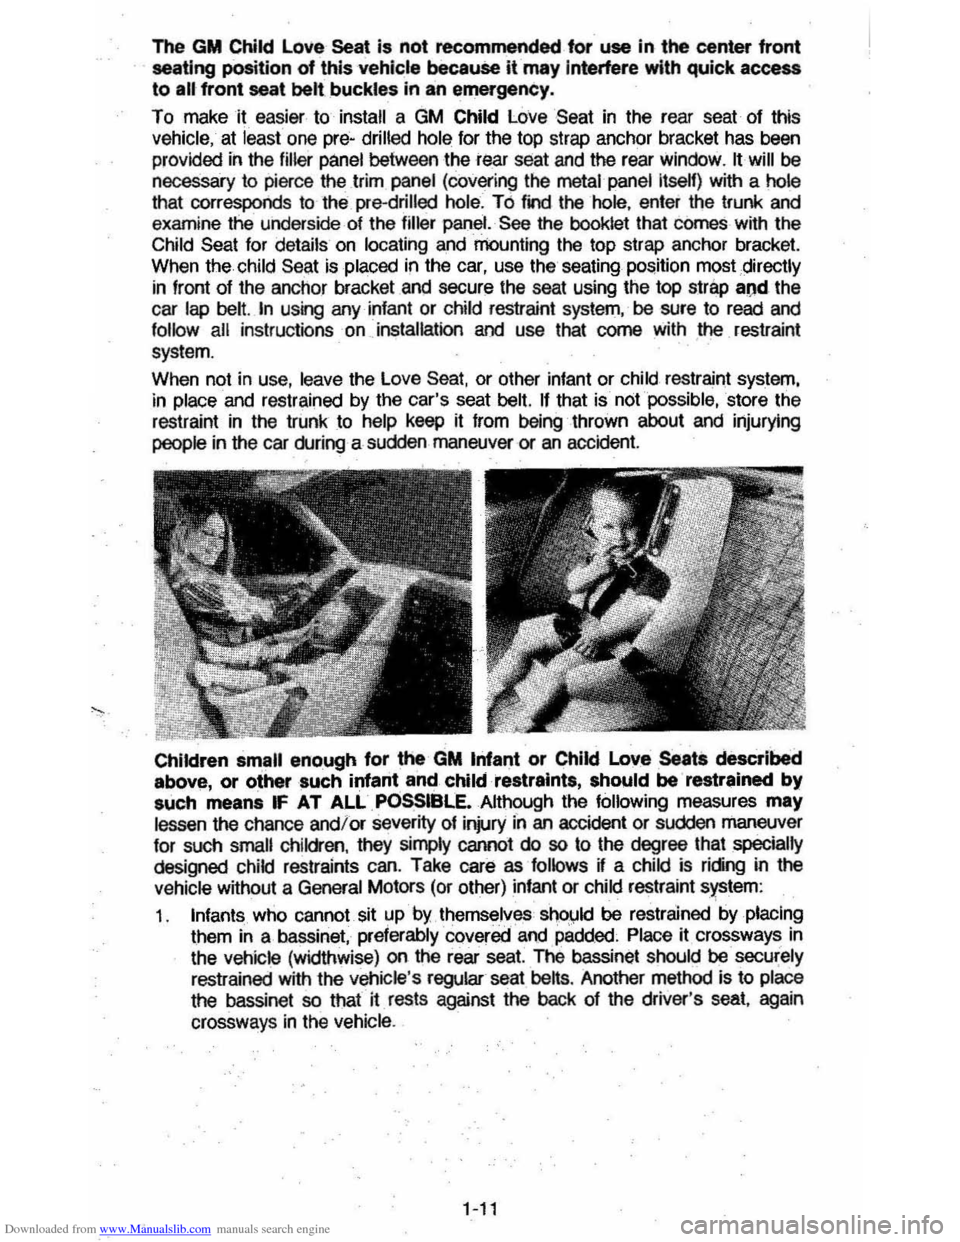
to install a GM Child Love Seat in the rear seat of this
vehicle, at least one pre- drilled hole for the top strap anchor bracket has been
provided in the filler
panel between the rear seat and the rear window . It will be
necessary to pierce the trim panel (covering the metal panel Itself) with a hole
that corresponds
to the pre-drilled hole. T 6 find the hole, enter the trunk and
examine the underside of the filler panel. See the booklet that comes with the
Child
Seat for details on locating and mounting the top strap anchor bracket.
When the child
Seat is placed in the car, use the seating position most directly
in front of the anchor bracket and secure the seat using the top strap and the
car lap belt. In using any infant or child restraint system, be sure to read and
follow all instructionsoninstatlatlon and use that come with .the restraint
system.
When not in
use, leave the Love Seat, or other infant or child restraint system,
in place
and restrained by the car's seat belt. If that is not possible, store the
restraint in the trunk to help keep it from being thrown about and injurying
people in the car during a suddlen maneuver or an accident.
Children
small enough for the GM Infant or Child love . Seats described
above, or other such infant and child restraints, should be restrained by
such means IF AT ALL POSSIBLE. Although the following measures may
lessen the chance
andlor severity of injury fn an accident or suddlen maneuver
for such
small children , they simply cannot do SO to the dlegree that specially designed child restraints can. Take care as follows ~ a child is ricing in the
vehicle without a General Motors
(or other) infant or child restraint system:
1 . Infants who cannot sit
up· by . themselves should be restrained by placing
them in
a· bassinet, preferably cQvered and padded. Place it crossways in
the vehicle (widthwise) on the rear seat.
The bassinet should be securely
restrained with the vehicle 's regular seat belts. Another method is to place
the bassinet
so that iI rests against the back of the driver 's seat. again
crossways
in the vehicle .
1-11
Page 17 of 104
Downloaded from www.Manualslib.com manuals search engine 2, Never leta child stand ,or kneel on any seat Children who can sit up by
themselves should
be placed on a sealand restrained with the seat belts
provided, When children ride in a rear seat, .they should be restrained with
a lap
belt, When child(en ride in the front seat, they should wear both lap
and shoulder belt If the .shoulder beH irritates the neck or face due to .the child's size, this may be r.educed by placing the child closer to the center
of the
vehicle , If irritalior Is not reduced, place the child in the rear seat
3, General Motors ~iseS that childr"", be restrained properly when riding ,
However. unusual cond~ions may prevent use of restraints. and require
that a small child
stand, If that ~s.lhe'Child should stand on the floor , behind the'driver's seat This will help reduce the chance and/or \he
severity of injury in case of a frontal collision, --'-'-'''"''''''''i''':>' ~7','" ,,.' ;.,,~"".'. _ .. .. ,
TRAILER TOWING
This car is designed and intended to be used mainly to carry people, Towing a
trailer will affect handling , durability and economy , Your safety and satisfaction
depend :,upoQ proper use of correct llqUipmenl. Also , you should avoiq
overloads
and other abusive use,
' The '
!1'lIiximum 1000000trailet: weight youe;mpull with your vehicle depends ,on what special equipffienrfi'as been installed on il,. We do not recommend towing
any
trailer more than 450 kilograms (1.000 pounds) gross trailer weight unless your vehicle has the required 'equipment
.. .... ~ ' °' -"""''1111'''.''-'' .. J~._ .. _ '."'-:,_, :" .,', .... ,,', , ,'" :', : ' . .. ....... :.' .... " ..... : .. , :"',' "'." ,: ",' ,i,.:." .... __ .. -:,:· .. ,,' .. _." . .'~:.,:;.,~')ff';:.' CAUTION: Do not .. try to tow .. • nv:,,. tr-I.-'r ,mqrtt:,_lt)arr ' 2 '2., Idfogranl( (5,000 Pounds) WPU trliler,we~t IlC) 'In.tter what trailer toWing -'equiprrient is instelled. Trai" over iMM maximum-~_iir:nlt.,-c:OuId teriously affect ~ __ vehk:"'. pertormence ; -_durability and
handling, ~_~kf l'esuh. in personal i~~;_-_, ;""_~ ':~.,,:.:.
Information ,on trailer towing ability, speciateq(Jipn1ent required, and optional
equipment available should.be obtained from your dealer . Ask for the trailering
~rocliure, Or, write: Consum~r Helations Department Chevrolet Motor Divfsion,
Warren , Michigan 48090. (In Canada, write to General Motors of Canada
limited , Customer Services Department, Oshilwa , Ontario L IJ 5Z6),
Tires
When towing trailers be sure your tires areprope,ly inflated'to 'the inflation
,
pressure shown 'on the .. Tire Placard on \he driver's door , The allowable
passenger . and cargo load for this vehicle, also.shown on the Tire Placard , is
reduced by the traiter tongue weight whenever . the trailer is attached to the
'v~hicle, See "Service arid Maintenance," Section 5, for more tire informatlon ,
Maintenance
More' frequent service is required when using your vehicle to pull a traileL See
Section A of the Maintenance Schedule folder for Automatic Transmission Fluid , Engine Oil, and Hear Axle Ltibricantchange requirements for. trailering ,
Now and \hen, check that all trailer hitch bolts and nuts are tight Also see the
Maintenance Schedule
foider, and the Index in this manual, for important facts
on belts, cooling system care and brake adjustment.
1-12
Page 18 of 104
Downloaded from www.Manualslib.com manuals search engine Break·ln Schedule
See the new vehicle break-in instructions in this manual. Also, we
recommended you drive your new vehicle for 500 miles (600 kilometers) before
trailer towing . AI the end of this 500 mile (600 kilometer) break-in period, avoid
speeds over 50 mph (80 km/h) and full throttle starts during the first 500 miles (800 kilometers) of trailer towing.
CAUTIONS:
BRAKES-To help avoid personal injury due 10 poor braking action:
• Trailer brakes of adequate size are required on Irailers more Ihan 450 kilograms (1,000 pounds) loaded weight.
• If you use trailer brakes with this vehicle , follow the installation and balance
instructions of the trailer brake maker.
• Do not tap into the vehicle's brake system tl the trailer brake system uses
more than 0.3 cubic centimeter (0.02 cubic inch) of fluid from the vehitle's
master cylinder. In this case, the vehicle brake fluid capacity will not be enough to operate both the vehicle and trailer brakes under all kinds of
use.
• All brake fluid parts must be able to stand 20 650 kPa (3,000 psi) .. The
brake fluid tap must be made to the master cylinder port supplying fluid to
the rear brakes. Copper tubing is subject to fatigue failure and must not be
used.
• Before going down a steep or long grade, reduce speed. and shiftlhe transmission into a lower gear 10 help control too' long or too often . This
could cause
Ihe brakes 10 overheal and reduce brake ef\ectiveness. .
HITCHES2T6 HeIP'avoid pe,sona/ ,jQiYry.Que 10 sway caused by such things as
crosswinds , big trucks passing or roact roughness, or due to separalion of the
trailer :
• A properly installed and adjusted (1) frame mounted, weight-distributing
hitch and (2) sway control with enough capacity are required for trailers
more than 900 kilograms
(2,000 pounds) loaded weight.
• If your vehicle has air shocks, keep them at a minimum pressure of 70 to 105 kPa (10 to 15 psi) when installing, adjusting or towing with a weight
distributing hitch.
• Keep the trailer tongue load at 10"10 of the loaded trailer \'feight for dead
weight hitches, and 12"10 for weight-distribuling hitches. Tongue loads can be adjusted by proper distribution of the load in the trailer. This can be
checked by
weighjng separately the loaded trailer and then the tongue .
• Do not use axle-mounted hitches. They can damage the axle hOuSing, wheel bearings, wheels or lires.
•
When you remove a trailer hitch, be sure to seal any mounting holes in the
bocjy. This will help prevent entry of exhaust fumes, dirt or water. (See
"Engine Exhaust Gas Caution (Carbon Monoxide)" at the beginning of "Starting and Operating," Section 2 of this manual.)
1-13
Page 19 of 104
Downloaded from www.Manualslib.com manuals search engine NOT1C~: Uoeonty ~ ...... hhches ....... pomiIt ' nonnoI ..,o,otlon' ..... Energy Ab8Orb4ng Bumper system, if to equipped~-For ex..".,.., • rigid fore 8nd 1ft conMction between the bumper and any other pwt Of-the c. mIIy Inc,. ... dMnege Nl the event gf I colli.lon.
TRAILER TOWING TIPS
, Getti"9
Started
Before entering traffic w~h a traile, that has electric brakes, start the vehicle
and trailer moving and apply the traile' brakes by hand to be sure the trailer brakes ' are working and the trailer eleCtrical syStem is connected ,
".d~,~!!.~!.~~,CooUng If your engine overheats "foliowthe steps under, "Engine Cooling System" in
"InCase of Emergency," Section 3 01 this manual.
Long Uphill Grades
When goingup,long grades ; you can reduce the chance of engine overheating
by dOwnshifting the transinission to a
Jower'gear range and reducing speeds to
'" '4S mph (70 km /h) or below . '. " " ,-,-."." .. ,. '
Transmission
See the method for checking the transmission fluid level in "Service and
"'~!!illl£<;': Section S of thismanuaJ.
Parking
You should not park vehicles with trailers on a grade (hill); However, If
you must park on a 'grade, these ste,PS }l1ust be fallowed:
1. Apply theregular .brakes . ,'\' y .
2, . Have someone place wheel chocks under the trailer wheels .
3. When the wheel cho cks are in place, release the regular brakes until, the
c hocks absorb the load. .
4 . Apply
the parking brake.
S . Shift the transmission to
"P"(l'ark) .
If the veh icle is parked on a .gr ad e, don 't Shift the transmission to "P "(Park )
until
the trailer wheels are chocked and tOO parking brake is set If you dO, the weight of the vehicle and trailer may put'somuch force on the parking pawl in
the transmission that it·may be hard to Shift out of "P "(Park) .
When' s tarting, after being parked On a grade :
L Apply the regular brakes and hold.
2. Start ,the engine in , "P"( Park) .
.
3 . '. Shift into gear and releas .e the parking brake ..
4. Release the regular brakes and drive until the chocks are free .
S .
Apply the regular brakes and haveanoti1er person remOve the chocks.
1-14
Page 20 of 104
Downloaded from www.Manualslib.com manuals search engine SECTION 2
STARTING AND OPERATING
ENGINE EXHAUST GAS CAUTION
(CARBON MONOXIDE)
Do not breathe exhaust gas because it contains carbon monoxide, which by
itself has no color or odor. Carbon monoxide is a dangerous gas. It can cause
unconsciousness and can be lethal.
If
at any time you think exhaust fumes are entering the vehicle, have the cause
determined and corrected
assdon.as possible. If you must drive under. lhese conditions , drive only wilh All windows fully OPEN .
To allow proper operation of your vehicle's ventilation system, keep the.air inlet grille in front of the windShield clear of snow, leaves or other obstructions at all
times.
Protect against carbon monoxide entry into the vehicle body . The best way is to keep the engine exhaust system, vehicle body and body ventilation system
properly maintained. We recommend that the exhaust system and body be inspected by a competent lechniclan :
•
each time the vehicle is raised for an oil change;
• whenever a change is noticed in the sound of the exhaust system;
• whenever the exhaust system, underbody or rear of the vehicle is damaged or. becomes corroded .
See your Miiintenance Schedule folder for parts recuiring inspection.
To allow proper operation of your vehicle's ventilation system, keep the air inlet
grille
in front of the windshi~1d clear of snow, leaves or other obstructions at all
times.
Do not perk or idle this vehicle for more than 10 minutes with the ventilation
system control switch in the "off" position while the engine is running . Even
with
the ventilation system on, running the engine while parked is not recommended . Entry of carbon monoxide into the vehicle body is possible with
a
poorly repaired , damaged, or corroded exhaust system or body.
Do
not run the. engine in CONFINED areas (such as garages or next to a
building) any more than needed to move the vehicle . When Ih.e vehicle has to be stopped in an UNCONFINED area with the engine running for any more
than a few minutes, take the following stepa :
A. Adjust the heating
or cooling ' system to force outside air into the vehicle as
follows:
1. On vehicles not ecuipped wijh air condijioning, set the fan to medium or high speed and the upper control lever to any position except
"Off."
2. On vehicles ecuipped with air conditioning , set the fan to medium or
high speed and the upper control lever to any position except "Off" or
"Max., "
B . Keep the exhaust tailpipe area clear 01 snow and other material to help
reduce the
buildup 01 exhaust gases under the vehicle.