change time CHEVROLET MONTE CARLO 1981 4.G Owners Manual
[x] Cancel search | Manufacturer: CHEVROLET, Model Year: 1981, Model line: MONTE CARLO, Model: CHEVROLET MONTE CARLO 1981 4.GPages: 104, PDF Size: 23.92 MB
Page 4 of 104
Downloaded from www.Manualslib.com manuals search engine 1981 MONTE CARLO
OWNER'S MANUAL
THIS MANUAL SHOULD BE CONSIDERED A PERMANENT PART OF THIS CAR. IT
SHOULD STAY WITH THE CAR WHEN SOLD, TO PROVIDE THE NEXT OWNER WITH IMPORTANT OPERATING, SAFETY, AND MAINTENANCE INFORMATION.
CHEVROLET MOTOR DIVISION
GENERAL MOTORS CORPORATION 30007 VAN DYKE WARREN, MICHIGAN 48090
All information, illustrations and specifications in this manual are based on the latest product information available at the time of printing. The fight isresefVedto 'make changes at any time without notice.
For cars sold in Canada, substitute the name General Motors of Canada Limited wherever the nameChevro/et Motor Division appears in this manual.
Table of Contents
Section
1 Before Driving Your Monte Carlo.
2 Starting and Operatin.~.
Steering Column Controls
Floor Controls
Instrument PaneL.
Other Controls and Features.
3 In Case 01 Emergency .~
4 Appearance Care
5 Service and Maintenance.
6 Owner Assistance.
Page
'·f
2·'
.. 2·6
.... 2·13
2-16
. 2-30
4·'
5·'
6·'
7 Specifications,·Service Manoals; Index, Service Station Information. . .............................• ·7·1
CHEVROLET MOTOR DIVISION
FOR CONTINUING SATISFACTION, KEEP YOUR GM CAR ALL GM. GENERAL MOTORS PARTS ARE IDENTIFIED BY ONE OF THESE
TRADEMARKS:
lSJ~~ ,~"_~~'~M"~~
Page 20 of 104
Downloaded from www.Manualslib.com manuals search engine SECTION 2
STARTING AND OPERATING
ENGINE EXHAUST GAS CAUTION
(CARBON MONOXIDE)
Do not breathe exhaust gas because it contains carbon monoxide, which by
itself has no color or odor. Carbon monoxide is a dangerous gas. It can cause
unconsciousness and can be lethal.
If
at any time you think exhaust fumes are entering the vehicle, have the cause
determined and corrected
assdon.as possible. If you must drive under. lhese conditions , drive only wilh All windows fully OPEN .
To allow proper operation of your vehicle's ventilation system, keep the.air inlet grille in front of the windShield clear of snow, leaves or other obstructions at all
times.
Protect against carbon monoxide entry into the vehicle body . The best way is to keep the engine exhaust system, vehicle body and body ventilation system
properly maintained. We recommend that the exhaust system and body be inspected by a competent lechniclan :
•
each time the vehicle is raised for an oil change;
• whenever a change is noticed in the sound of the exhaust system;
• whenever the exhaust system, underbody or rear of the vehicle is damaged or. becomes corroded .
See your Miiintenance Schedule folder for parts recuiring inspection.
To allow proper operation of your vehicle's ventilation system, keep the air inlet
grille
in front of the windshi~1d clear of snow, leaves or other obstructions at all
times.
Do not perk or idle this vehicle for more than 10 minutes with the ventilation
system control switch in the "off" position while the engine is running . Even
with
the ventilation system on, running the engine while parked is not recommended . Entry of carbon monoxide into the vehicle body is possible with
a
poorly repaired , damaged, or corroded exhaust system or body.
Do
not run the. engine in CONFINED areas (such as garages or next to a
building) any more than needed to move the vehicle . When Ih.e vehicle has to be stopped in an UNCONFINED area with the engine running for any more
than a few minutes, take the following stepa :
A. Adjust the heating
or cooling ' system to force outside air into the vehicle as
follows:
1. On vehicles not ecuipped wijh air condijioning, set the fan to medium or high speed and the upper control lever to any position except
"Off."
2. On vehicles ecuipped with air conditioning , set the fan to medium or
high speed and the upper control lever to any position except "Off" or
"Max., "
B . Keep the exhaust tailpipe area clear 01 snow and other material to help
reduce the
buildup 01 exhaust gases under the vehicle.
Page 30 of 104
Downloaded from www.Manualslib.com manuals search engine • Opet'ating the transmission at 'Of 'near,"st8Jlcondition" lor more than 1 0
secorlds at a time, ("Stall condition" is wfj~~ t~e engine is running at ,high
speed while the transmission is in a driving range arid the drive wtieels
aren't moving, such as when stuck in deep sand or whe(l the vehicle is
against a fixed barrier.) ,
•
Holding vehicle on an upgrede with the acCelerator pedal. (\Jse the regular
brakes to hold vehicle on an uphill grade.)
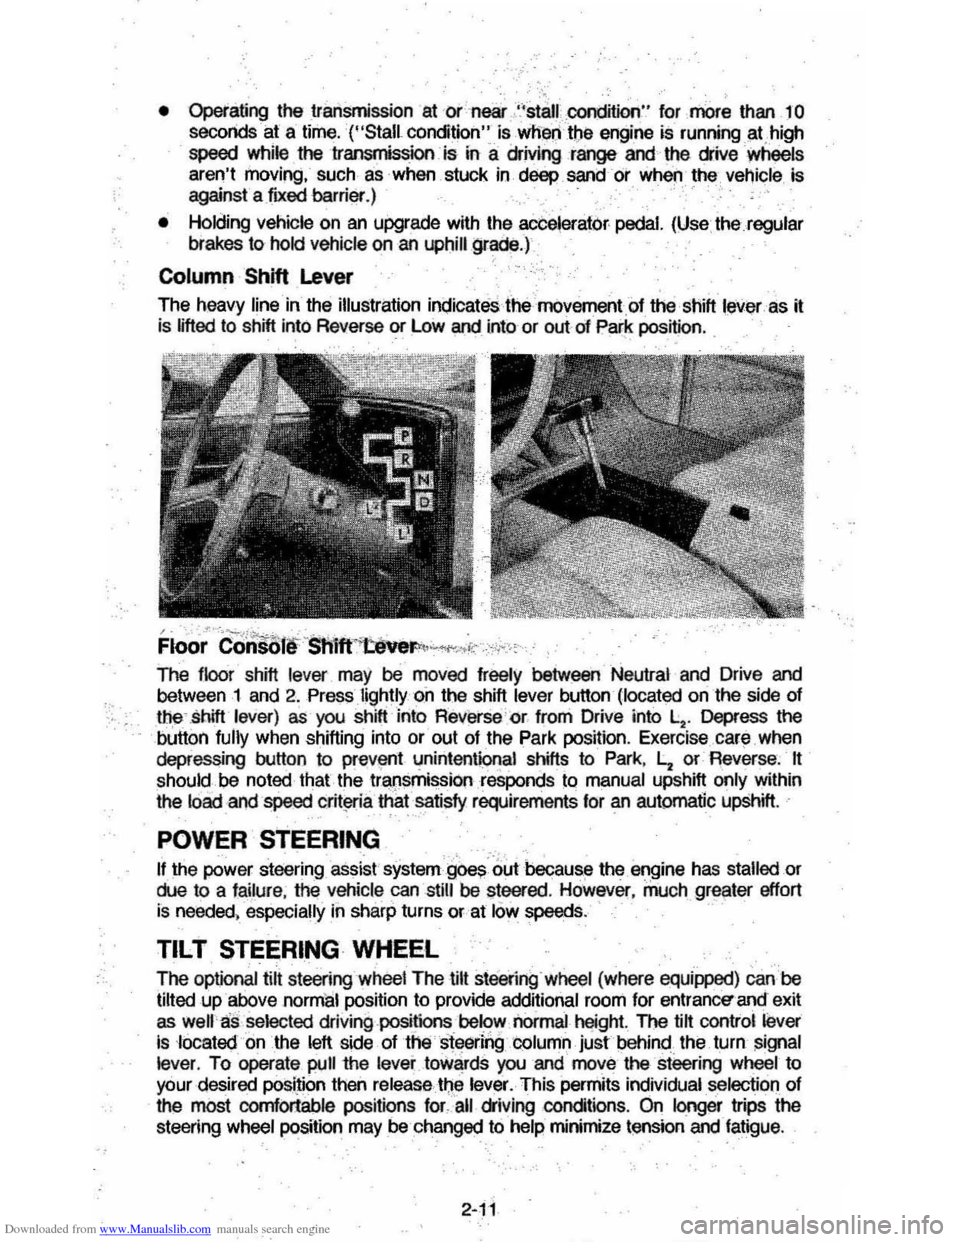
Column Shift Lever
The heavy line in the illustration indicatesihe movementol the shift lever as it
is lifted to shift into Reverse Of Low arid into or out 01 Park position . ,
~ ---. .,.-'.' . ...,..~;~.. .. .. -- -' -, .-,--. Floor ConsOliFSI\1ff~"~,,(C'·,':"
The floor shift lever may be moved freely between Neutral and Drive arid between 1 and 2. Press lightly oil the shift lever button (located on the side 01
'. ttie-shift lever) as you shift into ReviJ(se ' or from Drive into ~, Depress the
button fully when shifting into or out 01 the Park position . ExerCise ,care when
depressing button to
prev,!"'t unintenti
the
load ,arid speed criteria that satisfy requirements lor an autDmatic upshift, ~ -. - -.
POWER STEERING
II the power steering assist' system goes'''' ut beeaus .e the engine has stalled or due to a lailure , the vehicle can ,still be steered . However , much greater eitort
is needed , especially in sharp turns or at
low speeds . '
TILT STEERING WHEEL
The optional tilt steering wheel The tilt steering wheel (where equipped) can be
tilted up above
normal position to provide edditional room lor entrance' and exit
as
well'ss . selected driving ,positions bei<>w ilormalheight. The ti~ control lever is located on the left side 01 the steering.'column just behind . the turn signal
lever . To operate pull
the lever tow'¥ds you and move the steering wheel to
your desired
pos!~on then releaSe!?e lever. This permits individual seleclion 01 the most comfortable positionS lor. all driving conditions , On longer trips the
steering wheel position may be changed to help minimize tension
and latigue.
2-11
. ------ ,------
Page 33 of 104
Downloaded from www.Manualslib.com manuals search engine • without power assist. the vehicle cah stiR be 'St0ppe9 by pushing mUch harl'ler on the brake pedai.' However. the' stopping distance may be lOnger.
even though the brakes. themselves remain fully operational.
Self-Adjusting Brakes
• The brakes on this vehicle (excePt fO( the parking brake) areseli-adjusting .
They have been designed so that periodic brake adjustment is not required :
• The drum brakes.llIIj~st thelliselves when the brakes are firmly applied
while the vehicle is rIlClving backwardS . .. ..
• The disC brakes adi\lSt th!!rI'Jselves each time the'brakes are used ..
• iflhe brake pedal goes down· farther tI'",n normal. it ~y be due to a lack of adjustment. To find · out if this istheclISe •. p rive backward and forward a
few times •.. app/ying the brakes firmly wheri going each direction .
~'''''''':~-,;---.. '-:.,;r!.i-- ....... ""'~.-_ , : . __ '._ -• _ • . -• • • See your ~ealer If pepalhelghtdoes not return to normal. O(Ii there Isa rapid increase in pedartravel. This could be a sign of other brake trouble.
~. Also .eEl your dealer if the parking brake needs adjustment. .
NOTICE; "Rloirog lhe rio" by resting .y.,;., t_ on .h,;. tir ... podol when you do not intend to tWake:ciiri CauM overheated br.kes. This can we., out the brake linings fnter anci damage the brakes thamsetvas, .s w.lla.~ast."f~1. .
HEADLIGHT BEAM . CHANGER
The headlight beam charlger that controls the. head'ght high/low beam is built
into the turn signal lever. See "Turn Signal an(j Headlight , Beam Lever" in the
-'''''~''1li'OOm'l!r601umnGqpt''lls'' Section 2 of this manu~I.._ .
PARKING BRAKE
• To setthepat\(mgbrake. fully depresstheioot pedalat th~ far left side
• For better holding power.first,press&ow";'~eregular·brake pedal with your
right foot; Then
hold it wliile setting tile parking brake w'fh your leltfoot.
•
To ' releasethe parking brake. Wi' ·the "Brake Release " handle located at
the lower I.eftside of. the . instrument panel.
•
To help remind YOIJ; the brake sYStem warning light is designed to stay on
if the parking brake control is noi '\ullyreleased and the igilition key is On.
• Nev';; drive the vehicle wtlh ih~' ~I
2-14
Page 40 of 104
Downloaded from www.Manualslib.com manuals search engine The Mist feature, intended to remove incidental windshield spray such as from."
passing vehicles is activated by moving the control knob to the extreme left ,
and holding it in this posnion. The wipers will continue to operate until tile
control knob is released and allowed to return to the OFF position . .
The washer system is operated by depressing the control knob for one or two
seconds in any position.
In the OFF position the wipers will oper,ate 3 to 5
times and then stop .
Ught Switch
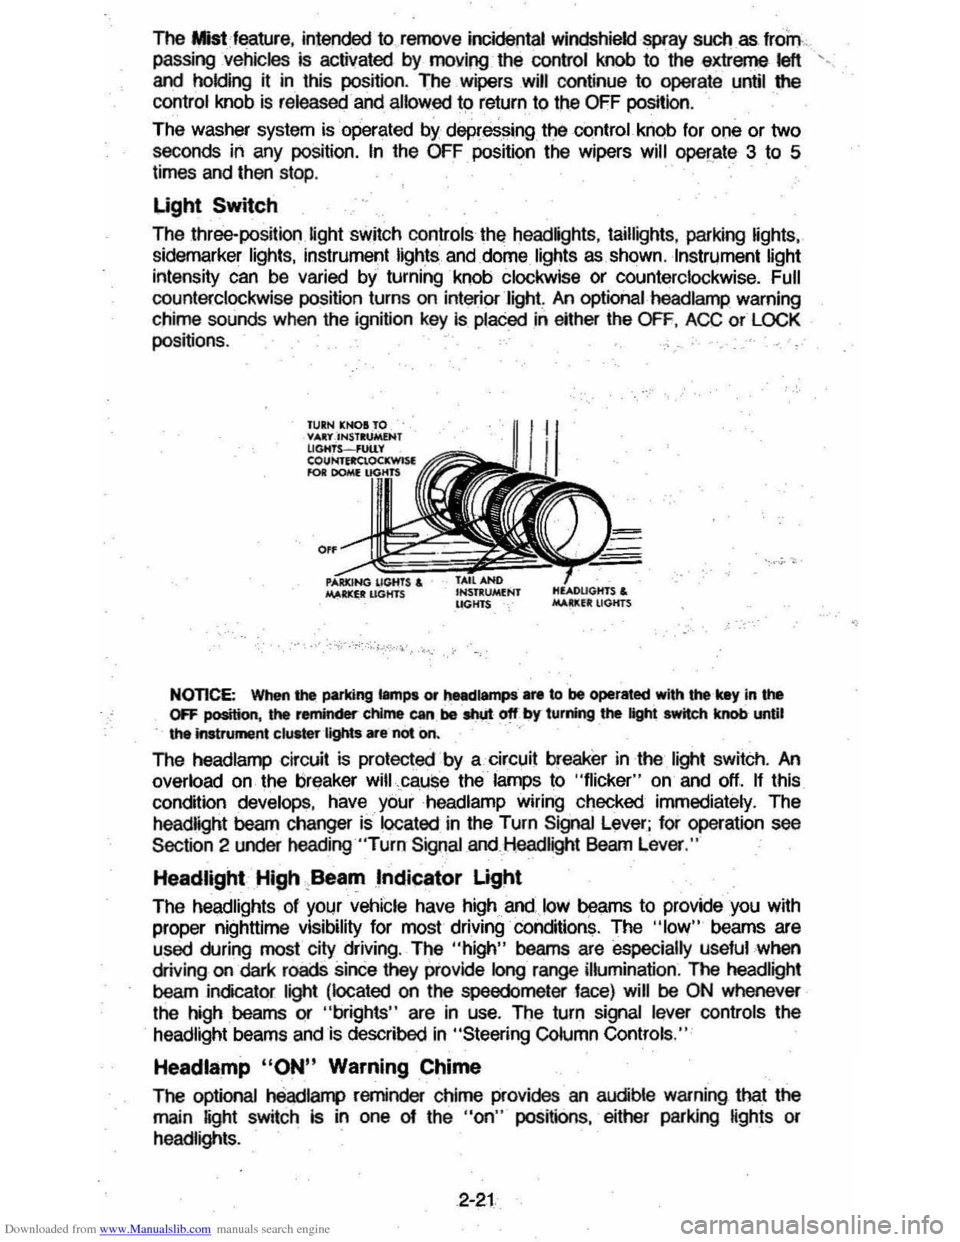
The three-position light switch controls the headlights, taillights, parking ~ghts, sidemarker lights, instrument lights. and dome lights as shown. Instrument light
intensity can
be varied by turning knob clockwise or counterclockwise. Full
counterclockwise position turns on interior light An optional head lamp warning
chime sounds when the ignition key is. placed in either the OFF, ACC or LOCK
positions. , ....
. ,-"",,.
NOTICE: When the parking lamps or t)Hd1ampS .... to be operated with the key in the OFF position, the reminder-chime can be shUt-Of' by turning the light switch knob until the instrument elu.1er Ifghts are not on. '
The headlarnp circuit is protected by a circuit breaker in the light switch. An
overload on the breaker will,cau$e the lamps to "flicker" on and off. If this
condnion develops , have your ·headlamp wiring checked immediately. The
headlight beam changer is located in the Turn Signal Lever; for operation see
Section 2 under heading "Turo Signal and Headlight Beam Lever."
Headlight High ,Beam Indicator Ught
The he!).dlights of your vehicle have high and ... loW beams to provide you with
proper nighttime visibility for most driving condnions. The "low" beams are
used during most city driving . The
"high" beams are especially useful when
driving on dark roads sinCe they provide long range illumination . The headlight
beam indicator light (located on the speedometer face) will be
ON whenever
the high beams or "brights " are in use. The turn signal l
Headlamp "ON" Warning Chime
The optional headlarrl> reminder chime provides' an audible warning thai the
main
light switch is in one 0/ the "on" posnions, either parking lights or
headlights. .
2-21
Page 47 of 104
Downloaded from www.Manualslib.com manuals search engine AM-FM Stereo Radio
"A 9J 1J ':4 "C b 0 ': 12 1~ '~
This· radio works the same as the AM-FM monaural radio . Be sure you also
read "Speakers" and "Stereo Sound "above for more information .
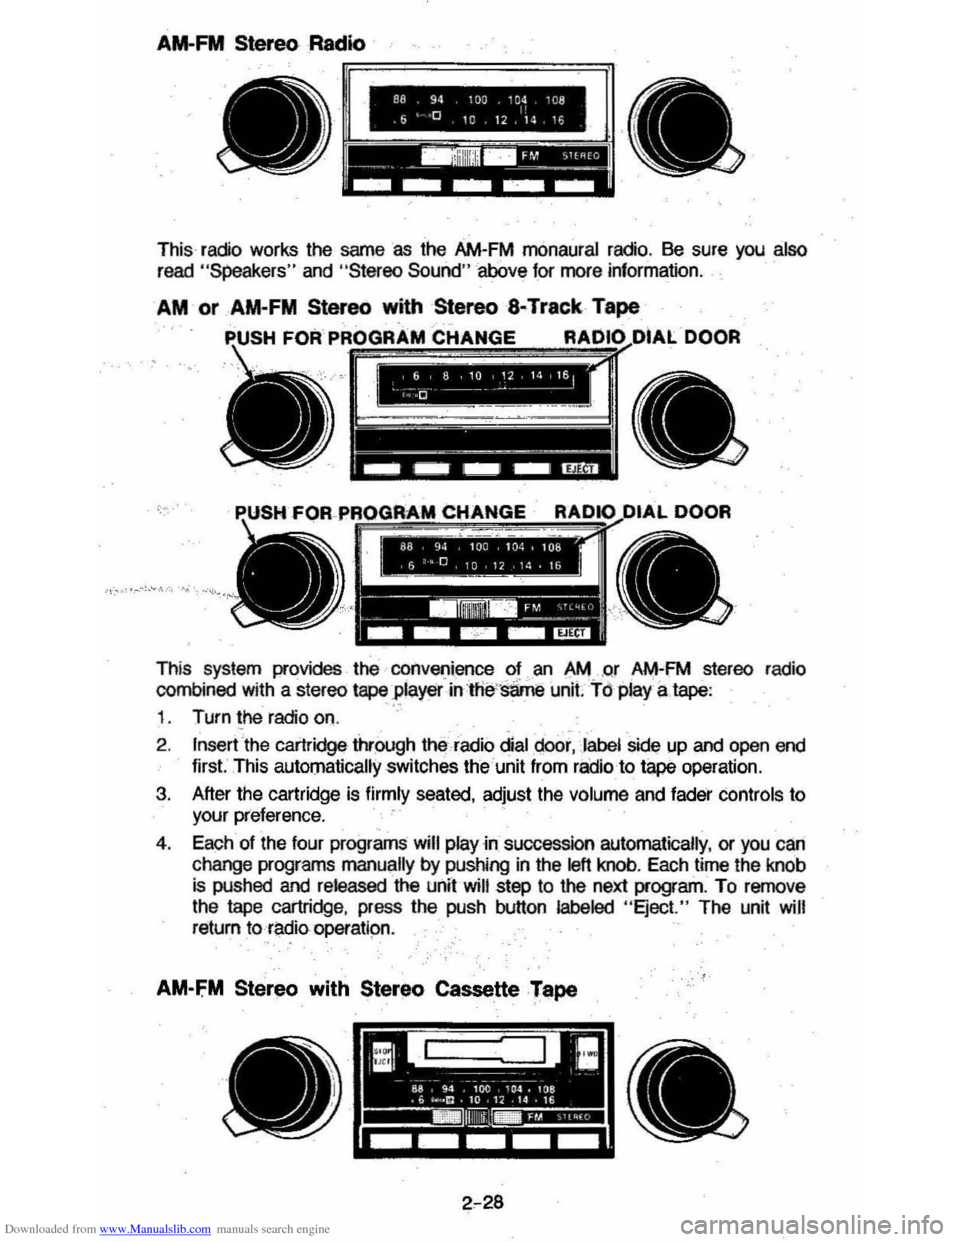
AM or AM-FM Stereo with StereoS-Track Tape
I __ ~ __ ~ 1 ____ Woil
9~ 10~ 104 lOb o 10 12 14 tf>
1=
This system provides the convenience of an AM .or AM"FM stereo radio
combined with a stereo tape player' in'lI1e'-same unit. TO play atape:
,. Turn the radio on. 'c·
2, Insert ethe cartridgE! through the radio dial doo", label side up and open end
first. ' This automatically switches the unit from radio to tape operation .
3. After the cartridge is firmly seated, adjust the volume and fader controls to
your preference.
4 . Each of the four programs will
play in succession automatically , or you can
change programs manually by pushing in the
left knob . Each time the knob
is pushed and released the unit will step to the next program, To remove
th e tape cartridge , press the push button
labeled "Eject." The unit will
return torll-dio operatlpn .
AM-FM Stereo with Stereo Cassette Tape
Page 59 of 104
Downloaded from www.Manualslib.com manuals search engine JACKING
CAUTION
To help avoid personal injury:
• Follow air jacking and stowage instructions.
• Use jack only for lifting this vehicle during wheel change.
• Never get . beneath the vehicle, start or run engine while vehicle is supported by jack.
• Always securely restol" sp!.re tire (orflattire) and all jac king equipment.
Wheel Nut Torque .
CAUTION: As soon as possible atter installing a wheel -AND at the intervals stated
In Section 'S of the Maintenanc," Schedule folder --have a technician tighten wheel nuts with a torque wrench to the specifications shown in "Specifications," Section 7 of this manual.
Wheel nuts should be tightened alternately and evenly to the correct torque.
Never use oil or grease on studs Of nuts.. Jrnproperty tightened wheel nuts could eventually aUow the whee! to come off while the veNeta Is moving, -po$$rbty causing
personal injury , damage and/or klss of c_ontrol. (Also see the "Replacement Fasteners" Caution In "Service and Maintenance ," Section 5 01 this m8nu81 regarding the danger of mixing metric and custom,sry fasteners. And, see the "Replacement Fasteners " Caution
under "Tires" in the same seclion regarding the importance of obtaining good metal-to
metsl contact.)
Stowage ·of. Tire . and .!aC;.k,. . .
CAUTION: Always securely restow the spare tire assembfy (or nat tire), all jacking equipm ent, any tire inflator, and any covers or doors, using the means provided. This will help keep such things from being thrown about-and injuring people In the vehicta d.Ufing a sudden maneuver or an accident.
Before stowing
the tire, be sure:to clean the tire well 01 anything that would keep the tlr. from resting on the bOttom of the well. To stow the jack, place its lever in the "UP" position and. move the handle back and forth until the column is ·secure in the receiver (see Illustration). If these steps are not taken, the tire or lack may push against the trunk lid so thai the trunk lid cannot seal tightly. This _ may allOw carbon monoxide from the '. exhaust system -to get _inside tiMt c • . ttvougtl the trunk. (See "Engine -Exhaust Gas Caution (CaroonMonoxkle) " al the beginning of "Starting and Operating,'; Section 2 of this manual .)
Extended Vehicle Storage
If you plan to store your vehicle over an extended periOd of time, certain steps
should be taken to give it maximum protection.
It is recommended that you
write the Chevrolet Motor Division , General Motors Corporation, Consumer
Relations Dept., Warren , Michigan
48090, for detailed instructions on how to
prepare your vehicle for storage .
3-7
Page 72 of 104
Downloaded from www.Manualslib.com manuals search engine Choosing Oil Viscosity
Engine oil viscosity (thickness) has an effect on fuel economy. Lower viscosity engine oils can provide· better fuel economy; however, higher temperature
weather cOl1ditions. require· higher viscosity .engine. oils· for satisfactory
lubrication.
It is recommended that you select an oil not only of the proper quality and
viscosity, but also. a fuel-saving product.· These oils can be found in Chevrolet dealer serviGe departments, service stati()ns and other retail stores. They are
identified by words such as: "Energy Conserving," "Energy Saving," "Conserves Gasoline," "Gas Saving," "Gasoline Saving," "Friction
Reducing," "Improved Gasoline Mileage," "Improved Fuel Economy" or "Fuel
Saving."
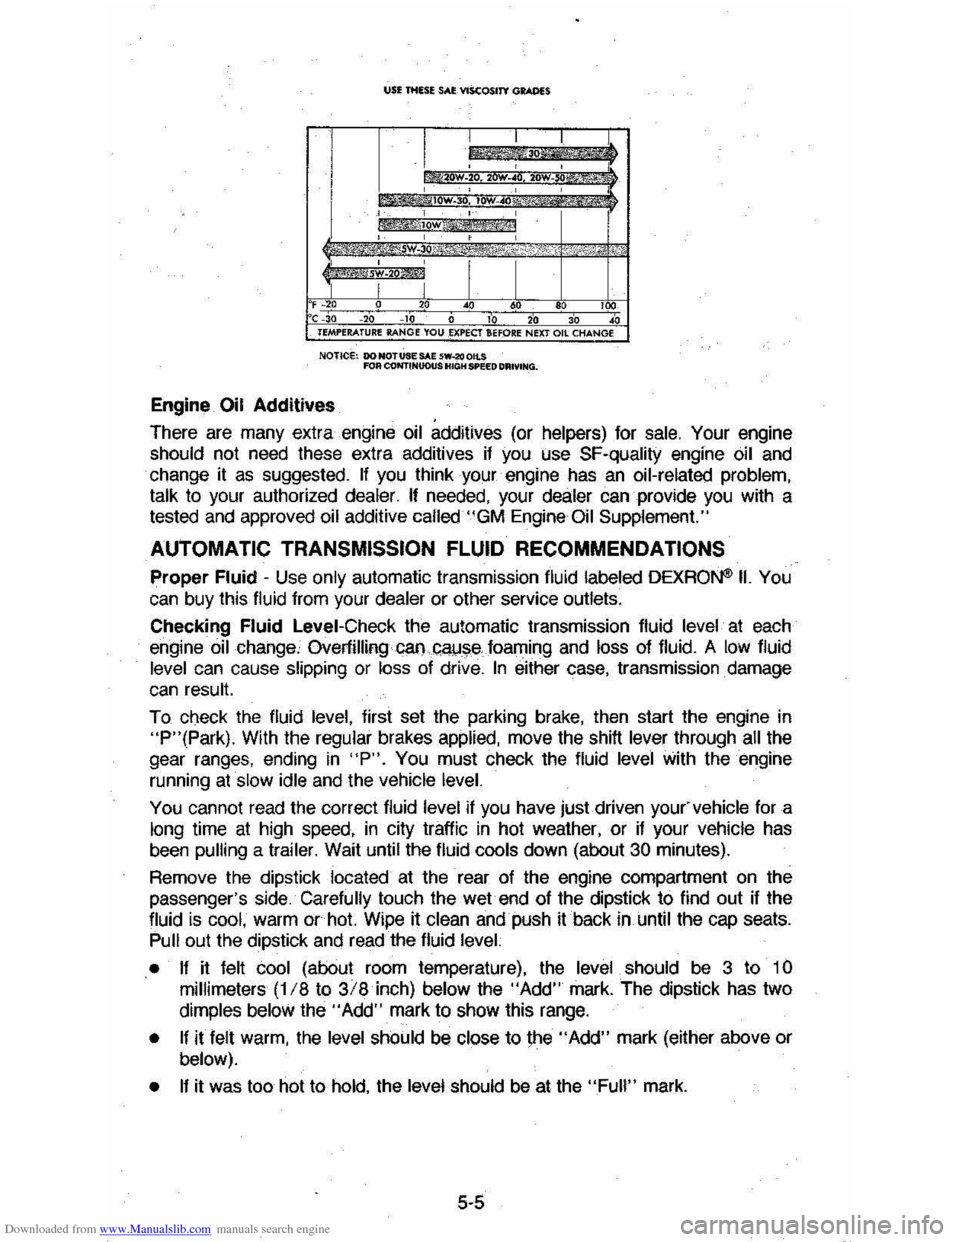
The following chart lists the engine oil viscosities recommended for the
tE3lT1per~ture range you·. expecLbefore your next oil change. For temperatures
above -18'C '(O'F), SAE 10W-30 is the preferred viscosity grade. If coldweather starting problems are encountered at temperatures below -18'C
(O'F), SAE 5W-30 viscosity oils m?-y be required.
Change Intervals
The oil and oil filter change intervals for your engine are based on the use of SF-quality oils and high-quality filters such as AC oil filters. Using oils other
than
SF-quality, or oil and/or filter change intervals longer than recommended, could reduce engine life.
Damage to engines due to improper maintenance or use of incorrect oil quality
'andl0r"'vi$9()~ity}s .~ot covered by the Chevrolet new car warranties.
Your engine WEIS filled with a high-quality engine oil when it was built. You do
not have to change this oil before the first recommended change
interval.
•
Severe Service-Change the oil and oil filter every 3,000 miles (4 800
kilometers) or three months (whichevefcbmes first) if one or more of the following "severe service" conditions is often encountered:
• Driving in dusty areas.
• Towing a trailer.
• Frequent idling or idling for long periods.
• Oriving 4 miles (6 kilometers) or less in freezing weather.
• Change the oil and oil filter as soon as possible after driving in a dust storm.
~ Norma! Service-If your engine is not a turbo-charged engine and your
normal driving does not include one of the above "severe service" conditions, change the oil every 7,500 miles (12 000 kilometers) or 12
months, whichever comes first. Change the oil
filter at the first oil change,
then every other
oil change, if mileage (7,500 miles or 12 000 kilometers)
determines when you change the oil. If time (12 months) determines when
you change the oil, change the filter with every oil change.
• If you have a turbocharged engine, it is VERY IMPORTANT to change the
oil and oil filter EVERY 3,000 miles (4 800 kilometers).
5-4
Page 73 of 104
Downloaded from www.Manualslib.com manuals search engine un mUE SAl: VIScOSITY GRADES
F~O 20 40 60 100 C -30 -20 10 0 10 20 30 40 TEMPERATURE RANGE YOU .EXPECT SHORE NEXT Oil CHANGE
NOTICe: DO NOTUSE SAE 5W-2(I OILS fOR COIfi"INUOUS HIGH SPEED DRIVING.
Engine Oil Additives
There are many extra engine oil additives (or helpers) for sale. Your engine
should not need these extra additives if you Use SF-quality engine oil and
change it as suggested. If you think your engine has an oil-related problem,
talk
to your authorized dealer. If needed, your dealer can provide you with a
tested and approved oil additive called "GM Engine Oil Supplement."
AUTOMATIC TRANSMISSION FLUID RECOMMENDATIONS
Proper Fluid -Use only automatic transmission fluid labeled DEXRON® II. You
can buy this fluid from your dealer or other service outlets.
Checking
Fluid Level-Check the automatic transmission fluid level at each
engine
oil change, Overfilling GaI).c"!,J~e foaming and loss of fluid. A low fluid
level can cause slipping or loss of drive. In either case, transmission damage
can result.
To check the fluid
level, first set the parking brake, then start the engine in "P"(Park). With the regular brakes applied, move the shift lever through all the
gear ranges, ending
in "P". You must check the fluid level with the engine
running
at slow idle and the vehicle level.
You cannot read the correct fluid level if you have just.driven you(vehicle fora
long time at high speed, in city traffic in hot weather, or if your vehicle has
been
pulling a trailer. Wait until the fluid cools down (about 30 minutes).
Remove the dipstick
located at the rear of the engine compartment on the
passenger's side. Carefully touch the wet end of the dipstick to find out if the
fluid
is cool, warm or hot. Wipe it clean and push it back in until the cap seats. Pull out the dipstick and read the fluid level.
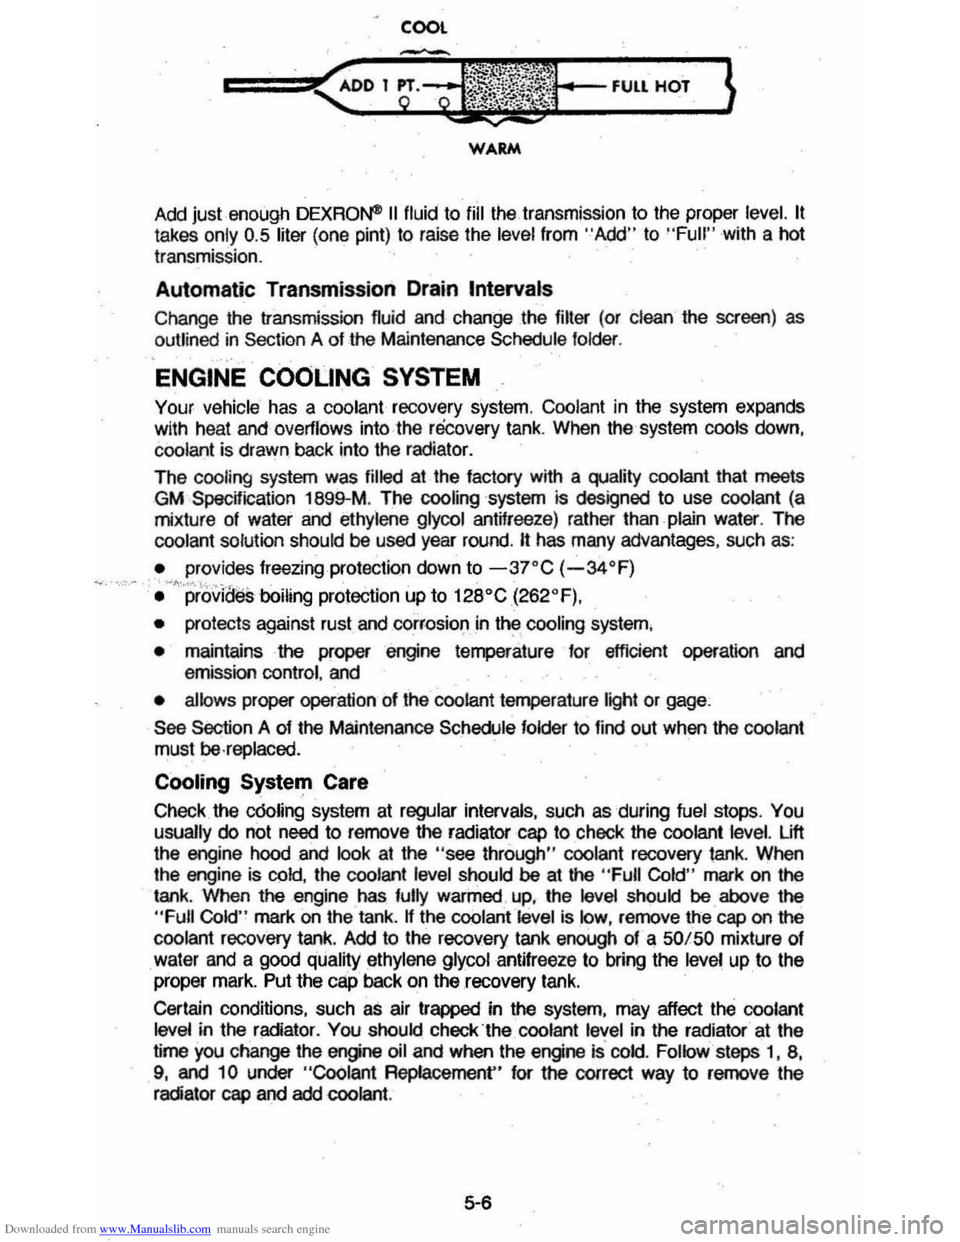
• If
it felt cool (about room temperature), the level should be 3 to 10
millimeters (118 to 3/8 inch) below the "Add" mark. The dipstick has two
dimples below the" Add" mark to show this range.
• If it felt warm, the level should be close to \he "Add" mark (either above or below).
• If
it was too hot to hold, the level should be at the "Full" mark.
5-5
Page 74 of 104
Downloaded from www.Manualslib.com manuals search engine COOL
WARM
Add just enough DEXRO~ II fluid to fill the transmission to the proper level. It
takes only 0.5 liter (one pint) to raise the level from "Add" to "Full" with a hot
transmission.
Automatic Transmission Drain Intervals
Change the transmission fluid and change the filter (or clean the screen) as
outlined
in Section A of the Maintenance Schedule folder.
ENGINE COOLING SYSTEM
Your vehicle has a coolant recovery system. Coolant in the system expands
with heat and overflows into the recovery tank. When the system cools down,
coolant is drawn back into the radiator.
The cooling system was
filled at the factory wrth a quality coolant that meets
GM
Spec~ication 1S99-M . The cooling ·system is designed to use coolant (a
mixture of water and ethylene glycol antifreeze) rather than plain water. The
coolant solution should be used year round.
It has many advantages, such as:
~ provides freezing protection down to -3rC (-34"F) "''''''<~. !'"","."" ' • provides boiling protection up to 12S"C (262"F),
• protects against rust and corrosio~in th~ cooling system,
• maintains the proper engine temperature for efficient operation and
emission control, and
• allows proper operation of the coolant temperature light or gage :
See Section A of the Maintenance Schedule folder to find out when the coolant
must
be ·replaced.
Cooling System Care
Check the c60ling system at regular intervals, such as during fuel stops . You usually do not need to remove the radiator cap to check the coolant level. Lift
the engine hood and look at the "see through" coolant recovery tank. When
the engine is
cold, the coolant level should be at the "Full Cold" mark on the
tank . When the engine has fully warmed . up, the level should be above the
"Full Cold" mark on the tank . If the coolantl6vel is low, remove the cap on the
coolant recovery tank. Add to the recovery tank enough of a 50/50 mixture of
water and a good quality ethylene glycol antifreeze to bring the
level up to the
proper mark. Put the cap back on the recovery tank.
Certain conditions, such
as air trapped in the system, may affect the coolant
level in the radiator. You should check"the coolant level in the radiator at the
time you change the engine
oil and when the engine Is cold. Follow.taps I, S,
9, and 10 under "Coolant Repfacement" for the correct way to remove the
radiator cap and add coolant.
5-6