reset CHEVROLET MONTE CARLO 2004 Owner's Manual
[x] Cancel search | Manufacturer: CHEVROLET, Model Year: 2004, Model line: MONTE CARLO, Model: CHEVROLET MONTE CARLO 2004Pages: 416, PDF Size: 4.56 MB
Page 208 of 416
The broken tape detection feature of your cassette tape
player may identify the cleaning cassette as a
damaged tape, in error. To prevent the cleaning cassette
from being ejected, use the following steps:
1. Turn the ignition on.
2. Turn the radio off.
3. Press and hold the TAPE AUX or the TAPE CD
button for �ve seconds. READY will appear on
the display and a cassette symbol will �ash for
�ve seconds.
4. Insert the scrubbing action cleaning cassette.
5. Eject the cleaning cassette after the manufacturer’s
recommended cleaning time.
After the cleaning cassette is ejected, the broken tape
detection feature will be active again.
You may also choose a non-scrubbing action, wet-type
cleaner which uses a cassette with a fabric belt to
clean the tape head. This type of cleaning cassette will
not eject on its own. A non-scrubbing action cleaner
may not clean as thoroughly as the scrubbing type
cleaner. The use of a non-scrubbing action, dry-type
cleaning cassette is not recommended.After you clean the player, press and hold the EJT
button for �ve seconds to reset the CLEAN indicator.
The radio will display CLEANED to show the indicator
was reset.
Cassettes are subject to wear and the sound quality
may degrade over time. Always make sure the cassette
tape is in good condition before you have your tape
player serviced.
Care of Your CDs
Handle CDs carefully. Store them in their original cases
or other protective cases and away from direct
sunlight and dust. If the surface of a CD is soiled,
dampen a clean, soft cloth in a mild, neutral detergent
solution and clean it, wiping from the center to the edge.
Be sure never to touch the side without writing when
handling CDs. Pick up CDs by grasping the outer edges
or the edge of the hole and the outer edge.
3-94
Page 278 of 416
Engine Oil Additives
Do not add anything to your oil. The recommended oils
with the starburst symbol that meet GM Standard
GM6094M are all you will need for good performance
and engine protection.
When to Change Engine Oil
(GM Oil Life System)
Your vehicle has a computer system that lets you know
when to change the engine oil and �lter. This is based on
engine revolutions and engine temperature, and not on
mileage. Based on driving conditions, the mileage at
which an oil change will be indicated can vary
considerably. For the oil life system to work properly,
you must reset the system every time the oil is changed.
When the system has calculated that oil life has been
diminished, it will indicate that an oil change is necessary.
A CHANGE ENGINE OIL message will come on.
Change your oil as soon as possible within the next two
times you stop for fuel. It is possible that, if you are driving
under the best conditions, the oil life system may not
indicate that an oil change is necessary for over a year.However, your engine oil and �lter must be changed at
least once a year and at this time the system must be
reset. Your dealer has GM-trained service people who
will perform this work using genuine GM parts and reset
the system. It is also important to check your oil regularly
and keep it at the proper level.
If the system is ever reset accidentally, you must
change your oil at 3,000 miles (5 000 km) since your
last oil change. Remember to reset the oil life system
whenever the oil is changed.
How to Reset the CHANGE ENGINE OIL
Message
The GM Oil Life System calculates when to change your
engine oil and �lter based on vehicle use. Anytime your
oil is changed, reset the system so it can calculate when
the next oil change is required. If a situation occurs where
you change your oil prior to a CHANGE ENGINE OIL
message being turned on, reset the system.
5-22
Page 279 of 416
After changing the engine oil, the system must be reset.
To reset the CHANGE ENGINE OIL message use
one of the following procedures:
Using the Radio
1. Turn the ignition to ACC or ON, with the radio off.
2. Press and hold the TUNE DISP knob on the
radio for at least �ve seconds until SETTINGS
is displayed.
3. Press the SEEK PSCAN up or down arrow to scroll
through the main menu.
4. Scroll until OIL LIFE appears on the display.
5. Press the 1 PREV or 2 NEXT buttons to enter the
submenu. RESET will be displayed.
6. Press the TUNE DISP knob to reset. A chime will
be heard to verify the new setting and DONE will
be displayed for one second.
7. Once the indicator has been reset, scroll until
EXIT appears on the display.8. Press the TUNE DISP knob to exit programming.
A chime will be heard to verify the exit.
9. Turn the key to OFF.
If the CHANGE ENGINE OIL message comes back on
when you start your vehicle, the engine oil life system
has not reset. Repeat the procedure.
Using the Accelerator Pedal
1. Turn the ignition to ON, with the engine off.
2. Fully press and release the accelerator pedal slowly
three times within �ve seconds. If the CHANGE
ENGINE OIL message �ashes, the system is reset.
However, if it stays on, it did not reset. Repeat
the procedure.
3. Turn the key to OFF.
If the CHANGE ENGINE OIL message comes back on
when you start your vehicle, the engine oil life system
has not reset. Repeat the procedure.
5-23
Page 290 of 416
Radiator Pressure Cap
Notice:The radiator cap on your vehicle is a
pressure-type cap and must be tightly installed to
prevent coolant loss and possible engine damage
from overheating. Be sure the arrows on the cap
line up with the over�ow tube on the radiator
�ller neck.
The radiator pressure cap is located in the front of the
engine compartment on the passenger’s side, near
the diagonal cross brace. SeeEngine Compartment
Overview on page 5-12for more information on location.
Engine Overheating
You will �nd a coolant temperature gage and a warning
message about a hot engine on your instrument
panel cluster. SeeEngine Coolant Temperature Gage
on page 3-38andHot Coolant Temperature Warning
Message on page 3-45.
Overheated Engine Protection
Operating Mode
This emergency operating mode allows your vehicle to
be driven to a safe place in an emergency situation.
If an overheated engine condition exists, an overheat
protection mode which alternates �ring groups of
cylinders helps prevent engine damage. In this mode,
you will notice a signi�cant loss in power and engine
performance. The low coolant light may come on
and the temperature gage will indicate an overheat
condition exists. Driving extended miles (km) and/or
towing a trailer in the overheat protection mode should
be avoided.
Notice:After driving in the overheated engine
protection operating mode, to avoid engine damage,
allow the engine to cool before attempting any repair.
The engine oil will be severely degraded. Repair the
cause of coolant loss, change the oil and reset the
oil life system. SeeEngine Oil on page 5-18.
5-34
Page 330 of 416
The LOW TIRE PRESSURE message will also be
displayed while the ignition is on until you reset
(calibrate) the system.
Don’t reset the tire pressure monitor system without
�rst correcting the cause of the problem and checking
and adjusting the pressure in all four tires. If you
reset the system when the tire pressures are incorrect,
the system will not work properly and may not alert
you when a tire is low.
Any time you adjust a tire’s pressure, rotate your tires,
or have one or more tires repaired or replaced, you’ll
need to reset (calibrate) the tire pressure monitor
system. You’ll also need to reset the system whenever
you buy new tires and whenever the vehicle’s battery
has been disconnected.
To reset (calibrate) the system: The tire pressure
monitor system can be reset two ways. With the ignition
position at ON, pull the interior lamps control to the
ON and OFF settings three times.
It can also be reset through the radio using the
following steps:
1. Turn the ignition to ACC or ON and turn the
radio off.
2. Press and hold the TUNE DISP button on the
radio for at least �ve seconds until SETTINGS
is displayed.3. Press the SEEK SCAN up or down arrow to scroll
through the main menu.
4. Scroll until TIRE MON appears on the display.
5. Press the 1 PREV or 2 NEXT button to enter the
submenu. RESET will be displayed.
6. Press the TUNE DISP button to reset. A chime will
be heard to verify the new setting and DONE will
be displayed for one second.
7. Once the monitor has been reset, scroll until EXIT
appears on the display.
8. Press the TUNE DISP button to exit programming.
A chime will be heard to verify exit.
The system completes the calibration process during
driving.
The system normally takes 15 to 20 minutes of driving
in each of three speed ranges to “learn” tire pressures.
The speed ranges are 15 to 4 mph (25 to 65 km/h),
40 to 65 mph (65 to 105 km/h) and above 65 mph
(105 km/h). When learning is complete, the system
will alert you after two to eight minutes if a tire is
12 psi (83 kPa) different from the other three tires.
Detection thresholds may be higher and detection times
may be longer on rough roads, curves and at high
speeds. The system is not capable of detection
at speeds greater than 70 mph (110 km/h).
5-74
Page 331 of 416
Tire Inspection and Rotation
Tires should be rotated every 5,000 to 8,000 miles
(8 000 to 13 000 km).
Any time you notice unusual wear, rotate your tires as
soon as possible and check wheel alignment. Also
check for damaged tires or wheels. SeeWhen It Is Time
for New Tires on page 5-76andWheel Replacement
on page 5-79for more information.
The purpose of regular rotation is to achieve more
uniform wear for all tires on the vehicle. The �rst rotation
is the most important. SeeScheduled Maintenance
on page 6-4for scheduled rotation intervals.
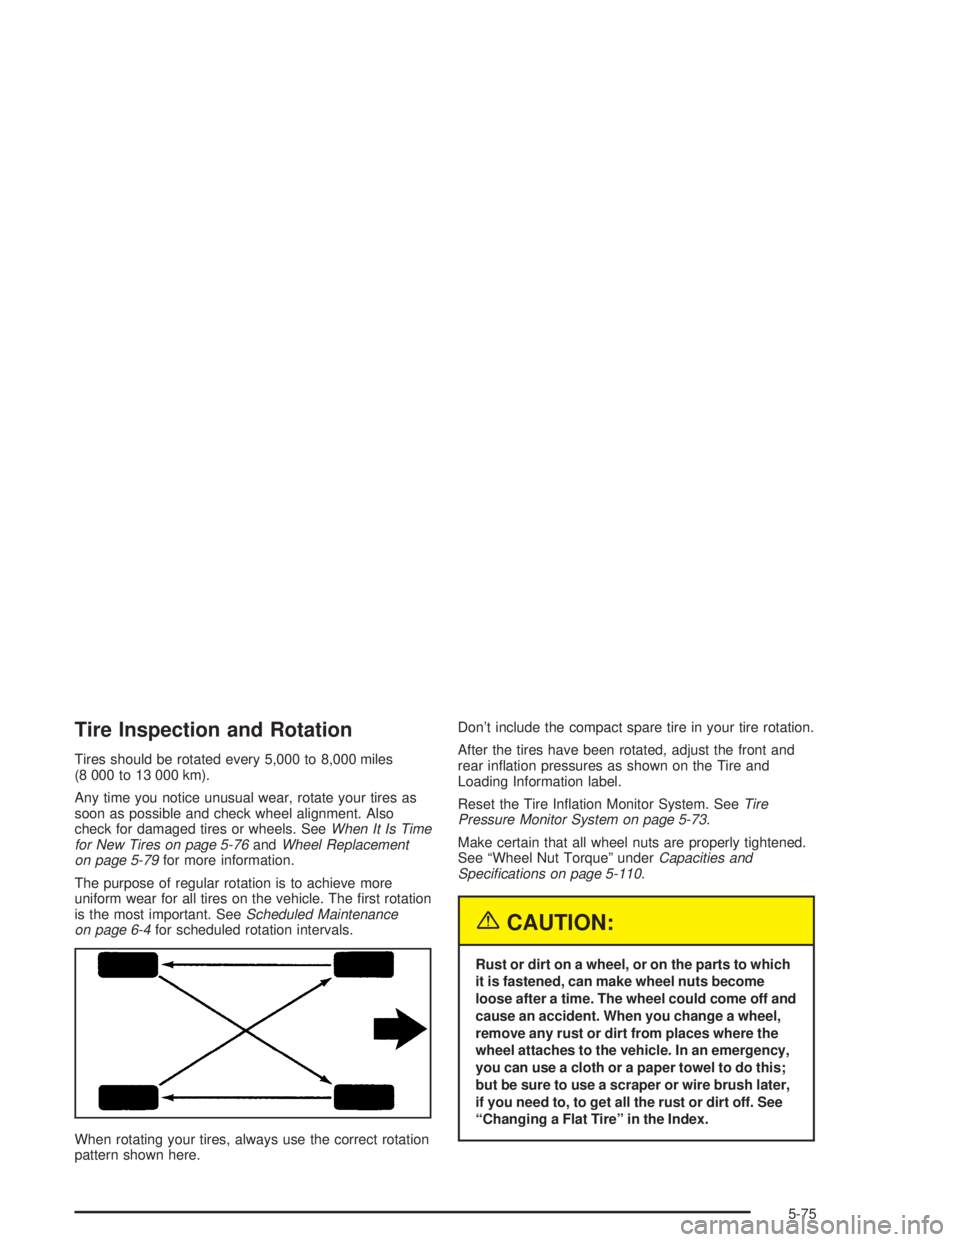
When rotating your tires, always use the correct rotation
pattern shown here.Don’t include the compact spare tire in your tire rotation.
After the tires have been rotated, adjust the front and
rear in�ation pressures as shown on the Tire and
Loading Information label.
Reset the Tire In�ation Monitor System. SeeTire
Pressure Monitor System on page 5-73.
Make certain that all wheel nuts are properly tightened.
See “Wheel Nut Torque” underCapacities and
Speci�cations on page 5-110.
{CAUTION:
Rust or dirt on a wheel, or on the parts to which
it is fastened, can make wheel nuts become
loose after a time. The wheel could come off and
cause an accident. When you change a wheel,
remove any rust or dirt from places where the
wheel attaches to the vehicle. In an emergency,
you can use a cloth or a paper towel to do this;
but be sure to use a scraper or wire brush later,
if you need to, to get all the rust or dirt off. See
“Changing a Flat Tire” in the Index.
5-75
Page 335 of 416
Wheel Alignment and Tire Balance
The wheels on your vehicle were aligned and balanced
carefully at the factory to give you the longest tire life
and best overall performance.
Scheduled wheel alignment and wheel balancing are
not needed. However, if you notice unusual tire wear or
your vehicle pulling one way or the other, the alignment
may need to be reset. If you notice your vehicle
vibrating when driving on a smooth road, your wheels
may need to be rebalanced.
Wheel Replacement
Replace any wheel that is bent, cracked or badly rusted
or corroded. If wheel nuts keep coming loose, the
wheel, wheel bolts and wheel nuts should be replaced.
If the wheel leaks air, replace it (except some
aluminum wheels, which can sometimes be repaired).
See your dealer if any of these conditions exist.
Your dealer will know the kind of wheel you need.
Each new wheel should have the same load-carrying
capacity, diameter, width, offset and be mounted
the same way as the one it replaces.If you need to replace any of your wheels, wheel bolts
or wheel nuts, replace them only with new GM
original equipment parts. This way, you will be sure to
have the right wheel, wheel bolts and wheel nuts
for your vehicle.
{CAUTION:
Using the wrong replacement wheels, wheel
bolts or wheel nuts on your vehicle can be
dangerous. It could affect the braking and
handling of your vehicle, make your tires lose
air and make you lose control. You could have
a collision in which you or others could be
injured. Always use the correct wheel, wheel
bolts and wheel nuts for replacement.
Notice:The wrong wheel can also cause problems
with bearing life, brake cooling, speedometer or
odometer calibration, headlamp aim, bumper height,
vehicle ground clearance and tire or tire chain
clearance to the body and chassis.
SeeChanging a Flat Tire on page 5-82for more
information.
5-79
Page 372 of 416

Scheduled Maintenance
When the CHANGE ENGINE OIL message comes on, it
means that service is required for your vehicle. Have your
vehicle serviced as soon as possible within the next 600
miles (1 000 km). It is possible that, if you are driving
under the best conditions, the engine oil life system may
not indicate that vehicle service is necessary for over a
year. However, your engine oil and �lter must be changed
at least once a year and at this time the system must be
reset. Your GM Goodwrench dealer has GM-trained
service technicians who will perform this work using
genuine GM parts and reset the system.
If the engine oil life system is ever reset accidentally,
you must service your vehicle within 3,000 miles
(5 000 km) since your last service. Remember to reset
the oil life system whenever the oil is changed. See
Engine Oil on page 5-18for information on the Engine
Oil Life System and resetting the system.When the change engine oil message appears, certain
services, checks and inspections are required.
Required services are described in the following for
“MaintenanceI” and “MaintenanceII.” Generally,
it is recommended that your �rst service be
MaintenanceI, your second service be MaintenanceII
and that you alternate MaintenanceIand MaintenanceII
thereafter. However, in some cases, MaintenanceII
may be required more often.
MaintenanceI— Use MaintenanceIif the change
engine oil message comes on within ten months since
vehicle was purchased or MaintenanceIIwas
performed.
MaintenanceII— Use MaintenanceIIif the previous
service performed was MaintenanceI. Always use
MaintenanceIIwhenever the message comes on ten
months or more since the last service or if the message
has not come on at all for one year.
6-4
Page 373 of 416

Service MaintenanceIMaintenanceII
Change engine oil and �lter. Reset oil life system. SeeEngine Oil on
page 5-18.An Emission Control Service.••
Visually check for any leaks or damage.See footnote (k).••
Inspect engine air cleaner �lter. If necessary, replace �lter. SeeEngine Air
Cleaner/Filter on page 5-26.An Emission Control Service. See footnote †.••
Rotate tires and check in�ation pressures and wear. SeeTires on page 5-65.••
Inspect brake system.See footnote (a).••
Check engine coolant and windshield washer �uid levels and add �uid as
needed.••
Perform any needed additional services. See “Additional Required Services” in
this section.••
Inspect suspension and steering components.See footnote (b).•
Inspect engine cooling system.See footnote (c).•
Inspect wiper blades.See footnote (d).•
Inspect restraint system components.See footnote (e).•
Lubricate body components.See footnote (f).•
Check transaxle �uid level and add �uid as needed.•
Replace passenger compartment air �lter (if equipped).See footnote (g).•
Inspect throttle system.See footnote (j).•
6-5
Page 410 of 416

N
New Vehicle Break-In......................................2-17
Normal Maintenance Replacement Parts............6-13
O
Odometer......................................................3-32
Off-Road Recovery..........................................4-14
Oil
Engine.......................................................5-18
Pressure Indicator Light................................3-41
Pressure Message.......................................3-46
Supercharger, Engine...................................5-24
OIL LIFE (GM Oil Life System Reset)................2-43
Older Children, Restraints................................1-29
Online Owner Center........................................ 7-4
OnStar
®Personal Calling.................................2-35
OnStar®Services............................................2-35
OnStar®System.............................................2-34
OnStar®Virtual Advisor....................................2-35
ORIG. SET (Return to the Original Settings).......2-49
Other Warning Devices...................................... 3-6
Outlet Adjustment............................................3-26
Outside
Convex Mirror.............................................2-34
Heated Mirrors............................................2-34
Power Mirrors.............................................2-33Overheated Engine Protection Operating Mode . . . 5-34
Overseas – Customer Assistance........................ 7-5
Owner Checks and Services.............................. 6-9
Owners, Canadian............................................... ii
Owner’s Information........................................7-14
P
Parade Dimming.............................................3-18
Park (P)
Shifting Out of............................................2-28
Parking
Brake........................................................2-25
Over Things That Burn.................................2-28
Parking on Hills..............................................4-44
Park(P)
Shifting Into................................................2-26
Passenger Compartment Air Filter.....................3-27
Passing.................................................4-14, 4-42
Passlock
®......................................................2-16
Plan Ahead When Possible................................ 7-8
Playing a Cassette Tape..........................3-64, 3-86
Playing a CD.........................................3-75, 3-89
Playing the Radio...........................3-57, 3-68, 3-79
Power
Accessory Outlets........................................3-19
Door Locks.................................................. 2-9
Electrical System.......................................5-103
10