check oil CHEVROLET PLYMOUTH ACCLAIM 1993 Owners Manual
[x] Cancel search | Manufacturer: CHEVROLET, Model Year: 1993, Model line: PLYMOUTH ACCLAIM, Model: CHEVROLET PLYMOUTH ACCLAIM 1993Pages: 2438, PDF Size: 74.98 MB
Page 1632 of 2438

3.0L ENGINE INDEX
page page
Accessory Drive Belt Service ................ 70
Auto Lash Adjuster ....................... 75
Camshaft Service ........................ 76
Checking Engine Oil Pressure ............... 93
Crankshaft and Cylinder Block, Assembly Service . 86
Cylinder Block ........................... 89
Cylinder Head ........................... 78
Cylinder Head and Camshaft Service ......... 75
Engine Assembly ......................... 69
Engine Lubrication System ................. 91
Engine Mounts .......................... 68 Engine Specifications
..................... 95
General Information ....................... 66
Oil Filter and Bracket ..................... 94
Oil Pan ................................ 92
Oil Pump Service ........................ 92
Piston and Connecting Rod Assembly Service . . . 82
Timing Belt InspectionÐIn Vehicle ............ 72
Timing Belt Service ....................... 72
Valve Service ........................... 80
GENERAL INFORMATION
ENGINE IDENTIFICATION NUMBER OR CODE
The engine identification number is located on the
rear of the cylinder block just below the cylinder
head (Fig. 1). BLOCK: The cylinder block is a light weight de-
sign created by reducing thickness in many parts
and a short 10 mm (3/8 inch) block skirt. High rigid-
ity is provided with ribs cast in the outer wall, a full
length water jacket, and a monoblock or beam type, main bearing cap. This single unit four bearing cap
is designed to control vibration of the cylinder block
partition walls.
CRANKSHAFT: A six throw, five weight crank-
shaft is supported by four main bearings with num-
ber three being the thrust bearing. The six separate
connecting rod throws pins reduce torque fluctua-
tions while a torsional vibration damper is used to
control torsion caused vibration of the crankshaft.
Rubber lipped seals are used at front and rear. The
front seal is retained in the oil pump case and the
rear is retained in a block-mounted housing.
3.0L ENGINE
9 - 66 3.0L ENGINE Ä
Page 1635 of 2438

LEFT SIDE MOUNT
(1) Raise vehicle on hoist and remove left front
wheel. (2) Remove inter splash shield.
(3) Support the transmission with a transmission
jack. (4) Remove the insulator thru bolt from the mount.
(5) Remove the transmission mount fasteners and
remove mount. (6) Reverse removal procedure for installation. En-
sure that the slide tube is seated into the rail
bracket guides. Refer to (Fig. 3) for bolt tightening
specifications. (7) Engine mount adjustment, Refer to Engine
Mount Insulator Adjustment of this section.
ENGINE MOUNT RUBBER INSULATORS
Insulator location on (right side) and transmission
bracket (left side) are adjustable to allow right/left
drive train adjustment in relation to drive shaft as-
sembly length. Check and reposition right engine mount insulator
(left engine mount insulator is floating type and will
adjust automatically (Fig. 3). Adjust drive train posi-
tion, if required, for the following conditions:
² Drive shaft distress: See Driveshafts in Suspen-
sion, Group 2.
² Any front end structural damage (after repair).
² Insulator replacement.
ENGINE MOUNT INSULATOR ADJUSTMENT
(1) Remove the load on the engine motor mounts
by carefully supporting the engine and transmission
assembly with a floor jack. (2) Loosen the right engine mount insulator yoke
screw and two turns on yoke nut, then loosen the
front engine mount bracket to front crossmember
screws and nuts. Left engine mount insulator is sleeved over
shaft and long support bolt to provide lateral
movement adjustment with engine weight re-
moved or not. (3) Pry the engine right or left as required to
achieve the proper drive shaft assembly length. See
Drive Shaft in Suspension Group 2 for driveshaft
identification and related assembly length measur-
ing. (4) Tighten right engine mount insulator yoke nut
to 102 N Im (75 ft. lbs.). Then tighten front engine
mount screws and nuts to 54 N Im (40 ft. lbs.) and
center left engine mount insulator. (5) Recheck drive shaft length.
ENGINE ASSEMBLY
REMOVAL
(1) Disconnect battery.
(2) Mark hood position at hinges and remove hood. (3) Drain cooling system. Refer to Cooling System
Group 7 for draining procedure. (4) Disconnect all electrical connections.
(5) Remove coolant hoses from radiator and en-
gine. (6) Remove radiator and fan assembly.
(7) See Fuel System Group 14, For procedures to
release fuel pressure, disconnect fuel lines and accel-
erator cable. (8) Remove air cleaner assembly.
(9) Hoist vehicle and drain engine oil.
(10) Remove air conditioning compressor mounting
bolts and set compressor aside. (11) Disconnect exhaust pipe at manifold.
(12) Remove transmission inspection cover and
mark flex plate to torque converter position. (13) Remove screws holding torque converter to
flex plate and attach C-clamp on bottom of converter
housing to prevent torque converter from coming out. (14) Remove power steering pump mounting bolts
and set pump aside. (15) Remove two lower transmission to block
screws. (16) Remove starter.
(17) Lower vehicles and disconnect vacuum lines
and ground strap. (18) Install transmission holding fixture.
(19) Attach engine lifting hoist and support en-
gine. (20) Remove upper transmission case to block
bolts. (21) See Engine Mounting in (Fig. 2) and separate
mount/insulators as follows: (a) Mark RIGHT insulator on right yoke and en-
gine plate supports. Remove insulator to rails
screws. (b) Remove FRONT engine mount through bolt
and nut.
Fig. 3 Left Insulator Movement
Ä 3.0L ENGINE 9 - 69
Page 1642 of 2438
CAMSHAFT SERVICE
SEE AUTO LASH ADJUSTER FUNCTION CHECK BEFORE DISASSEMBLY
REMOVAL
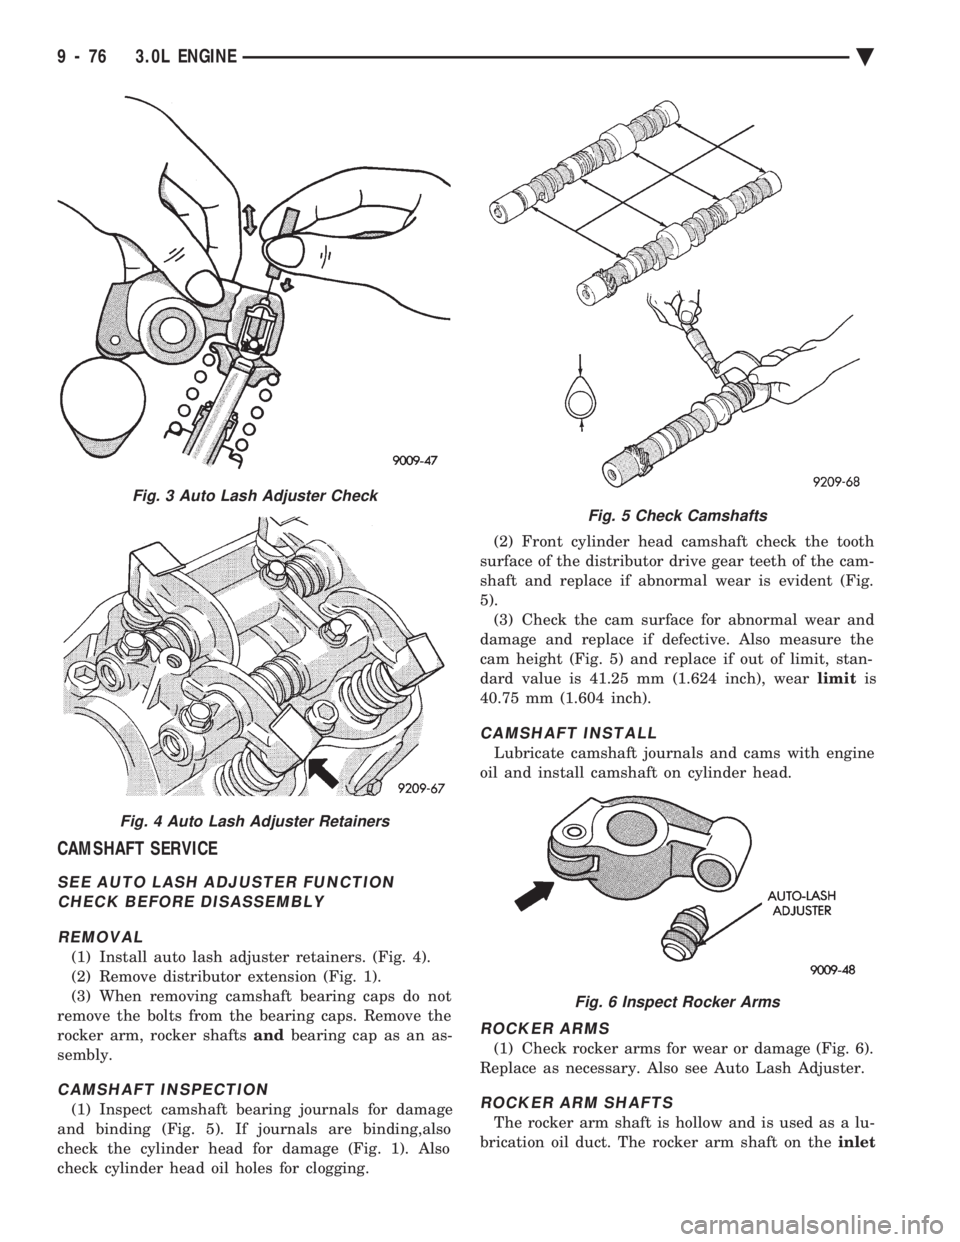
(1) Install auto lash adjuster retainers. (Fig. 4).
(2) Remove distributor extension (Fig. 1).
(3) When removing camshaft bearing caps do not
remove the bolts from the bearing caps. Remove the
rocker arm, rocker shafts andbearing cap as an as-
sembly.
CAMSHAFT INSPECTION
(1) Inspect camshaft bearing journals for damage
and binding (Fig. 5). If journals are binding,also
check the cylinder head for damage (Fig. 1). Also
check cylinder head oil holes for clogging. (2) Front cylinder head camshaft check the tooth
surface of the distributor drive gear teeth of the cam-
shaft and replace if abnormal wear is evident (Fig.
5). (3) Check the cam surface for abnormal wear and
damage and replace if defective. Also measure the
cam height (Fig. 5) and replace if out of limit, stan-
dard value is 41.25 mm (1.624 inch), wear limitis
40.75 mm (1.604 inch).
CAMSHAFT INSTALL
Lubricate camshaft journals and cams with engine
oil and install camshaft on cylinder head.
ROCKER ARMS
(1) Check rocker arms for wear or damage (Fig. 6).
Replace as necessary. Also see Auto Lash Adjuster.
ROCKER ARM SHAFTS
The rocker arm shaft is hollow and is used as a lu-
brication oil duct. The rocker arm shaft on the inlet
Fig. 3 Auto Lash Adjuster Check
Fig. 4 Auto Lash Adjuster Retainers
Fig. 5 Check Camshafts
Fig. 6 Inspect Rocker Arms
9 - 76 3.0L ENGINE Ä
Page 1643 of 2438
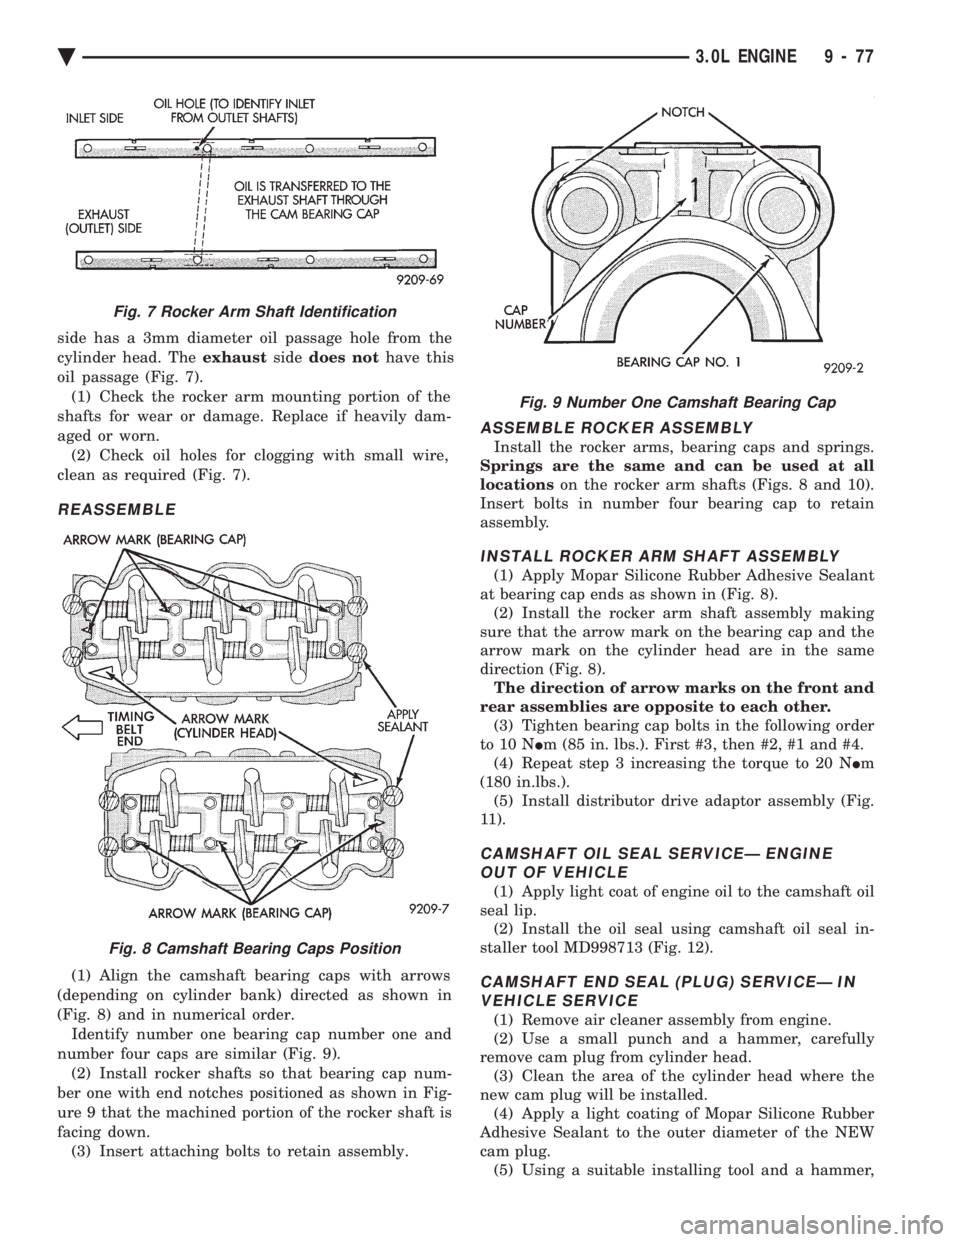
side has a 3mm diameter oil passage hole from the
cylinder head. The exhaustsidedoes not have this
oil passage (Fig. 7). (1) Check the rocker arm mounting portion of the
shafts for wear or damage. Replace if heavily dam-
aged or worn. (2) Check oil holes for clogging with small wire,
clean as required (Fig. 7).
REASSEMBLE
(1) Align the camshaft bearing caps with arrows
(depending on cylinder bank) directed as shown in
(Fig. 8) and in numerical order. Identify number one bearing cap number one and
number four caps are similar (Fig. 9). (2) Install rocker shafts so that bearing cap num-
ber one with end notches positioned as shown in Fig-
ure 9 that the machined portion of the rocker shaft is
facing down. (3) Insert attaching bolts to retain assembly.
ASSEMBLE ROCKER ASSEMBLY
Install the rocker arms, bearing caps and springs.
Springs are the same and can be used at all
locations on the rocker arm shafts (Figs. 8 and 10).
Insert bolts in number four bearing cap to retain
assembly.
INSTALL ROCKER ARM SHAFT ASSEMBLY
(1) Apply Mopar Silicone Rubber Adhesive Sealant
at bearing cap ends as shown in (Fig. 8). (2) Install the rocker arm shaft assembly making
sure that the arrow mark on the bearing cap and the
arrow mark on the cylinder head are in the same
direction (Fig. 8). The direction of arrow marks on the front and
rear assemblies are opposite to each other. (3) Tighten bearing cap bolts in the following order
to 10 N Im (85 in. lbs.). First #3, then #2, #1 and #4.
(4) Repeat step 3 increasing the torque to 20 N Im
(180 in.lbs.). (5) Install distributor drive adaptor assembly (Fig.
11).
CAMSHAFT OIL SEAL SERVICEÐ ENGINE OUT OF VEHICLE
(1) Apply light coat of engine oil to the camshaft oil
seal lip. (2) Install the oil seal using camshaft oil seal in-
staller tool MD998713 (Fig. 12).
CAMSHAFT END SEAL (PLUG) SERVICEÐ IN VEHICLE SERVICE
(1) Remove air cleaner assembly from engine.
(2) Use a small punch and a hammer, carefully
remove cam plug from cylinder head. (3) Clean the area of the cylinder head where the
new cam plug will be installed. (4) Apply a light coating of Mopar Silicone Rubber
Adhesive Sealant to the outer diameter of the NEW
cam plug. (5) Using a suitable installing tool and a hammer,
Fig. 7 Rocker Arm Shaft Identification
Fig. 8 Camshaft Bearing Caps Position
Fig. 9 Number One Camshaft Bearing Cap
Ä 3.0L ENGINE 9 - 77
Page 1645 of 2438
(2) See Camshaft Rocker Arms Removal.
(3) Remove upper intake manifold assembly. Refer
to Intake and Exhaust Manifolds, Group 11. (4) Remove distributor.
(5) Remove exhaust manifolds and cross over Refer
to Intake and Exhaust Manifolds, Group 11.
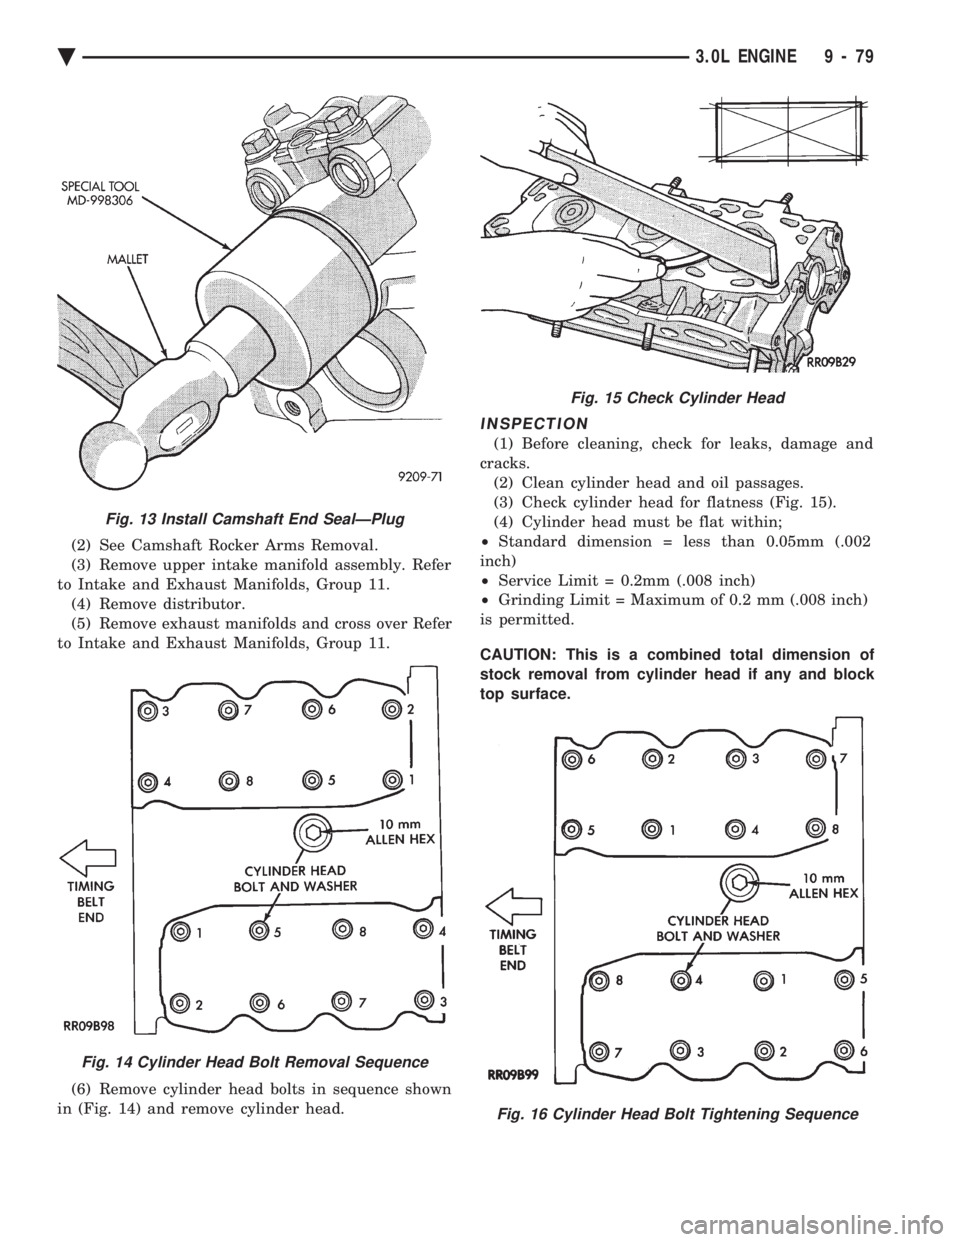
(6) Remove cylinder head bolts in sequence shown
in (Fig. 14) and remove cylinder head.
INSPECTION
(1) Before cleaning, check for leaks, damage and
cracks. (2) Clean cylinder head and oil passages.
(3) Check cylinder head for flatness (Fig. 15).
(4) Cylinder head must be flat within;
² Standard dimension = less than 0.05mm (.002
inch)
² Service Limit = 0.2mm (.008 inch)
² Grinding Limit = Maximum of 0.2 mm (.008 inch)
is permitted.
CAUTION: This is a combined total dimension of
stock removal from cylinder head if any and block
top surface.
Fig. 13 Install Camshaft End SealÐPlug
Fig. 14 Cylinder Head Bolt Removal Sequence
Fig. 15 Check Cylinder Head
Fig. 16 Cylinder Head Bolt Tightening Sequence
Ä 3.0L ENGINE 9 - 79
Page 1650 of 2438
PISTON RINGSÐINSTALLATION
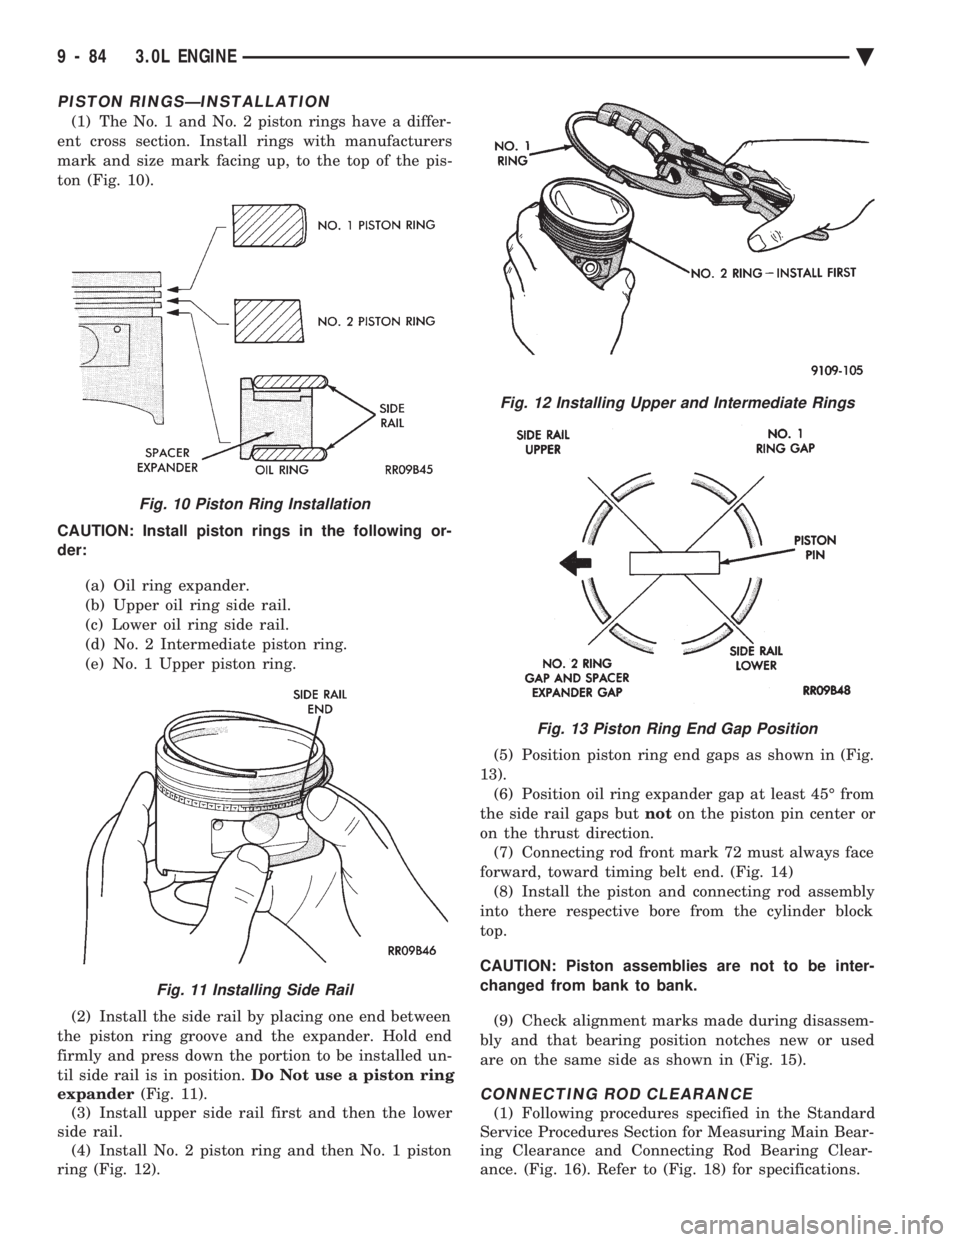
(1) The No. 1 and No. 2 piston rings have a differ-
ent cross section. Install rings with manufacturers
mark and size mark facing up, to the top of the pis-
ton (Fig. 10).
CAUTION: Install piston rings in the following or-
der:
(a) Oil ring expander.
(b) Upper oil ring side rail.
(c) Lower oil ring side rail.
(d) No. 2 Intermediate piston ring.
(e) No. 1 Upper piston ring.
(2) Install the side rail by placing one end between
the piston ring groove and the expander. Hold end
firmly and press down the portion to be installed un-
til side rail is in position. Do Not use a piston ring
expander (Fig. 11).
(3) Install upper side rail first and then the lower
side rail. (4) Install No. 2 piston ring and then No. 1 piston
ring (Fig. 12). (5) Position piston ring end gaps as shown in (Fig.
13). (6) Position oil ring expander gap at least 45É from
the side rail gaps but noton the piston pin center or
on the thrust direction. (7) Connecting rod front mark 72 must always face
forward, toward timing belt end. (Fig. 14) (8) Install the piston and connecting rod assembly
into there respective bore from the cylinder block
top.
CAUTION: Piston assemblies are not to be inter-
changed from bank to bank.
(9) Check alignment marks made during disassem-
bly and that bearing position notches new or used
are on the same side as shown in (Fig. 15).
CONNECTING ROD CLEARANCE
(1) Following procedures specified in the Standard
Service Procedures Section for Measuring Main Bear-
ing Clearance and Connecting Rod Bearing Clear-
ance. (Fig. 16). Refer to (Fig. 18) for specifications.
Fig. 10 Piston Ring Installation
Fig. 11 Installing Side Rail
Fig. 12 Installing Upper and Intermediate Rings
Fig. 13 Piston Ring End Gap Position
9 - 84 3.0L ENGINE Ä
Page 1652 of 2438
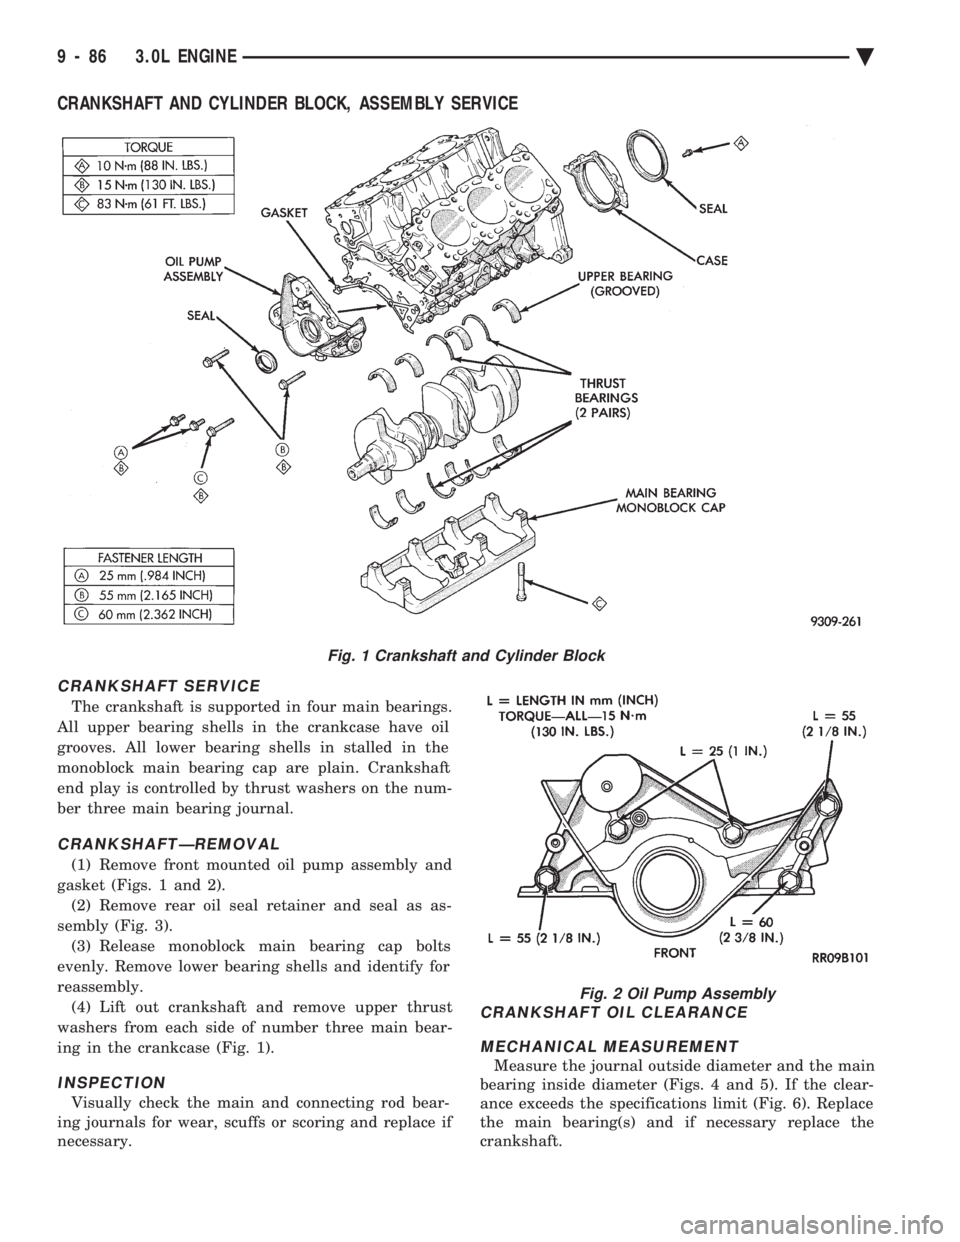
CRANKSHAFT AND CYLINDER BLOCK, ASSEMBLY SERVICE
CRANKSHAFT SERVICE
The crankshaft is supported in four main bearings.
All upper bearing shells in the crankcase have oil
grooves. All lower bearing shells in stalled in the
monoblock main bearing cap are plain. Crankshaft
end play is controlled by thrust washers on the num-
ber three main bearing journal.
CRANKSHAFTÐREMOVAL
(1) Remove front mounted oil pump assembly and
gasket (Figs. 1 and 2). (2) Remove rear oil seal retainer and seal as as-
sembly (Fig. 3). (3) Release monoblock main bearing cap bolts
evenly. Remove lower bearing shells and identify for
reassembly. (4) Lift out crankshaft and remove upper thrust
washers from each side of number three main bear-
ing in the crankcase (Fig. 1).
INSPECTION
Visually check the main and connecting rod bear-
ing journals for wear, scuffs or scoring and replace if
necessary.
CRANKSHAFT OIL CLEARANCE
MECHANICAL MEASUREMENT
Measure the journal outside diameter and the main
bearing inside diameter (Figs. 4 and 5). If the clear-
ance exceeds the specifications limit (Fig. 6). Replace
the main bearing(s) and if necessary replace the
crankshaft.
Fig. 1 Crankshaft and Cylinder Block
Fig. 2 Oil Pump Assembly
9 - 86 3.0L ENGINE Ä
Page 1654 of 2438
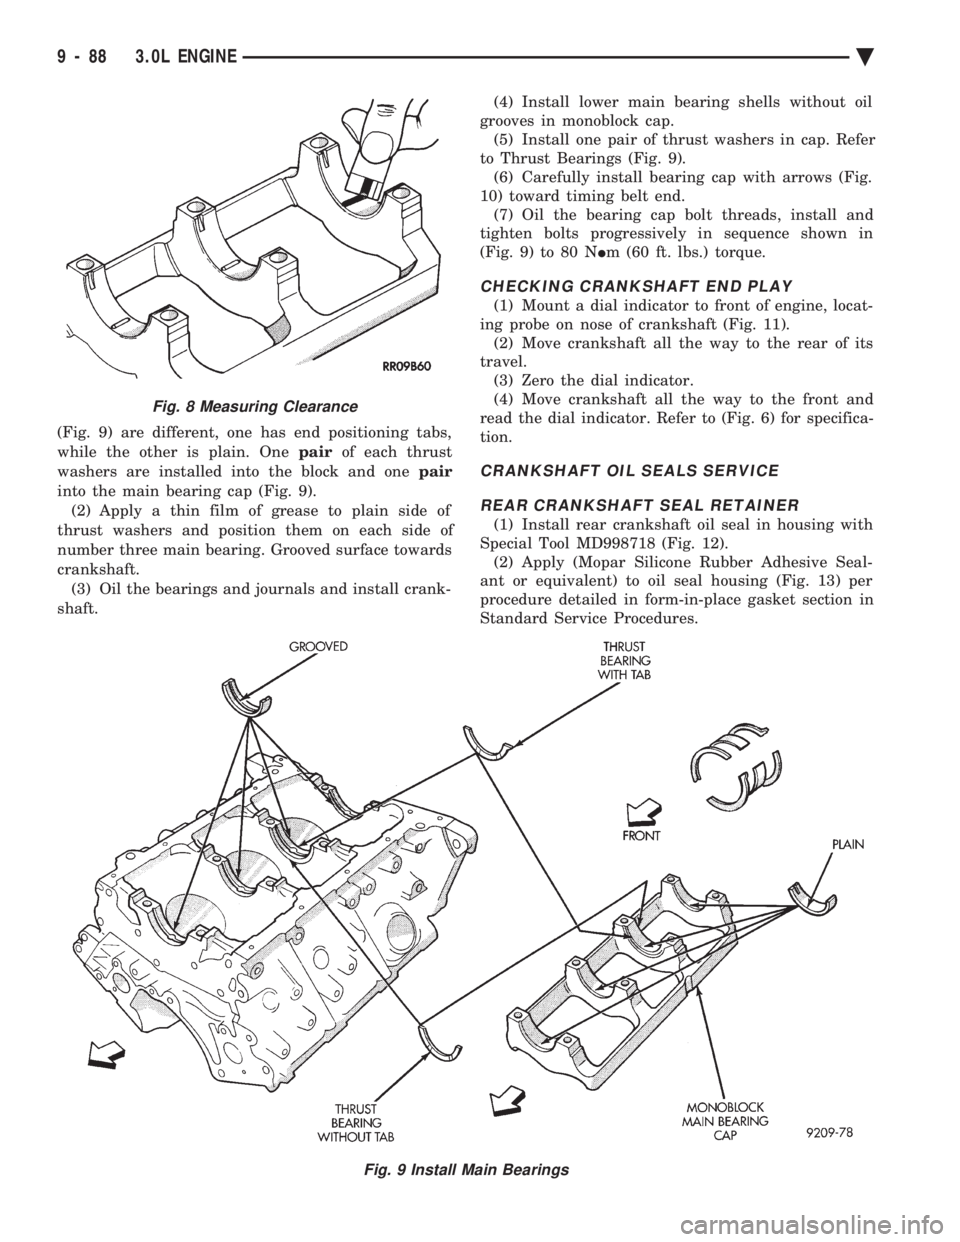
(Fig. 9) are different, one has end positioning tabs,
while the other is plain. One pairof each thrust
washers are installed into the block and one pair
into the main bearing cap (Fig. 9). (2) Apply a thin film of grease to plain side of
thrust washers and position them on each side of
number three main bearing. Grooved surface towards
crankshaft. (3) Oil the bearings and journals and install crank-
shaft. (4) Install lower main bearing shells without oil
grooves in monoblock cap. (5) Install one pair of thrust washers in cap. Refer
to Thrust Bearings (Fig. 9). (6) Carefully install bearing cap with arrows (Fig.
10) toward timing belt end. (7) Oil the bearing cap bolt threads, install and
tighten bolts progressively in sequence shown in
(Fig. 9) to 80 N Im (60 ft. lbs.) torque.
CHECKING CRANKSHAFT END PLAY
(1) Mount a dial indicator to front of engine, locat-
ing probe on nose of crankshaft (Fig. 11). (2) Move crankshaft all the way to the rear of its
travel. (3) Zero the dial indicator.
(4) Move crankshaft all the way to the front and
read the dial indicator. Refer to (Fig. 6) for specifica-
tion.
CRANKSHAFT OIL SEALS SERVICE
REAR CRANKSHAFT SEAL RETAINER
(1) Install rear crankshaft oil seal in housing with
Special Tool MD998718 (Fig. 12). (2) Apply (Mopar Silicone Rubber Adhesive Seal-
ant or equivalent) to oil seal housing (Fig. 13) per
procedure detailed in form-in-place gasket section in
Standard Service Procedures.
Fig. 9 Install Main Bearings
Fig. 8 Measuring Clearance
9 - 88 3.0L ENGINE Ä
Page 1655 of 2438
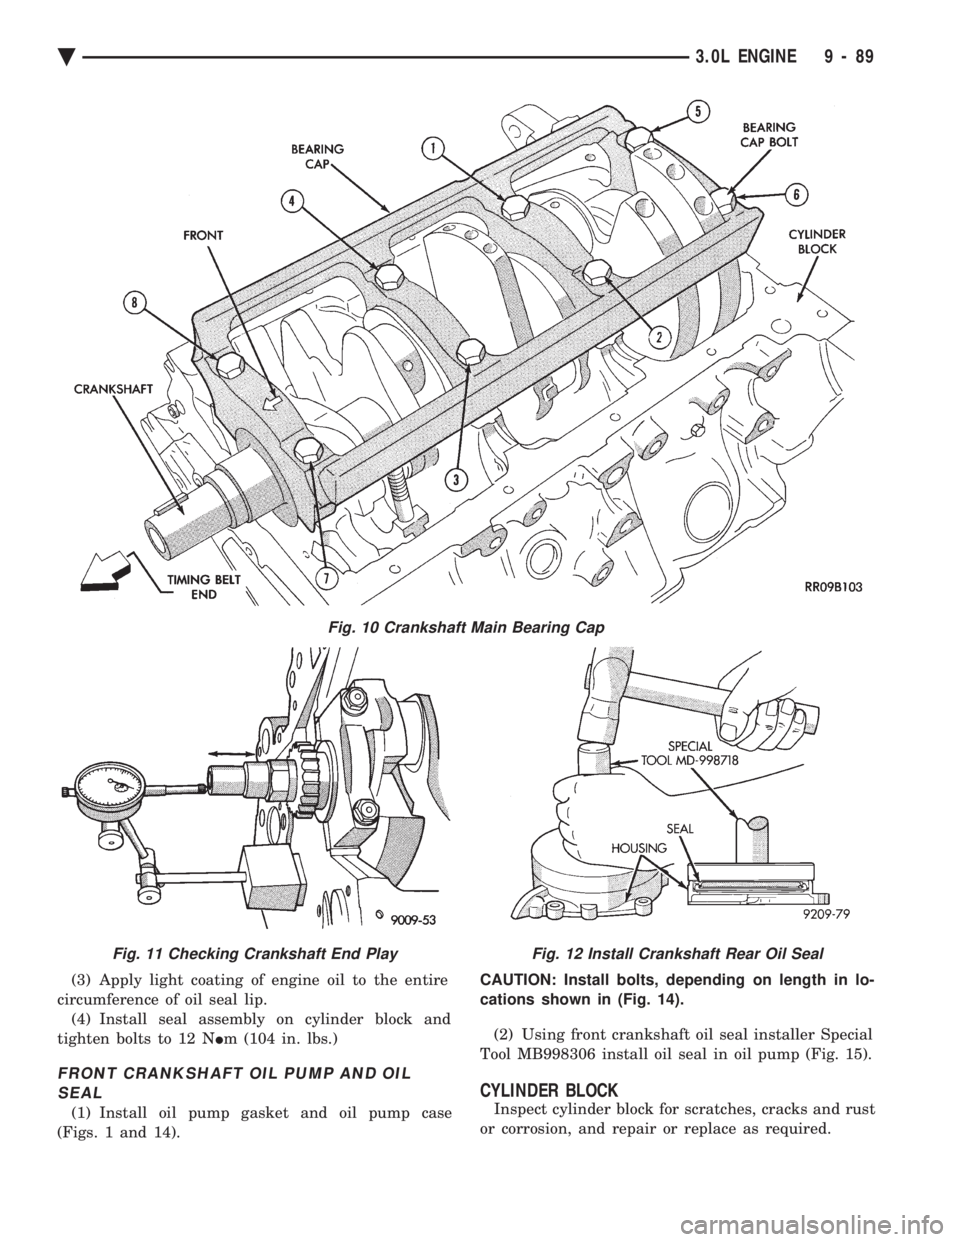
(3) Apply light coating of engine oil to the entire
circumference of oil seal lip. (4) Install seal assembly on cylinder block and
tighten bolts to 12 N Im (104 in. lbs.)
FRONT CRANKSHAFT OIL PUMP AND OIL
SEAL
(1) Install oil pump gasket and oil pump case
(Figs. 1 and 14). CAUTION: Install bolts, depending on length in lo-
cations shown in (Fig. 14).
(2) Using front crankshaft oil seal installer Special
Tool MB998306 install oil seal in oil pump (Fig. 15).
CYLINDER BLOCK
Inspect cylinder block for scratches, cracks and rust
or corrosion, and repair or replace as required.
Fig. 10 Crankshaft Main Bearing Cap
Fig. 11 Checking Crankshaft End PlayFig. 12 Install Crankshaft Rear Oil Seal
Ä 3.0L ENGINE 9 - 89
Page 1656 of 2438
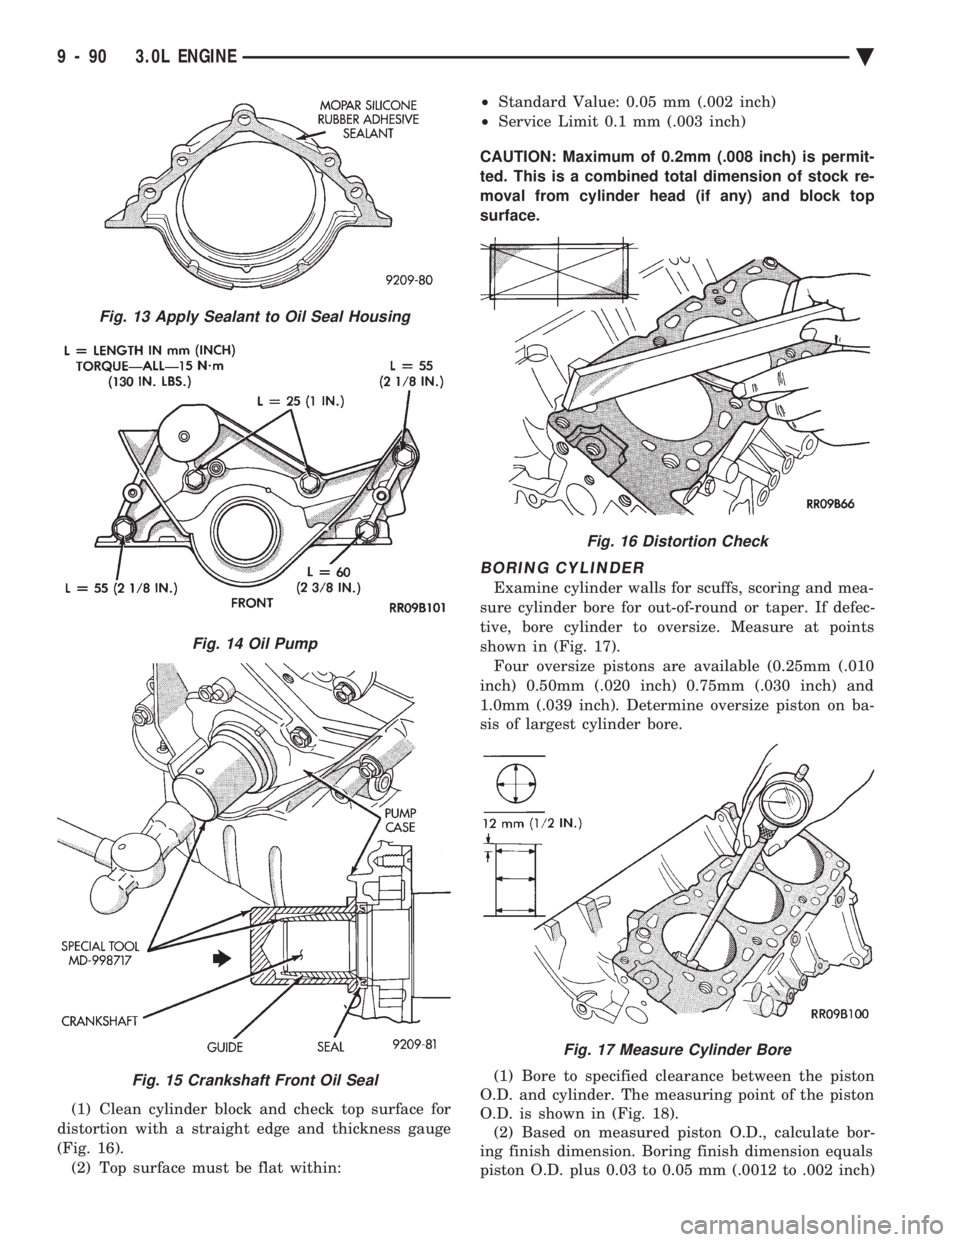
(1) Clean cylinder block and check top surface for
distortion with a straight edge and thickness gauge
(Fig. 16). (2) Top surface must be flat within: ²
Standard Value: 0.05 mm (.002 inch)
² Service Limit 0.1 mm (.003 inch)
CAUTION: Maximum of 0.2mm (.008 inch) is permit-
ted. This is a combined total dimension of stock re-
moval from cylinder head (if any) and block top
surface.
BORING CYLINDER
Examine cylinder walls for scuffs, scoring and mea-
sure cylinder bore for out-of-round or taper. If defec-
tive, bore cylinder to oversize. Measure at points
shown in (Fig. 17). Four oversize pistons are available (0.25mm (.010
inch) 0.50mm (.020 inch) 0.75mm (.030 inch) and
1.0mm (.039 inch). Determine oversize piston on ba-
sis of largest cylinder bore.
(1) Bore to specified clearance between the piston
O.D. and cylinder. The measuring point of the piston
O.D. is shown in (Fig. 18). (2) Based on measured piston O.D., calculate bor-
ing finish dimension. Boring finish dimension equals
piston O.D. plus 0.03 to 0.05 mm (.0012 to .002 inch)
Fig. 13 Apply Sealant to Oil Seal Housing
Fig. 14 Oil Pump
Fig. 15 Crankshaft Front Oil Seal
Fig. 16 Distortion Check
Fig. 17 Measure Cylinder Bore
9 - 90 3.0L ENGINE Ä