CHEVROLET PRIZM 1998 3.G Owners Manual
Manufacturer: CHEVROLET, Model Year: 1998, Model line: PRIZM, Model: CHEVROLET PRIZM 1998 3.GPages: 364, PDF Size: 18.79 MB
Page 281 of 364
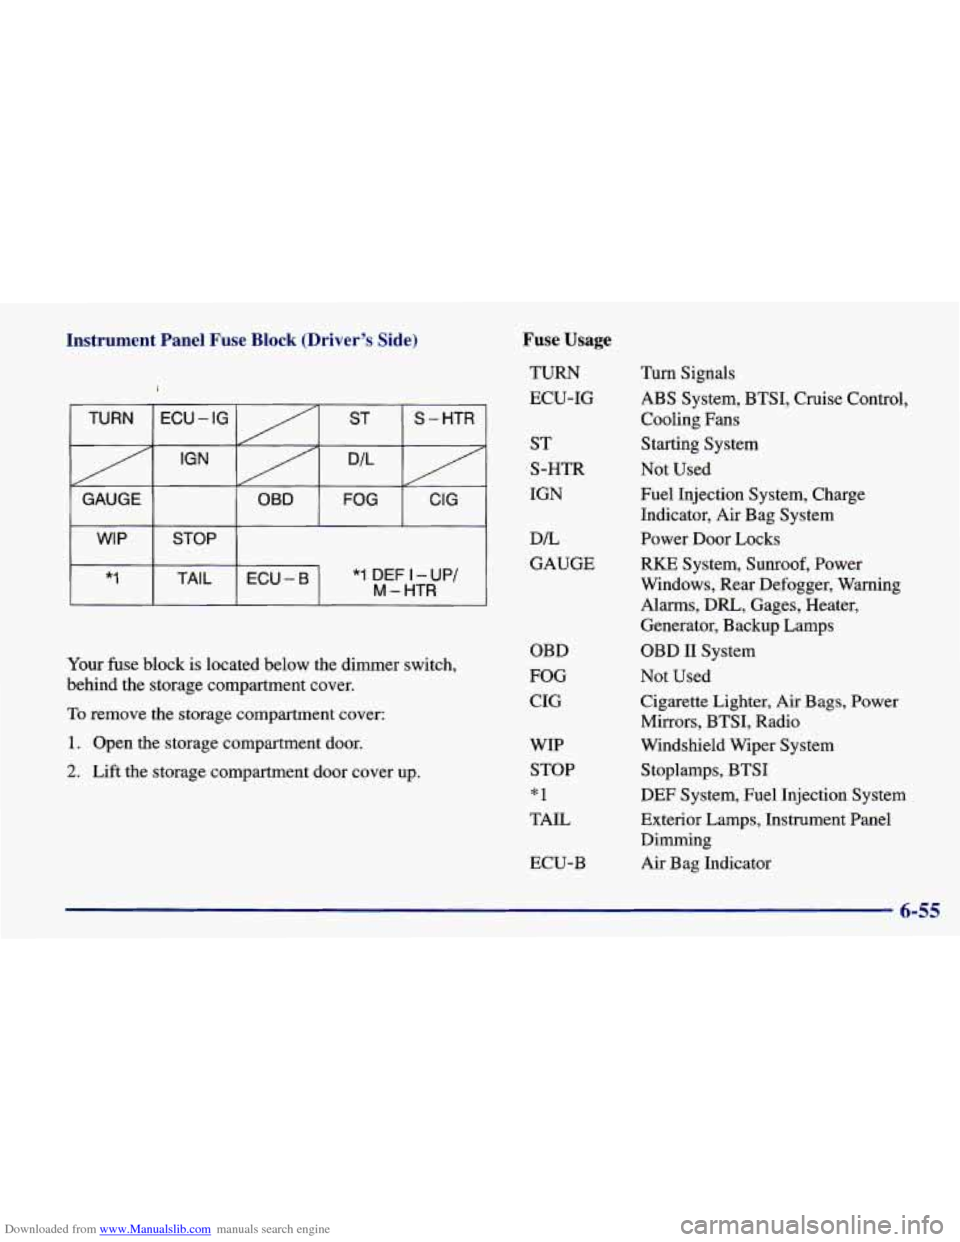
Downloaded from www.Manualslib.com manuals search engine Instrument Panel Fuse Block (Driver's Side)
1
TURN S - HTR ST ECU - IG
IGN D/L
GAUGE CIG FOG OBD
WIP STOP
*I DEF I - UP/
M - HTR
Your fuse block is located below the dimmer switch,
behind the storage compartment cover.
To remove the storage compartment cover:
1. Open the storage compartment door.
2. Lift the storage compartment door cover up.
Fuse Usage
TURN
ECU-IG
ST
S-HTR
IGN
DL
GAUGE
OBD
FOG
CIG
WIP STOP
"1
TAIL
ECU-B
Turn Signals
ABS System, BTSI, Cruise Control,
Cooling Fans
Starting System
Not Used
Fuel Injection System, Charge
Indicator, Air Bag System Power Door
Locks
RKE System, Sunroof, Power
Windows, Rear Defogger, Warning Alarms,
DRL, Gages, Heater,
Generator, Backup Lamps
OBD 11 System
Not Used
Cigarette Lighter, Air Bags, Power
Mirrors, BTSI, Radio
Windshield Wiper System
Stoplamps, BTSI
DEF System, Fuel Injection System
Exterior Lamps, Insmment Panel
Dimming
Air Bag Indicator
6-55
Page 282 of 364
Downloaded from www.Manualslib.com manuals search engine Engine Compartment Fusemelay Block
(Driver's Side)
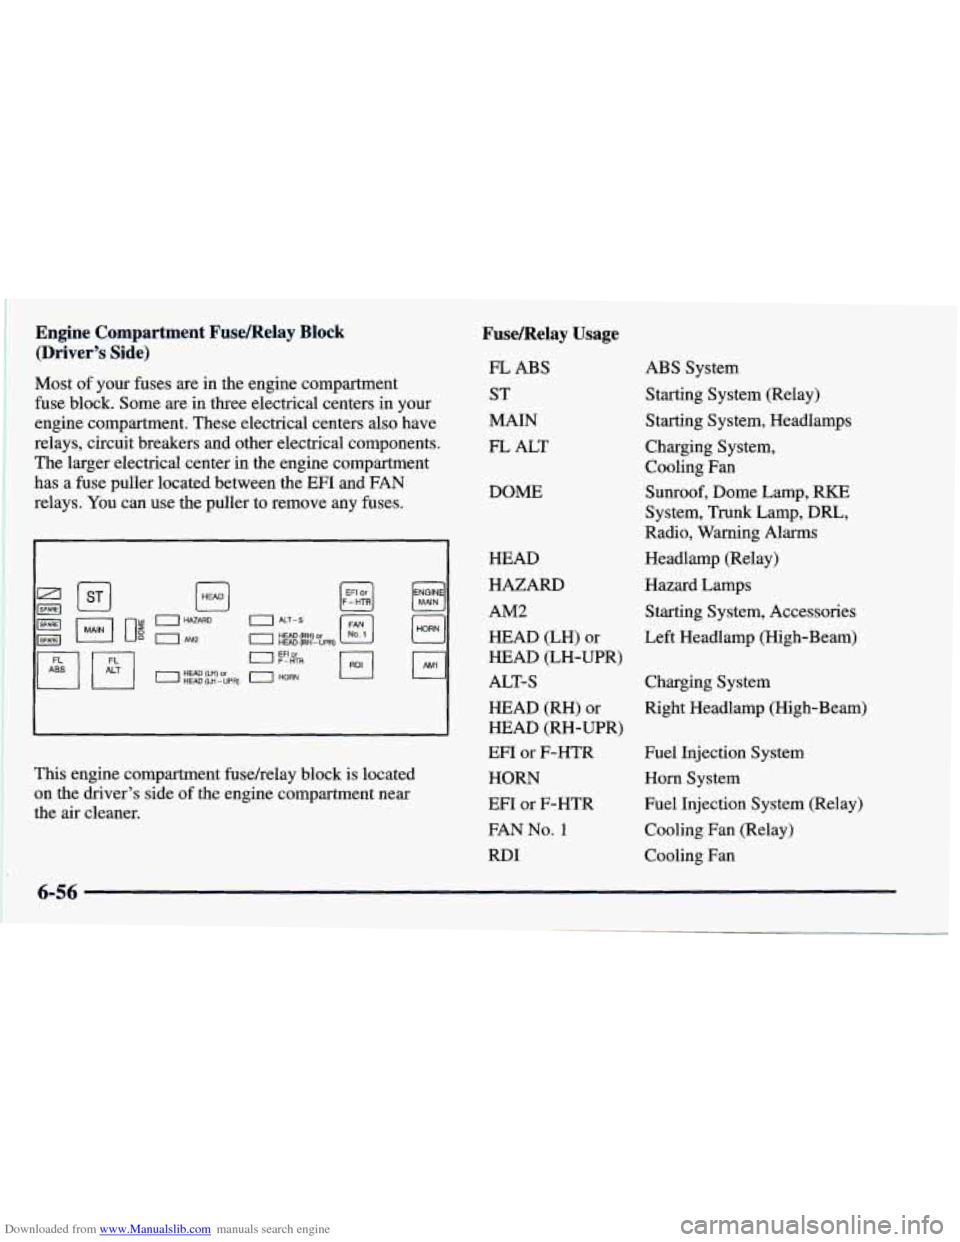
Most of your fuses are in the engine compartment
fuse block. Some are in three electrical centers in your
engine compartment. These electrical centers also have
relays, circuit breakers and other electrical components.
The larger electrical center in the engine compartment
has a fuse puller located between the EFI and FAN
relays. You can use the puller to remove any fuses.
Fusemelay Usage
FL ABS
ST
MAIN
FL ALT
DOME
[.-I
0 HAZARD
0 AM2
0 HEAD (LH -UPR) HEAD (LH) or
[,,,,I ENGlN
This engine compartment fusehelay block is located
on the driver's side of the engine compartment near
the air cleaner. HEAD
HAZARD
AM2
HEAD (LH) or
HEAD (LH-UPR)
LT-S
HEAD
(RH) or
EFI or F-HTR
HORN
EFI or F-HTR
FAN
No. 1
RDI HEAD (RH-UPR)
ABS System
Starting System (Relay)
Starting System, Headlamps
Charging System,
Cooling Fan
Sunroof, Dome Lamp, RKE
System, Trunk Lamp, DRL,
Radio, Warning Alarms
Headlamp (Relay)
Hazard Lamps
Starting System, Accessories
Left Headlamp (High-Beam)
Charging System
Right Headlamp (High-Beam)
Fuel Injection System
Horn System
Fuel Injection System (Relay)
Cooling Fan (Relay) Cooling Fan
6-56
Page 283 of 364
Downloaded from www.Manualslib.com manuals search engine Fusemelay Usage
ENGINE MAIN
HORN (Relay)
AM1 Main Engine (Relay)
Horn System
Starting System, Air Bags
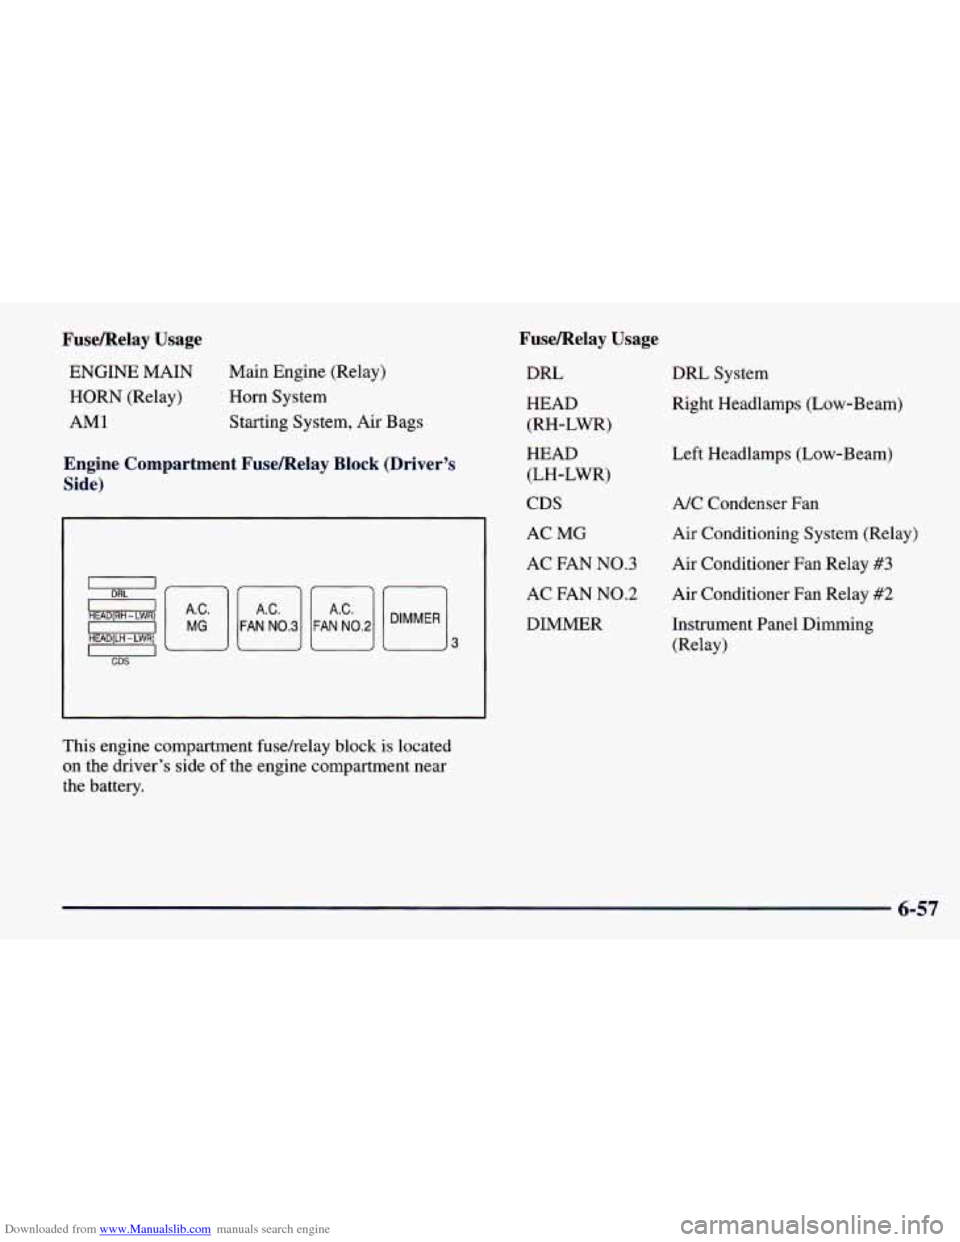
Engine Compartment Fusemelay Block (Driver’s
Side)
-
e5 HEAD(RH - LWR)
0
0
HEAD(LH -LWR)
CDS Elm FAN N0.3 FAN N0.2 El3
DIMMER
This engine compartment fusehelay block is located
on the driver’s side of the engine compartment near
the battery.
Fusemelay Usage
DRL
HEAD
(RH-LWR)
HEAD (LH-LWR)
CDS
AC
MG
AC FAN N0.3
AC FAN
N0.2
DIMMER DRL System
Right Headlamps (Low-Beam)
Left Headlamps (Low-Beam)
A/C Condenser Fan
Air Conditioning System (Relay)
Air Conditioner Fan Relay
#3
Air Conditioner Fan Relay #2
Instrument Panel Dimming
(Relay)
6-57
Page 284 of 364
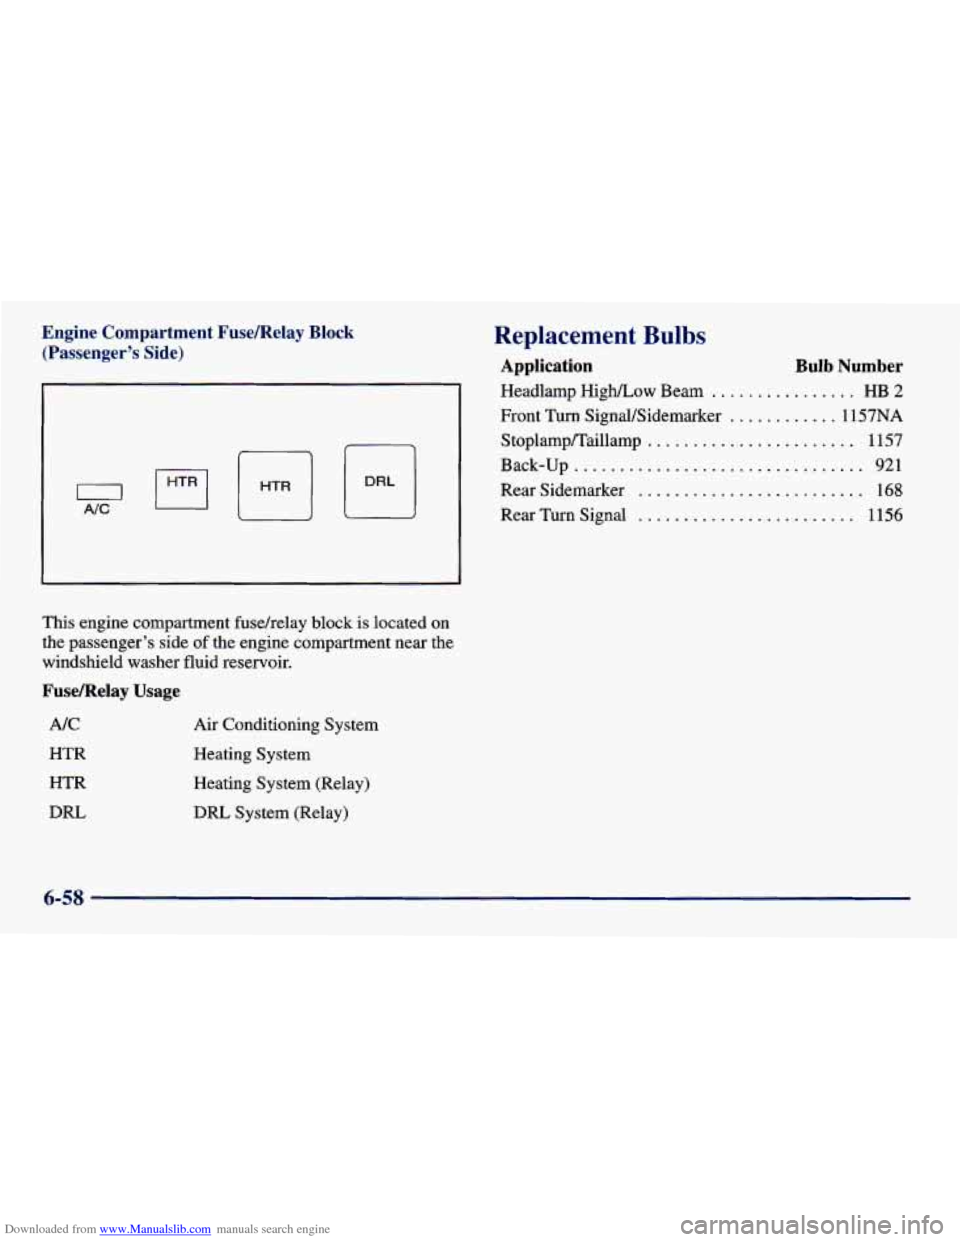
Downloaded from www.Manualslib.com manuals search engine Engine Compartment Fusemelay Block (Passenger's Side)
n
This engine compartment fusehelay block is located on
the passenger's side
of the engine compartment near the
windshield washer fluid reservoir.
Fusemelay Usage
NC
HTR
HTR
DRL Air Conditioning System
Heating System
Heating System (Relay)
DRL System (Relay)
Replacement Bulbs
Headlamp High/Low Beam ................ HB 2
Front Turn SignaVSidemarker ............ 1157NA
Application Bulb Number
Stoplamp/"aillamp ....................... 1157
Back-up
................................ 921
Rear Sidemarker ......................... 168
Rear Turn Signal
........................ 1156
6-58
Page 285 of 364
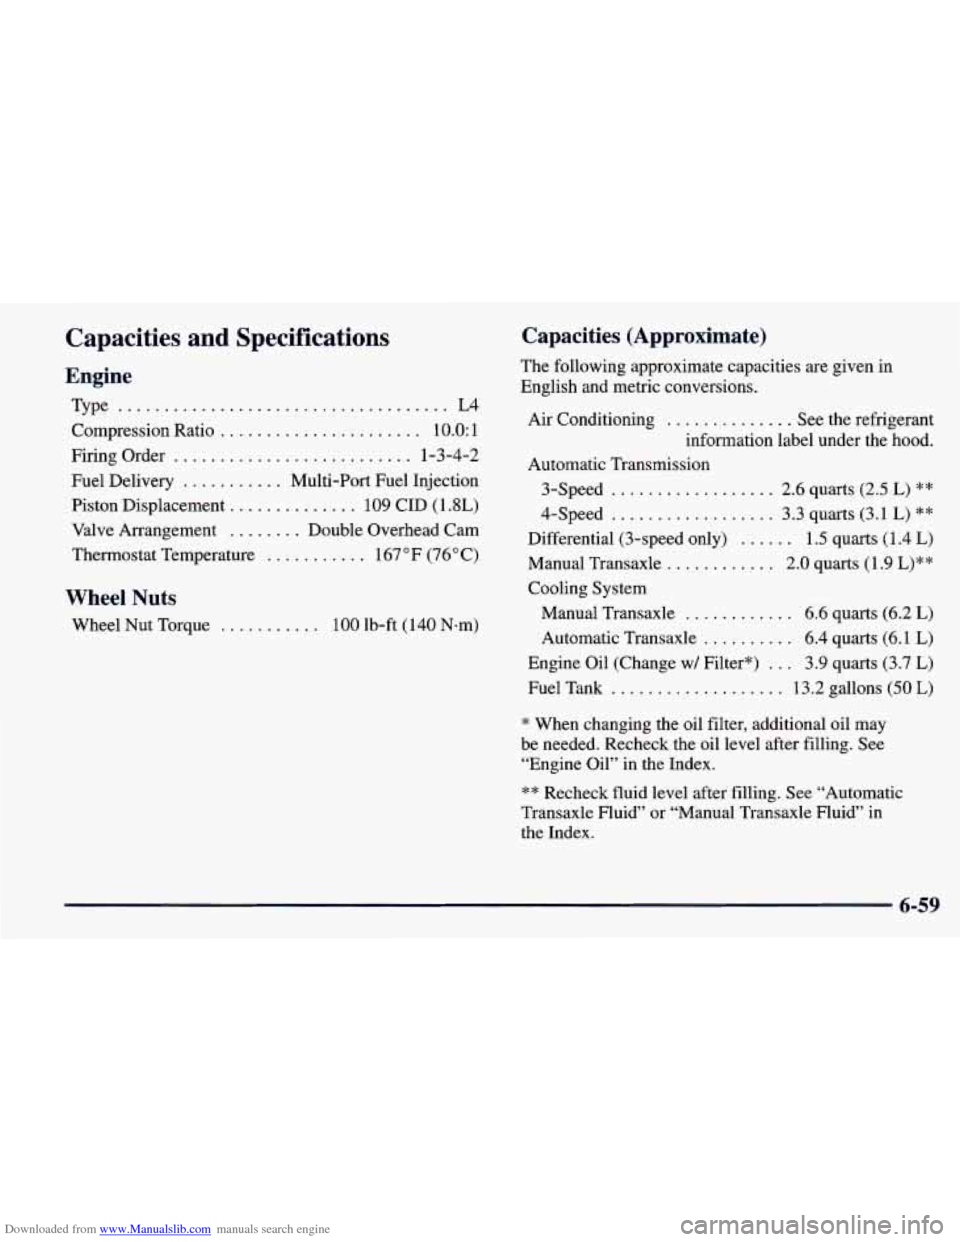
Downloaded from www.Manualslib.com manuals search engine Capacities and Specifications
Engine
Type .................................... L4
Compression Ratio ...................... 10.0: 1
Firing Order
.......................... 1-3-4-2
Fuel Delivery
........... Multi-Port Fuel Injection
Piston Displacement
.............. 109 CID (1.8L)
Valve Arrangement
........ Double Overhead Cam
Thermostat Temperature
........... 167°F (76°C)
Wheel Nuts
Wheel Nut Torque ........... 100 lb-ft (140 Nem)
Capacities (Approximate)
The following approximate capacities are given in
English and metric conversions.
Air Conditioning
.............. See the refrigerant
information label under the hood.
Automatic Transmission
3-Speed
.................. 2.6 quarts (2.5 L) **
4-Speed .................. 3.3 quarts (3.1 L) **
Differential (3-speed only) ...... 1.5 quarts (1.4 L)
Manual Transaxle ............ 2.0 quarts (1.9 L)**
Cooling System
Manual Transaxle
.......... 6.6 quarts (6.2 L)
Automatic Transaxle .......... 6.4 quarts (6.1 L)
Fuel Tank ................... 13.2 gallons (50 L)
Engine Oil (Change w/ Filter*)
... 3.9 quarts (3.7 L)
* When changing the oil filter, additional oil may
be needed. Recheck the oil level after filling. See “Engine Oil” in the Index.
** Recheck fluid level after filling. See “Automatic
Transaxle Fluid” or “Manual Transaxle Fluid”
in
the Index.
6-59
Page 286 of 364
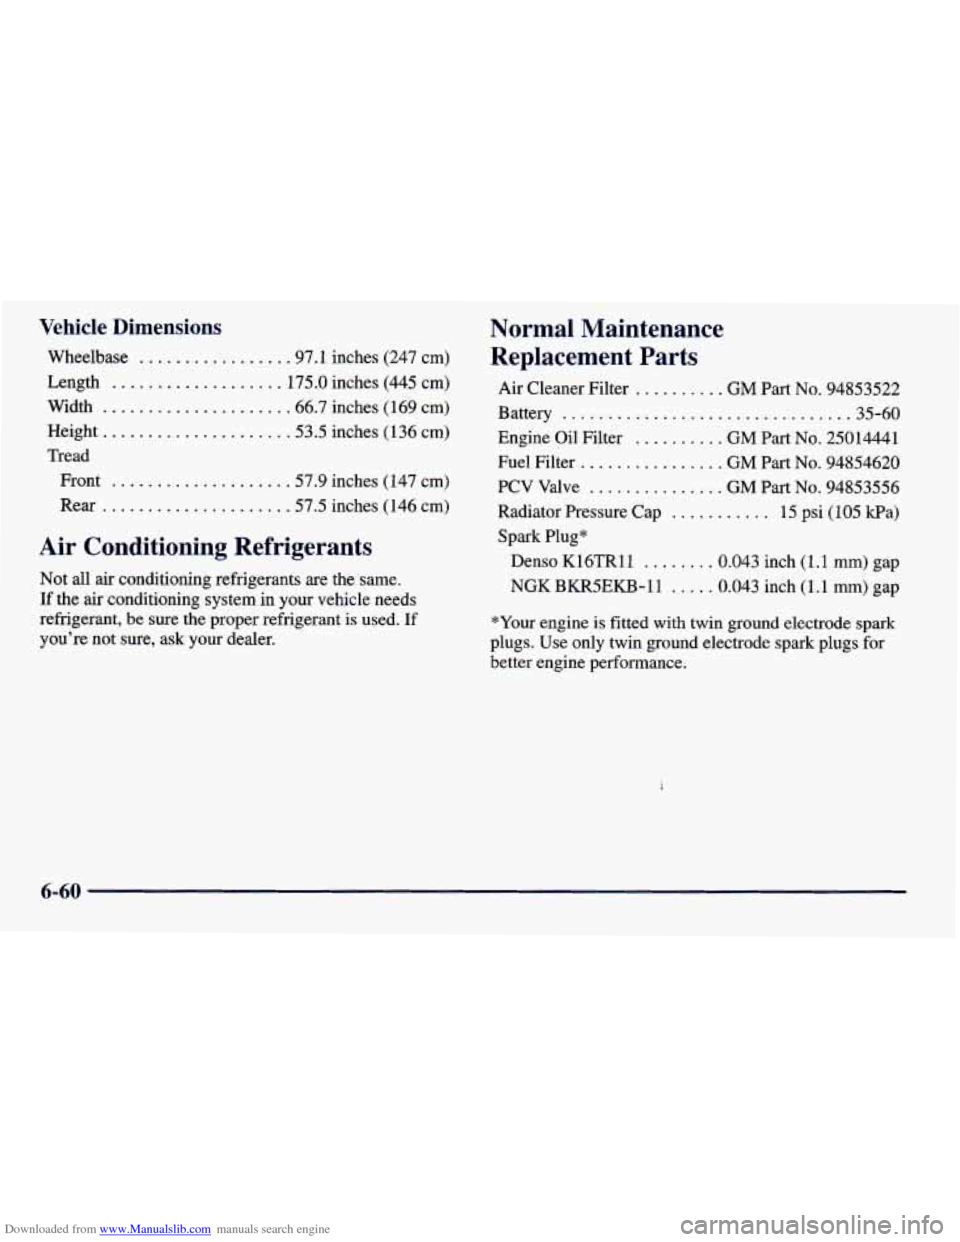
Downloaded from www.Manualslib.com manuals search engine Vehicle Dimensions
Wheelbase ................ .97.1 inches (247 cm)
Length
................... 175.0 inches (445 cm)
Width
.................... .66.7 inches (169 cm)
Height
.................... .53.5 inches (1 36 cm)
Tread Front
................... .57.9 inches (147 cm)
Rear
.................... -57.5 inches (146 cm)
Air Conditioning Refrigerants
Not all air conditioning refrigerants are the same.
If the air conditioning system
in your vehicle needs
refrigerant, be sure the proper refrigerant
is used. If
you’re not sure, ask your dealer.
Normal Maintenance
Replacement Parts
Air Cleaner Filter .......... GM Part No. 94853522
Battery
............................... .35-60
Engine Oil Filter .......... GM Part No. 25014441
Fuel Filter
................ GM Part No. 94854620
PCV Valve
............... GM Part No. 94853556
Radiator Pressure Cap
........... 15 psi (105 kPa)
Spark Plug*
Denso K16TR11 ........ 0.043 inch (1.1 mm) gap
NGK BKRSEKB-11
..... 0.043 inch (1.1 mm) gap
*Your engine is fitted
with twin ground electrode spark
plugs. Use
only twin ground electrode spark plugs for
better engine performance.
6-60
Page 287 of 364
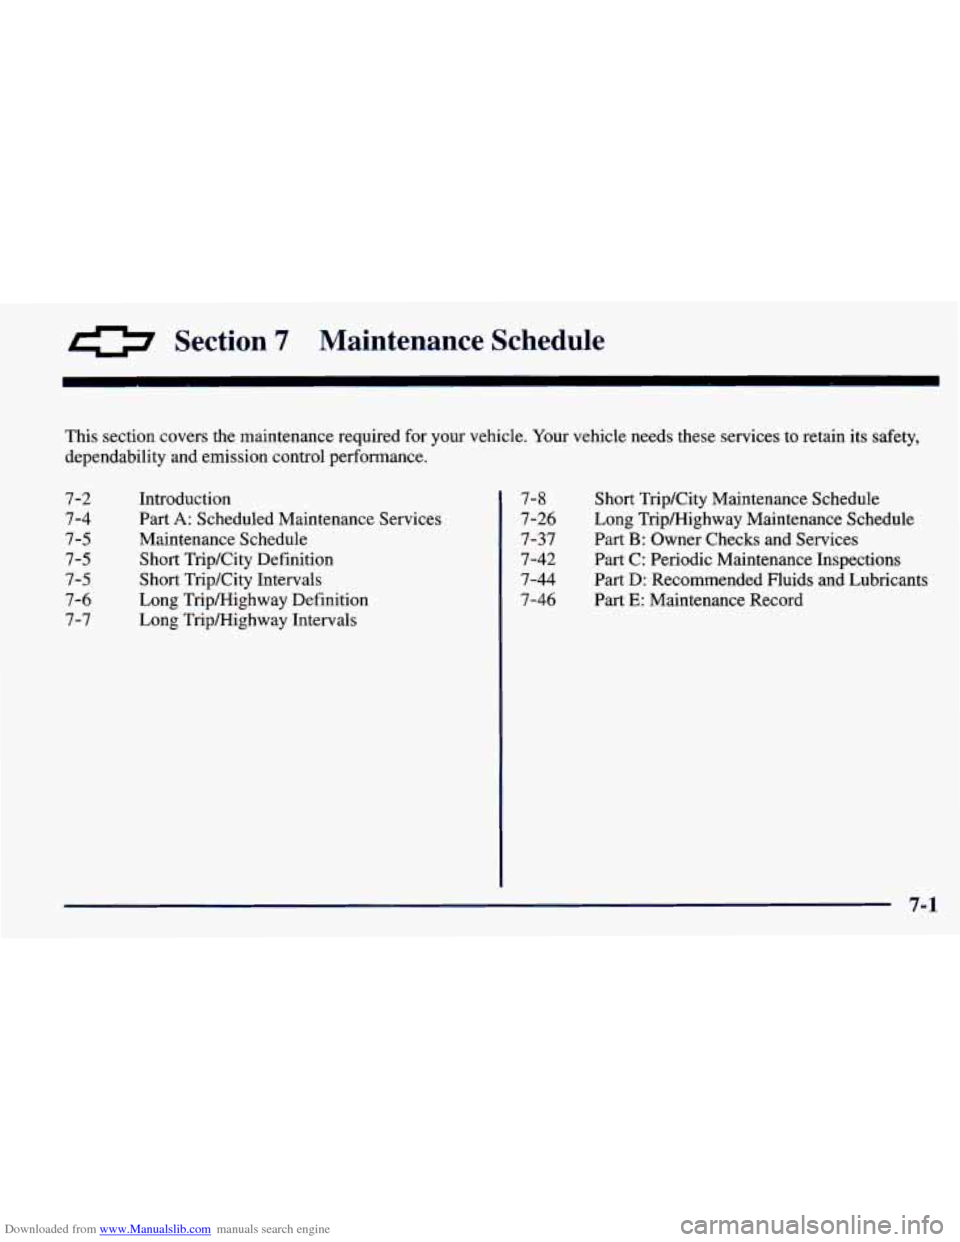
Downloaded from www.Manualslib.com manuals search engine 0 Section 7 Maintenance Schedule
This section covers the maintenance required for your vehicle. Your vehicle needs these services to retain its \
safety,
dependability and emission control performance.
7-2
7 -4
7-5
7-5
7-5
7-6
7-7
Short TripKity Maintenance Schedule
Long Triphlighway Maintenance Schedule
Part
B: Owner Checks and Services
Part C: Periodic Maintenance Inspections
Part D: Recommended Fluids and Lubricants
Part
E: Maintenance Record
Introduction
Part
A: Scheduled Maintenance Services
Maintenance Schedule
Short Trip/City Definition
Short TripKity Intervals
Long Tripmighway Definition
Long Tripmighway Intervals
7-8
7-26
7-37 7-42
7-44
7-46
7-1
Page 288 of 364
Downloaded from www.Manualslib.com manuals search engine IMPORTANT.
KEEP ENGINE OIL
AT THE PROPER
LEVEL AND CHANGE AS
RECOMMENDED
I
protection
Plan
Have you purchased the GM Protection Plan? The Plan
supplements your new vehicle warranties. See your
Warranty and Owner Assistance booklet, or your
Chevrolet dealer for details.
Introduction
Your Vehicle and the Environment
Proper vehicle maintenance not only helps to keep your
vehicle in good working condition, but also helps the
environment. All recommended maintenance procedures
are important. Improper vehicle maintenance can even
affect the quality
of the air we breathe. Improper fluid
levels or the wrong tire inflation can increase the level
of emissions from your vehicle. To help protect our
environment, and
to keep your vehicle in good
condition, please maintain
your vehicle properly.
7-2
Page 289 of 364
Downloaded from www.Manualslib.com manuals search engine How This Section is Organized
The remainder of this section is divided into five parts:
“Part A: Scheduled Maintenance Services” shows
what to have done and how often. Some of these
services can be complex,
so unless you are technically
qualified and have the necessary equipment, you should
let your dealer’s service department or another qualified service center do these jobs.
Performing maintenance work on a vehicle can
be dangerous. In trying to do some
jobs, you can
be seriously injured. Do your own maintenance
work only
if you have the required know-how
and the proper tools and equipment for the
job.
If you have any doubt, have a qualified
technician do the work.
If you are skilled enough to do some work on your
vehicle, you will probably want to get the service
information. See “Service and Owner Publications”
in the Index.
“Part B: Owner Checks and Services” tells you
what should be checked and when. It also explains
what you can easily do to help keep your vehicle in
good condition.
“Part C: Periodic Maintenance Inspections”
explains important inspections that your dealer’s
service department or another qualified service center
should perform.
“Part D: Recommended Fluids and Lubricants”
lists some recommended products to help keep your
vehicle properly maintained. These products, or their
equivalents, should be used whether you do the work
yourself or have
it done.
“Part E: Maintenance Record” provides a place for
you to record the maintenance performed on your
vehicle. Whenever any maintenance is performed, be sure to write it down in this part. This will help you
determine when your next maintenance should be done.
In addition, it
is a good idea to keep your maintenance
receipts. They may be needed to qualify your vehicle
for warranty repairs.
7-3
Page 290 of 364
Downloaded from www.Manualslib.com manuals search engine Part A: Scheduled
Maintenance Services
Using Your Maintenance Schedule
We at General Motors want to help you keep your
vehicle in good working condition. But we don’t
know exactly how you’ll drive it. You may drive very
short distances only a few times
a week. Or you may
drive long distances all the time
in very hot, dusty
weather. You
may use your vehicle in making deliveries.
Or you may drive it to work,
to do errands or in
many other ways.
Because of all the different ways people
use their
vehicles, maintenance needs vary.
You may even need
more frequent checks and replacements than you’ll find
in the schedules in this section.
So please read this
section and note how you drive. If you have any
questions on how to keep your vehicle in good
condition, see your dealer.
This part tells you the maintenance services you should
have done and when you should schedule them. If you
go to your dealer for your service needs, you’ll know
that GM-trained and supported service people will
perform the work using genuine GM parts. The proper fluids and lubricants to use are listed in
Part
D. Make sure whoever services your vehicle
uses these. All parts should be replaced and all necessary repairs done before you or anyone else
drives the vehicle.
These schedules are for vehicles that:
0 carry passengers and cargo within recommended
limits, You will find these limits
on your vehicle’s
Tire-Loading Information label. See “Loading Your
Vehicle” in the Index.
are driven on reasonable road surfaces within legal
0 use the recommended fuel. See “Fuel” in the Index.
driving limits.
Selecting the Right Schedule
First you’ll need to decide which
of the two schedules
is right for your vehicle. Here’s how to decide which
schedule to follow:
7-4