CHEVROLET SILVERADO 2009 2.G Owners Manual
Manufacturer: CHEVROLET, Model Year: 2009, Model line: SILVERADO, Model: CHEVROLET SILVERADO 2009 2.GPages: 600, PDF Size: 3.24 MB
Page 471 of 600
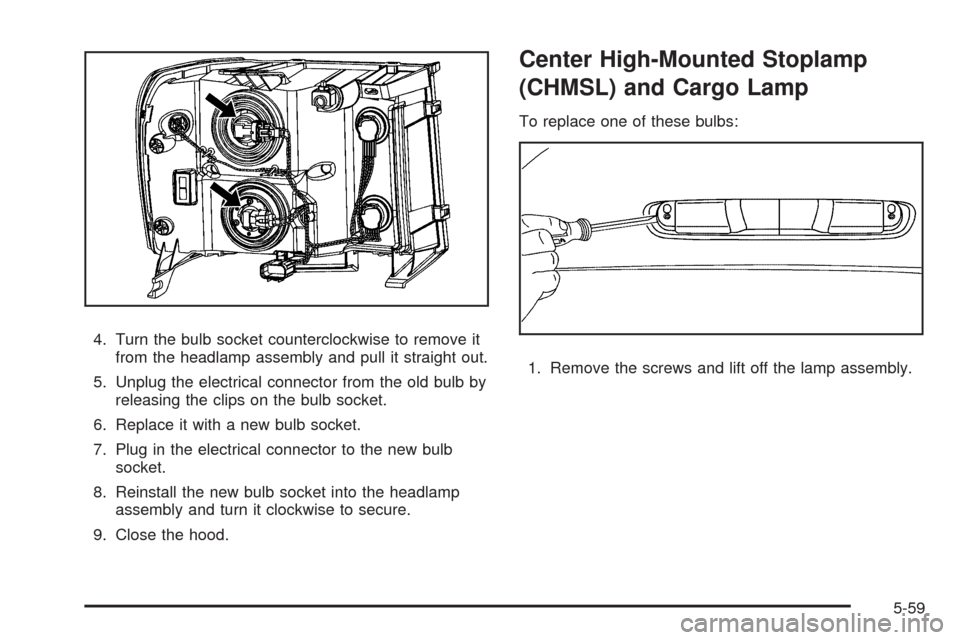
4. Turn the bulb socket counterclockwise to remove it
from the headlamp assembly and pull it straight out.
5. Unplug the electrical connector from the old bulb by
releasing the clips on the bulb socket.
6. Replace it with a new bulb socket.
7. Plug in the electrical connector to the new bulb
socket.
8. Reinstall the new bulb socket into the headlamp
assembly and turn it clockwise to secure.
9. Close the hood.
Center High-Mounted Stoplamp
(CHMSL) and Cargo Lamp
To replace one of these bulbs:
1. Remove the screws and lift off the lamp assembly.
5-59
Page 472 of 600
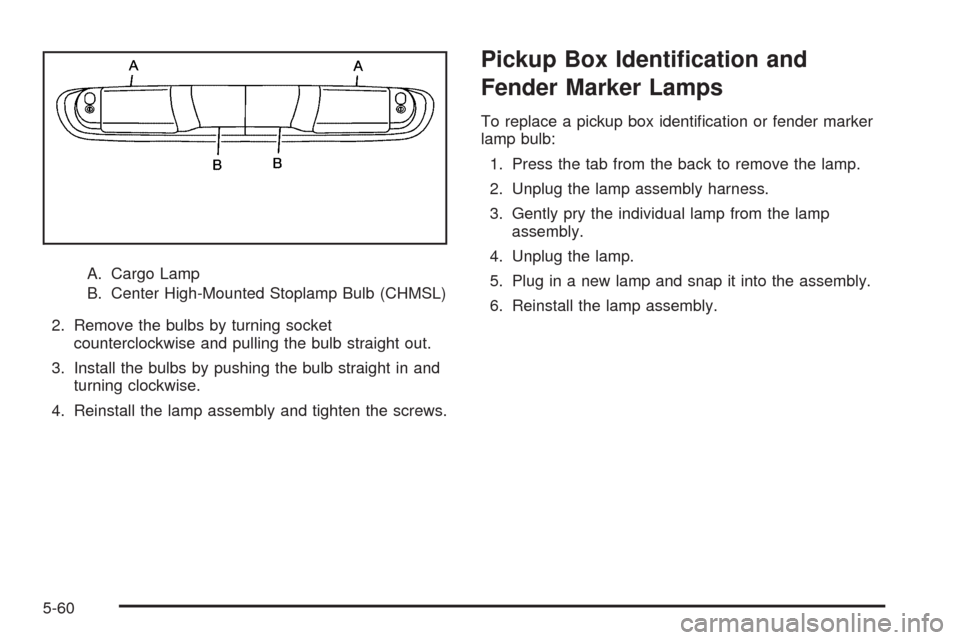
A. Cargo Lamp
B. Center High-Mounted Stoplamp Bulb (CHMSL)
2. Remove the bulbs by turning socket
counterclockwise and pulling the bulb straight out.
3. Install the bulbs by pushing the bulb straight in and
turning clockwise.
4. Reinstall the lamp assembly and tighten the screws.
Pickup Box Identi�cation and
Fender Marker Lamps
To replace a pickup box identi�cation or fender marker
lamp bulb:
1. Press the tab from the back to remove the lamp.
2. Unplug the lamp assembly harness.
3. Gently pry the individual lamp from the lamp
assembly.
4. Unplug the lamp.
5. Plug in a new lamp and snap it into the assembly.
6. Reinstall the lamp assembly.
5-60
Page 473 of 600
Taillamps, Turn Signal, Stoplamps
and Back-up Lamps
To replace one of these bulbs:
1. Open the tailgate.Tailgate on page 2-12for more
information.
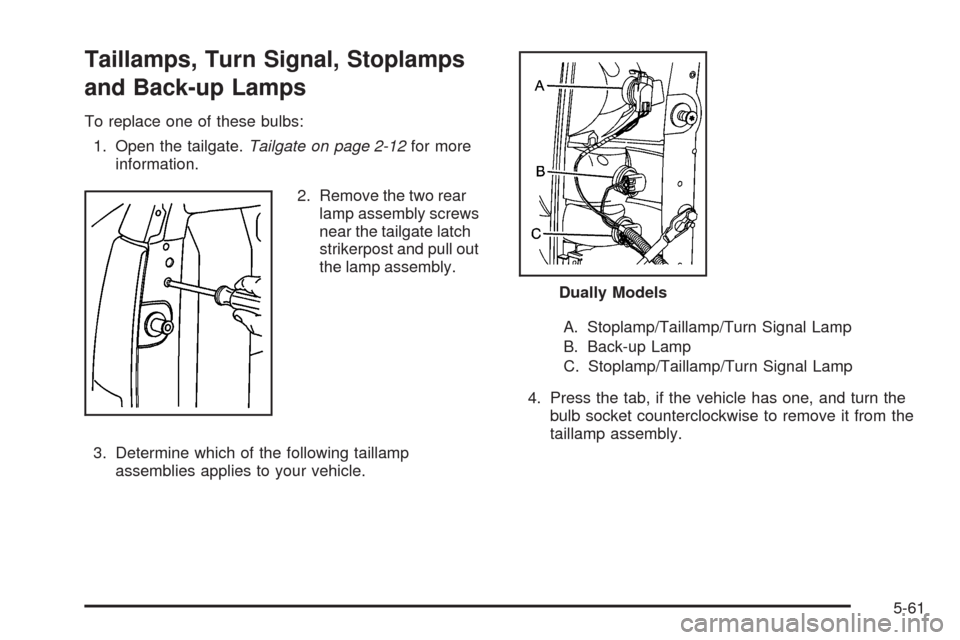
2. Remove the two rear
lamp assembly screws
near the tailgate latch
strikerpost and pull out
the lamp assembly.
3. Determine which of the following taillamp
assemblies applies to your vehicle.A. Stoplamp/Taillamp/Turn Signal Lamp
B. Back-up Lamp
C. Stoplamp/Taillamp/Turn Signal Lamp
4. Press the tab, if the vehicle has one, and turn the
bulb socket counterclockwise to remove it from the
taillamp assembly.
Dually Models
5-61
Page 474 of 600
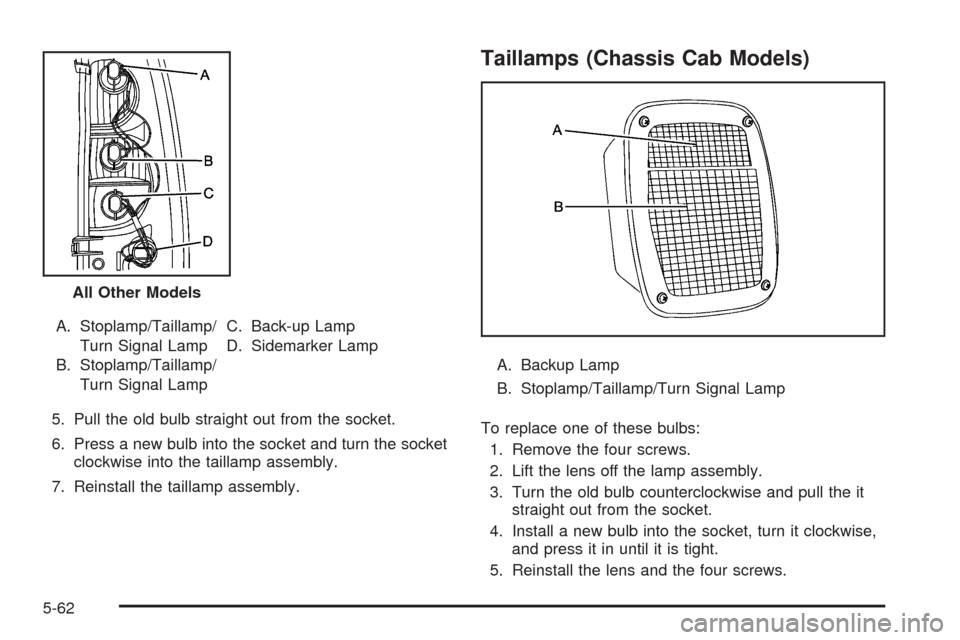
A. Stoplamp/Taillamp/
Turn Signal Lamp
B. Stoplamp/Taillamp/
Turn Signal LampC. Back-up Lamp
D. Sidemarker Lamp
5. Pull the old bulb straight out from the socket.
6. Press a new bulb into the socket and turn the socket
clockwise into the taillamp assembly.
7. Reinstall the taillamp assembly.
Taillamps (Chassis Cab Models)
A. Backup Lamp
B. Stoplamp/Taillamp/Turn Signal Lamp
To replace one of these bulbs:
1. Remove the four screws.
2. Lift the lens off the lamp assembly.
3. Turn the old bulb counterclockwise and pull the it
straight out from the socket.
4. Install a new bulb into the socket, turn it clockwise,
and press it in until it is tight.
5. Reinstall the lens and the four screws. All Other Models
5-62
Page 475 of 600
License Plate Lamp
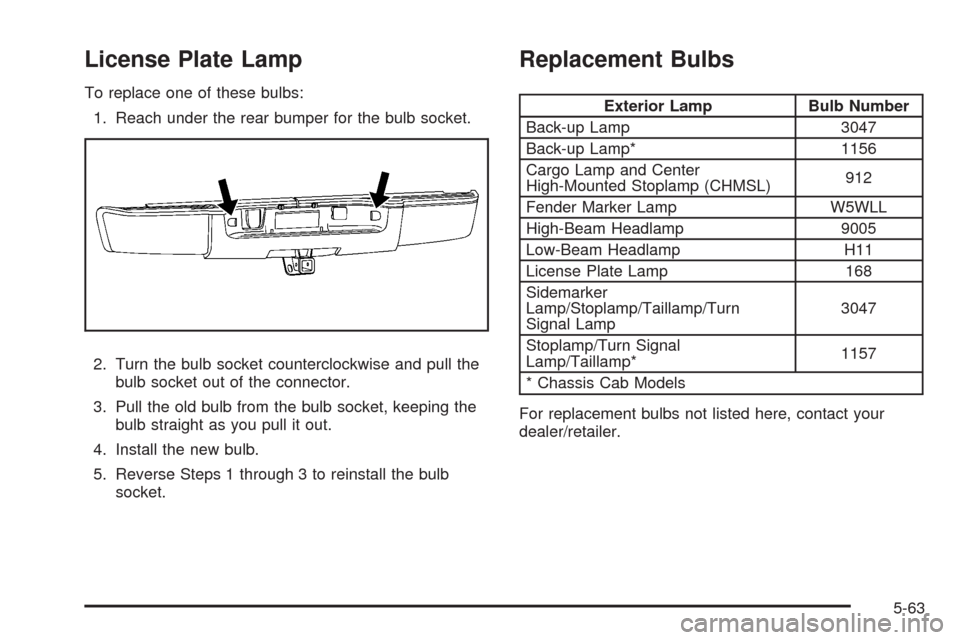
To replace one of these bulbs:
1. Reach under the rear bumper for the bulb socket.
2. Turn the bulb socket counterclockwise and pull the
bulb socket out of the connector.
3. Pull the old bulb from the bulb socket, keeping the
bulb straight as you pull it out.
4. Install the new bulb.
5. Reverse Steps 1 through 3 to reinstall the bulb
socket.
Replacement Bulbs
Exterior Lamp Bulb Number
Back-up Lamp 3047
Back-up Lamp* 1156
Cargo Lamp and Center
High-Mounted Stoplamp (CHMSL)912
Fender Marker Lamp W5WLL
High-Beam Headlamp 9005
Low-Beam Headlamp H11
License Plate Lamp 168
Sidemarker
Lamp/Stoplamp/Taillamp/Turn
Signal Lamp3047
Stoplamp/Turn Signal
Lamp/Taillamp*1157
* Chassis Cab Models
For replacement bulbs not listed here, contact your
dealer/retailer.
5-63
Page 476 of 600
Windshield Wiper Blade
Replacement
Windshield wiper blades should be inspected for wear
or cracking. SeeScheduled Maintenance (Gasoline
Engine) on page 6-4for more information on wiper blade
inspection.
Replacement blades come in different types and are
removed in different ways. Here is how to remove
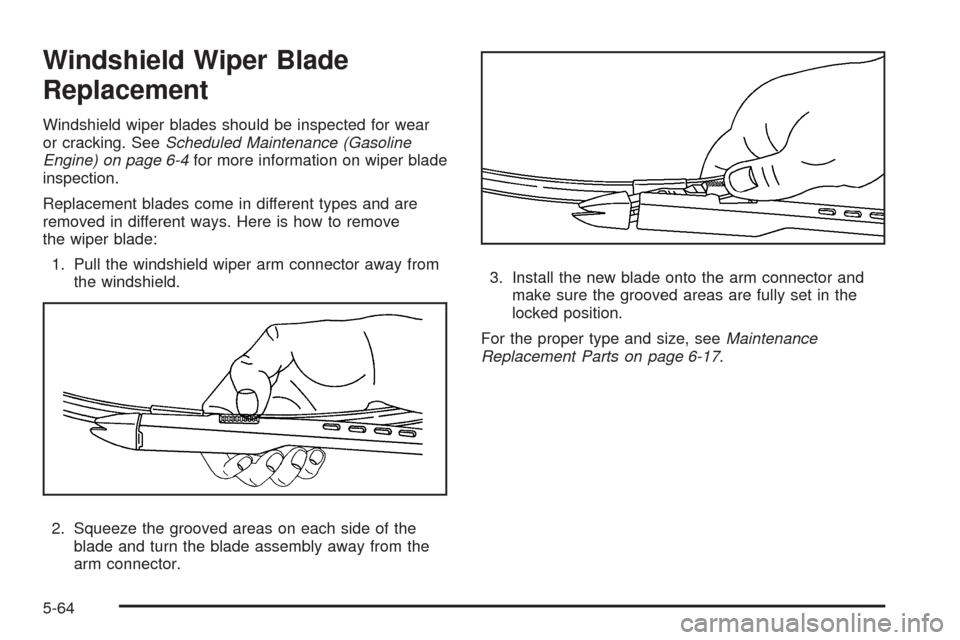
the wiper blade:
1. Pull the windshield wiper arm connector away from
the windshield.
2. Squeeze the grooved areas on each side of the
blade and turn the blade assembly away from the
arm connector.3. Install the new blade onto the arm connector and
make sure the grooved areas are fully set in the
locked position.
For the proper type and size, seeMaintenance
Replacement Parts on page 6-17.
5-64
Page 477 of 600
Tires
Your new vehicle comes with high-quality tires
made by a leading tire manufacturer. If you ever
have questions about your tire warranty and where
to obtain service, see your vehicle Warranty
booklet for details. For additional information refer
to the tire manufacturer.
{CAUTION:
Poorly maintained and improperly used tires
are dangerous.
Overloading your vehicle’s tires can
cause overheating as a result of too
much �exing. You could have an air-out
and a serious accident. SeeLoading the
Vehicle on page 4-32.
CAUTION: (Continued)
CAUTION: (Continued)
Underin�ated tires pose the same danger
as overloaded tires. The resulting accident
could cause serious injury. Check all tires
frequently to maintain the recommended
pressure. Tire pressure should be
checked when your vehicle’s tires are
cold. SeeInflation - Tire Pressure on
page 5-73.
Overin�ated tires are more likely to be
cut, punctured, or broken by a sudden
impact — such as when you hit a pothole.
Keep tires at the recommended pressure.
Worn, old tires can cause accidents. If the
tire’s tread is badly worn, or if your
vehicle’s tires have been damaged,
replace them.
5-65
Page 478 of 600
20-Inch Tires
If your vehicle has the optional 20-inch
P275/55R20 size tires, they are classi�ed as
touring tires and are designed for on road use. The
low-pro�le, wide tread design is not recommended
for “off-road” driving or commercial uses such
as snow plowing. SeeOff-Road Driving on
page 4-12andAdding a Snow Plow or Similar
Equipment on page 4-39for additional information.
Notice:If the vehicle has low-pro�le tires,
they are more susceptible to damage from road
hazards or curb impact than standard pro�le
tires. Tire and/or wheel assembly damage
can occur when coming into contact with road
hazards like, potholes, or sharp edged
objects, or when sliding into a curb. The
vehicle warranty does not cover this type of
damage. Keep tires set to the correct in�ation
pressure and, when possible avoid contact
with curbs, potholes, and other road hazards.
Tire Sidewall Labeling
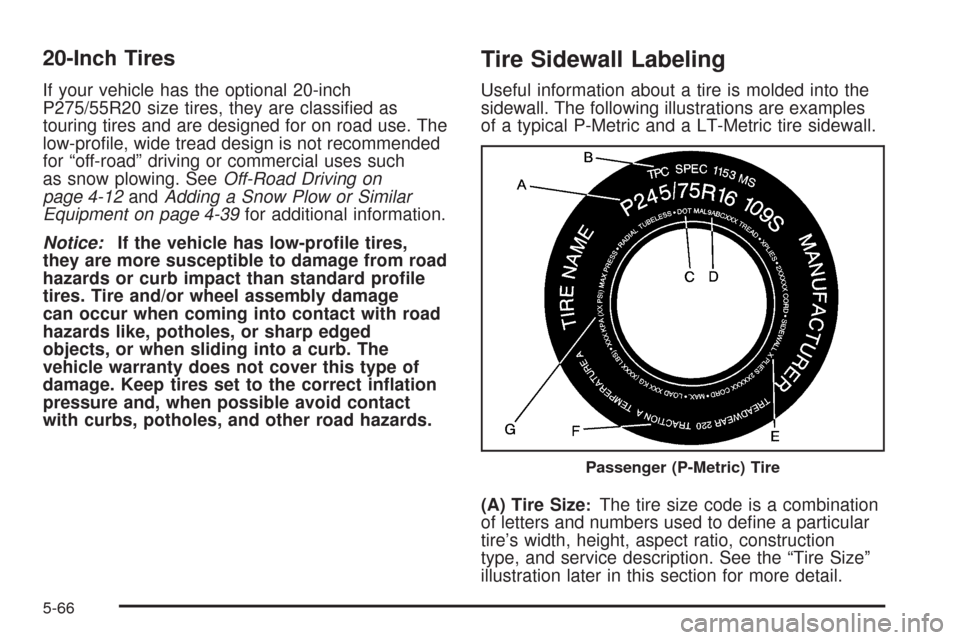
Useful information about a tire is molded into the
sidewall. The following illustrations are examples
of a typical P-Metric and a LT-Metric tire sidewall.
(A) Tire Size
:The tire size code is a combination
of letters and numbers used to de�ne a particular
tire’s width, height, aspect ratio, construction
type, and service description. See the “Tire Size”
illustration later in this section for more detail.
Passenger (P-Metric) Tire
5-66
Page 479 of 600
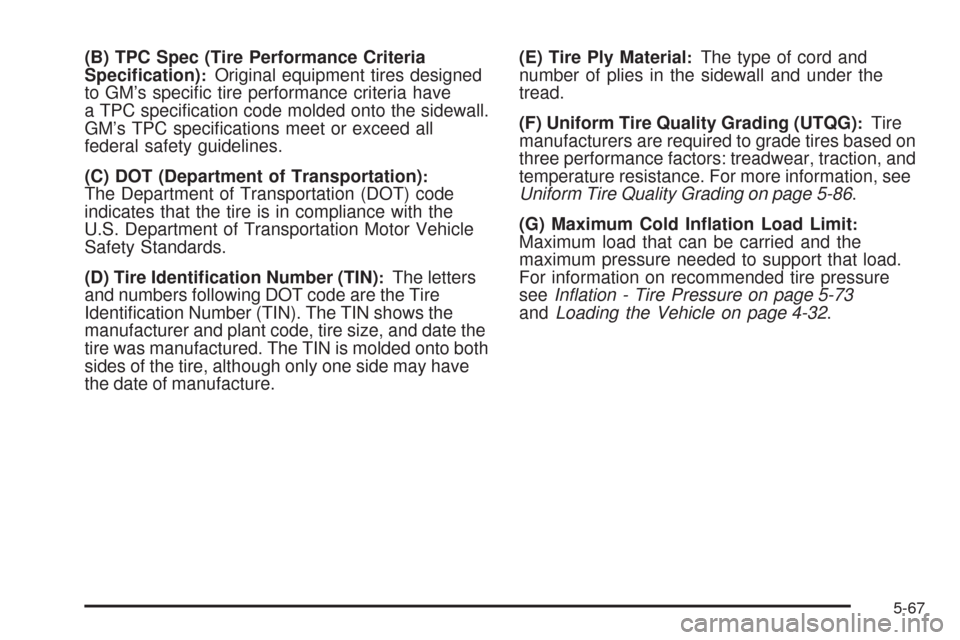
(B) TPC Spec (Tire Performance Criteria
Speci�cation):Original equipment tires designed
to GM’s speci�c tire performance criteria have
a TPC speci�cation code molded onto the sidewall.
GM’s TPC speci�cations meet or exceed all
federal safety guidelines.
(C) DOT (Department of Transportation)
:The Department of Transportation (DOT) code
indicates that the tire is in compliance with the
U.S. Department of Transportation Motor Vehicle
Safety Standards.
(D) Tire Identi�cation Number (TIN)
:The letters
and numbers following DOT code are the Tire
Identi�cation Number (TIN). The TIN shows the
manufacturer and plant code, tire size, and date the
tire was manufactured. The TIN is molded onto both
sides of the tire, although only one side may have
the date of manufacture.(E) Tire Ply Material
:The type of cord and
number of plies in the sidewall and under the
tread.
(F) Uniform Tire Quality Grading (UTQG)
:Tire
manufacturers are required to grade tires based on
three performance factors: treadwear, traction, and
temperature resistance. For more information, see
Uniform Tire Quality Grading on page 5-86.
(G) Maximum Cold In�ation Load Limit
:Maximum load that can be carried and the
maximum pressure needed to support that load.
For information on recommended tire pressure
seeInflation - Tire Pressure on page 5-73
andLoading the Vehicle on page 4-32.
5-67
Page 480 of 600
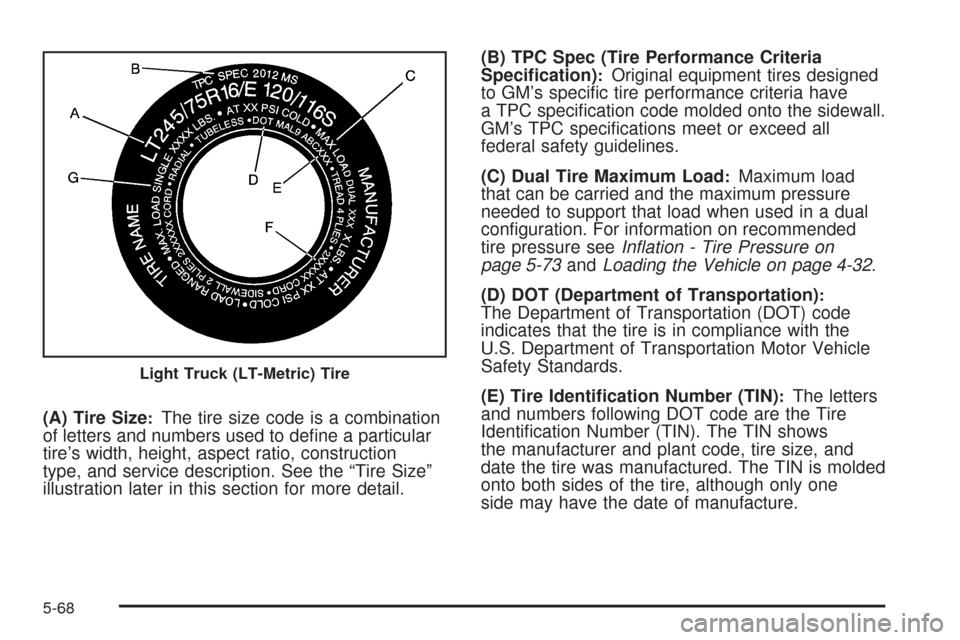
(A) Tire Size:The tire size code is a combination
of letters and numbers used to de�ne a particular
tire’s width, height, aspect ratio, construction
type, and service description. See the “Tire Size”
illustration later in this section for more detail.(B) TPC Spec (Tire Performance Criteria
Speci�cation)
:Original equipment tires designed
to GM’s speci�c tire performance criteria have
a TPC speci�cation code molded onto the sidewall.
GM’s TPC speci�cations meet or exceed all
federal safety guidelines.
(C) Dual Tire Maximum Load
:Maximum load
that can be carried and the maximum pressure
needed to support that load when used in a dual
con�guration. For information on recommended
tire pressure seeInflation - Tire Pressure on
page 5-73andLoading the Vehicle on page 4-32.
(D) DOT (Department of Transportation)
:The Department of Transportation (DOT) code
indicates that the tire is in compliance with the
U.S. Department of Transportation Motor Vehicle
Safety Standards.
(E) Tire Identi�cation Number (TIN)
:The letters
and numbers following DOT code are the Tire
Identi�cation Number (TIN). The TIN shows
the manufacturer and plant code, tire size, and
date the tire was manufactured. The TIN is molded
onto both sides of the tire, although only one
side may have the date of manufacture.
Light Truck (LT-Metric) Tire
5-68