airbag off CHEVROLET SILVERADO 2010 2.G Owners Manual
[x] Cancel search | Manufacturer: CHEVROLET, Model Year: 2010, Model line: SILVERADO, Model: CHEVROLET SILVERADO 2010 2.GPages: 626, PDF Size: 4.8 MB
Page 9 of 626

A.Outlet Adjustment on page 4‑28.
B. Turn Signal/Multifunction Lever on page 4‑4.
C. Driver Information Center (DIC) Buttons. See Driver Information Center (DIC) on page 4‑49.
D. Hazard Warning Flashers on page 4‑3.
E. Instrument Panel Cluster on page 4‑29.
F. Shift Lever. See Automatic Transmission Operation
on page 3‑28. Tow/Haul Selector Button
(If Equipped). See Tow/Haul Modeon page 3‑34.
Range Selection Mode (Allison Transmission and
Hydra-Matic
®6‐Speed Button (If Equipped). See
Automatic Transmission Operation on page 3‑28.
G. Audio System(s) on page 4‑82.
H. Instrument Panel Storage on page 3‑76.
I. Integrated Trailer Brake Controller (If Equipped). See Towing a Trailer on page 5‑51.
J. Exterior Lamps on page 4‑10.
K. Hood Release on page 6‑15.
L. Parking Brake on page 3‑50.
M. Dome Lamp Override
on page 4‑15.Dome Lampson page 4‑14.Fog Lampson page 4‑13(If Equipped).
N. Cruise Control on page 4‑7.
O. Tilt Wheel on page 4‑3. P.
Horn on page 4‑3.
Q. Audio Steering Wheel Controls
on page 4‑143(If Equipped).
R. Automatic Transfer Case Control (If Equipped). See Four-Wheel Drive on page 3‑36.
S. Ashtray (If Equipped). See Ashtray(s) and
Cigarette Lighter on page 4‑18.
T. StabiliTrak
®Systemon page 5‑6(If Equipped).
Ultrasonic Rear Parking Assist (URPA)on
page 3‑60(If Equipped). Pedal Adjust Button
(If Equipped). See Adjustable Throttle and Brake
Pedal
on page 3‑26. Heated Windshield Washer
Fluid Button (If Equipped). Windshield Washeron
page 4‑6.
U. Accessory Power Outlet(s) on page 4‑17.
V. Climate Control System (With Air Conditioning)
on
page 4‑18or Climate Control System (With Heater
Only)on page 4‑21and Dual Automatic Climate
Control System on page 4‑22.
W. Power Take Off (PTO) Control (If Equipped). See Power Take Off (PTO) in the Duramax Diesel
Supplement Index.
X. Passenger Airbag Off Control (If Equipped). See Airbag Off Switch on page 2‑82.
Y. Glove Box on page 3‑75.
1-3
Page 11 of 626

A.Outlet Adjustment on page 4‑28.
B. Turn Signal/Multifunction Lever on page 4‑4.
C. Instrument Panel Cluster on page 4‑29.
D. Hazard Warning Flashers
on page 4‑3.
E. Shift Lever. See Automatic Transmission Operation
on page 3‑28.
F. Tow/Haul Mode
on page 3‑34(If Equipped).
G. Driver Information Center (DIC) Buttons. See Driver Information Center (DIC) on page 4‑49.
H. Audio System(s) on page 4‑82.
I. Exterior Lamps on page 4‑10.
J. Integrated Trailer Brake Controller (If Equipped). See Towing a Trailer on page 5‑51.
K. Dome Lamp Override
on page 4‑15.Dome Lampson page 4‑14.
L. Automatic Transfer Case Control. (If Equipped). See Four-Wheel Drive on page 3‑36.
M. Hood Release on page 6‑15.
N. Parking Brake on page 3‑50. O.
Cruise Control on page 4‑7.
P. Tilt Wheel on page 4‑3.
Q. Horn on page 4‑3.
R. Audio Steering Wheel Controls on page 4‑143.
S. Climate Control System (With Air Conditioning)
on
page 4‑18or Climate Control System (With Heater
Only)on page 4‑21or Dual Automatic Climate
Control Systemon page 4‑22(If Equipped).
T. Accessory Power Outlet(s)
on page 4‑17.
Cigarette Lighter (If Equipped). See Ashtray(s) and
Cigarette Lighter
on page 4‑18.
U. StabiliTrak®Systemon page 5‑6(If Equipped).
Pedal Adjust Button (If Equipped). See Adjustable
Throttle and Brake Pedal
on page 3‑26. Ultrasonic
Rear Parking Assist (URPA)on page 3‑60(If Equipped). Heated Windshield Washer Fluid
Button (If Equipped). See Windshield Washeron
page 4‑6.
V. Passenger Airbag Off Control (If Equipped). See Airbag Off Switch on page 2‑82.
W. Glove Box on page 3‑75.
1-5
Page 19 of 626
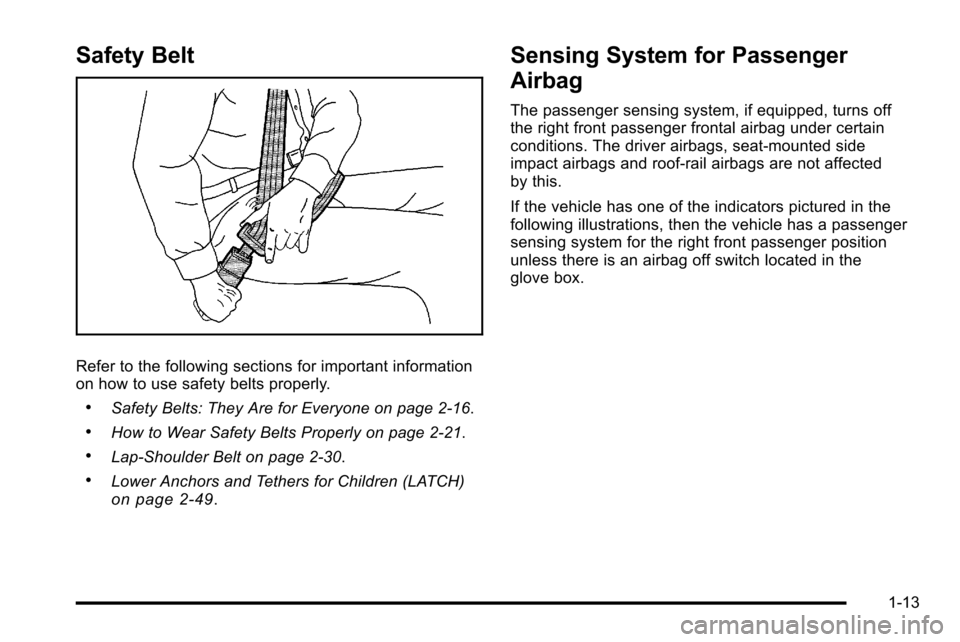
Safety Belt
Refer to the following sections for important information
on how to use safety belts properly.
.Safety Belts: They Are for Everyone on page 2‑16.
.How to Wear Safety Belts Properly on page 2‑21.
.Lap-Shoulder Belt on page 2‑30.
.Lower Anchors and Tethers for Children (LATCH)on page 2‑49.
Sensing System for Passenger
Airbag
The passenger sensing system, if equipped, turns off
the right front passenger frontal airbag under certain
conditions. The driver airbags, seat‐mounted side
impact airbags and roof‐rail airbags are not affected
by this.
If the vehicle has one of the indicators pictured in the
following illustrations, then the vehicle has a passenger
sensing system for the right front passenger position
unless there is an airbag off switch located in the
glove box.
1-13
Page 20 of 626
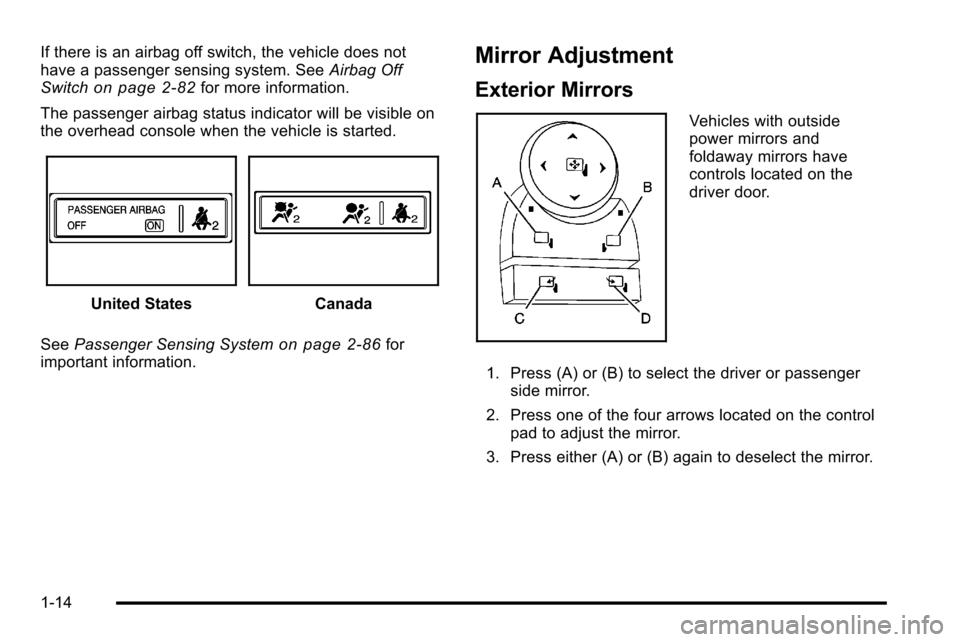
If there is an airbag off switch, the vehicle does not
have a passenger sensing system. SeeAirbag Off
Switch
on page 2‑82for more information.
The passenger airbag status indicator will be visible on
the overhead console when the vehicle is started.
United StatesCanada
See Passenger Sensing System
on page 2‑86for
important information.
Mirror Adjustment
Exterior Mirrors
Vehicles with outside
power mirrors and
foldaway mirrors have
controls located on the
driver door.
1. Press (A) or (B) to select the driver or passenger side mirror.
2. Press one of the four arrows located on the control pad to adjust the mirror.
3. Press either (A) or (B) again to deselect the mirror.
1-14
Page 43 of 626
Section 2 Seats and Restraint System
Head Restraints. . . . . . . . . . . . . . . . . . . . . . . . . . . . . . . . . . . . 2-3
Front Seats . . . . . . . . . . . . . . . . . . . . . . . . . . . . . . . . . . . . . . . . . 2-4
Manual Seats . . . . . . . . . . . . . . . . . . . . . . . . . . . . . . . . . . . 2-4
Power Seats . . . . . . . . . . . . . . . . . . . . . . . . . . . . . . . . . . . . 2-5
Manual Lumbar . . . . . . . . . . . . . . . . . . . . . . . . . . . . . . . . . 2-6
Power Lumbar . . . . . . . . . . . . . . . . . . . . . . . . . . . . . . . . . . 2-7
Heated Seats . . . . . . . . . . . . . . . . . . . . . . . . . . . . . . . . . . . 2-8
Memory Seat, Mirrors, and Pedals . . . . . . . . . . . . . . 2-8
Reclining Seatbacks . . . . . . . . . . . . . . . . . . . . . . . . . . . 2-10
Seatback Latches . . . . . . . . . . . . . . . . . . . . . . . . . . . . . 2-13
Center Seat . . . . . . . . . . . . . . . . . . . . . . . . . . . . . . . . . . . . 2-13
Rear Seats . . . . . . . . . . . . . . . . . . . . . . . . . . . . . . . . . . . . . . . . 2-14
Rear Seat Operation (Extended Cab Full Bench) . . . . . . . . . . . . . . . . . . . . . . . . . . . . . . . . . . . . . . 2-14
Rear Seat Operation (All Split Bench and Hybrid Full Bench) . . . . . . . . . . . . . . . . . . . . . . . . . . . . . . . . . . 2-15
Safety Belts . . . . . . . . . . . . . . . . . . . . . . . . . . . . . . . . . . . . . . . 2-16
Safety Belts: They Are for Everyone . . . . . . . . . . . 2-16
How to Wear Safety Belts Properly . . . . . . . . . . . . 2-21
Lap-Shoulder Belt . . . . . . . . . . . . . . . . . . . . . . . . . . . . . 2-30 Safety Belt Use During Pregnancy . . . . . . . . . . . . . 2-37
Lap Belt (Crew and Extended Cab) . . . . . . . . . . . . 2-37
Safety Belt Extender . . . . . . . . . . . . . . . . . . . . . . . . . . . 2-38
Child Restraints . . . . . . . . . . . . . . . . . . . . . . . . . . . . . . . . . . 2-39
Older Children . . . . . . . . . . . . . . . . . . . . . . . . . . . . . . . . . 2-39
Infants and Young Children . . . . . . . . . . . . . . . . . . . . 2-42
Child Restraint Systems . . . . . . . . . . . . . . . . . . . . . . . 2-45
Where to Put the Restraint . . . . . . . . . . . . . . . . . . . . . 2-48
Lower Anchors and Tethers for Children
(LATCH) . . . . . . . . . . . . . . . . . . . . . . . . . . . . . . . . . . . . . 2-49
Securing a Child Restraint in a Rear Seat Position . . . . . . . . . . . . . . . . . . . . . . . . . . . . . . . . . . . . . . 2-58
Securing a Child Restraint in the Center Front Seat Position . . . . . . . . . . . . . . . . . . . . . . . . . . . . . . . . 2-61
Securing a Child Restraint in the Right Front Seat Position (With Passenger Sensing
System) . . . . . . . . . . . . . . . . . . . . . . . . . . . . . . . . . . . . . 2-61
Securing a Child Restraint in the Right Front Seat Position (With Airbag Off Switch) . . . . . . . 2-65
Securing a Child Restraint in the Right Front Seat Position (Heavy Duty Crew
Cab Only) . . . . . . . . . . . . . . . . . . . . . . . . . . . . . . . . . . . 2-70
2-1
Page 44 of 626
Section 2 Seats and Restraint System
Airbag System. . . . . . . . . . . . . . . . . . . . . . . . . . . . . . . . . . . . 2-73
Where Are the Airbags? . . . . . . . . . . . . . . . . . . . . . . . 2-75
When Should an Airbag Inflate? . . . . . . . . . . . . . . . 2-78
What Makes an Airbag Inflate? . . . . . . . . . . . . . . . . 2-79
How Does an Airbag Restrain? . . . . . . . . . . . . . . . . 2-80
What Will You See After an Airbag Inflates? . . . 2-80
Airbag Off Switch . . . . . . . . . . . . . . . . . . . . . . . . . . . . . . 2-82
Passenger Sensing System . . . . . . . . . . . . . . . . . . . 2-86 Servicing Your Airbag-Equipped Vehicle . . . . . . . 2-92
Adding Equipment to Your Airbag-Equipped
Vehicle . . . . . . . . . . . . . . . . . . . . . . . . . . . . . . . . . . . . . . 2-92
Restraint System Check . . . . . . . . . . . . . . . . . . . . . . . . .2-94
Checking the Restraint Systems . . . . . . . . . . . . . . . 2-94
Replacing Restraint System Parts After a
Crash . . . . . . . . . . . . . . . . . . . . . . . . . . . . . . . . . . . . . . . . 2-95
2-2
Page 84 of 626
Infants and Young Children
Everyone in a vehicle needs protection! This includes
infants and all other children. Neither the distance
traveled nor the age and size of the traveler changes
the need, for everyone, to use safety restraints. In fact,
the law in every state in the United States and in every
Canadian province says children up to some age must
be restrained while in a vehicle.
{WARNING:
Children can be seriously injured or strangled if a
shoulder belt is wrapped around their neck and
the safety belt continues to tighten. Never leave
children unattended in a vehicle and never allow
children to play with the safety belts.
Airbags plus lap‐shoulder belts offer protection for
adults and older children, but not for young children and
infants. Neither the vehicle's safety belt system nor its
airbag system is designed for them. Every time infants
and young children ride in vehicles, they should have
the protection provided by appropriate child restraints.
Children who are not restrained properly can strike
other people, or can be thrown out of the vehicle.
{WARNING:
Never do this.
Never hold an infant or a child while riding in a
vehicle. Due to crash forces, an infant or a child
will become so heavy it is not possible to hold it
during a crash. For example, in a crash at only
40 km/h (25 mph), a 5.5 kg (12 lb) infant will
suddenly become a 110 kg (240 lb) force on a
person's arms. An infant should be secured in an
appropriate restraint.
2-42
Page 90 of 626
Where to Put the Restraint
According to accident statistics, children and infants are
safer when properly restrained in a child restraint
system or infant restraint system secured in a rear
seating position.
We recommend that children and child restraints be
secured in a rear seat, including: an infant or a child
riding in a rear-facing child restraint; a child riding in a
forward-facing child seat; an older child riding in a
booster seat; and children, who are large enough, using
safety belts.
If a child restraint is secured in the right front passenger
seat, and the vehicle has a switch in the glove box to
manually turn off the right front passenger airbag, see
Airbag Off Switch
on page 2‑82andSecuring a Child
Restraint in the Right Front Seat Position (With
Passenger Sensing System)
on page 2‑61or Securing
a Child Restraint in the Right Front Seat Position (With
Airbag Off Switch)
on page 2‑65or Securing a Child
Restraint in the Right Front Seat Position (Heavy Duty
Crew Cab Only)
on page 2‑70for more information,
including important safety information.
A label on the sun visor says, “Never put a rear-facing
child seat in the front.” This is because the risk to the
rear-facing child is so great, if the airbag deploys.
{WARNING:
A child in a rear-facing child restraint can be
seriously injured or killed if the right front
passenger airbag inflates. This is because the
back of the rear-facing child restraint would be
very close to the inflating airbag. A child in a
forward-facing child restraint can be seriously
injured or killed if the right front passenger airbag
inflates and the passenger seat is in a forward
position.
Even if the passenger sensing system or airbag
switch has turned off the right front passenger
frontal airbag, no system is fail-safe. No one can
guarantee that an airbag will not deploy under
some unusual circumstance, even though it is
turned off.
Secure rear-facing child restraints in a rear seat,
even if the airbag is off. If you secure a
forward-facing child restraint in the right front seat,
always move the front passenger seat as far back
as it will go. It is better to secure the child restraint
in a rear seat.
2-48
Page 91 of 626
{WARNING:
A child in a child restraint in the center front seat
can be badly injured or killed by the frontal
airbags if they inflate. Never secure a child
restraint in the center front seat. It is always better
to secure a child restraint in a rear seat.
Do not use child restraints in the center front seat
position.
When securing a child restraint in a rear seating
position, study the instructions that came with your child
restraint to make sure it is compatible with this vehicle.
If the vehicle does not have a rear seat that will
accommodate a rear-facing child restraint, a rear-facing
child restraint should not be installed in the vehicle,
even if the airbag is off.
Wherever a child restraint is installed, be sure to secure
the child restraint properly.
Keep in mind that an unsecured child restraint can
move around in a collision or sudden stop and injure
people in the vehicle. Be sure to properly secure any
child restraint in your vehicle —even when no child is
in it.
Lower Anchors and Tethers for
Children (LATCH)
The LATCH system holds a child restraint during driving
or in a crash. This system is designed to make
installation of a child restraint easier. The LATCH
system uses anchors in the vehicle and attachments on
the child restraint that are made for use with the LATCH
system.
Make sure that a LATCH-compatible child restraint is
properly installed using the anchors, or use the vehicle's
safety belts to secure the restraint, following the
instructions that came with that restraint, and also the
instructions in this manual. When installing a child
restraint with a top tether, you must also use either the
lower anchors or the safety belts to properly secure the
child restraint. A child restraint must never be installed
using only the top tether and anchor.
In order to use the LATCH system in your vehicle, you
need a child restraint that has LATCH attachments. The
child restraint manufacturer will provide you with
instructions on how to use the child restraint and its
attachments. The following explains how to attach a
child restraint with these attachments in your vehicle.
Not all vehicle seating positions or child restraints have
lower anchors and attachments or top tether anchors
and attachments.
2-49
Page 98 of 626
2. SeeSecuring a Child Restraint in the Right Front
Seat Position (With Passenger Sensing System)
on page 2‑61or Securing a Child Restraint in the
Right Front Seat Position (With Airbag Off Switch)
on page 2‑65or Securing a Child Restraint in the
Right Front Seat Position (Heavy Duty Crew Cab
Only)
on page 2‑70for instructions on installing
the child restraint using the safety belts.
3. Push and pull the child restraint in different directions to be sure it is secure.
Crew and Extended Cab Models
1. Attach and tighten the lower attachments to thelower anchors. If the child restraint does not have
lower attachments or the desired seating position
does not have lower anchors, secure the child
restraint with the top tether and the safety belts.
Refer to your child restraint manufacturer
instructions and the instructions in this manual.
1. 1. Find the lower anchors for the desired seating position.
1. 2. Put the child restraint on the seat.
1. 3. Attach and tighten the lower attachments on the child restraint to the lower anchors. 2. If the child restraint manufacturer recommends that
the top tether be attached, attach and tighten the
top tether to the top tether anchor (loop), if your
vehicle has one. Refer to the child restraint
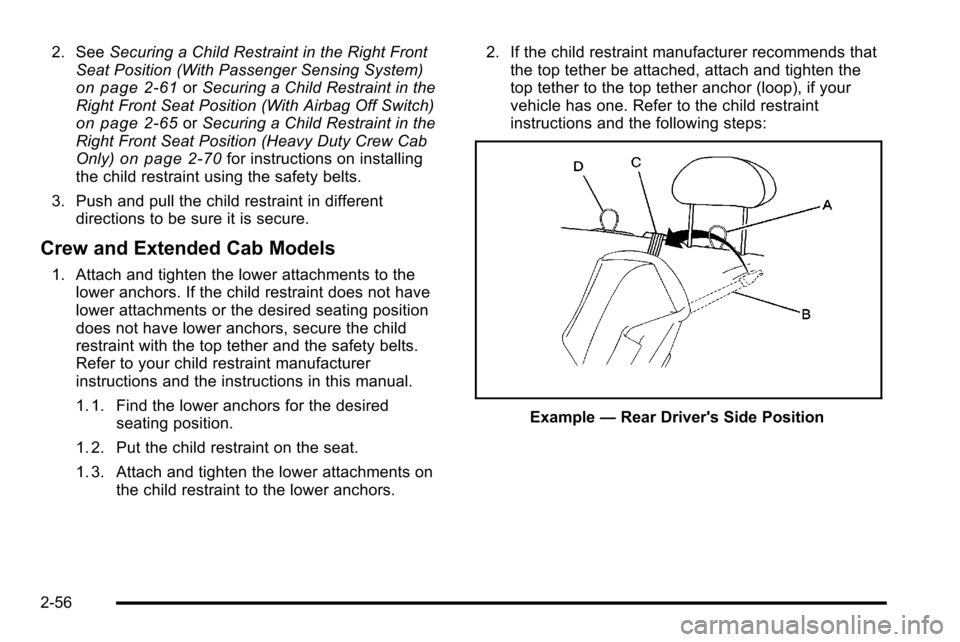
instructions and the following steps:
Example —Rear Driver's Side Position
2-56