CHEVROLET SILVERADO 2020 Owner's Manual
Manufacturer: CHEVROLET, Model Year: 2020, Model line: SILVERADO, Model: CHEVROLET SILVERADO 2020Pages: 495, PDF Size: 8.09 MB
Page 201 of 495
Chevrolet Silverado Owner Manual (GMNA-Localizing-U.S./Canada/Mexico-
13337620) - 2020 - CTC - 1/27/20
200 Driving and Operating
of the driver, passengers, and
cargo should never exceed the
vehicle's capacity weight.
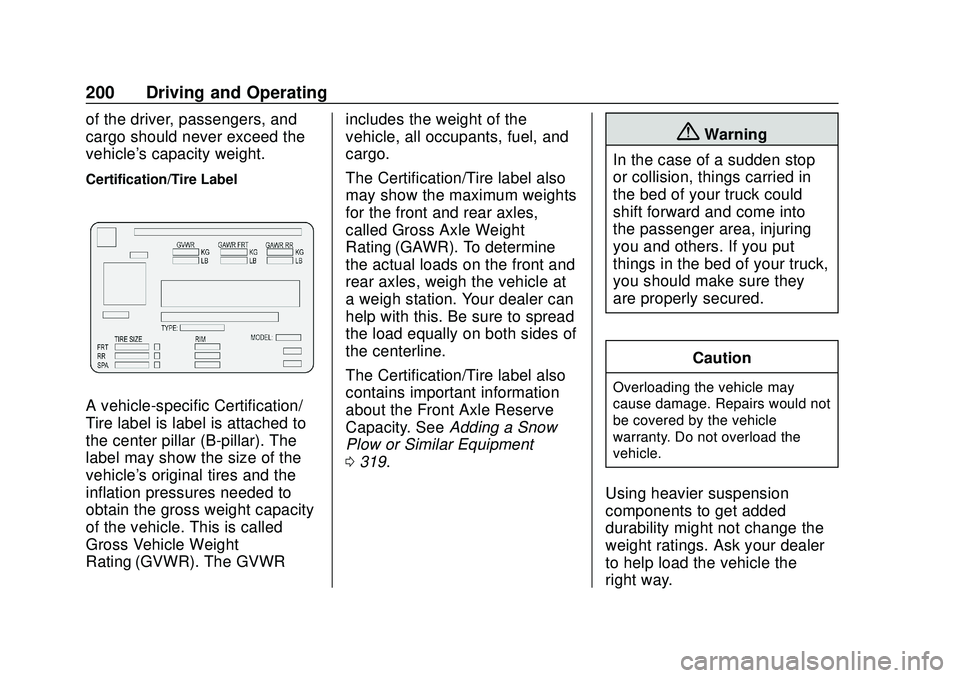
Certification/Tire Label
A vehicle-specific Certification/
Tire label is label is attached to
the center pillar (B-pillar). The
label may show the size of the
vehicle's original tires and the
inflation pressures needed to
obtain the gross weight capacity
of the vehicle. This is called
Gross Vehicle Weight
Rating (GVWR). The GVWRincludes the weight of the
vehicle, all occupants, fuel, and
cargo.
The Certification/Tire label also
may show the maximum weights
for the front and rear axles,
called Gross Axle Weight
Rating (GAWR). To determine
the actual loads on the front and
rear axles, weigh the vehicle at
a weigh station. Your dealer can
help with this. Be sure to spread
the load equally on both sides of
the centerline.
The Certification/Tire label also
contains important information
about the Front Axle Reserve
Capacity. See
Adding a Snow
Plow or Similar Equipment
0 319.
{Warning
In the case of a sudden stop
or collision, things carried in
the bed of your truck could
shift forward and come into
the passenger area, injuring
you and others. If you put
things in the bed of your truck,
you should make sure they
are properly secured.
Caution
Overloading the vehicle may
cause damage. Repairs would not
be covered by the vehicle
warranty. Do not overload the
vehicle.
Using heavier suspension
components to get added
durability might not change the
weight ratings. Ask your dealer
to help load the vehicle the
right way.
Page 202 of 495
 - 2020 - CTC - 1/27/20
Driving and Operating 201
{Warning
Things you put inside the
vehicle can strike and injure
people")
Chevrolet Silverado Owner Manual (GMNA-Localizing-U.S./Canada/Mexico-
13337620) - 2020 - CTC - 1/27/20
Driving and Operating 201
{Warning
Things you put inside the
vehicle can strike and injure
people in a sudden stop or
turn, or in a crash.
.Put things in the cargo
area of the vehicle. Try to
spread the weight evenly.
.Never stack heavier
things, like suitcases,
inside the vehicle so that
some of them are above
the tops of the seats.
.Do not leave an
unsecured child restraint
in the vehicle.
.When you carry
something inside the
vehicle, secure it
whenever you can.
.Do not leave a seat
folded down unless you
need to. There is also important loading
information for off-road driving in
this manual. See
“Loading the
Vehicle for Off-Road Driving“
under Off-Road Driving 0188.
Two-Tiered Loading
Depending on the model of the
pickup, an upper load platform
can be created by positioning
three or four 5 cm (2 in) by
15 cm (6 in) wooden planks
across the width of the pickup
box. The planks must be
inserted in the pickup box
depressions.
When using this upper load
platform, be sure the load is
securely tied down to prevent it
from shifting. The load's center
of gravity should be positioned
in a zone over the rear axle. The
zone is located in the area
between the front of each wheel
well and the rear of each wheel well. The center of gravity height
must not extend above the top
of the pickup box flareboard.
Any load that extends beyond
the vehicle's taillamp area must
be properly marked according to
local laws and regulations.
Remember not to exceed the
Gross Axle Weight
Rating (GAWR) of the front or
rear axle.
Add-On Equipment
When carrying removable items,
a limit on how many people
carried inside the vehicle may
be necessary. Be sure to weigh
the vehicle before buying and
installing the new equipment.
Page 203 of 495
 - 2020 - CTC - 1/27/20
202 Driving and Operating
Caution
Overloading the vehicle may
cause damage. Repairs would not
be")
Chevrolet Silverado Owner Manual (GMNA-Localizing-U.S./Canada/Mexico-
13337620) - 2020 - CTC - 1/27/20
202 Driving and Operating
Caution
Overloading the vehicle may
cause damage. Repairs would not
be covered by the vehicle
warranty. Do not overload the
vehicle.
Remember not to exceed the
Gross Axle Weight
Rating (GAWR) of the front or
rear axle.* Equipment Maximum
Weight
Ladder Rack
and Cargo 340 kg (750 lb)
Cross Toolbox
and Cargo 181 kg (400 lb)
Side Boxes
and Cargo 113 kg per
side (250 lb
per side)
* The combined weight for all
rail-mounted equipment should
not exceed 454 kg (1,000 lb).
Loading Points
1. Primary Load Points
2. Secondary Load Areas
3. GM Approved Accessory Mounting Points
Structural members (1) and (2) are
included in the pickup box design.
Additional accessories should use
these load points. Depending on the
accessory design, use a spacer
under the accessory at the load
points to remove gap. The holes for
GM approved accessories (3) are
not intended for aftermarket equipment. See www.gmupfitter.com
for additional pickup box load
bearing structural information.
Truck-Camper Loading
Information
A vehicle-specific Truck-Camper
Loading Information label is
attached to the inside of the
vehicle's glove box. This label
indicates if a slide-in camper
can be carried, how much of a
load the vehicle can carry, and
how to correctly spread out the
load. It will help to match the
right slide-in camper to the
vehicle.
Your dealer can help make a
good vehicle-camper match and
help determine the Cargo
Weight Rating (CWR).
When installing and loading a
slide-in camper, check the
manufacturer's instructions.
Page 204 of 495
 - 2020 - CTC - 1/27/20
Driving and Operating 203
When carrying a slide-in
camper, the total cargo load of
the vehicle is")
Chevrolet Silverado Owner Manual (GMNA-Localizing-U.S./Canada/Mexico-
13337620) - 2020 - CTC - 1/27/20
Driving and Operating 203
When carrying a slide-in
camper, the total cargo load of
the vehicle is the weight of the
camper plus:
.Everything added to the
camper after it left the
factory.
.Everything in the camper.
.All the people inside.
The CWR is the maximum
weight of the load the vehicle
can carry. It does not include the
weight of the people inside. But,
use about 68 kg (150 lb) for
each seat.
The total cargo load must not be
more than the vehicle's CWR.
Refer to the Truck-Camper
Loading Information label in the
glove box for dimensions A and
B as shown in the following
illustration.Use the rear edge of the load
floor for measurement purposes.
The recommended location for
the cargo center of gravity is in
zone C for the CWR. It is the
point where the mass of a body
is concentrated and,
if suspended at that point, would
balance the front and rear.
Here is an example of proper
truck and camper match:
1.Camper Center of
Gravity
2.Recommended Center of
Gravity Location Zone
When the truck is used to carry
a slide-in camper, the total cargo
load of the truck consists of the
manufacturer's camper weight
figure, the weight of installed
additional camper equipment not
included in the manufacturer's
camper weight figure, the weight
of camper cargo, and the weight
of passengers in the camper.
The total cargo load should not
Page 205 of 495
 - 2020 - CTC - 1/27/20
204 Driving and Operating
exceed the truck's cargo weight
rating, and the camper's center")
Chevrolet Silverado Owner Manual (GMNA-Localizing-U.S./Canada/Mexico-
13337620) - 2020 - CTC - 1/27/20
204 Driving and Operating
exceed the truck's cargo weight
rating, and the camper's center
of gravity (1) should fall within
the truck's recommended center
of gravity zone (2) when
installed.
Any accessories or other
equipment that are added to the
vehicle must be weighed. Then,
subtract this extra weight from
the CWR. This extra weight may
shorten the center of gravity
zone of the vehicle.
If the slide-in camper and its
load weighs less than the CWR,
the center of gravity zone for the
vehicle may be larger.
Secure loose items to prevent
weight shifts that could affect the
balance of the vehicle. When the
truck-camper is loaded, drive to
a scale and weigh on the front
and on the rear wheels
separately to determine axle
loads. Individual axle loads
should not exceed either of thegross axle weight ratings
(GAWR). The total axle
loads should not exceed the
vehicle's gross vehicle weight
rating (GVWR). These ratings
are given on the Certification/
Tire label attached to the
B-pillar. See
“Certification/Tire
Label” underVehicle Load
Limits 0197. If weight ratings
are exceeded, move or remove
items to bring all weights below
the ratings.
See your dealer for more
information on curb weights,
cargo weights, Cargo Weight
Rating, and the correct center of
gravity zone.Starting and
Operating
New Vehicle Break-In
Caution
The vehicle does not need an
elaborate break-in. But it will
perform better in the long run if
you follow these guidelines:
. Keep the vehicle speed at
88 km/h (55 mph) or less for
the first 805 km (500 mi).
. Do not drive at any one
constant speed, fast or slow,
for the first 805 km (500 mi).
Do not make full-throttle
starts. Avoid downshifting to
brake or slow the vehicle.
. Avoid making hard stops for
the first 322 km (200 mi) or
so. During this time the new
brake linings are not yet
broken in. Hard stops with
new linings can mean
(Continued)
Page 206 of 495
 - 2020 - CTC - 1/27/20
Driving and Operating 205
Caution (Continued)
premature wear and earlier
replacement. Follow this")
Chevrolet Silverado Owner Manual (GMNA-Localizing-U.S./Canada/Mexico-
13337620) - 2020 - CTC - 1/27/20
Driving and Operating 205
Caution (Continued)
premature wear and earlier
replacement. Follow this
breaking-in guideline every
time you get new brake
linings.
. Do not tow a trailer during
break-in. See Trailer Towing
0 288 for the trailer towing
capabilities of the vehicle
and more information.
Following break-in, engine speed
and load can be gradually
increased.
Ignition Positions
(Keyless Access)
Vehicles equipped with Keyless
Access have pushbutton starting.
The Remote Keyless Entry (RKE)
transmitter must be in the vehicle for
the system to operate. If the
pushbutton start is not working, the
vehicle may be near a strong radio antenna signal causing interference
to the Keyless Access system. See
Remote Keyless Entry (RKE)
System Operation (Key Access)
0
13 or
Remote Keyless Entry (RKE)
System Operation (Keyless Access)
0 16.
To shift out of P (Park), the ignition
must be on or in Service Mode, and
the brake pedal must be applied.
{Warning
Turning off the vehicle while
moving may cause loss of power
assist in the brake and steering
systems and disable the airbags.
While driving, only shut the
vehicle off in an emergency.
Stopping the Engine/LOCK/
OFF (No Indicator Lights) : When
the vehicle is stopped, press
ENGINE START/STOP once to turn
the engine off.
Page 207 of 495
 - 2020 - CTC - 1/27/20
206 Driving and Operating
If the vehicle is in P (Park), the
ignition will turn off, and Retained")
Chevrolet Silverado Owner Manual (GMNA-Localizing-U.S./Canada/Mexico-
13337620) - 2020 - CTC - 1/27/20
206 Driving and Operating
If the vehicle is in P (Park), the
ignition will turn off, and Retained
Accessory Power (RAP) will remain
active. SeeRetained Accessory
Power (RAP) 0213.
If the vehicle is not in P (Park), the
ignition will return to ACC/
ACCESSORY and display the
message SHIFT TO PARK in the
Driver Information Center (DIC).
When the vehicle is shifted into
P (Park), the ignition system will
turn off.
The vehicle may have an electric
steering column lock. The lock is
activated when the ignition is turned
off and driver door is opened.
A sound may be heard as the lock
actuates or releases. The steering
column lock may not release with
the wheels turned off center. If this
happens, the vehicle may not start.
Move the steering wheel from left to
right while attempting to start the
vehicle. If this does not work, the
vehicle needs service.
Unless an emergency exists, do not
turn the engine off when the vehicle
is moving. This will cause a loss of power assist in the brake and
steering systems and disable the
airbags.
If the vehicle must be shut off in an
emergency:
1. If the vehicle cannot be pulled over, and must be shut off
while driving, press and hold
ENGINE START/STOP button
for longer than two seconds,
or press twice in five seconds.
2. Brake using a firm and steady pressure. Do not pump the
brakes repeatedly. This may
deplete power assist, requiring
increased brake pedal force.
3. Shift the vehicle to N (Neutral). This can be done while the
vehicle is moving. After shifting
to N (Neutral), firmly apply the
brakes and steer the vehicle to
a safe location.
4. Come to a complete stop, shift to P (Park), and make sure
engine is off. The shift lever
must be in P (Park) to turn the
ignition off. 5. Set the parking brake. See
Electric Parking Brake 0229.
{Warning
Turning off the vehicle while
moving may cause loss of power
assist in the brake and steering
systems and disable the airbags.
While driving, only shut the
vehicle off in an emergency.
ACC/ACCESSORY (Amber
Indicator Light) : This mode allows
some electrical accessories to be
used when the engine is off.
With the ignition off, pressing the
ENGINE START/STOP button one
time without the brake pedal applied
will place the ignition system in
ACC/ACCESSORY.
The ignition will switch from ACC/
ACCESSORY to off after
five minutes to prevent battery
rundown.
ON/RUN/START (Green Indicator
Light) : This mode is for driving and
starting. With the ignition off, and
Page 208 of 495
 - 2020 - CTC - 1/27/20
Driving and Operating 207
the brake pedal applied, pressing
ENGINE START/STOP button once
will tu")
Chevrolet Silverado Owner Manual (GMNA-Localizing-U.S./Canada/Mexico-
13337620) - 2020 - CTC - 1/27/20
Driving and Operating 207
the brake pedal applied, pressing
ENGINE START/STOP button once
will turn the ignition on. Once engine
cranking begins, release the button.
Engine cranking will continue until
the engine starts. SeeStarting the
Engine 0209.
Service Mode
This power mode is available for
service and diagnostics, and to
verify the proper operation of the
malfunction indicator lamp as may
be required for emission inspection
purposes. With the vehicle off, and
the brake pedal not applied,
pressing and holding the ENGINE
START/STOP button for more than
five seconds will place the vehicle in
Service Mode. The instruments and
audio systems will operate as they
do when the ignition is on, but the
vehicle will not be able to be driven.
The engine will not start in Service
Mode. Press the ENGINE START/
STOP button again to turn the
ignition off.Ignition Positions (Key
Access)
0. Stopping the Engine/LOCK/OFF
1. ACC/ACCESSORY
2. ON/RUN
3. START
The ignition switch has four
positions.
To shift out of P (Park), the ignition
must be ON/RUN and the brake
pedal must be applied. 0 (Stopping the Engine/LOCK/
OFF) :
This position turns off the
vehicle. It also locks the ignition, the
transmission, and the steering
column, if equipped with a locking
steering column.
To turn off the vehicle:
1. Make sure that the vehicle is stopped.
2. Shift to P (Park).
3. Continue to hold the brake pedal, then set the parking
brake. See Electric Parking
Brake 0229.
Page 209 of 495
 - 2020 - CTC - 1/27/20
208 Driving and Operating
4. Push the key all the way intoward the steering column,
then turn the")
Chevrolet Silverado Owner Manual (GMNA-Localizing-U.S./Canada/Mexico-
13337620) - 2020 - CTC - 1/27/20
208 Driving and Operating
4. Push the key all the way intoward the steering column,
then turn the key to
LOCK/OFF.
5. Remove the key.
6. Release the brake pedal.
See your dealer if the key can be
removed in any other position.
Retained Accessory Power (RAP)
will remain active. See Retained
Accessory Power (RAP) 0213.
A warning chime will sound when
the driver door is opened and the
key is in the ignition.
If equipped with a locking steering
column, the steering can bind with
the front wheels turned off center,
which may prevent key rotation out
of LOCK/OFF. If this happens, move
the steering wheel from right to left
while turning the key to ACC/
ACCESSORY. If this does not work,
then the vehicle needs service.
{Warning
Turning off the vehicle while
moving may cause loss of power
assist in the brake and steering
systems and disable the airbags.
While driving, turn off the vehicle
only in an emergency.
In an emergency, if the vehicle
cannot be pulled over and must be
turned off while driving: 1. Push the key all the way in toward the steering column,
then turn the key to ACC/
ACCESSORY.
2. Brake using firm and steady pressure. Do not pump the
brakes repeatedly. This may
deplete power assist, requiring
increased brake pedal force.
3. Shift the vehicle to N (Neutral). This can be done while the
vehicle is moving. Continue
braking and steer the vehicle to
a safe location.
4. Come to a complete stop. 5. Shift to P (Park).
6. Push the key all the way in
toward the steering column (1),
then turn the ignition to
LOCK/OFF (2).
7. Set the parking brake. See Electric Parking Brake 0229.
8. Remove the key.
9. Release the brake pedal.
Caution
Use the correct key, make sure it
is all the way in —or pushed all
the way in toward the steering
column when turning off the
vehicle —and turn it only with
your hand.
1 (ACC/ACCESSORY) : This
position allows features such as the
infotainment system to operate
while the vehicle is off. It also
unlocks the steering column,
if equipped with a locking steering
column. Use this position if the
Page 210 of 495
 - 2020 - CTC - 1/27/20
Driving and Operating 209
vehicle must be pushed or towed.
SeeRetained Accessory Power
(RAP) 0213")
Chevrolet Silverado Owner Manual (GMNA-Localizing-U.S./Canada/Mexico-
13337620) - 2020 - CTC - 1/27/20
Driving and Operating 209
vehicle must be pushed or towed.
SeeRetained Accessory Power
(RAP) 0213.
From ON/RUN, push the key all the
way in toward the steering column,
then turn the key to ACC/
ACCESSORY.
If the key is left in ACC/
ACCESSORY with the engine off,
the battery could drain and the
vehicle may not start.
A warning chime will sound when
the driver door is opened and the
key is in the ignition.
2 (ON/RUN) : This position can be
used to operate the electrical
accessories and to display some
instrument cluster warning and
indicator lights. This position can
also be used for service and
diagnostics, and to verify the proper
operation of the malfunction
indicator lamp as may be required
for emission inspection purposes.
The switch stays in this position
when the engine is running. The
transmission is also unlocked in this
position. If the key is left in ON/RUN with the
engine off, the battery could drain
and the vehicle may not start.
3 (START) :
This is the position that
starts the engine. When the engine
starts, release the key. The ignition
returns to ON/RUN for driving.
Starting the Engine
If the vehicle has a diesel engine,
see the Duramax diesel
supplement.
Caution
If you add electrical parts or
accessories, you could change
the way the engine operates. Any
resulting damage would not be
covered by the vehicle warranty.
See Add-On Electrical Equipment
0 318.
Move the shift lever to P (Park) or
N (Neutral). To restart the engine
when the vehicle is already moving,
use N (Neutral) only.
Caution
Do not try to shift to P (Park) if the
vehicle is moving. If you do, you
could damage the transmission.
Shift to P (Park) only when the
vehicle is stopped.
Starting Procedure
1. For Key Access vehicles, turn the ignition key to Start. When
the engine starts, let go of the
key. For Keyless Access
vehicles, the RKE transmitter
must be in the vehicle. Press
ENGINE START/STOP with the
brake pedal applied. When the
engine begins cranking, let go
of the button.
The driver may observe a
minor, and temporary, brake
pedal kickback when starting
the vehicle. This is normal.
The idle speed will go down as
the engine gets warm. Do not
race the engine immediately
after starting it. Operate the