four wheel drive CHEVROLET SILVERADO 2500 2020 Owner's Manual
[x] Cancel search | Manufacturer: CHEVROLET, Model Year: 2020, Model line: SILVERADO 2500, Model: CHEVROLET SILVERADO 2500 2020Pages: 500, PDF Size: 9.71 MB
Page 242 of 500
Chevrolet Silverado Owner Manual (GMNA-Localizing-U.S./Canada/Mexico-
13337620) - 2020 - CRC - 4/11/19
Driving and Operating 241
characteristics of four-wheel-drive
low (4
n) without the torque
capabilities.
Use when:
. Traveling on very rough roads at
very low speeds, such as a
two-track or heavily rutted road.
. Traveling slowly in grassy fields.
. Pulling a boat out of the water
on a trailer.
. Using the vehicle for public
off-road recreational driving. See
Off-Road Driving 0191 and
Hill and Mountain Roads 0197.
When in Terrain Mode, the vehicle
will shift automatically but may hold
a lower gear longer to maximize
engine torque. The steering will
change to provide more precise
control. A unique pedal map, transmission shift pattern, and rpm
control are utilized to give better
control at lower speeds and over
rough terrain. When the vehicle
comes to a stop, Vehicle Hold is
engaged. TCS will be optimized for
maximum torque transfer across
axles, and Active Braking During Lift
Throttle will be engaged.
Active Braking During Lift Throttle:
.
Automatically applies light
braking, similar to heavy engine
braking of four-wheel-drive low.
. Applies light braking in D (Drive)
until the vehicle is at idle
speeds. In Manual L1 and
Manual L2, moderate braking
may stop the vehicle.
. Reduces trailer braking.
Page 292 of 500
Chevrolet Silverado Owner Manual (GMNA-Localizing-U.S./Canada/Mexico-
13337620) - 2020 - CRC - 4/11/19
Driving and Operating 291
Leaving After Parking on a Hill
1. Apply and hold the brakepedal.
.Start the engine.
. Shift into a gear.
. Release the parking brake.
2. Let up on the brake pedal.
3. Drive slowly until the trailer is clear of the chocks.
4. Stop and have someone pick up and store the chocks.
Launching and Retrieving
a Boat
Backing the Trailer into the Water
{Warning
.Have all passengers get out
of the vehicle before
backing onto the sloped part
of the ramp. Lower the
driver and passenger side
windows before backing
onto the ramp. This will
(Continued)
Warning (Continued)
provide a means of escape
in the unlikely event the
vehicle slides into the water.
. If the boat launch surface is
slippery, have the driver
remain in the vehicle with
the brake pedal applied
while the boat is being
launched. The boat launch
can be especially slippery at
low tide when part of the
ramp was previously
submerged at high tide. Do
not back onto the ramp to
launch the boat if you are
not sure the vehicle can
maintain traction.
. Do not move the vehicle if
someone is in the path of
the trailer. Some parts of the
trailer might be underwater
and not visible to people
who are assisting in
launching the boat. Disconnect the wiring to the trailer
before backing the trailer into the
water to prevent damage to the
electrical circuits on the trailer.
Reconnect the wiring to the trailer
after removing the trailer from the
water. If the trailer has electric
brakes that can function when the
trailer is submerged, it might help to
leave the electrical trailer connector
attached to maintain trailer brake
functionality while on the boat ramp.
To back the trailer into the water:
1. If equipped, place the vehicle in four-wheel-drive high.
2. Slowly back down the boat ramp until the boat is floating,
but no further than necessary.
3. Press and hold the brake pedal, but do not shift into
P (Park) yet.
4. Have someone place chocks under the front wheels of the
vehicle.
5. Gradually release the brake pedal to allow the chocks to
absorb the load of the trailer.
Page 293 of 500
Chevrolet Silverado Owner Manual (GMNA-Localizing-U.S./Canada/Mexico-
13337620) - 2020 - CRC - 4/11/19
292 Driving and Operating
6. Reapply the brake pedal. Thenapply the parking brake and
shift into P (Park).
7. Release the brake pedal.
Pulling the Trailer from the Water
To pull the trailer out of the water: 1. Press and hold the brake pedal.
2. Start the engine and shift into gear.
3. Release the parking brake.
4. Let up on the brake pedal.
5. Drive slowly until the tires are clear of the chocks.
6. Stop and have someone pick up and store the chocks.
7. Slowly pull the trailer from the water.
8. Once the vehicle and trailer have been driven from the
sloped part of the boat ramp,
the vehicle can be shifted from
four-wheel-drive high. Shift into the drive mode that is
appropriate for the road
conditions.
Caution
If the vehicle tires begin to spin
and the vehicle begins to slide
toward the water, remove your
foot from the accelerator pedal
and apply the brake pedal. Seek
help to have the vehicle towed up
the ramp.
Maintenance when Trailer
Towing
The vehicle needs service more
often when used to tow trailers. See
Maintenance Schedule
0441. It is
especially important to check the
engine oil, axle lubricant, belts,
cooling system, and brake system
before and during each trip.
Check periodically to see that all
nuts and bolts on the trailer hitch
are tight.
Engine Cooling When Trailer
Towing
The cooling system may temporarily
overheat during severe operating
conditions. See Engine Overheating
0 351.
Trailer Towing
If equipped with a diesel engine,
see the Duramax diesel
supplement.
Caution
Towing a trailer improperly can
damage the vehicle and result in
costly repairs not covered by the
vehicle warranty. To tow a trailer
correctly, follow the directions in
this section and see your dealer
for important information about
towing a trailer with the vehicle.
Trailering is different than just
driving the vehicle by itself.
Trailering means changes in
handling, acceleration, braking,
durability, and fuel economy.
Page 328 of 500
Chevrolet Silverado Owner Manual (GMNA-Localizing-U.S./Canada/Mexico-
13337620) - 2020 - CRC - 4/10/19
Vehicle Care 327
Vehicle Care
General Information
General Information . . . . . . . . . . 328
California Proposition65 Warning . . . . . . . . . . . . . . . . . 329
California Perchlorate Materials Requirements . . . . . 329
Accessories and Modifications . . . . . . . . . . . . . . . . 329
Vehicle Checks
Doing Your OwnService Work . . . . . . . . . . . . . . . 330
Hood . . . . . . . . . . . . . . . . . . . . . . . . . 330
Engine Compartment Overview . . . . . . . . . . . . . . . . . . . . 332
Engine Oil . . . . . . . . . . . . . . . . . . . . 339
Engine Oil Life System . . . . . . . 341
Automatic Transmission Fluid . . . . . . . . . . . . . . . . . . . . . . . . 343
Engine Air Filter Life System . . . . . . . . . . . . . . . . . . . . . . 343
Engine Air Cleaner/Filter . . . . . . 344
Cooling System . . . . . . . . . . . . . . 346
Engine Overheating . . . . . . . . . . 351
Overheated Engine Protection Operating Mode . . . . . . . . . . . . . 352
Engine Fan . . . . . . . . . . . . . . . . . . . 353 Power Steering Fluid . . . . . . . . . 353
Washer Fluid . . . . . . . . . . . . . . . . . 354
Brakes . . . . . . . . . . . . . . . . . . . . . . . 355
Brake Pad Life System . . . . . . . 356
Brake Fluid . . . . . . . . . . . . . . . . . . . 357
Battery - North America . . . . . . 358
Four-Wheel Drive . . . . . . . . . . . . . 360
Front Axle . . . . . . . . . . . . . . . . . . . . 361
Rear Axle . . . . . . . . . . . . . . . . . . . . 361
Noise Control System . . . . . . . . 361
Starter Switch Check . . . . . . . . . 362
Automatic Transmission Shift
Lock Control Function
Check . . . . . . . . . . . . . . . . . . . . . . . 363
Ignition Transmission Lock Check . . . . . . . . . . . . . . . . . . . . . . . 363
Park Brake and P (Park) Mechanism Check . . . . . . . . . . 363
Wiper Blade Replacement . . . . 364
Glass Replacement . . . . . . . . . . 365
Windshield Replacement . . . . . 365
Gas Strut(s) . . . . . . . . . . . . . . . . . . 365
Headlamp Aiming
Headlamp Aiming . . . . . . . . . . . . 366
Bulb Replacement
Bulb Replacement . . . . . . . . . . . . 366
Halogen Bulbs . . . . . . . . . . . . . . . . 366
LED Lighting . . . . . . . . . . . . . . . . . 367 Headlamps, Front Turn Signal,
Sidemarker, and Parking
Lamps . . . . . . . . . . . . . . . . . . . . . . 367
Taillamps, Turn Signal, Stoplamps, and Back-Up
Lamps . . . . . . . . . . . . . . . . . . . . . . 368
Center High-Mounted Stoplamp (CHMSL) and
Cargo Lamp . . . . . . . . . . . . . . . . . 369
License Plate Lamp . . . . . . . . . . 369
Electrical System
Electrical System Overload . . . 370
Fuses and Circuit Breakers . . . 370
Engine Compartment Fuse Block . . . . . . . . . . . . . . . . . . . . . . . . 371
Instrument Panel Fuse
Block (Left) . . . . . . . . . . . . . . . . . 374
Instrument Panel Fuse Block (Right) . . . . . . . . . . . . . . . . . . . . . . 376
Wheels and Tires
Tires . . . . . . . . . . . . . . . . . . . . . . . . . . 379
All-Season Tires . . . . . . . . . . . . . . 379
Winter Tires . . . . . . . . . . . . . . . . . . 380
Low-Profile Tires . . . . . . . . . . . . . 380
All-Terrain Tires . . . . . . . . . . . . . . . 381
Tire Sidewall Labeling . . . . . . . . 381
Tire Designations . . . . . . . . . . . . . 383
Tire Terminology andDefinitions . . . . . . . . . . . . . . . . . . 385
Page 361 of 500
Chevrolet Silverado Owner Manual (GMNA-Localizing-U.S./Canada/Mexico-
13337620) - 2020 - CRC - 4/10/19
360 Vehicle Care
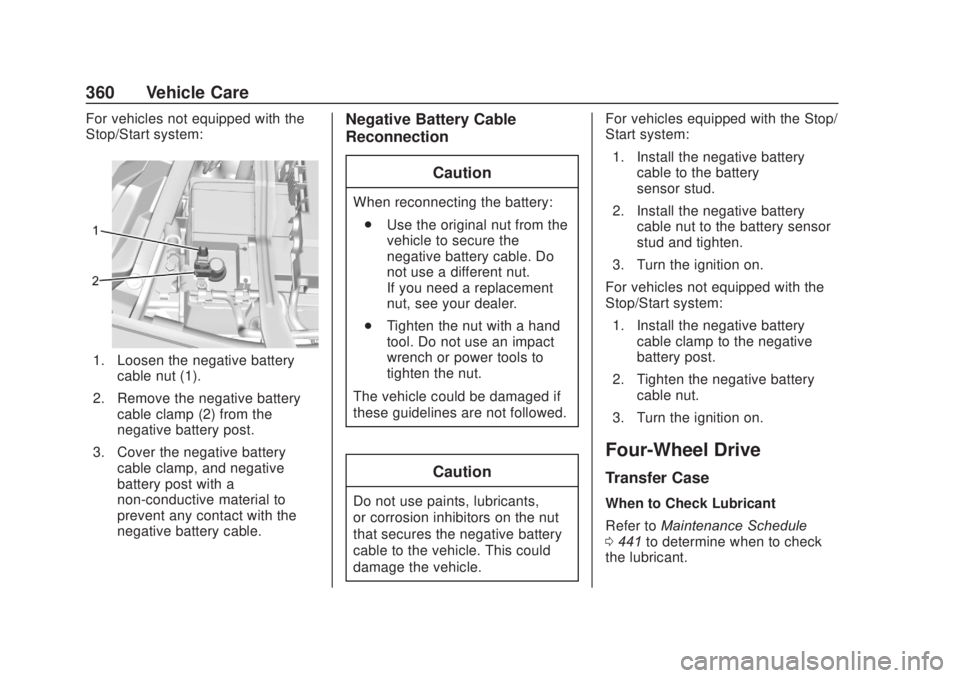
For vehicles not equipped with the
Stop/Start system:
1. Loosen the negative batterycable nut (1).
2. Remove the negative battery cable clamp (2) from the
negative battery post.
3. Cover the negative battery cable clamp, and negative
battery post with a
non-conductive material to
prevent any contact with the
negative battery cable.
Negative Battery Cable
Reconnection
Caution
When reconnecting the battery:. Use the original nut from the
vehicle to secure the
negative battery cable. Do
not use a different nut.
If you need a replacement
nut, see your dealer.
. Tighten the nut with a hand
tool. Do not use an impact
wrench or power tools to
tighten the nut.
The vehicle could be damaged if
these guidelines are not followed.
Caution
Do not use paints, lubricants,
or corrosion inhibitors on the nut
that secures the negative battery
cable to the vehicle. This could
damage the vehicle. For vehicles equipped with the Stop/
Start system:
1. Install the negative battery cable to the battery
sensor stud.
2. Install the negative battery cable nut to the battery sensor
stud and tighten.
3. Turn the ignition on.
For vehicles not equipped with the
Stop/Start system: 1. Install the negative battery cable clamp to the negative
battery post.
2. Tighten the negative battery cable nut.
3. Turn the ignition on.
Four-Wheel Drive
Transfer Case
When to Check Lubricant
Refer to Maintenance Schedule
0 441 to determine when to check
the lubricant.
Page 394 of 500
Chevrolet Silverado Owner Manual (GMNA-Localizing-U.S./Canada/Mexico-
13337620) - 2020 - CRC - 4/10/19
Vehicle Care 393
.The battery of the TPMS sensor
is low.
If the tire fill alert does not operate
due to TPMS interference, move the
vehicle about 1 m (3 ft) back or
forward and try again. If the tire fill
alert feature is not working, use a
tire pressure gauge.
TPMS Sensor Matching
Process
Each TPMS sensor has a unique
identification code. The identification
code needs to be matched to a new
tire/wheel position after rotating the
vehicle’s tires or replacing one or
more of the TPMS sensors. Also,
the TPMS sensor matching process
should be performed after replacing
a spare tire with a road tire
containing the TPMS sensor. The
malfunction light and the DIC
message should go off at the next
ignition cycle. The sensors are
matched to the tire/wheel positions,
using a TPMS relearn tool, in the
following order: driver side front tire,
passenger side front tire, passenger
side rear tire, and driver side rear. See your dealer for service or to
purchase a relearn tool. A TPMS
relearn tool can also be purchased.
See Tire Pressure Monitor Sensor
Activation Tool at
www.gmtoolsandequipment.com or
call 1-800-GM TOOLS
(1-800-468-6657).
There are two minutes to match the
first tire/wheel position, and
five minutes overall to match all four
tire/wheel positions. If it takes
longer, the matching process stops
and must be restarted.
The TPMS sensor matching
process is:
1. Set the parking brake.
2. Turn the ignition on without starting the vehicle.
3. Uplevel DIC Only: Make sure the Tire Pressure info page
option is turned on. The info
pages on the DIC can be
turned on and off through the Options menu. See
Driver
Information Center (DIC) (Base
Level) 0148 or
Driver Information Center (DIC)
(Midlevel and Uplevel) 0149.
4. If the vehicle has an uplevel DIC, use the DIC controls on
the right side of the steering
wheel to scroll to the Tire
Pressure screen under the DIC
info page.
If the vehicle has a base level
DIC, use the trip odometer
reset stem to scroll to the Tire
Pressure screen.
5. If the vehicle has an uplevel DIC, press and hold the
thumbwheel located in the
center of the DIC controls on
the right side of the steering
wheel.
If the vehicle has a base level
DIC, press and hold the trip
odometer reset stem for about
five seconds. A message
asking if the process should
begin should appear. Select
Page 395 of 500
Chevrolet Silverado Owner Manual (GMNA-Localizing-U.S./Canada/Mexico-
13337620) - 2020 - CRC - 4/10/19
394 Vehicle Care
yes and press the trip
odometer reset stem to confirm
the selection.
The horn sounds twice to
signal the receiver is in relearn
mode and the TIRE
LEARNING ACTIVE message
displays on the DIC screen.
6. Start with the driver side front tire.
7. Place the relearn tool against the tire sidewall, near the valve
stem. Then press the button to
activate the TPMS sensor.
A horn chirp confirms that the
sensor identification code has
been matched to this tire and
wheel position.
8. Proceed to the passenger side front tire, and repeat the
procedure in Step 7.
9. Proceed to the passenger side rear tire, and repeat the
procedure in Step 7.
10. Proceed to the driver side rear tire, and repeat the procedure
in Step 7. The horn sounds two times to indicate the sensor
identification code has been
matched to the driver side rear
tire, and the TPMS sensor
matching process is no longer
active. The TIRE LEARNING
ACTIVE message on the DIC
display screen goes off.
11. Turn the vehicle off.
12. Set all four tires to the recommended air pressure
level as indicated on the Tire
and Loading Information label.
Trailer Tire Pressure
Monitoring Operation
If equipped, the Trailer Tire
Pressure Monitoring System
(TTPMS) is designed to monitor the
pressure of the trailer tires and warn
the driver when a low pressure
condition exists. TTPMS sensors for
four tires are provided. The system
can accommodate a trailer with up
to six tires if additional sensors are
purchased from the dealer. Also, the
system can be paired with up to five
individual trailers. Prior to use, the vehicle must learn
the sensors by following the
learning process. See
Trailering App
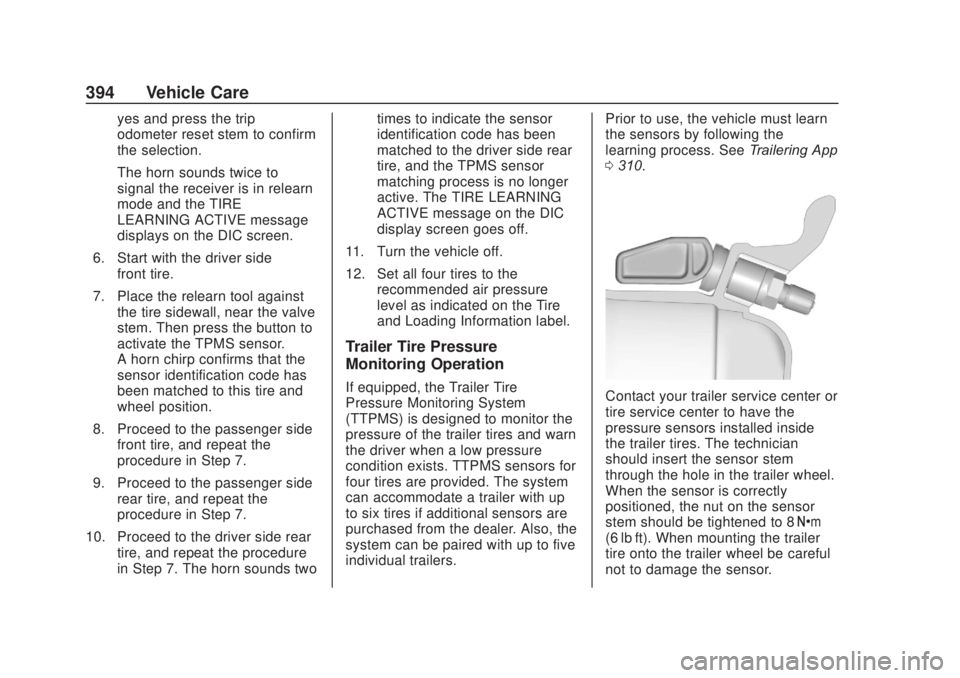
0 310.Contact your trailer service center or
tire service center to have the
pressure sensors installed inside
the trailer tires. The technician
should insert the sensor stem
through the hole in the trailer wheel.
When the sensor is correctly
positioned, the nut on the sensor
stem should be tightened to 8 Y
(6 lb ft). When mounting the trailer
tire onto the trailer wheel be careful
not to damage the sensor.
Page 401 of 500
Chevrolet Silverado Owner Manual (GMNA-Localizing-U.S./Canada/Mexico-
13337620) - 2020 - CRC - 4/10/19
400 Vehicle Care
sidewall near the tire size. If the
tires have an all-season tread
design, the TPC Spec number
will be followed by MS for mud
and snow. SeeTire Sidewall
Labeling 0381 for additional
information.
GM recommends replacing worn
tires in complete sets of four (six
for dual rear wheels). Uniform
tread depth on all tires will help
to maintain the performance of
the vehicle. Braking and
handling performance may be
adversely affected if all the tires
are not replaced at the same
time. If proper rotation and
maintenance have been done,
all four tires (six for dual rear
wheels) should wear out at
about the same time. See Tire
Rotation 0396 for information
on proper tire rotation. However,
if it is necessary to replace only
one axle set of worn tires, place the new tires on the rear axle
(two for single rear wheels, four
for dual rear wheels).
{Warning
Tires could explode during
improper service. Attempting
to mount or dismount a tire
could cause injury or death.
Only your dealer or authorized
tire service center should
mount or dismount the tires.
{Warning
Mixing tires of different sizes,
tread patterns, or types on the
same axle may cause loss of
control of the vehicle, resulting
in a crash or other vehicle
damage. Use the same size,
load range, and type of tires
as the original tires.
(Continued)
Warning (Continued)
This vehicle may have a
different size spare than the
road tires originally installed
on the vehicle. When new, the
vehicle included a spare tire
and wheel assembly with a
similar overall diameter as the
road tires and wheels, so it is
all right to drive on it. The
spare tire was developed for
use on this vehicle and will not
affect vehicle handling.
{Warning
Using bias-ply tires on the
vehicle may cause the wheel
rim flanges to develop cracks
after many miles of driving.
A tire and/or wheel could fail
suddenly and cause a crash.
Use only radial-ply tires with
the wheels on the vehicle.
Page 407 of 500
Chevrolet Silverado Owner Manual (GMNA-Localizing-U.S./Canada/Mexico-
13337620) - 2020 - CRC - 4/10/19
406 Vehicle Care
{Warning
Lifting a vehicle and getting under
it to do maintenance or repairs is
dangerous without the
appropriate safety equipment and
training. If a jack is provided with
the vehicle, it is designed only for
changing a flat tire. If it is used for
anything else, you or others could
be badly injured or killed if the
vehicle slips off the jack. If a jack
is provided with the vehicle, only
use it for changing a flat tire.
If a tire goes flat, avoid further tire
and wheel damage by driving slowly
to a level place, well off the road,
if possible. Turn on the hazard
warning flashers. See Hazard
Warning Flashers 0169.
{Warning
Changing a tire can be
dangerous. The vehicle can slip
off the jack and roll over or fall
causing injury or death. Find a
level place to change the tire. To
help prevent the vehicle from
moving:
1. Set the parking brake firmly.
2. Put the shift lever inP (Park).
3. For vehicles with four-wheel drive with an N (Neutral)
transfer case position, be
sure the transfer case is in a
drive gear —not in
N (Neutral).
4. Turn off the engine and do not restart while the vehicle
is raised.
5. Do not allow passengers to remain in the vehicle.
(Continued)
Warning (Continued)
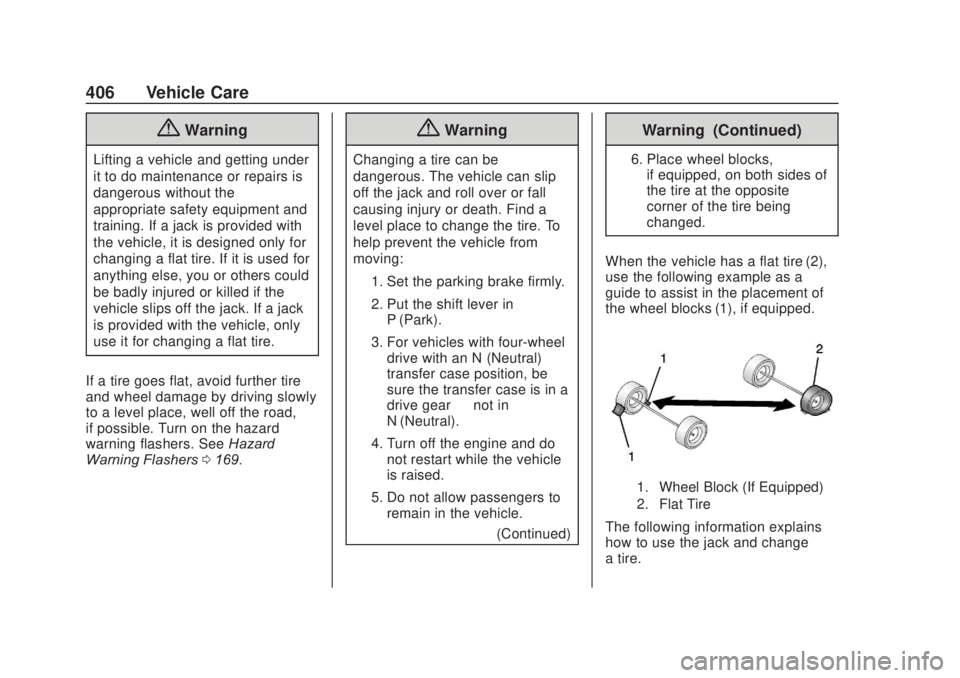
6. Place wheel blocks,if equipped, on both sides of
the tire at the opposite
corner of the tire being
changed.
When the vehicle has a flat tire (2),
use the following example as a
guide to assist in the placement of
the wheel blocks (1), if equipped.
1. Wheel Block (If Equipped)
2. Flat Tire
The following information explains
how to use the jack and change
a tire.
Page 420 of 500
Chevrolet Silverado Owner Manual (GMNA-Localizing-U.S./Canada/Mexico-
13337620) - 2020 - CRC - 4/10/19
Vehicle Care 419
should not be driven on over
112 km/h (70 mph), or 88 km/h
(55 mph) when pulling a trailer, at
the proper inflation pressure. Repair
and replace the road tire as soon as
it is convenient, and stow the spare
tire for future use.
Caution
If the vehicle has four-wheel drive
and a different size spare tire is
installed, do not drive in
four-wheel drive until the flat tire
is repaired and/or replaced. The
vehicle could be damaged and
the repairs would not be covered
by the warranty. Never use
four-wheel drive when a different
size spare tire is installed on the
vehicle.
The vehicle may have a different
size spare tire than the road tires
originally installed on the vehicle.
This spare tire was developed for
use on this vehicle, so it is all right
to drive on it. If the vehicle has four-wheel drive and a different size
spare tire is installed, drive only in
two-wheel drive.
After installing the spare tire on the
vehicle, stop as soon as possible
and check that the spare tire is
correctly inflated.
Have the damaged or flat road tire
repaired or replaced and installed
back onto the vehicle as soon as
possible so the spare tire will be
available in case it is needed again.
Do not mix tires and wheels of
different sizes, because they will not
fit. Keep your spare tire and its
wheel together. If the vehicle has a
spare tire that does not match the
original road tires and wheels in size
and type, do not include the spare in
the tire rotation.
Jump Starting
Jump Starting - North
America
For more information about the
vehicle battery, see
Battery - North
America 0358.
If the vehicle's battery (or batteries)
has run down, you may want to use
another vehicle and some jumper
cables to start your vehicle. Be sure
to use the following steps to do it
safely.
{Warning
WARNING: Battery posts,
terminals, and related
accessories contain lead and lead
compounds, chemicals known to
the State of California to cause
cancer and birth defects or other
reproductive harm. Batteries also
contain other chemicals known to
the State of California to cause
cancer. WASH HANDS AFTER
(Continued)