CHEVROLET SILVERADO EV 2024 Owners Manual
Manufacturer: CHEVROLET, Model Year: 2024, Model line: SILVERADO EV, Model: CHEVROLET SILVERADO EV 2024Pages: 429, PDF Size: 8.98 MB
Page 121 of 429
Chevrolet Silverado EV Owner Manual (GMNA-Localizing-U.S./Canada-
16702912) - 2024 - CRC - 1/13/23
120 Instruments and Controls
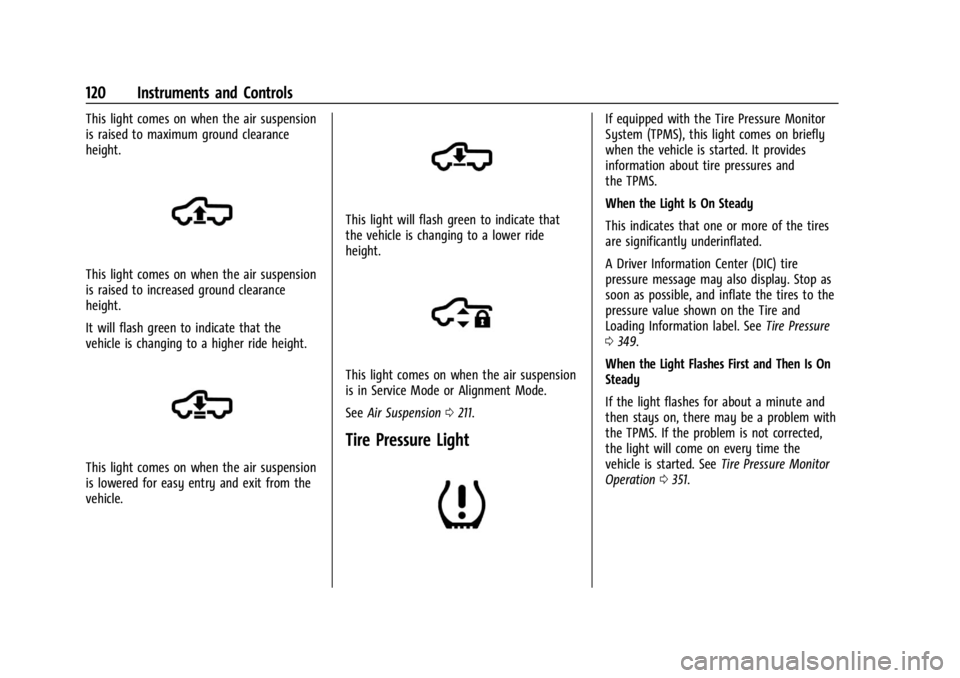
This light comes on when the air suspension
is raised to maximum ground clearance
height.
This light comes on when the air suspension
is raised to increased ground clearance
height.
It will flash green to indicate that the
vehicle is changing to a higher ride height.
This light comes on when the air suspension
is lowered for easy entry and exit from the
vehicle.
This light will flash green to indicate that
the vehicle is changing to a lower ride
height.
This light comes on when the air suspension
is in Service Mode or Alignment Mode.
SeeAir Suspension 0211.
Tire Pressure Light
If equipped with the Tire Pressure Monitor
System (TPMS), this light comes on briefly
when the vehicle is started. It provides
information about tire pressures and
the TPMS.
When the Light Is On Steady
This indicates that one or more of the tires
are significantly underinflated.
A Driver Information Center (DIC) tire
pressure message may also display. Stop as
soon as possible, and inflate the tires to the
pressure value shown on the Tire and
Loading Information label. See Tire Pressure
0 349.
When the Light Flashes First and Then Is On
Steady
If the light flashes for about a minute and
then stays on, there may be a problem with
the TPMS. If the problem is not corrected,
the light will come on every time the
vehicle is started. See Tire Pressure Monitor
Operation 0351.
Page 122 of 429
Chevrolet Silverado EV Owner Manual (GMNA-Localizing-U.S./Canada-
16702912) - 2024 - CRC - 1/13/23
Instruments and Controls 121
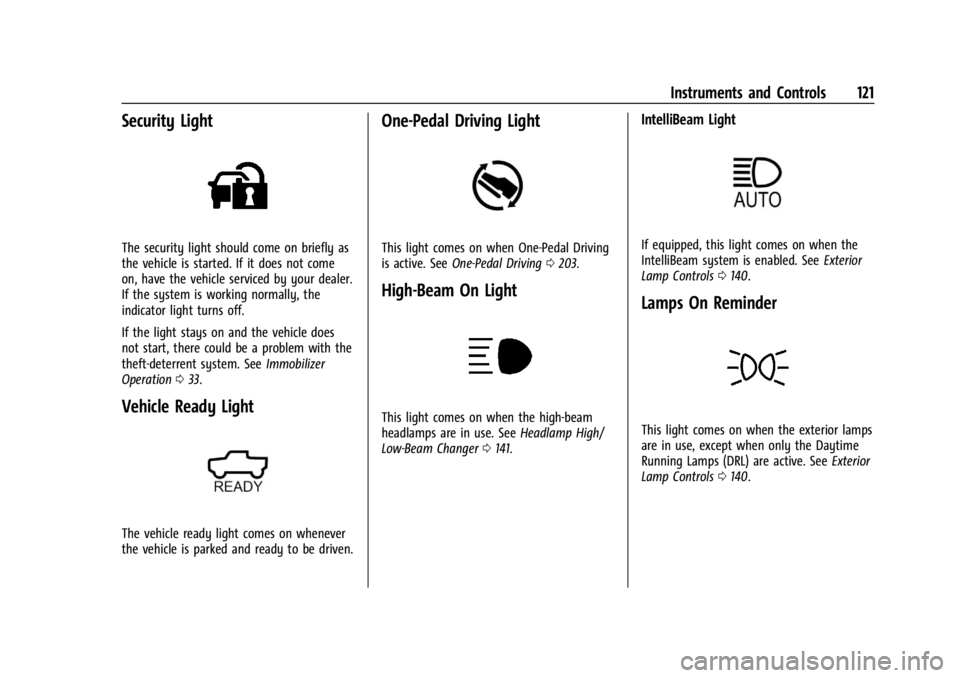
Security Light
The security light should come on briefly as
the vehicle is started. If it does not come
on, have the vehicle serviced by your dealer.
If the system is working normally, the
indicator light turns off.
If the light stays on and the vehicle does
not start, there could be a problem with the
theft-deterrent system. SeeImmobilizer
Operation 033.
Vehicle Ready Light
The vehicle ready light comes on whenever
the vehicle is parked and ready to be driven.
One-Pedal Driving Light
This light comes on when One-Pedal Driving
is active. See One-Pedal Driving 0203.
High-Beam On Light
This light comes on when the high-beam
headlamps are in use. See Headlamp High/
Low-Beam Changer 0141.
IntelliBeam Light
If equipped, this light comes on when the
IntelliBeam system is enabled. See Exterior
Lamp Controls 0140.
Lamps On Reminder
This light comes on when the exterior lamps
are in use, except when only the Daytime
Running Lamps (DRL) are active. See Exterior
Lamp Controls 0140.
Page 123 of 429
Chevrolet Silverado EV Owner Manual (GMNA-Localizing-U.S./Canada-
16702912) - 2024 - CRC - 1/13/23
122 Instruments and Controls
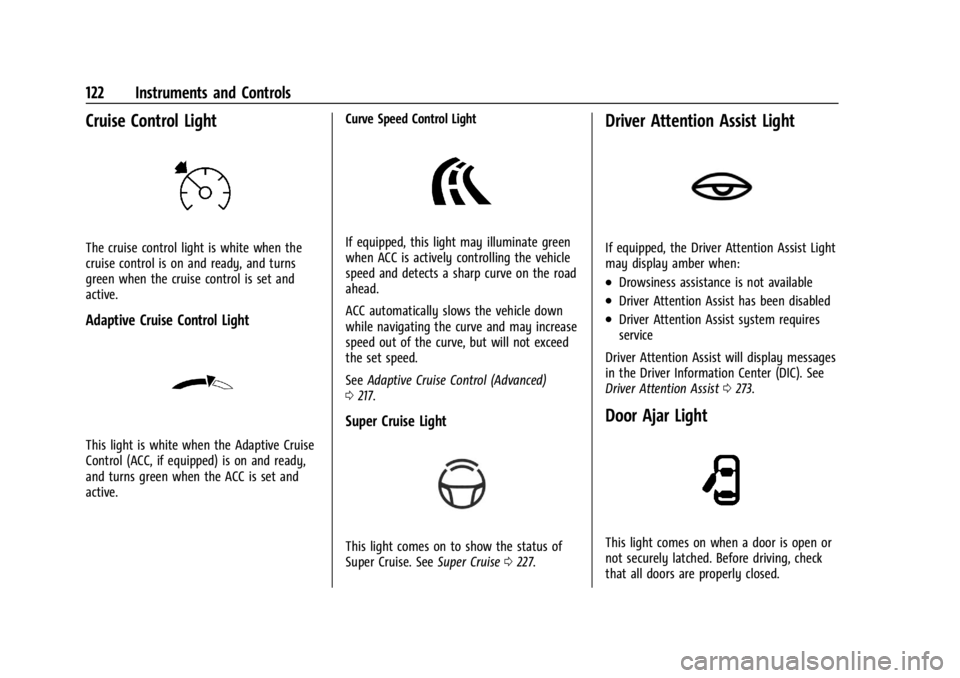
Cruise Control Light
The cruise control light is white when the
cruise control is on and ready, and turns
green when the cruise control is set and
active.
Adaptive Cruise Control Light
This light is white when the Adaptive Cruise
Control (ACC, if equipped) is on and ready,
and turns green when the ACC is set and
active.Curve Speed Control Light
If equipped, this light may illuminate green
when ACC is actively controlling the vehicle
speed and detects a sharp curve on the road
ahead.
ACC automatically slows the vehicle down
while navigating the curve and may increase
speed out of the curve, but will not exceed
the set speed.
See
Adaptive Cruise Control (Advanced)
0 217.
Super Cruise Light
This light comes on to show the status of
Super Cruise. See Super Cruise0227.
Driver Attention Assist Light
If equipped, the Driver Attention Assist Light
may display amber when:
.Drowsiness assistance is not available
.Driver Attention Assist has been disabled
.Driver Attention Assist system requires
service
Driver Attention Assist will display messages
in the Driver Information Center (DIC). See
Driver Attention Assist 0273.
Door Ajar Light
This light comes on when a door is open or
not securely latched. Before driving, check
that all doors are properly closed.
Page 124 of 429

Chevrolet Silverado EV Owner Manual (GMNA-Localizing-U.S./Canada-
16702912) - 2024 - CRC - 1/13/23
Instruments and Controls 123
Information Displays
Charging
Important Information about Electric Vehicle
Charging
.Charging an electric vehicle can stress a
building’s electrical system more than a
typical household appliance.
.Charge cord limits can vary from vehicle
to vehicle, and increased charging rates
can stress a building’s electrical system.
.Before plugging into any electrical outlet,
have a qualified electrician inspect and
verify the electrical system (electrical
outlet, wiring, junctions, and protection
devices) for heavy-duty service at a
12 amp continuous load.
.Electrical outlets may wear out with
normal usage or may be damaged over
time, making them unsuitable for electric
vehicle charging.
.Check the electrical outlet/plug while
charging and discontinue use if the
electrical outlet/plug is hot, then have the
electrical outlet serviced by a qualified
electrician.
.When outdoors, plug into an electrical
outlet that is weatherproof while in use.
.Mount the charging cord to reduce strain
on the electrical outlet/plug.
.Do not place the charge cord in a position
where it is expected to be submerged in
water.
{Danger
Improper use of portable electric vehicle
charge cords may cause a fire, electrical
shock, or burns, and may result in
damage to property, serious injury,
or death.
.Do not use extension cords,
multi-outlet power strips, splitters,
grounding adapters, surge protectors,
or similar devices.
.Do not use an electrical outlet that is
worn or damaged, or will not hold the
plug firmly in place.
.Do not use an electrical outlet that is
not properly grounded.
.Do not use an electrical outlet that is
on a circuit with other electrical loads.
Charging App
The Charging app gives you access to
features that will help you better
understand and control how the vehicle
manages charging, providing a central
location to determine and review your
charging preferences.
To launch the Charging app from the
infotainment home screen, touch the
Charging icon. There are four selections to
choose from: Next Charge, Charge Assist,
Schedule, and Settings. When you launch
Charging for the first time, the Next Charge
screen will display.
Next Charge
To view the current charging status in the
infotainment display, touch
C.
On the Next Charge screen, there is a range
of information associated with the next
Charging session, as well as the ability to
specify when you would like to charge the
vehicle. The choices available to charge are
Charge Now or Charge Later.
Page 125 of 429
Chevrolet Silverado EV Owner Manual (GMNA-Localizing-U.S./Canada-
16702912) - 2024 - CRC - 1/13/23
124 Instruments and Controls
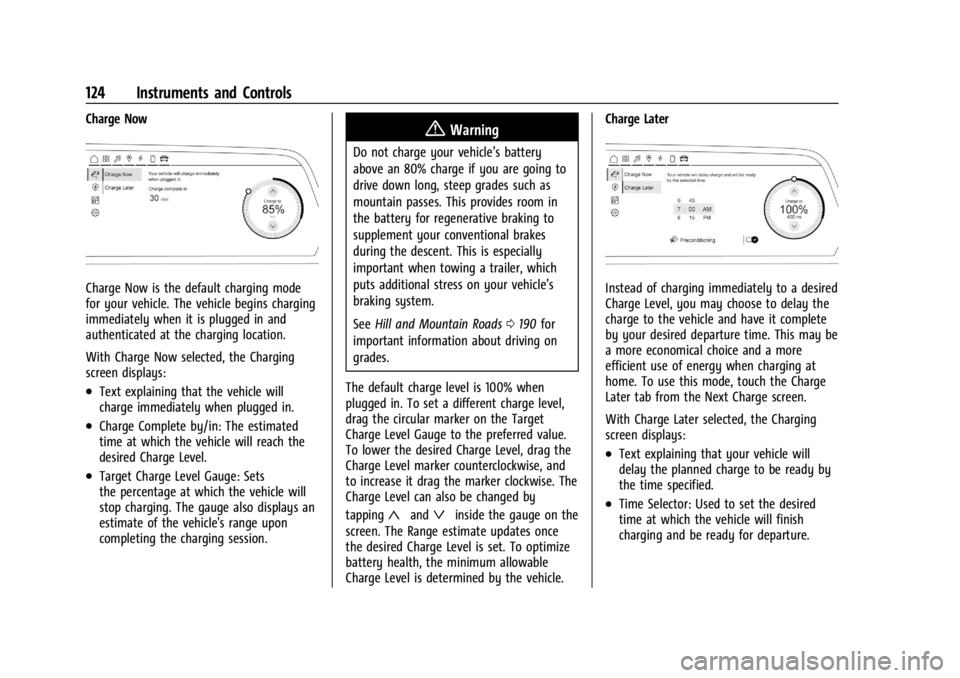
Charge Now
Charge Now is the default charging mode
for your vehicle. The vehicle begins charging
immediately when it is plugged in and
authenticated at the charging location.
With Charge Now selected, the Charging
screen displays:
.Text explaining that the vehicle will
charge immediately when plugged in.
.Charge Complete by/in: The estimated
time at which the vehicle will reach the
desired Charge Level.
.Target Charge Level Gauge: Sets
the percentage at which the vehicle will
stop charging. The gauge also displays an
estimate of the vehicle's range upon
completing the charging session.
{Warning
Do not charge your vehicle’s battery
above an 80% charge if you are going to
drive down long, steep grades such as
mountain passes. This provides room in
the battery for regenerative braking to
supplement your conventional brakes
during the descent. This is especially
important when towing a trailer, which
puts additional stress on your vehicle’s
braking system.
SeeHill and Mountain Roads 0190 for
important information about driving on
grades.
The default charge level is 100% when
plugged in. To set a different charge level,
drag the circular marker on the Target
Charge Level Gauge to the preferred value.
To lower the desired Charge Level, drag the
Charge Level marker counterclockwise, and
to increase it drag the marker clockwise. The
Charge Level can also be changed by
tapping
«andªinside the gauge on the
screen. The Range estimate updates once
the desired Charge Level is set. To optimize
battery health, the minimum allowable
Charge Level is determined by the vehicle. Charge Later
Instead of charging immediately to a desired
Charge Level, you may choose to delay the
charge to the vehicle and have it complete
by your desired departure time. This may be
a more economical choice and a more
efficient use of energy when charging at
home. To use this mode, touch the Charge
Later tab from the Next Charge screen.
With Charge Later selected, the Charging
screen displays:
.Text explaining that your vehicle will
delay the planned charge to be ready by
the time specified.
.Time Selector: Used to set the desired
time at which the vehicle will finish
charging and be ready for departure.
Page 126 of 429
Chevrolet Silverado EV Owner Manual (GMNA-Localizing-U.S./Canada-
16702912) - 2024 - CRC - 1/13/23
Instruments and Controls 125
.Target Charge Level Gauge: Sets
the percentage at which the vehicle will
stop charging. The gauge also displays an
estimate of the vehicle's range upon
completing the charging session.
.Preconditioning: Allows the vehicle to
heat or cool the cabin to your desired
temperature using energy from the
charger. This means energy from the
battery is not used to condition the cabin,
ensuring the vehicle gets the maximum
range from the charging session.
Preconditioning happens at the end of the
charge, and right before the
departure time.
To set the time at which the vehicle will
complete the charge and be ready for
departure:
Swipe up or down on each value within the
Time Selector until the preferred time is
selected. If the desired Charge Level cannot
be reached by the selected time, a message
will display that one of the two preferences
will need to be adjusted.
To adjust desired Charge Level in Charge
Later mode, see “Charge Now”earlier in this
section. Setting the Preconditioning preference:
Touch the switch to turn on Preconditioning.
Cabin Preconditioning temperature can be
adjusted by touching Preconditioning on this
screen, or in Settings.
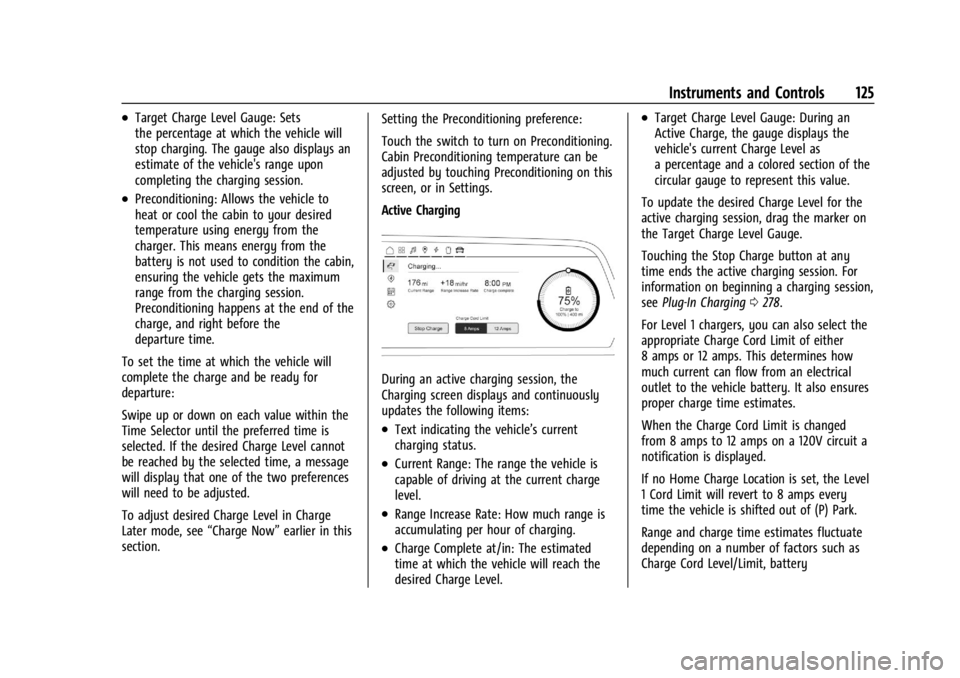
Active Charging
During an active charging session, the
Charging screen displays and continuously
updates the following items:
.Text indicating the vehicle’s current
charging status.
.Current Range: The range the vehicle is
capable of driving at the current charge
level.
.Range Increase Rate: How much range is
accumulating per hour of charging.
.Charge Complete at/in: The estimated
time at which the vehicle will reach the
desired Charge Level.
.Target Charge Level Gauge: During an
Active Charge, the gauge displays the
vehicle's current Charge Level as
a percentage and a colored section of the
circular gauge to represent this value.
To update the desired Charge Level for the
active charging session, drag the marker on
the Target Charge Level Gauge.
Touching the Stop Charge button at any
time ends the active charging session. For
information on beginning a charging session,
see Plug-In Charging 0278.
For Level 1 chargers, you can also select the
appropriate Charge Cord Limit of either
8 amps or 12 amps. This determines how
much current can flow from an electrical
outlet to the vehicle battery. It also ensures
proper charge time estimates.
When the Charge Cord Limit is changed
from 8 amps to 12 amps on a 120V circuit a
notification is displayed.
If no Home Charge Location is set, the Level
1 Cord Limit will revert to 8 amps every
time the vehicle is shifted out of (P) Park.
Range and charge time estimates fluctuate
depending on a number of factors such as
Charge Cord Level/Limit, battery
Page 127 of 429
Chevrolet Silverado EV Owner Manual (GMNA-Localizing-U.S./Canada-
16702912) - 2024 - CRC - 1/13/23
126 Instruments and Controls
temperature, and outside air temperature.
To learn more about the vehicle battery see
Plug-In Charging0278.
The peek-in charging screen can be used to
monitor your vehicle’s charge status when
the vehicle is off, see Instrument Cluster
(Base Level) 0107 or
Instrument Cluster (Uplevel) 0109. To
monitor the charging status remotely,
download the myChevrolet app on your
mobile device.
Fast Charging
The vehicle will immediately begin charging
when plugged into a fast charging station.
While Fast Charging, the vehicle will bypass
any schedule or departure time selection.
See Plug-In Charging 0278.
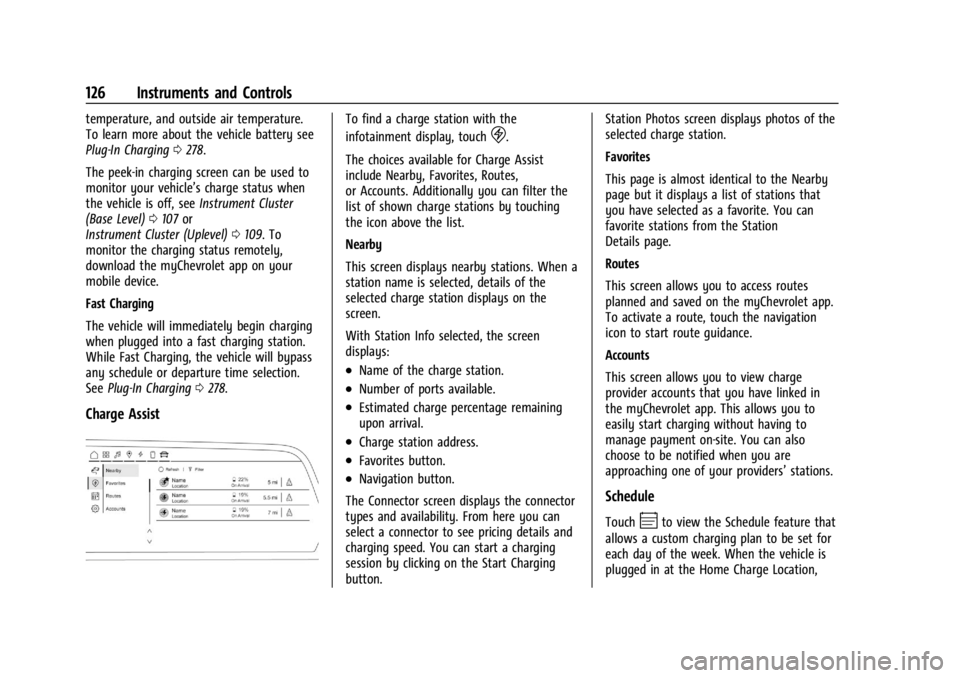
Charge Assist
To find a charge station with the
infotainment display, touch
D.
The choices available for Charge Assist
include Nearby, Favorites, Routes,
or Accounts. Additionally you can filter the
list of shown charge stations by touching
the icon above the list.
Nearby
This screen displays nearby stations. When a
station name is selected, details of the
selected charge station displays on the
screen.
With Station Info selected, the screen
displays:
.Name of the charge station.
.Number of ports available.
.Estimated charge percentage remaining
upon arrival.
.Charge station address.
.Favorites button.
.Navigation button.
The Connector screen displays the connector
types and availability. From here you can
select a connector to see pricing details and
charging speed. You can start a charging
session by clicking on the Start Charging
button. Station Photos screen displays photos of the
selected charge station.
Favorites
This page is almost identical to the Nearby
page but it displays a list of stations that
you have selected as a favorite. You can
favorite stations from the Station
Details page.
Routes
This screen allows you to access routes
planned and saved on the myChevrolet app.
To activate a route, touch the navigation
icon to start route guidance.
Accounts
This screen allows you to view charge
provider accounts that you have linked in
the myChevrolet app. This allows you to
easily start charging without having to
manage payment on-site. You can also
choose to be notified when you are
approaching one of your providers’
stations.
Schedule
TouchEto view the Schedule feature that
allows a custom charging plan to be set for
each day of the week. When the vehicle is
plugged in at the Home Charge Location,
Page 128 of 429
Chevrolet Silverado EV Owner Manual (GMNA-Localizing-U.S./Canada-
16702912) - 2024 - CRC - 1/13/23
Instruments and Controls 127
the Schedule feature will automatically
charge to the desired Charge Level and
precondition the cabin by the time set in
the Schedule. This feature acts as a more
customizable Charge Later setting than the
one on the Next Charge screen.
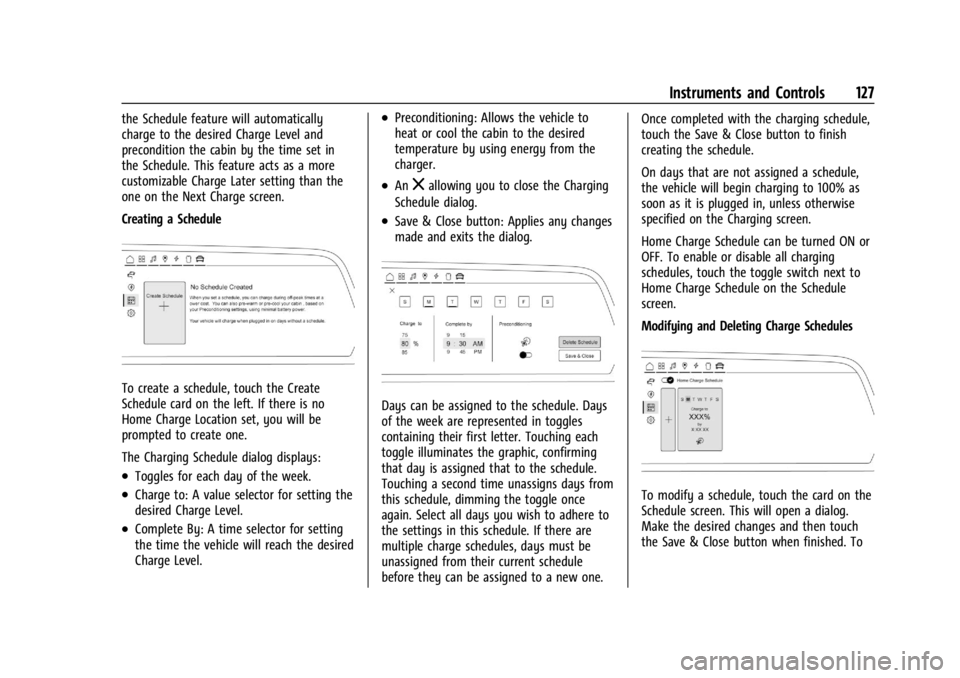
Creating a Schedule
To create a schedule, touch the Create
Schedule card on the left. If there is no
Home Charge Location set, you will be
prompted to create one.
The Charging Schedule dialog displays:
.Toggles for each day of the week.
.Charge to: A value selector for setting the
desired Charge Level.
.Complete By: A time selector for setting
the time the vehicle will reach the desired
Charge Level.
.Preconditioning: Allows the vehicle to
heat or cool the cabin to the desired
temperature by using energy from the
charger.
.Anzallowing you to close the Charging
Schedule dialog.
.Save & Close button: Applies any changes
made and exits the dialog.
Days can be assigned to the schedule. Days
of the week are represented in toggles
containing their first letter. Touching each
toggle illuminates the graphic, confirming
that day is assigned that to the schedule.
Touching a second time unassigns days from
this schedule, dimming the toggle once
again. Select all days you wish to adhere to
the settings in this schedule. If there are
multiple charge schedules, days must be
unassigned from their current schedule
before they can be assigned to a new one. Once completed with the charging schedule,
touch the Save & Close button to finish
creating the schedule.
On days that are not assigned a schedule,
the vehicle will begin charging to 100% as
soon as it is plugged in, unless otherwise
specified on the Charging screen.
Home Charge Schedule can be turned ON or
OFF. To enable or disable all charging
schedules, touch the toggle switch next to
Home Charge Schedule on the Schedule
screen.
Modifying and Deleting Charge Schedules
To modify a schedule, touch the card on the
Schedule screen. This will open a dialog.
Make the desired changes and then touch
the Save & Close button when finished. To
Page 129 of 429
Chevrolet Silverado EV Owner Manual (GMNA-Localizing-U.S./Canada-
16702912) - 2024 - CRC - 1/13/23
128 Instruments and Controls
delete the schedule, simply touch the Delete
Schedule button, at which point you will be
prompted to confirm your decision.
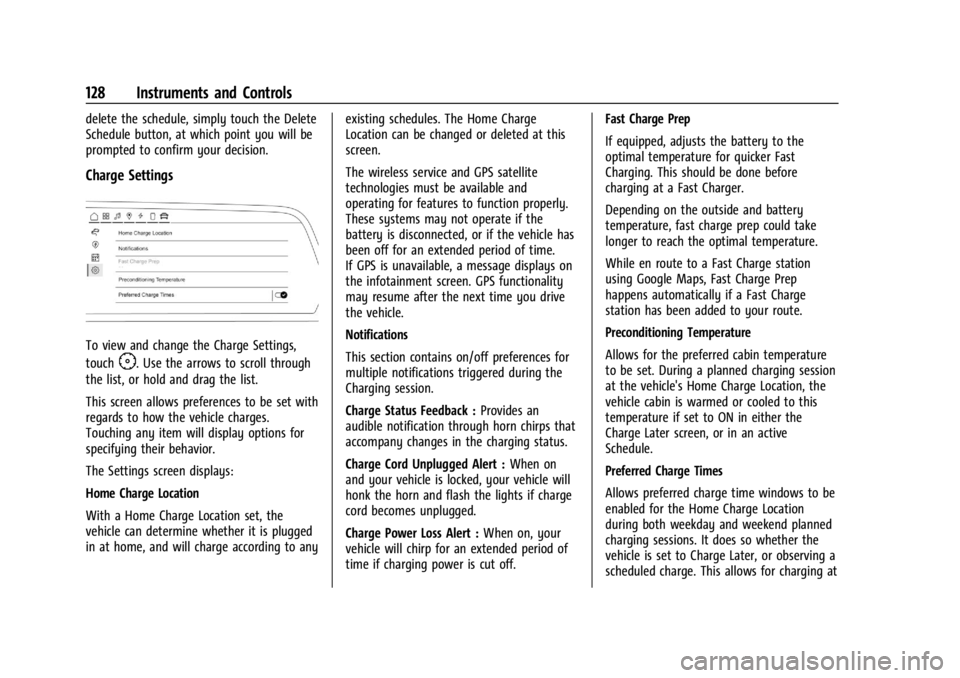
Charge Settings
To view and change the Charge Settings,
touch
F. Use the arrows to scroll through
the list, or hold and drag the list.
This screen allows preferences to be set with
regards to how the vehicle charges.
Touching any item will display options for
specifying their behavior.
The Settings screen displays:
Home Charge Location
With a Home Charge Location set, the
vehicle can determine whether it is plugged
in at home, and will charge according to any existing schedules. The Home Charge
Location can be changed or deleted at this
screen.
The wireless service and GPS satellite
technologies must be available and
operating for features to function properly.
These systems may not operate if the
battery is disconnected, or if the vehicle has
been off for an extended period of time.
If GPS is unavailable, a message displays on
the infotainment screen. GPS functionality
may resume after the next time you drive
the vehicle.
Notifications
This section contains on/off preferences for
multiple notifications triggered during the
Charging session.
Charge Status Feedback :
Provides an
audible notification through horn chirps that
accompany changes in the charging status.
Charge Cord Unplugged Alert : When on
and your vehicle is locked, your vehicle will
honk the horn and flash the lights if charge
cord becomes unplugged.
Charge Power Loss Alert : When on, your
vehicle will chirp for an extended period of
time if charging power is cut off. Fast Charge Prep
If equipped, adjusts the battery to the
optimal temperature for quicker Fast
Charging. This should be done before
charging at a Fast Charger.
Depending on the outside and battery
temperature, fast charge prep could take
longer to reach the optimal temperature.
While en route to a Fast Charge station
using Google Maps, Fast Charge Prep
happens automatically if a Fast Charge
station has been added to your route.
Preconditioning Temperature
Allows for the preferred cabin temperature
to be set. During a planned charging session
at the vehicle's Home Charge Location, the
vehicle cabin is warmed or cooled to this
temperature if set to ON in either the
Charge Later screen, or in an active
Schedule.
Preferred Charge Times
Allows preferred charge time windows to be
enabled for the Home Charge Location
during both weekday and weekend planned
charging sessions. It does so whether the
vehicle is set to Charge Later, or observing a
scheduled charge. This allows for charging at
Page 130 of 429

Chevrolet Silverado EV Owner Manual (GMNA-Localizing-U.S./Canada-
16702912) - 2024 - CRC - 1/13/23
Instruments and Controls 129
a lower cost by prioritizing charging during
the electrical provider’s off-peak period. The
vehicle will use these times to reach the
desired Charge Level by the scheduled time.
If the vehicle cannot reach the desired
charge level within these times, it will
charge as needed outside of this time
window.
Driver Information Center (DIC)
(Base Level)
The DIC is displayed in the instrument
cluster. It shows the status of many vehicle
systems.
yorz:Use to scroll to the previous or
next selection.
V: Press to open a menu or select a menu
item. Press and hold to reset certain
displays.
DIC Information Display Options
Select which info display to view on the DIC
through the Settings menu, or by selecting
Add to Driver Display in the Vehicle Status
on the infotainment display. See Settings
0 166 or
Vehicle Status 0132.
DIC Information Displays
The following is the list of all possible DIC
information displays and their locations.
Some of the information displays may not
be available for your particular vehicle.
Auto Lane Change : Displays the status of a
driver-requested lane change when Super
Cruise is active. See Super Cruise0227.
Audio Now Playing : Displays the actively
playing audio.
Navigation : Displays a variety of navigation
information.
Phone : Displays a variety of call
information. Trip 1 or Trip 2 and Average Efficiency :
The
Trip display shows the current distance
traveled, in either kilometers (km) or
miles (mi), since the trip odometer was last
reset. To reset the current trip, touch and
hold the touchscreen display when trip
odometer is displayed on the vehicle status
screen.
The Average Efficiency shows the
approximate average kWh per
100 kilometers (kWh/100 km), kilometers
per kilowatt hour kWh (km/kWh), or miles
per kilowatt hour kWh(mi/kWh). This
number is calculated based on the number
of kWh/100 km, km/kWh, or mi/kWh
recorded since the last time this menu item
was reset. This number only reflects the
approximate average electrical energy
economy that the vehicle has at that
moment, and changes as driving conditions
change.
Current Trip : Displays distance driven,
average efficiency, and time elapsed since
vehicle startup. It resets when you turn your
vehicle off.
Time/Date : Displays current date and time
information.