CHEVROLET SILVERADO EV 2024 Owners Manual
Manufacturer: CHEVROLET, Model Year: 2024, Model line: SILVERADO EV, Model: CHEVROLET SILVERADO EV 2024Pages: 429, PDF Size: 8.98 MB
Page 131 of 429

Chevrolet Silverado EV Owner Manual (GMNA-Localizing-U.S./Canada-
16702912) - 2024 - CRC - 1/13/23
130 Instruments and Controls
Tire Pressure :Shows the approximate
pressures of all four tires. Tire pressure is
displayed in either kilopascal (kPa) or in
pounds per square inch (psi). If the pressure
is low, the value for that tire is shown in
amber. See Tire Pressure Monitor System
0 351 and
Tire Pressure Monitor Operation 0351.
If equipped, Tire Temperature is located near
the tire pressure graphic. Tire Temperature
shows overall temperature as either Cold,
Cool, Normal, Warm, or Hot. Normal is
typical for normal driving while Warm is
typical for spirited driving. Unknown
displays when tire temperature information
is unavailable.
Trailer Brake : On vehicles with the
Integrated Trailer Brake Control (ITBC)
system, the trailer brake display appears in
the DIC.
TRAILER GAIN shows the trailer gain setting.
This setting can be adjusted from 0.0 to 10.0
with either a trailer connected or
disconnected.
TRAILER OUTPUT shows the power output to
the trailer any time a trailer with electric
brakes is connected. Output is displayed as a
bar graph. Dotted lines may appear in the
OUTPUT display if a trailer is not connected. Energy Usage :
Shows energy usage of the
Driving, Remote Start, Climate and
Conditioning vehicle systems as percentages
of overall vehicle energy use.
Energy Efficiency : Shows a graph showing
the energy efficiency that has been used by
the vehicle over a recently driven distance.
Off : Allows for no information to be
displayed in the cluster info display areas.
Driver Information Center (DIC)
(Uplevel)
The DIC is displayed in the instrument
cluster. It shows the status of many vehicle
systems.
DIC information is broken down into two
main zones:
Left Zone : Displays on the instrument
cluster to the left of the speedometer.
Right Zone : Displays on the instrument
cluster to the right of the speedometer.yorz: Use to scroll to the previous or
next selection.
V: Press to open a menu or select a menu
item. Press and hold to reset certain
displays.
DIC Information Display Options
Select which info display to view on the DIC
through the Settings menu, or by selecting
Add to Driver Display in the Vehicle Status
on the infotainment display. See Settings
0 166 or
Vehicle Status 0132.
Page 132 of 429

Chevrolet Silverado EV Owner Manual (GMNA-Localizing-U.S./Canada-
16702912) - 2024 - CRC - 1/13/23
Instruments and Controls 131
DIC Information Displays
The following is the list of all possible DIC
information displays and their locations.
Some of the information displays may not
be available for your particular vehicle.
Left Zone
Trip 1 or Trip 2 and Average Efficiency :The
Trip display shows the current distance
traveled, in either kilometers (km) or
miles (mi), since the trip odometer was last
reset. To reset the current trip, touch and
hold the touchscreen display when trip
odometer is displayed on the vehicle status
screen.
The Average Efficiency shows the
approximate average kWh per
100 kilometers (kWh/100 km), kilometers
per kilowatt hour kWh (km/kWh), or miles
per kilowatt hour kWh(mi/kWh). This
number is calculated based on the number
of kWh/100 km, km/kWh, or mi/kWh
recorded since the last time this menu item
was reset. This number only reflects the
approximate average electrical energy
economy that the vehicle has at that
moment, and changes as driving conditions
change. Current Trip :
Displays distance driven,
average efficiency, and time elapsed since
vehicle startup. It resets when you turn your
vehicle off.
Time/Date : Displays current date and time
information.
Tire Pressure : Shows the approximate
pressures of all four tires. Tire pressure is
displayed in either kilopascal (kPa) or in
pounds per square inch (psi). If the pressure
is low, the value for that tire is shown in
amber. See Tire Pressure Monitor System
0 351 and
Tire Pressure Monitor Operation 0351.
If equipped, Tire Temperature is located
below the tire pressure graphic. Tire
Temperature shows overall temperature as
either Cold, Cool, Normal, Warm, or Hot.
Normal is typical for normal driving while
Warm is typical for spirited driving.
Unknown displays when tire temperature
information is unavailable.
Trailer Brake : On vehicles with the
Integrated Trailer Brake Control (ITBC)
system, the trailer brake display appears in
the DIC. TRAILER GAIN shows the trailer gain setting.
This setting can be adjusted from 0.0 to 10.0
with either a trailer connected or
disconnected.
TRAILER OUTPUT shows the power output to
the trailer any time a trailer with electric
brakes is connected. Output is displayed as a
bar graph. Dotted lines may appear in the
OUTPUT display if a trailer is not connected.
Trailer Tire Pressure :
If equipped, shows the
approximate pressures of all trailer tires. Tire
pressure is displayed in either
kilopascal (kPa) or in pounds per square
inch (psi). If the pressure is low, the value
for that tire is shown in amber. See
Trailering App 0310.
Trailer Tire Temperature is located below the
tire pressure. Trailer Tire Temperature shows
each trailer tire temperature in either
degrees Celsius (°C) or degrees Fahrenheit
(°F).
Energy Usage : Shows energy usage of the
Driving, Remote Start, Climate and
Conditioning vehicle systems as percentages
of overall vehicle energy use.
Energy Efficiency : Shows a graph showing
the energy efficiency that has been used by
the vehicle over a recently driven distance.
Page 133 of 429
Chevrolet Silverado EV Owner Manual (GMNA-Localizing-U.S./Canada-
16702912) - 2024 - CRC - 1/13/23
132 Instruments and Controls
Off :Allows for no information to be
displayed in the cluster info display areas.
Right Zone
Auto Lane Change : Displays the status of a
driver-requested lane change when Super
Cruise is active. See Super Cruise0227.
Audio Now Playing : Displays the actively
playing audio.
Navigation : Displays a variety of navigation
information.
Phone : Displays a variety of call
information.
Off : Allows for no information to be
displayed in the cluster info display areas.
Vehicle Status
The following are all possible vehicle status
features.
To access the vehicle status menu touch
A
from the list of home page icons displayed
on the left side of the infotainment display.
Vehicle status content is shown on cards
that are grouped together in option tabs
that are displayed on the infotainment
display. Touching a card on the infotainment display
opens up a dialog box for that card. To
select a desired option within a dialog box,
touch the option and follow any message or
alerts that may display. Some options may
be unavailable while driving.
Touch Add to Driver Display to send the
desired card to the Driver Information
Center (DIC) on the instrument cluster.
Touch Remove from Driver Display to
remove the selected card from the
instrument cluster. See
Driver Information
Center (DIC) (Base Level) 0129 or
Driver Information Center (DIC) (Uplevel)
0 130.
Options
The following is the list of all possible cards
and their locations. Some of the cards may
not be available for your particular vehicle.
Overview
Displays an interactive 3-D rendered image
of your vehicle that shows performance and
health information.
Tire Pressure
Displays the approximate pressures of all
four tires. Tire pressure is displayed in either
kilopascal (kPa) or in pounds per square inch (psi). If the pressure is low, the value
for that tire is shown in amber. See
Tire
Pressure Monitor System 0351 and
Tire Pressure Monitor Operation 0351.
If equipped, Tire Temperature is located
below the tire pressure graphic. Tire
Temperature shows overall temperature as
either Cold, Cool, Normal, Warm, or Hot.
Normal is typical for normal driving while
Warm is typical for spirited driving.
Unknown displays when tire temperature
information is unavailable.
When selected, the following options may
be chosen in the dialog: Relearn Tire
Pressure, Turn Off/On Leak Detection, Reset
Leak Detection, and Add to Driver Display.
When enabled, you will receive alerts when
a fast and/or slow tire leak is detected. The
Leak Detection speeds shown are either Tire
Leak or Fast Leak. When disabled, you will
still receive low tire pressure alerts.
However, you will stop receiving additional
alerts when a tire is leaking air.
Energy Info
Energy Usage : Displays how energy is
being used for the current drive since the
last time the vehicle was started.
Percentages of the Driving, Remote Climate,
and Climate and Prep vehicle systems as
Page 134 of 429

Chevrolet Silverado EV Owner Manual (GMNA-Localizing-U.S./Canada-
16702912) - 2024 - CRC - 1/13/23
Instruments and Controls 133
overall vehicle energy use are shown. When
selected, distance driven, total energy,
energy usage bar diagram, and selectable
categories are displayed. Select a category
to learn more about how your vehicle uses
energy from the battery.
When selected, Add to Driver Display may
be chosen in the dialog.
Energy Efficiency :Displays a graph showing
the energy efficiency that has been used by
the vehicle over a recently driven distance.
When selected, regenerated range, and
instant efficiency is shown along with
average efficiency in the dialog.
When selected, Add to Driver Display may
be chosen in the dialog.
Trip
Trip Information : Trip 1 or 2 displays the
current distance traveled, in either
kilometers (km) or miles (mi), since the trip
odometer was last reset.
If equipped, Average Efficiency shows the
approximate average kilometers per kilowatt
hour kWh (km/kWh) or miles per kilowatt
hour kWh (mi/kWh). This number is
calculated based on the number of km/kWh
or mi/kWh recorded since the last time this
menu item was reset. This number only reflects the approximate average electrical
energy economy that the vehicle has at that
moment, and changes as driving conditions
change.
To reset these values, touch reset on the
touchscreen display when the Trip
Information dialog is selected.
When selected, the following options may
be chosen in the dialog: Reset Trip 1, Reset
Trip 2, and Add to Driver Display.
Current Trip :
Displays distance driven,
average efficiency, and time elapsed since
vehicle startup. It resets when you turn your
vehicle off.
When selected, Add to Driver Display may
be chosen in the dialog.
Head-Up Display (HUD)
{Warning
If the HUD image is too bright or too
high in your field of view, it may take
you more time to see things you need to
see when it is dark outside. Be sure to
keep the HUD image dim and placed low
in your field of view. If equipped, some vehicle information can be
projected as an image on the windshield via
the HUD lens on top of the instrument
panel.
Caution
If you try to use the HUD image as a
parking aid, you may misjudge the
distance and damage your vehicle. Do not
use the HUD image as a parking aid.
HUD information can be displayed in various
languages. The speedometer reading and
other numerical values can be displayed in
either English or metric units.
The language selection is changed through
the radio, and the units of measurement are
changed through the infotainment display.
See Settings 0166.
Page 135 of 429

Chevrolet Silverado EV Owner Manual (GMNA-Localizing-U.S./Canada-
16702912) - 2024 - CRC - 1/13/23
134 Instruments and Controls
HUD Display on the Windshield
Depending on how the vehicle is equipped,
the HUD may display some of the following
vehicle information and vehicle messages or
alerts:
.Speed
.Audio
.Phone
.Navigation
.Driver Assistance Features
.Vehicle Messages
Some vehicle messages or alerts displayed in
the HUD may be cleared by using the
steering wheel controls. Head-Up Display (HUD) Controls
If equipped, this feature under HUD Controls
of the infotainment screen allows for
adjusting brightness, height, and rotation.
HUD Controls: This feature may only be
available in P (Park).
HUD controls are available on the
infotainment screen.
To adjust the HUD image:
1. Adjust the driver seat.
2. Start the vehicle.
3. On the infotainment screen navigate to Home > Controls > HUD. 4. Touch the HUD Control icons above and
below to adjust height, brightness, and
image angle. The values can also be
adjusted by tapping on the bar.
The HUD image will automatically dim and
brighten to compensate for outside lighting.
Adjust as needed.
The HUD image can temporarily light up
depending on the angle and position of
sunlight on the HUD display. This is normal.
Polarized sunglasses could make the HUD
image harder to see.
HUD Options
Options can be turned on or off from the
HEAD-UP DISPLAY screen. See Settings0166.
If equipped, the following can be turned on
or off using the infotainment display:
.Speed Sign
.Navigation
.Recent Calls/Audio Lists
Page 136 of 429
Chevrolet Silverado EV Owner Manual (GMNA-Localizing-U.S./Canada-
16702912) - 2024 - CRC - 1/13/23
Instruments and Controls 135
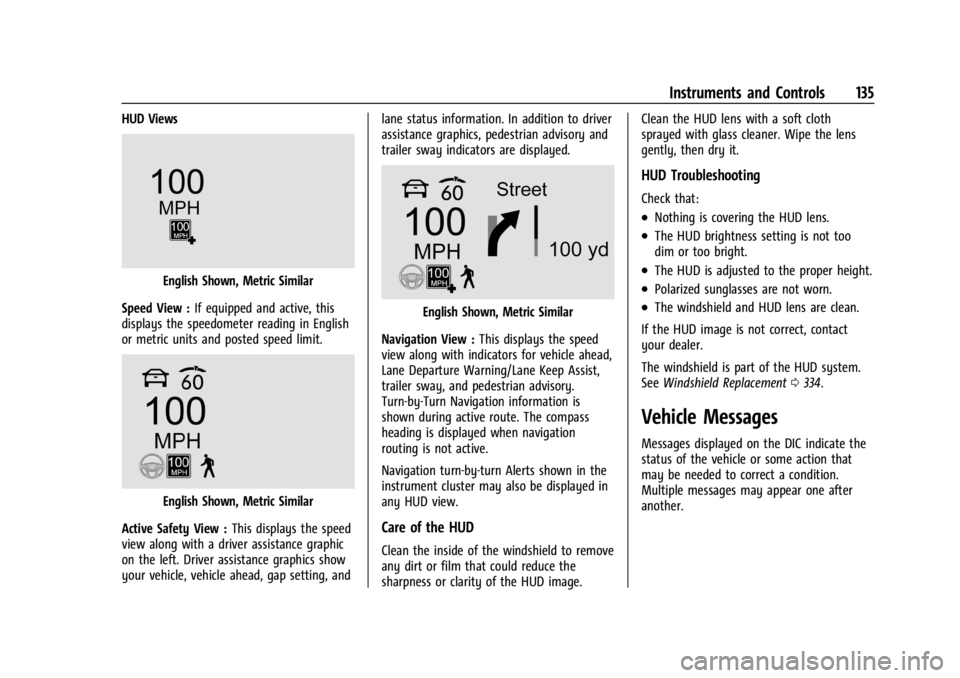
HUD Views
English Shown, Metric Similar
Speed View : If equipped and active, this
displays the speedometer reading in English
or metric units and posted speed limit.
English Shown, Metric Similar
Active Safety View : This displays the speed
view along with a driver assistance graphic
on the left. Driver assistance graphics show
your vehicle, vehicle ahead, gap setting, and lane status information. In addition to driver
assistance graphics, pedestrian advisory and
trailer sway indicators are displayed.
English Shown, Metric Similar
Navigation View : This displays the speed
view along with indicators for vehicle ahead,
Lane Departure Warning/Lane Keep Assist,
trailer sway, and pedestrian advisory.
Turn-by-Turn Navigation information is
shown during active route. The compass
heading is displayed when navigation
routing is not active.
Navigation turn-by-turn Alerts shown in the
instrument cluster may also be displayed in
any HUD view.
Care of the HUD
Clean the inside of the windshield to remove
any dirt or film that could reduce the
sharpness or clarity of the HUD image. Clean the HUD lens with a soft cloth
sprayed with glass cleaner. Wipe the lens
gently, then dry it.
HUD Troubleshooting
Check that:
.Nothing is covering the HUD lens.
.The HUD brightness setting is not too
dim or too bright.
.The HUD is adjusted to the proper height.
.Polarized sunglasses are not worn.
.The windshield and HUD lens are clean.
If the HUD image is not correct, contact
your dealer.
The windshield is part of the HUD system.
See Windshield Replacement 0334.
Vehicle Messages
Messages displayed on the DIC indicate the
status of the vehicle or some action that
may be needed to correct a condition.
Multiple messages may appear one after
another.
Page 137 of 429
Chevrolet Silverado EV Owner Manual (GMNA-Localizing-U.S./Canada-
16702912) - 2024 - CRC - 1/13/23
136 Instruments and Controls
The messages that do not require
immediate action can be acknowledged and
cleared by pressing
V. The messages that
require immediate action cannot be cleared
until that action is performed.
All messages should be taken seriously;
clearing the message does not correct the
problem.
If a SERVICE message appears, see your
dealer.
Follow the instructions given in the
messages. The system displays messages
regarding the following topics:
.Service Messages
.Fluid Levels
.Vehicle Security
.Brakes
.Ride Control Systems
.Advanced Driver Assistance Systems
.Cruise Control
.Lighting and Bulb Replacement
.Wiper/Washer Systems
.Doors and Windows
.Seat Belts
.Airbag Systems
.Propulsion
.Tire Pressure
.Battery
.Steering
Propulsion Power Messages
REDUCED ACCELERATION DRIVE
WITH CARE
This message displays when the vehicle's
propulsion power is reduced. A reduction in
propulsion power can affect the vehicle's
ability to accelerate. If this message is on,
but there is no observed reduction in
performance, proceed to your destination.
Under certain conditions, the performance
may be reduced the next time the vehicle is
driven. The vehicle may be driven while this
message is on, but maximum acceleration
and speed may be reduced. Anytime this
message stays on, or displays repeatedly,
the vehicle should be taken to your dealer
for service as soon as possible.
This message can be displayed when the
high voltage battery charge level is low. This
is normal behavior as the vehicle is limiting
power due to reduced battery capability. Under certain operating conditions
propulsion will be disabled. Try restarting
after the vehicle has been off for
two minutes.
PROPULSION POWER REDUCED DUE TO
TEMPERATURE
This message displays when the vehicle is
on, the battery temperature is low, and
when the vehicle’s performance is limited.
The duration of the limited vehicle
performance depends, in part, on the high
voltage battery charge level. If the high
voltage battery charge level is relatively
high, as the vehicle is driven, the battery
temperature will increase, and the vehicle
will return to normal operation. If the high
voltage battery charge level is relatively low
the vehicle will not return to normal
operation until charged.
Keep the vehicle plugged in, even when fully
charged, to keep the high voltage battery
temperature ready for the next drive. This is
important when outside temperatures are
extremely hot or cold.
Page 138 of 429
Chevrolet Silverado EV Owner Manual (GMNA-Localizing-U.S./Canada-
16702912) - 2024 - CRC - 1/13/23
Instruments and Controls 137
Vehicle Speed Messages
SPEED LIMITED TO XXX KM/H (MPH)
This message shows that the vehicle speed
has been limited to the speed displayed. The
limited speed is a protection for various
propulsion and vehicle systems, such as
lubrication, thermal, brakes, suspension,
Teen Driver if equipped, or tires.
Universal Remote System
SeeRadio Frequency Statement 0404.
Universal Remote System
Programming
If equipped, the Universal Garage Door
(Universal Remote) controls are located on
the infotainment screen.
This system can replace up to eight remote
control transmitters used to activate devices
such as garage door openers, security
systems, and home automation devices.
These instructions refer to a garage door
opener, but can be used for other devices. Do not use the Universal Remote system
with any garage door opener that does not
have the stop and reverse feature. This
includes any garage door opener model
manufactured before April 1, 1982.
Keep the original hand-held transmitter for
use in other vehicles as well as for future
programming. Erase the programming when
vehicle ownership is terminated. See
“Erasing Universal Remotes.”
To program a garage door opener, park
outside directly in line with and facing the
garage door opener receiver. Clear all people
and objects away from the garage door.
Make sure the hand-held transmitter has a
new battery for quick and accurate
transmission of the radio-frequency signal.
Programming the Universal Remote
System
Programming involves time-sensitive actions
and may time out, requiring the procedure
to be repeated. Read these instructions
completely before programming the
Universal Remote system. It may help to
have another person assist with the
programming process. 1. On the infotainment home screen,
navigate to the Universal Remote
controls.
2. Hold the end of the hand-held transmitter about 3 to 8 cm (1 to 3 in)
away from the rear-view mirror. The
hand-held transmitter was supplied by
the manufacturer of the garage door
opener.
3. Select the “Add Remotes” option on the
infotainment screen.
4. Press and hold the hand-held transmitter button. Do not release the hand-held
transmitter button until “Signal Found”
appears on the infotainment screen.
5. Once the signal is found, test the Universal Remote System by pressing the
Test button. If your garage door moves,
then programming was successful. You
may need to press the Test button
several times. Indicate the successful
programming of a remote by pressing
the It Worked button. After successfully
programming a remote, there is no need
to complete Steps 6–10.
Page 139 of 429

Chevrolet Silverado EV Owner Manual (GMNA-Localizing-U.S./Canada-
16702912) - 2024 - CRC - 1/13/23
138 Instruments and Controls
6. If your garage door does not reactduring testing, press the It Didn’t Work
button and proceed to Step 7.
The following steps require the location
and pressing of the Learn or Smart
button on the garage door opener
receiver inside the garage. These steps
may require a ladder and are time
sensitive.
7. Locate the Learn or Smart button on the garage door opener receiver in the
garage. The name and color may vary by
manufacturer but is usually located near
the antenna wire.
8. Press and release the Learn or Smart button on the garage door opener
receiver. Step 9 must be completed
within 30 seconds of pressing this
button.
9. Press the Test button on the infotainment screen. If your garage door
moves, then programming was
successful. You may need to press the
Test button several times. Indicate
successful programming by pressing the
It Worked button. 10. If programming is not successful,
press It Didn’t Work button and repeat
Steps 8–9, or consult HomeLink by
website or phone.
After your Universal Remote has been
successfully programmed, you can change
the name of the remote on the screen as
desired.
Some garage door openers require a
modification of Step 4. See “Radio Signals
for Some Gate Operators.”
For questions or programming help, visit
www.homelink.com/gm for self-help videos
or call 1–800–355–3515. For calls placed
outside the U.S., Canada, or Puerto Rico,
international rates will apply and may differ
based on landline or mobile phone.
Erasing Universal Remotes
To erase a programmed Universal Remote,
select the remote on the infotainment
screen. Then select “Delete.”
To erase ALL programmed Universal
Remotes, select any remote on the
infotainment screen. Then select
“Delete All.”
Radio Signals for Some Gate Operators
Some gate operators and radio-frequency
laws require transmitter signals to time out
or quit after several seconds of transmission.
This may not be long enough for the
Universal Remote system to pick up the
signal during programming.
If programming did not work, replace Step 4
under “Programming the Universal Remote
System,” with the following:
Press and release the hand-held transmitter
button every two seconds until the signal
has been found by the Universal Remote
System. Proceed to Step 5 under
“Programming the Universal Remote
System” to complete programming.
Universal Remote System
Operation
Using the Universal Remote System
Press the desired Universal Remote button
on the infotainment screen.
Page 140 of 429
Chevrolet Silverado EV Owner Manual (GMNA-Localizing-U.S./Canada-
16702912) - 2024 - CRC - 1/13/23
Instruments and Controls 139
Reprogramming a Single Universal
Remote System Button
To reprogram any of the system buttons:1. Select the universal remote to be reprogrammed.
2. Select “Delete”.
3. Select “Add Remote”. Follow the
instructions in Universal Remote System
Programming 0137.