front end CHEVROLET SONIC 2020 User Guide
[x] Cancel search | Manufacturer: CHEVROLET, Model Year: 2020, Model line: SONIC, Model: CHEVROLET SONIC 2020Pages: 329, PDF Size: 5.56 MB
Page 72 of 329
Chevrolet Sonic Owner Manual (GMNA-Localizing-U.S./Canada-13566834) -
2020 - CRC - 10/4/19
Seats and Restraints 71
Warning (Continued)
front passenger airbag inflates
and the passenger seat is in a
forward position.
Even if the passenger sensing
system has turned off the front
passenger frontal airbag, no
system is fail-safe. No one can
guarantee that an airbag will not
deploy under some unusual
circumstance, even though it is
turned off.
Secure rear-facing child restraints
in a rear seat, even if the airbag
is off. If you secure a
forward-facing child restraint in
the front seat, always move the
front passenger seat as far back
as it will go. It is better to secure
the child restraint in a rear seat.
SeePassenger Sensing System
0 58 for additional information. When securing a child restraint with
the seat belts in a rear seat position,
study the instructions that came with
the child restraint to make sure it is
compatible with this vehicle.
Child restraints and booster seats
vary considerably in size, and some
may fit in certain seating positions
better than others.
Depending on where you place the
child restraint and the size of the
child restraint, you may not be able
to access adjacent seat belts or
LATCH anchors for additional
passengers or child restraints.
Adjacent seating positions should
not be used if the child restraint
prevents access to or interferes with
the routing of the seat belt.
Wherever a child restraint is
installed, be sure to follow the
instructions that came with the child
restraint and secure the child
restraint properly.
Keep in mind that an unsecured
child restraint can move around in a
collision or sudden stop and injure
people in the vehicle. Be sure to
properly secure any child restraint in
the vehicle
—even when no child is
in it.
Lower Anchors and
Tethers for Children
(LATCH System)
The LATCH system secures a child
restraint during driving or in a crash.
LATCH attachments on the child
restraint are used to attach the child
restraint to the anchors in the
vehicle. The LATCH system is
designed to make installation of a
child restraint easier.
Page 74 of 329
Chevrolet Sonic Owner Manual (GMNA-Localizing-U.S./Canada-13566834) -
2020 - CRC - 10/4/19
Seats and Restraints 73
Recommended Methods for Attaching Child Restraints
Restraint Type CombinedWeight of the
Child + Child
Restraint Use Only Approved Attachment Methods Shown with an X
LATCH
–Lower
Anchors Only Seat Belt Only LATCH
–Lower
Anchors and Top
Tether Anchor Seat Belt and
Top Tether
Anchor
Rear-Facing
Child Restraint Up to
29.5 kg (65 lb) X X
Rear-Facing
Child Restraint Greater than
29.5 kg (65 lb) X
Forward-Facing
Child Restraint Up to
29.5 kg (65 lb) X X
Forward-Facing
Child Restraint Greater than
29.5 kg (65 lb) X
See Securing Child Restraints
(With the Seat Belt in the Rear
Seat) 080 or
Securing Child Restraints (With the
Seat Belt in the Front Seat) 082.
Child restraints built after March
2014 will be labeled with the
specific child weight up to which the
LATCH system can be used to
install the restraint. The following explains how to attach
a child restraint with these
attachments in the vehicle.
Not all vehicle seating positions
have lower anchors. In this case,
the seat belt must be used (with top
tether where available) to secure
the child restraint. See
Securing
Child Restraints (With the Seat Belt
in the Rear Seat) 080 or
Securing Child Restraints (With the
Seat Belt in the Front Seat) 082.
Page 114 of 329
Chevrolet Sonic Owner Manual (GMNA-Localizing-U.S./Canada-13566834) -
2020 - CRC - 10/4/19
Instruments and Controls 113
OIL LIFE 99 % is displayed, that
means 99% of the current oil life
remains.
When the remaining oil life is low,
the CHANGE ENGINE OIL SOON
message will appear on the display.
The oil should changed as soon as
possible. SeeEngine Oil0208. In
addition to the engine oil life system
monitoring the oil life, additional
maintenance is recommended in the
Maintenance Schedule. See
Maintenance Schedule 0278.
Remember, the Oil Life display must
be reset after each oil change. It will
not reset itself. Also, be careful not
to reset the Oil Life display
accidentally at any time other than
when the oil has just been changed.
It cannot be reset accurately until
the next oil change. To reset the
engine oil life system, press SET/
CLR while the Oil Life display is
active. See Engine Oil Life System
0 210.Vehicle Messages
Messages displayed on the DIC
indicate the status of the vehicle or
some action that may be needed to
correct a condition. Multiple
messages appear one after another.
All messages should be taken
seriously.
Base Level Cluster
On the base level cluster, vehicle
messages appear as code numbers.
Some of these codes may appear
with the Service Vehicle Soon light
in the DIC display.
2 : No Remote Detected. Press
Clutch to Restart
3 : Coolant Level Low Add Coolant
4 : A/C Off Due to High
Engine Temp
5 : Steering Column Is Locked
6 : Step on Brake to Release Park
Brake
7 : Turn Steering Wheel, Turn Key
Off, Then On 9 :
Turn Steering Wheel, Start
Vehicle Again
10 : Brakes Overheated
11 : Brakes Worn
12 : Vehicle Overloaded
13 : Compressor Overheated
15 : Check High-Mounted
Brake Lamp
16 : Check Brake Lamps
17 : Headlamp Leveling Malfunction
18 : Left Low Beam Failure
19 : Check Rear Fog Lamp
20 : Check Right Low Beam Lamp
21 : Check Left Position Lamp
22 : Check Right Position Lamp
23 : Reversing Lamp Failure
24 : License Plate Lamp Failure
25 : Check Left Front Turn
Signal Lamp
26 : Left Rear Turn Indicator Failure
27 : Check Right Front Turn
Signal Lamp
Page 121 of 329
Chevrolet Sonic Owner Manual (GMNA-Localizing-U.S./Canada-13566834) -
2020 - CRC - 10/4/19
120 Lighting
;:Turns on the parking lamps
including all lamps except the
headlamps.
5: Turns the headlamps on
together with the parking lamps and
instrument panel lights. A warning
chime sounds if the driver door is
opened when the ignition switch is
off and the headlamps are on.
#: If equipped with fog lamps,
press to turn the lamps on or off.
See Fog Lamps 0122.
When the lights are on,
;will be
lit. See Lamps On Reminder 0108.
Headlamp High/
Low-Beam Changer
3:Push the turn signal lever away
from you to turn the high beams on. Push the lever again or pull the
lever toward you to return to low
beams.
This indicator light turns on in the
instrument cluster when the
high-beam headlamps are on.
Flash-to-Pass
To flash the high beams, pull the
turn signal lever all the way toward
you. Then release it.
Daytime Running
Lamps (DRL)
DRL can make it easier for others to
see the front of your vehicle during
the day. Fully functional DRL are
required on all vehicles first sold in
Canada.
The DRL system makes the
low-beam headlamps come on at a
reduced brightness when the
following conditions are met:
.
The ignition is on.
. The exterior lamp control is
in AUTO.
. The engine is running.
When the DRL are on, only the
low-beam headlamps, at a reduced
level of brightness, will be on. The
taillamps, sidemarker, instrument
panel, and other lamps will not
be on.
The headlamps automatically
change from DRL to the regular
headlamps depending on the
darkness of the surroundings. The
other lamps that come on with the
headlamps will also come on.
When it is bright enough outside,
the headlamps go off and the DRL
come on.
To turn the DRL lamps off or on
again, turn the exterior lamp control
to
Oand then release. For vehicles
Page 142 of 329
Chevrolet Sonic Owner Manual (GMNA-Localizing-U.S./Canada-13566834) -
2020 - CRC - 10/4/19
Infotainment System 141
Steering Wheel Controls
b/g:Press to answer incoming
calls. Hold to start voice recognition
on your connected Bluetooth phone,
for example Siri and Google.
$/i: Press to end a call, decline
a call, or cancel an operation. Press
to mute or unmute the infotainment
system when not on a call.
Infotainment System Controls
For information about how to
navigate the menu system using the
infotainment controls, see
Introduction 0126.
Phone
Touch the Phone icon on the Home
Page to enter the phone
main menu.
Audio System
When using the Bluetooth phone
system, sound comes through the
vehicle's front audio system
speakers and overrides the audio
system. The volume level while on a
phone call can be adjusted by
pressing the steering wheel controls or by touching the volume control on
the center stack. The adjusted
volume level remains in memory for
later calls. The volume cannot be
lowered beyond a certain level.
Bluetooth (Pairing and
Using a Phone)
Pairing
A Bluetooth-enabled cell phone
must be paired to the Bluetooth
system and then connected to the
vehicle before it can be used. See
the cell phone manufacturer's user
guide for Bluetooth functions before
pairing the cell phone.
Pairing Information
.
If no mobile device has been
connected, the Phone main
page on the infotainment display
will show the Connect Phone
option. Touch this option to
connect. Another way to connect
is to touch the Phones tab at the
top right of the display and then
touch Add Phone. .
A Bluetooth phone with music
capability can be paired to the
vehicle as a phone and a music
player at the same time.
. Up to 10 devices can be paired
to the Bluetooth system.
. The pairing process is disabled
when the vehicle is moving.
. Pairing only needs to be
completed once, unless the
pairing information on the cell
phone changes or the cell phone
is deleted from the system.
. If multiple paired cell phones are
within range of the system, the
system connects to the paired
cell phone that is set to First to
Connect. If there is no phone set
to First to Connect, it will link to
the device which was used last.
To link to a different paired
phone, see “Linking to a
Different Phone” later in this
section.
Pairing a Phone 1. Make sure Bluetooth has been enabled on the cell phone
before pairing is started.
Page 160 of 329
Chevrolet Sonic Owner Manual (GMNA-Localizing-U.S./Canada-13566834) -
2020 - CRC - 10/4/19
Driving and Operating 159
Driving Information
Driving for Better Fuel
Economy
Driving habits can affect fuel
mileage. Here are some driving tips
to get the best fuel economy
possible:
.Set the climate controls to the
desired temperature after the
engine is started, or turn them
off when not required.
. Avoid fast starts and accelerate
smoothly.
. Brake gradually and avoid
abrupt stops.
. Avoid idling the engine for long
periods of time.
. When road and weather
conditions are appropriate, use
the cruise control.
. Always follow posted speed
limits or drive more slowly when
conditions require.
. Keep the vehicle tires properly
inflated. .
Combine several trips into a
single trip.
. Replace the vehicle's tires with
the same TPC Spec number
molded into the tire's sidewall
near the size.
. Follow the recommended
scheduled maintenance.
Distracted Driving
Distraction comes in many forms
and can take your focus from the
task of driving. Exercise good
judgment and do not let other
activities divert your attention away
from the road. Many local
governments have enacted laws
regarding driver distraction. Become
familiar with the local laws in
your area.
To avoid distracted driving, keep
your eyes on the road, keep your
hands on the steering wheel, and
focus your attention on driving. .
Do not use a phone in
demanding driving situations.
Use a hands-free method to
place or receive necessary
phone calls.
. Watch the road. Do not read,
take notes, or look up
information on phones or other
electronic devices.
. Designate a front seat
passenger to handle potential
distractions.
. Become familiar with vehicle
features before driving, such as
programming favorite radio
stations and adjusting climate
control and seat settings.
Program all trip information into
any navigation device prior to
driving.
. Wait until the vehicle is parked
to retrieve items that have fallen
to the floor.
. Stop or park the vehicle to tend
to children.
. Keep pets in an appropriate
carrier or restraint.
Page 168 of 329
Chevrolet Sonic Owner Manual (GMNA-Localizing-U.S./Canada-13566834) -
2020 - CRC - 10/4/19
Driving and Operating 167
The Tire and Loading
Information label also shows the
tire size of the original
equipment tires (3) and the
recommended cold tire inflation
pressures (4). For more
information on tires and inflation
seeTires 0233 and
Tire Pressure 0240.
There is also important loading
information on the Certification
label. It may show the Gross
Vehicle Weight Rating (GVWR)
and the Gross Axle Weight
Rating (GAWR) for the front and
rear axle. See “Certification
Label” later in this section.
“Steps for Determining Correct
Load Limit–
1.Locate the statement "The
combined weight of
occupants and cargo should
never exceed XXX kg or
XXX lbs." on your vehicle’s
placard.
2.Determine the combined
weight of the driver and
passengers that will be
riding in your vehicle.
3.Subtract the combined
weight of the driver and
passengers from XXX kg or
XXX lbs.
4.The resulting figure equals
the available amount of
cargo and luggage load
capacity. For example, if the
"XXX" amount equals
1400 lbs. and there will be
five 150 lb passengers in
your vehicle, the amount of
available cargo and luggage
load capacity is 650 lbs.
(1400-750 (5 x 150) =
650 lbs.)
5.Determine the combined
weight of luggage and cargo
being loaded on the vehicle.
That weight may not safely
exceed the available cargo
and luggage load capacity
calculated in Step 4.
6.If your vehicle will be towing
a trailer, load from your
trailer will be transferred to
your vehicle. Consult this
manual to determine how
this reduces the available
cargo and luggage load
capacity of your vehicle.”
This vehicle is neither designed
nor intended to tow a trailer.
Page 178 of 329
Chevrolet Sonic Owner Manual (GMNA-Localizing-U.S./Canada-13566834) -
2020 - CRC - 10/4/19
Driving and Operating 177
4. Before starting the engine, besure to unplug and store the
cord as it was before to keep it
away from moving engine
parts. If you do not it could be
damaged.
The length of time the heater should
remain plugged in depends on
several factors. Ask a dealer in the
area where you will be parking the
vehicle for the best advice on this.
Retained Accessory
Power (RAP)
When the ignition is turned from on
to off, the following features (if
equipped) will continue to function
for up to 10 minutes, or until the
driver door is opened. These
features will also work when the
ignition is in RUN or ACC/
ACCESSORY:
. Infotainment System
. Power Windows (during RAP
this functionality will be lost
when any door is opened) .
Sunroof (during RAP this
functionality will be lost when
any door is opened)
. Auxiliary Power Outlet
. Audio System
. OnStar System
Shifting Into Park
1. Hold the brake pedal down and
set the parking brake. See
Parking Brake 0184.
2. Move the shift lever into P (Park) by pressing the button
on the shift lever and pushing
the lever all the way toward the
front of the vehicle.
3. Push the ignition key in, toward the steering column and then
turn the ignition off.
4. If equipped, remove the key and take it with you. If you can
leave the vehicle with the
ignition key in your hand, the
vehicle is in P (Park).
Leaving the Vehicle with the
Engine Running
{Warning
It can be dangerous to leave the
vehicle with the engine running.
It could overheat and catch fire.
It is dangerous to get out of the
vehicle if the shift lever is not fully
in P (Park) with the parking brake
firmly set. The vehicle can roll.
Do not leave the vehicle when the
engine is running. If you have left
the engine running, the vehicle
can move suddenly. You or others
could be injured. To be sure the
vehicle will not move, even when
you are on fairly level ground,
always set the parking brake and
move the shift lever to P (Park).
See Shifting Into Park 0177.
If you have to leave the vehicle with
the engine running, be sure the
vehicle is in P (Park) and the
parking brake is firmly set before
you leave it. After you have moved
Page 195 of 329
Chevrolet Sonic Owner Manual (GMNA-Localizing-U.S./Canada-13566834) -
2020 - CRC - 10/4/19
194 Driving and Operating
.The Park Assist sensors are
covered by frost or ice. Frost or
ice can form around and behind
the sensors and may not always
be seen; this can occur after
washing the vehicle in cold
weather. The message may not
clear until the frost or ice has
melted.
If the above conditions do not exist,
take the vehicle to your dealer to
repair the system.
PARK ASSIST OFF : If the RPA
system does not activate due to a
temporary condition, the message
displays on the DIC. This can occur
under the following conditions:
. An object was hanging out of the
trunk during the last drive cycle.
Once the object is removed,
RPA will return to normal
operation.
. The bumper is damaged. Take
the vehicle to your dealer to
repair the system. .
Other conditions, such as
vibrations from a jackhammer or
the compression of air brakes on
a very large truck, are affecting
system performance.
Forward Collision Alert
(FCA) System
If equipped, the FCA system may
help to avoid or reduce the harm
caused by front-end crashes. When
approaching a vehicle ahead too
quickly, FCA provides a red flashing
alert on the windshield and rapidly
beeps.
FCA detects vehicles within a
distance of approximately 60 m
(197 ft) and operates at speeds
above 40 km/h (25 mph).
{Warning
FCA is a warning system and
does not apply the brakes. When
approaching a slower-moving or
stopped vehicle ahead too rapidly,
or when following a vehicle too
(Continued)
Warning (Continued)
closely, FCA may not provide a
warning with enough time to help
avoid a crash. It also may not
provide any warning at all. FCA
does not warn of pedestrians,
animals, signs, guardrails,
bridges, construction barrels,
or other objects. Be ready to take
action and apply the brakes. See
Defensive Driving0160.
FCA can be disabled with the FCA
steering wheel control.
Detecting the Vehicle Ahead
FCA warnings will not occur unless
the FCA system detects a vehicle
ahead. When a vehicle is detected,
the vehicle ahead indicator will
Page 207 of 329
Chevrolet Sonic Owner Manual (GMNA-Localizing-U.S./Canada-13566834) -
2020 - CRC - 10/4/19
206 Vehicle Care
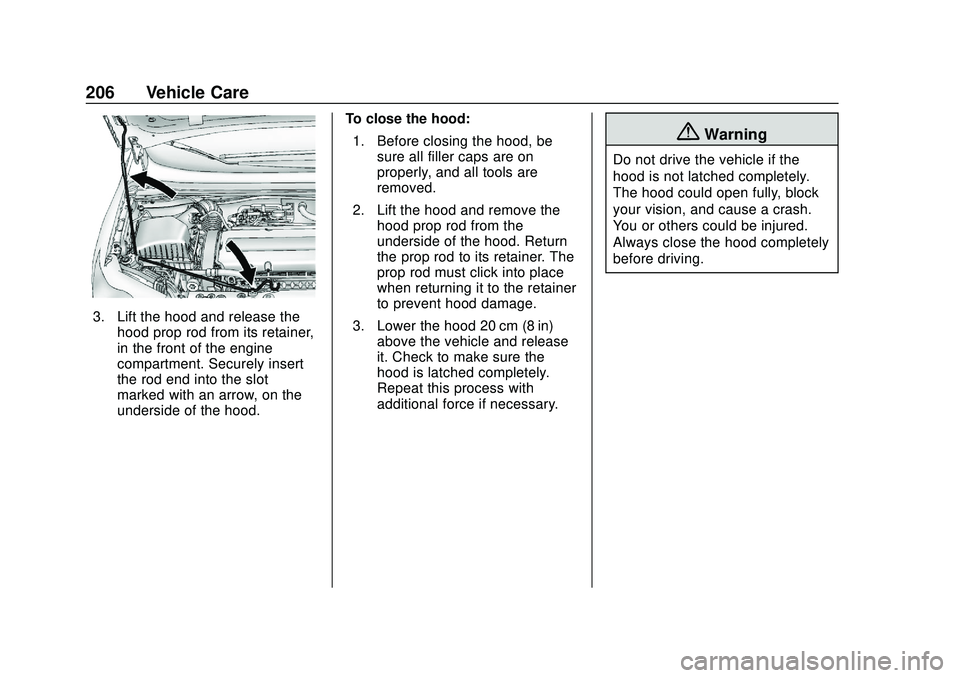
3. Lift the hood and release thehood prop rod from its retainer,
in the front of the engine
compartment. Securely insert
the rod end into the slot
marked with an arrow, on the
underside of the hood. To close the hood:
1. Before closing the hood, be sure all filler caps are on
properly, and all tools are
removed.
2. Lift the hood and remove the hood prop rod from the
underside of the hood. Return
the prop rod to its retainer. The
prop rod must click into place
when returning it to the retainer
to prevent hood damage.
3. Lower the hood 20 cm (8 in) above the vehicle and release
it. Check to make sure the
hood is latched completely.
Repeat this process with
additional force if necessary.
{Warning
Do not drive the vehicle if the
hood is not latched completely.
The hood could open fully, block
your vision, and cause a crash.
You or others could be injured.
Always close the hood completely
before driving.