CHEVROLET SS 2017 1.G Owners Manual
Manufacturer: CHEVROLET, Model Year: 2017, Model line: SS, Model: CHEVROLET SS 2017 1.GPages: 400, PDF Size: 7.31 MB
Page 321 of 400
Chevrolet SS Sedan Owner Manual (GMNA-Localizing-U.S.-10122752) -2017 - crc - 8/31/16
320 Vehicle Care
norm due to variations in driving
habits, service practices and
differences in road
characteristics and climate.
Traction
The traction grades, from
highest to lowest, are AA, A, B,
and C. Those grades represent
the tire's ability to stop on wet
pavement as measured under
controlled conditions on
specified government test
surfaces of asphalt and
concrete. A tire marked C may
have poor traction performance.
Warning: The traction grade
assigned to this tire is based on
straight-ahead braking traction
tests, and does not include
acceleration, cornering,
hydroplaning, or peak traction
characteristics.
Temperature
The temperature grades are A
(the highest), B, and C,
representing the tire's resistance
to the generation of heat and its
ability to dissipate heat when
tested under controlled
conditions on a specified indoor
laboratory test wheel. Sustained
high temperature can cause the
material of the tire to degenerate
and reduce tire life, and
excessive temperature can lead
to sudden tire failure. The grade
Ccorrespondstoalevelof
performance which all
passenger car tires must meet
under the Federal Motor Safety
Standard No. 109. Grades B and
Arepresenthigherlevelsof
performance on the laboratory
test wheel than the minimum
required by law. Warning: The
temperature grade for this tire is
established for a tire that is
properly inflated and not
overloaded. Excessive speed,
underinflation, or excessive
loading, either separately or in
combination, can cause heat
buildup and possible tire failure.
Wheel Alignment and Tire
Balance
The tires and wheels were alignedand balanced at the factory toprovide the longest tire life and bestoverall performance. Adjustments towheel alignment and tire balancingare not necessary on a regularbasis. Consider an alignment checkif there is unusual tire wear or thevehicle is significantly pulling to oneside or the other. Some slight pull tothe left or right, depending on thecrown of the road and/or other roadsurface variations such as troughsor ruts, is normal. If the vehicle isvibrating when driving on a smoothroad, the tires and wheels may needto be rebalanced. See your dealerfor proper diagnosis.
Wheel Replacement
Replace any wheel that is bent,cracked, or badly rusted orcorroded. If wheel nuts keep comingloose, the wheel, wheel bolts, andwheel nuts should be replaced.If the wheel leaks air, replace it.
Page 322 of 400
Chevrolet SS Sedan Owner Manual (GMNA-Localizing-U.S.-10122752) -2017 - crc - 8/31/16
Vehicle Care 321
Some aluminum wheels can berepaired. See your dealer if any ofthese conditions exist.
Yo u r d e a l e r w i l l k n o w t h e k i n d o fwheel that is needed.
Each new wheel should have thesame load-carrying capacity,diameter, width, offset, and bemounted the same way as the one itreplaces.
Replace wheels, wheel bolts, wheelnuts, or Tire Pressure MonitorSystem (TPMS) sensors with newGM original equipment parts.
{Warning
Using the wrong replacement
wheels, wheel bolts, or wheel
nuts can be dangerous. It could
affect the braking and handling of
the vehicle. Tires can lose air,
and cause loss of control, causing
acrash.Alwaysusethecorrect
wheel, wheel bolts, and wheel
nuts for replacement.
Caution
The wrong wheel can also cause
problems with bearing life, brake
cooling, speedometer or
odometer calibration, headlamp
aim, bumper height, vehicle
ground clearance, and tire or tire
chain clearance to the body and
chassis.
Used Replacement Wheels
{Warning
Replacing a wheel with a used
one is dangerous. How it has
been used or how far it has been
driven may be unknown. It could
fail suddenly and cause a crash.
When replacing wheels, use a
new GM original equipment
wheel.
Tire Chains
{Warning
Do not use tire chains. There is
not enough clearance. Tire chains
used on a vehicle without the
proper amount of clearance can
cause damage to the brakes,
suspension, or other vehicle
parts. The area damaged by the
tire chains could cause loss of
control and a crash. Use another
type of traction device only if its
manufacturer recommends it for
the vehicle's tire size combination
and road conditions. Follow that
manufacturer's instructions. To
avoid vehicle damage, drive
slowly and readjust or remove the
traction device if it contacts the
vehicle. Do not spin the wheels.
If traction devices are used, install
them on the rear tires.
Page 323 of 400
Chevrolet SS Sedan Owner Manual (GMNA-Localizing-U.S.-10122752) -2017 - crc - 8/31/16
322 Vehicle Care
If a Tire Goes Flat
It is unusual for a tire to blow outwhile driving, especially if the tiresare maintained properly. SeeTires0303.Ifairgoesoutofatire,itismuch more likely to leak out slowly.But if there is ever a blowout, hereare a few tips about what to expectand what to do:
If a front tire fails, the flat tirecreates a drag that pulls the vehicletoward that side. Take your foot offthe accelerator pedal and grip thesteering wheel firmly. Steer tomaintain lane position, and thengently brake to a stop, well off theroad, if possible.
Arearblowout,particularlyonacurve, acts much like a skid andmay require the same correction asused in a skid. Stop pressing theaccelerator pedal and steer tostraighten the vehicle. It may bevery bumpy and noisy. Gently braketo a stop, well off the road,if possible.
{Warning
Driving on a flat tire will cause
permanent damage to the tire.
Re-inflating a tire after it has been
driven on while severely
underinflated or flat may cause a
blowout and a serious crash.
Never attempt to re-inflate a tire
that has been driven on while
severely underinflated or flat.
Have your dealer or an authorized
tire service center repair or
replace the flat tire as soon as
possible.
{Warning
Lifting a vehicle and getting under
it to do maintenance or repairs is
dangerous without the
appropriate safety equipment and
training. If a jack is provided with
the vehicle, it is designed only for
changing a flat tire. If it is used for
anything else, you or others could
(Continued)
Warning (Continued)
be badly injured or killed if the
vehicle slips off the jack. If a jack
is provided with the vehicle, only
use it for changing a flat tire.
If a tire goes flat, avoid further tireand wheel damage by driving slowlyto a level place, well off the road,if possible. Turn on the hazardwarning flashers. SeeHazardWarning Flashers0127.
{Warning
Changing a tire can be
dangerous. The vehicle can slip
off the jack and roll over or fall
causing injury or death. Find a
level place to change the tire. To
help prevent the vehicle from
moving:
1. Set the parking brake firmly.
(Continued)
Page 324 of 400
Chevrolet SS Sedan Owner Manual (GMNA-Localizing-U.S.-10122752) -2017 - crc - 8/31/16
Vehicle Care 323
Warning (Continued)
2. Put an automatictransmission in P (Park) or amanual transmission in1(First) or R(Reverse).
3. Turn off the engine and donot restart while the vehicleis raised.
4. Do not allow passengers toremain in the vehicle.
5. Place wheel blocks,if equipped, on both sides ofthe tire at the oppositecorner of the tire beingchanged.
This vehicle may come with a jackand spare tire or a tire sealant andcompressor kit. To use the jackingequipment to change a spare tiresafely, follow the instructions below.Then seeTire Changing0329.Touse the tire sealant and compressorkit, seeTire Sealant andCompressor Kit0323.
When the vehicle has a flat tire (2),use the following example as aguide to assist you in the placementof wheel blocks (1), if equipped.
1. Wheel Block (If Equipped)
2. Flat Tire
The following information explainshow to repair or change a tire.
Tire Sealant and
Compressor Kit
{Warning
Idling a vehicle in an enclosed
area with poor ventilation is
dangerous. Engine exhaust may
(Continued)
Warning (Continued)
enter the vehicle. Engine exhaust
contains carbon monoxide (CO)
which cannot be seen or smelled.
It can cause unconsciousness
and even death. Never run the
engine in an enclosed area that
has no fresh air ventilation. For
more information, seeEngine
Exhaust0235.
{Warning
Overinflating a tire could cause
the tire to rupture and you or
others could be injured. Be sure
to read and follow the tire sealant
and compressor kit instructions
and inflate the tire to its
recommended pressure. Do not
exceed the recommended
pressure.
Page 325 of 400
Chevrolet SS Sedan Owner Manual (GMNA-Localizing-U.S.-10122752) -2017 - crc - 8/31/16
324 Vehicle Care
{Warning
Storing the tire sealant and
compressor kit or other
equipment in the passenger
compartment of the vehicle could
cause injury. In a sudden stop or
collision, loose equipment could
strike someone. Store the tire
sealant and compressor kit in its
original location.
If this vehicle has a tire sealant andcompressor kit, there may not be aspare tire, tire changing equipment,and on some vehicles there may notbe a place to store a tire.
The tire sealant and compressorcan be used to temporarily sealpunctures up to 6 mm (0.25 inch) inthe tread area of the tire. It can alsobe used to inflate an underinflated tire.
If the tire has been separated fromthe wheel, has damaged sidewalls,or has a large puncture, the tire istoo severely damaged for the tire
sealant and compressor kit to beeffective. SeeRoadside AssistanceProgram0368.
Read and follow all of the tiresealant and compressor kitinstructions.
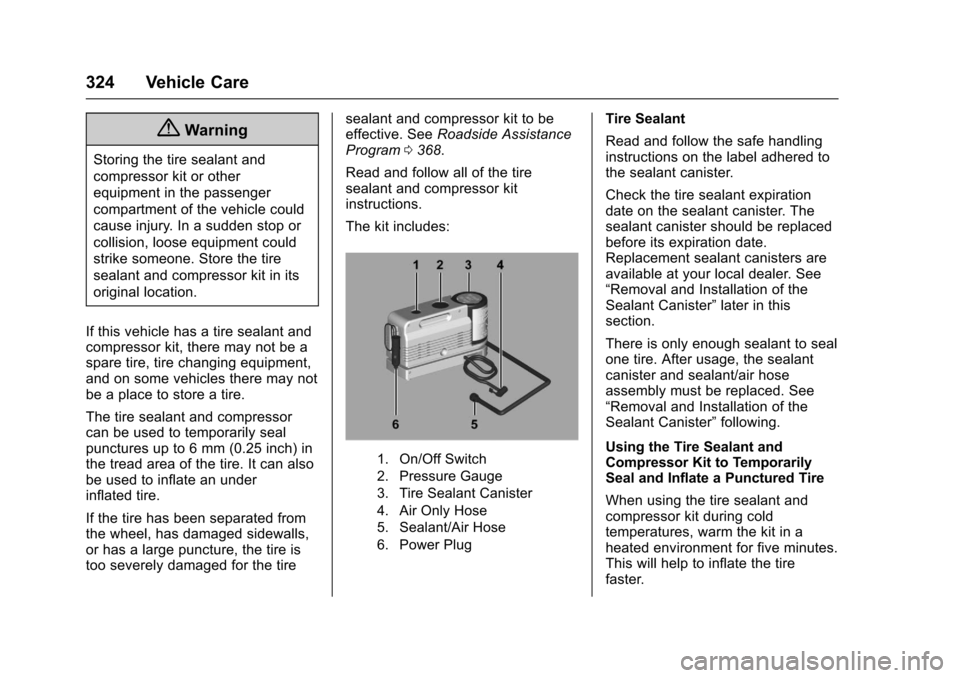
The kit includes:
1. On/Off Switch
2. Pressure Gauge
3. Tire Sealant Canister
4. Air Only Hose
5. Sealant/Air Hose
6. Power Plug
Tire Sealant
Read and follow the safe handlinginstructions on the label adhered tothe sealant canister.
Check the tire sealant expirationdate on the sealant canister. Thesealant canister should be replacedbefore its expiration date.Replacement sealant canisters areavailable at your local dealer. See“Removal and Installation of theSealant Canister”later in thissection.
There is only enough sealant to sealone tire. After usage, the sealantcanister and sealant/air hoseassembly must be replaced. See“Removal and Installation of theSealant Canister”following.
Using the Tire Sealant andCompressor Kit to TemporarilySeal and Inflate a Punctured Tire
When using the tire sealant andcompressor kit during coldtemperatures, warm the kit in aheated environment for five minutes.This will help to inflate the tirefaster.
Page 326 of 400
Chevrolet SS Sedan Owner Manual (GMNA-Localizing-U.S.-10122752) -2017 - crc - 8/31/16
Vehicle Care 325
If a tire goes flat, avoid further tireand wheel damage by driving slowlyto a level place. Turn on the hazardwarning flashers. SeeHazardWarning Flashers0127.
SeeIf a Tire Goes Flat0322forother important safety warnings.
Do not remove any objects thathave penetrated the tire.
1. Remove the tire sealant andcompressor kit from its storagelocation. SeeStoring the TireSealant and Compressor Kit0329.
2. Remove the sealant/airhose (5) from the side of thecompressor.
3. Remove the power plug (6).
4. Place the kit on the ground.
Make sure the tire valve stemis positioned close to theground so the hose willreach it.
5. Remove the valve stem capfrom the flat tire by turning itcounterclockwise.
6. Attach the sealant/air hose (5)onto the tire valve. Turn itclockwise until it is tight.
7. Switch the on/off switch (1) tothe O position.
8. Plug the power plug (6) into thepower outlet in the vehicle.Unplug all items from otheraccessory power outlets. SeePower Outlets094.
If the vehicle has an accessorypower outlet, do not use thecigarette lighter.
If the vehicle only has acigarette lighter, use thecigarette lighter.
Do not pinch the power plugcord in the door or window.
9. Start the vehicle. The vehiclemust be running while usingthe air compressor.
10. Switch the on/off switch (1) tothe I position.
The compressor will injectsealant and air into the tire.
Sealant may leak from thepuncture hole until the vehicleis driven and the hole hassealed.
The pressure gauge (2) willinitially show a high pressurewhile the compressor pushesthe sealant into the tire. Oncethe sealant is completelydispersed into the tire, thepressure will quickly drop andstart to rise again as the tireinflates with air only.
11 . I n f l a t e t h e t i r e t o t h erecommended inflationpressure using the pressuregauge (2). The recommendedinflation pressure can be foundon the Tire and LoadingInformation label. SeeTirePressure0309.
The pressure gauge (2) mayread higher than the actual tirepressure while the compressoris on. Turn the compressor offto get an accurate pressurereading. The compressor maybe turned on/off until thecorrect pressure is reached.
Page 327 of 400
Chevrolet SS Sedan Owner Manual (GMNA-Localizing-U.S.-10122752) -2017 - crc - 8/31/16
326 Vehicle Care
Caution
If the recommended pressure
cannot be reached after
approximately 25 minutes, the
vehicle should not be driven
farther. The tire is too severely
damaged and the tire sealant and
compressor kit cannot inflate the
tire. Remove the power plug from
the accessory power outlet and
unscrew the inflating hose from
the tire valve. SeeRoadside
Assistance Program0368.
12. Switch the on/off switch (1) tothe O position.
The tire is not sealed and willcontinue to leak air until thevehicle is driven and thesealant is distributed in the tire.Therefore, Steps 13–19 mustbe done immediately afterStep 12.
Be careful while handling thetire sealant and compressor kitas it could be warm afterusage.
13. Unplug the power plug (6) fromthe accessory power outlet inthe vehicle.
14. Turn the sealant/air hose (5)counterclockwise to remove itfrom the tire valve stem.
15. Replace the tire valvestem cap.
16. Replace the sealant/airhose (5), and the power plug (6back in their original location.
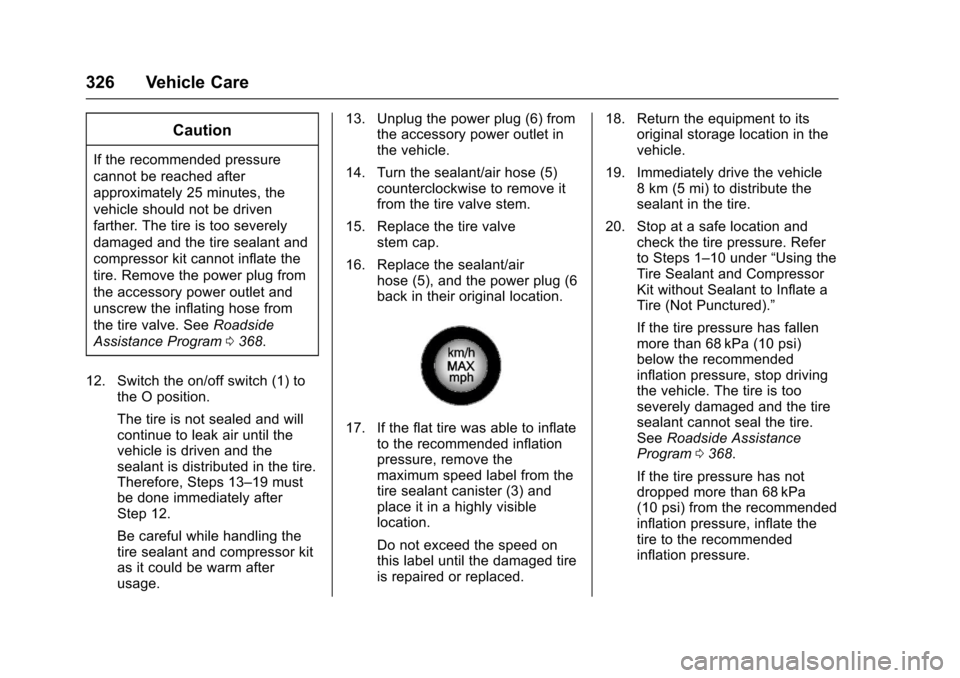
17. If the flat tire was able to inflateto the recommended inflationpressure, remove themaximum speed label from thetire sealant canister (3) andplace it in a highly visiblelocation.
Do not exceed the speed onthis label until the damaged tireis repaired or replaced.
18. Return the equipment to itsoriginal storage location in thevehicle.
19. Immediately drive the vehicle8km(5mi)todistributethesealant in the tire.
20. Stop at a safe location andcheck the tire pressure. Referto Steps 1–10 under“Using theTire Sealant and CompressorKit without Sealant to Inflate aTire (Not Punctured).”
If the tire pressure has fallenmore than 68 kPa (10 psi)below the recommendedinflation pressure, stop drivingthe vehicle. The tire is tooseverely damaged and the tiresealant cannot seal the tire.SeeRoadside AssistanceProgram0368.
If the tire pressure has notdropped more than 68 kPa(10 psi) from the recommendedinflation pressure, inflate thetire to the recommendedinflation pressure.
Page 328 of 400
Chevrolet SS Sedan Owner Manual (GMNA-Localizing-U.S.-10122752) -2017 - crc - 8/31/16
Vehicle Care 327
21. Wipe off any sealant from thewheel, tire or vehicle.
22. Dispose of the used tiresealant canister (3) andsealant/air hose (5) assemblyat a local dealer or inaccordance with local statecodes and practices.
23. Replace it with a new canisteravailable from your dealer.
24. After temporarily sealing a tireusing the tire sealant andcompressor kit, take thevehicle to an authorized dealerwithin 161 km (100 mi) ofdriving to have the tire repairedor replaced.
Using the Tire Sealant andCompressor Kit without Sealant toInflate a Tire (Not Punctured)
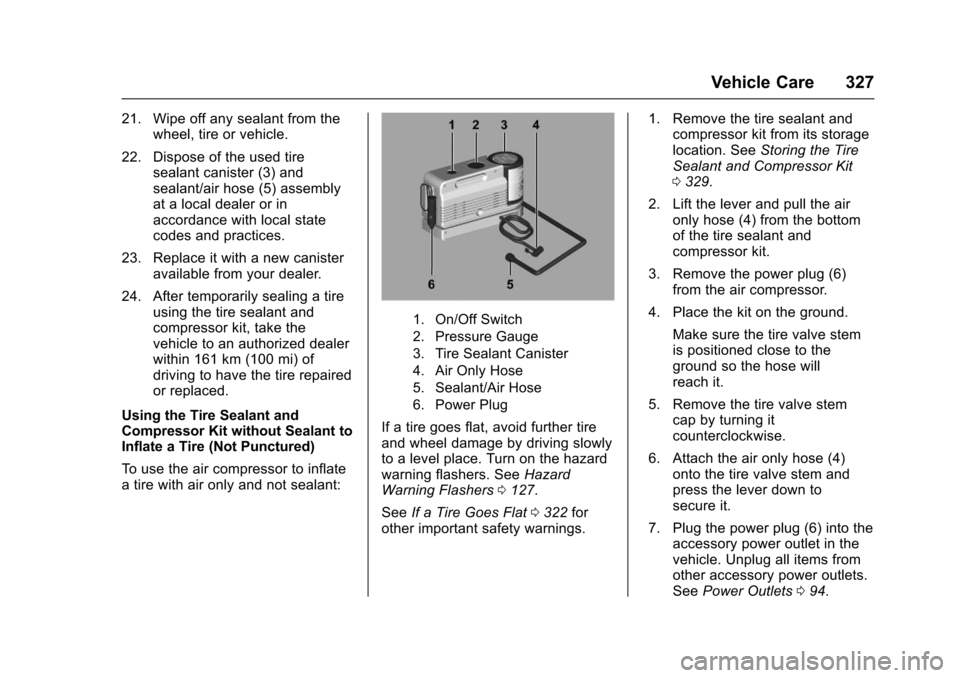
To u s e t h e a i r c o m p r e s s o r t o i n f l a t eatirewithaironlyandnotsealant:
1. On/Off Switch
2. Pressure Gauge
3. Tire Sealant Canister
4. Air Only Hose
5. Sealant/Air Hose
6. Power Plug
If a tire goes flat, avoid further tireand wheel damage by driving slowlyto a level place. Turn on the hazardwarning flashers. SeeHazardWarning Flashers0127.
SeeIf a Tire Goes Flat0322forother important safety warnings.
1. Remove the tire sealant andcompressor kit from its storagelocation. SeeStoring the TireSealant and Compressor Kit0329.
2. Lift the lever and pull the aironly hose (4) from the bottomof the tire sealant andcompressor kit.
3. Remove the power plug (6)from the air compressor.
4. Place the kit on the ground.
Make sure the tire valve stemis positioned close to theground so the hose willreach it.
5. Remove the tire valve stemcap by turning itcounterclockwise.
6. Attach the air only hose (4)onto the tire valve stem andpress the lever down tosecure it.
7. Plug the power plug (6) into theaccessory power outlet in thevehicle. Unplug all items fromother accessory power outlets.SeePower Outlets094.
Page 329 of 400
Chevrolet SS Sedan Owner Manual (GMNA-Localizing-U.S.-10122752) -2017 - crc - 8/31/16
328 Vehicle Care
If the vehicle has an accessorypower outlet, do not use thecigarette lighter.
If the vehicle only has acigarette lighter, use thecigarette lighter.
Do not pinch the power plugcord in the door or window.
8. Start the vehicle. The vehiclemust be running while usingthe air compressor.
9. Switch the on/off switch (1) tothe I position.
The compressor will inflate thetire with air only.
10. Inflate the tire to therecommended inflationpressure using the pressuregauge (2). The recommendedinflation pressure can be foundon the Tire and LoadingInformation label. SeeTirePressure0309.
The pressure gauge (2) mayread higher than the actual tirepressure while the compressoris on. Turn the compressor offto get an accurate reading. The
compressor may be turned on/off until the correct pressure isreached.
11 . S w i t c h t h e o n / o f f s w i t c h ( 1 ) t othe O position.
Be careful while handling thetire sealant and compressor kitas it could be warm afterusage.
12. Unplug the power plug (6) andthe air only hose (4).
13. Replace the tire valvestem cap.
14. Place the equipment in theoriginal storage location in thevehicle.
Removal and Installation of theSealant Canister
After repairing a tire, replace the tiresealant canister.
To r e m o v e t h e s e a l a n t c a n i s t e r :
1. Unlock the air only hose (4)from the tire sealantcanister (3) by pulling up on thelever.
2. Pull the air only hose (4) fromthe tire sealant canister (3).
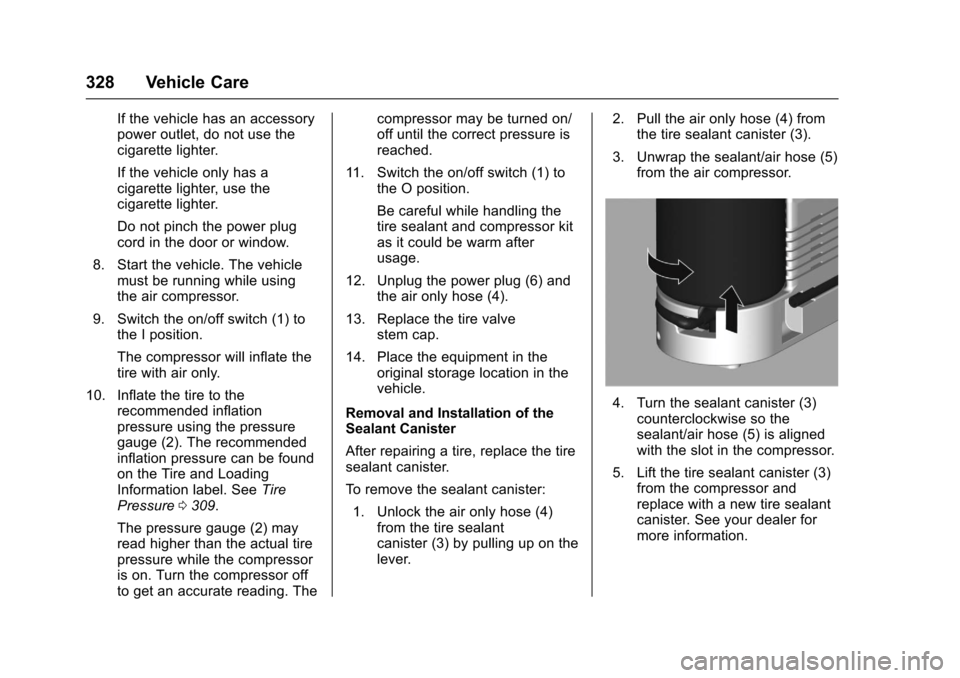
3. Unwrap the sealant/air hose (5)from the air compressor.
4. Turn the sealant canister (3)counterclockwise so thesealant/air hose (5) is alignedwith the slot in the compressor.
5. Lift the tire sealant canister (3)from the compressor andreplace with a new tire sealantcanister. See your dealer formore information.
Page 330 of 400
Chevrolet SS Sedan Owner Manual (GMNA-Localizing-U.S.-10122752) -2017 - crc - 8/31/16
Vehicle Care 329
6. Dispose of the tire sealantcanister at your dealer or inaccordance with local or Statecodes and practices.
To i n s t a l l a n e w s e a l a n t c a n i s t e r :
1. Align the sealant/air hose (5)with the slot in the compressor.
2. Push the tire sealantcanister (3) down and turn itclockwise.
3. Wrap the sealant/air hose (5)around the air compressorchannel to stow it in its originallocation.
4. Push the air only hose (4) ontothe tire sealant canister (3) inletand push the lever down.
Storing the Tire Sealant
and Compressor Kit
To a c c e s s t h e t i r e s e a l a n t a n dcompressor kit:
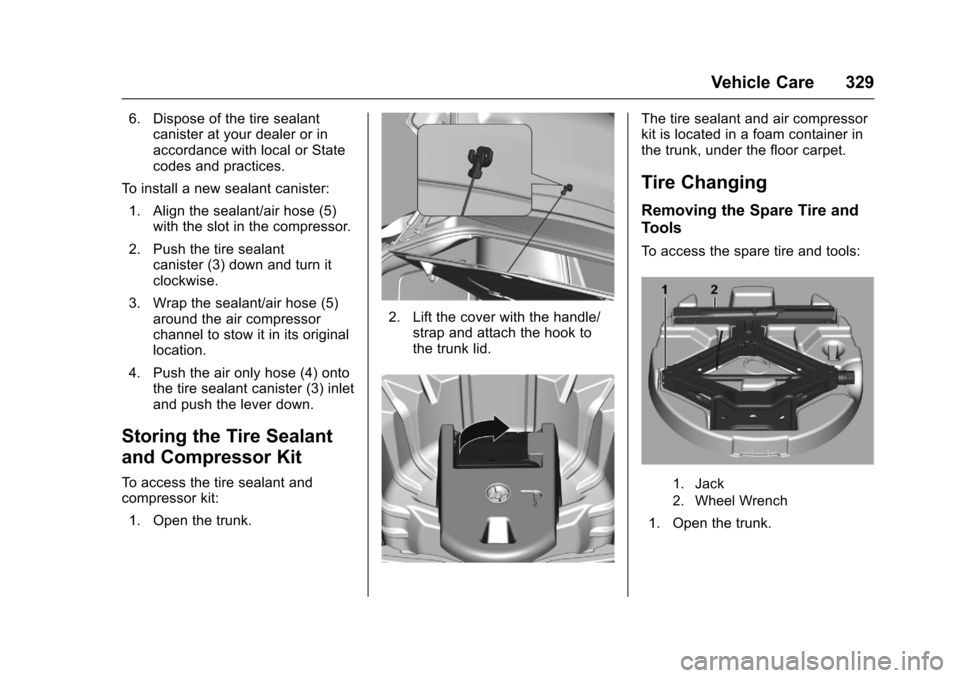
1. Open the trunk.
2. Lift the cover with the handle/strap and attach the hook tothe trunk lid.
The tire sealant and air compressorkit is located in a foam container inthe trunk, under the floor carpet.
Tire Changing
Removing the Spare Tire and
Tools
To a c c e s s t h e s p a r e t i r e a n d t o o l s :
1. Jack
2. Wheel Wrench
1. Open the trunk.