ignition CHEVROLET SSR 2003 1.G Service Manual
[x] Cancel search | Manufacturer: CHEVROLET, Model Year: 2003, Model line: SSR, Model: CHEVROLET SSR 2003 1.GPages: 374, PDF Size: 2.55 MB
Page 157 of 374
Automatic Unlocking
This feature allows you to choose how the vehicle’s
doors are unlocked. Press the personalization button
until AUTOMATIC UNLOCKING appears in the display.
To access the modes for AUTOMATIC UNLOCKING,
press the select button. Once AUTOMATIC
UNLOCKING is selected, press the select button to
scroll through the following modes:
Mode 1:UNLOCK ALL IN PARK
Mode 2:UNLOCK ALL AT KEY OUT
Mode 3:UNLOCK DRIVER IN PARK
Mode 4:UNLOCK DOORS MANUALLYIf you choose Mode 1, all of the doors will unlock when
the vehicle is shifted into PARK (P).
If you choose Mode 2, all of the doors will unlock when
the key is taken out of the ignition.
If you choose Mode 3, the driver’s door will be unlocked
when the vehicle is shifted into PARK (P).
If you choose Mode 4, the doors will not be unlocked
automatically.
Scroll through the list of modes. When the mode you
want is displayed on the DIC, press personalization
button to set your choice, return to the personalization
menu, and advance to the next programmable feature.
For more information on automatic door locks see
Programmable Automatic Door Locks on page 2-8.
3-53
Page 161 of 374
Seat Position Recall
This feature allows you to choose how any previously
programmed seat position is recalled. Press the
personalization button until SEAT POSITION RECALL
appears in the display. To access the modes for
SEAT POSITION RECALL, press the select button.
Once SEAT POSITION RECALL is selected, press the
select button to scroll through the following modes:
Mode 1:SEAT POSITION RECALL OFF
Mode 2:SEAT POSITION RECALL AT KEY IN
Mode 3:SEAT POSITION RECALL ON REMOTE
If you choose Mode 1, the memory seat position you
saved will only be recalled when the memory
button 1 or 2 is pressed.
If you choose Mode 2, the memory seat position you
saved will be recalled when you put the key in the
ignition.
If you choose Mode 3, the memory seat position you
saved will be recalled when you unlock the vehicle with
the remote keyless entry transmitter.
Scroll through the list of modes. When the mode you want
is displayed on the DIC, press personalization button to
set your choice, return to the personalization menu, and
advance to the next programmable feature. SeeMemory
Seat on page 2-44for more information.
Display Language
This feature allows you to choose the language in which
the DIC information will be displayed. Press the select
button until DISPLAY LANGUAGE appears on the
DIC. Once DISPLAY LANGUAGE is selected, press the
select button to scroll through the following modes:
Mode 1:ENGLISH
Mode 2:FRANCAIS (French)
Mode 3:ESPANOL (Spanish)
When the language you desire is displayed on the DIC,
press personalization button to set your choice,
return to the personalization menu, and advance to the
next programmable feature.
If you accidentally choose a language that you don’t
want, press and hold the personalization button and the
trip information button at the same time. The DIC will
begin scrolling through the languages in their particular
language. English will be in English, French will be
in French and so on. When you see the language that
you would like, release both buttons. The DIC will
then display the information in the language you chose.
3-57
Page 163 of 374
Setting the Time
The radio may have a button marked with an H or HR to
represent hours and an M or MN to represent minutes.
Press and hold the hour button until the correct hour
appears on the display. AM or PM will appear on
the display for morning or evening hours. Press and
hold the minute button until the correct minute appears
on the display. The time can be set with the ignition
on or off.
To synchronize the time with an FM station broadcasting
Radio Data System (RDS) information, press and
hold the hour and minute buttons at the same time for
two seconds until UPDATED and the clock symbol
appear on the display. If the time is not available from
the station, NO UPDAT will appear on the display.
RDS time is broadcast once a minute. After tuning to an
RDS broadcast station, it may take a few minutes for
the time to update.
Radio with CD
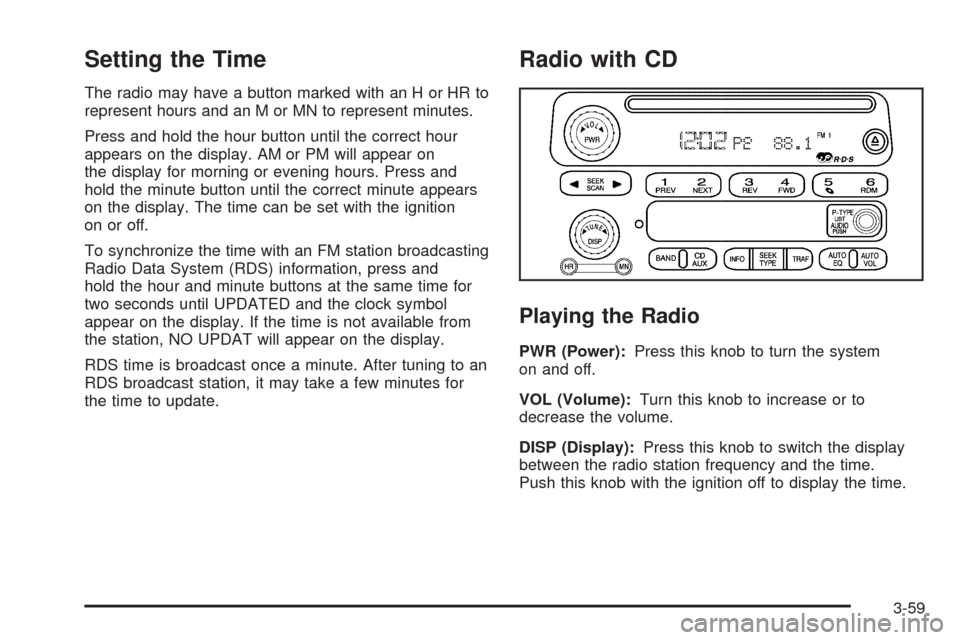
Playing the Radio
PWR (Power):Press this knob to turn the system
on and off.
VOL (Volume):Turn this knob to increase or to
decrease the volume.
DISP (Display):Press this knob to switch the display
between the radio station frequency and the time.
Push this knob with the ignition off to display the time.
3-59
Page 169 of 374
Once the complete message has been displayed, the
information symbol will disappear from the display
until another new message is received. The last
message can be displayed by pressing the INFO button.
You can view the last message until a new message
is received or a different station is tuned to.
When a message is not available from a station,
NO INFO will appear on the display.
TRAF (Traffic):If TRAF appears on the display,
the tuned station broadcasts traffic announcements and
when a traffic announcement comes on the tuned
radio station you will hear it.
If the station does not broadcast traffic announcements,
press the TRAF button and the radio will seek to a
station that does. When a station that broadcasts traffic
announcements is found, the radio will stop seeking
and TRAF will appear on the display. If no station
is found that broadcasts traffic announcements,
NO TRAFFIC will appear on the display.
If TRAF is on the display, press the TRAF button to
turn off the traffic announcements.
The radio will play the traffic announcement even if
the volume is low. The radio will interrupt the play
of a CD if the last tuned station broadcasts traffic
announcements.Radio Messages
CAL ERR (Calibration Error):The audio system has
been calibrated for your vehicle from the factory.
If CAL ERR appears on the display, it means that the
radio has not been con�gured properly for your
vehicle and must be returned to the dealer for service.
LOCKED:This message is displayed when the
THEFTLOCK
®system has locked up. Take your
vehicle to the dealer for service.
If any error occurs repeatedly or if an error cannot be
corrected, contact your dealer.
Playing a CD
Insert a CD partway into the slot, label side up.
The player will pull it in and the CD should begin playing.
If you want to insert a CD with the ignition off, �rst
press the eject button or the DISP knob.
When the CD is inserted, the CD symbol will appear
on the display. As each new track starts to play,
the track number will appear on the display.
If the ignition or radio is turned off with a CD in the
player, it will stay in the player. When the ignition
or radio is turned on, the CD will start playing, where it
stopped, if it was the last selected audio source.
3-65
Page 171 of 374
6 RDM (Random):Press this pushbutton to hear the
tracks in random, rather than sequential, order. RDM ON
will appear on the display. RDM T and the track
number will appear on the display when each track
starts to play. Press RDM again to turn off random play.
RDM OFF will appear on the display.
qSEEKr:Press the left arrow to go to the start of
the current or to the previous track. Press the right
arrow to go to the start of the next track. If either arrow
is held or pressed more than once, the player will
continue moving backward or forward through the CD.
qSCANr:To scan the CD, press and hold
either SCAN arrow for more than two seconds until
SCAN appears on the display and you hear a beep. The
radio will go to the next track, play for 10 seconds,
then go on to the next track. Press either SCAN arrow
again, to stop scanning.DISP (Display):Press this knob to see how long the
current track has been playing. ET and the elapsed time
of the track will appear on the display. To change the
default on the display, track or elapsed time, press
this knob until you see the display you want, then hold
the knob for two seconds. The radio will produce
one beep and the selected display will now be the
default.
BAND:Press this button to listen to the radio when a
CD is playing. The inactive CD will remain safely
inside the radio for future listening.
CD AUX (Auxiliary):Press this button to play a CD
when listening to the radio. The CD symbol will appear
on the display when a CD is loaded.
Z(Eject):Press this button to stop a CD when it is
playing or to eject a CD when it is not playing. Eject
may be activated with either the ignition or radio off.
CDs may be loaded with the ignition and radio off if this
button is pressed �rst.
3-67
Page 172 of 374
CD Messages
If the CD comes out, it could be for one of the following
reasons:
It is very hot. When the temperature returns to
normal, the CD should play.
You are driving on a very rough road. When the
road becomes smoother, the CD should play.
The CD is dirty, scratched, wet, or upside down.
The air is very humid. If so, wait about an hour
and try again.
There may have been a problem while burning
the CD.
The label may be caught in the CD player.
If the CD is not playing correctly, for any other reason,
try a known good CD.
If any error occurs repeatedly or if an error cannot be
corrected, contact your dealer. If the radio displays
an error message, write it down and provide it to your
dealer when reporting the problem.
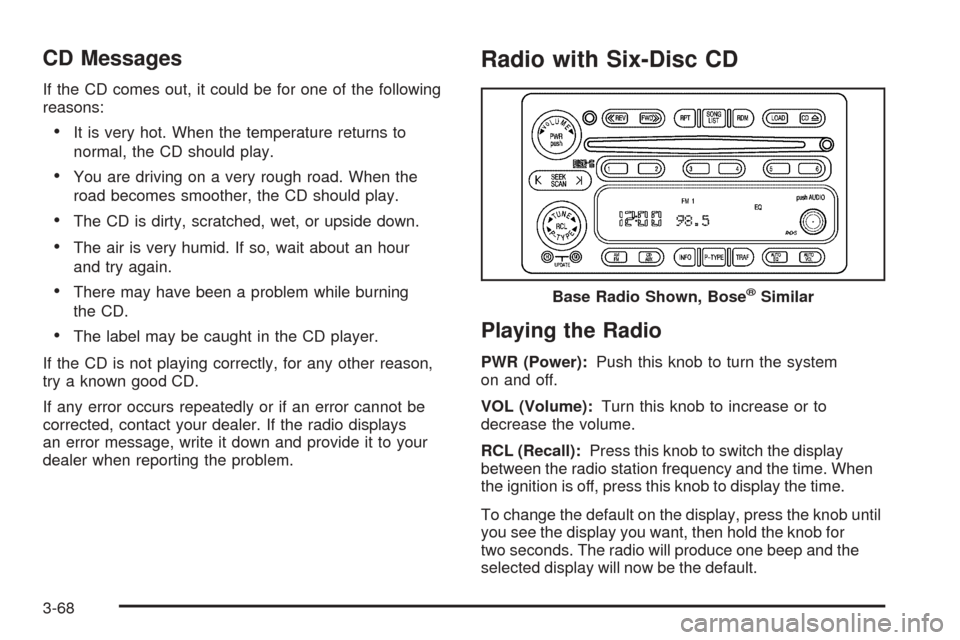
Radio with Six-Disc CD
Playing the Radio
PWR (Power):Push this knob to turn the system
on and off.
VOL (Volume):Turn this knob to increase or to
decrease the volume.
RCL (Recall):Press this knob to switch the display
between the radio station frequency and the time. When
the ignition is off, press this knob to display the time.
To change the default on the display, press the knob until
you see the display you want, then hold the knob for
two seconds. The radio will produce one beep and the
selected display will now be the default.Base Radio Shown, Bose
®Similar
3-68
Page 179 of 374
Playing a CD
If the ignition or radio is turned off, with a CD in the
player, it will stay in the player. When the ignition
or radio is turned on, the CD will start playing where it
stopped, if it was the last selected audio source.
When a CD is inserted, the CD symbol will appear on
the CD. As each new track starts to play, the track
number will appear on the display.
The CD player can play the smaller 3 inch (8 cm)
single CDs with an adapter ring. Full-size CDs and the
smaller CDs are loaded in the same manner.
If playing a CD-R the sound quality may be reduced
due to CD-R quality, the method of recording, the quality
of the music that has been recorded, and the way the
CD-R has been handled. There may be an increase
in skipping, difficulty in �nding tracks, and/or difficulty in
loading and ejecting. If these problems occur try a
known good CD.
Do not add paper labels to CDs, they could get caught
in the CD player.
If an error appears on the display, see “CD Messages”
later in this section.LOAD CD
Z:Press the LOAD side of this button to
load CDs into the CD player. This CD player will
hold up to six CDs.
To insert one CD, do the following:
1. Turn the ignition on.
2. Press and release the LOAD button.
3. Wait for the indicator light, located to the right of the
slot, to turn green.
4. Load a CD. Insert the CD partway into the slot,
label side up. The player will pull the CD in.
To insert multiple CDs, do the following:
1. Turn the ignition on.
2. Press and hold the LOAD button for two seconds.
You will hear a beep and the indicator light, located
to the right of the slot, will begin to �ash.
3. Once the light stops �ashing and turns green, load
a CD. Insert the CD partway into the slot, label side
up. The player will pull the CD in.
Once the CD is loaded, the light will begin �ashing
again. Once the light stops �ashing and turns green
you can load another CD. The CD player takes up to
six CDs. Do not try to load more than six.
3-75
Page 211 of 374
{CAUTION:
Coasting downhill in NEUTRAL (N) or with the
ignition off is dangerous. Your brakes will have
to do all the work of slowing down. They could
get so hot that they would not work well. You
would then have poor braking or even none
going down a hill. You could crash. Always
have your engine running and your vehicle in
gear when you go downhill.
Know how to go uphill. You may want to shift down
to a lower gear. The lower gears help cool your
engine and transmission, and you can climb the
hill better.
Stay in your own lane when driving on two-lane
roads in hills or mountains. Do not swing wide
or cut across the center of the road. Drive at speeds
that let you stay in your own lane.
As you go over the top of a hill, be alert. There
could be something in your lane, like a stalled car or
an accident.
You may see highway signs on mountains that warn
of special problems. Examples are long grades,
passing or no-passing zones, a falling rocks area, or
winding roads. Be alert to these and take appropriate
action.
4-25
Page 273 of 374
Notice:Ignoring these steps could result in costly
damage to your vehicle that would not be covered
by your warranty.
Trying to start your vehicle by pushing or pulling it
will not work, and it could damage your vehicle.
1. Check the other vehicle. It must have a 12-volt
battery with a negative ground system.
Notice:If the other vehicle’s system is not a 12-volt
system with a negative ground, both vehicles can
be damaged. Only use vehicles with 12-volt systems
with negative grounds to jump start your vehicle.
2. Get the vehicles close enough so the jumper cables
can reach, but be sure the vehicles aren’t touching
each other. If they are, it could cause a ground
connection you don’t want. You wouldn’t be able to
start your vehicle and the bad grounding could
damage the electrical systems.
To avoid the possibility of the vehicles rolling, set
the parking brake �rmly on both vehicles involved in
the jump start procedure. Put your transmission
in PARK (P) before setting the parking brake.
Notice:If you leave your radio or other accessories
on during the jump starting procedure, they could
be damaged. The repairs would not be covered
by your warranty. Always turn off your radio and
other accessories when jump starting your vehicle.3. Turn off the ignition on both vehicles. Unplug
unnecessary accessories plugged into the cigarette
lighter or in the accessory power outlets. Turn off
the radio and all lamps that aren’t needed. This will
avoid sparks and help save both batteries. And it
could save your radio.
4. Open the hoods and locate the positive (+) and
negative (−) terminal locations on the other vehicle.
Your vehicle has a remote positive (+) jump starting
terminal and a remote negative (−) jump starting
terminal. You should always use these remote
terminals instead of the terminals on the battery.
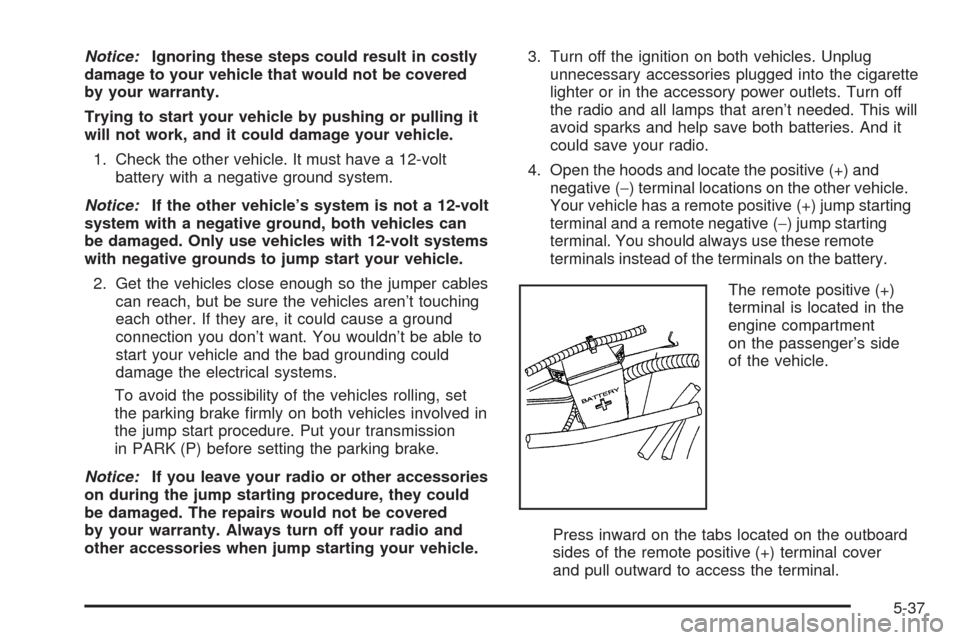
The remote positive (+)
terminal is located in the
engine compartment
on the passenger’s side
of the vehicle.
Press inward on the tabs located on the outboard
sides of the remote positive (+) terminal cover
and pull outward to access the terminal.
5-37
Page 320 of 374

Fuses Usage
25 Blank
26 Blank
27 HomeLink
®System
28 Roof Door Module
29 Blank
31 Truck Body Controller
32 Remote Keyless Entry (RKE)
33 Windshield Wipers
34 Stoplamps
35 Blank
36Climate Control System,
Driver’s Door Unlock
37 Front Parking Lamps
38 Driver’s Side Turn Signal
39 Climate Control System
40 Truck Body Controller
41 Radio
42 Trailer Parking Lamps
43 Passenger’s Side Turn Signal
44 Blank
Fuses Usage
46 Accessory Power Outlets
47 Ignition
48 Blank
49 Blank
50 Truck Body Controller, Ignition
51 Brakes
52 Blank
Relays Usage
18 Locks
24 Unlock
30 Parking Lamps
45Rear Window Defogger,
Outside Power Heated Mirrors
Circuit
BreakersUsage
01 Roof & Door Module
02 Roof Pump
08 Power Seats
5-84