CHEVROLET SSR 2005 1.G Owners Manual
Manufacturer: CHEVROLET, Model Year: 2005, Model line: SSR, Model: CHEVROLET SSR 2005 1.GPages: 388, PDF Size: 2.5 MB
Page 131 of 388

The exterior lamps control operates the following
systems:
·Headlamps
·Taillamps
·Parking Lamps
·License Lamps
·Sidemarker Lamps
·Instrument Panel Lights
·Interior Courtesy Lamps
O(Fog Lamp Indicator Light):This light illuminates
when the fog lamps are turned on. See
Fog Lamps
on page 3-15for more information.
AUTO (Automatic Headlamp System): Turning the
exterior lamps control to this position activates the
automatic headlamp system. See
Automatic Headlamp
System on page 3-14for more information.
;(Parking Lamps): Turning the exterior lamps
control to this position turns on the parking lamps,
license plate lamps, the sidemarker lamps and the
instrument panel lights.
2(Headlamps): Turning the exterior lamps control
to this position turns on the headlamps, together with the
previously listed lamps and lights.
Headlamps on Reminder
A reminder tone will sound when your headlamps or
parking lamps are manually turned on, the driver's door
is open and your ignition is in OFF or ACCESSORY.
To turn the tone off, turn the knob all the way
counterclockwise. In the automatic mode, the headlamps
turn off once the ignition key is in OFF.
3-13
Page 132 of 388

Daytime Running Lamps (DRL)
Daytime Running Lamps (DRL) can make it easier for
others to see the front of your vehicle during the
day. DRL can be helpful in many different driving
conditions, but they can be especially helpful in the short
periods after dawn and before sunset. Fully functional
daytime running lamps are required on all vehicles
®rst sold in Canada.
The DRL system will make your headlamps come
on at reduced brightness when the following conditions
are met:
·The ignition is on,
·the exterior lamps knob is in AUTO,
·the light sensor detects daytime light, and
·the automatic transmission is not in PARK (P)
or the parking brake is not set on a manual
transmission.
When the DRL are on, only your headlamps will be on.
The taillamps, sidemarker and other lamps won't be
on. The instrument panel won't be lit up either. When it begins to get dark, the headlamps will
automatically switch from DRL to the regular headlamps.
To idle your vehicle with the DRL off, put your
automatic transmission in PARK (P). The DRL will
stay off until you shift out of PARK (P). If you have a
manual transmission, set the parking brake when
the ignition is off and then start your vehicle. The DRL
will stay off until you release the parking brake.
Automatic Headlamp System
When it is dark enough outside, your automatic
headlamp system will turn on your headlamps at the
normal brightness along with other lamps such as
the taillamps, sidemarker, parking lamps and the
instrument panel lights when the exterior lamps knob is
turned to AUTO. See
Exterior Lamps on page 3-12for more information. The radio lights will also be on.
Your vehicle is equipped with a light sensor on the top
of the instrument panel. Be sure it is not covered or
the system will be on whenever the ignition is on.
The system may also turn on your lights when driving
through a parking garage, heavy overcast weather
or a tunnel. This is normal.
3-14
Page 133 of 388

There is a delay in the transition between the daytime
and nighttime operation of the Daytime Running
Lamps (DRL) and the automatic headlamp systems so
that driving under bridges or bright overhead street
lights does not affect the system. The DRL and
automatic headlamp system will only be affected when
the light sensor sees a change in lighting lasting
longer than the delay. See
Daytime Running Lamps
(DRL) on page 3-14for more information.
To idle your vehicle with the automatic headlamp
system off, set the parking brake while the ignition is
off. Then start your vehicle. The automatic headlamp
system will stay off until you release the parking brake,
or until you shift out of PARK (P).
You may be able to turn off your automatic headlamp
system. See
Daytime Running Lamps (DRL) on
page 3-14for more information.
If you start your vehicle in a dark garage, the automatic
headlamp system will come on immediately. Once you
leave the garage, it will take approximately one minute
for the automatic headlamp system to change to
DRL if it is light outside. During that delay, your
instrument panel cluster may not be as bright as usual. Make sure your instrument panel brightness control is in
the full bright position. See
Instrument Panel Brightness
on page 3-16for more information.
As with any vehicle, you should turn on the regular
headlamp system when you need it.
Fog Lamps
Use your fog lamps for better vision in foggy or misty
conditions. Your ignition must be in RUN for your
fog lamps to work.
-(Fog Lamps): Press this button located on the
exterior lamps control to turn the fog lamps on or off.
The fog lamps will go off whenever you turn on the
high-beam headlamps. When the high beams are turned
off, the fog lamps will come on again.
O(Fog Lamp Indicator Light): This light located on
the exterior lamps control illuminates when the fog
lamps are turned on.
3-15
Page 134 of 388

Interior Lamps
O(Exterior and Interior Lamp Controls):These
controls (B) are used to operate the exterior and interior
lamps. Information on the interior lamps follows. For
more information on the exterior lamps, see
Exterior
Lamps on page 3-12.
D(Interior Lamp Control): The interior lamp
control (A) is located to the left of the steering wheel
and is used to adjust the brightness of the instrument
panel lights.
Instrument Panel Brightness
To adjust the brightness of the instrument panel lights,
press lightly on the interior lamp control and release.
The control will extend outward. Turn the control
counterclockwise to brighten and clockwise to dim the
instrument panel lights. Press on the control to return it
to the stored position.
Parade Dimming
This feature prohibits the dimming of your instrument
panel displays during daylight while your headlamps are
on. When the light sensor reads darkness outside,
you will be able to dim your instrument panel displays
once again.
3-16
Page 135 of 388

Theater Dimming
This feature allows for a three to ®ve-second fade out
of the courtesy lamps instead of immediate turn off.
Exit Lighting
With the exit lighting, the interior lamps will come on
when you remove the key from the ignition to help you
see while exiting the vehicle.
Perimeter Lighting
When the button with the unlock symbol on the remote
keyless entry transmitter is pressed, the DRL, parking
lamps and back-up lamps will come on if it is dark
enough outside.
This feature can be personalized for up to two drivers.
See
DIC Vehicle Personalization on page 3-52for
more information.
Map Lamps
If your vehicle has front map lamps, they are located on
the inside rearview mirror. They will automatically come
on for approximately 40 seconds when the doors are
unlocked with the remote keyless entry transmitter or
until the ignition key is turned to RUN or ACCESSORY.
The lamps will also stay on for approximately 40 seconds
after you exit the vehicle unless you lock the doors with
the remote keyless entry transmitter.
You can also turn the lamps on and off by pressing the
button near each lamp.
Battery Run-Down Protection
This feature shuts off all lamps that are left on for
more than 10 minutes when the ignition is off. This
will keep your battery from running down.
3-17
Page 136 of 388

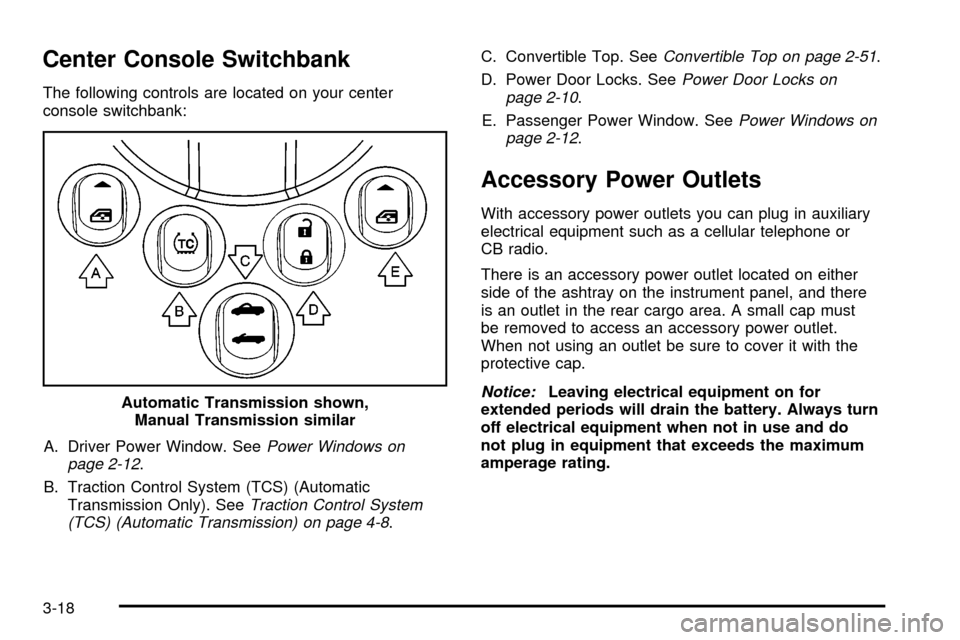
Center Console Switchbank
The following controls are located on your center
console switchbank:A. Driver Power Window. See
Power Windows on
page 2-12.
B. Traction Control System (TCS) (Automatic Transmission Only). See
Traction Control System
(TCS) (Automatic Transmission) on page 4-8. C. Convertible Top. See
Convertible Top on page 2-51.
D. Power Door Locks. See
Power Door Locks on
page 2-10.
E. Passenger Power Window. See
Power Windows on
page 2-12.
Accessory Power Outlets
With accessory power outlets you can plug in auxiliary
electrical equipment such as a cellular telephone or
CB radio.
There is an accessory power outlet located on either
side of the ashtray on the instrument panel, and there
is an outlet in the rear cargo area. A small cap must
be removed to access an accessory power outlet.
When not using an outlet be sure to cover it with the
protective cap.
Notice:Leaving electrical equipment on for
extended periods will drain the battery. Always turn
off electrical equipment when not in use and do
not plug in equipment that exceeds the maximum
amperage rating.
Automatic Transmission shown,
Manual Transmission similar
3-18
Page 137 of 388

Certain electrical accessories may not be compatible
with the accessory power outlet and could result
in blown vehicle or adapter fuses. If you experience
a problem, see your dealer for additional information on
accessory power outlets.
Notice:Adding any electrical equipment to your
vehicle may damage it or keep other components
from working as they should. The repairs would
not be covered by your warranty. Check with your
dealer before adding electrical equipment.
When adding electrical equipment, be sure to follow
the proper installation instructions included with
the equipment.
Notice:Improper use of the power outlet can cause
damage not covered by your warranty. Do not
hang any type of accessory or accessory bracket
from the plug because the power outlets are
designed for accessory power plugs only.
Ashtrays and Cigarette Lighter
Your vehicle has an ashtray and cigarette lighter.
To access, push the upper edge of the center instrument
panel door until it clicks and then release. The door
will open to expose the ashtray and cigarette lighter.
Press the lighter all the way in and release it. It will
pop back out by itself once the element has heated
for use.
Notice:If you put papers or other ¯ammable items
in the ashtray, hot cigarettes or other smoking
materials could ignite them and possibly damage
your vehicle. Never put ¯ammable items in the
ashtray.
Notice:Holding a cigarette lighter in while it is
heating will not allow the lighter to back away from
the heating element when it is hot. Damage from
overheating may occur to the lighter or heating
element, or a fuse could be blown. Do not hold
a cigarette lighter in while it is heating. Do not use
anything other than the cigarette lighter in the
heating element.
3-19
Page 138 of 388

Climate Controls
Climate Control System
A. Temperature Knob
B. Fan Knob
C. Mode Knob
With this system you can control the heating, cooling,
and ventilation for your vehicle.
Temperature Knob
The left knob on the control panel is used to adjust the
temperature of the air in the vehicle. Turn the knob
clockwise or counterclockwise to increase or decrease
the temperature.
#(Air Conditioning): Press this button located on the
temperature knob to turn the air-conditioning system on
or off. An indicator light on the button will come on to let
you know the air conditioning is activated. When the
system is on, this setting cools and dehumidi®es the air
entering your vehicle and directs it through the ¯oor ducts
as well as the instrument panel outlets.
The air conditioning system removes moisture from the
air, so you may sometimes notice a small amount of
water dripping underneath your vehicle while idling
or after turning off the engine. This is normal.
The air conditioning will not function if the fan is
turned off.
Fan Knob
The center knob on the control panel is used to
control the fan speed. Turn the knob clockwise or
counterclockwise to increase or decrease the fan speed.
?(Recirculation): This mode keeps outside air
from coming in the vehicle. It can be used to prevent
outside air and odors from entering your vehicle or help
heat or cool the air inside your vehicle more quickly.
3-20
Page 139 of 388

Press this button on the fan knob to turn the recirculation
mode on or off. An indicator light on the button will
come on to let you know the recirculation mode
is activated.
Recirculation is only available in the bi-level and vent
modes. If you push the recirculation button while
the system is in any other mode, the light on the button
will ¯ash to indicate that recirculation is not available.
Mode Knob
The right knob on the control panel is used to direct the
air¯ow inside your vehicle. Turn the knob to select
one of the following modes:
H(Vent):Select this mode to direct air to the
instrument panel outlets.
)(Bi-Level): Select this mode to direct approximately
half of the air to the instrument panel outlets, and the
remaining air to the ¯oor outlets and the defroster
and side window outlets. Cooler air is directed to the
upper outlets and warmer air to the ¯oor outlets.
6(Floor): Select this mode to direct air to the ¯oor
outlets. Recirculation does not work in this mode.
Defogging and Defrosting
Fog on the inside of windows is a result of high
humidity (moisture) condensing on the cool window
glass. This can be minimized if the climate control
system is used properly. There are two modes to clear
fog or frost from your windshield and side windows.
Use the defog mode to clear the windows of fog
or moisture and warm the passengers. Use the defrost
mode to remove fog or frost from the windshield
more quickly. For best results, clear all snow and
ice from the windshield before defrosting.
/(Floor/Defog): This mode directs half of the air
to the windshield and the side window outlets and the
other half to the ¯oor outlets. When you select this
mode, the system runs the air-conditioning compressor
unless the outside temperature is at or below freezing.
Recirculation is not available in this mode.
0(Defrost): This mode directs most of the air to the
windshield, with some air directed to the side window
outlets and the ¯oor outlets. When you select this
mode, the system runs the air-conditioning compressor
unless the outside temperature is at or below freezing.
Recirculation is not available in this mode.
3-21
Page 140 of 388

1(Maximum Defrost):This mode directs most of
the air to the windshield, with some air directed to
the side window outlets and the ¯oor outlets. The rear
window defogger and heated outside mirrors will turn on,
and the fan speed will be at the highest setting (5).
The temperature will be at the hottest setting also.
Recirculation is not available in this mode.
If this mode was selected when you turn your vehicle
off, the warmest temperature and highest fan speed will
be restored when the vehicle is started, regardless of
the temperature and fan setting.
Do not drive the vehicle until all the windows are clear.
Rear Window Defogger
The rear window defogger uses a warming grid to
remove fog from the rear window.
The rear window defogger will only work when the
ignition is on.
=(Rear): Press this button on the right knob to turn
the rear window defogger on or off. An indicator light
on the button will come on to let you know that the rear
window defogger is activated. When the rear defogger button is pressed, the outside
heated mirrors will warm to help clear any fog or
frost from the surface of the mirrors.
Notice:Using a razor blade or sharp object to
clear the inside rear window may damage the rear
window defogger. Repairs would not be covered
by your warranty. Do not clear the inside of the rear
window with sharp objects.
Outlet Adjustment
Use the levers located in the center of each outlet to
change the direction of the air¯ow.
Operation Tips
·
Clear away any ice, snow or leaves from the air
inlets at the base of the windshield that may
block the ¯ow of air into your vehicle.
·Use of non-GM approved hood de¯ectors may
adversely affect the performance of the system.
·Keep the path under the front seats clear of objects
to help circulate the air inside of your vehicle more
effectively.
3-22