ECO mode CHEVROLET TRAVERSE 2019 Owner's Manual
[x] Cancel search | Manufacturer: CHEVROLET, Model Year: 2019, Model line: TRAVERSE, Model: CHEVROLET TRAVERSE 2019Pages: 428, PDF Size: 6.28 MB
Page 11 of 428
Chevrolet Traverse Owner Manual (GMNA-Localizing-U.S./Canada/Mexico-
12146157) - 2019 - CRC - 10/31/18
10 In Brief
Keyless Access
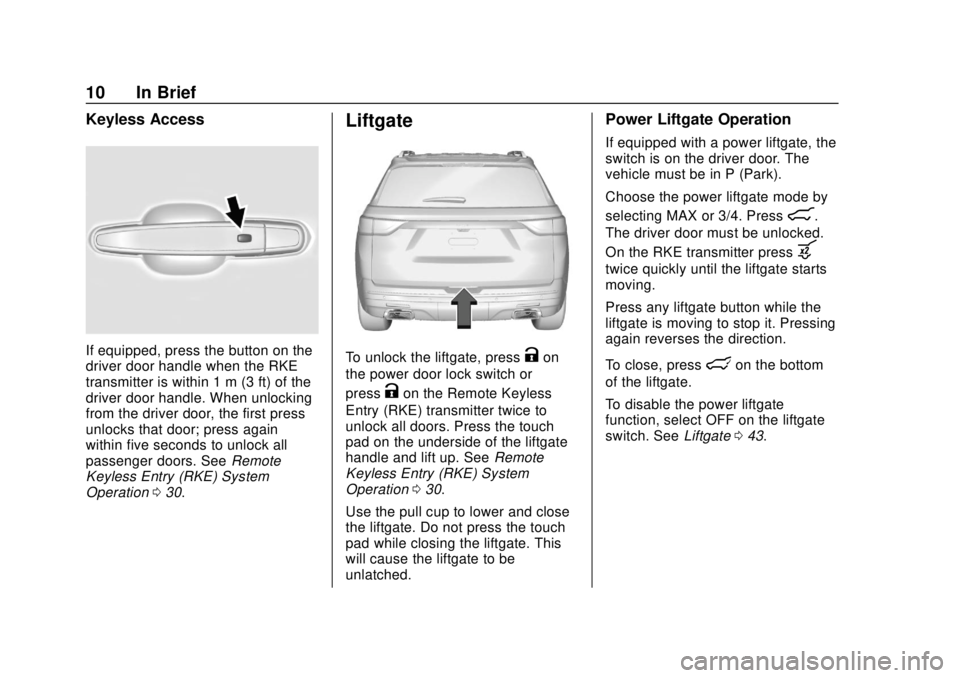
If equipped, press the button on the
driver door handle when the RKE
transmitter is within 1 m (3 ft) of the
driver door handle. When unlocking
from the driver door, the first press
unlocks that door; press again
within five seconds to unlock all
passenger doors. SeeRemote
Keyless Entry (RKE) System
Operation 030.
Liftgate
To unlock the liftgate, pressKon
the power door lock switch or
press
Kon the Remote Keyless
Entry (RKE) transmitter twice to
unlock all doors. Press the touch
pad on the underside of the liftgate
handle and lift up. See Remote
Keyless Entry (RKE) System
Operation 030.
Use the pull cup to lower and close
the liftgate. Do not press the touch
pad while closing the liftgate. This
will cause the liftgate to be
unlatched.
Power Liftgate Operation
If equipped with a power liftgate, the
switch is on the driver door. The
vehicle must be in P (Park).
Choose the power liftgate mode by
selecting MAX or 3/4. Press
8.
The driver door must be unlocked.
On the RKE transmitter press
b
twice quickly until the liftgate starts
moving.
Press any liftgate button while the
liftgate is moving to stop it. Pressing
again reverses the direction.
To close, press
lon the bottom
of the liftgate.
To disable the power liftgate
function, select OFF on the liftgate
switch. See Liftgate043.
Page 28 of 428
Chevrolet Traverse Owner Manual (GMNA-Localizing-U.S./Canada/Mexico-
12146157) - 2019 - CRC - 10/31/18
In Brief 27
Regular Unleaded Fuel
Use only Regular 87 octane—
(R+M)/2 —or higher unleaded
gasoline in your vehicle. TOP TIER
Detergent Gasoline is
recommended. Do not use gasoline
with an octane rating lower as it will
result in reduced performance and
lower fuel economy. See
Recommended Fuel (3.6L
V6 Engine) 0272 orRecommended
Fuel (2.0L L4 Engine) 0272.
E85 or FlexFuel
No E85 or FlexFuel
Gasoline-ethanol fuel blends greater
than E15 (15% ethanol by volume),
such as E85, cannot be used in this
vehicle.
Engine Oil Life System
The engine oil life system calculates
engine oil life based on vehicle use
and displays the CHANGE ENGINE
OIL SOON message when it is time
to change the engine oil and filter.
The oil life system should be reset
to 100% only following an oil
change.
Resetting the Oil Life System
1. Display the REMAINING OIL LIFE on the DIC. See Driver
Information Center (DIC) 0151.
2. Press and hold
Von the DIC
while the Oil Life display is
active. The oil life will change
to 100%.
See Engine Oil Life System 0298.
Driving for Better Fuel
Economy
Driving habits can affect fuel
mileage. Here are some driving tips
to get the best fuel economy
possible. .
Set the climate controls to the
desired temperature after the
engine is started, or turn them
off when not required.
. On AWD vehicles, see Driver
Mode Control 0242.
. Avoid fast starts and accelerate
smoothly.
. Brake gradually and avoid
abrupt stops.
. Avoid idling the engine for long
periods of time.
. When road and weather
conditions are appropriate, use
cruise control.
. Always follow posted speed
limits or drive more slowly when
conditions require.
. Keep vehicle tires properly
inflated.
. Combine several trips into a
single trip.
. Replace the vehicle's tires with
the same TPC Spec number
molded into the tire's sidewall
near the size.
Page 35 of 428
Chevrolet Traverse Owner Manual (GMNA-Localizing-U.S./Canada/Mexico-
12146157) - 2019 - CRC - 10/31/18
34 Keys, Doors, and Windows
programmed through your dealer.
The vehicle can be reprogrammed
so that lost or stolen transmitters no
longer work. Each vehicle can have
up to eight transmitters matched
to it.
Programming with Recognized
Transmitters
A new transmitter can be
programmed to the vehicle when
there are two recognized
transmitters.
To program, the vehicle must be off
and all of the transmitters, both
currently recognized and new, must
be with you.1. Remove the key lock cylinder cap on the driver door handle.
See Door Locks 038. Place
the two recognized transmitters
in the transmitter pocket.
2. Insert the vehicle key of the transmitter into the key lock
cylinder on the driver door
handle and turn the key,
counterclockwise, to the unlock
position five times within
10 seconds. The DIC displays READY FOR
REMOTE #2, 3, 4, ETC.
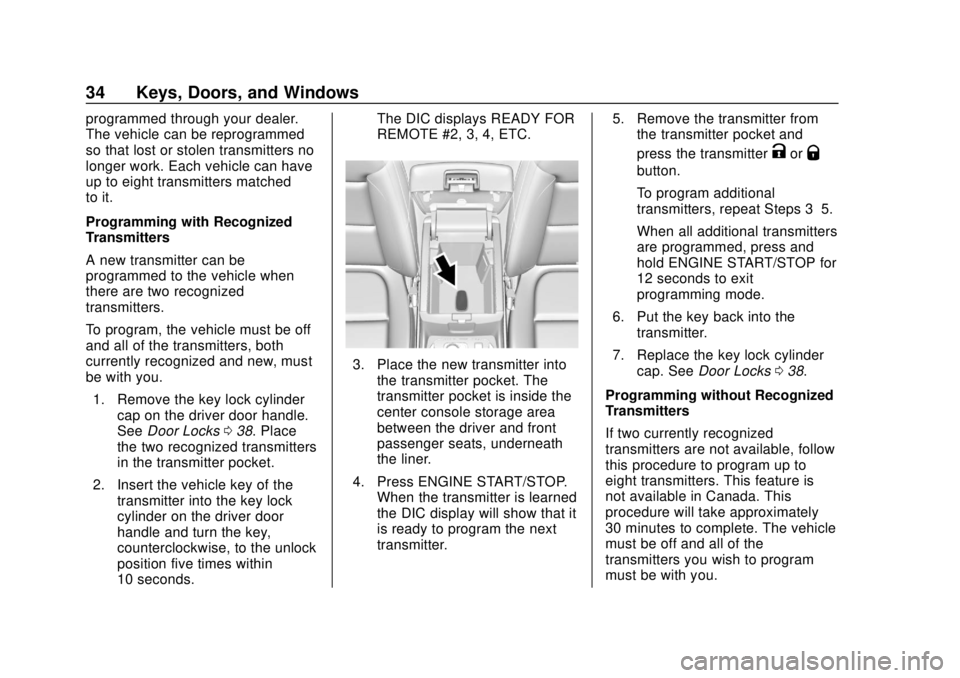
3. Place the new transmitter into
the transmitter pocket. The
transmitter pocket is inside the
center console storage area
between the driver and front
passenger seats, underneath
the liner.
4. Press ENGINE START/STOP. When the transmitter is learned
the DIC display will show that it
is ready to program the next
transmitter. 5. Remove the transmitter from
the transmitter pocket and
press the transmitter
KorQ
button.
To program additional
transmitters, repeat Steps 3–5.
When all additional transmitters
are programmed, press and
hold ENGINE START/STOP for
12 seconds to exit
programming mode.
6. Put the key back into the transmitter.
7. Replace the key lock cylinder cap. See Door Locks 038.
Programming without Recognized
Transmitters
If two currently recognized
transmitters are not available, follow
this procedure to program up to
eight transmitters. This feature is
not available in Canada. This
procedure will take approximately
30 minutes to complete. The vehicle
must be off and all of the
transmitters you wish to program
must be with you.
Page 36 of 428
Chevrolet Traverse Owner Manual (GMNA-Localizing-U.S./Canada/Mexico-
12146157) - 2019 - CRC - 10/31/18
Keys, Doors, and Windows 35
1. Remove the key lock cylindercap on the driver door handle.
See Door Locks 038. Insert
the vehicle key of the
transmitter into the key lock
cylinder on the driver door
handle and turn the key,
counterclockwise, to the unlock
position five times within
10 seconds.
The DIC displays REMOTE
LEARN PENDING,
PLEASE WAIT.
2. Wait for 10 minutes until the DIC displays PRESS ENGINE
START BUTTON TO LEARN
and then press ENGINE
START/STOP.
The DIC will again display
REMOTE LEARN PENDING,
PLEASE WAIT.
3. Repeat Step 2 two additional times. After the third time all
previously known transmitters
will no longer work with the
vehicle. Remaining transmitters
can be relearned during the
next steps. The DIC display should now
show READY FOR REMOTE
# 1.
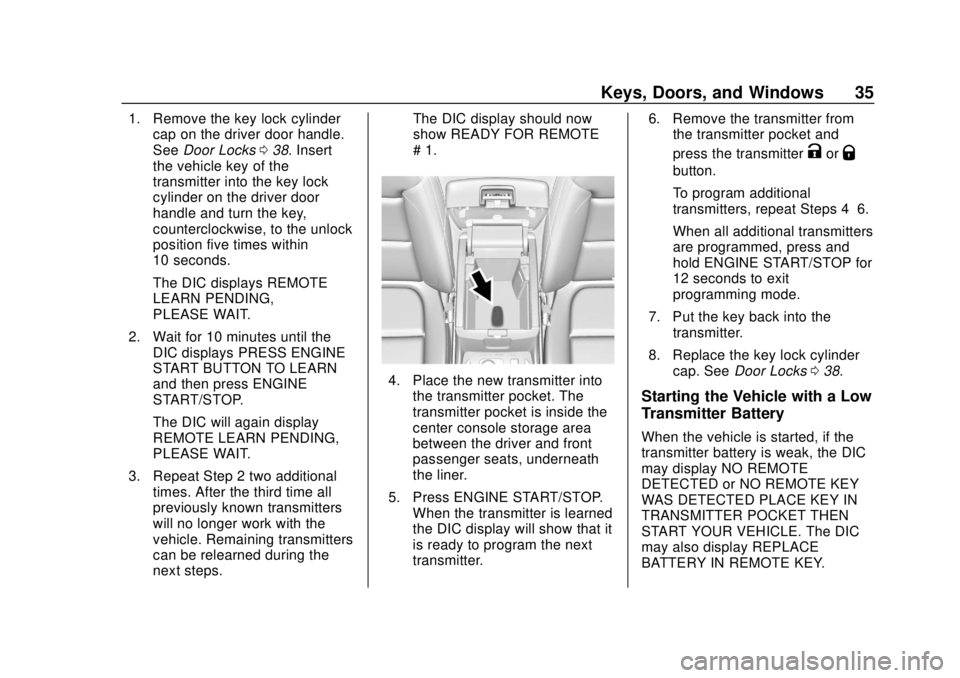
4. Place the new transmitter into
the transmitter pocket. The
transmitter pocket is inside the
center console storage area
between the driver and front
passenger seats, underneath
the liner.
5. Press ENGINE START/STOP. When the transmitter is learned
the DIC display will show that it
is ready to program the next
transmitter. 6. Remove the transmitter from
the transmitter pocket and
press the transmitter
KorQ
button.
To program additional
transmitters, repeat Steps 4–6.
When all additional transmitters
are programmed, press and
hold ENGINE START/STOP for
12 seconds to exit
programming mode.
7. Put the key back into the transmitter.
8. Replace the key lock cylinder cap. See Door Locks 038.
Starting the Vehicle with a Low
Transmitter Battery
When the vehicle is started, if the
transmitter battery is weak, the DIC
may display NO REMOTE
DETECTED or NO REMOTE KEY
WAS DETECTED PLACE KEY IN
TRANSMITTER POCKET THEN
START YOUR VEHICLE. The DIC
may also display REPLACE
BATTERY IN REMOTE KEY.
Page 39 of 428
Chevrolet Traverse Owner Manual (GMNA-Localizing-U.S./Canada/Mexico-
12146157) - 2019 - CRC - 10/31/18
38 Keys, Doors, and Windows
When the remote start is extended,
the second 15-minute period is
added on to the first 15 minutes for
a total of 30 minutes.
A maximum of two remote starts,
or a remote start with an extension,
are allowed between ignition cycles.
The ignition must be turned on and
then off before the remote start
procedure can be used again.
Canceling a Remote Start
To cancel a remote start, do any of
the following:
.Press and hold
/until the
parking lamps turn off.
. Turn on the hazard warning
flashers.
. Turn the vehicle on and then off.
Conditions in Which Remote Start
Will Not Work
The remote start will not operate if
any of the following occur:
. An RKE transmitter is in the
vehicle.
. The hood is not closed. .
The ignition is in any mode other
than off.
. The hazard warning flashers
are on.
. There is an emission control
system malfunction.
. The engine coolant temperature
is too high.
. The oil pressure is low.
. Two remote vehicle starts or a
start with an extension have
already been used.
. The vehicle is not in P (Park).
Door Locks
{Warning
Unlocked doors can be
dangerous.
. Passengers, especially
children, can easily open
the doors and fall out of a
moving vehicle. The doors
can be unlocked and
(Continued)
Warning (Continued)
opened while the vehicle is
moving. The chance of
being thrown out of the
vehicle in a crash is
increased if the doors are
not locked. So, all
passengers should wear
seat belts properly and the
doors should be locked
whenever the vehicle is
driven.
. Young children who get into
unlocked vehicles may be
unable to get out. A child
can be overcome by
extreme heat and can suffer
permanent injuries or even
death from heat stroke.
Always lock the vehicle
whenever leaving it.
. Outsiders can easily enter
through an unlocked door
when you slow down or stop
the vehicle. Locking the
doors can help prevent this
from happening.
Page 45 of 428
Chevrolet Traverse Owner Manual (GMNA-Localizing-U.S./Canada/Mexico-
12146157) - 2019 - CRC - 10/31/18
44 Keys, Doors, and Windows
The liftgate has an electric latch.
If the battery is disconnected or has
low voltage, the liftgate will not
open. The liftgate will resume
operation when the battery is
reconnected and charged.
Always close the liftgate before
driving.
Power Liftgate Operation
{Warning
You or others could be injured if
caught in the path of the power
liftgate. Make sure there is no one
in the way of the liftgate as it is
opening and closing.
Caution
Driving with an open and
unsecured liftgate may result in
damage to the power liftgate
components.
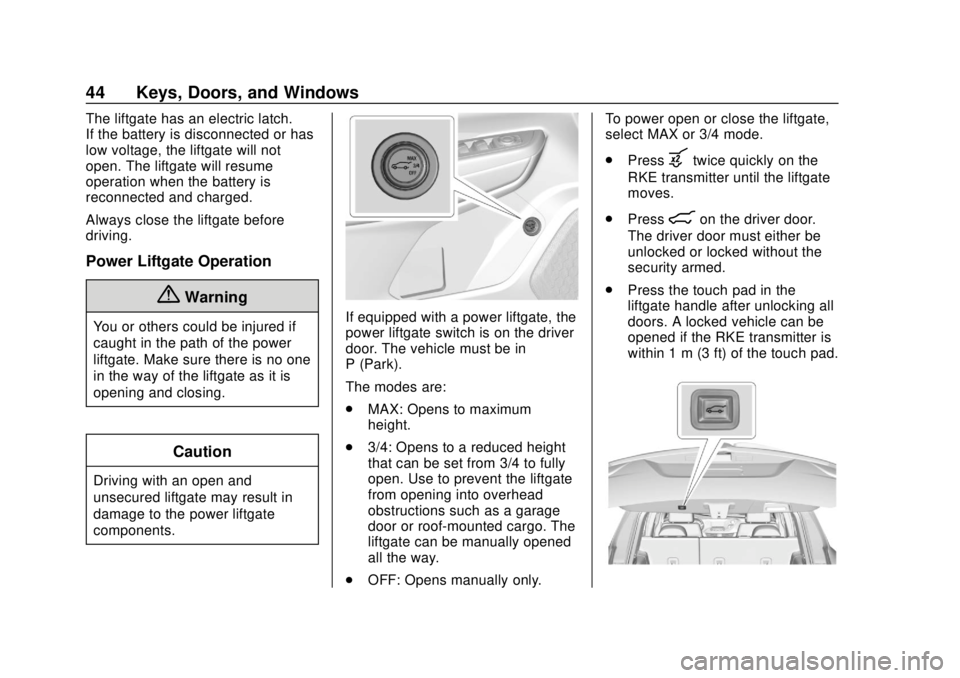
If equipped with a power liftgate, the
power liftgate switch is on the driver
door. The vehicle must be in
P (Park).
The modes are:
.MAX: Opens to maximum
height.
. 3/4: Opens to a reduced height
that can be set from 3/4 to fully
open. Use to prevent the liftgate
from opening into overhead
obstructions such as a garage
door or roof-mounted cargo. The
liftgate can be manually opened
all the way.
. OFF: Opens manually only. To power open or close the liftgate,
select MAX or 3/4 mode.
.
Press
btwice quickly on the
RKE transmitter until the liftgate
moves.
. Press
8on the driver door.
The driver door must either be
unlocked or locked without the
security armed.
. Press the touch pad in the
liftgate handle after unlocking all
doors. A locked vehicle can be
opened if the RKE transmitter is
within 1 m (3 ft) of the touch pad.
Page 47 of 428
Chevrolet Traverse Owner Manual (GMNA-Localizing-U.S./Canada/Mexico-
12146157) - 2019 - CRC - 10/31/18
46 Keys, Doors, and Windows
vehicle and presses against a
sensor, the liftgate will reverse
direction and open fully. The liftgate
will remain open until it is activated
again or closed manually.
Setting the 3/4 Mode
To change the position the liftgate
stops at when opening:1. Select MAX or 3/4 mode and power open the liftgate.
2. Stop the liftgate movement at the desired height by pressing
any liftgate button. Manually
adjust the liftgate position if
needed.
3. Press and hold
lat the
bottom of the liftgate until the
turn signals flash and a beep
sounds. This indicates the
setting has been recorded. The liftgate cannot be set below a
minimum programmable height.
If there is no light flash or sound,
then the height adjustment may be
too low.
Manual Operation
Select OFF to manually operate the
liftgate. See
“Manual Liftgate” at the
beginning of this section.
Caution
Attempting to move the liftgate
too quickly and with excessive
force may result in damage to the
vehicle.
Operate the liftgate manually with a
smooth motion and moderate
speed. The system includes a
feature which limits the manual
closing speed to protect the
components.
Hands-Free Operation
If equipped, the liftgate may be
operated with a kicking motion
under the left side of the rear
bumper at the location of the
projected logo. The RKE transmitter
must be within 1 m (3 ft) of the rear
bumper to operate the power liftgate
hands-free.
The hands-free feature will not work
while the liftgate is moving. To stop
the liftgate while in motion use one
of the liftgate switches.
The hands-free feature can be
customized. See Vehicle
Personalization 0155. Choose from
the following:
On-Open and Close : The kicking
motion is activated to both open and
close the liftgate.
On-Open Only : The kicking motion
is activated to only open the liftgate.
Off : The feature is disabled.
Page 82 of 428
Chevrolet Traverse Owner Manual (GMNA-Localizing-U.S./Canada/Mexico-
12146157) - 2019 - CRC - 10/31/18
Seats and Restraints 81
To unlatch the belt, push the button
on the buckle. The belt should
return to its stowed position.
Always stow the seat belt slowly.
If the seat belt webbing returns
quickly to the stowed position, the
retractor may lock and cannot be
pulled out. If this happens, pull the
seat belt straight out firmly to unlock
the webbing, and then release it.
If the webbing is still locked in the
retractor, see your dealer.
Before a door is closed, be sure the
seat belt is out of the way. If a door
is slammed against a seat belt,
damage can occur to both the seat
belt and the vehicle.
Seat Belt Pretensioners
This vehicle has seat belt
pretensioners for front outboard
occupants. Although the seat belt
pretensioners cannot be seen, they
are part of the seat belt assembly.
They can help tighten the seat belts
during the early stages of a
moderate to severe frontal, near
frontal, or rear crash if the threshold
conditions for pretensioneractivation are met. Seat belt
pretensioners can also help tighten
the seat belts in a side crash or a
rollover event.
Pretensioners work only once. If the
pretensioners activate in a crash,
the pretensioners and probably
other parts of the vehicle’s seat belt
system will need to be replaced.
See
Replacing Seat Belt System
Parts after a Crash 084.
Do not sit on the outboard seat belt
while entering or exiting the vehicle
or at any time while sitting in the
seat. Sitting on the seat belt can
damage the webbing and hardware.
Rear Seat Belt Comfort Guides
{Warning
A seat belt that is not properly
worn may not provide the
protection needed in a crash. The
person wearing the belt could be
seriously injured. The shoulder
belt should go over the shoulder (Continued)
Warning (Continued)
and across the chest. These parts
of the body are best able to take
belt restraining forces.
Rear seat belt comfort guides may
provide added seat belt comfort for
older children who have outgrown
booster seats and for some adults.
When installed on a shoulder belt,
the comfort guide positions the
shoulder belt away from the neck
and head.
Second Row Outboard Seating
Positions
The vehicle has comfort guides for
the second row outboard seating
positions. The comfort guides are
stored in a pocket on the side of the
seatback.
Page 91 of 428
Chevrolet Traverse Owner Manual (GMNA-Localizing-U.S./Canada/Mexico-
12146157) - 2019 - CRC - 10/31/18
90 Seats and Restraints
In any particular crash, no one can
say whether an airbag should have
inflated simply because of the
vehicle damage or repair costs.
What Makes an Airbag
Inflate?
In a deployment event, the sensing
system sends an electrical signal
triggering a release of gas from the
inflator. Gas from the inflator fills the
airbag causing the bag to break out
of the cover. The inflator, the airbag,
and related hardware are all part of
the airbag module.
For airbag locations, seeWhere Are
the Airbags? 087.
How Does an Airbag
Restrain?
In moderate to severe frontal or
near frontal collisions, even belted
occupants can contact the steering
wheel or the instrument panel. In
moderate to severe side collisions,
even belted occupants can contact
the inside of the vehicle. Airbags supplement the protection
provided by seat belts by
distributing the force of the impact
more evenly over the
occupant's body.
Rollover capable roof-rail airbags
are designed to help contain the
head and chest of occupants in the
outboard seating positions in the
first, second, and third rows. The
rollover capable roof-rail airbags are
designed to help reduce the risk of
full or partial ejection in rollover
events, although no system can
prevent all such ejections.
But airbags would not help in many
types of collisions, primarily
because the occupant's motion is
not toward those airbags. See
When
Should an Airbag Inflate? 089.
Airbags should never be regarded
as anything more than a supplement
to seat belts.
What Will You See after
an Airbag Inflates?
After frontal and seat-mounted side
impact airbags inflate, they quickly
deflate, so quickly that some people
may not even realize the airbags
inflated. The front center airbag and
roof-rail airbags may still be at least
partially inflated for some time after
they inflate. Some components of
the airbag module may be hot for
several minutes. For location of the
airbags, see Where Are the
Airbags? 087.
The parts of the airbag that come
into contact with you may be warm,
but not too hot to touch. There may
be some smoke and dust coming
from the vents in the deflated
airbags. Airbag inflation does not
prevent the driver from seeing out of
the windshield or being able to steer
the vehicle, nor does it prevent
people from leaving the vehicle.
Page 92 of 428

Chevrolet Traverse Owner Manual (GMNA-Localizing-U.S./Canada/Mexico-
12146157) - 2019 - CRC - 10/31/18
Seats and Restraints 91
{Warning
When an airbag inflates, there
may be dust in the air. This dust
could cause breathing problems
for people with a history of
asthma or other breathing trouble.
To avoid this, everyone in the
vehicle should get out as soon as
it is safe to do so. If you have
breathing problems but cannot
get out of the vehicle after an
airbag inflates, then get fresh air
by opening a window or a door.
If you experience breathing
problems following an airbag
deployment, you should seek
medical attention.
The vehicle has a feature that may
automatically unlock the doors, turn
on the interior lamps and hazard
warning flashers, and shut off the
fuel system after the airbags inflate.
The feature may also activate,
without airbag inflation, after an
event that exceeds a predetermined
threshold. After turning the ignition off and then on again, the fuel
system will return to normal
operation; the doors can be locked,
the interior lamps can be turned off,
and the hazard warning flashers can
be turned off using the controls for
those features. If any of these
systems are damaged in the crash
they may not operate as normal.
{Warning
A crash severe enough to inflate
the airbags may have also
damaged important functions in
the vehicle, such as the fuel
system, brake and steering
systems, etc. Even if the vehicle
appears to be drivable after a
moderate crash, there may be
concealed damage that could
make it difficult to safely operate
the vehicle.
Use caution if you should attempt
to restart the engine after a crash
has occurred.
In many crashes severe enough to
inflate the airbag, windshields are
broken by vehicle deformation.
Additional windshield breakage may
also occur from the front outboard
passenger airbag.
.
Airbags are designed to inflate
only once. After an airbag
inflates, you will need some new
parts for the airbag system.
If you do not get them, the
airbag system will not be there
to help protect you in another
crash. A new system will include
airbag modules and possibly
other parts. The service manual
for the vehicle covers the need
to replace other parts.
. The vehicle has a crash sensing
and diagnostic module which
records information after a
crash. See Vehicle Data
Recording and Privacy 0401
and Event Data Recorders
0 401.
. Let only qualified technicians
work on the airbag systems.
Improper service can mean that