spare wheel CHEVROLET TRAVERSE 2023 User Guide
[x] Cancel search | Manufacturer: CHEVROLET, Model Year: 2023, Model line: TRAVERSE, Model: CHEVROLET TRAVERSE 2023Pages: 369, PDF Size: 16.89 MB
Page 300 of 369
Chevrolet Traverse Owner Manual (GMNA-Localizing-U.S./Canada/Mexico-
16411537) - 2023 - CRC - 3/28/22
Vehicle Care 299
Check that all wheel nuts are properly
tightened. See“Wheel Nut Torque”
under Capacities and Specifications
0 335, and “Removing the Flat Tire and
Installing the Spare Tire” underTire
Changing 0305.
{Warning
Rust or dirt on a wheel, or on the
parts to which it is fastened, can
cause wheel nuts to become loose
over time. The wheel could come off
and cause a crash. When changing a
wheel, remove any rust or dirt from
places where the wheel attaches to
the vehicle. In an emergency, a cloth
or paper towel can be used; however,
use a scraper or wire brush later to
remove all rust or dirt.
Lightly coat the inner diameter of the
wheel hub opening with wheel bearing
grease after a wheel change or tire
rotation to prevent corrosion or rust
buildup.
{Warning
Do not apply grease to the wheel
mounting surface, wheel conical
seats, or the wheel nuts or bolts.
Grease applied to these areas could
cause a wheel to become loose or
come off, resulting in a crash.
When It Is Time for New Tires
Factors, such as maintenance, temperatures,
driving speeds, vehicle loading, and road
conditions affect the wear rate of the tires.
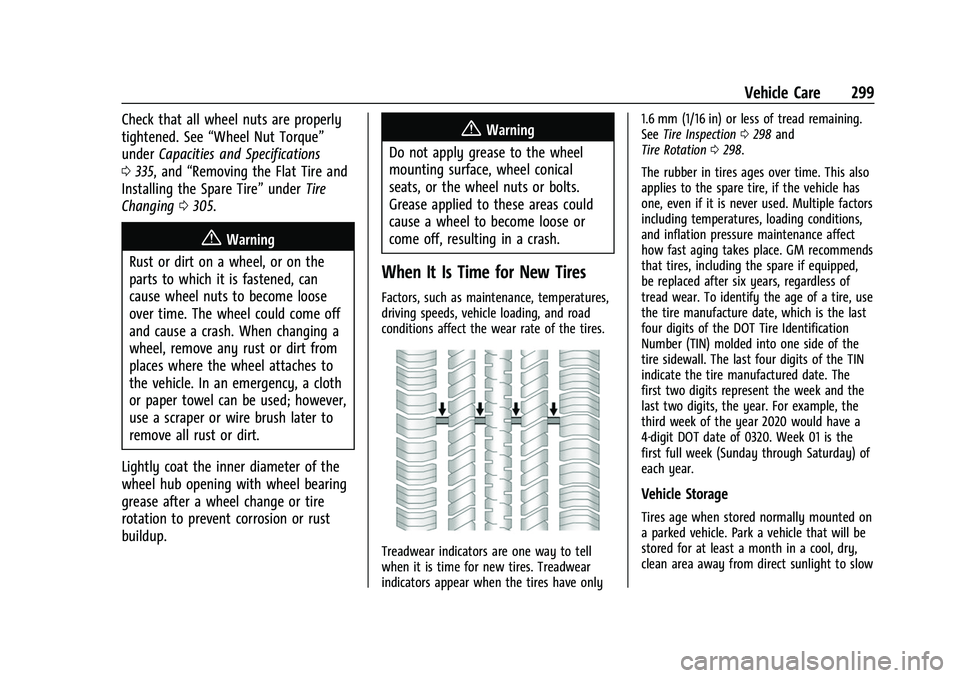
Treadwear indicators are one way to tell
when it is time for new tires. Treadwear
indicators appear when the tires have only 1.6 mm (1/16 in) or less of tread remaining.
See
Tire Inspection 0298 and
Tire Rotation 0298.
The rubber in tires ages over time. This also
applies to the spare tire, if the vehicle has
one, even if it is never used. Multiple factors
including temperatures, loading conditions,
and inflation pressure maintenance affect
how fast aging takes place. GM recommends
that tires, including the spare if equipped,
be replaced after six years, regardless of
tread wear. To identify the age of a tire, use
the tire manufacture date, which is the last
four digits of the DOT Tire Identification
Number (TIN) molded into one side of the
tire sidewall. The last four digits of the TIN
indicate the tire manufactured date. The
first two digits represent the week and the
last two digits, the year. For example, the
third week of the year 2020 would have a
4-digit DOT date of 0320. Week 01 is the
first full week (Sunday through Saturday) of
each year.
Vehicle Storage
Tires age when stored normally mounted on
a parked vehicle. Park a vehicle that will be
stored for at least a month in a cool, dry,
clean area away from direct sunlight to slow
Page 302 of 369
Chevrolet Traverse Owner Manual (GMNA-Localizing-U.S./Canada/Mexico-
16411537) - 2023 - CRC - 3/28/22
Vehicle Care 301
Winter tires with the same speed rating
as the original equipment tires may not
be available for H, V, W, Y and ZR
speed rated tires. Never exceed the
winter tires’maximum speed capability
when using winter tires with a lower
speed rating.
If the vehicle tires must be replaced
with a tire that does not have a TPC
Spec number, make sure they are the
same size, load range, speed rating, and
construction (radial) as the original
tires.
The Tire and Loading Information label
indicates the original equipment tires
on the vehicle. See Vehicle Load Limits
0 196.
Different Size Tires and Wheels
If wheels or tires are installed that are a
different size than the original equipment
wheels and tires, vehicle performance,
including its braking, ride and handling
characteristics, stability, and resistance to
rollover may be affected. If the vehicle has
electronic systems such as antilock brakes,
rollover airbags, traction control, electronic stability control, or All-Wheel Drive, the
performance of these systems can also be
affected.
{Warning
If different sized wheels are used, there
may not be an acceptable level of
performance and safety if tires not
recommended for those wheels are
selected. This increases the chance of a
crash and serious injury. Only use GM
specific wheel and tire systems developed
for the vehicle, and have them properly
installed by a GM certified technician.
See Buying New Tires 0300 and
Accessories and Modifications 0258.
Uniform Tire Quality Grading
The following information relates to the
system developed by the United States
National Highway Traffic Safety
Administration (NHTSA), which grades
tires by treadwear, traction, and
temperature performance. This applies
only to vehicles sold in the United
States. The grades are molded on the
sidewalls of most passenger car tires. The Uniform Tire Quality Grading
(UTQG) system does not apply to deep
tread, winter tires, compact spare tires,
tires with nominal rim diameters of
10 to 12 inches (25 to 30 cm), or to some
limited-production tires.
While the tires available on General
Motors passenger cars and light trucks
may vary with respect to these grades,
they must also conform to federal
safety requirements and additional
General Motors Tire Performance
Criteria (TPC) standards.
Quality grades can be found where
applicable on the tire sidewall between
tread shoulder and maximum section
width. For example:Treadwear 200 Traction AA Temperature A
All Passenger Car Tires Must Conform to
Federal Safety Requirements In Addition
To These Grades.
Treadwear
The treadwear grade is a comparative
rating based on the wear rate of the
tire when tested under controlled
Page 306 of 369
Chevrolet Traverse Owner Manual (GMNA-Localizing-U.S./Canada/Mexico-
16411537) - 2023 - CRC - 3/28/22
Vehicle Care 305
Warning (Continued)
5. Place wheel blocks, if equipped, onboth sides of the tire at the opposite
corner of the tire being changed.
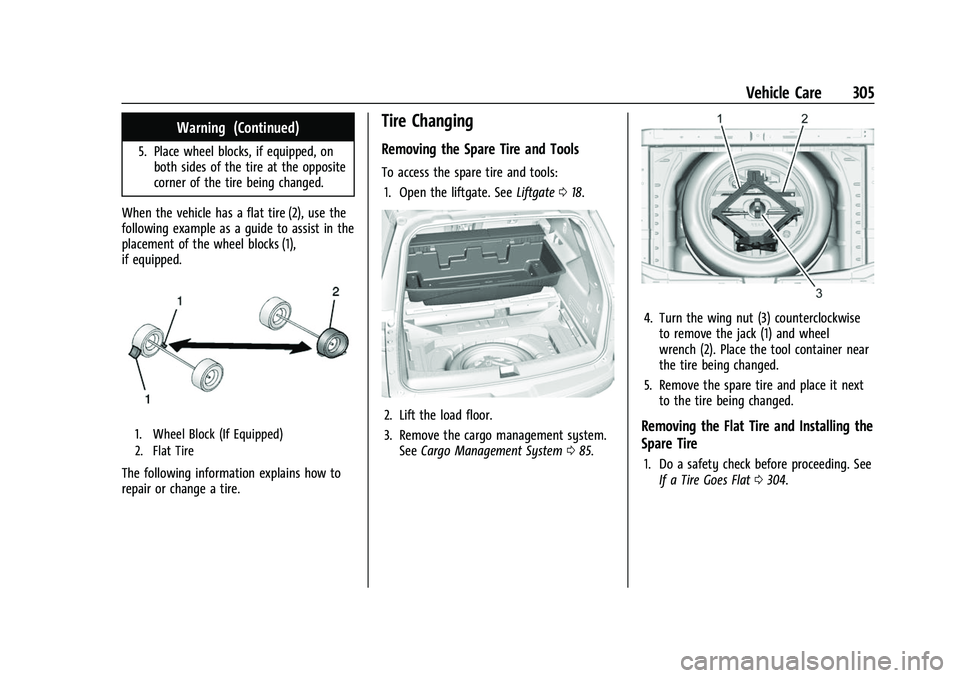
When the vehicle has a flat tire (2), use the
following example as a guide to assist in the
placement of the wheel blocks (1),
if equipped.
1. Wheel Block (If Equipped)
2. Flat Tire
The following information explains how to
repair or change a tire.
Tire Changing
Removing the Spare Tire and Tools
To access the spare tire and tools: 1. Open the liftgate. See Liftgate018.
2. Lift the load floor.
3. Remove the cargo management system.
See Cargo Management System 085.
4. Turn the wing nut (3) counterclockwise
to remove the jack (1) and wheel
wrench (2). Place the tool container near
the tire being changed.
5. Remove the spare tire and place it next to the tire being changed.
Removing the Flat Tire and Installing the
Spare Tire
1. Do a safety check before proceeding. SeeIf a Tire Goes Flat 0304.
Page 308 of 369
Chevrolet Traverse Owner Manual (GMNA-Localizing-U.S./Canada/Mexico-
16411537) - 2023 - CRC - 3/28/22
Vehicle Care 307
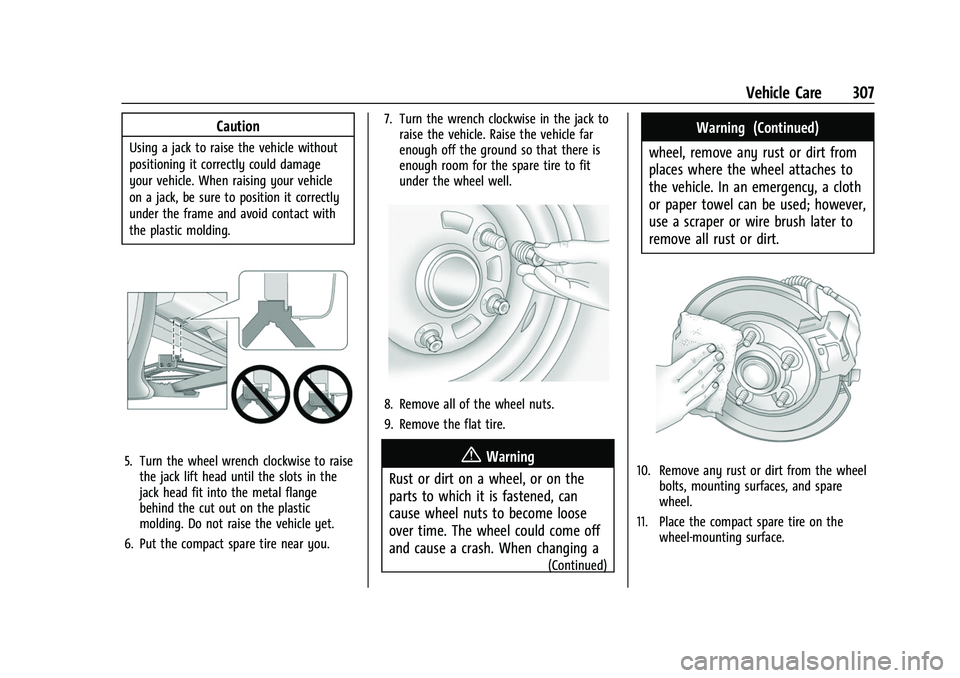
Caution
Using a jack to raise the vehicle without
positioning it correctly could damage
your vehicle. When raising your vehicle
on a jack, be sure to position it correctly
under the frame and avoid contact with
the plastic molding.
5. Turn the wheel wrench clockwise to raisethe jack lift head until the slots in the
jack head fit into the metal flange
behind the cut out on the plastic
molding. Do not raise the vehicle yet.
6. Put the compact spare tire near you. 7. Turn the wrench clockwise in the jack to
raise the vehicle. Raise the vehicle far
enough off the ground so that there is
enough room for the spare tire to fit
under the wheel well.
8. Remove all of the wheel nuts.
9. Remove the flat tire.
{Warning
Rust or dirt on a wheel, or on the
parts to which it is fastened, can
cause wheel nuts to become loose
over time. The wheel could come off
and cause a crash. When changing a
(Continued)
Warning (Continued)
wheel, remove any rust or dirt from
places where the wheel attaches to
the vehicle. In an emergency, a cloth
or paper towel can be used; however,
use a scraper or wire brush later to
remove all rust or dirt.
10. Remove any rust or dirt from the wheel bolts, mounting surfaces, and spare
wheel.
11. Place the compact spare tire on the wheel-mounting surface.
Page 309 of 369
Chevrolet Traverse Owner Manual (GMNA-Localizing-U.S./Canada/Mexico-
16411537) - 2023 - CRC - 3/28/22
308 Vehicle Care
{Warning
Never use oil or grease on bolts or nuts
because the nuts might come loose. The
vehicle's wheel could fall off, causing a
crash.
12. Reinstall the wheel nuts. Tighten each nut by hand until the wheel is held
against the hub.
13. Lower the vehicle by turning the jack handle counterclockwise.
{Warning
Wheel nuts that are improperly or
incorrectly tightened can cause the
wheels to become loose or come off. The
wheel nuts should be tightened with a
torque wrench to the proper torque
specification after replacing. Follow the
torque specification supplied by the
aftermarket manufacturer when using
accessory locking wheel nuts. See
Capacities and Specifications 0335 for
original equipment wheel nut torque
specifications.
Caution
Improperly tightened wheel nuts can lead
to brake pulsation and rotor damage. To
avoid expensive brake repairs, evenly
tighten the wheel nuts in the proper
sequence and to the proper torque
specification. See Capacities and
Specifications 0335 for the wheel nut
torque specification.
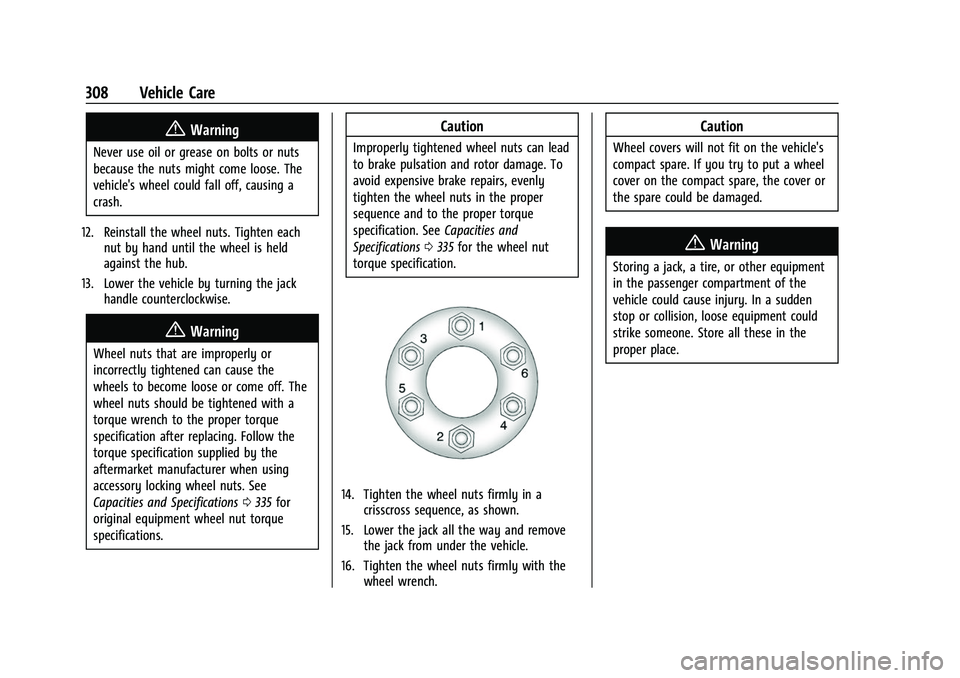
14. Tighten the wheel nuts firmly in a crisscross sequence, as shown.
15. Lower the jack all the way and remove the jack from under the vehicle.
16. Tighten the wheel nuts firmly with the wheel wrench.
Caution
Wheel covers will not fit on the vehicle's
compact spare. If you try to put a wheel
cover on the compact spare, the cover or
the spare could be damaged.
{Warning
Storing a jack, a tire, or other equipment
in the passenger compartment of the
vehicle could cause injury. In a sudden
stop or collision, loose equipment could
strike someone. Store all these in the
proper place.
Page 310 of 369
Chevrolet Traverse Owner Manual (GMNA-Localizing-U.S./Canada/Mexico-
16411537) - 2023 - CRC - 3/28/22
Vehicle Care 309
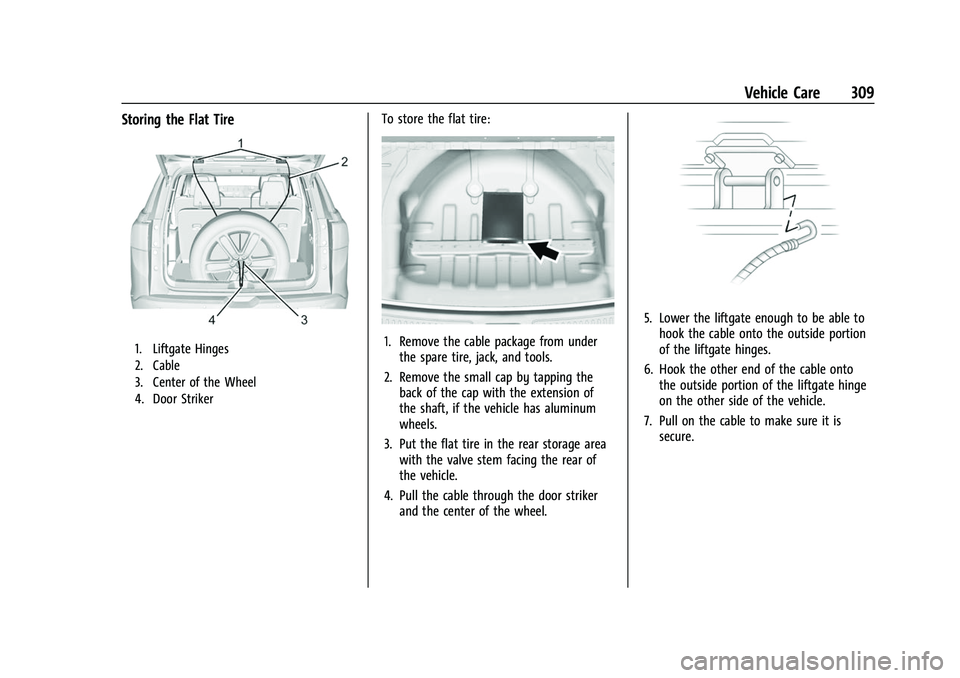
Storing the Flat Tire
1. Liftgate Hinges
2. Cable
3. Center of the Wheel
4. Door Striker
To store the flat tire:
1. Remove the cable package from underthe spare tire, jack, and tools.
2. Remove the small cap by tapping the back of the cap with the extension of
the shaft, if the vehicle has aluminum
wheels.
3. Put the flat tire in the rear storage area with the valve stem facing the rear of
the vehicle.
4. Pull the cable through the door striker and the center of the wheel.
5. Lower the liftgate enough to be able tohook the cable onto the outside portion
of the liftgate hinges.
6. Hook the other end of the cable onto the outside portion of the liftgate hinge
on the other side of the vehicle.
7. Pull on the cable to make sure it is secure.
Page 311 of 369
Chevrolet Traverse Owner Manual (GMNA-Localizing-U.S./Canada/Mexico-
16411537) - 2023 - CRC - 3/28/22
310 Vehicle Care
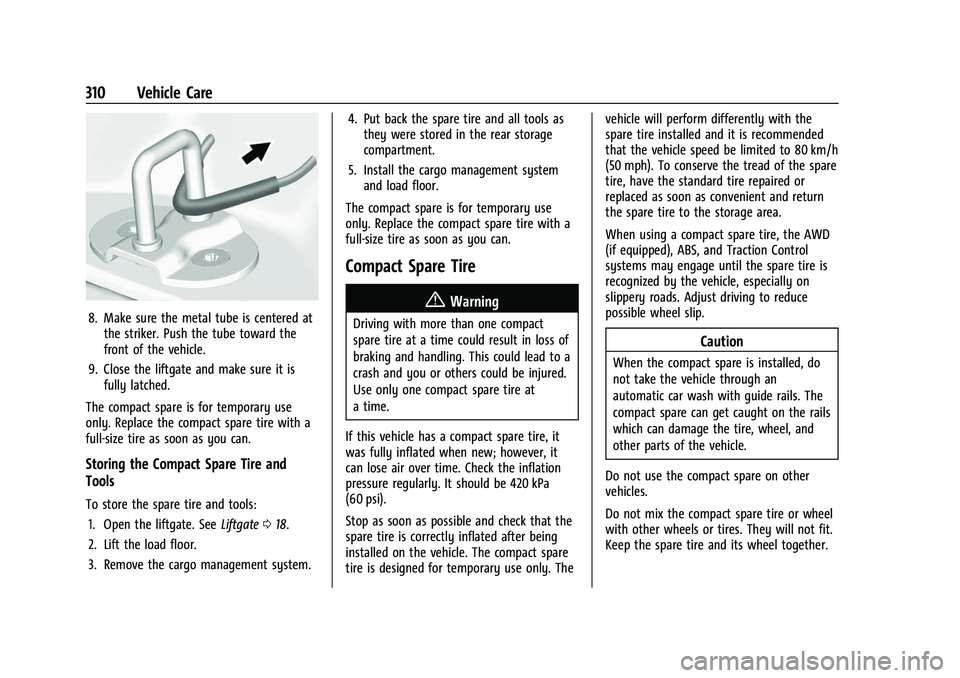
8. Make sure the metal tube is centered atthe striker. Push the tube toward the
front of the vehicle.
9. Close the liftgate and make sure it is fully latched.
The compact spare is for temporary use
only. Replace the compact spare tire with a
full-size tire as soon as you can.
Storing the Compact Spare Tire and
Tools
To store the spare tire and tools: 1. Open the liftgate. See Liftgate018.
2. Lift the load floor.
3. Remove the cargo management system. 4. Put back the spare tire and all tools as
they were stored in the rear storage
compartment.
5. Install the cargo management system and load floor.
The compact spare is for temporary use
only. Replace the compact spare tire with a
full-size tire as soon as you can.
Compact Spare Tire
{Warning
Driving with more than one compact
spare tire at a time could result in loss of
braking and handling. This could lead to a
crash and you or others could be injured.
Use only one compact spare tire at
a time.
If this vehicle has a compact spare tire, it
was fully inflated when new; however, it
can lose air over time. Check the inflation
pressure regularly. It should be 420 kPa
(60 psi).
Stop as soon as possible and check that the
spare tire is correctly inflated after being
installed on the vehicle. The compact spare
tire is designed for temporary use only. The vehicle will perform differently with the
spare tire installed and it is recommended
that the vehicle speed be limited to 80 km/h
(50 mph). To conserve the tread of the spare
tire, have the standard tire repaired or
replaced as soon as convenient and return
the spare tire to the storage area.
When using a compact spare tire, the AWD
(if equipped), ABS, and Traction Control
systems may engage until the spare tire is
recognized by the vehicle, especially on
slippery roads. Adjust driving to reduce
possible wheel slip.
Caution
When the compact spare is installed, do
not take the vehicle through an
automatic car wash with guide rails. The
compact spare can get caught on the rails
which can damage the tire, wheel, and
other parts of the vehicle.
Do not use the compact spare on other
vehicles.
Do not mix the compact spare tire or wheel
with other wheels or tires. They will not fit.
Keep the spare tire and its wheel together.
Page 317 of 369
Chevrolet Traverse Owner Manual (GMNA-Localizing-U.S./Canada/Mexico-
16411537) - 2023 - CRC - 3/28/22
316 Vehicle Care
Caution
Do not tow a vehicle with the front drive
wheels on the ground if one of the front
tires is a compact spare tire. Towing with
two different tire sizes on the front of
the vehicle can cause severe damage to
the transmission.
To dinghy tow: 1. Position the front of the vehicle being towed—with all four wheels on the
ground—behind the towing vehicle.
2. Secure it to the towing vehicle.
3. Put the vehicle in N (Neutral).
4. Shut engine off (vehicle will remain in accessory mode).
5. Disconnect the negative (-) terminal connector from the 12-volt battery.
6. Close the hood of the vehicle.
Caution
If the vehicle is towed without
performing each of the steps listed under
“Dinghy Towing,” the automatic
transmission could be damaged. Be sure
(Continued)
Caution (Continued)
to follow all steps of the dinghy towing
procedure prior to and after towing the
vehicle.
Caution
If 105 km/h (65 mph) is exceeded while
towing the vehicle, it could be damaged.
Never exceed 105 km/h (65 mph) while
towing the vehicle.
Once the destination is reached: 1. Shift the vehicle to P (Park).
2. Reconnect the negative (-) terminal connector to the 12-volt battery.
3. Start the engine and let it idle for more than three minutes before driving the
vehicle.
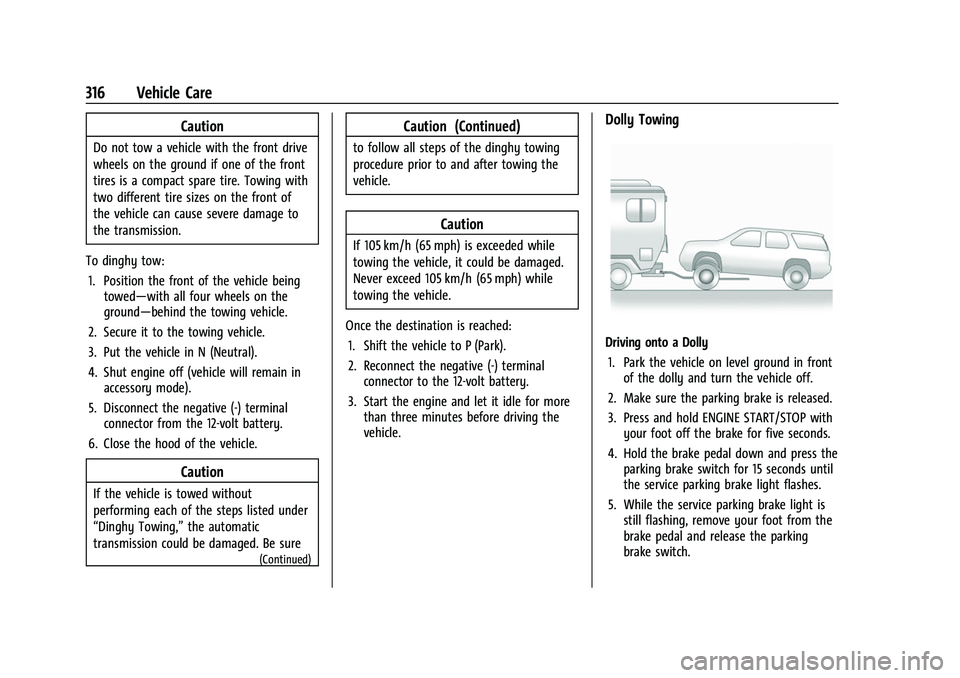
Dolly Towing
Driving onto a Dolly
1. Park the vehicle on level ground in front of the dolly and turn the vehicle off.
2. Make sure the parking brake is released.
3. Press and hold ENGINE START/STOP with your foot off the brake for five seconds.
4. Hold the brake pedal down and press the parking brake switch for 15 seconds until
the service parking brake light flashes.
5. While the service parking brake light is still flashing, remove your foot from the
brake pedal and release the parking
brake switch.
Page 360 of 369
Chevrolet Traverse Owner Manual (GMNA-Localizing-U.S./Canada/Mexico-
16411537) - 2023 - CRC - 3/28/22
Index 359
Cleaning (cont'd)Interior Care . . . . . . . . . . . . . . . . . . . . . . . . . . . 321
Climate Control Systems Dual Automatic . . . . . . . . . . . . . . . . . . . . . . . . 180
Rear . . . . . . . . . . . . . . . . . . . . . . . . . . . . . . . . . . . 184
Clock . . . . . . . . . . . . . . . . . . . . . . . . . . . . . . . . . . . . . 93
Cluster, Instrument . . . . . . . . . . . . . . .97, 99, 102
Collision Damage Repair . . . . . . . . . . . . . . . . . 344
Compact Spare Tire . . . . . . . . . . . . . . . . . . . . . . 310
Compartments Storage . . . . . . . . . . . . . . . . . . . . . . . . . . . . . . . . . 84
Compass . . . . . . . . . . . . . . . . . . . . . . . . . . . . . . . . . . 93
Connected Services
Connections . . . . . . . . . . . . . . . . . . . . . . . . . . . 354
Diagnostics . . . . . . . . . . . . . . . . . . . . . . . . . . . . 356
Navigation . . . . . . . . . . . . . . . . . . . . . . . . . . . . . 354
Connections Connected Services . . . . . . . . . . . . . . . . . . . . 354
Control Traction and Electronic Stability . . . . . . . 212
Control of a Vehicle . . . . . . . . . . . . . . . . . . . . . 188
Controls
Steering Wheel . . . . . . . . . . . . . . . . . . . . . . . . 134
Convex Mirrors . . . . . . . . . . . . . . . . . . . . . . . . . . . 26
Coolant Engine Temperature Gauge . . . . . . . . . . . . 106
Cooling . . . . . . . . . . . . . . . . . . . . . . . . . . . . . 180, 184
Cooling System . . . . . . . . . . . . . . . . . . . . . . . . . . 265 Courtesy Lamps . . . . . . . . . . . . . . . . . . . . . . . . . . 129
Courtesy Transportation Program . . . . . . . . 343
Coverage Explanations . . . . . . . . . . . . . . . . . . . . 155
Cruise Control . . . . . . . . . . . . . . . . . . . . . . . . . . . 216
Adaptive . . . . . . . . . . . . . . . . . . . . . . . . . . . . . . . 218
Light . . . . . . . . . . . . . . . . . . . . . . . . . . . . . . . . . . . . 116
Customer Assistance
Offices . . . . . . . . . . . . . . . . . . . . . . . . . . . . . . . . . 340
Text Telephone (TTY) Users . . . . . . . . . . . . 340
Customer Information Publications Ordering Information . . . . . 345
Customer Satisfaction Procedure . . . . . . . . . 338
Cybersecurity . . . . . . . . . . . . . . . . . . . . . . . . . . . . 347
D
Damage Repair, Collision . . . . . . . . . . . . . . . . . 344
Danger, Warning, and Caution . . . . . . . . . . . . . .2
Dashboard . . . . . . . . . . . . . . . . . . . . . . . . . . . . . . . . . 4
Data Collection Infotainment System . . . . . . . . . . . . . . . . . . 348
OnStar . . . . . . . . . . . . . . . . . . . . . . . . . . . . . . . . . 348
Data Recorders, Event . . . . . . . . . . . . . . . . . . . 348
Database Coverage Explanations . . . . . . . . . . 155
Daytime Running Lamps (DRL) . . . . . . . . . . . . 127
Defensive Driving . . . . . . . . . . . . . . . . . . . . . . . . 188
Delayed Locking . . . . . . . . . . . . . . . . . . . . . . . . . . . 17
Destination . . . . . . . . . . . . . . . . . . . . . . . . . . . . . . 148 Diagnostics
Connected Services . . . . . . . . . . . . . . . . . . . . 356
Disabled Vehicle Transporting . . . . . . . . . . . . . . . . . . . . . . . . . . . 313
Distracted Driving . . . . . . . . . . . . . . . . . . . . . . . . .187
Dome Lamps . . . . . . . . . . . . . . . . . . . . . . . . . . . . . 129
Door Ajar Light . . . . . . . . . . . . . . . . . . . . . . . . . . . . . . . 116
Delayed Locking . . . . . . . . . . . . . . . . . . . . . . . . . 17
Locks . . . . . . . . . . . . . . . . . . . . . . . . . . . . . . . . . . . . 15
Power Locks . . . . . . . . . . . . . . . . . . . . . . . . . . . . . 17
Drive Belt Routing, Engine . . . . . . . . . . . . . . . 337
Drive Systems All-Wheel Drive . . . . . . . . . . . . . . . . . . . 209, 272
Driver Assistance Systems . . . . . . . . . . . . . . . . . . . . 226
Information Center (DIC) . . . . . . . . . . . 117, 119
Mode Control . . . . . . . . . . . . . . . . . . . . . . . . . . 214
Mode Control Light . . . . . . . . . . . . . . . . . . . . . 114
Teen . . . . . . . . . . . . . . . . . . . . . . . . . . . . . . . . . . . 170
Driving
Assistance Systems . . . . . . . . . . . . . . . . . . . . 233
Better Fuel Economy . . . . . . . . . . . . . . . . . . . 187
Characteristics and Towing Tips . . . . . . . . 245
Defensive . . . . . . . . . . . . . . . . . . . . . . . . . . . . . . 188
Distracted . . . . . . . . . . . . . . . . . . . . . . . . . . . . . 187
Hill and Mountain Roads . . . . . . . . . . . . . . 194
If the Vehicle is Stuck . . . . . . . . . . . . . . . . . 196
Page 366 of 369
Chevrolet Traverse Owner Manual (GMNA-Localizing-U.S./Canada/Mexico-
16411537) - 2023 - CRC - 3/28/22
Index 365
Retained Accessory Power (RAP) . . . . . . . . . 204
Reverse Tilt Mirrors . . . . . . . . . . . . . . . . . . . . . . . 28
RoadsDriving, Wet . . . . . . . . . . . . . . . . . . . . . . . . . . . 193
Roadside Assistance Program . . . . . . . . . . . . .341
Roof Rack System . . . . . . . . . . . . . . . . . . . . . . . . . . . . 87
Sunroof . . . . . . . . . . . . . . . . . . . . . . . . . . . . . . . . . 33
Rotation, Tires . . . . . . . . . . . . . . . . . . . . . . . . . . . 298
Routing, Engine Drive Belt . . . . . . . . . . . . . . . 337
Running the Vehicle While Parked . . . . . . . 207
S
Safety Locks . . . . . . . . . . . . . . . . . . . . . . . . . . . . . . . . . . . 18
Safety Defects Reporting Canadian Government . . . . . . . . . . . . . . . . . 346
General Motors . . . . . . . . . . . . . . . . . . . . . . . . 347
U.S. Government . . . . . . . . . . . . . . . . . . . . . . . 346
Safety System Check . . . . . . . . . . . . . . . . . . . . . 54
Satellite Radio . . . . . . . . . . . . . . . . . . . . . . . . . . . 140
Scheduling Appointments . . . . . . . . . . . . . . . . 342
Seat Belts . . . . . . . . . . . . . . . . . . . . . . . . . . . . . . . . . 48 Buckle To Drive . . . . . . . . . . . . . . . . . . . . . . . . . 49
Care . . . . . . . . . . . . . . . . . . . . . . . . . . . . . . . . . . . . 55
Extender . . . . . . . . . . . . . . . . . . . . . . . . . . . . . . . . 54
How to Wear Seat Belts Properly . . . . . . . 49
Lap-Shoulder Belt . . . . . . . . . . . . . . . . . . . . . . . . 51 Seat Belts (cont'd)
Reminders . . . . . . . . . . . . . . . . . . . . . . . . . . . . . 107
Replacing after a Crash . . . . . . . . . . . . . . . . . 55
Use During Pregnancy . . . . . . . . . . . . . . . . . . 54
Seats Adjustment, Front . . . . . . . . . . . . . . . . . . . . . . 37
Head Restraints . . . . . . . . . . . . . . . . . . . . . . . . . 35
Heated and Ventilated, Front . . . . . . . . . . . 42
Heated, Rear . . . . . . . . . . . . . . . . . . . . . . . . . . . . 46
Lumbar Adjustment, Front . . . . . . . . . . . . . . 39
Memory . . . . . . . . . . . . . . . . . . . . . . . . . . . . . . . . 39
Power Adjustment, Front . . . . . . . . . . . . . . . 37
Rear . . . . . . . . . . . . . . . . . . . . . . . . . . . . . . . . . . . . 43
Reclining Seatbacks . . . . . . . . . . . . . . . . . . . . . 38
Third Row Seat . . . . . . . . . . . . . . . . . . . . . . . . . 46
Securing Child Restraints . . . . . . . . . . . . . . . 79, 81
Security
Light . . . . . . . . . . . . . . . . . . . . . . . . . . . . . . . . . . . . 115
OnStar . . . . . . . . . . . . . . . . . . . . . . . . . . . . . . . . . 350
Vehicle . . . . . . . . . . . . . . . . . . . . . . . . . . . . . . . . . 25
Vehicle Alarm . . . . . . . . . . . . . . . . . . . . . . . . . . . 25
Service . . . . . . . . . . . . . . . . . . . . . . . . . . . . . . . . . . . .185 Accessories and Modifications . . . . . . . . . 258
Doing Your Own Work . . . . . . . . . . . . . . . . . 258
Electric Parking Brake Light . . . . . . . . . . . . . 111
Maintenance Records . . . . . . . . . . . . . . . . . . 333
Maintenance, General Information . . . . . 326
Parts Identification . . . . . . . . . . . . . . . . . . . . . 334 Service (cont'd)
Scheduling Appointments . . . . . . . . . . . . . . 342
Services Special Application . . . . . . . . . . . . . . . . . . . . . 330
Servicing System . . . . . . . . . . . . . . . . . . . . . . . . . 155
Servicing the Airbag . . . . . . . . . . . . . . . . . . . . . . 64
Settings . . . . . . . . . . . . . . . . . . . . . . . . . . . . . . . . . . 166
Shifting Into Park . . . . . . . . . . . . . . . . . . . . . . . . . . . . . . 205
Out of Park . . . . . . . . . . . . . . . . . . . . . . . . . . . . 205
Side Blind Zone Alert (SBZA) . . . . . . . . . . . . . 238
Signals, Turn and Lane-Change . . . . . . . . . . . .128
Software Updates . . . . . . . . . . . . . . . . . . . . . . . . .138
Spare Tire Compact . . . . . . . . . . . . . . . . . . . . . . . . . . . . . . . 310
Special Application Services . . . . . . . . . . . . . . 330
Specifications and Capacities . . . . . . . . . . . . . 335
Speedometer . . . . . . . . . . . . . . . . . . . . . . . . . . . . 104
StabiliTrak
OFF Light . . . . . . . . . . . . . . . . . . . . . . . . . . . . . . . 113
Start Assist, Hill . . . . . . . . . . . . . . . . . . . . . . . . . . . 212
Start Vehicle, Remote . . . . . . . . . . . . . . . . . . . . . .14
Starting the Engine . . . . . . . . . . . . . . . . . . . . . . 201
Steering . . . . . . . . . . . . . . . . . . . . . . . . . . . . . . . . . 189
Heated Wheel . . . . . . . . . . . . . . . . . . . . . . . . . . 90
Wheel Adjustment . . . . . . . . . . . . . . . . . . . . . . 90
Wheel Controls . . . . . . . . . . . . . . . . . . . . . . . . 134
Stop/Start System . . . . . . . . . . . . . . . . . . . . . . . 202