tow CHEVROLET TRAX 2020 Owners Manual
[x] Cancel search | Manufacturer: CHEVROLET, Model Year: 2020, Model line: TRAX, Model: CHEVROLET TRAX 2020Pages: 355, PDF Size: 5.75 MB
Page 18 of 355
Chevrolet TRAX Owner Manual (GMNA-Localizing-U.S./Canada/Mexico-
13556235) - 2020 - CRC - 9/19/19
Keys, Doors, and Windows 17
3. Remove the battery by pushingon the battery and sliding it
toward the bottom of the
transmitter.
4. Insert the new battery, positive side facing the back cover.
Push the battery down until it is
held in place. Replace with a
CR2032 or equivalent battery.
5. Snap the battery cover back on to the transmitter.
6. Reinsert the key.
Remote Keyless Entry
(RKE) System Operation
(Key Access)
The RKE transmitter may work up to
60 m (197 ft) away from the vehicle.
Other conditions can affect the
performance of the transmitter. See
Remote Keyless Entry (RKE)
System 010.
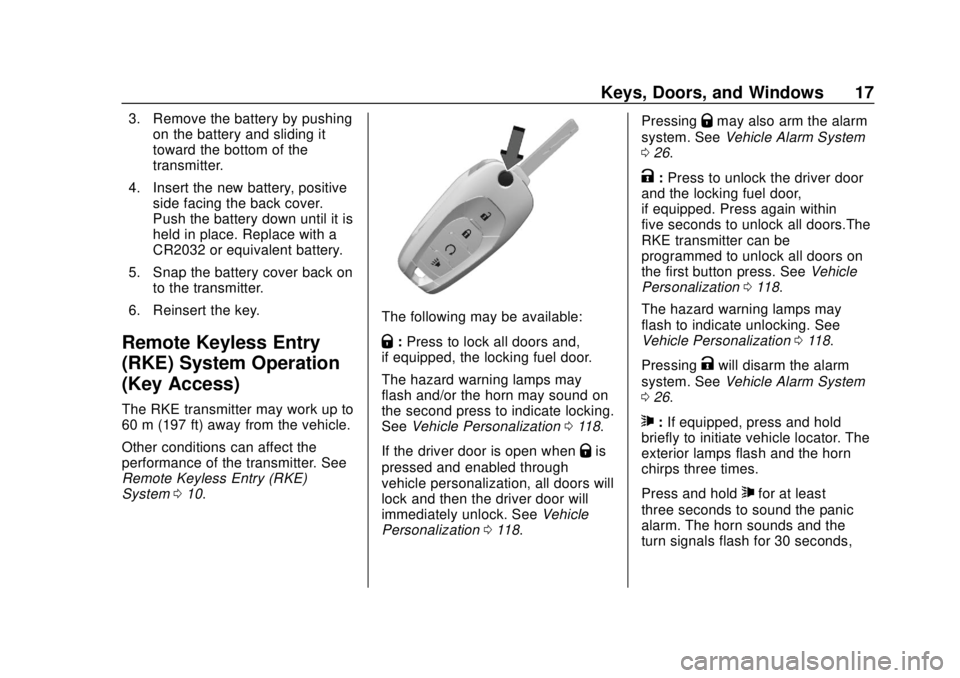
The following may be available:
Q:Press to lock all doors and,
if equipped, the locking fuel door.
The hazard warning lamps may
flash and/or the horn may sound on
the second press to indicate locking.
See Vehicle Personalization 0118.
If the driver door is open when
Qis
pressed and enabled through
vehicle personalization, all doors will
lock and then the driver door will
immediately unlock. See Vehicle
Personalization 0118. Pressing
Qmay also arm the alarm
system. See Vehicle Alarm System
0 26.
K:Press to unlock the driver door
and the locking fuel door,
if equipped. Press again within
five seconds to unlock all doors.The
RKE transmitter can be
programmed to unlock all doors on
the first button press. See Vehicle
Personalization 0118.
The hazard warning lamps may
flash to indicate unlocking. See
Vehicle Personalization 0118.
Pressing
Kwill disarm the alarm
system. See Vehicle Alarm System
0 26.
7:If equipped, press and hold
briefly to initiate vehicle locator. The
exterior lamps flash and the horn
chirps three times.
Press and hold
7for at least
three seconds to sound the panic
alarm. The horn sounds and the
turn signals flash for 30 seconds,
Page 21 of 355

Chevrolet TRAX Owner Manual (GMNA-Localizing-U.S./Canada/Mexico-
13556235) - 2020 - CRC - 9/19/19
20 Keys, Doors, and Windows
1. Separate the two halves of thetransmitter by inserting a flat
tool into the recess of the
transmitter.
2. Remove the battery with asmall tool by pushing it toward
the top of the transmitter.
3. Insert a new battery, positive side up, pushing it down until it
is held in place. Use a CR
2032 or equivalent battery.
4. Snap the battery cover back on to the transmitter.
Remote Vehicle Start
The vehicle may have this feature
that allows you to start the engine
from outside the vehicle.
/:This button will be on the RKE
transmitter if the vehicle has remote
start.
The climate control system will use
the previous settings during a
remote start. The rear window
defogger may come on during a
remote start based on cold ambient
conditions. The rear window
defogger indicator light does not
come on during a remote start. If the
vehicle has heated seats, they may
come on during a remote start. See
Heated Front Seats 040.
Laws in some local communities
may restrict the use of remote
starters. For example, some laws
require a person using remote start
to have the vehicle in view. Check
local regulations for any
requirements.
Do not use the remote start feature
if the vehicle is low on fuel. The
vehicle could run out of fuel. Other conditions can affect the
performance of the transmitter. See
Remote Keyless Entry (RKE)
System
010.
Starting the Vehicle
To start the engine using the remote
start feature:
1. Press and release
Q.
2. Immediately after completing Step 1, press and hold
/for at
least four seconds or until the
turn signal lamps flash. The
turn signal lamps flashing
confirms the request to remote
start the vehicle has been
received.
When the engine starts, the parking
lamps will turn on and remain on as
long as the engine is running. The
doors will be locked and the climate
control system may come on.
The engine will continue to run for
15 minutes. After 30 seconds,
repeat the steps if a 15-minute
extension is desired. Remote start
can be extended only once. Turn
the ignition on before driving.
Page 31 of 355

Chevrolet TRAX Owner Manual (GMNA-Localizing-U.S./Canada/Mexico-
13556235) - 2020 - CRC - 9/19/19
30 Keys, Doors, and Windows
Power Mirrors
To adjust the mirrors:1. Turn the selector switch to L (Left) or R (Right) to choose
the driver or passenger mirror.
2. Move the control to adjust the mirror.
3. Turn the selector switch to
(to
deselect the mirror.
Folding Mirrors
Manual Folding Mirrors
If equipped, the outside mirrors can
be folded inward to prevent
damage. To fold, pull the mirror
toward the vehicle. Push the mirror
outward to return it to the original
position.
Heated Mirrors
1: If equipped, press to heat the
mirrors.
See “Rear Window Defogger” under
Climate Control Systems 0155.
Interior Mirrors
Interior Rearview Mirrors
Adjust the rearview mirror for a clear
view of the area behind your
vehicle.
If equipped with OnStar, the vehicle
may have three control buttons at
the bottom of the mirror. See OnStar
Overview 0331.
To avoid accidental OnStar calls,
clean the mirror with the ignition off.
Do not spray glass cleaner directly
on the mirror. Use a soft towel
dampened with water.
Manual Rearview Mirror
If equipped with a manual rearview
mirror, push the tab forward for
daytime use and pull it for nighttime
use to avoid glare from the
headlamps from behind.
Page 42 of 355
Chevrolet TRAX Owner Manual (GMNA-Localizing-U.S./Canada/Mexico-
13556235) - 2020 - CRC - 9/19/19
Seats and Restraints 41
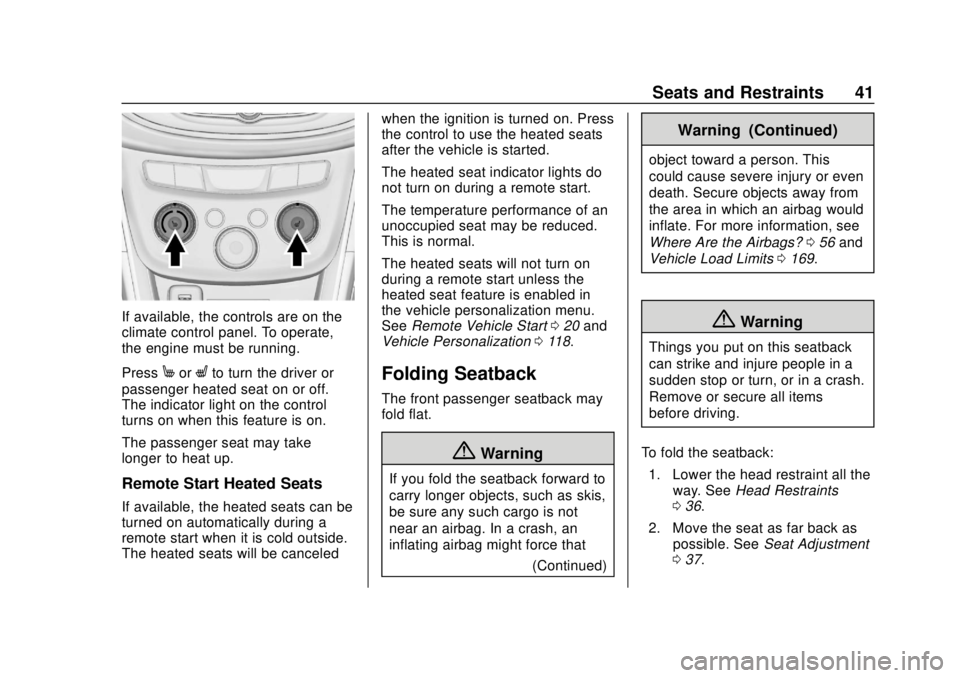
If available, the controls are on the
climate control panel. To operate,
the engine must be running.
Press
MorLto turn the driver or
passenger heated seat on or off.
The indicator light on the control
turns on when this feature is on.
The passenger seat may take
longer to heat up.
Remote Start Heated Seats
If available, the heated seats can be
turned on automatically during a
remote start when it is cold outside.
The heated seats will be canceled when the ignition is turned on. Press
the control to use the heated seats
after the vehicle is started.
The heated seat indicator lights do
not turn on during a remote start.
The temperature performance of an
unoccupied seat may be reduced.
This is normal.
The heated seats will not turn on
during a remote start unless the
heated seat feature is enabled in
the vehicle personalization menu.
See
Remote Vehicle Start 020 and
Vehicle Personalization 0118.
Folding Seatback
The front passenger seatback may
fold flat.
{Warning
If you fold the seatback forward to
carry longer objects, such as skis,
be sure any such cargo is not
near an airbag. In a crash, an
inflating airbag might force that
(Continued)
Warning (Continued)
object toward a person. This
could cause severe injury or even
death. Secure objects away from
the area in which an airbag would
inflate. For more information, see
Where Are the Airbags? 056 and
Vehicle Load Limits 0169.
{Warning
Things you put on this seatback
can strike and injure people in a
sudden stop or turn, or in a crash.
Remove or secure all items
before driving.
To fold the seatback: 1. Lower the head restraint all the way. See Head Restraints
0 36.
2. Move the seat as far back as possible. See Seat Adjustment
0 37.
Page 44 of 355
Chevrolet TRAX Owner Manual (GMNA-Localizing-U.S./Canada/Mexico-
13556235) - 2020 - CRC - 9/19/19
Seats and Restraints 43
the vehicle through the rear door
and left the vehicle without the
vehicle being shut off.
The feature can be turned on or off.
SeeVehicle Personalization 0118.
Folding the Seatback
Either side of the seatback can be
folded down for more cargo space.
Fold a seatback only when the
vehicle is not moving.
Caution
Folding a rear seat with the seat
belts still fastened may cause
damage to the seat or the seat
belts. Always unbuckle the seat
belts and return them to their
normal stowed position before
folding a rear seat.
Caution
Folding the rear seatback prior to
tilting the seat cushion forward
may damage the rear seat.
Always tilt the rear seat cushion
forward before folding the
seatback.
To fold a seatback down: 1. Make sure the floor area in front of the rear seats is clear.
2. Fully lower the head restraint. See Head Restraints 036.
3. Slide the front seats forward and place the front seatbacks
in the upright position. See
Seat Adjustment 037 and
Reclining Seatbacks 039.
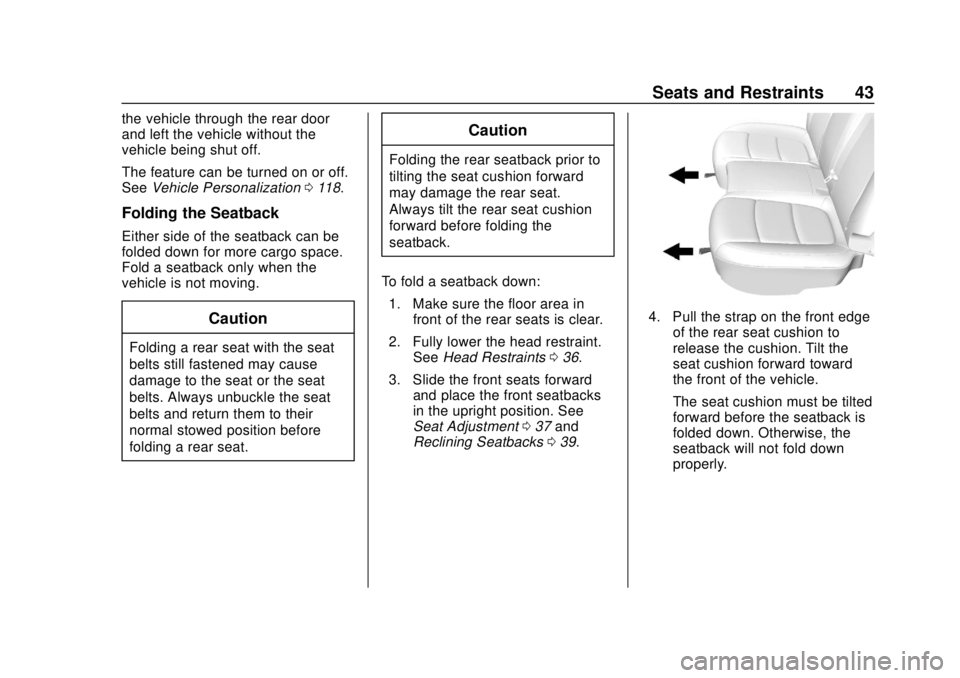
4. Pull the strap on the front edge
of the rear seat cushion to
release the cushion. Tilt the
seat cushion forward toward
the front of the vehicle.
The seat cushion must be tilted
forward before the seatback is
folded down. Otherwise, the
seatback will not fold down
properly.
Page 51 of 355
Chevrolet TRAX Owner Manual (GMNA-Localizing-U.S./Canada/Mexico-
13556235) - 2020 - CRC - 9/19/19
50 Seats and Restraints
{Warning
The seat belt can be pinched if it
is routed under plastic trim on the
seat, such as trim around the rear
seatback folding handle or side
airbag. In a crash, pinched seat
belts might not be able to provide
adequate protection. Never allow
seat belts to be routed under
plastic trim pieces.
Lap-Shoulder Belt
All seating positions in the vehicle
have a lap-shoulder belt.
The following instructions explain
how to wear a lap-shoulder belt
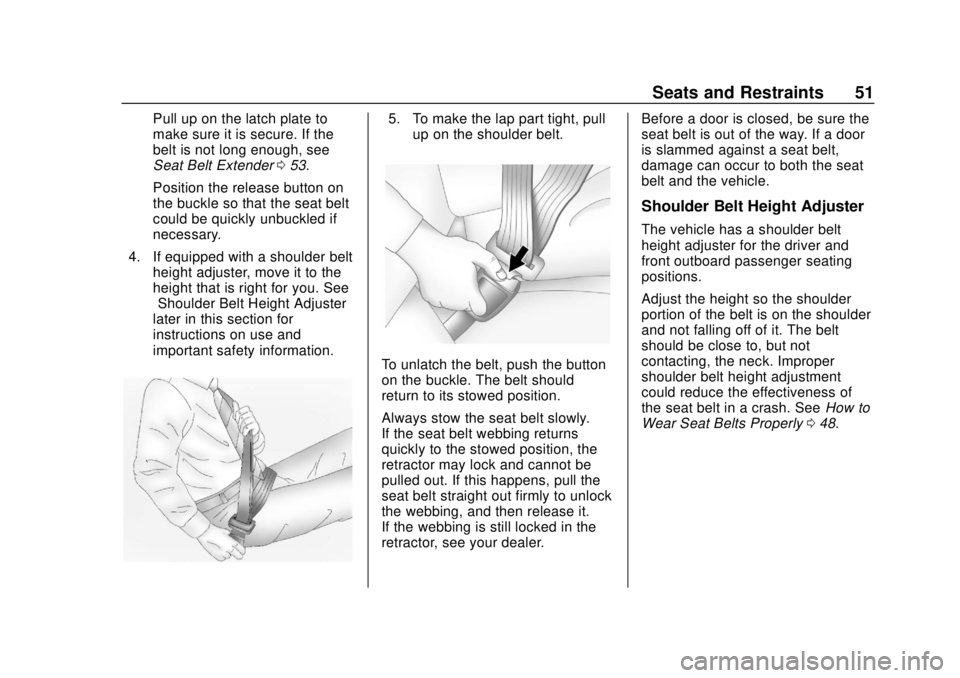
properly.1. Adjust the seat, if the seat is adjustable, so you can sit up
straight. To see how, see
“Seats” in the Index.
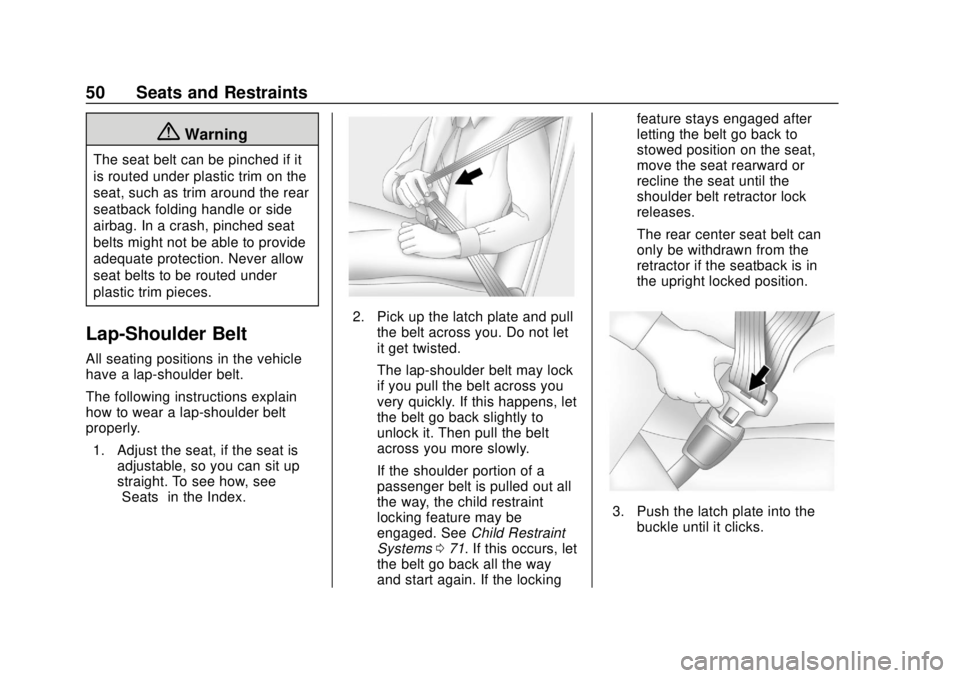
2. Pick up the latch plate and pull
the belt across you. Do not let
it get twisted.
The lap-shoulder belt may lock
if you pull the belt across you
very quickly. If this happens, let
the belt go back slightly to
unlock it. Then pull the belt
across you more slowly.
If the shoulder portion of a
passenger belt is pulled out all
the way, the child restraint
locking feature may be
engaged. See Child Restraint
Systems 071. If this occurs, let
the belt go back all the way
and start again. If the locking feature stays engaged after
letting the belt go back to
stowed position on the seat,
move the seat rearward or
recline the seat until the
shoulder belt retractor lock
releases.
The rear center seat belt can
only be withdrawn from the
retractor if the seatback is in
the upright locked position.
3. Push the latch plate into the
buckle until it clicks.
Page 52 of 355
Chevrolet TRAX Owner Manual (GMNA-Localizing-U.S./Canada/Mexico-
13556235) - 2020 - CRC - 9/19/19
Seats and Restraints 51
Pull up on the latch plate to
make sure it is secure. If the
belt is not long enough, see
Seat Belt Extender053.
Position the release button on
the buckle so that the seat belt
could be quickly unbuckled if
necessary.
4. If equipped with a shoulder belt height adjuster, move it to the
height that is right for you. See
“Shoulder Belt Height Adjuster”
later in this section for
instructions on use and
important safety information.5. To make the lap part tight, pullup on the shoulder belt.
To unlatch the belt, push the button
on the buckle. The belt should
return to its stowed position.
Always stow the seat belt slowly.
If the seat belt webbing returns
quickly to the stowed position, the
retractor may lock and cannot be
pulled out. If this happens, pull the
seat belt straight out firmly to unlock
the webbing, and then release it.
If the webbing is still locked in the
retractor, see your dealer. Before a door is closed, be sure the
seat belt is out of the way. If a door
is slammed against a seat belt,
damage can occur to both the seat
belt and the vehicle.
Shoulder Belt Height Adjuster
The vehicle has a shoulder belt
height adjuster for the driver and
front outboard passenger seating
positions.
Adjust the height so the shoulder
portion of the belt is on the shoulder
and not falling off of it. The belt
should be close to, but not
contacting, the neck. Improper
shoulder belt height adjustment
could reduce the effectiveness of
the seat belt in a crash. See
How to
Wear Seat Belts Properly 048.
Page 60 of 355
Chevrolet TRAX Owner Manual (GMNA-Localizing-U.S./Canada/Mexico-
13556235) - 2020 - CRC - 9/19/19
Seats and Restraints 59
Roof-rail airbags are designed to
inflate in moderate to severe side
crashes depending on the location
of the impact. In addition, these
roof-rail airbags are designed to
inflate during a rollover or in a
severe frontal impact. Roof-rail
airbags are not designed to inflate in
rear impacts. Both roof-rail airbags
will inflate when either side of the
vehicle is struck, if the sensing
system predicts that the vehicle is
about to roll over on its side, or in a
severe frontal impact.
In any particular crash, no one can
say whether an airbag should have
inflated simply because of the
vehicle damage or the repair costs.
What Makes an Airbag
Inflate?
In a deployment event, the sensing
system sends an electrical signal
triggering a release of gas from the
inflator. Gas from the inflator fills the
airbag causing the bag to break out
of the cover. The inflator, the airbag,
and related hardware are all part of
the airbag module.For airbag locations, see
Where Are
the Airbags? 056.
How Does an Airbag
Restrain?
In moderate to severe frontal or
near frontal collisions, even belted
occupants can contact the steering
wheel or the instrument panel. In
moderate to severe side collisions,
even belted occupants can contact
the inside of the vehicle.
Airbags supplement the protection
provided by seat belts by
distributing the force of the impact
more evenly over the
occupant's body.
Rollover capable roof-rail airbags,
if equipped, are designed to help
contain the head and chest of
occupants in the outboard seating
positions in the first and second
rows. The rollover capable roof-rail
airbags are designed to help reduce
the risk of full or partial ejection in
rollover events, although no system
can prevent all such ejections. But airbags would not help in many
types of collisions, primarily
because the occupant's motion is
not toward those airbags. See
When
Should an Airbag Inflate? 058.
Airbags should never be regarded
as anything more than a supplement
to seat belts.
What Will You See after
an Airbag Inflates?
After frontal and seat-mounted side
impact airbags inflate, they quickly
deflate, so quickly that some people
may not even realize the airbags
inflated. Roof-rail airbags may still
be at least partially inflated for some
time after they inflate. Some
components of the airbag module
may be hot for several minutes. For
location of the airbags, see Where
Are the Airbags? 056.
The parts of the airbag that come
into contact with you may be warm,
but not too hot to touch. There may
be some smoke and dust coming
from the vents in the deflated
airbags. Airbag inflation does not
Page 65 of 355

Chevrolet TRAX Owner Manual (GMNA-Localizing-U.S./Canada/Mexico-
13556235) - 2020 - CRC - 9/19/19
64 Seats and Restraints
1. Turn the vehicle off.
2. Remove any additional materialfrom the seat, such as
blankets, cushions, seat
covers, seat heaters, or seat
massagers.
3. Place the seatback in the fully upright position.
4. Have the person sit upright in the seat, centered on the seat
cushion, with legs comfortably
extended.
5. Restart the vehicle and have the person remain in this
position for two to
three minutes after the ON
indicator is lit.
{Warning
If the front outboard passenger
airbag is turned off for an
adult-sized occupant, the airbag
will not be able to inflate and help
protect that person in a crash,
resulting in an increased risk of
(Continued)
Warning (Continued)
serious injury or even death. An
adult-sized occupant should not
ride in the front outboard
passenger seat, if the passenger
airbag OFF indicator is lit.
Additional Factors Affecting
System Operation
Seat belts help keep the passenger
in position on the seat during
vehicle maneuvers and braking,
which helps the passenger sensing
system maintain the passenger
airbag status. See“Seat Belts”and
“Child Restraints” in the Index for
additional information about the
importance of proper restraint use.
A thick layer of additional material,
such as a blanket or cushion,
or aftermarket equipment such as
seat covers, seat heaters, and seat
massagers can affect how well the
passenger sensing system
operates. We recommend that you
not use seat covers or other
aftermarket equipment except when approved by GM for your specific
vehicle. See
Adding Equipment to
the Airbag-Equipped Vehicle 065
for more information about
modifications that can affect how
the system operates.
The ON indicator may be lit if an
object, such as a briefcase,
handbag, grocery bag, laptop,
or other electronic device, is put on
an unoccupied seat. If this is not
desired, remove the object from
the seat.
{Warning
Stowing articles under the
passenger seat or between the
passenger seat cushion and
seatback may interfere with the
proper operation of the passenger
sensing system.
Servicing the
Airbag-Equipped Vehicle
Airbags affect how the vehicle
should be serviced. There are parts
of the airbag system in several
Page 79 of 355
Chevrolet TRAX Owner Manual (GMNA-Localizing-U.S./Canada/Mexico-
13556235) - 2020 - CRC - 9/19/19
78 Seats and Restraints
Warning (Continued)
Attaching more than one child
restraint to a single anchor could
cause the anchor or attachment
to come loose or even break
during a crash. A child or others
could be injured.
{Warning
Children can be seriously injured
or strangled if a shoulder belt is
wrapped around their neck. The
shoulder belt can tighten but
cannot be loosened if it is locked.
The shoulder belt locks when it is
pulled all the way out of the
retractor. It unlocks when the
shoulder belt is allowed to go all
the way back into the retractor,
but it cannot do this if it is
wrapped around a child’s neck.
If the shoulder belt is locked and(Continued)
Warning (Continued)
tightened around a child’s neck,
the only way to loosen the belt is
to cut it.
Buckle any unused seat belts
behind the child restraint so
children cannot reach them. Pull
the shoulder belt all the way out
of the retractor to set the lock,
and tighten the belt behind the
child restraint after the child
restraint has been installed.
Caution
Do not let the LATCH
attachments rub against the
vehicle’s seat belts. This may
damage these parts. If necessary,
move buckled seat belts to avoid
rubbing the LATCH attachments.(Continued)
Caution (Continued)
Do not fold the rear seatback
when the seat is occupied. Do not
fold the empty rear seat with a
seat belt buckled. This could
damage the seat belt or the seat.
Unbuckle and return the seat belt
to its stowed position, before
folding the seat.
If you need to secure more than one
child restraint in the rear seat, see
Where to Put the Restraint 072.
1. Attach and tighten the lower attachments to the lower
anchors. If the child restraint
does not have lower
attachments or the desired
seating position does not have
lower anchors, secure the child
restraint with the top tether and
the seat belt. Refer to the child
restraint manufacturer
instructions and the
instructions in this manual.