brake fluid CHEVROLET TRAX 2024 Owners Manual
[x] Cancel search | Manufacturer: CHEVROLET, Model Year: 2024, Model line: TRAX, Model: CHEVROLET TRAX 2024Pages: 328, PDF Size: 7.3 MB
Page 95 of 328

Chevrolet TRAX Owner Manual (GMNA-Localizing-U.S./Canada/Mexico-
17041293) - 2024 - CRC - 12/2/22
94 Instruments and Controls
warmed up. If this occurs, change the fuel
brand. It may require at least one full
tank of the proper fuel to turn the light
off. SeeRecommended Fuel 0211.
If the light remains on, see your dealer.
Emissions Inspection and Maintenance
Programs
If the vehicle requires an Emissions
Inspection/Maintenance test, the test
equipment will likely connect to the
vehicle's Data Link Connector (DLC).
The DLC is under the instrument panel to
the left of the steering wheel. Connecting
devices that are not used to perform an
Emissions Inspection/Maintenance test or to
service the vehicle may affect vehicle
operation. See Add-On Electrical Equipment
0 214. See your dealer if assistance is
needed. The vehicle may not pass inspection if:
.The light is on when the engine is
running.
.The light does not come on when the
ignition is on while the engine is off.
.Critical emission control systems have not
been completely diagnosed. If this
happens, the vehicle would not be ready
for inspection and might require
several days of routine driving before the
system is ready for inspection. This can
happen if the 12-volt battery has recently
been replaced or run down, or if the
vehicle has been recently serviced.
See your dealer if the vehicle will not pass
or cannot be made ready for the test.
Brake System Warning Light
MetricEnglish This light comes on briefly when the vehicle
is turned on to show that the light is
working. If it does not come on then, have
it fixed so it will be ready to warn you if
there is a problem.
When the vehicle is on, the brake system
warning light also comes on when the
parking brake is set. The light stays on if
the parking brake does not fully release. If it
stays on after the parking brake is fully
released, there is a brake problem. Have the
brake system inspected right away. This
light may come on if the brake fluid is low.
See
Brake Fluid 0230.
If the light comes on while driving, pull off
the road and stop carefully. The brake pedal
might be harder to push, or the brake pedal
may go closer to the floor. It could take
longer to stop. If the light is still on, have
the vehicle towed for service. See
Transporting a Disabled Vehicle 0274.
{Warning
The brake system might not be working
properly if the brake system warning
light is on. Driving with the brake system
warning light on can lead to a crash.
If the light is still on after the vehicle has
(Continued)
Page 107 of 328
Chevrolet TRAX Owner Manual (GMNA-Localizing-U.S./Canada/Mexico-
17041293) - 2024 - CRC - 12/2/22
106 Instruments and Controls
When selected, Show in Cluster may be
chosen in the dialog.
Oil Temperature :Displays the current oil
temperature in either degrees Celsius (°C) or
degrees Fahrenheit (°F).
When selected, Show in Cluster may be
chosen in the dialog.
Engine Hours : Displays the total number of
hours the engine has run.
When selected, Show in Cluster may be
chosen in the dialog.
Trip
Trip Information : Trip 1 or 2 displays the
current distance traveled, in either
kilometers (km) or miles (mi), since the trip
odometer was last reset.
Average Fuel Economy displays the
approximate average liters per
100 kilometers (L/100 km) or miles per
gallon (mpg). This number is calculated
based on the number of L/100 km (mpg)
recorded since the last time this menu item
was reset. This number reflects only the
current, approximate average fuel economy
and changes as driving conditions change. To reset these values, touch reset on the
touchscreen display when the Trip
Information dialog is selected.
When selected, the following options may
be chosen in the dialog: Reset Trip 1, Reset
Trip 2, and Show in Cluster.
Fuel Economy :
Displays average fuel
economy, the best fuel economy over the
selected distance, and a bar graph showing
instantaneous fuel economy. Values are
displayed in liters per 100 kilometers
(L/100 km) or miles per gallon (mpg). This
number reflects only the approximate fuel
economy and changes frequently as driving
conditions change. Only the best score can
be reset.
If the vehicle is equipped with an Active Fuel
Management indicator, the engine operating
mode may be shown in the bottom corner
of this display.
When selected, the following options may
be chosen in the dialog: Change Distance,
Reset Best Score, and Show in Cluster. The
distance for average fuel economy and the
best fuel economy can be changed to:
25 miles, 50 miles, and 300 miles.Vehicle Messages
Messages displayed on the DIC indicate the
status of the vehicle or some action that
may be needed to correct a condition.
Multiple messages may appear one after
another.
The messages that do not require
immediate action can be acknowledged and
cleared by pressing
V. The messages that
require immediate action cannot be cleared
until that action is performed.
All messages should be taken seriously;
clearing the message does not correct the
problem.
If a SERVICE message appears, see your
dealer.
Follow the instructions given in the
messages. The system displays messages
regarding the following topics:
.Service Messages
.Fluid Levels
.Vehicle Security
.Brakes
.Steering
.Ride Control Systems
.Advanced Driver Assistance Systems
Page 168 of 328
Chevrolet TRAX Owner Manual (GMNA-Localizing-U.S./Canada/Mexico-
17041293) - 2024 - CRC - 12/6/22
Driving and Operating 167
Control of a Vehicle
Braking, steering, and accelerating are
important factors in helping to control a
vehicle while driving.
Braking
Braking action involves perception time and
reaction time. Deciding to push the brake
pedal is perception time. Actually doing it is
reaction time.
Average driver reaction time is about
three-quarters of a second. In that time, a
vehicle moving at 100 km/h (60 mph) travels
20 m (66 ft), which could be a lot of
distance in an emergency.
Helpful braking tips to keep in mind include:
.Keep enough distance between you and
the vehicle in front of you.
.Avoid needless heavy braking.
.Keep pace with traffic.
If the engine ever stops while the vehicle is
being driven, brake normally but do not
pump the brakes. Doing so could make the
pedal harder to push down. If the engine
stops, there will be some power brake assist
but it will be used when the brake is applied. Once the power assist is used up, it
can take longer to stop and the brake pedal
will be harder to push.
Steering
Caution
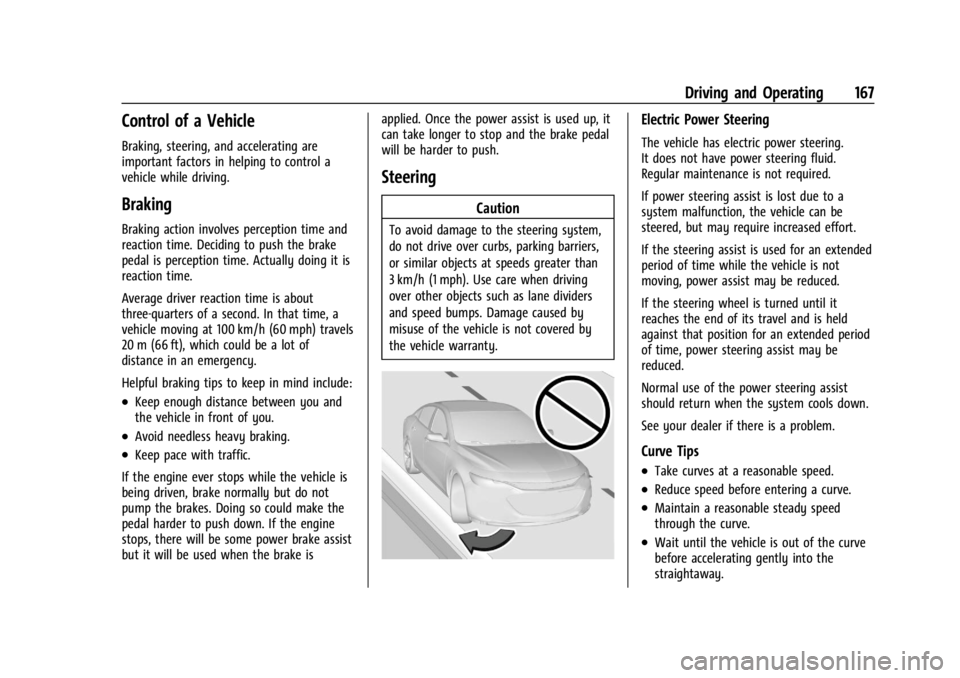
To avoid damage to the steering system,
do not drive over curbs, parking barriers,
or similar objects at speeds greater than
3 km/h (1 mph). Use care when driving
over other objects such as lane dividers
and speed bumps. Damage caused by
misuse of the vehicle is not covered by
the vehicle warranty.
Electric Power Steering
The vehicle has electric power steering.
It does not have power steering fluid.
Regular maintenance is not required.
If power steering assist is lost due to a
system malfunction, the vehicle can be
steered, but may require increased effort.
If the steering assist is used for an extended
period of time while the vehicle is not
moving, power assist may be reduced.
If the steering wheel is turned until it
reaches the end of its travel and is held
against that position for an extended period
of time, power steering assist may be
reduced.
Normal use of the power steering assist
should return when the system cools down.
See your dealer if there is a problem.
Curve Tips
.Take curves at a reasonable speed.
.Reduce speed before entering a curve.
.Maintain a reasonable steady speed
through the curve.
.Wait until the vehicle is out of the curve
before accelerating gently into the
straightaway.
Page 170 of 328
Chevrolet TRAX Owner Manual (GMNA-Localizing-U.S./Canada/Mexico-
17041293) - 2024 - CRC - 12/6/22
Driving and Operating 169
Driving on Wet Roads
Rain and wet roads can reduce vehicle
traction and affect your ability to stop and
accelerate. Always drive slower in these
types of driving conditions and avoid driving
through large puddles and deep-standing or
flowing water.
{Warning
Wet brakes can cause crashes. They
might not work as well in a quick stop
and could cause pulling to one side. You
could lose control of the vehicle.
After driving through a large puddle of
water or a car/vehicle wash, lightly apply
the brake pedal until the brakes work
normally.
Flowing or rushing water creates strong
forces. Driving through flowing water
could cause the vehicle to be carried
away. If this happens, you and other
vehicle occupants could drown. Do not
ignore police warnings and be very
cautious about trying to drive through
flowing water.
Hydroplaning
Hydroplaning is dangerous. Water can build
up under the vehicle's tires so they actually
ride on the water. This can happen if the
road is wet enough and you are going fast
enough. When the vehicle is hydroplaning, it
has little or no contact with the road.
There is no hard and fast rule about
hydroplaning. The best advice is to slow
down when the road is wet.
Other Rainy Weather Tips
Besides slowing down, other wet weather
driving tips include:
.Allow extra following distance.
.Pass with caution.
.Keep windshield wiping equipment in
good shape.
.Keep the windshield washer fluid reservoir
filled.
.Have good tires with proper tread depth.
SeeTires 0243.
.Turn off cruise control.
Hill and Mountain Roads
Driving on steep hills or through mountains
is different than driving on flat or rolling
terrain. Tips include:
.Keep the vehicle serviced and in good
shape.
.Check brakes, tires, cooling system, and
all fluid levels.
.Shift to a lower gear when going down
steep or long hills.
{Warning
Using the brakes to slow the vehicle on a
long downhill slope can cause brake
overheating, can reduce brake
performance, and could result in a loss of
braking. Shift the transmission to a lower
gear to let the engine assist the brakes
on a steep downhill slope.
{Warning
Coasting downhill in N (Neutral) or with
the ignition off is dangerous. This can
cause overheating of the brakes and loss
of steering assist. Always have the engine
running and the vehicle in gear.
Page 186 of 328

Chevrolet TRAX Owner Manual (GMNA-Localizing-U.S./Canada/Mexico-
17041293) - 2024 - CRC - 12/6/22
Driving and Operating 185
Caution
Shifting out of P (Park) or N (Neutral)
with the engine running at high speed
may damage the transmission. The
repairs would not be covered by the
vehicle warranty. Be sure the engine is
not running at high speed when shifting
the vehicle.
Caution
A transmission hot message may display
if the automatic transmission fluid is
too hot.
Driving under this condition can damage
the vehicle. Stop and idle the engine to
cool the automatic transmission fluid.
This message clears when the
transmission fluid has cooled sufficiently.
D : This position is for normal driving.
If more power is needed for passing, press
the accelerator pedal down.
Caution
If the vehicle does not shift gears, the
transmission could be damaged. Have the
vehicle serviced right away.
Caution
Spinning the tires or holding the vehicle
in one place on a hill using only the
accelerator pedal may damage the
transmission.
The repair will not be covered by the
vehicle warranty. If the vehicle is stuck,
do not spin the tires. When stopping on
a hill, use the brakes to hold the vehicle
in place.
L : Allows the driver to select the range of
gear positions. See Manual Mode0185.
Operating Modes
The transmission may operate in a lower
gear than normal to improve vehicle
performance. The engine speed may be
higher and there may be an increase in
noise during the following conditions:
.When climbing a grade.
.When driving downhill.
.When driving in hot temperatures or at
high altitude.
Manual Mode
Electronic Range Select (ERS) Mode
ERS or manual mode allows for the selection
of the range of gear positions. Use this
mode when driving downhill or towing a
trailer to limit the top gear and vehicle
speed. The shift position indicator within the
Driver Information Center (DIC) will display a
number next to the L indicating the highest
available gear under manual mode and the
driving conditions when manual mode was
selected.
Page 216 of 328
Chevrolet TRAX Owner Manual (GMNA-Localizing-U.S./Canada/Mexico-
17041293) - 2024 - CRC - 12/6/22
Vehicle Care 215
Vehicle Care
General Information
General Information . . . . . . . . . . . . . . . . . . . 216
California Perchlorate MaterialsRequirements . . . . . . . . . . . . . . . . . . . . . . . . 216
Accessories and Modifications . . . . . . . . . 216
Vehicle Checks
Doing Your Own Service Work . . . . . . . . . 216
Hood . . . . . . . . . . . . . . . . . . . . . . . . . . . . . . . . . . 217
Engine Compartment Overview . . . . . . . . 219
Engine Oil . . . . . . . . . . . . . . . . . . . . . . . . . . . . . 220
Engine Oil Life System . . . . . . . . . . . . . . . . . 222
Automatic Transmission Fluid . . . . . . . . . . 223
Engine Air Filter Life System . . . . . . . . . . . 223
Engine Air Cleaner/Filter . . . . . . . . . . . . . . . 223
Cooling System . . . . . . . . . . . . . . . . . . . . . . . . 225
Engine Overheating . . . . . . . . . . . . . . . . . . . . 227
Washer Fluid . . . . . . . . . . . . . . . . . . . . . . . . . . 228
Brakes . . . . . . . . . . . . . . . . . . . . . . . . . . . . . . . . . 229
Brake Fluid . . . . . . . . . . . . . . . . . . . . . . . . . . . . 230
Battery - North America . . . . . . . . . . . . . . . 230
Starter Switch Check . . . . . . . . . . . . . . . . . . . 231
Automatic Transmission Shift Lock Control Function Check . . . . . . . . . . . . . . . 231
Park Brake and P (Park) Mechanism Check . . . . . . . . . . . . . . . . . . . . . . . . . . . . . . . . 232
Wiper Blade Replacement . . . . . . . . . . . . . 232 Windshield Replacement . . . . . . . . . . . . . . . 233
Gas Strut(s) . . . . . . . . . . . . . . . . . . . . . . . . . . . . 233
Headlamp Aiming
Front Headlamp Aiming . . . . . . . . . . . . . . . 234
Bulb Replacement
Bulb Replacement . . . . . . . . . . . . . . . . . . . . . 234
Halogen Bulbs . . . . . . . . . . . . . . . . . . . . . . . . . 235
LED Lighting . . . . . . . . . . . . . . . . . . . . . . . . . . . 235
Headlamps, Front Turn Signal,
Sidemarker, and Parking Lamps . . . . . . 235
Taillamps, Turn Signal, Sidemarker, Stoplamps, and Back-Up Lamps . . . . . . 236
Electrical System
Electrical System Overload . . . . . . . . . . . . . 237
Fuses and Circuit Breakers . . . . . . . . . . . . . 238
Engine Compartment Fuse Block . . . . . . 239
Instrument Panel Fuse Block . . . . . . . . . . . 241
Wheels and Tires
Tires . . . . . . . . . . . . . . . . . . . . . . . . . . . . . . . . . . . 243
All-Season Tires . . . . . . . . . . . . . . . . . . . . . . . . 243
Winter Tires . . . . . . . . . . . . . . . . . . . . . . . . . . . 244
Tire Sidewall Labeling . . . . . . . . . . . . . . . . . 244
Tire Designations . . . . . . . . . . . . . . . . . . . . . . 246
Tire Terminology and Definitions . . . . . . 246
Tire Pressure . . . . . . . . . . . . . . . . . . . . . . . . . . 248
Tire Pressure for High-SpeedOperation . . . . . . . . . . . . . . . . . . . . . . . . . . . 249 Tire Pressure Monitor System . . . . . . . . . 249
Tire Pressure Monitor Operation . . . . . . 250
Tire Inspection . . . . . . . . . . . . . . . . . . . . . . . . 254
Tire Rotation . . . . . . . . . . . . . . . . . . . . . . . . . . 254
When It Is Time for New Tires . . . . . . . . 255
Buying New Tires . . . . . . . . . . . . . . . . . . . . . 256
Different Size Tires and Wheels . . . . . . . . 257
Uniform Tire Quality Grading . . . . . . . . . . 257
Wheel Alignment and Tire Balance . . . . 258
Wheel Replacement . . . . . . . . . . . . . . . . . . . 258
Tire Chains . . . . . . . . . . . . . . . . . . . . . . . . . . . . 259
If a Tire Goes Flat . . . . . . . . . . . . . . . . . . . . . 260
Tire Sealant and Compressor Kit . . . . . . . 261
Storing the Tire Sealant and
Compressor Kit . . . . . . . . . . . . . . . . . . . . . . 266
Tire Changing . . . . . . . . . . . . . . . . . . . . . . . . . 267
Compact Spare Tire . . . . . . . . . . . . . . . . . . . . 271
Jump Starting
Jump Starting - North America . . . . . . . . 272
Towing the Vehicle
Transporting a Disabled Vehicle . . . . . . . 274
Recreational Vehicle Towing . . . . . . . . . . . 275
Appearance Care
Exterior Care . . . . . . . . . . . . . . . . . . . . . . . . . . . 277
Interior Care . . . . . . . . . . . . . . . . . . . . . . . . . . . 281
Floor Mats . . . . . . . . . . . . . . . . . . . . . . . . . . . . 284
Page 221 of 328
Chevrolet TRAX Owner Manual (GMNA-Localizing-U.S./Canada/Mexico-
17041293) - 2024 - CRC - 12/6/22
220 Vehicle Care
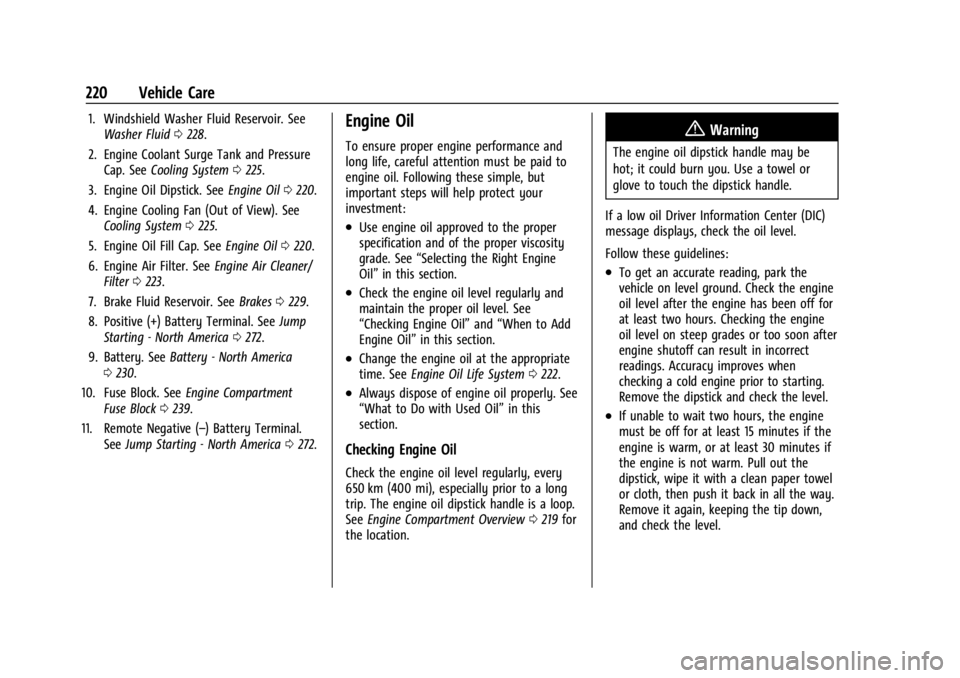
1. Windshield Washer Fluid Reservoir. SeeWasher Fluid 0228.
2. Engine Coolant Surge Tank and Pressure Cap. See Cooling System 0225.
3. Engine Oil Dipstick. See Engine Oil0220.
4. Engine Cooling Fan (Out of View). See Cooling System 0225.
5. Engine Oil Fill Cap. See Engine Oil0220.
6. Engine Air Filter. See Engine Air Cleaner/
Filter 0223.
7. Brake Fluid Reservoir. See Brakes0229.
8. Positive (+) Battery Terminal. See Jump
Starting - North America 0272.
9. Battery. See Battery - North America
0 230.
10. Fuse Block. See Engine Compartment
Fuse Block 0239.
11. Remote Negative (–) Battery Terminal. SeeJump Starting - North America 0272.Engine Oil
To ensure proper engine performance and
long life, careful attention must be paid to
engine oil. Following these simple, but
important steps will help protect your
investment:
.Use engine oil approved to the proper
specification and of the proper viscosity
grade. See “Selecting the Right Engine
Oil” in this section.
.Check the engine oil level regularly and
maintain the proper oil level. See
“Checking Engine Oil” and“When to Add
Engine Oil” in this section.
.Change the engine oil at the appropriate
time. SeeEngine Oil Life System 0222.
.Always dispose of engine oil properly. See
“What to Do with Used Oil” in this
section.
Checking Engine Oil
Check the engine oil level regularly, every
650 km (400 mi), especially prior to a long
trip. The engine oil dipstick handle is a loop.
See Engine Compartment Overview 0219 for
the location.
{Warning
The engine oil dipstick handle may be
hot; it could burn you. Use a towel or
glove to touch the dipstick handle.
If a low oil Driver Information Center (DIC)
message displays, check the oil level.
Follow these guidelines:
.To get an accurate reading, park the
vehicle on level ground. Check the engine
oil level after the engine has been off for
at least two hours. Checking the engine
oil level on steep grades or too soon after
engine shutoff can result in incorrect
readings. Accuracy improves when
checking a cold engine prior to starting.
Remove the dipstick and check the level.
.If unable to wait two hours, the engine
must be off for at least 15 minutes if the
engine is warm, or at least 30 minutes if
the engine is not warm. Pull out the
dipstick, wipe it with a clean paper towel
or cloth, then push it back in all the way.
Remove it again, keeping the tip down,
and check the level.
Page 230 of 328

Chevrolet TRAX Owner Manual (GMNA-Localizing-U.S./Canada/Mexico-
17041293) - 2024 - CRC - 12/6/22
Vehicle Care 229
Open the cap with the washer symbol on it.
Add washer fluid until the tank is full. See
Engine Compartment Overview0219 for
reservoir location.
Caution
.Do not use washer fluid that contains
any type of water repellent coating.
This can cause the wiper blades to
chatter or skip.
.Do not use engine coolant (antifreeze)
in the windshield washer. It can
damage the windshield washer system
and paint.
.Do not mix water with ready-to-use
washer fluid. Water can cause the
solution to freeze and damage the
washer fluid tank and other parts of
the washer system.
.When using concentrated washer fluid,
follow the manufacturer instructions
for adding water.
.Fill the washer fluid tank only
three-quarters full when it is very cold.
This allows for fluid expansion if
freezing occurs, which could damage
the tank if it is completely full.
Brakes
Disc brake linings have built-in wear
indicators that make a high-pitched warning
sound when the brake linings are worn and
new linings are needed. The sound can come
and go or can be heard all the time when
the vehicle is moving, except when applying
the brake pedal firmly.
{Warning
The brake wear warning sound means
that soon the brakes will not work well.
That could lead to a crash. When the
brake wear warning sound is heard, have
the vehicle serviced.
Caution
Continuing to drive with worn-out brake
linings could result in costly brake
repairs.
Some driving conditions or climates can
cause a brake squeal when the brakes are
first applied, clearing up following several
applications. This does not mean something
is wrong with the brakes. Properly torqued wheel nuts are necessary
to help prevent brake pulsation. When tires
are rotated, inspect brake linings for wear
and evenly tighten wheel nuts in the proper
sequence to torque specifications. See
Capacities and Specifications
0295.
Brake pads should be replaced as complete
axle sets.
Brake Pedal Travel
See your dealer if the brake pedal does not
return to normal height, or if there is a
rapid increase in pedal travel. This could be
a sign that brake service may be required.
Replacing Brake System Parts
Always replace brake system parts with
new, approved replacement parts. If this is
not done, the brakes may not work
properly. The braking performance can
change in many ways if the wrong brake
parts are installed or if parts are improperly
installed.
Page 231 of 328
Chevrolet TRAX Owner Manual (GMNA-Localizing-U.S./Canada/Mexico-
17041293) - 2024 - CRC - 12/6/22
230 Vehicle Care
Brake Fluid
The brake master cylinder reservoir is filled
with GM approved DOT 4 brake fluid as
indicated on the reservoir cap. SeeEngine
Compartment Overview 0219 for the
location of the reservoir.
Checking Brake Fluid
With the vehicle in P (Park) on a level
surface, the brake fluid level should be
between the minimum and maximum marks
on the brake fluid reservoir.
There are only two reasons why the brake
fluid level in the reservoir may go down:
.Normal brake lining wear. When new
linings are installed, the fluid level goes
back up.
.A fluid leak in the brake hydraulic system.
Have the brake hydraulic system fixed.
With a leak, the brakes will not
work well. Always clean the brake fluid reservoir cap
and the area around the cap before
removing it.
Do not top off the brake fluid. Adding fluid
does not correct a leak. If fluid is added
when the linings are worn, there will be too
much fluid when new brake linings are
installed. Add or remove fluid, as necessary,
only when work is done on the brake
hydraulic system.
{Warning
If too much brake fluid is added, it can
spill on the engine and burn, if the
engine is hot enough. You or others could
be burned, and the vehicle could be
damaged. Add brake fluid only when
work is done on the brake hydraulic
system.
When the brake fluid falls to a low level,
the brake warning light comes on. See Brake
System Warning Light 094.
Brake fluid absorbs water over time which
degrades the effectiveness of the brake fluid.
Replace brake fluid at the specified intervals
to prevent increased stopping distance. See
Maintenance Schedule 0287. What to Add
Use only GM approved DOT 4 brake fluid
from a clean, sealed container. See
Recommended Fluids and Lubricants
0291.
{Warning
The wrong or contaminated brake fluid
could result in damage to the brake
system. This could result in the loss of
braking leading to a possible injury.
Always use the proper GM approved
brake fluid.
Caution
If brake fluid is spilled on the vehicle's
painted surfaces, the paint finish can be
damaged. Immediately wash off any
painted surface.
Battery - North America
The original equipment battery is
maintenance free. Do not remove the cap
and do not add fluid.
Refer to the replacement number shown on
the original battery label when a new
battery is needed. See Engine Compartment
Overview 0219 for battery location.
Page 274 of 328
Chevrolet TRAX Owner Manual (GMNA-Localizing-U.S./Canada/Mexico-
17041293) - 2024 - CRC - 12/6/22
Vehicle Care 273
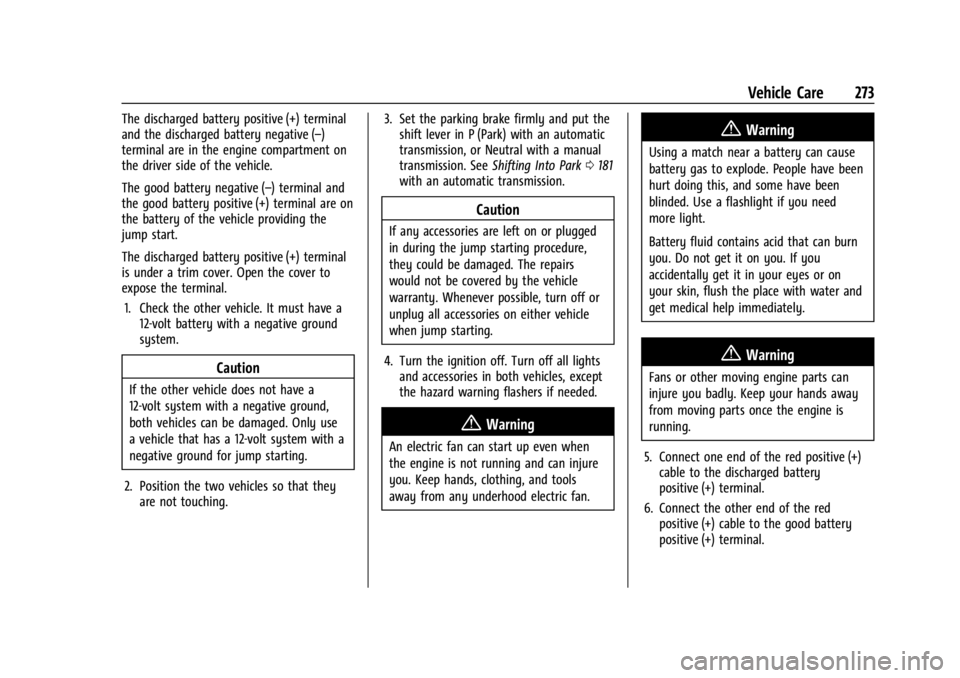
The discharged battery positive (+) terminal
and the discharged battery negative (–)
terminal are in the engine compartment on
the driver side of the vehicle.
The good battery negative (–) terminal and
the good battery positive (+) terminal are on
the battery of the vehicle providing the
jump start.
The discharged battery positive (+) terminal
is under a trim cover. Open the cover to
expose the terminal.1. Check the other vehicle. It must have a 12-volt battery with a negative ground
system.
Caution
If the other vehicle does not have a
12-volt system with a negative ground,
both vehicles can be damaged. Only use
a vehicle that has a 12-volt system with a
negative ground for jump starting.
2. Position the two vehicles so that they are not touching. 3. Set the parking brake firmly and put the
shift lever in P (Park) with an automatic
transmission, or Neutral with a manual
transmission. See Shifting Into Park 0181
with an automatic transmission.
Caution
If any accessories are left on or plugged
in during the jump starting procedure,
they could be damaged. The repairs
would not be covered by the vehicle
warranty. Whenever possible, turn off or
unplug all accessories on either vehicle
when jump starting.
4. Turn the ignition off. Turn off all lights and accessories in both vehicles, except
the hazard warning flashers if needed.
{Warning
An electric fan can start up even when
the engine is not running and can injure
you. Keep hands, clothing, and tools
away from any underhood electric fan.
{Warning
Using a match near a battery can cause
battery gas to explode. People have been
hurt doing this, and some have been
blinded. Use a flashlight if you need
more light.
Battery fluid contains acid that can burn
you. Do not get it on you. If you
accidentally get it in your eyes or on
your skin, flush the place with water and
get medical help immediately.
{Warning
Fans or other moving engine parts can
injure you badly. Keep your hands away
from moving parts once the engine is
running.
5. Connect one end of the red positive (+) cable to the discharged battery
positive (+) terminal.
6. Connect the other end of the red positive (+) cable to the good battery
positive (+) terminal.