display CHRYSLER 200 2015 2.G Owner's Manual
[x] Cancel search | Manufacturer: CHRYSLER, Model Year: 2015, Model line: 200, Model: CHRYSLER 200 2015 2.GPages: 220, PDF Size: 3.7 MB
Page 53 of 220
NINE-SPEED AUTOMATIC TRANSMISSION
The transmission is controlled using a rotary electronic gear selector located on the center
console. The transmission gear range (PRNDL/S) is displayed both above the gear selector and
in the Electronic Vehicle Information Center (EVIC) or the Driver Information Display (DID).
To select a gear range, simply rotate the shifter
control.
NOTE:
You must press the brake pedal to shift the
transmission out of PARK or from NEUTRAL
into DRIVE or REVERSE (when stopped or
moving at low speeds).
Push down on the gear selector and then rotate
it, to access the L or S position.
Select the DRIVE range for normal driving.
Transmission Gear Selector
OPERATING YOUR VEHICLE
51
Page 55 of 220
PADDLE SHIFT MODE
• When the transmission is in DRIVE orSPORT mode, it will operate automatically,
shifting between the nine available gears.
• To activate Paddle Shift mode, simply tap one of the steering wheel-mounted shift
paddles (+/-) while in DRIVE or SPORT
mode. Tapping (-) to enter Paddle Shift
mode will downshift the transmission to the
next lower gear, while using (+) to enter
Paddle Shift mode will retain the current
gear. When Paddle Shift is active, the cur-
rent transmission gear is displayed in the
instrument cluster.
• In Paddle Shift mode, the transmission will shift up or down when (+/-) is manually se-
lected by the driver, unless an engine lug-
ging or overspeed condition would result. It
will remain in the selected gear until another
upshift or downshift is chosen, except as
explained below.
• If Paddle Shift is engaged while in DRIVE mode, the transmission will automatically shift up when maximum engine speed is reached. Lack of accelerator pedal activity will cause the
transmission to revert to automatic operation.
• If Paddle Shift is engaged while in SPORT mode, the transmission will remain in the selected gear even when maximum engine speed is reached (except the transmission will upshift
automatically from 1st to 2nd gear at wide open throttle, if necessary). Otherwise, the
transmission will upshift only when commanded by the driver.
• In either DRIVE or SPORT mode, the transmission will automatically downshift as the vehicle slows to a stop (to prevent engine lugging) and will display the current gear. Tapping the (+)
paddle (at a stop) will allow starting in second gear. After a stop, the driver should manually
upshift (+) the transmission as the vehicle accelerates.
• Holding the (-) paddle depressed will downshift the transmission to the lowest gear possible at the current speed.
To disengage Paddle Shift mode, press and hold the (+) shift paddle until “D” or “S” is once again
indicated in the instrument cluster. You can shift in or out of Paddle Shift mode at any time
without taking your foot off the accelerator pedal.
WARNING!
Do not downshift for additional engine braking on a slippery surface. The drive wheels could
lose their grip and the vehicle could skid, causing a collision or personal injury.
Shift Paddles
1 — (-) Paddle Shift
2 — (+) Paddle Shift
OPERATING YOUR VEHICLE
53
Page 56 of 220
STOP/START SYSTEM — 2.4L ENGINE
The Stop/Start function is developed to save fuel and reduce emissions. The system will stop the
engine automatically during a vehicle stop if the required conditions are met. Releasing the brake
pedal or pressing the accelerator pedal on an automatic transmission will start the engine.
Automatic Mode
The Stop/Start feature is enabled after every normal customer engine start. It will remain in
STOP/START NOT READY until you drive forward with a vehicle speed greater than 5 mph
(8 km/h). At that time, the system will go into STOP/START READY and if all other conditions
are met, can go into a STOP/START AUTOSTOP ACTIVE “Autostop” mode.
To Activate The Autostop Mode, The Following Must Occur:
• The system must be in STOP/START READY state. A STOP/START READY message willbe displayed in the Electronic Vehicle Information Center (EVIC) or Driver Information
Display (DID) within the Stop/Start section. Refer to “Electronic Vehicle Information Center
(EVIC)” or “Driver Information Display (DID)” in “Understanding Your Instrument Panel” in
your owners manual on the DVD for further information.
• The vehicle must be completely stopped.
• The shifter must be in DRIVE or NEUTRAL and the brake pedal depressed.
The engine will shut down, the tachometer will move to the zero position and the Stop/Start
telltale will illuminate indicating you are in Autostop. While in Autostop, the Climate Controls
system may automatically adjust airflow to maintain cabin comfort. Customer settings will be
maintained upon return to an engine running condition.
Refer to the “Stop/Start System” in the “Starting and Operating” section located in your owners
manual on the DVD for further information.
To Manually Turn Off The Stop/Start System
1. Press the STOP/START Off switch (located on the switch bank). The light on the switch will illuminate.
2. The “STOP/START OFF” message will ap- pear in Electronic Vehicle Information Cen-
ter (EVIC) or Driver Information Display
(DID). Refer to “Electronic Vehicle Infor-
mation Center (EVIC)” or “Driver Informa-
tion Display (DID)” in “Understanding Your
Instrument Panel” your owners manual on
the DVD for further information.
3. At the next vehicle stop (after turning off the STOP/START system) the engine will
not be stopped.
4. The STOP/START system will reset itself back to an ON condition every time the key is turned off and back on.
STOP/START OFF Switch
OPERATING YOUR VEHICLE
54
Page 59 of 220
PARKSENSE®
ParkSense® Front And Rear Park Assist
ParkSense® can be enabled and disabled by pressing the ParkSense® switch located on the switch
panel below the Uconnect® display.
The six ParkSense® sensors, located in the rear
fascia/bumper, monitor the area behind the
vehicle that is within the sensors’ field of view.
The sensors can detect obstacles from approxi-
mately 12 in (30 cm) up to 79 in (200 cm) from
the rear fascia/bumper in the horizontal direc-
tion, depending on the location, type and ori-
entation of the obstacle.
The six ParkSense® sensors, located in the front
fascia/bumper, monitor the area in front of the
vehicle that is within the sensors’ field of view.
The sensors can detect obstacles from approxi-
mately 12 in (30 cm) up to 47 in (120 cm) from
the front fascia/bumper in the horizontal direc-
tion, depending on the location, type and ori-
entation of the obstacle.
When an object is detected within 2 meters behind the rear bumper while the vehicle is in
REVERSE, a warning will display in the Electronic Vehicle Information Center (EVIC) or Driver
Information Display (DID). In addition a chime will sound (when Sound and Display is selected
from the Customer Programmable Features screen of the Uconnect® System). As the vehicle
moves closer to the object, the chime rate will change from single 1/2 second tone (for rear only),
to slow (for rear only), to fast, to continuous.
Refer to your Owner's Manual on the DVD for further details.
ParkSense® Switch
OPERATING YOUR VEHICLE
57
Page 60 of 220
ParkSense® Active Park Assist
The ParkSense® Active Park Assist system can be enabled and disabled with the ParkSense®
Active Park Assist switch, located on the switch panel below the Uconnect® display.
The ParkSense® Active Park Assist system is
intended to assist the driver during parallel and
perpendicular parking maneuvers by identify-
ing a proper parking space, providing audible/
visual instructions, and controlling the steering
wheel. The ParkSense® Active Park Assist sys-
tem is defined as “semi-automatic” since the
driver maintains control of the accelerator, shift
lever and brakes. Depending on the driver’s
parking maneuver selection, the ParkSense®
Active Park Assist system is capable of maneu-
vering a vehicle into a parallel or a perpendicu-
lar parking space on either side (i.e., driver side
or passenger side).
Refer to your Owner's Manual on the DVD for
further details.
CAUTION!
•ParkSense® is only a parking aid and it is unable to recognize every obstacle, including small
obstacles. Parking curbs might be temporarily detected or not detected at all. Obstacles
located above or below the sensors will not be detected when they are in close proximity.
• The vehicle must be driven slowly when using ParkSense® in order to be able to stop intime when an obstacle is detected. It is recommended that the driver looks over his/her
shoulder when using ParkSense®.
WARNING!
• Drivers must be careful when backing up even when using ParkSense®. Always checkcarefully behind your vehicle, look behind you, and be sure to check for pedestrians,
animals, other vehicles, obstructions, and blind spots before backing up. You are respon-
sible for safety and must continue to pay attention to your surroundings. Failure to do so
can result in serious injury or death.
•
Before using ParkSense®, it is strongly recommended that the ball mount and hitch ball
assembly is disconnected from the vehicle when the vehicle is not used for towing. Failure to do
so can result in injury or damage to vehicles or obstacles because the hitch ball will be much
closer to the obstacle than the rear fascia when the loudspeaker sounds the continuous tone.
Also, the sensors could detect the ball mount and hitch ball assembly, depending on its size and
shape, giving a false indication that an obstacle is behind the vehicle.
ParkSense® Active Park Assist Switch
OPERATING YOUR VEHICLE
58
Page 61 of 220
LANESENSE
The LaneSense system can be enabled and disabled with the LaneSense button, located on the
switch panel below the Uconnect® display.
• Press the LaneSense button to turn the sys-tem ON (LED turns off ).
The LaneSense system is operational at speeds
above 37 mph (60 km/h) and below 112 mph
(180 km/h). The LaneSense system uses a for-
ward looking camera to detect lane markings
and measure vehicle position within the lane
boundaries.
When both lane markings are detected and the
driver unintentionally drifts out of the lane (no
turn signal applied), the LaneSense system
provides a haptic warning in the form of torque
applied to the steering wheel to prompt the
driver to remain within the lane boundaries. If
the driver continues to unintentionally drift out
of the lane, the LaneSense system provides a visual warning through the Electronic Vehicle
Information Center (EVIC) or Driver Information Display (DID) to prompt the driver to remain
within the lane boundaries.
The driver may manually override the haptic warning by applying torque into the steering wheel
at any time.
When only a single lane marking is detected and the driver unintentionally drifts across the lane
marking (no turn signal applied), the LaneSense system provides a visual warning through the
Electronic Vehicle Information Center (EVIC) or Driver Information Display (DID) to prompt
the driver to remain within the lane. When only a single lane marking is detected, a haptic
(torque) warning will not be provided.
Refer to your Owner's Manual on the DVD for further details.
NOTE:
When operating conditions have been met, the LaneSense system will monitor if the driver’s
hands are on the steering wheel and provides an audible warning to the driver when the driver’s
hands are not detected on the steering wheel. The system will cancel if the driver does not return
their hands to the wheel.
LaneSense Button
OPERATING YOUR VEHICLE
59
Page 62 of 220
PARKVIEW® REAR BACK-UP CAMERA
You can see an on-screen image of the rear of your vehicle whenever the shift lever is put into
REVERSE. The ParkView® Rear Back-Up Camera image will be displayed on the radio display
screen, located on the center stack of the instrument panel.
If the radio display screen appears foggy, clean the camera lens located on the rear of the vehicle
above the rear license plate.
Refer to your Owner's Manual on the DVD for further details.
WARNING!
Drivers must be careful when backing up; even when using the ParkView® Rear Back-Up
Camera. Always check carefully behind your vehicle, and be sure to check for pedestrians,
animals, other vehicles, obstructions, or blind spots before backing up. You must continue to
pay attention while backing up. Failure to do so can result in serious injury or death.
BLIND SPOT MONITORING
The Blind Spot Monitoring (BSM) system uses two radar-based sensors, located inside the rear
bumper fascia, to detect Highway licensable vehicles (automobiles, trucks, motorcycles etc.) that
enter the blind spot zones from the rear/front/side of the vehicle.
The Blind Spot Monitoring (BSM) system warning light, located in the outside mirrors, will
illuminate if a vehicle moves into a blind spot zone.
The BSM system can also be configured to sound an audible (chime) alert and mute the radio to
notify you of objects that have entered the detection zones.
Refer to your Owner's Manual on the DVD for further details.
OPERATING YOUR VEHICLE
60
Page 68 of 220
IDENTIFYING YOUR RADIO
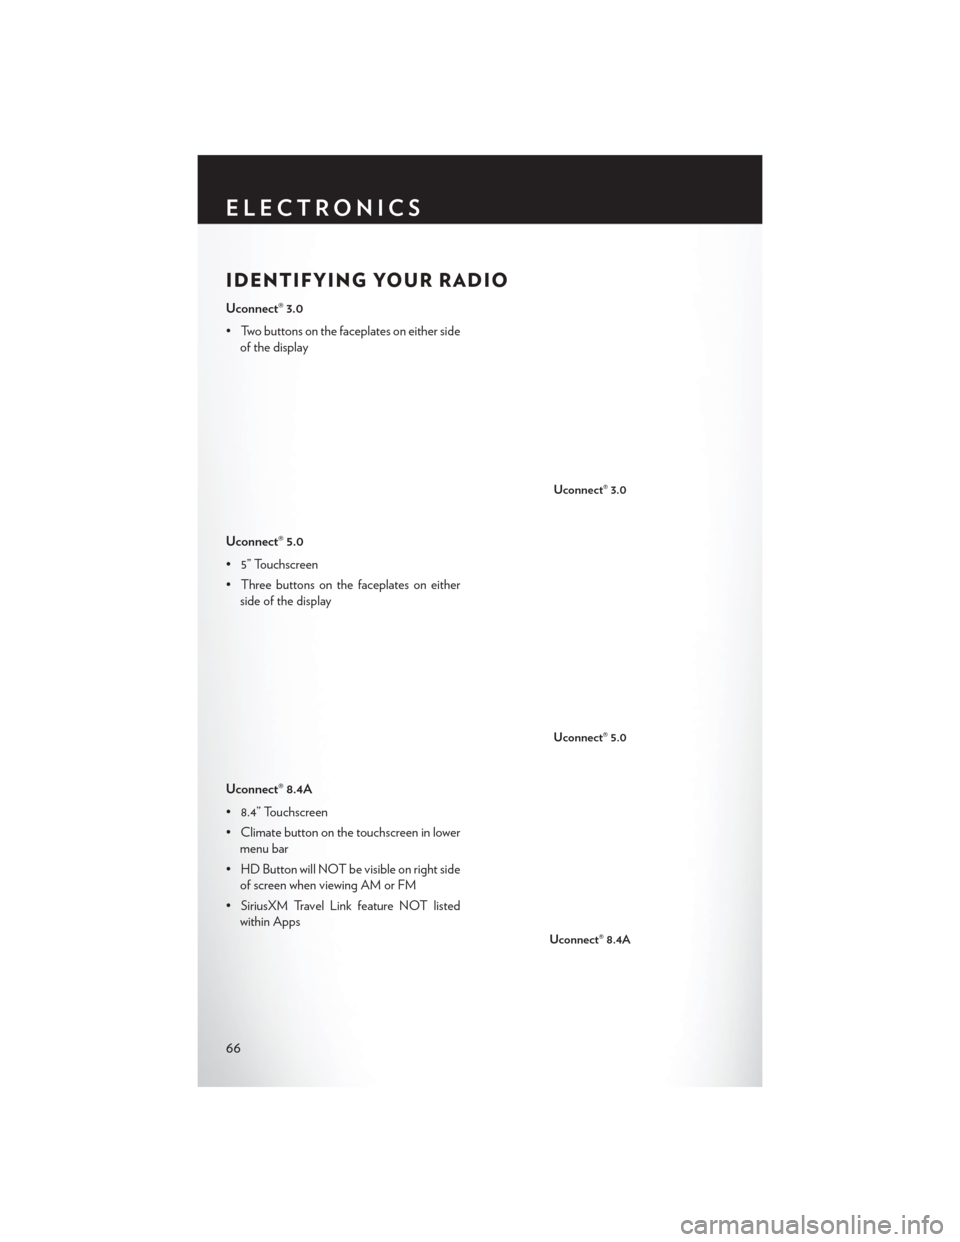
Uconnect® 3.0
• Two buttons on the faceplates on either sideof the display
Uconnect® 5.0
• 5” Touchscreen
• Three buttons on the faceplates on either side of the display
Uconnect® 8.4A
• 8.4” Touchscreen
• Climate button on the touchscreen in lower menu bar
• HD Button will NOT be visible on right side of screen when viewing AM or FM
• SiriusXM Travel Link feature NOT listed within Apps
Uconnect® 3.0
Uconnect® 5.0
Uconnect® 8.4A
ELECTRONICS
66
Page 71 of 220
3. The Uconnect® Access Registration App will open and display step-by-step instructions tostart your registration.
4. Enter your email address into the radio touchscreen.
5. A message will display on the touchscreen indicating your email submission was accepted. In a few minutes, you will receive an email which will allow you to register your vehicle for
Uconnect® Access. You should open this email and begin your Uconnect® Access registration
within 72 hours.
6. Check for an email from Uconnect® Access that contains your personalized registration link. If you don't see it, check your spam or junk mail folder. Open the email and click on the link to
continue registering.
NOTE:
For security reasons, this link is valid for 72 hours from the time you’ve submitted your email
address into the radio touchscreen. If the link has expired, simply re-enter your email address into
the Uconnect® Registration App on the radio touchscreen to receive another link. The secured
registration link will take you through the Uconnect® Access registration process step by step.
7. T
o unlock the full potential of Uconnect® Access in your vehicle, you will need to create or validate
an existing Mopar Owner Connect account previously (Owner Center). Uconnect® along with
Mopar Owner Connect have joined forces to create one destination to manage all of your vehicle
needs, from managing your Uconnect® Access account, to tracking service history and finding
recommended accessories for your vehicle. If you already have a Mopar Owner Connect account,
log in to the website with your existing username/email and password. For assistance with this web
based registration process, call Uconnect® Care at 1-855-792-4241.
8. Once you are logged in to your Mopar Owner Connect account, you will create a personal
Uconnect® Security PIN. The Uconnect® Security PIN will be required to authenticate you
when accessing your account via Uconnect® Care or performing any remote services such as
Remote Door Lock/Unlock, Remote Horn & Lights or Starting and Stopping the engine.
9. If your vehicle qualifies for a trial package it will be presented. Simply agree to the Uconnect® Terms of Service (checkbox) and then select the “Start Service” button.
At this point your vehicle is registered with Uconnect® Access. Continue to set up Via Mobile.
Apps will be downloaded the next time you start your vehicle. If the Apps have not appeared after
24 hours, please contact Uconnect® Care.
ELECTRONICS
69
Page 73 of 220
Renewing Subscriptions And Purchasing WiFi Hotspot
(Uconnect® 8.4AN Only, U.S. 48 Contiguous States And Alaska)
Subscriptions, and WiFi Hotspot, can be purchased from the Uconnect® Store within your
vehicle, and online at Mopar Owner Connect. If you need help press the ASSIST button on the
rearview mirror, then select Uconnect® Care (or dial 1-855-792-4241).
Purchasing Online
You can renew your subscription to a package or purchase WiFi from the Mopar Owner Connect
website. You must first set up a Uconnect® Access Payment Account online. Log into
moparownerconnect.com
1. Log In to the Mopar Owner Connect website (moparownerconnect.com) with yourusername/email and password.
2. Click on the “Shop” tab, then click on the Uconnect® Store.
3. From the Uconnect® Store, select the item you wish to purchase.
4. This will launch the selected item into purchase mode along with providing additional information.
5. The Uconnect® Store will display a “Purchase Overview” message confirming the financial details of your purchase. Press the “Purchase” key to continue.
6. The Uconnect® Store will ask you to “Confirm Payment” using your default payment method on file in your Payment Account. Press the “Complete” key to continue.
7. The Uconnect® Payment Account will then ask for your “Payment Account PIN,” which you established when setting up your Uconnect® payment account. After entering this four digit
PIN, press the “Complete” key to make the purchase.
8. You will receive a confirmation message that your purchase has been submitted. Press the “OK” button to end the process.
ELECTRONICS
71