Light CHRYSLER 200 2015 2.G Owner's Manual
[x] Cancel search | Manufacturer: CHRYSLER, Model Year: 2015, Model line: 200, Model: CHRYSLER 200 2015 2.GPages: 220, PDF Size: 3.7 MB
Page 72 of 220
Download The Uconnect® Access App
The Uconnect® Access smartphone app allows you to remotely lock or unlock your doors, start
your engine (if equipped) and activate your horn and lights from virtually anywhere. The
smartphone app also features Via Mobile (if equipped) which uses your smartphone’s data plan
to access your personal Pandora®, iHeartRadio, Slacker Radio and Aha™ by HARMAN accounts
and control them using your vehicle touchscreen.
The Uconnect® Access app is only compatible with select iPhone® and Android smartphones.
Visit UconnectPhone.com or call 1-877-855-8400 to confirm that your smartphone is compatible
with Uconnect®. Once you’ve confirmed your smartphone is compatible, Android and iPhone®
users should visit their respective app store and search for “Uconnect Access” to download the
app.
Set Up Your Via Mobile Profile — If Equipped
Setting up your Via Mobile profile means entering your login information for each App so that
they can work in your vehicle. Complete your Via Mobile Profile online during registration of your
Uconnect® Access system. Access this pageby logging into your Mopar Owner Connect
account (moparownerconnect.com), going to Edit Profile, then Via Mobile Profile.
If you already have an account with these Apps, scroll down and press “Link” to enter your
information. If you do not have an account, you can create a new one.
Aha™ by HARMAN (www.aharadio.com)
• Enter your email address and password for Aha™, or create a new Aha™ account.
• You can link your Facebook, Twitter or Slacker accounts on the Aha™ website.
iHeartRadio (www.iHeartRadio.com)
• Enter your email address and password for iHeartRadio, or create a new iHeartRadio account.
• Select “Activate” to continue,
• Select “Close” to complete activation.
Pandora® (www.pandora.com)
• Enter your Pandora® username/email address and password, then click “Save.”
• Create a new Pandora® account.
Slacker Radio (www.slacker.com)
• Enter your Slacker username/email address and password, then click “Save.”
• Create a new Slacker Radio account.
Invite family and friends to use the Via Mobile Apps in your vehicle by setting up their own Via
Mobile profile.
ELECTRONICS
70
Page 76 of 220
Selling Your Vehicle
When you sell your vehicle, we recommend that you remove your Uconnect® Access Account
information from the vehicle. You can do this using the radio touchscreen in the vehicle or on the
Mopar Owner Connect website (moparownerconnect.com). Removing your account informa-
tion cancels your subscription and makes your vehicle factory-ready for a new owner/subscriber.
1. From your vehicle’s radio touchscreen, select “Uconnect® Store” from the Apps Menu.
2. Select “My Apps,” then “Settings.” Press “Remove Uconnect® Account.”
3. Enter your Uconnect® Security PIN, and select “Continue.”
For additional information on Uconnect®:
• U.S. residents - visit DriveUconnect.com or call 1-877-855-8400.
• Canadian Residents - visit DriveUconnect.ca or call, 1-800-465-2001 (English) or1-800-387-9983 (French).
Built-In Features (Uconnect® 8.4AN Only)
CAUTION!
• Ignoring the rearview mirror light could mean you may not have 9-1-1 Call service if needed. If the rearview mirror light is illuminated, have an authorized dealer service the
9-1-1 Call system immediately.
• The Occupant Restraint Controller (ORC) turns on the Air Bag Warning Light on the
instrument panel if a malfunction is detected in any part of the air bag system. If the Air
Bag Warning Light is illuminated, the air bag system may not be working properly and the
9-1-1 system may not be able to send a signal to a 9-1-1 operator. If the Air Bag Warning
Light is illuminated, have an authorized dealer service your vehicle immediately.
• If anyone in the vehicle could be in danger (e.g., fire or smoke is visible, dangerous road
conditions or location), do not wait for voice contact from a 9-1-1 operator. All occupants
should exit the vehicle immediately and move to a safe location.
• Do not add any aftermarket electrical equipment to the vehicle’s electrical system. This
may prevent your vehicle from sending a signal to initiate an emergency call. To avoid
interference that can cause the 9-1-1 Call system to fail, never add aftermarket equipment
(e.g., two-way mobile radio, CB radio, data recorder, etc.) to your vehicle’s electrical
system or modify the antennas on your vehicle. IF YOUR VEHICLE LOSES BATTERY
POWER FOR ANY REASON (INCLUDING DURING OR AFTER AN ACCI-
DENT), THE UCONNECT® FEATURES, APPS AND SERVICES, AMONG OTH-
ERS, WILL NOT OPERATE.
ELECTRONICS
74
Page 77 of 220
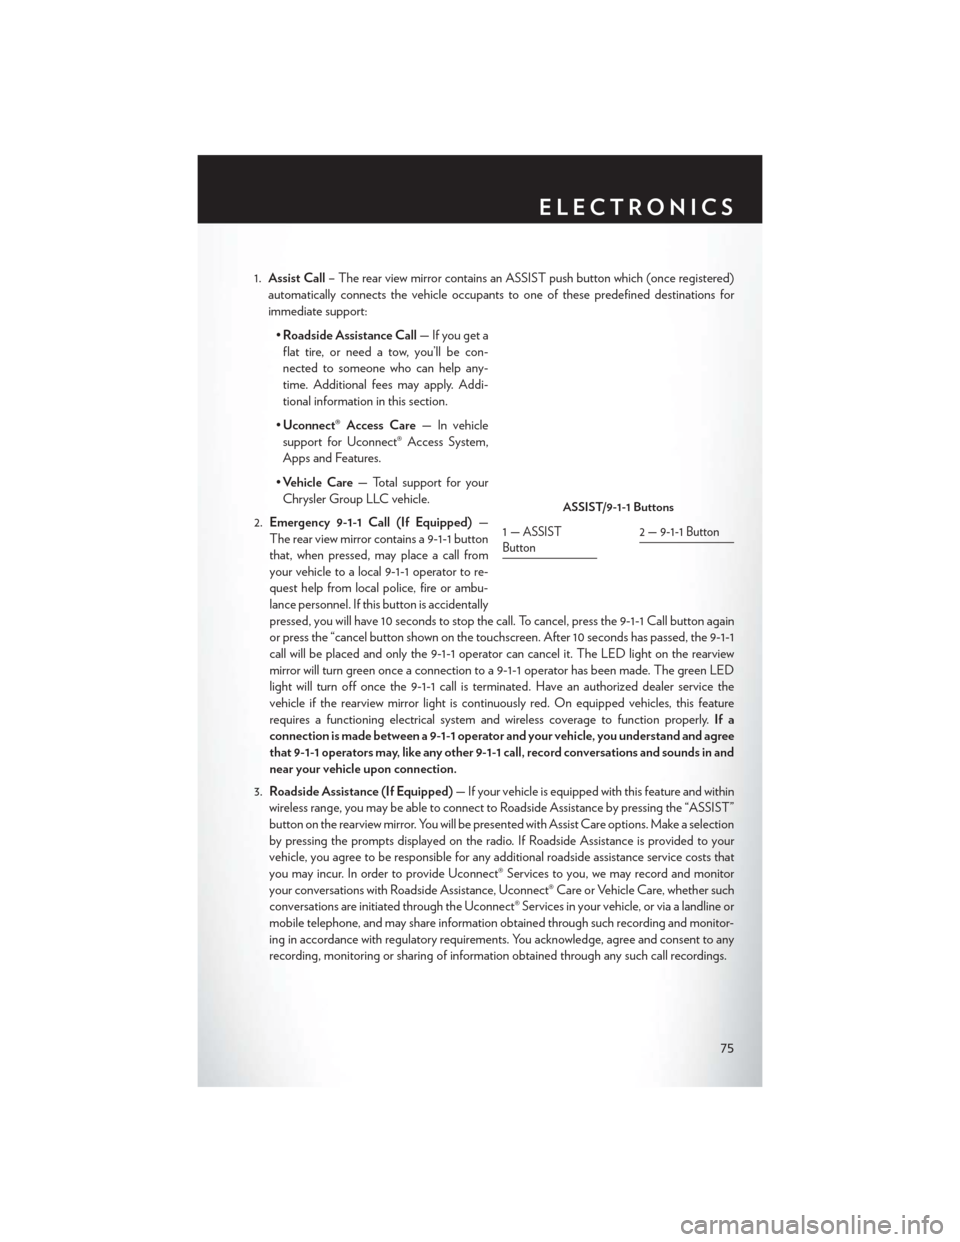
1.Assist Call – The rear view mirror contains an ASSIST push button which (once registered)
automatically connects the vehicle occupants to one of these predefined destinations for
immediate support:
•Roadside Assistance Call — If you get a
flat tire, or need a tow, you’ll be con-
nected to someone who can help any-
time. Additional fees may apply. Addi-
tional information in this section.
• Uconnect® Access Care — In vehicle
support for Uconnect® Access System,
Apps and Features.
• Vehicle Care — Total support for your
Chrysler Group LLC vehicle.
2. Emergency 9-1-1 Call (If Equipped) —
The rear view mirror contains a 9-1-1 button
that, when pressed, may place a call from
your vehicle to a local 9-1-1 operator to re-
quest help from local police, fire or ambu-
lance personnel. If this button is accidentally
pressed, you will have 10 seconds to stop the call. To cancel, press the 9-1-1 Call button again
or press the “cancel button shown on the touchscreen. After 10 seconds has passed, the 9-1-1
call will be placed and only the 9-1-1 operator can cancel it. The LED light on the rearview
mirror will turn green once a connection to a 9-1-1 operator has been made. The green LED
light will turn off once the 9-1-1 call is terminated. Have an authorized dealer service the
vehicle if the rearview mirror light is continuously red. On equipped vehicles, this feature
requires a functioning electrical system and wireless coverage to function properly. If a
connection is made between a 9-1-1 operator and your vehicle, you understand and agree
that 9-1-1 operators may, like any other 9-1-1 call, record conversations and sounds in and
near your vehicle upon connection.
3. Roadside Assistance (If Equipped) — If your vehicle is equipped with this feature and within
wireless range, you may be able to connect to Roadside Assistance by pressing the “ASSIST”
button on the rearview mirror. You will be presented with Assist Care options. Make a selection
by pressing the prompts displayed on the radio. If Roadside Assistance is provided to your
vehicle, you agree to be responsible for any additional roadside assistance service costs that
you may incur. In order to provide Uconnect® Services to you, we may record and monitor
your conversations with Roadside Assistance, Uconnect® Care or Vehicle Care, whether such
conversations are initiated through the Uconnect® Services in your vehicle, or via a landline or
mobile telephone, and may share information obtained through such recording and monitor-
ing in accordance with regulatory requirements. You acknowledge, agree and consent to any
recording, monitoring or sharing of information obtained through any such call recordings.
ASSIST/9-1-1 Buttons
1—ASSIST
Button2 — 9-1-1 Button
ELECTRONICS
75
Page 79 of 220
Uconnect® Access Remote Features
If you own a compatible iPhone® or Android® powered device, the Uconnect® Access App allows
you to remotely lock or unlock your doors, start your engine or activate your horn and lights from
virtually anywhere (Vehicle must be within the United States and have network coverage). You
can download the App from Mopar Owner Connect or from the App Store (iPhone) or Google
Play store. Visit UconnectPhone.com to determine if your device is compatible. For Uconnect®
Phone customer support and to determine if your device is compatible.
U.S. residents - visit UconnectPhone.com or call 1-877-855-8400
Remote Start— This feature provides the ability to start the engine on your vehicle, without the
keys and from virtually any distance. You can send a request to your vehicle in one of two ways:
1. Using the Uconnect® Access App from a compatible smartphone.
2. From the Mopar Owner Connect website.
• After 15 minutes if you have not entered your vehicle with the key, the engine will shut offautomatically.
• You can also send a command to turn-off an engine that has been remote started.
• This remote function requires your vehicle to be equipped with a factory-installed Remote Start system. To utilize this feature after the Uconnect® Access App is downloaded, login
with your user name and password.
NOTE:
Your four digit Uconnect® Security PIN is required to confirm the request. •
You can set-up notifications for your account to receive an email or text (SMS) message every
time a command is sent. Login to Mopar Owner Connect (
moparownerconnect.com) and
click on Edit Profile to manage Uconnect® Notifications.
Remote Door Lock/Unlock — This feature provides the ability to lock or unlock the door on
your vehicle, without the keys and from virtually any distance. You can send a request to your
vehicle in one of three ways:
1. Using the Uconnect® Access App from a compatible smartphone.
2. From the Mopar Owner Connect website.
3. By contacting the Uconnect® Care on the phone.
To use this feature after the Uconnect® Access App is downloaded, login using your user name
and password. You will need your four digit Uconnect® Security PIN to confirm the request. Press
the “closed lock” icon on your Uconnect® Access App to lock the doors, and press the “open
Lock” icon to unlock the driver’s door.
You can set-up notifications for your account to receive an email or text (SMS) message every
time a command is sent. Login to Mopar Owner Connect (moparownerconnect.com) and click
on Edit Profile to manage Uconnect® Notifications.
ELECTRONICS
77
Page 80 of 220
Remote Horn And Lights— It’s easy to locate a vehicle in a dark, crowded or noisy parking area
by activating the horn and lights. It may also help if you need to draw attention to your vehicle for
any reason. You can send a request to your vehicle in one of three ways:
1. Using the Uconnect® Access App from a compatible smartphone.
2. From the Mopar Owner Connect website.
3. By contacting the Uconnect® Care on the phone.
To use this feature after the Uconnect® Access App is downloaded, login using your user name
and password. You will need your four digit Uconnect® Security PIN to confirm the request. You
can set-up notifications for your account to receive an email or text (SMS) message every time
a command is sent. Login to Mopar Owner Connect (moparownerconnect.com) and click on
Edit Profile to manage Uconnect® Notifications.
Voice Texting — Want to dictate a personal message? Register with Uconnect® Access to take
advantage of a new, cloudbased Voice Texting service, an enhancement to Voice Text Reply.
Voice Texting allows you to compose a new text or reply to an incoming text message. Before you
attempt to use the Voice Texting feature, check to ensure you have the following:
1. A paired, Bluetooth® enabled phone with the Message Access Profile (MAP). Not all Bluetooth® enabled phones support MAP, including all iPhones® (Apple iOS). Visit
UconnectPhone.com for system and device compatibility information.
2. An active Uconnect® Access trial or paid subscription. Press the “Apps” button on the lower right hand corner of the touchscreen to begin the registration process.
3. Accept the “Allow MAP” profile request on your smart phone. (Please refer to device manufacturer instructions for details).
To Send A Text Message:
1. Push the Uconnect® Phone Button
on the steering wheel.
2. Wait for the beep.
3. Say “Text.”
4. Uconnect® will prompt you “Say the phone number, or full name and phone type of the contact you want to send a message to.”
5. Wait for the beep and say a contact that is in your phonebook, or a mobile phone number that you would like to send the message to.
6. Uconnect® will prompt you “Please say the message that you would like to send.” (If you do not hear this prompt, you may not have an active subscription with Uconnect® Access).
7. Wait for the beep, and then dictate any message up to 140 characters. If you exceed 140 characters, you will hear the following prompt: “Message was too long; your message will be
truncated.”
8. Uconnect® will then repeat the message back to you.
ELECTRONICS
78
Page 97 of 220
Media
Uconnect® offers connections via USB, SD, Bluetooth® and auxiliary ports (If Equipped). Voice
operation is only available for connected USB and iPod® devices. (Remote CD player optional
and not available on all vehicles.)
Push the VR button
. After the beep, say one of the following commands and follow the
prompts to switch your media source or choose an artist.
• Change source to Bluetooth®
• Change source to iPod®
• Change source to USB
• Play artist Beethoven; Play album Greatest Hits; Play songMoonlight Sonata; Play genre
Classical
TIP: Press the Browse button on the touchscreen to see all of the music on your iPod® or USB
device. Your Voice Command must match exactlyhow the artist, album, song and genre
information is displayed.
Uconnect® 5.0 Media
ELECTRONICS
95
Page 119 of 220
Media
Uconnect® offers connections via USB, SD, Bluetooth® and auxiliary ports (If Equipped). Voice
operation is only available for connected USB and iPod® devices. (Remote CD player optional
and not available on all vehicles.)
Push the VR button
. After the beep, say one of the following commands and follow the
prompts to switch your media source or choose an artist.
• Change source to Bluetooth®
• Change source to iPod®
• Change source to USB
• Play artist Beethoven; Play album Greatest Hits; Play songMoonlight Sonata; Play genre
Classical
TIP: Press the Browse button on the touchscreen to see all of the music on your iPod® or USB
device. Your Voice Command must match exactlyhow the artist, album, song and genre
information is displayed.
Uconnect® 8.4A/8.4AN Media
ELECTRONICS
117
Page 124 of 220
Uconnect® Access — If Equipped (8.4A/8.4AN)
An included trial and/or subscription is required to take advantage of the Uconnect® Access
services in the next section of this guide. To register with Uconnect® Access, press the “Apps”
button on the 8.4-inch touchscreen to get started. Detailed registration instructions can be found
on the next page.
*Uconnect® Access is available only on equipped vehicles purchased within the continental
United States, Alaska and Hawaii. Services can only be used where coverage is available; see
coverage map for details.
CALL9119-1-1 CallTheft Alarm Notification
Remote Door Lock/UnlockStolen Vehicle Assistance
Remote Vehicle Start**Yelp® Search
Remote Horn and Lights
Text
Voice Texting
Roadside Assistance CallWi-Fi Hotspot***
**If vehicle is equipped.
***Extra charges apply.
ELECTRONICS
122
Page 150 of 220
PROGRAMMABLE FEATURES
Uconnect® Customer Programmable Features
The Uconnect® system allows you to access Customer Programmable feature settings such as
Display, Clock, Safety/Assistance, Lights, Doors & Locks, Auto-On Comfort & Remote Start,
Engine Off Operation, Compass Settings, Audio, Trailer Brake, Phone/Bluetooth®, Suspension
and SiriusXM Setup and System Information through buttons on the touchscreen.
• Push the “Controls” button located near the bottom of the touchscreen, then push the“Settings” button on the touchscreen to access the Settings screen. When making a selection,
scroll up or down until the preferred setting is highlighted, then press and release the preferred
setting until a check-mark appears next to the setting, showing that setting has been selected.
The following feature settings are available:
• Display • Voice
• Units • Doors & Locks
• Safety/Assistance • Engine Off Options
• Auto-On Comfort & Remote Start • Audio
• Phone/Bluetooth® • SiriusXM Setup
• Lights • System Information
• Clock • Compass
Refer to “Uconnect Settings/Customer Programmable Features” found within “Understanding
Your Instrument Panel” located in your Owner's Manual on the DVD for further information.
UNIVERSAL GARAGE DOOR OPENER
(HomeLink®)
HomeLink® replaces up to three hand-held
transmitters that operate devices such as ga-
rage door openers, motorized gates, lighting or
home security systems. The HomeLink® unit is
powered by your vehicles 12 Volt battery.
The HomeLink® buttons that are located in the
overhead console or sunvisor designate the
three different HomeLink® channels.
The HomeLink® indicator is located above the
center button.
Homelink® Indicator
ELECTRONICS
148
Page 151 of 220
Before You Begin Programming HomeLink®
Ensure that your vehicle is parked outside of the garage before you begin programming.
For efficient programming and accurate transmission of the radio-frequency signal, it is recom-
mended that a new battery be placed in the hand-held transmitter of the device that is being
programmed to the HomeLink® system.
To erase the channels, place the ignition switch into the ON/RUN position, then push and hold the
two outside HomeLink® buttons (I and III) for up to 20 seconds or until the red indicator flashes.
NOTE:
Erasing all channels should only be performed when programming HomeLink® for the first time.
Do not erase channels when programming additional buttons.
If you have any problems, or require assistance, please call toll-free 1-800-355-3515 or, on the
Internet at for information or assistance.
Programming A Rolling Code
NOTE:
For programming Garage Door Openers that were manufactured after 1995. These Garage
Door Openers can be identified by the “LEARN” or “TRAIN” button located where the hanging
antenna is attached to the Garage Door Opener. It is NOT the button that is normally used to
open and close the door. The name and color of the button may vary by manufacturer.
1. Place the ignition switch into the ON/RUN position.
2. Place the hand-held transmitter 1 to 3 inches (3 to 8 cm) away from the HomeLink® button youwish to program while keeping the HomeLink® indicator light in view.
3. Push and hold the HomeLink® button you want to program while you push and hold the hand-held transmitter button.
4.
Continue to hold both buttons and observe the indicator light. The HomeLink® indicator will flash
slowly and then rapidly after HomeLink® has received the frequency signal from the hand-held
transmitter. Release both buttons after the indicator light changes from slow to rapid.
5. At the garage door opener motor (in the garage), locate the “LEARN” or “TRAINING” button. This can usually be found where the hanging antenna wire is attached to the garage
door opener motor. Firmly push and release the “LEARN” or “TRAINING” button.
NOTE:
You have 30 seconds in which to initiate the next step after the LEARN button has been pushed.
6. Return to the vehicle and push the programmed HomeLink® button twice (holding the button for two seconds each time). If the device is plugged in and activates, programming is
complete.
ELECTRONICS
149