tow CHRYSLER 200 CONVERTIBLE 2014 1.G User Guide
[x] Cancel search | Manufacturer: CHRYSLER, Model Year: 2014, Model line: 200 CONVERTIBLE, Model: CHRYSLER 200 CONVERTIBLE 2014 1.GPages: 124, PDF Size: 3.31 MB
Page 3 of 124
INTRODUCTION/WELCOME
WELCOME FROM CHRYSLER GROUP LLC..2
CONTROLS AT A GLANCE
DRIVER COCKPIT...............4
INSTRUMENT CLUSTER ...........6
GETTING STARTED
KEYFOB ....................8
REMOTE START................9
THEFT ALARM . ...............10
SUPPLEMENTAL RESTRAINT SYSTEM (SRS)
—AIRBAGS ..................11
CHILD RESTRAINTS .............12
SEATBELT ...................16
FRONTSEATS .................17
HEATEDSEATS ................19
TILT/TELESCOPING STEERING COLUMN..20
OPERATING YOUR VEHICLE
ENGINE BREAK-IN
RECOMMENDATIONS ............21
TURN SIGNAL/LIGHTS LEVER . ......22
WIPER/WASHER LEVER ...........23
SPEED CONTROL ..............24
MANUAL CLIMATE CONTROLS .....25
AUTOMATIC TEMPERATURE CONTROLS
(ATC) .....................26
POWER CONVERTIBLE TOP
OPERATION .................27
WIND BUFFETING ..............29
ELECTRONICS
YOUR VEHICLE'S SOUND SYSTEM ....30
Uconnect® 130 ..................32
Uconnect® 130 WITH SiriusXM SATELLITE
RADIO .....................34
Uconnect® 430/430N ..............37
Uconnect® 730N ................47
SiriusXM SATELLITE RADIO/TRAVEL
LINK.......................58
STEERING WHEEL AUDIO CONTROLS..61
SETTING THE ANALOG CLOCK .....62
iPod®/USB/MP3 CONTROL .........62
Uconnect® Phone ................63
Uconnect® VOICE COMMAND .......66
Bluetooth® STREAMING AUDIO ......69
ELECTRONIC VEHICLE INFORMATION
CENTER (EVIC) ................69
PROGRAMMABLE FEATURES .......70UNIVERSAL GARAGE DOOR OPENER
(HomeLink®)
..................71
POWER OUTLETS . . . ...........74
UTILITY
TRAILER TOWING WEIGHTS (MAXIMUM
TRAILER WEIGHT RATINGS) ........75
RECREATIONAL TOWING (BEHIND
MOTORHOME, ETC.) ............76
WHAT TO DO IN EMERGENCIES
ROADSIDE ASSISTANCE . .........77
INSTRUMENT CLUSTER WARNING
LIGHTS .....................77
IF YOUR ENGINE OVERHEATS ......81
JACKING AND TIRE CHANGING .....82
BATTERY LOCATION ............87
JUMP-STARTING ...............87
SHIFT LEVER OVERRIDE ..........89
TOWING A DISABLED VEHICLE . . . . . 90
FREEING A STUCK VEHICLE ........91
EVENT DATA RECORDER (EDR) ......92
MAINTAINING YOUR VEHICLE
OPENING THE HOOD...........93
ENGINE COMPARTMENT .........94
FLUIDSANDCAPACITIES .........96
MAINTENANCE SCHEDULE ........98
MAINTENANCE RECORD .........102
FUSES .....................103
TIRE PRESSURES . . . ............105
WHEEL AND WHEEL TRIM CARE . . . . 106
EXTERIOR BULBS ..............106
CUSTOMER ASSISTANCE
CHRYSLER GROUP LLC CUSTOMER
CENTER...................107
CHRYSLER CANADA INC. CUSTOMER
CENTER ...................107
ASSISTANCE FOR THE HEARING
IMPAIRED ..................107
PUBLICATIONS ORDERING . .......107
REPORTING SAFETY DEFECTS IN THE
UNITEDSTATES ...............108
MOPAR ACCESSORIES
AUTHENTIC ACCESSORIES BY MOPAR®. . 109
INDEX................... 110
FAQ(HowTo?)
FREQUENTLY ASKED QUESTIONS ....113
TABLE OF CONTENTS
Page 24 of 124
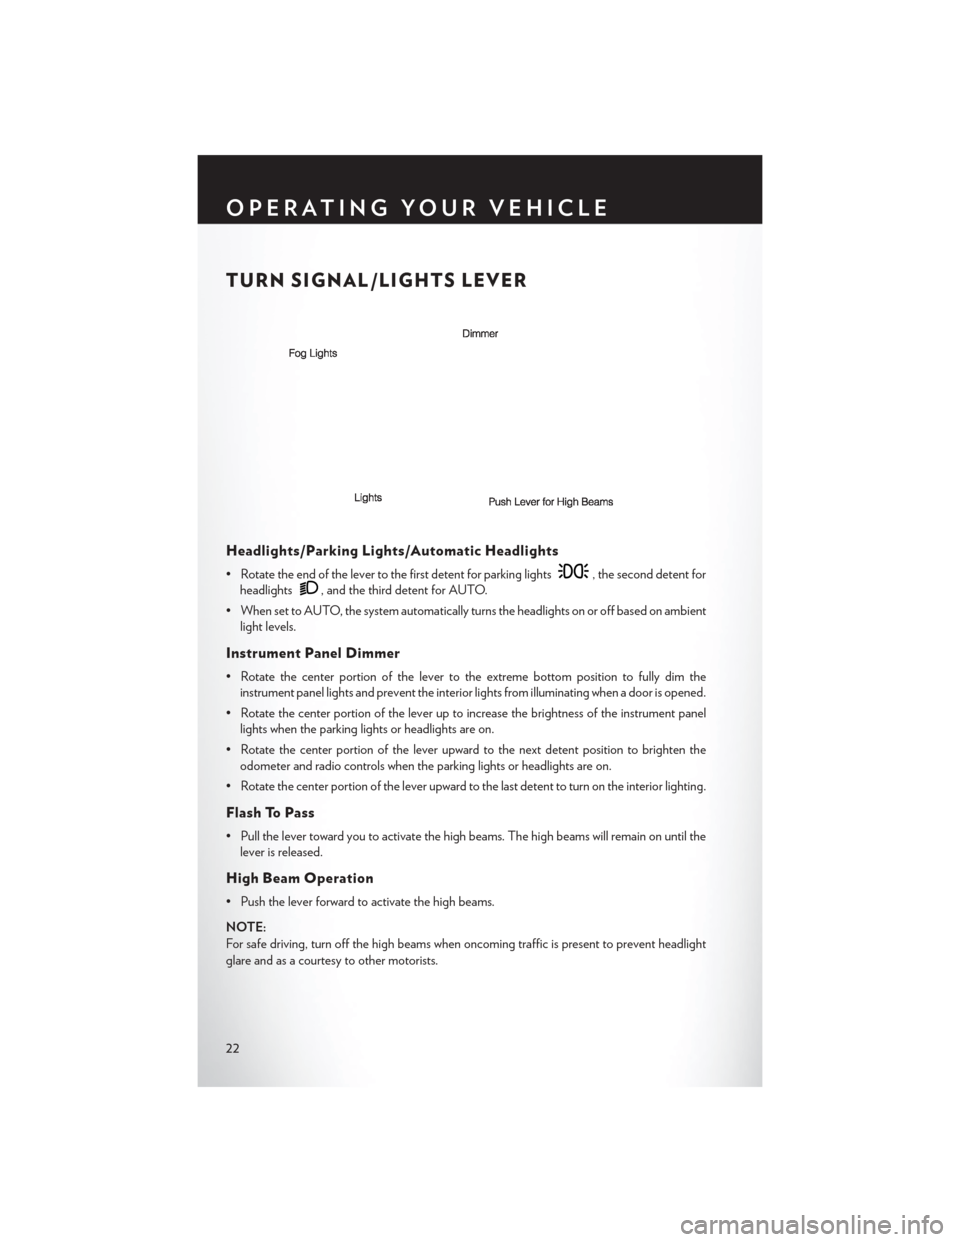
TURN SIGNAL/LIGHTS LEVER
Headlights/Parking Lights/Automatic Headlights
• Rotate the end of the lever to the first detent for parking lights, the second detent for
headlights
, and the third detent for AUTO.
• When set to AUTO, the system automatically turns the headlights on or off based on ambient light levels.
Instrument Panel Dimmer
• Rotate the center portion of the lever to the extreme bottom position to fully dim theinstrument panel lights and prevent the interior lights from illuminating when a door is opened.
• Rotate the center portion of the lever up to increase the brightness of the instrument panel lights when the parking lights or headlights are on.
• Rotate the center portion of the lever upward to the next detent position to brighten the odometer and radio controls when the parking lights or headlights are on.
• Rotate the center portion of the lever upward to the last detent to turn on the interior lighting.
Flash To Pass
• Pull the lever toward you to activate the high beams. The high beams will remain on until the lever is released.
High Beam Operation
• Push the lever forward to activate the high beams.
NOTE:
For safe driving, turn off the high beams when oncoming traffic is present to prevent headlight
glare and as a courtesy to other motorists.
OPERATING YOUR VEHICLE
22
Page 25 of 124
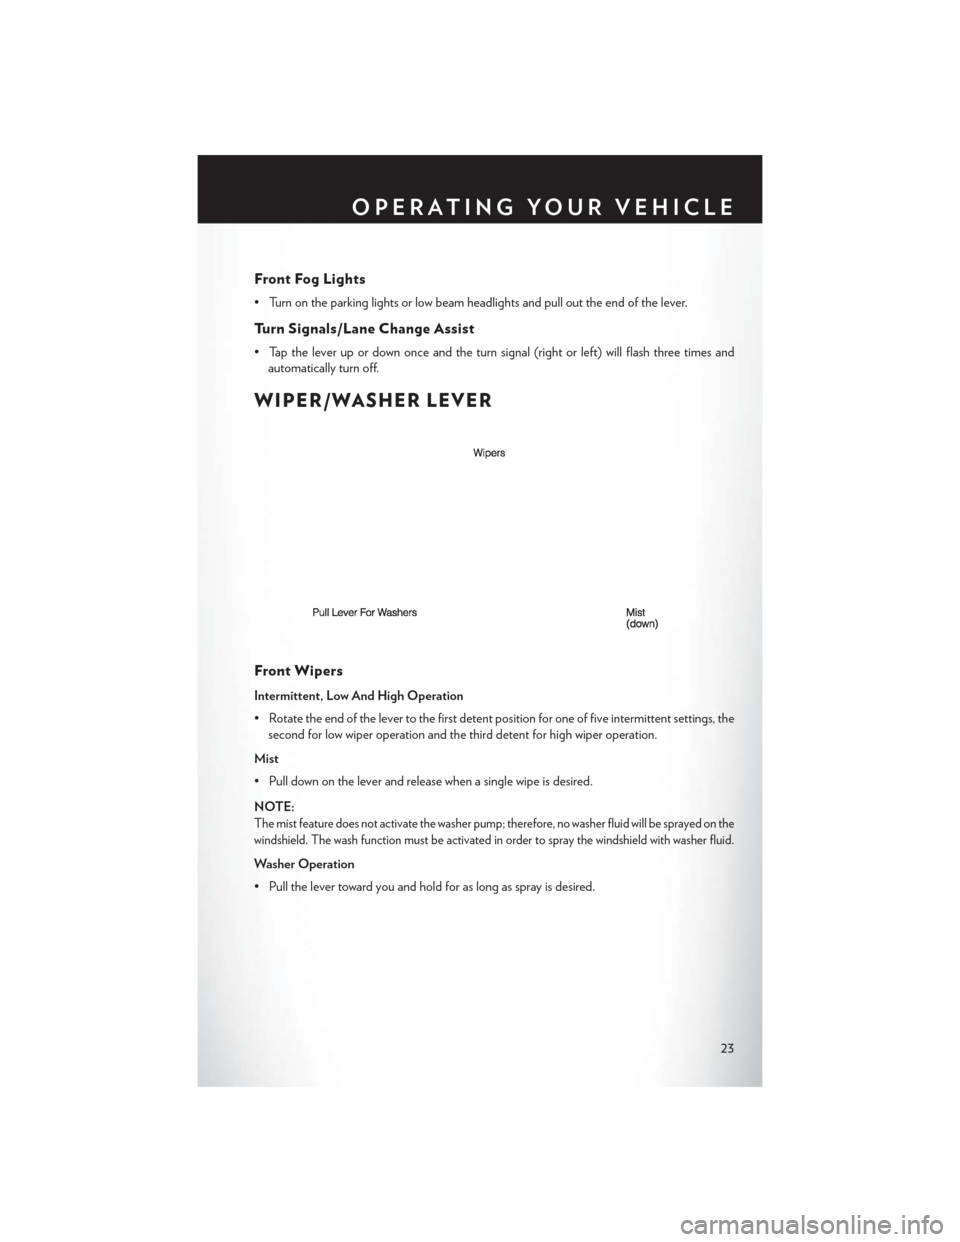
Front Fog Lights
• Turn on the parking lights or low beam headlights and pull out the end of the lever.
Turn Signals/Lane Change Assist
• Tap the lever up or down once and the turn signal (right or left) will flash three times andautomatically turn off.
WIPER/WASHER LEVER
Front Wipers
Intermittent, Low And High Operation
• Rotate the end of the lever to the first detent position for one of five intermittent settings, thesecond for low wiper operation and the third detent for high wiper operation.
Mist
• Pull down on the lever and release when a single wipe is desired.
NOTE:
The mist feature does not activate the washer pump; therefore, no washer fluid will be sprayed on the
windshield. The wash function must be activated in order to spray the windshield with washer fluid.
Washer Operation
• Pull the lever toward you and hold for as long as spray is desired.
OPERATING YOUR VEHICLE
23
Page 29 of 124
POWER CONVERTIBLE TOP OPERATION
• Before lowering the top, verify the cargo shield is perfectly positioned in the trunk.
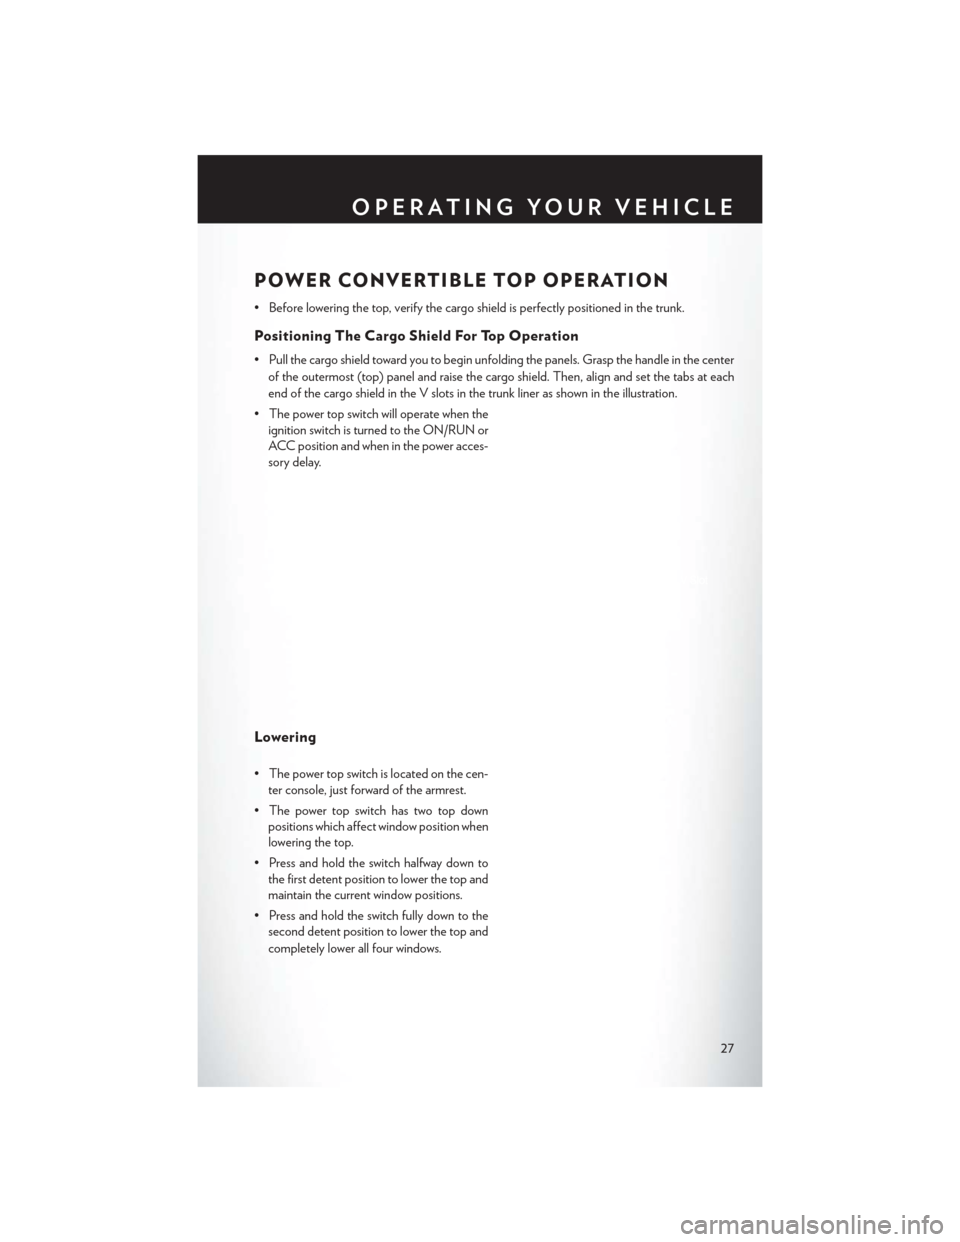
Positioning The Cargo Shield For Top Operation
• Pull the cargo shield toward you to begin unfolding the panels. Grasp the handle in the centerof the outermost (top) panel and raise the cargo shield. Then, align and set the tabs at each
end of the cargo shield in the V slots in the trunk liner as shown in the illustration.
• The power top switch will operate when the ignition switch is turned to the ON/RUN or
ACC position and when in the power acces-
sory delay.
Lowering
• The power top switch is located on the cen-ter console, just forward of the armrest.
• The power top switch has two top down positions which affect window position when
lowering the top.
• Press and hold the switch halfway down to the first detent position to lower the top and
maintain the current window positions.
• Press and hold the switch fully down to the second detent position to lower the top and
completely lower all four windows.
OPERATING YOUR VEHICLE
27
Page 77 of 124
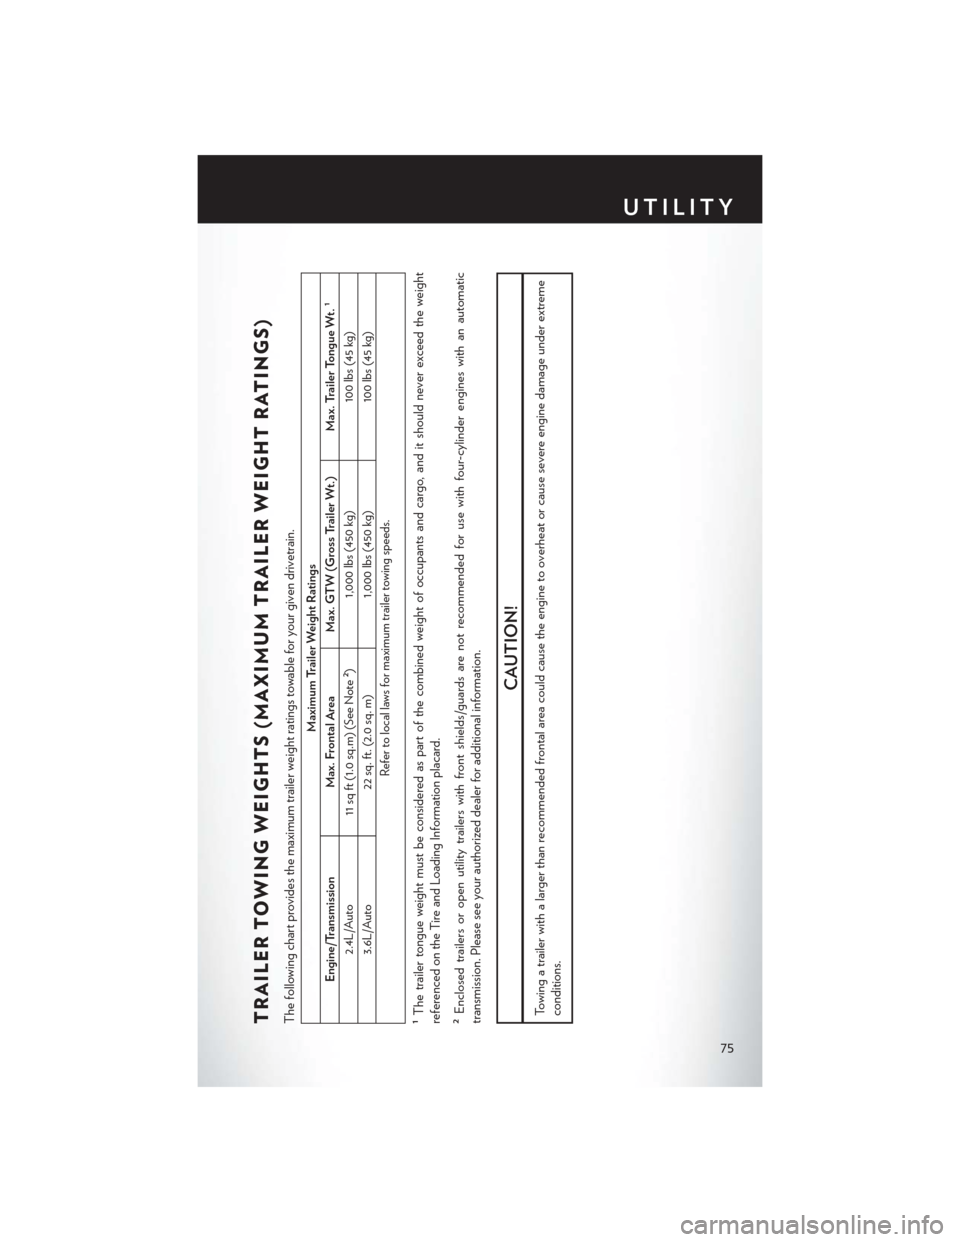
TRAILER TOWING WEIGHTS (MAXIMUM TRAILER WEIGHT RATINGS)The following chart provides the maximum trailer weight ratings towable for your given drivetrain.
Maximum Trailer Weight Ratings
Engine/Transmission Max. Frontal AreaMax. GTW (Gross Trailer Wt.) Max. Trailer Tongue Wt.
1
2.4L/Auto
11 sq ft (1.0 sq.m) (See Note
2)1,000 lbs (450 kg)
100 lbs (45 kg)
3.6L/Auto 22 sq. ft. (2.0 sq. m) 1,000 lbs (450 kg) 100 lbs (45 kg)
Refer to local laws for maximum trailer towing speeds.
1The trailer tongue weight must be considered as part of the combined weight of occupants and cargo, and it should never exceed the weight
referenced on the Tire and Loading Information placard.2Enclosed trailers or open utility trailers with front shields/guards are not recommended for use with four-cylinder engines with an automatic
transmission. Please see your authorized dealer for additional information.
CAUTION!
Towing a trailer with a larger than recommended frontal area could cause the engine to overheat or cause severe engine damage under extreme
conditions.
UTILITY
75
Page 78 of 124
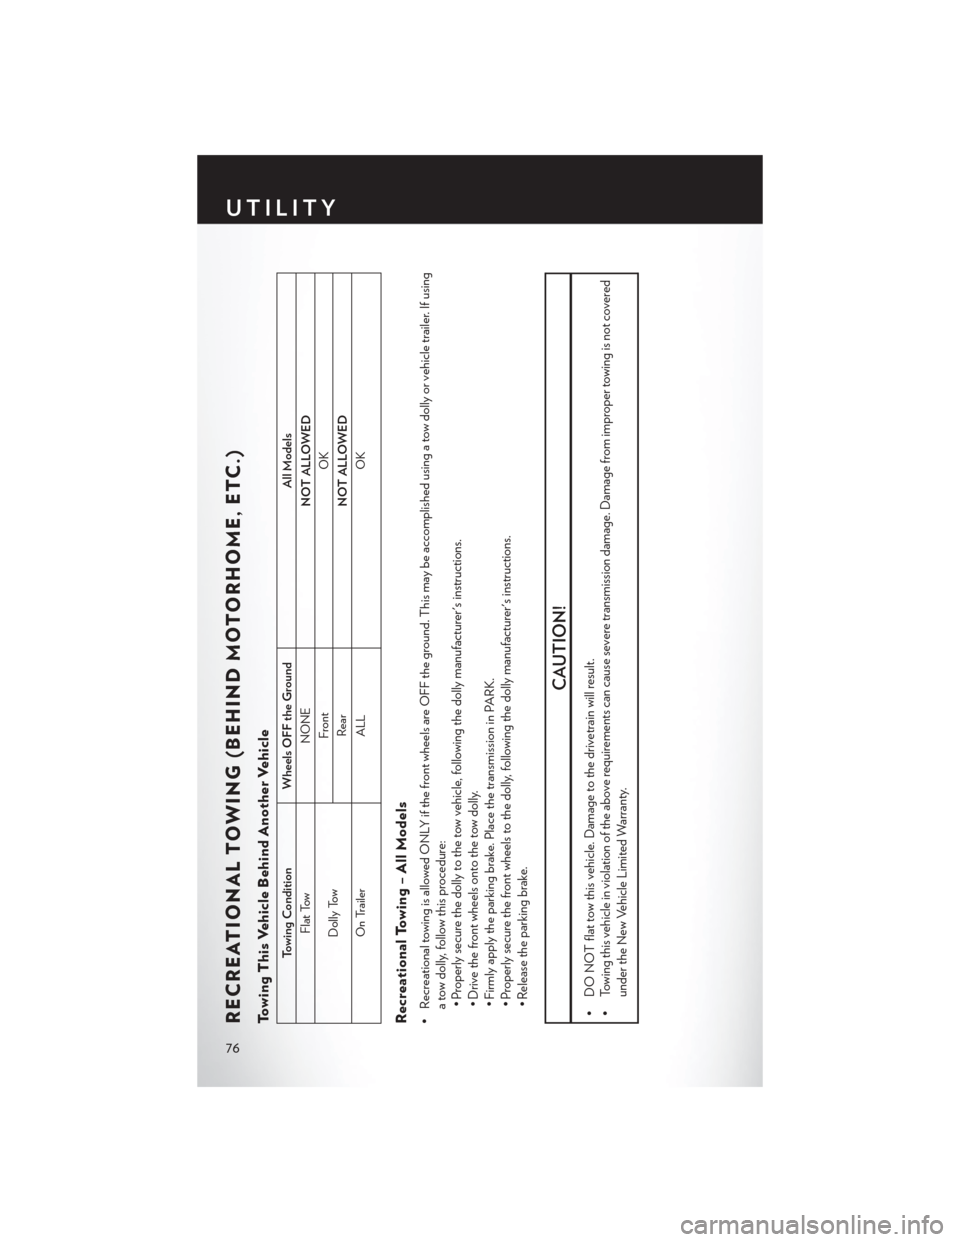
RECREATIONAL TOWING (BEHIND MOTORHOME, ETC.)Towing This Vehicle Behind Another Vehicle
Towing ConditionWheels OFF the Ground All Models
Flat Tow NONE
NOT ALLOWED
Dolly Tow Front
OK
Rear NOT ALLOWED
On Trailer ALL OK
Recreational Towing – All Models• Recreational towing is allowed ONLY if the front wheels are OFF the ground. This may be accomplished using a tow dolly or vehicle trailer. If using
a tow dolly, follow this procedure:• Properly secure the dolly to the tow vehicle, following the dolly manufacturer's instructions.
• Drive the front wheels onto the tow dolly.
• Firmly apply the parking brake. Place the transmission in PARK.
• Properly secure the front wheels to the dolly, following the dolly manufacturer's instructions.
• Release the parking brake.
CAUTION!
• DO NOT flat tow this vehicle. Damage to the drivetrain will result.
• Towing this vehicle in violation of the above requirements can cause severe transmission damage. Damage from improper towing is not covered
under the New Vehicle Limited Warranty.
UTILITY
76
Page 81 of 124
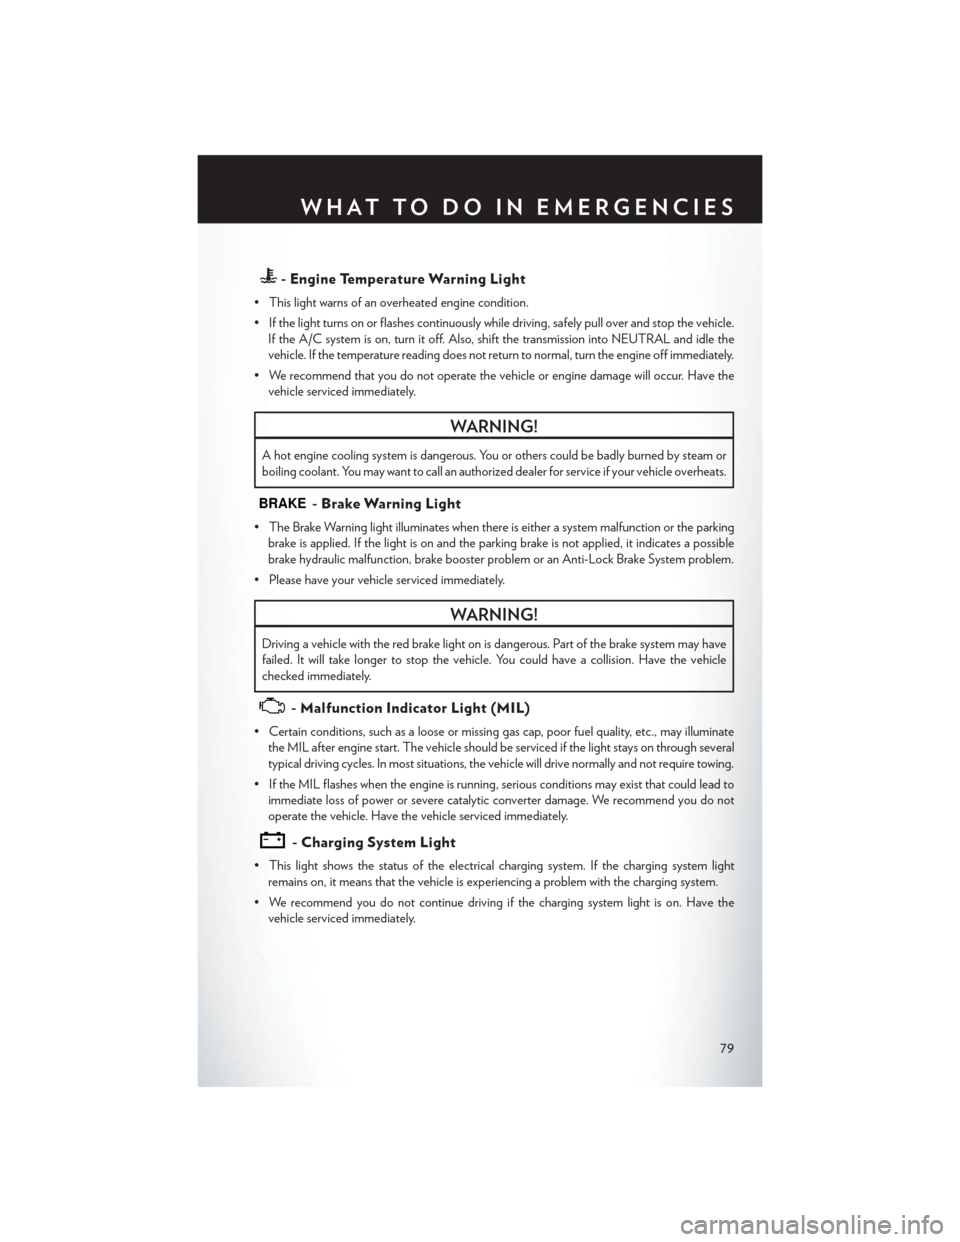
- Engine Temperature Warning Light
• This light warns of an overheated engine condition.
• If the light turns on or flashes continuously while driving, safely pull over and stop the vehicle.If the A/C system is on, turn it off. Also, shift the transmission into NEUTRAL and idle the
vehicle. If the temperature reading does not return to normal, turn the engine off immediately.
• We recommend that you do not operate the vehicle or engine damage will occur. Have the vehicle serviced immediately.
WARNING!
A hot engine cooling system is dangerous. You or others could be badly burned by steam or
boiling coolant. You may want to call an authorized dealer for service if your vehicle overheats.
BRAKE- Brake Warning Light
• The Brake Warning light illuminates when there is either a system malfunction or the parkingbrake is applied. If the light is on and the parking brake is not applied, it indicates a possible
brake hydraulic malfunction, brake booster problem or an Anti-Lock Brake System problem.
• Please have your vehicle serviced immediately.
WARNING!
Driving a vehicle with the red brake light on is dangerous. Part of the brake system may have
failed. It will take longer to stop the vehicle. You could have a collision. Have the vehicle
checked immediately.
- Malfunction Indicator Light (MIL)
• Certain conditions, such as a loose or missing gas cap, poor fuel quality, etc., may illuminate the MIL after engine start. The vehicle should be serviced if the light stays on through several
typical driving cycles. In most situations, the vehicle will drive normally and not require towing.
• If the MIL flashes when the engine is running, serious conditions may exist that could lead to immediate loss of power or severe catalytic converter damage. We recommend you do not
operate the vehicle. Have the vehicle serviced immediately.
- Charging System Light
• This light shows the status of the electrical charging system. If the charging system lightremains on, it means that the vehicle is experiencing a problem with the charging system.
• We recommend you do not continue driving if the charging system light is on. Have the vehicle serviced immediately.
WHAT TO DO IN EMERGENCIES
79
Page 82 of 124
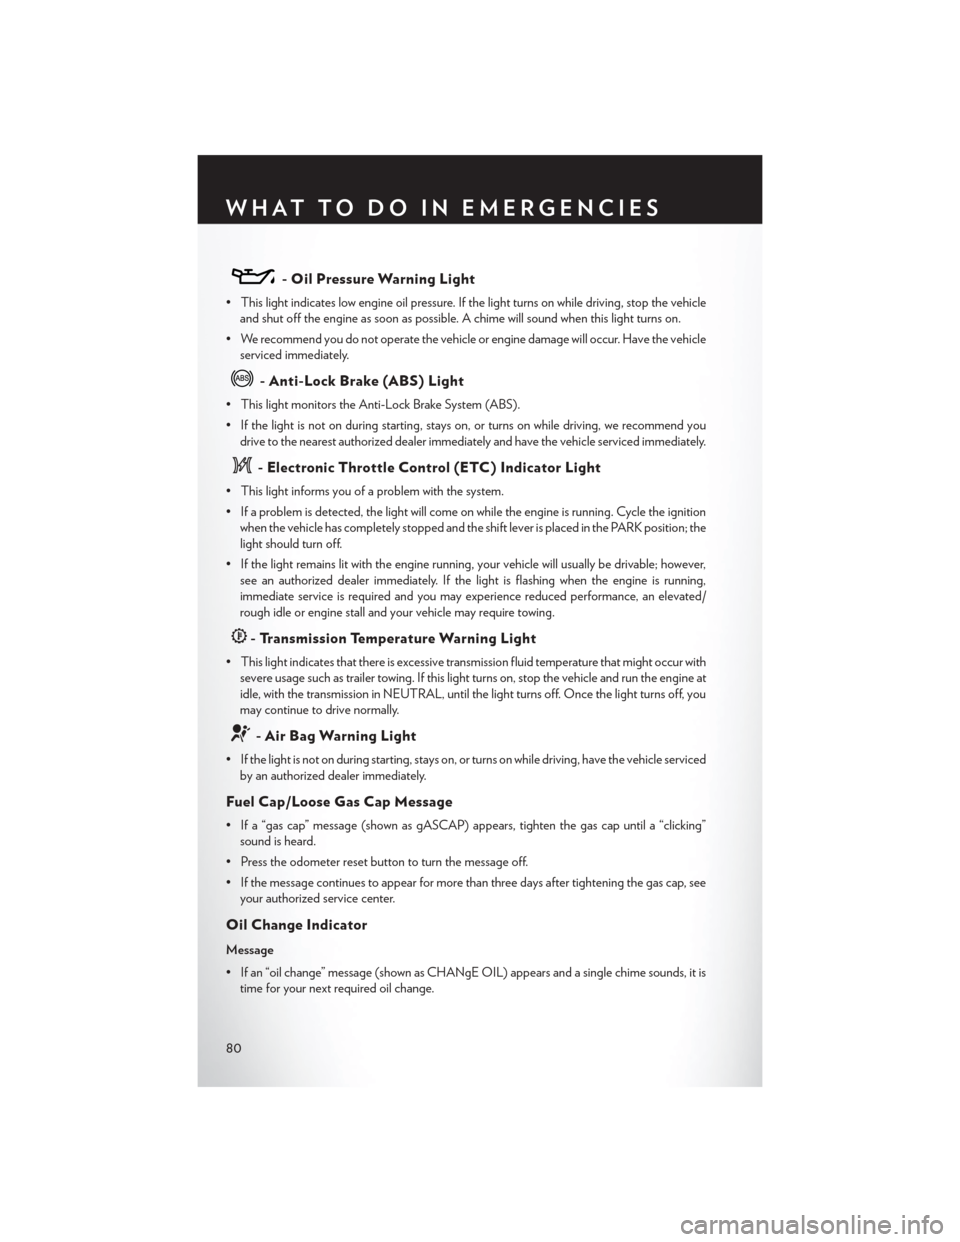
- Oil Pressure Warning Light
• This light indicates low engine oil pressure. If the light turns on while driving, stop the vehicleand shut off the engine as soon as possible. A chime will sound when this light turns on.
• We recommend you do not operate the vehicle or engine damage will occur. Have the vehicle serviced immediately.
- Anti-Lock Brake (ABS) Light
• This light monitors the Anti-Lock Brake System (ABS).
• If the light is not on during starting, stays on, or turns on while driving, we recommend youdrive to the nearest authorized dealer immediately and have the vehicle serviced immediately.
- Electronic Throttle Control (ETC) Indicator Light
• This light informs you of a problem with the system.
• If a problem is detected, the light will come on while the engine is running. Cycle the ignitionwhen the vehicle has completely stopped and the shift lever is placed in the PARK position; the
light should turn off.
• If the light remains lit with the engine running, your vehicle will usually be drivable; however, see an authorized dealer immediately. If the light is flashing when the engine is running,
immediate service is required and you may experience reduced performance, an elevated/
rough idle or engine stall and your vehicle may require towing.
- Transmission Temperature Warning Light
• This light indicates that there is excessive transmission fluid temperature that might occur withsevere usage such as trailer towing. If this light turns on, stop the vehicle and run the engine at
idle, with the transmission in NEUTRAL, until the light turns off. Once the light turns off, you
may continue to drive normally.
- Air Bag Warning Light
• If the light is not on during starting, stays on, or turns on while driving, have the vehicle servicedby an authorized dealer immediately.
Fuel Cap/Loose Gas Cap Message
• If a “gas cap” message (shown as gASCAP) appears, tighten the gas cap until a “clicking”sound is heard.
• Press the odometer reset button to turn the message off.
• If the message continues to appear for more than three days after tightening the gas cap, see your authorized service center.
Oil Change Indicator
Message
• If an “oil change” message (shown as CHANgE OIL) appears and a single chime sounds, it istime for your next required oil change.
WHAT TO DO IN EMERGENCIES
80
Page 83 of 124
Resetting The Light After Servicing
• Turn the ignition switch to the ON/RUN position (do not start engine).
• Fully depress the accelerator pedal three times within 10 seconds.
• Turn the ignition switch to the OFF/LOCK position.
IF YOUR ENGINE OVERHEATS
• In any of the following situations, you can reduce the potential for overheating by taking theappropriate action.• On the highways — slow down.
• In city traffic — while stopped, shift transmission into NEUTRAL, but do not increase engine
idle speed.
NOTE:
There are steps that you can take to slow down an impending overheat condition:
• If your air conditioner (A/C) is on, turn it off. The A/C system adds heat to the engine cooling system and turning the A/C off can help remove this heat.
• You can also turn the Temperature Control to maximum heat, the Mode Control to floor and the Fan Control to high. This allows the heater core to act as a supplement to the radiator and
aids in removing heat from the engine cooling system.
• If the temperature reading does not return to normal, turn the engine off immediately.
• We recommend that you do not operate the vehicle or engine damage will occur. Have the vehicle serviced immediately.
Engine Oil Overheating — 2.4L Gas
• On hot days the engine oil temperature may become too hot during sustained high-speeddriving or if towing a trailer up long grades. If this happens, a HOTOIL message will flash in the
odometer and the vehicle speed will be reduced to 48 mph (77 km/h) maximum until the
engine oil temperature is reduced.
NOTE:
Although the maximum vehicle speed is reduced to 48 mph (77 km/h), you may reduce vehicle
speed further as needed. Once the engine oil temperature is reduced, you may continue to drive
normally.
CAUTION!
Driving with a hot cooling system could damage your vehicle. If the temperature gauge reads
HOT (H), pull over and stop the vehicle. Idle the vehicle with the air conditioner turned off
until the pointer drops back into the normal range. If the pointer remains on HOT (H), and
you hear continuous chimes, turn the engine off immediately, and call for service.
WHAT TO DO IN EMERGENCIES
81
Page 84 of 124

WARNING!
You or others can be badly burned by hot engine coolant (antifreeze) or steam from your
radiator. If you see or hear steam coming from under the hood, do not open the hood until the
radiator has had time to cool. Never try to open a cooling system pressure cap when the
radiator or coolant bottle is hot.
JACKING AND TIRE CHANGING
Jack Location
• The jack and jack-handle are stowed under the load floor in the trunk.
Spare Tire Stowage
• The compact spare tire is stowed under the rear load floor in the trunk.
Spare Tire Removal
• Lift up the load floor cover and remove the hold down.
Preparations For Jacking
1. Park the vehicle on a firm, level surface.Avoid ice or slippery areas.
2. Turn on the Hazard Warning flashers.
3. Set the parking brake.
4. Place the shift lever into PARK (automatic transmission) or REVERSE (manual trans-
mission).
5. Turn OFF the ignition.
WHAT TO DO IN EMERGENCIES
82