CHRYSLER 300 2015 2.G Owner's Manual
Manufacturer: CHRYSLER, Model Year: 2015, Model line: 300, Model: CHRYSLER 300 2015 2.GPages: 180, PDF Size: 30.54 MB
Page 21 of 180

Locating LATCH Anchorages
The lower anchorages are round bars that
are found at the rear of the seat cushion where
it meets the seatback, below the anchorage
symbols on the seatback. They are just visible
when you lean into the rear seat to install the
child restraint. You will easily feel them if you
run your finger along the gap between the
seatback and seat cushion.
Locating Tether Anchorages
•In addition, there are tether strap anchorages behind each rear seating position located
in the panel between the rear seatback and the rear window. These tether strap anchorages are
under a plastic cover with the tether anchorage symbol on it.
Center Seat LATCH
If a child restraint installed in the center position
blocks the seat belt webbing or buckle for the
outboard position, do not use that outboard
position. If a child seat in the center position
blocks the outboard LATCH anchors or seat
belt, do not install a child seat in that outboard
position.
LATCH Anchorage Locations
Tether Anchorage Location
GETTING STARTED
19
Page 22 of 180

Installing The Child Restraint Using The LATCH Lower Anchors
NOTE:
Never “share” a LATCH anchorage with two or more child restraints.
1. Loosen the adjusters on the lower straps and on the tether strap of the child seat so that youcan more easily attach the hooks or connectors to the vehicle anchorages.
2. Attach the lower hooks or connectors of the child restraint to the lower anchorages in theselected seating position.
3. If the child restraint has a tether strap, connect it to the top tether anchorage. See below fordirections to attach a tether anchor.
4. Tighten all of the straps as you push the child restraint rearward and downward into the seat.
Remove slack in the straps according to the child restraint manufacturer’s instructions.
5. Test that the child restraint is installed tightly by pulling back and forth on the child seat at thebelt path. It should not move more than 1 inch (25.4 mm) in any direction.
Installing The Child Restraint Using The Vehicle Seat Belts
The seat belts in the passenger seating positions are equipped with a Switchable AutomaticLocking Retractor (ALR) that is designed to keep the lap portion of the seat belt tight around thechild restraint. Any seat belt system will loosen with time, so check the belt occasionally, and pullit tight if necessary.
Te t h e r A n c h o r a g e W e i g h t L i m i t
Always use the tether anchor when using the seat belt to install a forward facing child restraint, up
to the recommended weight limit of the child restraint.
To I n s t a l l A C h i l d S e a t U s i n g A n A L R :
1. Pull enough of the seat belt webbing from the retractor to pass it through the belt path of thechild restraint. Do not twist the belt webbing in the belt path.
2. Slide the latch plate into the buckle until you hear a “click.”
3. Pull on the webbing to make the lap portion tight against the child seat.
4. To lock the seat belt, pull down on the shoulder part of the belt until you have pulled all the seatbelt webbing out of the retractor. Then, allow the webbing to retract back into the retractor. Asthe webbing retracts, you will hear a clicking sound. This means the seat belt is now in theAutomatic Locking mode.
5. Try to pull the webbing out of the retractor. If it is locked, you should not be able to pull out anywebbing. If the retractor is not locked, repeat the last step.
6. Finally, pull up on any extra webbing to tighten the lap portion around the child restraint whileyou push the child restraint rearward and downward into the vehicle seat.
7. If the child restraint has a top tether strap and the seating position has a top tether anchorage,connect the tether strap to the anchorage and tighten the tether strap. See below fordirections to attach a tether anchor.
8. Test that the child restraint is installed tightly by pulling back and forth on the child seat at the
belt path. It should not move more than 1 inch (25.4 mm) in any direction.
GETTING STARTED
20
Page 23 of 180

Installing The Top Tether Strap (With Either Lower Anchors Or Vehicle
Seat Belt):
When installing a forward-facing child restraint, always secure the top tether strap, up to the
tether anchor weight limit, whether the child restraint is installed with the lower anchors or the
vehicle seat belt.
Te t h e r S t r a p I n s t a l l a t i o n
1. Rotate or lift the cover to access the anchor directly behind the seat where you are placing the
child restraint.
2. Route the tether strap to provide the most direct path for the strap between the anchor and
the child seat.
3. If your vehicle is equipped with adjustable rear head restraints, raise the head restraint, and
where possible, route the tether strap under the head restraint and between the two posts. If
not possible, lower the head restraint and pass the tether strap around the outboard side of the
head restraint.
4. Attach the tether strap hook of the child restraint to the top tether anchorage and remove
slack in the tether strap according to the child restraint manufacturer’s instructions.
Tether Strap Mounting
1—Cover3 — Attaching StrapA — Tether Strap HookB — Tether Anchor
GETTING STARTED
21
Page 24 of 180

WARNING!
•Inacollision,anunrestrainedchild,evenatinybaby,canbecomeaprojectileinsidethevehicle. The force required to hold even an infant on your lap could become so great thatyou could not hold the child, no matter how strong you are. The child and others could beseverely injured or killed. Any child riding in your vehicle should be in a proper restraint forthe child's size.
•Rearward-facingchildseatsmustneverbeusedinthefrontseatofavehiclewithafrontpassenger air bag. An air bag deployment could cause severe injury or death to infants inthis position.
• Only use a rearward-facing child restraint in a vehicle with a rear seat.
• Improper installation of a child restraint to the LATCH anchorages can lead to failure of an
infant or child restraint. The child could be severely injured or killed. Follow the manufac-
turer’s directions exactly when installing an infant or child restraint.
• An incorrectly anchored tether strap could lead to increased head motion and possible
injury to the child. Use only the anchor positions directly behind the child seat to secure a
child restraint top tether strap.
•Ifyourvehicleisequippedwithasplitrearseat,makesurethetetherstrapdoesnotslipinto
the opening between the seatbacks as you remove slack in the strap.
HEAD RESTRAINTS
Head restraints are designed to reduce the risk of injury by restricting head movement in the
event of a rear impact. Head restraints should be adjusted so that the top of the head restraint is
located above the top of your ear.
WARNING!
The head restraints for all occupants must be properly adjusted prior to operating the vehicle
or occupying a seat. Head restraints should never be adjusted while the vehicle is in motion.
Driving a vehicle with the head restraints improperly adjusted or removed could cause serious
injury or death in the event of a collision.
NOTE:
Do not reverse the head restraints (making the rear of the head restraint face forward) in an
attempt to gain additional clearance to the back of your head.
GETTING STARTED
22
Page 25 of 180

Reactive Head Restraints — Front Seats
The front driver and passenger seats are equipped with Reactive Head Restraints (RHR). In theevent of a rear impact the RHRs will automatically extend forward minimizing the gap betweenthe back of the occupants head and the RHR.
The RHRs will automatically return to their normal position following a rear impact. If the RHRsdo not return to their normal position see your authorized dealer immediately.
To raise the head restraint, pull upward on the head restraint. To lower the head restraint, push the
adjustment button located at the base of the head restraint and push downward on the head
restraint.
NOTE:
To r e m o v e t h e h e a d r e s t r a i n t , r a i s e i t a s f a r a s i t c a n g o t h e n p u s h t h e r e l e a s e b u t t o n a n d t h e
adjustment button at the base of each post while pulling the head restraint up. To reinstall the
head restraint, put the head restraint posts into the holes and push downward. Then adjust the
head restraint to the appropriate height.
WARNING!
• A loose head restraint thrown forward in a collision or hard stop could cause serious injury
or death to occupants of the vehicle. Always securely stow removed head restraints in a
location outside the occupant compartment.
•ALLtheheadrestraintsMUSTbereinstalledinthevehicletoproperlyprotectthe
occupants. Follow the re-installation instructions above prior to operating the vehicle or
occupying a seat.
•DonotplaceitemsoverthetopoftheReactiveHeadRestraint,suchascoats,seatcovers
or portable DVD players. These items may interfere with the operation of the Reactive
Head Restraint in the event of a collision and could result in serious injury or death.
Rear Head Restraints
The center head restraint has two adjustable positions, up or down. When the center seat is being
occupied the head restraint should be in the raised position. When there are no occupants in the
center seat the head restraint can be lowered for maximum visibility for the driver.
To raise the head restraint, pull upward on the head restraint. To lower the head restraint, push the
adjustment button located at the base of the head restraint and push downward on the head
restraint.
NOTE:
•Theheadrestraintshouldonlyberemovedbyqualifiedtechnicians,forservicepurposesonly.
If the center rear head restraints requires removal, see your authorized dealer.
•Theoutboardheadrestraintsarenotadjustable.
GETTING STARTED
23
Page 26 of 180

FRONT SEATS
Power Seats
The power seat switches are located on the outboard side of the front seat cushions.
The seat switch controls, forward/backward,
up/down or to recline the seat. The passenger’s
seat will move up or down, forward or rearward.
The recline switch controls the angle of the
seatback.
• Push the switch forward or rearward and the
seatback will move in either direction.
Power Lumbar
• Push the switch forward to increase the lum-
bar support. Push the switch rearward to
decrease the lumbar support.
• Pushing upward or downward on the switch
will raise and lower the position of the
support.
Power Seat Switches
1 — Seat Switch2 — Recline Switch
Power Lumbar Switch
GETTING STARTED
24
Page 27 of 180

Memory Seat
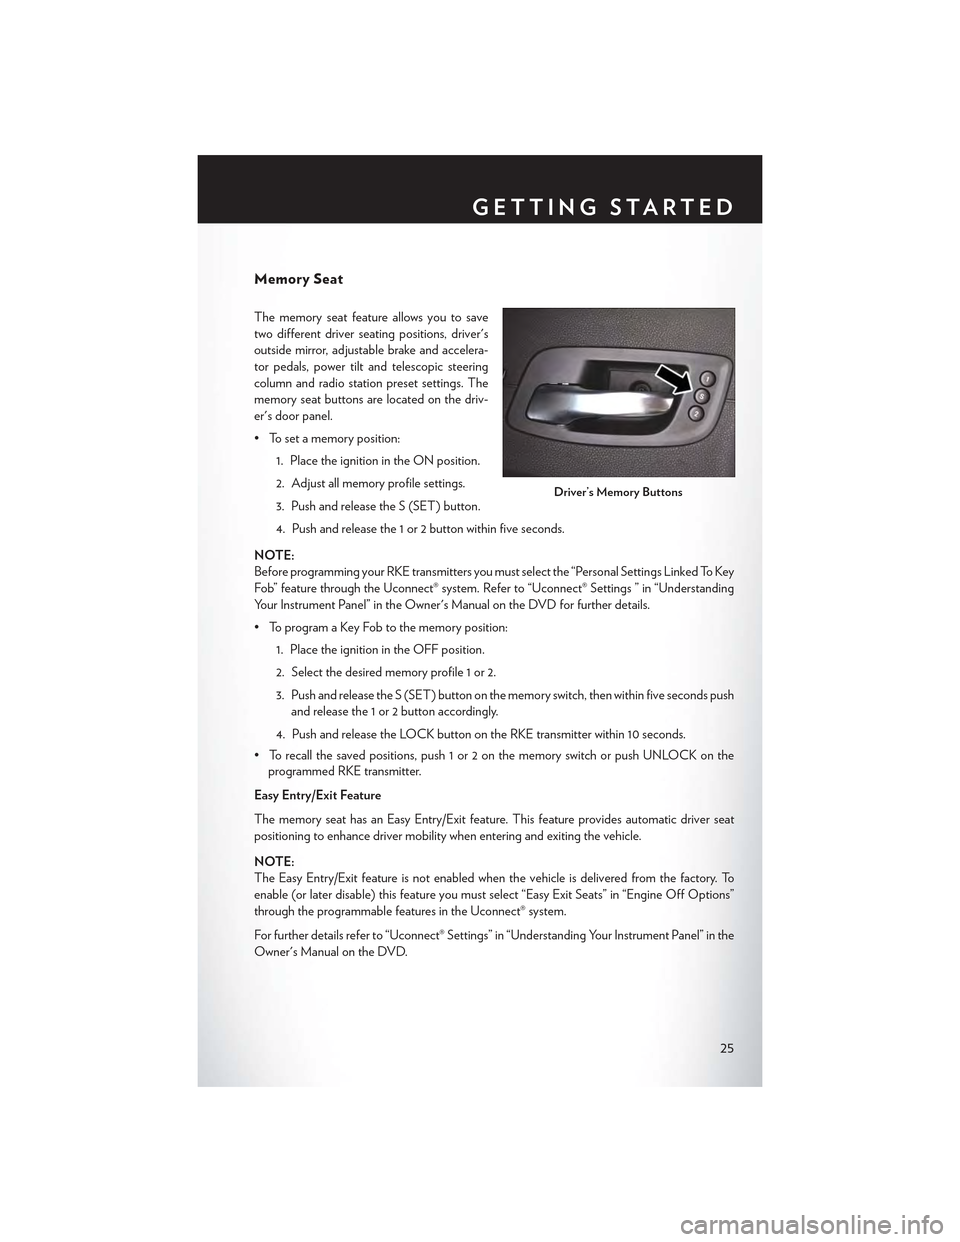
The memory seat feature allows you to save
two different driver seating positions, driver's
outside mirror, adjustable brake and accelera-
tor pedals, power tilt and telescopic steering
column and radio station preset settings. The
memory seat buttons are located on the driv-
er's door panel.
• To set a memory position:
1. Place the ignition in the ON position.
2. Adjust all memory profile settings.
3. Push and release the S (SET) button.
4. Push and release the 1 or 2 button within five seconds.
NOTE:
Before programming your RKE transmitters you must select the “Personal Settings Linked To Key
Fob” feature through the Uconnect® system. Refer to “Uconnect® Settings ” in “Understanding
Yo u r I n s t r u m e n t P a n e l ” i n t h e O w n e r ' s M a n u a l o n t h e D V D f o r f u r t h e r d e t a i l s .
• To program a Key Fob to the memory position:
1. Place the ignition in the OFF position.
2. Select the desired memory profile 1 or 2.
3. Push and release the S (SET) button on the memory switch, then within five seconds push
and release the 1 or 2 button accordingly.
4. Push and release the LOCK button on the RKE transmitter within 10 seconds.
•Torecallthesavedpositions,push1or2onthememoryswitchorpushUNLOCKonthe
programmed RKE transmitter.
Easy Entry/Exit Feature
The memory seat has an Easy Entry/Exit feature. This feature provides automatic driver seat
positioning to enhance driver mobility when entering and exiting the vehicle.
NOTE:
The Easy Entry/Exit feature is not enabled when the vehicle is delivered from the factory. To
enable (or later disable) this feature you must select “Easy Exit Seats” in “Engine Off Options”
through the programmable features in the Uconnect® system.
For further details refer to “Uconnect® Settings” in “Understanding Your Instrument Panel” in the
Owner's Manual on the DVD.
Driver’s Memory Buttons
GETTING STARTED
25
Page 28 of 180

Manual Seat
Forward/Rearward
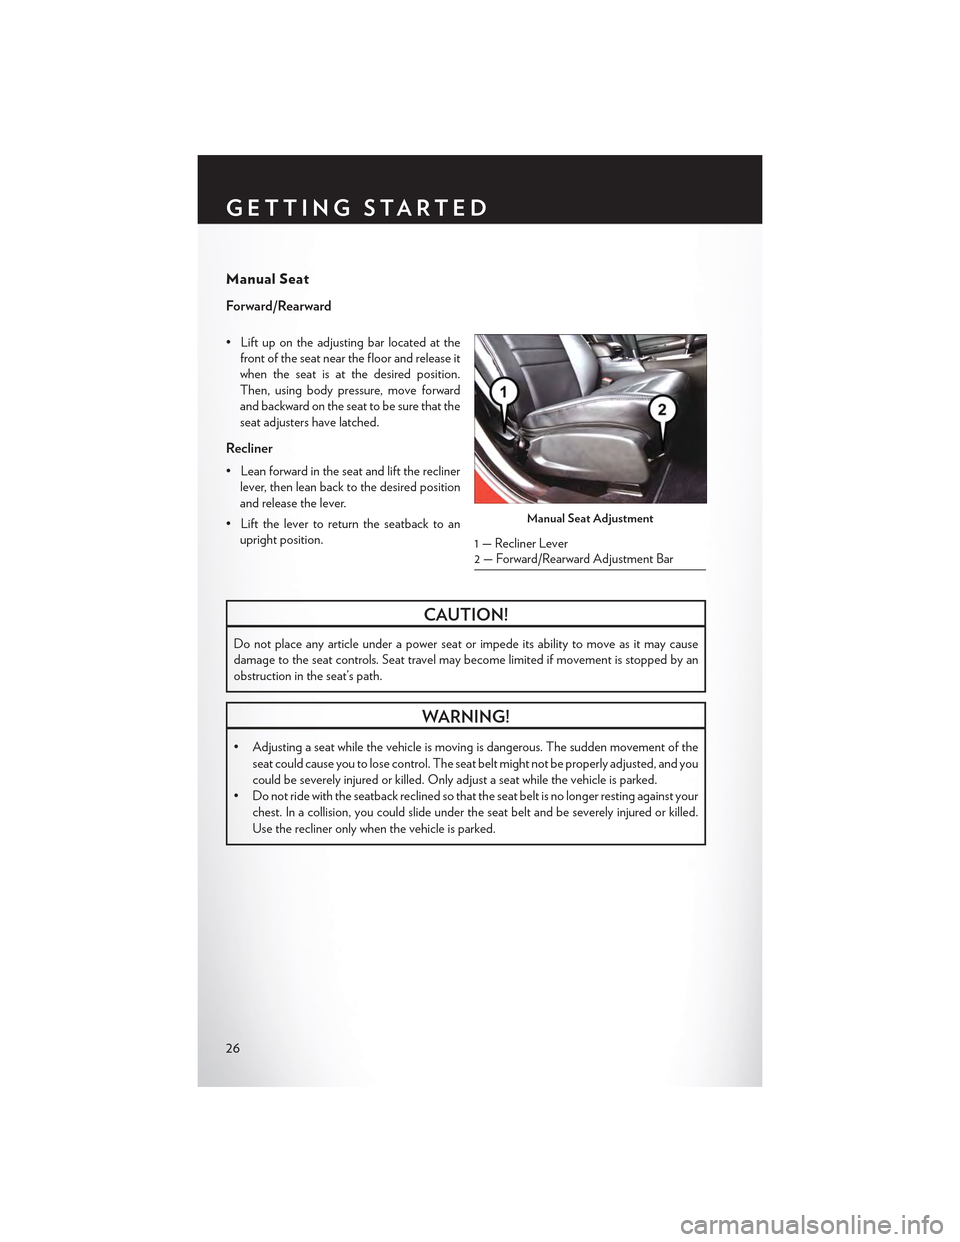
•Liftupontheadjustingbarlocatedatthe
front of the seat near the floor and release it
when the seat is at the desired position.
Then, using body pressure, move forward
and backward on the seat to be sure that the
seat adjusters have latched.
Recliner
• Lean forward in the seat and lift the recliner
lever, then lean back to the desired position
and release the lever.
•Liftthelevertoreturntheseatbacktoan
upright position.
CAUTION!
Do not place any article under a power seat or impede its ability to move as it may cause
damage to the seat controls. Seat travel may become limited if movement is stopped by an
obstruction in the seat’s path.
WARNING!
•Adjustingaseatwhilethevehicleismovingisdangerous.Thesuddenmovementofthe
seat could cause you to lose control. The seat belt might not be properly adjusted, and you
could be severely injured or killed. Only adjust a seat while the vehicle is parked.
•Donotridewiththeseatbackreclinedsothattheseatbeltisnolongerrestingagainstyour
chest. In a collision, you could slide under the seat belt and be severely injured or killed.
Use the recliner only when the vehicle is parked.
Manual Seat Adjustment
1—ReclinerLever2—Forward/RearwardAdjustmentBar
GETTING STARTED
26
Page 29 of 180

REAR SEAT
Folding Rear Seatback
•Pullontheloops,locatedneartheoutertopoftheseatbacks,tofolddowneitherorboth
seatbacks. These loops can be tucked away when not in use.
•Whentheseatbackisraisedtotheupright
position, make sure it is latched by strongly
pulling on the top of the seatback above the
seat loop.
WARNING!
•Be certain that the seatback is securely locked into position. If the seatback is not securely locked
into position, the seat will not provide the proper stability for child seats and/or passengers. An
improperly latched seat could cause you and others to severely injured or killed.
•Thecargoareaintherearofthevehicle(withtherearseatbacksinthelocked-upor
folded-down position) should not be used as a play area by children when the vehicle is in
motion. They could be severely injured or killed in a collision. Children should be seated
and using the proper restraint system.
HEATED SEATS
Front Heated Seats
The front heated seats control buttons are located within the climate or controls screen of the
touchscreen.
• Press the heated seat buttononce to turn the HI setting On.
• Press the heated seat buttona second time to turn the LO setting On.
• Press the heated seat buttona third time to turn the heating elements Off.
If the HI-level setting is selected, the system will automatically switch to LO-level after approximately
60 minutes. The LO-level setting will turn Off automatically after approximately 45 minutes.
NOTE:
On models that are equipped with remote start, this feature can be programmed to come on
during a remote start through the Uconnect® system. Refer to “Uconnect® Settings” in “Under-
standing Your Instrument Panel” in the Owner's Manual on the DVD.
Rear Seat Loop
GETTING STARTED
27
Page 30 of 180

Rear Heated Seats
Second row heated seat switches are located on the rear of the center console.
• Push the heated seat buttononce to turn the HI setting On.
• Push the heated seat buttona second time to turn the LO setting On.
• Push the heated seat buttona third time to turn the heating elements Off.
If the HI-level setting is selected, the system will automatically switch to LO-level after approxi-
mately 60 minutes. The LO-level setting will turn Off automatically after approximately 45
minutes.
WARNING!
•Personswhoareunabletofeelpaintotheskinbecauseofadvancedage,chronicillness,
diabetes, spinal cord injury, medication, alcohol use, exhaustion or other physical condi-
tions must exercise care when using the seat heater. It may cause burns even at low
temperatures, especially if used for long periods of time.
• Do not place anything on the seat that insulates against heat, such as a blanket or cushion.
This may cause the seat heater to overheat. Sitting in a seat that has been overheated
could cause serious burns due to the increased surface temperature of the seat.
HEATED AND COOLED CUPHOLDERS
Yo u r v e h i c l e m a y b e e q u i p p e d w i t h h e a t e d a n d c o o l e d c u p h o l d e r s . T h e c u p h o l d e r s a r e d e s i g n e d
to help keep warm beverages warm and cold beverages cool.
• Push the “Cold” symbol once to turn on the
cupholder; push the symbol a second time
to turn the cupholder off. Push the “Hot”
symbol once to activate the cupholder; push
the symbol a second time to turn off the
cupholder.
Heated And Cooled Cupholder Switches
GETTING STARTED
28