battery CHRYSLER 300 2015 2.G User Guide
[x] Cancel search | Manufacturer: CHRYSLER, Model Year: 2015, Model line: 300, Model: CHRYSLER 300 2015 2.GPages: 180, PDF Size: 30.54 MB
Page 3 of 180
INTRODUCTION/WELCOME
WELCOME FROM FCA US LLC . . . . . . . 2
CONTROLS AT A GLANCE
DRIVER COCKPIT...............4INSTRUMENT CLUSTER...........6
GETTING STARTED
KEY FOB . . . . . . . . . . . . . . . . . . . . 8REMOTE START...............10KEYLESS ENTER-N-GO™..........10VEHICLE SECURITY ALARM . .......14SEAT BELT SYSTEMS.............14SUPPLEMENTAL RESTRAINT SYSTEM (SRS)—AIRBAGS . . . . . . . . . . . . . . . . . . 15CHILD RESTRAINTS.............18HEAD RESTRAINTS..............22FRONT SEATS . . . . . . . . . . . . . . . . 24REAR SEAT...................27HEATED SEATS . . . . . . . . . . . . . . . . 27HEATED AND COOLED CUPHOLDERS...28ADJUSTABLE PEDALS............29TILT/TELESCOPING STEERINGCOLUMN . . . . . . . . . . . . . . . . . . . 30
OPERATING YOUR VEHICLE
ENGINE BREAK-INRECOMMENDATIONS............31TURN SIGNAL/WIPER/WASHER/HIGH BEAMLEVER.....................32HEADLIGHT SWITCH............33ELECTRONIC SPEED CONTROL.....35ADAPTIVE CRUISE CONTROL (ACC) . . . 37LANESENSE..................42PA R K V I E W ® R E A R B AC K- U P C A M E R A . . 4 2EIGHT-SPEED AUTOMATICTRANSMISSION................43AUTOSTICK . . . . . . . . . . . . . . . . . . 44AUTOMATIC TEMPERATURE CONTROLS(ATC) . . . . . . . . . . . . . . . . . . . . . 46BLIND SPOT MONITORING........48POWER SUNROOF..............49WIND BUFFETING..............51
ELECTRONICS
YO U R V E H I C L E ' S S O U N D SYS T E M....52IDENTIFYING YOUR RADIO........54Uconnect® ACCESS..............55Uconnect® 8.4A.................71Uconnect® 8.4AN...............94Uconnect® PHONE ..............109STEERING WHEEL AUDIO CONTROLS...118SETTING THE ANALOG CLOCK.....118DRIVER INFORMATION DISPLAY (DID). . 119PROGRAMMABLE FEATURES.......120UNIVERSAL GARAGE DOOR OPENER(HomeLink®)..................121
POWER OUTLETS.............123
UTILITY
TRAILER TOWING WEIGHTS (MAXIMUMTRAILER WEIGHT RATINGS).......124RECREATIONAL TOWING (BEHINDMOTORHOME, ETC.)...........125
WHAT TO DO IN EMERGENCIES
ROADSIDE ASSISTANCE..........126INSTRUMENT CLUSTER WARNINGLIGHTS . . . . . . . . . . . . . . . . . . . . 126INSTRUMENT CLUSTER INDICATORLIGHTS . . . . . . . . . . . . . . . . . . . . 130IF YOUR ENGINE OVERHEATS......132JACKING AND TIRE CHANGING.....132BATTERY LOCATION............139JUMP-STARTING..............139MANUAL PARK RELEASE..........141TOWING A DISABLED VEHICLE.....142FREEING A STUCK VEHICLE.......143EVENT DATA RECORDER (EDR).....144
MAINTAINING YOUR VEHICLE
OPENING THE HOOD . . .........145ENGINE COMPARTMENT — 3.6L.....146ENGINE COMPARTMENT — 5.7L.....148FLUID CAPACITIES . . . . . . . . . . . . . 150FLUIDS, LUBRICANTS, AND GENUINEPA RTS . . . . . . . . . . . . . . . . . . . . . 1 5 0MAINTENANCE PROCEDURES . . . . . . 152MAINTENANCE SCHEDULE . . .....152FUSES.....................157TIRE PRESSURES...............161SPARE TIRES — IF EQUIPPED . . . . . . . 162FUEL DOOR RELEASE ...........164WHEEL AND WHEEL TRIM CARE.....165REPLACEMENT BULBS...........166
CONSUMER ASSISTANCE
FCA US LLC CUSTOMER CENTER . . . . 167FCA CANADA INC. CUSTOMERCENTER...................167PUBLICATIONS ORDERING........167ASSISTANCE FOR THE HEARINGIMPAIRED . . . . . . . . . . . . . . . . . . 167REPORTING SAFETY DEFECTS IN THEUNITED STATES . . . . . . . . . . . . . . . 168
MOPAR® ACCESSORIES
AUTHENTIC ACCESSORIES BYMOPAR® . . . . . . . . . . . . . . . . . . . 169
FREQUENTLY ASKED QUESTIONSFREQUENTLY ASKED QUESTIONS....170
INDEX................... 171
TA B L E O F CO N T E N TS
Page 10 of 180
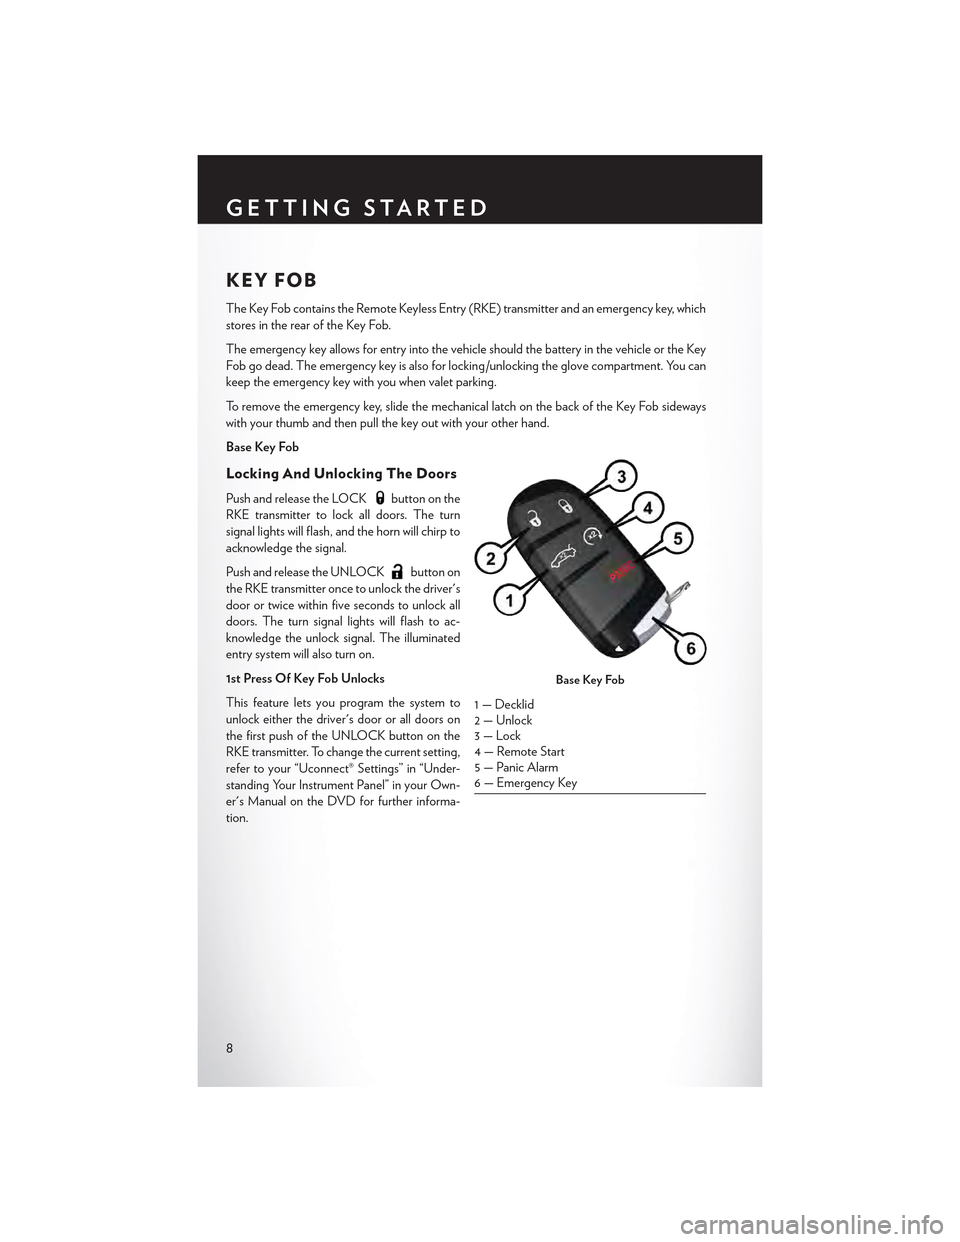
KEY FOB
The Key Fob contains the Remote Keyless Entry (RKE) transmitter and an emergency key, which
stores in the rear of the Key Fob.
The emergency key allows for entry into the vehicle should the battery in the vehicle or the Key
Fob go dead. The emergency key is also for locking /unlocking the glove compartment. You can
keep the emergency key with you when valet parking.
To r e m o v e t h e e m e r g e n c y k e y , s l i d e t h e m e c h a n i c a l l a t c h o n t h e b a c k o f t h e K e y F o b s i d e w a y s
with your thumb and then pull the key out with your other hand.
Base Key Fob
Locking And Unlocking The Doors
Push and release the LOCKbutton on the
RKE transmitter to lock all doors. The turn
signal lights will flash, and the horn will chirp to
acknowledge the signal.
Push and release the UNLOCKbutton on
the RKE transmitter once to unlock the driver's
door or twice within five seconds to unlock all
doors. The turn signal lights will flash to ac-
knowledge the unlock signal. The illuminated
entry system will also turn on.
1st Press Of Key Fob Unlocks
This feature lets you program the system to
unlock either the driver's door or all doors on
the first push of the UNLOCK button on the
RKE transmitter. To change the current setting,
refer to your “Uconnect® Settings” in “Under-
standing Your Instrument Panel” in your Own-
er's Manual on the DVD for further informa-
tion.
Base Key Fob
1 — Decklid2 — Unlock3 — Lock4 — Remote Start5 — Panic Alarm6 — Emergency Key
GETTING STARTED
8
Page 11 of 180
Opening The Trunk
Push the Trunk Release button on the transmitter two times within five seconds to open the trunk.
Panic Alarm
1. Push the PANIC button once to turn the panic alarm on.
2. Wait approximately three seconds and push the button a second time to turn the panic alarm
off.
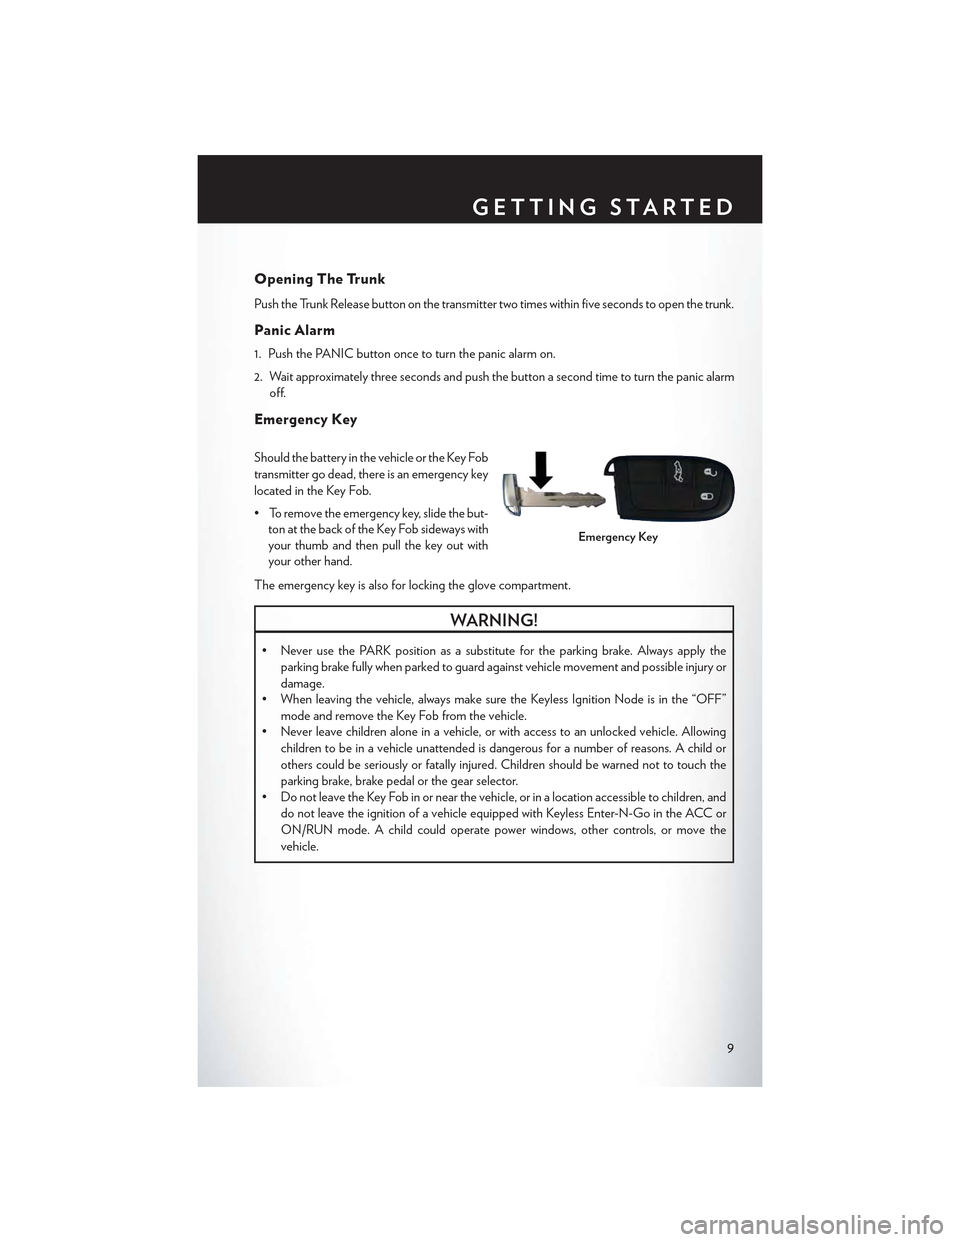
Emergency Key
Should the battery in the vehicle or the Key Fob
transmitter go dead, there is an emergency key
located in the Key Fob.
•Toremovetheemergencykey,slidethebut-
ton at the back of the Key Fob sideways with
your thumb and then pull the key out with
your other hand.
The emergency key is also for locking the glove compartment.
WARNING!
•NeverusethePARKpositionasasubstitutefortheparkingbrake.Alwaysapplythe
parking brake fully when parked to guard against vehicle movement and possible injury or
damage.
•Whenleavingthevehicle,alwaysmakesuretheKeylessIgnitionNodeisinthe“OFF”
mode and remove the Key Fob from the vehicle.
•Neverleavechildrenaloneinavehicle,orwithaccesstoanunlockedvehicle.Allowing
children to be in a vehicle unattended is dangerous for a number of reasons. A child or
others could be seriously or fatally injured. Children should be warned not to touch the
parking brake, brake pedal or the gear selector.
•DonotleavetheKeyFobinornearthevehicle,orinalocationaccessibletochildren,and
do not leave the ignition of a vehicle equipped with Keyless Enter-N-Go in the ACC or
ON/RUN mode. A child could operate power windows, other controls, or move the
vehicle.
Emergency Key
GETTING STARTED
9
Page 14 of 180
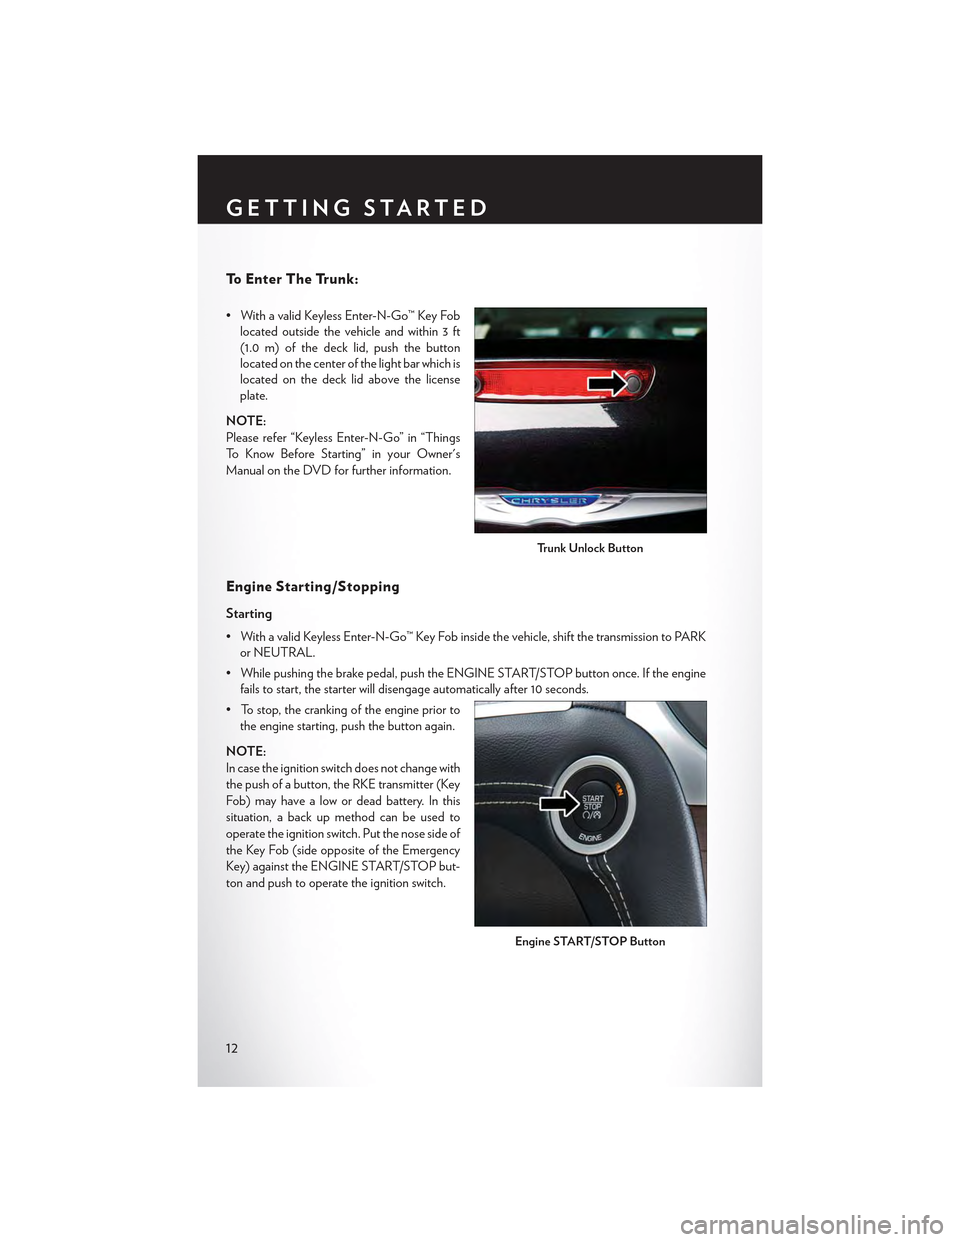
To E n t e r T h e Tr u n k :
• With a valid Keyless Enter-N-Go™ Key Fob
located outside the vehicle and within 3 ft
(1.0 m) of the deck lid, push the button
located on the center of the light bar which is
located on the deck lid above the license
plate.
NOTE:
Please refer “Keyless Enter-N-Go” in “Things
To K n o w B e f o r e S t a r t i n g ” i n y o u r O w n e r ' s
Manual on the DVD for further information.
Engine Starting /Stopping
Starting
•WithavalidKeylessEnter-N-Go™KeyFobinsidethevehicle,shiftthetransmissiontoPARK
or NEUTRAL.
• While pushing the brake pedal, push the ENGINE START/STOP button once. If the engine
fails to start, the starter will disengage automatically after 10 seconds.
• To stop, the cranking of the engine prior to
the engine starting, push the button again.
NOTE:
In case the ignition switch does not change with
the push of a button, the RKE transmitter (Key
Fob) may have a low or dead battery. In this
situation, a back up method can be used to
operate the ignition switch. Put the nose side of
the Key Fob (side opposite of the Emergency
Key) against the ENGINE START/STOP but-
ton and push to operate the ignition switch.
Trunk Unlock Button
Engine START/STOP Button
GETTING STARTED
12
Page 63 of 180
Selling Your Vehicle
When you sell your vehicle, we recommend that you remove your Uconnect® Access Account
information from the vehicle. You can do this using the radio touchscreen in the vehicle or on the
Mopar Owner Connect website (moparownerconnect.com). Removing your account informa-
tion cancels your subscription and makes your vehicle factory-ready for a new owner/subscriber.
1. From your vehicle’s radio touchscreen, select “Uconnect® Store” from the Apps Menu.
2. Select “My Apps,” then “Settings.” Press “Remove Uconnect® Account.”
3. Enter your Uconnect® Security PIN, and select “Continue.”
For additional information on Uconnect®:
•U.S.residents-visitDriveUconnect.comorcall1-877-855-8400.
•CanadianResidents-visitDriveUconnect.caorcall,1-800-465-2001(English)or
1-800-387-9983 (French).
Built-In Features (Uconnect® 8.4A/8.4AN)
CAUTION!
•Ignoringtherearviewmirrorlightcouldmeanyoumaynothave9-1-1Callserviceif
needed. If the rearview mirror light is illuminated, have an authorized dealer service the
9-1-1 Call system immediately.
•TheOccupantRestraintController(ORC)turnsontheAirBagWarningLightonthe
instrument panel if a malfunction is detected in any part of the air bag system. If the Air
Bag Warning Light is illuminated, the air bag system may not be working properly and the
9-1-1 system may not be able to send a signal to a 9-1-1 operator. If the Air Bag Warning
Light is illuminated, have an authorized dealer service your vehicle immediately.
•Ifanyoneinthevehiclecouldbeindanger(e.g.,fireorsmokeisvisible,dangerousroad
conditions or location), do not wait for voice contact from a 9-1-1 operator. All occupants
should exit the vehicle immediately and move to a safe location.
•Donotaddanyaftermarketelectricalequipmenttothevehicle’selectricalsystem.This
may prevent your vehicle from sending a signal to initiate an emergency call. To avoid
interference that can cause the 9-1-1 Call system to fail, never add aftermarket equipment
(e.g., two-way mobile radio, CB radio, data recorder, etc.) to your vehicle’s electrical
system or modify the antennas on your vehicle. IF YOUR VEHICLE LOSES BATTERY
POWER FOR ANY REASON (INCLUDING DURING OR AFTER AN ACCI-
DENT), THE UCONNECT® FEATURES, APPS AND SERVICES, AMONG OTH-
ERS, WILL NOT OPERATE.
ELECTRONICS
61
Page 79 of 180
•TheiPod®batterychargeswhenpluggedintotheUSBport(ifsupportedbythespecific
device).
• To route the USB/iPod® cable out of the center console, use the access cut out.
NOTE:
•WhenconnectingyouriPod®deviceforthefirsttime,thesystemmaytakeseveralminutesto
read your music, depending on the number of files. For example, the system will take
approximately five minutes for every 1,000 songs loaded on the device. Also during the
reading process, the Shuffle and Browse functions will be disabled. This process is needed to
ensure the full use of your iPod® features and only happens the first time it is connected. After
the first time, the reading process of your iPod® will take considerably less time unless changes
are made or new songs are added to the playlist.
• The USB port supports certain Mini, Classic, Nano, Touch, and iPhone® devices. The USB
port also supports playing music from compatible external USB Mass Storage Class memory
devices. Some iPod® software versions may not fully support the USB port features. Please visit
Apple’s website for iPod® software updates.
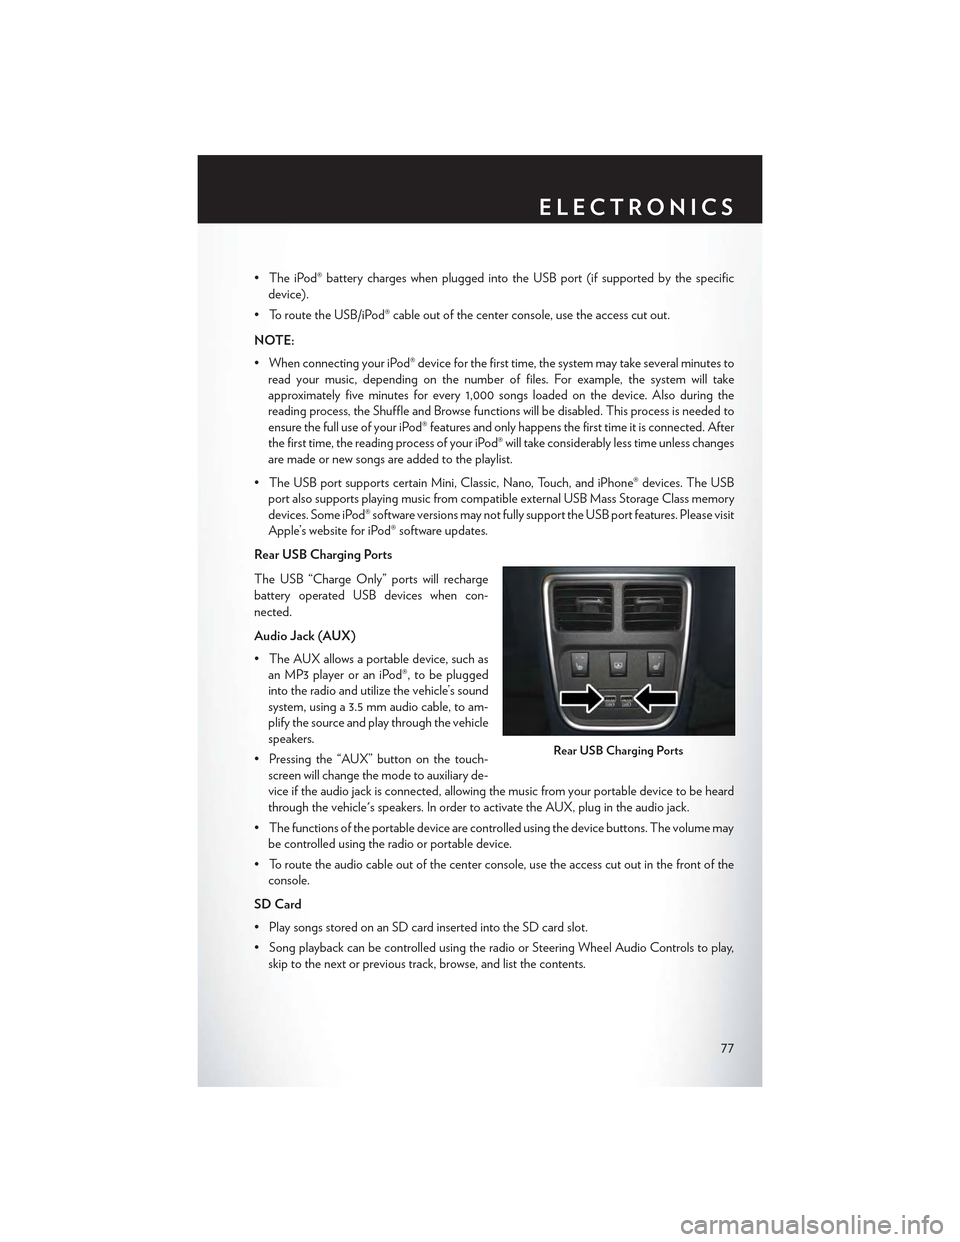
Rear USB Charging Ports
The USB “Charge Only” ports will recharge
battery operated USB devices when con-
nected.
Audio Jack (AUX)
• The AUX allows a portable device, such as
an MP3 player or an iPod®, to be plugged
into the radio and utilize the vehicle’s sound
system, using a 3.5 mm audio cable, to am-
plify the source and play through the vehicle
speakers.
• Pressing the “AUX” button on the touch-
screen will change the mode to auxiliary de-
vice if the audio jack is connected, allowing the music from your portable device to be heard
through the vehicle's speakers. In order to activate the AUX, plug in the audio jack.
•Thefunctionsoftheportabledevicearecontrolledusingthedevicebuttons.Thevolumemay
be controlled using the radio or portable device.
• To route the audio cable out of the center console, use the access cut out in the front of the
console.
SD Card
• Play songs stored on an SD card inserted into the SD card slot.
•SongplaybackcanbecontrolledusingtheradioorSteeringWheelAudioControlstoplay,
skip to the next or previous track, browse, and list the contents.
Rear USB Charging Ports
ELECTRONICS
77
Page 103 of 180
USB Port
Connect your iPod® or compatible device using a USB cable into the USB Port. USB Memory
sticks with audio files can also be used. Audio from the device can be played on the vehicle's
sound system while providing metadata (artist, track title, album, etc.) information on the radio
display.
When connected, the iPod®/compatible USB device can be controlled using the radio or
Steering Wheel Audio Controls to play, skip to the next or previous track, browse, and list the
contents.
The iPod® battery charges when plugged into the USB port (if supported by the specific device).
To route the USB/iPod® cable out of the center console, use the access cut out.
NOTE:
•WhenconnectingyouriPod®deviceforthefirsttime,thesystemmaytakeseveralminutesto
read your music, depending on the number of files. For example, the system will take
approximately five minutes for every 1000 songs loaded on the device. Also during the
reading process, the Shuffle and Browse functions will be disabled. This process is needed to
ensure the full use of your iPod® features and only happens the first time it is connected. After
the first time, the reading process of your iPod® will take considerably less time unless changes
are made or new songs are added to the playlist.
• The USB port supports certain Mini, Classic, Nano, Touch, and iPhone® devices. The USB
port also supports playing music from compatible external USB Mass Storage Class memory
devices. Some iPod® software versions may not fully support the USB port features. Please visit
Apple’s website for iPod® software updates.
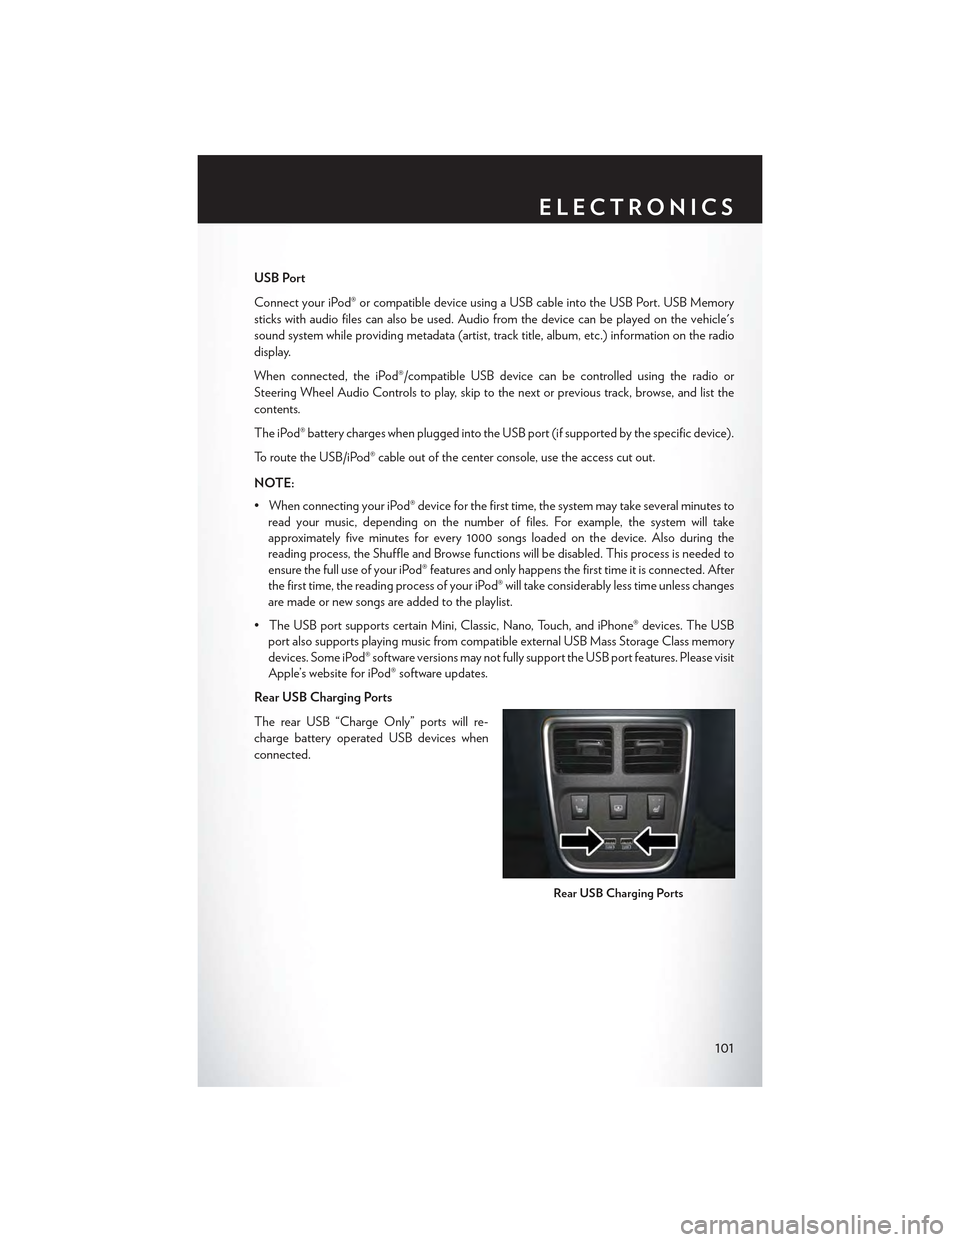
Rear USB Charging Ports
The rear USB “Charge Only” ports will re-
charge battery operated USB devices when
connected.
Rear USB Charging Ports
ELECTRONICS
101
Page 111 of 180
Uconnect® PHONE
Uconnect® Phone (Bluetooth® Hands Free Calling)
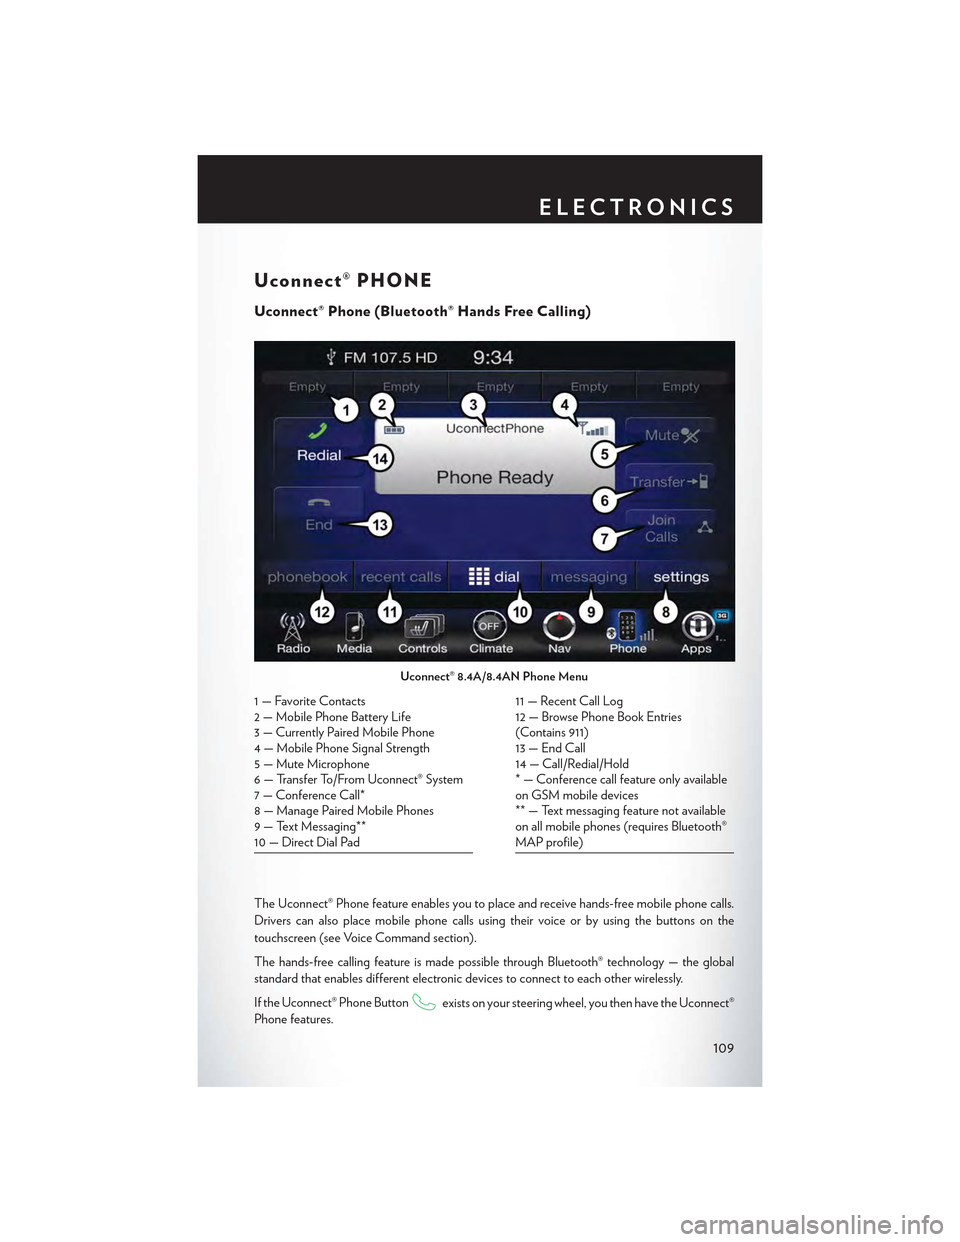
The Uconnect® Phone feature enables you to place and receive hands-free mobile phone calls.
Drivers can also place mobile phone calls using their voice or by using the buttons on the
touchscreen (see Voice Command section).
The hands-free calling feature is made possible through Bluetooth® technology — the global
standard that enables different electronic devices to connect to each other wirelessly.
If the Uconnect® Phone Buttonexists on your steering wheel, you then have the Uconnect®
Phone features.
Uconnect® 8.4A/8.4AN Phone Menu
1—FavoriteContacts2 — Mobile Phone Battery Life3—CurrentlyPairedMobilePhone4—MobilePhoneSignalStrength5—MuteMicrophone6—TransferTo/FromUconnect®System7 — Conference Call*8—ManagePairedMobilePhones9—TextMessaging**10 — Direct Dial Pad
11 — Recent Call Log12 — Browse Phone Book Entries(Contains 911)13 — End Call14 — Call/Redial/Hold* — Conference call feature only availableon GSM mobile devices** — Text messaging feature not availableon all mobile phones (requires Bluetooth®MAP profile)
ELECTRONICS
109
Page 119 of 180
Helpful Tips And Common Questions To Improve Bluetooth®
Performance With Your Uconnect® System
Mobile Phone won’t reconnect to system after pairing:
• Set mobile phone to auto-connect or trusted device in mobile phone Bluetooth® settings
(Blackberry devices).
•Performafactoryresetonyourmobilephone.Refertoyourmobilephonemanufactureror
cellular provider for instructions.
• Many mobile phones do not automatically reconnect after being restarted (hard reboot). Your
mobile phone can still be connected manually. Close all applications that may be operating
(refer to mobile phone manufacturer’s instructions), and follow “Pairing (Wirelessly Connect-
ing) Your Mobile Phone To The Uconnect® System”.
Mobile Phone won’t pair to system:
•Performahardresetinthemobilephonebyremovingthebattery(ifremovable—seeyour
mobile phone’s owner manual).
•DeletepairinghistoryinmobilephoneandUconnectsystem;usuallyfoundinphone’s
Bluetooth® connection settings.
•Verifyyouareselecting“Uconnect”inthediscoveredBluetooth®devicesonyourmobile
phone.
•Ifyourvehiclesystemgeneratesapincodethedefaultis0000.
Mobile Phonebook didn’t download:
•Check“Donotaskagain,”thenacceptthe“phonebookdownload”requestonyourmobile
phone.
• Up to 5,000 contact names with four numbers per contact will transfer to the Uconnect®
8.4A/8.4AN system phonebook.
• Up to 2,000 contact names with six numbers per contact will transfer to the Uconnect® 5.0
system phonebook.
Text messaging won’t work:
•Check“Donotaskagain,”thenacceptthe“connecttoyourmessages”requestonyourmobile
phone.
•VerifythatyourmobilephonehastheBluetooth®feature(MessageAccessProfile).
Can’t make a conference call:
•CDMA(Code-DivisionMultipleAccess)carriersdonotsupportconferencecalling.Referto
your mobile phone user’s manual for further information.
Making calls while connected to AUX:
•PlugginginyourmobilephonetoAUXwhileconnectedtoBluetooth®willdisableHands-
Free Calling. Do not make calls while your mobile phone is plugged into the AUX jack.
ELECTRONICS
117
Page 123 of 180

UNIVERSAL GARAGE DOOR OPENER
(HomeLink®)
• HomeLink® replaces up to three hand-held transmitters that operate devices such as garage
door openers, motorized gates, lighting or home security systems. The HomeLink® unit is
powered by your vehicles 12 Volt battery.
•TheHomeLink®buttonsthatarelocatedintheoverheadconsoleorsunvisordesignatethe
three different HomeLink® channels.
•TheHomeLink®indicatorislocatedabovethecenterbutton.
Before You Begin Programming
HomeLink®
Ensure that your vehicle is parked outside of
the garage before you begin programming.
For efficient programming and accurate trans-
mission of the radio-frequency signal, it is rec-
ommended that a new battery be placed in the
hand-held transmitter of the device that is be-
ing programmed to the HomeLink® system.
To erase the channels, place the ignition switch
into the ON/RUN position, then push and hold
the two outside HomeLink® buttons (I and III) for up to 20 seconds or until the red indicator
flashes.
NOTE:
Erasing all channels should only be performed when programming HomeLink® for the first time.
Do not erase channels when programming additional buttons.
If you have any problems, or require assistance, please call toll-free 1-800-355-3515 or, on the
Internet at HomeLink.com for information or assistance.
Programming A Rolling Code
NOTE:
For programming Garage Door Openers that were manufactured after 1995. These Garage
Door Openers can be identified by the “LEARN” or “TRAIN” button located where the hanging
antenna is attached to the Garage Door Opener. It is NOT the button that is normally used to
open and close the door. The name and color of the button may vary by manufacturer.
1. Place the ignition switch into the ON/RUN position.
2. Place the hand-held transmitter 1 to 3 inches (3 to 8 cm) away from the HomeLink® button you
wish to program while keeping the HomeLink® indicator light in view.
3. Push and hold the HomeLink® button you want to program while you push and hold the
hand-held transmitter button.
HomeLink® Buttons
ELECTRONICS
121