wheel CHRYSLER 300 SRT 2014 2.G Owner's Manual
[x] Cancel search | Manufacturer: CHRYSLER, Model Year: 2014, Model line: 300 SRT, Model: CHRYSLER 300 SRT 2014 2.GPages: 132, PDF Size: 4.64 MB
Page 55 of 132
• The functions of the portable device are controlled using the device buttons. The volume maybe controlled using the radio or portable device.
• To route the audio cable out of the center console, use the access cut out in the front of the console.
2. USB Port
• Connect your iPod® or compatible device using a USB cable into the USB Port. USB Memory sticks with audio files can also be used. Then, audio from the device can be played on the
vehicles sound system while providing metadata (artist, track title, album, etc.) information on
the radio display.
• When connected, the iPod®/compatible USB device can be controlled using the radio or Steering Wheel Audio Controls to play, skip to the next or previous track, browse, and list the
contents.
• The iPod® battery charges when plugged into the USB port (if supported by the specific device).
• To route the USB/iPod® cable out of the center console, use the access cut out in the front of the console.
NOTE:
When connecting your iPod® device for the first time, the system may take several minutes to
read your music, depending on the number of files. For example, the system will take approxi-
mately five minutes for every 1000 songs loaded on the device. Also during the reading process,
the Shuffle and Browse functions will be disabled. This process is needed to ensure the full use of
your iPod® features and only happens the first time it is connected. After the first time, the
reading process of your iPod® will take considerably less time unless changes are made or new
songs are added to the playlist.
• The USB port supports certain Mini, Classic, Nano, Touch, and iPhone® devices. The USB port also supports playing music from compatible external USB Mass Storage Class memory
devices. Some iPod® software versions may not fully support the USB port features. Please visit
Apple’s website for iPod® software updates.
3. SD Card
• Play songs stored on an SD card inserted into the SD card slot.
• Song playback can be controlled using the radio or Steering Wheel Audio Controls to play, skip to the next or previous track, browse, and list the contents.
4. Bluetooth® Streaming Audio
• If equipped with Uconnect® Voice Command, your Bluetooth-equipped iPod® devices, cell phones or other media players, may also be able to stream music to your vehicle's sound
system. Your connected device must be Bluetooth-compatible, and paired with your
Uconnect® system (see Uconnect® Phone for pairing instructions). You can access the music
from your connected Bluetooth® device by touching the Source soft-key while in Player mode.
ELECTRONICS
53
Page 56 of 132
Uconnect® PHONE (Bluetooth® HANDS FREE
CALLING)
• If the Uconnect® Phone Buttonexists on your steering wheel, then you have the
Uconnect® Phone features.
• The Uconnect® Phone is a voice-activated, hands-free, in-vehicle communications system with Voice Command Capability (see Voice Command section).
• The Uconnect® Phone allows you to dial a phone number with your mobile phone using simple voice commands or using screen soft-keys.
• Refer to the Understand The Features Of Your Vehicle section of your vehicle's Owner's Manual on the DVD for further details.
NOTE:
The Uconnect® Phone requires a mobile phone equipped with the Bluetooth® Hands-Free Profile,
Version 1.0 or higher. For Uconnect® customer support, call 1–877–855–8400 or visit
www.UconnectPhone.com. Canadian Residents: call 1–800–465–2001 (English) or 1–800–387–
9983 (French).
Pairing A Phone
• To use the Uconnect® Phone feature, you must first pair your Bluetooth® phone with the Uconnect® system.
Start Pairing Procedure On The Radio
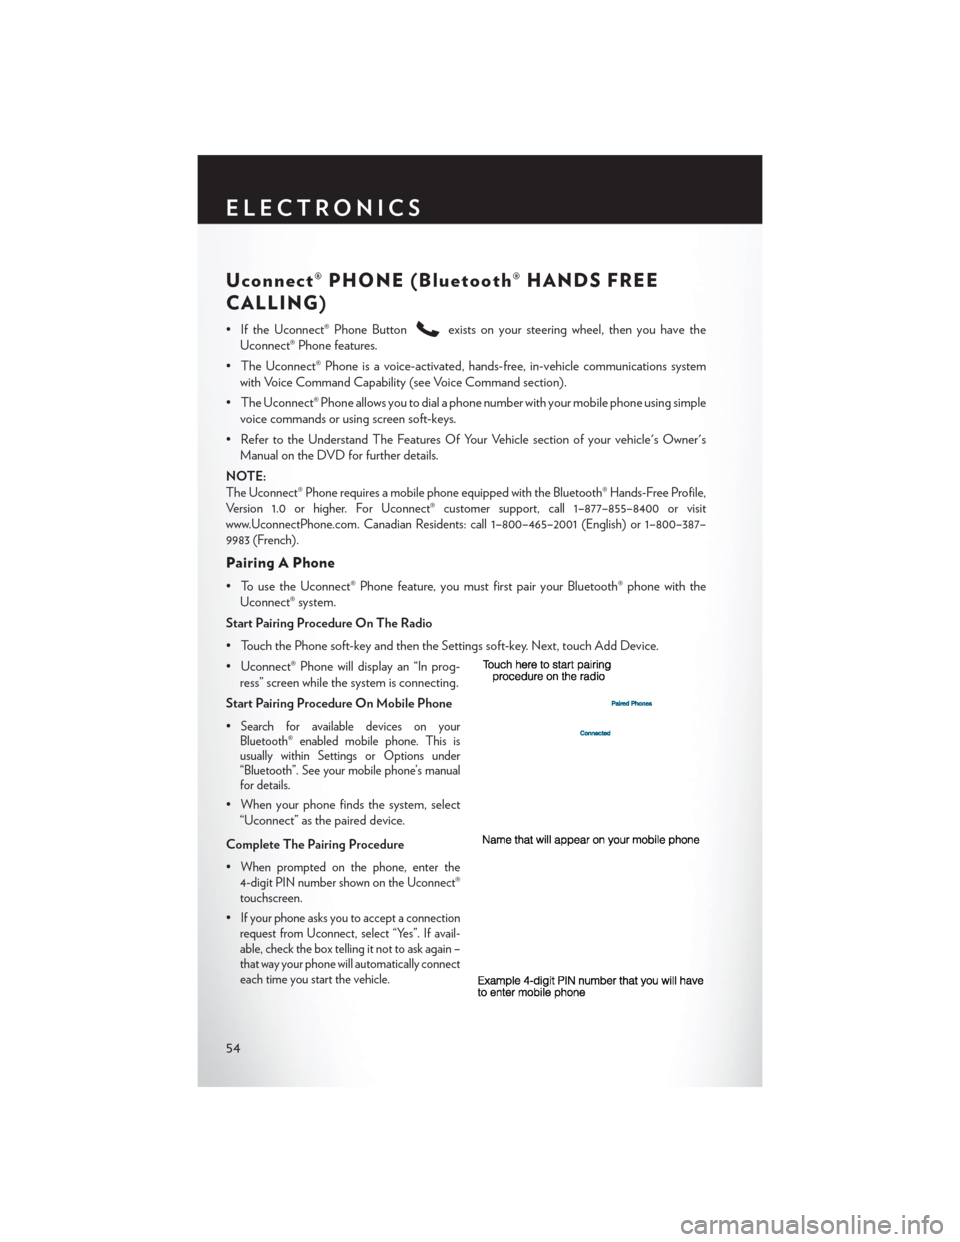
• Touch the Phone soft-key and then the Settings soft-key. Next, touch Add Device.
• Uconnect® Phone will display an “In prog- ress” screen while the system is connecting.
Start Pairing Procedure On Mobile Phone
•
Search for available devices on your
Bluetooth® enabled mobile phone. This is
usually within Settings or Options under
“Bluetooth”. See your mobile phone’s manual
for details.
• When your phone finds the system, select
“Uconnect” as the paired device.
Complete The Pairing Procedure
•
When prompted on the phone, enter the
4-digit PIN number shown on the Uconnect®
touchscreen.
•If your phone asks you to accept a connection
request from Uconnect, select “Yes”. If avail-
able, check the box telling it not to ask again –
that way your phone will automatically connect
each time you start the vehicle.
ELECTRONICS
54
Page 57 of 132
Select The Mobile Phone's Priority Level
• When the pairing process has successfully completed, the system will prompt you to choosewhether or not this is your favorite phone. Selecting Yes will make this phone the highest
priority. This phone will take precedence over other paired phones within range. Only one
phone can be paired at a time.
• You are now ready to make hands-free calls. Press the Uconnect® Phone button on your steering wheel to begin.
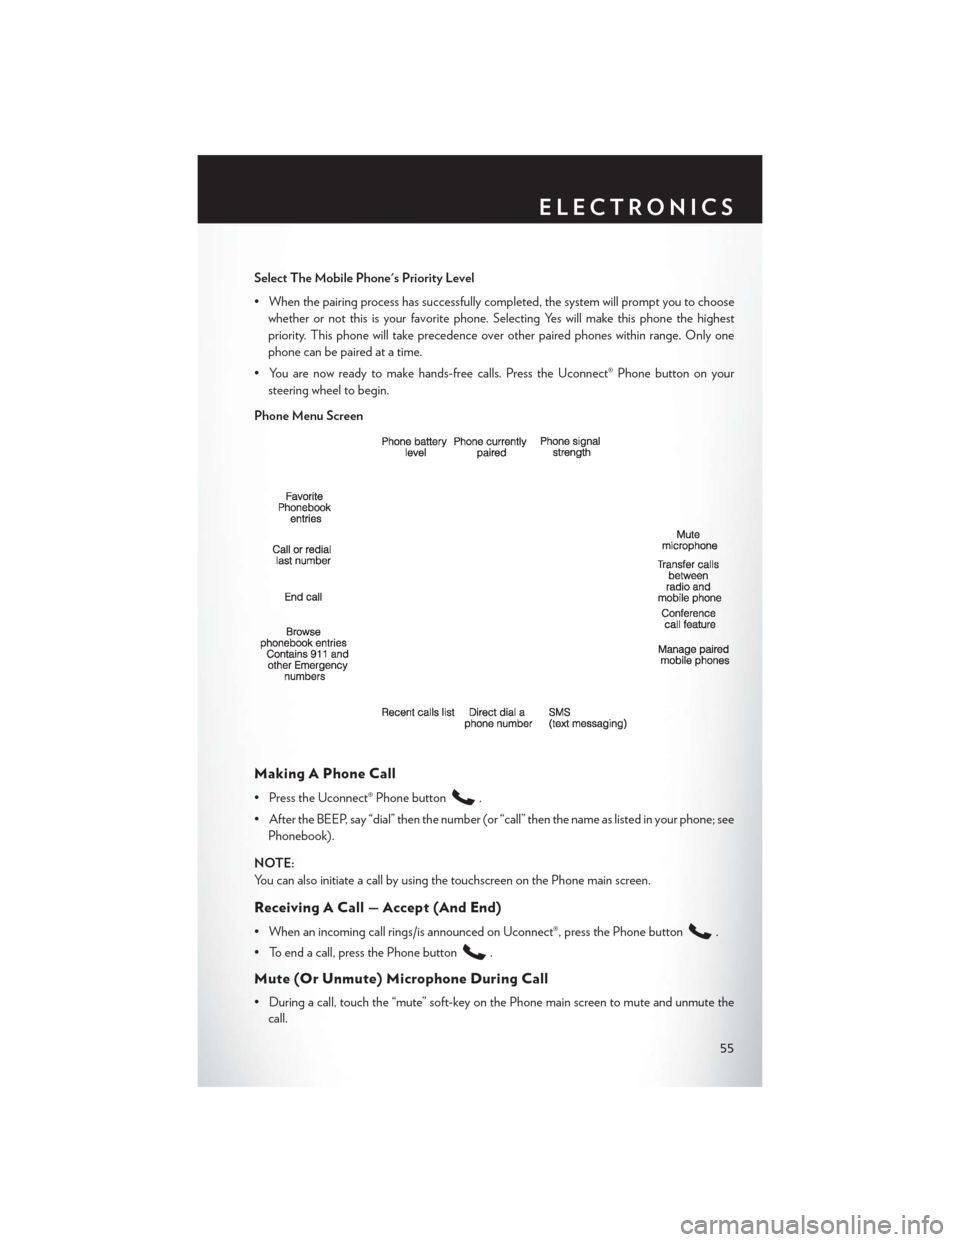
Phone Menu Screen
Making A Phone Call
• Press the Uconnect® Phone button.
• After the BEEP, say “dial” then the number (or “call” then the name as listed in your phone; see Phonebook).
NOTE:
You can also initiate a call by using the touchscreen on the Phone main screen.
Receiving A Call — Accept (And End)
• When an incoming call rings/is announced on Uconnect®, press the Phone button.
• To end a call, press the Phone button
.
Mute (Or Unmute) Microphone During Call
• During a call, touch the “mute” soft-key on the Phone main screen to mute and unmute the call.
ELECTRONICS
55
Page 58 of 132
Transfer Ongoing Call Between Handset And Vehicle
• During an on-going call, touch the “Transfer” soft-key on the Phone main screen to transfer anon-going call between handset and vehicle.
Common Phone Commands (Examples)
• “Call John Smith”
• “Call John Smith mobile”
• “Dial 1 248 555 1212”
• “Call Emergency”
• “Call Towing Assistance”
• “Redial”
Phonebook
• Uconnect® radios will automatically download your phonebook from your paired phone, if thisfeature is supported by your phone. Entries are updated each time that the phone is
connected. If your phone book entries do not appear, check the settings on your phone. Some
phones require you to enable this feature manually.
• Your phonebook can be browsed on your radio screen, but editing can only be done on your phone. To browse, touch the “Phone” soft-key, then the “Phonebook” soft-key.
• Favorite phonebook entries can be saved as Favorites for quicker access. Favorites are shown at the top of your main phone screen.
Voice Command Tips (8.4A And 8.4AN Only)
• Using complete names (i.e; Call John Doe vs. Call John) will result in greater system accuracy.
•
You can “chain” commands together for faster results. Say “Call John Doe, mobile”, for example.
• If you are listening to available voice command options, you do not have to listen to the entirelist. When you hear the command that you need, press the
button on the steering
wheel, wait for the beep and say your command.
Changing The Volume
• Start a dialogue by pressing the Phone button, then say a command for example -
"Help."
• Use the radio ON/OFF VOLUME rotary knob to adjust the volume to a comfortable level while the Uconnect® system is speaking. Please note the volume setting for Uconnect® is
different than the audio system.
NOTE:
To access help, press the Uconnect® Phone
button on the steering wheel and say "help."
Touch the display or push either
orbutton and say "cancel" to cancel the help
session.
ELECTRONICS
56
Page 59 of 132
Voice Text Reply
• Uconnect® Phone can read or send new text messages on your mobile phone.
• Your mobile phone must support Voice Text Reply over Bluetooth® to use this feature. If theUconnect® Phone determines your mobile phone is not compatible with Voice Text Reply
messaging over Bluetooth®, the “Messaging” button will be greyed out and the feature will not
be available for use.
NOTE:
•
For mobile phone compatibility and pairing instructions, please visit www.UconnectPhone.com
• Uconnect® Phone Voice Text Reply is only available when the vehicle is not moving.
WARNING!
• Any voice commanded system should be used only in safe driving conditions following applicable laws regarding phone use. Your attention should be focused on safely operating
the vehicle. Failure to do so may result in a collision causing you and others to be severely
injured or killed.
• In an emergency, to use Uconnect® Phone, your mobile phone must be:
• turned on,
• paired to Uconnect® Phone,
• and have network coverage.
Uconnect® VOICE COMMAND (8.4 & 8.4N ONLY)
• If the Uconnect® Voice Commandbutton exists on your steering wheel, then you
have the Voice Command feature.
• The Voice Command feature lets you keep your hands on the steering wheel, and your eyes on the road.
• When you press the Voice Command button
located on the radio faceplate or
steering wheel, you will hear a beep. The beep is your signal to give a command. If you do not
know what commands to say, you can say "help" and the system will provide options to you. If
you ever wish to interrupt the system while it lists options, press the Voice Command button
, listen for the BEEP, and say your command.
• You can “chain” commands together for faster results. Say “Play the artist Scott Joplin”, for example.
ELECTRONICS
57
Page 62 of 132
ELECTRONIC VEHICLE INFORMATION
CENTER (EVIC)
• The EVIC features a driver interactive dis-play that is located in the instrument cluster.
Pressing the controls on the left side of the
steering wheel allows the driver to select
vehicle information and Personal Settings.
For additional information, refer to “Pro-
grammable Features” located in this guide.
• Press and release the UP
button to
scroll upward through the main menus (Fuel
Economy, Vehicle Info, Tire PSI, Cruise,
Messages, Trip Info, Vehicle Speed and Turn
Menu Off ) and sub menus.
• Press and release the DOWN
button to scroll downward through the main menus and
sub menus.
• Press and release the SELECT
button for access to main menus, sub menus or to select
a personal setting in the setup menu. Press and hold the SELECT button for two seconds to
reset features.
• Press the BACK button to scroll back to a previous menu or sub menu.
Compass Calibration
• This compass is self-calibrating, which eliminates the need to set the compass manually. When the vehicle is new, the compass may appear erratic and the EVIC will display “CAL” until the
compass is calibrated.
• You may also calibrate the compass by completing one or more 360 degree turns (in an area free from large metal or metallic objects) until the “CAL” message displayed in the EVIC turns
off. The compass will now function normally.
ECO
• The ECO message will appear in your EVIC display whenever you are driving in a fuelefficient manner.
• This feature allows you to monitor when you are driving in a fuel efficient manner, and it can be used to modify driving habits in order to increase fuel economy.
ELECTRONICS
60
Page 68 of 132
TRAILER TOWING WEIGHTS (MAXIMUM
TRAILER WEIGHT RATINGS)
Engine/Transmission Frontal Area Max. GTW(Gross Trailer Wt.)Max. Tongue Wt.
(See Note)
3.6L Automatic 22 sq ft (2.04 sq m) 1,000 lbs (454 kg) 100 lbs (45 kg)
5.7L Automatic 32 sq ft (2.97 sq m) 1,000 lbs (454 kg) 100 lbs (45 kg)
Refer to local laws for maximum trailer towing speeds
NOTE:
The trailer tongue weight must be considered as part of the combined weight of occupants and cargo,
and it should never exceed the weight referenced on the “Tire and Loading Information” placard.
RECREATIONAL TOWING (BEHIND
MOTORHOME, ETC.)
Two-Wheel Drive And All-Wheel Drive
• Recreational towing (with all four wheels on the ground, or using a tow dolly) is NOT
ALLOWED. The only acceptable method for towing this vehicle (behind another vehicle) is
on a vehicle trailer with all four wheels OFFthe ground.
CAUTION!
Towing this vehicle in violation of the above requirements can cause severe transmission
and/or transfer case damage. Such damage is not covered by the New Vehicle Limited
Warranty.
UTILITY
66
Page 69 of 132
AUTOSTICK®
Steering Wheel Mounted Paddle Shifters Or Console Mounted Shifter
• AutoStick® is a driver-interactive transmis-sion feature that offers manual gear shifting
to provide you with more control of the
vehicle. AutoStick® allows you to maximize
engine braking, and improve overall vehicle
performance.
• This system can also provide you with more control during passing, city driving, cold
slippery conditions, mountain driving, trailer
towing, and many other situations.
Operation
• When the shift lever is in the DRIVE posi-tion, the transmission will operate automati-
cally, shifting between the five available
gears. To engage AutoStick®, simply move
the shift lever to the right or left (+/-) while in the DRIVE position, or press one of the steering
wheel mounted shift paddles (+/-). When AutoStick® is active, the current transmission gear is
displayed in the Electronic Vehicle Information Center (EVIC) portion of the instrument
cluster. In AutoStick® mode, the transmission will shift when manually selected by the driver
(using the shift lever, or the shift paddles), unless an engine lugging or overspeed condition
would result. It will remain in the selected gear until another upshift or downshift is chosen,
except as described below:• The transmission will automatically downshift as the vehicle slows (to prevent engine
lugging) and will display the current gear.
• The transmission will automatically downshift to first gear when coming to a stop.
• You can start out in first or second gear. Tapping (+) (at a stop) will allow starting in second gear. Starting out in second gear is helpful in snowy or icy conditions.
• The system will ignore attempts to upshift at too low of a vehicle speed.
• Transmission shifting will be more noticeable when AutoStick® is engaged. To disengage AutoStick® mode, hold the shift lever to the right or press and hold the (+) shift paddle until
“D” is once again displayed in the instrument cluster. You can shift in or out of the AutoStick®
mode at any time without taking your foot off the accelerator pedal.
SRT
67
Page 73 of 132
Gauges 2
• Coolant Temperature
• Oil Temperature
• Transmission Temperature
• Intake Air Temperature
• Oil Pressure
• Battery Voltage
Engine
• When selected, this screen displays miles per hour (mph), horsepower (hp), torque (ft/lb), oilpressure (psi) and gear selector values.
Handling
•When selected, this screen displays peak g-force, instantaneous g-force, steering and yaw angles.
Options
• When selected, this screen allows you to choose a standard or custom display for your SRThome page.
WARNING!
Measurement of vehicle statistics with the Performance Features is intended for off-highway
or off-road use only and should not be done on any public roadways. It is recommended
that these features be used in a controlled environment and within the limits of the law. The
capabilities of the vehicle as measured by the performance pages must never be exploited in
a reckless or dangerous manner, which can jeopardize the user’s safety or the safety of others.
Only a safe, attentive, and skillful driver can prevent accidents.
SUMMER/THREE-SEASON TIRES
• This vehicle may be equipped with wheels and tires to enhance traction in both wet and dryconditions.
• Summer tires are not intended to be driven in snow or on ice.
• Summer tires have significantly reduced grip in temperatures below 50°F (10°C)
• Use summer tires only in sets of four.
NOTE:
Summer tires will not contain the all season designation or mountain/snowflake symbol on the
sidewall of the tire.
WARNING!
Do not use summer tires in snow/ice conditions. You could lose control, resulting in severe injury or
death. Driving too fast for conditions also creates the possibility of loss of vehicle control.
SRT
71
Page 75 of 132
NOTE:
AFTER INFLATION, THE VEHICLE MAY NEED TO BE DRIVEN FOR 20 MINUTES
BEFORE THE FLASHING LIGHT WILL TURN OFF.
• Please note that the TPMS is not a substitute for proper tire maintenance, and it is the driver’sresponsibility to maintain correct tire pressure, even if under-inflation has not reached the level
to trigger illumination of the TPMS low tire pressure telltale.
• Your vehicle has also been equipped with a TPMS malfunction indicator to indicate when the system is not operating properly. TPMS malfunction indicator is provided by a separate
telltale, which displays the symbol “TPMS” when illuminated. The TPMS malfunction indica-
tor is combined with the low tire pressure telltale.
• When the system detects a malfunction, the telltale will flash for approximately one minute and then remain continuously illuminated. This sequence will continue upon subsequent
vehicle start-ups as long as the malfunction exists. When the malfunction indicator is illumi-
nated, the system may not be able to detect or signal low tire pressure as intended. TPMS
malfunctions may occur for a variety of reasons, including the installation of replacement or
alternate tires or wheels on the vehicle that prevent the TPMS from functioning properly.
Always check the TPMS malfunction telltale after replacing one or more tires or wheels on
your vehicle to ensure that the replacement or alternate tires and wheels allow the TPMS to
continue to function properly.
NOTE:
Tire pressures change by approximately 1 psi (7 kPa) per 12° F (7° C) of air temperature change.
Keep this in mind when checking tire pressure inside a garage, especially in the Winter. Example:
If garage temperature is 68°F (20°C) and the outside temperature is 32°F (0°C), then the cold
tire inflation pressure should be increased by 3 psi (21 kPa), which equals 1 psi (7 kPa) for every
12°F (7°C) for this outside temperature condition.
CAUTION!
The TPMS has been optimized for the original equipment tires and wheels. TPMS pressures
and warning have been established for the tire size equipped on your vehicle. Undesirable
system operation or sensor damage may result when using replacement equipment that is not
of the same size, type, and/or style. Aftermarket wheels can cause sensor damage. Do not use
tire sealant from a can, or balance beads if your vehicle is equipped with a TPMS, as damage
to the sensors may result.
- Engine Temperature Warning Light
• This light warns of an overheated engine condition.
• If the light turns on or flashes continuously while driving, safely pull over and stop the vehicle. If the A/C system is on, turn it off. Also, shift the transmission into NEUTRAL and idle the
vehicle. If the temperature reading does not return to normal, turn the engine off immediately.
• We recommend that you do not operate the vehicle or engine damage will occur. Have the vehicle serviced immediately.
WHAT TO DO IN EMERGENCIES
73