fig. 78 CHRYSLER CARAVAN 2002 Service Manual
[x] Cancel search | Manufacturer: CHRYSLER, Model Year: 2002, Model line: CARAVAN, Model: CHRYSLER CARAVAN 2002Pages: 2399, PDF Size: 57.96 MB
Page 206 of 2399

(11) Support caliper to prevent the weight of the
caliper from damaging the flexible brake hose (Fig.
131).
(12) Remove the rotor from the hub/bearing.
(13) Remove the park brake cable mounting bolt to
adapter.
(14) Remove the end of the park brake cable from
the actuator lever on the adapter (Fig. 132).(15) Remove the end of the park brake cable from
the adapter. Park brake cable is removed from
adapter using a 1/2 wrench slipped over the park
brake cable retainer as show in (Fig. 133) to com-
press the locking tabs on the park brake cable
retainer.
Fig. 130 Removing/Installing Caliper
1 - LIFT THIS END OF CALIPER AWAY FROM ADAPTER FIRST
2 - DISC BRAKE CALIPER
3 - ADAPTER ABUTMENT
4 - OUTBOARD BRAKE SHOE HOLD DOWN CLIP
5 - OUTBOARD BRAKE SHOE
6 - ROTOR
7 - ADAPTER
Fig. 131 Correctly Supported Caliper
1 - WIRE
2 - CALIPER
3 - ADAPTER
4 - ROTOR
5 - INNER FENDER
Fig. 132 Park Brake Cable Attachment To Actuator
1 - ADAPTER
2 - PARK BRAKE CABLE
3 - ACTUATOR
4 - AXLE
5 - DRIVESHAFT
6 - PARK BRAKE CABLE RETAINER
7 - HORSESHOE CLIP
Fig. 133 Park Brake Cable Removal From Adapter
1 - DRIVESHAFT
2 - 1/2º WRENCH
3 - PARK BRAKE CABLE
4 - PARK BRAKE CABLE RETAINER
5 - ADAPTER
RSBRAKES - BASE5-77
SHOES - PARKING BRAKE (Continued)
ProCarManuals.com
Page 207 of 2399

(16) AWD only - Remove ABS wheel speed sensor
head from hub/bearing (Fig. 134).
(17) FWD only - Remove the ABS wheel speed sen-
sor from the hub/bearing in the following fashion:
(a) Remove secondary (yellow) retaining clip at
rear of wheel speed sensor head (Fig. 135).
(b) Push up on metal retaining clip (Fig. 135)
until it bottoms. This will release wheel speed sen-
sor head from hub and bearing. While holding
metal clip up, pull back on wheel speed sensor
head removing it from hub and bearing.
(c) Remove wheel speed sensor from hub/bear-
ing.
(18) Remove the hub/bearing-to-axle mounting
bolts (Fig. 136).
(19) Remove the hub/bearing (Fig. 137).
Fig. 134 Speed Sensor Attaching Bolt (AWD)
1 - ADAPTER
2 - TONE WHEEL
3 - WHEEL SPEED SENSOR
4 - AXLE
5 - BOLT
6 - DRIVESHAFT
Fig. 135 Sensor Connection At Hub And Bearing
1 - SECONDARY SENSOR RETAINING CLIP
2 - METAL SENSOR RETAINING CLIP
3 - HUB AND BEARING
Fig. 136 Hub/Bearing Mounting Bolts (AWD Shown)
1 - DRIVESHAFT
2 - MOUNTING BOLTS
3 - AXLE
4 - MOUNTING BOLTS
5 - ADAPTER
5 - 78 BRAKES - BASERS
SHOES - PARKING BRAKE (Continued)
ProCarManuals.com
Page 208 of 2399

CAUTION: Corrosion may occur between the hub/
bearing and the axle flange. If this occurs, the hub/
bearing will be difficult to remove from the axle and
disc brake caliper adapter. If the hub/bearing will
not come out by pulling on it by hand, don't not
pound on it with a hammer. Pounding on the hub/
bearing will damage it. To remove a hub/bearing
that is corroded in place, lightly tap the disc brake
caliper adapter using a soft-face hammer. This will
remove both the caliper adapter and hub/bearing
together from the axle. With a helper supporting the
caliper adapter in his hands, position Remover,
Special Tool 8214-1, on the cast housing of hub/
bearing (Fig. 138). Do not position the special tool
on the inner race of hub/bearing. Lightly strike the
Remover with a hammer to remove the hub/bearing
from the caliper adapter.
(20) Remove the adapter from the rear axle.
(21) Mount the adapter in a vise using the anchor
boss for the park brake cable (Fig. 139).
Fig. 137 Hub/Bearing Removal/Installation (AWD
Shown)
1 - PARK BRAKE BRAKE SHOE
2 - OUTER C/V JOINT
3 - HUB/BEARING
4 - PARK BRAKE BRAKE SHOE
5 - STUB SHAFT
Fig. 138 Hub/Bearing Removal From Caliper Adapter
1 - SPECIAL TOOL 8214-1
2 - PARK BRAKE CABLE
3 - DISC BRAKE CALIPER ADAPTER
4 - HUB/BEARING
Fig. 139 Adapter Mounted In Vise
1 - ADAPTER
2 - PARK BRAKE CABLE BOSS
3 - VISE
4 - PARK BRAKE BRAKE SHOES
RSBRAKES - BASE5-79
SHOES - PARKING BRAKE (Continued)
ProCarManuals.com
Page 209 of 2399

(22) Remove the lower return spring (Fig. 140)
from the leading and trailing park brake shoes.
(23) Remove the hold down spring and pin (Fig.
141) from the leading park brake shoe.(24) Remove the adjuster (Fig. 142) from the lead-
ing and trailing park brake shoe.
(25) Remove the leading park brake shoe (Fig.
143) from the adapter. Leading brake shoe is
removed by rotating the bottom of the brake shoe
inward (Fig. 143) until the top of the brake shoe can
be removed from the brake shoe anchor. Then remove
the upper return springs (Fig. 143) from the leading
brake shoe.
Fig. 140 Lower Return Spring
1 - ADAPTER
2 - LEADING PARK BRAKE SHOE
3 - RETURN SPRING
4 - TRAILING PARK BRAKE SHOE
Fig. 141 Leading Brake Shoe Hold Down Pin And
Spring
1 - ADAPTER
2 - LEADING PARK BRAKE SHOE
3 - ALLEN WRENCH
4 - HOLD DOWN SPRING/PIN
Fig. 142 Brake Shoe Adjuster
1 - LEADING PARK BRAKE SHOE
2 - ADJUSTER
3 - TRAILING PARK BRAKE SHOE
Fig. 143 Primary Brake Shoe Remove/Install
1 - PARK BRAKE ACTUATOR
2 - ANCHOR
3 - LEADING PARK BRAKE SHOE
4 - UPPER RETURN SPRINGS
5 - TRAILING PARK BRAKE SHOE
5 - 80 BRAKES - BASERS
SHOES - PARKING BRAKE (Continued)
ProCarManuals.com
Page 210 of 2399
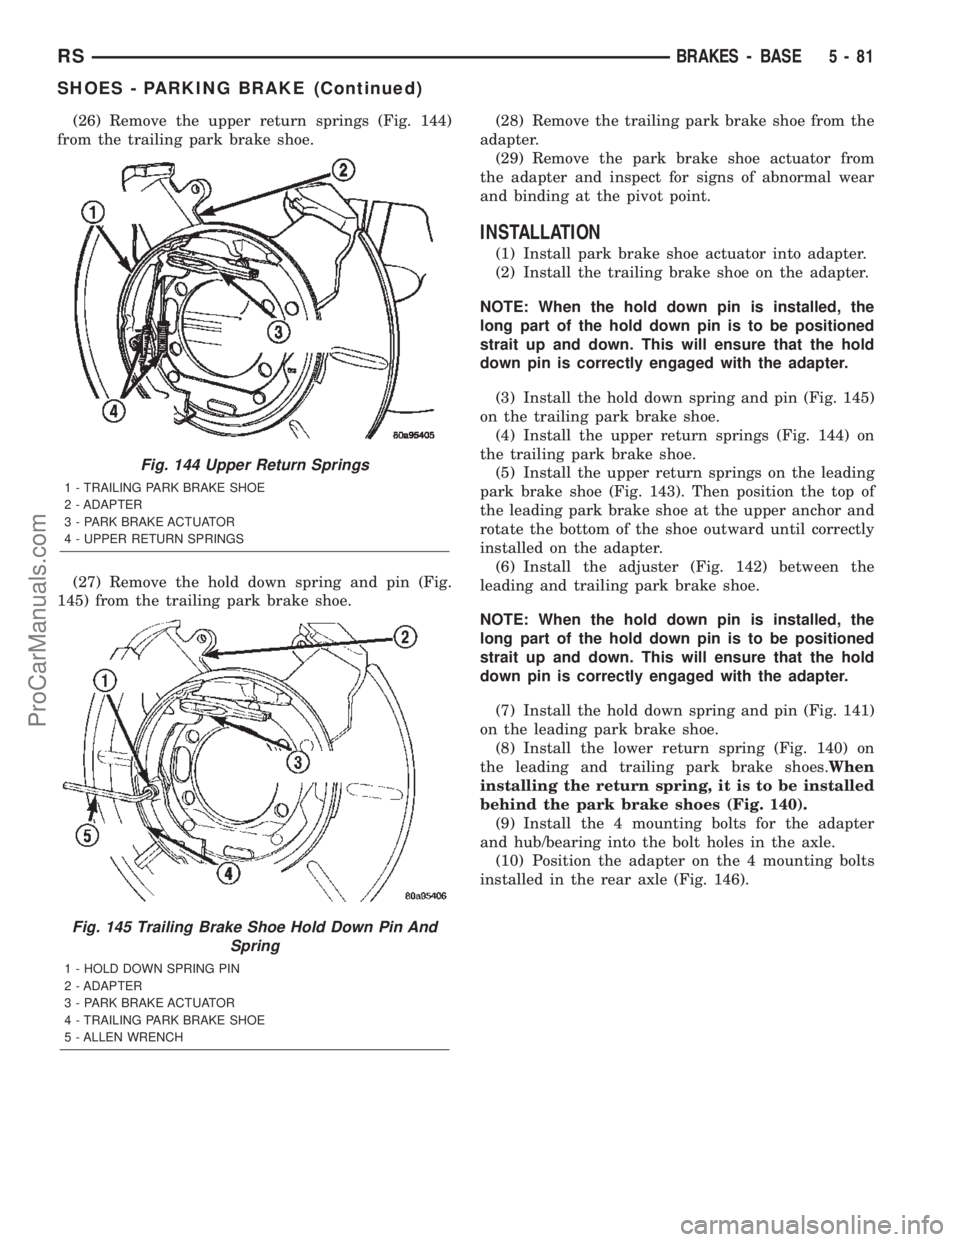
(26) Remove the upper return springs (Fig. 144)
from the trailing park brake shoe.
(27) Remove the hold down spring and pin (Fig.
145) from the trailing park brake shoe.(28) Remove the trailing park brake shoe from the
adapter.
(29) Remove the park brake shoe actuator from
the adapter and inspect for signs of abnormal wear
and binding at the pivot point.
INSTALLATION
(1) Install park brake shoe actuator into adapter.
(2) Install the trailing brake shoe on the adapter.
NOTE: When the hold down pin is installed, the
long part of the hold down pin is to be positioned
strait up and down. This will ensure that the hold
down pin is correctly engaged with the adapter.
(3) Install the hold down spring and pin (Fig. 145)
on the trailing park brake shoe.
(4) Install the upper return springs (Fig. 144) on
the trailing park brake shoe.
(5) Install the upper return springs on the leading
park brake shoe (Fig. 143). Then position the top of
the leading park brake shoe at the upper anchor and
rotate the bottom of the shoe outward until correctly
installed on the adapter.
(6) Install the adjuster (Fig. 142) between the
leading and trailing park brake shoe.
NOTE: When the hold down pin is installed, the
long part of the hold down pin is to be positioned
strait up and down. This will ensure that the hold
down pin is correctly engaged with the adapter.
(7) Install the hold down spring and pin (Fig. 141)
on the leading park brake shoe.
(8) Install the lower return spring (Fig. 140) on
the leading and trailing park brake shoes.When
installing the return spring, it is to be installed
behind the park brake shoes (Fig. 140).
(9) Install the 4 mounting bolts for the adapter
and hub/bearing into the bolt holes in the axle.
(10) Position the adapter on the 4 mounting bolts
installed in the rear axle (Fig. 146).
Fig. 144 Upper Return Springs
1 - TRAILING PARK BRAKE SHOE
2 - ADAPTER
3 - PARK BRAKE ACTUATOR
4 - UPPER RETURN SPRINGS
Fig. 145 Trailing Brake Shoe Hold Down Pin And
Spring
1 - HOLD DOWN SPRING PIN
2 - ADAPTER
3 - PARK BRAKE ACTUATOR
4 - TRAILING PARK BRAKE SHOE
5 - ALLEN WRENCH
RSBRAKES - BASE5-81
SHOES - PARKING BRAKE (Continued)
ProCarManuals.com
Page 211 of 2399
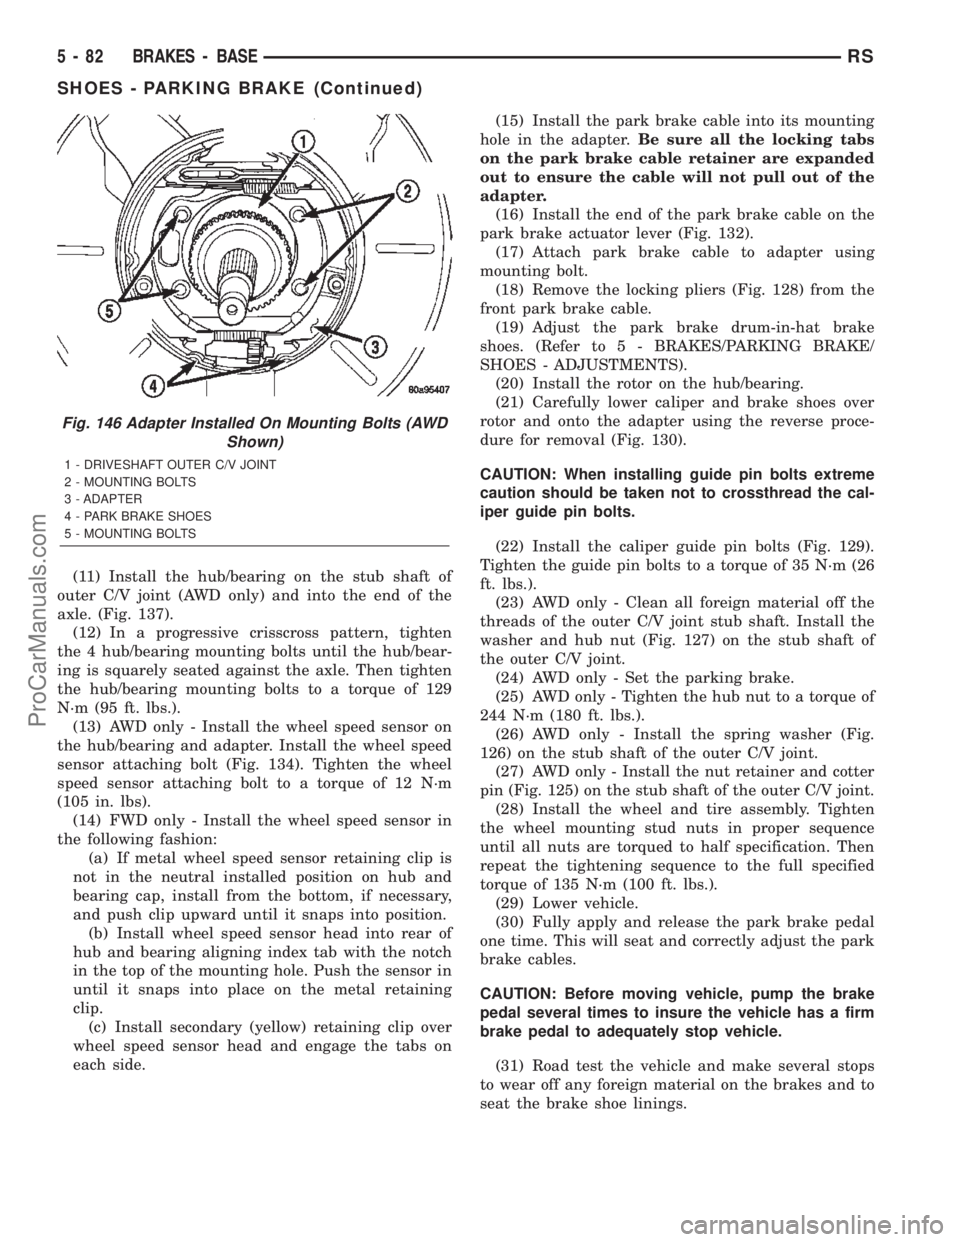
(11) Install the hub/bearing on the stub shaft of
outer C/V joint (AWD only) and into the end of the
axle. (Fig. 137).
(12) In a progressive crisscross pattern, tighten
the 4 hub/bearing mounting bolts until the hub/bear-
ing is squarely seated against the axle. Then tighten
the hub/bearing mounting bolts to a torque of 129
N´m (95 ft. lbs.).
(13) AWD only - Install the wheel speed sensor on
the hub/bearing and adapter. Install the wheel speed
sensor attaching bolt (Fig. 134). Tighten the wheel
speed sensor attaching bolt to a torque of 12 N´m
(105 in. lbs).
(14) FWD only - Install the wheel speed sensor in
the following fashion:
(a) If metal wheel speed sensor retaining clip is
not in the neutral installed position on hub and
bearing cap, install from the bottom, if necessary,
and push clip upward until it snaps into position.
(b) Install wheel speed sensor head into rear of
hub and bearing aligning index tab with the notch
in the top of the mounting hole. Push the sensor in
until it snaps into place on the metal retaining
clip.
(c) Install secondary (yellow) retaining clip over
wheel speed sensor head and engage the tabs on
each side.(15) Install the park brake cable into its mounting
hole in the adapter.Be sure all the locking tabs
on the park brake cable retainer are expanded
out to ensure the cable will not pull out of the
adapter.
(16) Install the end of the park brake cable on the
park brake actuator lever (Fig. 132).
(17) Attach park brake cable to adapter using
mounting bolt.
(18) Remove the locking pliers (Fig. 128) from the
front park brake cable.
(19) Adjust the park brake drum-in-hat brake
shoes. (Refer to 5 - BRAKES/PARKING BRAKE/
SHOES - ADJUSTMENTS).
(20) Install the rotor on the hub/bearing.
(21) Carefully lower caliper and brake shoes over
rotor and onto the adapter using the reverse proce-
dure for removal (Fig. 130).
CAUTION: When installing guide pin bolts extreme
caution should be taken not to crossthread the cal-
iper guide pin bolts.
(22) Install the caliper guide pin bolts (Fig. 129).
Tighten the guide pin bolts to a torque of 35 N´m (26
ft. lbs.).
(23) AWD only - Clean all foreign material off the
threads of the outer C/V joint stub shaft. Install the
washer and hub nut (Fig. 127) on the stub shaft of
the outer C/V joint.
(24) AWD only - Set the parking brake.
(25) AWD only - Tighten the hub nut to a torque of
244 N´m (180 ft. lbs.).
(26) AWD only - Install the spring washer (Fig.
126) on the stub shaft of the outer C/V joint.
(27) AWD only - Install the nut retainer and cotter
pin (Fig. 125) on the stub shaft of the outer C/V joint.
(28) Install the wheel and tire assembly. Tighten
the wheel mounting stud nuts in proper sequence
until all nuts are torqued to half specification. Then
repeat the tightening sequence to the full specified
torque of 135 N´m (100 ft. lbs.).
(29) Lower vehicle.
(30) Fully apply and release the park brake pedal
one time. This will seat and correctly adjust the park
brake cables.
CAUTION: Before moving vehicle, pump the brake
pedal several times to insure the vehicle has a firm
brake pedal to adequately stop vehicle.
(31) Road test the vehicle and make several stops
to wear off any foreign material on the brakes and to
seat the brake shoe linings.
Fig. 146 Adapter Installed On Mounting Bolts (AWD
Shown)
1 - DRIVESHAFT OUTER C/V JOINT
2 - MOUNTING BOLTS
3 - ADAPTER
4 - PARK BRAKE SHOES
5 - MOUNTING BOLTS
5 - 82 BRAKES - BASERS
SHOES - PARKING BRAKE (Continued)
ProCarManuals.com
Page 212 of 2399
ADJUSTMENTS
ADJUSTMENT - PARKING BRAKE SHOES
CAUTION: Before adjusting the park brake shoes be
sure that the park brake pedal is in the fully
released position. If park brake pedal is not in the
fully released position, the park brake shoes can
not be accurately adjusted.
(1) Raise vehicle.
(2) Remove tire and wheel.
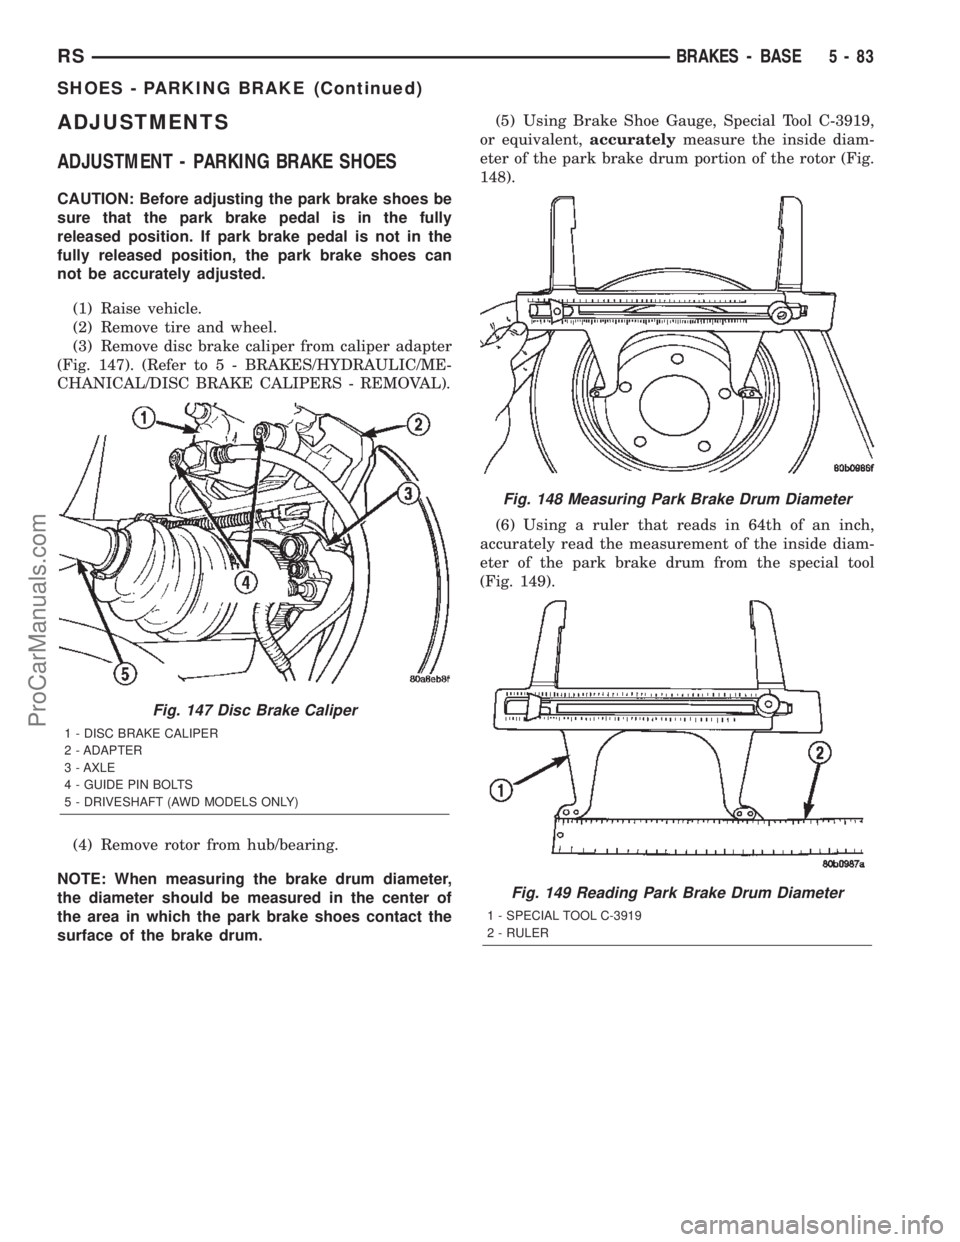
(3) Remove disc brake caliper from caliper adapter
(Fig. 147). (Refer to 5 - BRAKES/HYDRAULIC/ME-
CHANICAL/DISC BRAKE CALIPERS - REMOVAL).
(4) Remove rotor from hub/bearing.
NOTE: When measuring the brake drum diameter,
the diameter should be measured in the center of
the area in which the park brake shoes contact the
surface of the brake drum.(5) Using Brake Shoe Gauge, Special Tool C-3919,
or equivalent,accuratelymeasure the inside diam-
eter of the park brake drum portion of the rotor (Fig.
148).
(6) Using a ruler that reads in 64th of an inch,
accurately read the measurement of the inside diam-
eter of the park brake drum from the special tool
(Fig. 149).
Fig. 147 Disc Brake Caliper
1 - DISC BRAKE CALIPER
2 - ADAPTER
3 - AXLE
4 - GUIDE PIN BOLTS
5 - DRIVESHAFT (AWD MODELS ONLY)
Fig. 148 Measuring Park Brake Drum Diameter
Fig. 149 Reading Park Brake Drum Diameter
1 - SPECIAL TOOL C-3919
2 - RULER
RSBRAKES - BASE5-83
SHOES - PARKING BRAKE (Continued)
ProCarManuals.com
Page 213 of 2399
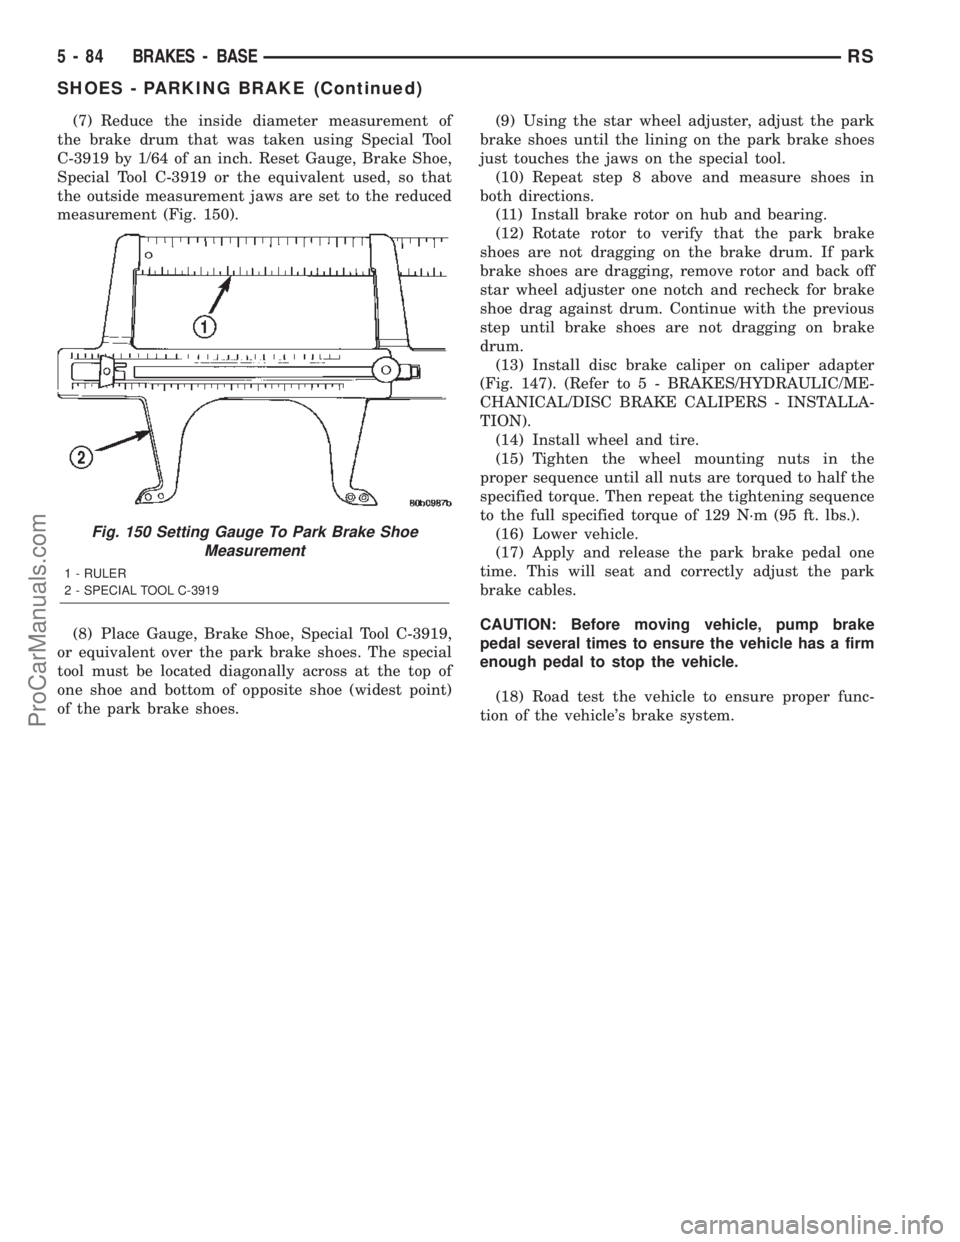
(7) Reduce the inside diameter measurement of
the brake drum that was taken using Special Tool
C-3919 by 1/64 of an inch. Reset Gauge, Brake Shoe,
Special Tool C-3919 or the equivalent used, so that
the outside measurement jaws are set to the reduced
measurement (Fig. 150).
(8) Place Gauge, Brake Shoe, Special Tool C-3919,
or equivalent over the park brake shoes. The special
tool must be located diagonally across at the top of
one shoe and bottom of opposite shoe (widest point)
of the park brake shoes.(9) Using the star wheel adjuster, adjust the park
brake shoes until the lining on the park brake shoes
just touches the jaws on the special tool.
(10) Repeat step 8 above and measure shoes in
both directions.
(11) Install brake rotor on hub and bearing.
(12) Rotate rotor to verify that the park brake
shoes are not dragging on the brake drum. If park
brake shoes are dragging, remove rotor and back off
star wheel adjuster one notch and recheck for brake
shoe drag against drum. Continue with the previous
step until brake shoes are not dragging on brake
drum.
(13) Install disc brake caliper on caliper adapter
(Fig. 147). (Refer to 5 - BRAKES/HYDRAULIC/ME-
CHANICAL/DISC BRAKE CALIPERS - INSTALLA-
TION).
(14) Install wheel and tire.
(15) Tighten the wheel mounting nuts in the
proper sequence until all nuts are torqued to half the
specified torque. Then repeat the tightening sequence
to the full specified torque of 129 N´m (95 ft. lbs.).
(16) Lower vehicle.
(17) Apply and release the park brake pedal one
time. This will seat and correctly adjust the park
brake cables.
CAUTION: Before moving vehicle, pump brake
pedal several times to ensure the vehicle has a firm
enough pedal to stop the vehicle.
(18) Road test the vehicle to ensure proper func-
tion of the vehicle's brake system.
Fig. 150 Setting Gauge To Park Brake Shoe
Measurement
1 - RULER
2 - SPECIAL TOOL C-3919
5 - 84 BRAKES - BASERS
SHOES - PARKING BRAKE (Continued)
ProCarManuals.com
Page 218 of 2399

The ABS portion of the brake system must be bled
separately. Use the following procedure to properly
bleed the brake hydraulic system including the ABS.
BLEEDING
When bleeding the ABS system, the following
bleeding sequence must be followed to insure com-
plete and adequate bleeding.
(1) Make sure all hydraulic fluid lines are installed
and properly torqued.
(2) Connect the DRBIIItscan tool to the diagnos-
tics connector. The diagnostic connector is located
under the lower steering column cover to the left of
the steering column.
(3) Using the DRB, check to make sure the CAB
does not have any fault codes stored. If it does, clear
them using the DRB.
WARNING: WHEN BLEEDING THE BRAKE SYSTEM
WEAR SAFETY GLASSES. A CLEAR BLEED TUBE
MUST BE ATTACHED TO THE BLEEDER SCREWS
AND SUBMERGED IN A CLEAR CONTAINER FILLED
PART WAY WITH CLEAN BRAKE FLUID. DIRECT
THE FLOW OF BRAKE FLUID AWAY FROM YOUR-
SELF AND THE PAINTED SURFACES OF THE VEHI-
CLE. BRAKE FLUID AT HIGH PRESSURE MAY
COME OUT OF THE BLEEDER SCREWS WHEN
OPENED.
(4) Bleed the base brake system using the stan-
dard pressure or manual bleeding procedure. (Refer
to 5 - BRAKES - BASE - STANDARD PROCEDURE)
(5) Using the DRB, select ANTILOCK BRAKES,
followed by MISCELLANEOUS, then BLEED
BRAKES. Follow the instructions displayed. When
the scan tool displays TEST COMPLETED, discon-
nect the scan tool and proceed.
(6) Bleed the base brake system a second time.
Check brake fluid level in the reservoir periodically
to prevent emptying, causing air to enter the hydrau-
lic system.
(7) Fill the master cylinder reservoir to the full
level.
(8) Test drive the vehicle to be sure the brakes are
operating correctly and that the brake pedal does not
feel spongy.
SPECIFICATIONS
ABS FASTENER TORQUE
(Refer to 5 - BRAKES - BASE - SPECIFICA-
TIONS)
TONE WHEEL RUNOUT
DESCRIPTION SPECIFICATION
Front Tone Wheel
Maximum Runout0.15 mm (0.006 in.)
Rear Tone Wheel
Maximum Runout0.15 mm (0.006 in.)
WHEEL SPEED SENSOR AIR GAP
DESCRIPTION SPECIFICATION
Front Sensor0.35 ± 1.20 mm
0.014 ± 0.047 in.
Rear Sensor0.40 ± 1.20 mm
0.016 ± 0.047 in.
FRONT WHEEL SPEED
SENSOR
REMOVAL
(1) Raise vehicle. (Refer to LUBRICATION &
MAINTENANCE/HOISTING - STANDARD PROCE-
DURE)
(2) Remove the tire and wheel assembly.
(3) Remove the sensor cable routing clamp screws.
CAUTION: When disconnecting the wheel speed
sensor from vehicle wiring harness, be careful not
to damage pins on connector
(4) Remove speed sensor cable grommets from
intermediate bracket on strut.
(5) Disconnect speed sensor cable from vehicle wir-
ing harness behind fender well shield.
(6) Remove the wheel speed sensor head mounting
bolt (Fig. 1).
(7) Remove sensor head from steering knuckle. If
sensor has seized due to corrosion,DO NOT USE
PLIERS ON SENSOR HEAD.Use a hammer and a
punch and tap edge of sensor ear, rocking the sensor
side-to-side until free.
(8) Remove front wheel speed sensor from vehicle.
INSTALLATION
CAUTION: Proper installation of wheel speed sen-
sor cables is critical to continued system operation.
Be sure that cables are installed in retainers. Fail-
ure to install cables in retainers as shown in this
section may result in contact with moving parts and
over extension of cables, resulting in an open cir-
cuit.
RSBRAKES - ABS5-89
BRAKES - ABS (Continued)
ProCarManuals.com
Page 219 of 2399

(1) Connect the front wheel speed sensor cable to
the vehicle wiring harness connector. Be sure speed
sensor cable connector is fully seated and locked into
vehicle wiring harness connector.
(2) Install the bolts attaching the routing clamps
to the body of the vehicle. Tighten the bolts to a
torque of 14 N´m (125 in. lbs.).
(3) Insert speed sensor cable grommets into inter-
mediate bracket on strut.
(4) Install the wheel speed sensor head mounting
bolt (Fig. 1). Tighten the bolt to a torque of 13 N´m
(115 in. lbs.)
(5) Install the wheel and tire assembly on vehicle.
(6) Lower vehicle.
(7) Road test vehicle to ensure proper operation of
the base and ABS brake systems.
REAR WHEEL SPEED SENSOR
-AWD
REMOVAL
(1) Raise vehicle. (Refer to LUBRICATION &
MAINTENANCE/HOISTING - STANDARD PROCE-
DURE)
CAUTION: When disconnecting speed sensor cable
from vehicle wiring harness be careful not to dam-
age pins on the electrical connectors. Also, inspect
connectors for any signs of previous damage.(2) Remove grommet from floor pan of vehicle and
disconnect speed sensor cable connector from vehicle
wiring harness.
CAUTION: When removing rear wheel speed sensor
cable from routing clips, be sure not to damage the
routing clips. Routing clips that are molded onto
the brake hose will require replacement of the brake
hose if damaged during removal or installation of
the speed sensor cable.
(3) Carefully remove speed sensor cable from
press-in routing clips along brake hose and tubing.
(4) Remove bolt securing wheel speed sensor cable
metal clip to rear of axle. Remove metal clip from
cable if necessary.
CAUTION: If speed sensor head has seized due to
corrosion, do not use pliers on speed sensor head
in an attempt to remove it. Use a hammer and a
punch and tap mounting flange edge side-to-side,
rocking the sensor until free.
(5) Remove wheel speed sensor head attaching
bolt.
(6) Remove wheel speed sensor head from the axle,
and remove sensor from vehicle.
INSTALLATION
CAUTION: Proper installation of wheel speed sen-
sor cables is critical to continued system operation.
Be sure that cables are installed in retainers. Fail-
ure to install cables in retainers as indicated may
result in contact with moving parts or over-exten-
sion of cables, resulting in an open circuit.
(1) Install wheel speed sensor head in axle flange.
CAUTION: Prior to installing the speed sensor head
attaching bolt, the plastic anti-rotation pin must be
fully seated into the bearing flange.
(2) Install wheel speed sensor head attaching bolt.
Tighten bolt to a torque 10 N´m (90 in. lbs.).
(3) Check the air gap between the face of the
wheel speed sensor and the top surface of the tone
wheel. (Refer to 5 - BRAKES - SPECIFICATIONS)
CAUTION: When installing wheel speed sensor
cable in the routing clips on rear brake flex hose,
be sure not to damage the routing clips. Routing
clips are molded onto the hose and will require
replacement of the brake hose if damaged.
(4) Install speed sensor cable under leaf spring
onto brake hose and tubing utilizing routing clips to
secure it in place.
Fig. 1 Front Wheel Speed Sensor Attaching Bolt
1 - MOUNTING BOLT
2 - WHEEL SPEED SENSOR
3 - DRIVESHAFT
4 - TONE WHEEL
5 - STEERING KNUCKLE
5 - 90 BRAKES - ABSRS
FRONT WHEEL SPEED SENSOR (Continued)
ProCarManuals.com