audio CHRYSLER CARAVAN 2005 Owner's Manual
[x] Cancel search | Manufacturer: CHRYSLER, Model Year: 2005, Model line: CARAVAN, Model: CHRYSLER CARAVAN 2005Pages: 2339, PDF Size: 59.69 MB
Page 279 of 2339

FRONT DOOR SPEAKER
(1) Connect the wire harness connector and install
speaker to door.
(2) Install the speaker mounting screws.
(3) Install the front door trim panel (Refer to 23 -
BODY/DOOR - FRONT/TRIM PANEL - INSTALLA-
TION).
(4) Connect battery negative cable.
INSTRUMENT PANEL SPEAKER
(1) Connect the wire harness connector and install
speaker to instrument panel.
(2) Install the speaker mounting screws.
(3) Install instrument panel top pad (Refer to 23 -
BODY/INSTRUMENT PANEL/INSTRUMENT
PANEL TOP PAD - INSTALLATION).
(4) Install A-pillar trim (Refer to 23 - BODY/INTE-
RIOR/A-PILLAR TRIM - INSTALLATION).
(5) Connect battery negative cable.
QUARTER PANEL SPEAKER
(1) Connect the wire harness connector and install
speaker to trim panel.
(2) Install the speaker mounting screws.
(3) Install quarter trim bolster (Refer to 23 -
BODY/INTERIOR/QUARTER TRIM BOLSTER -
INSTALLATION).
(4) Connect battery negative cable.
VIDEO SCREEN
DESCRIPTION
The video screen (if equipped) is mounted on the
headliner behind the driver and front passenger seat.
Pressing the release button will allow the screen to
be opened.
OPERATION
Operating instructions for the factory installed
video screen can be found in the owner's manual pro-
vided with this vehicle.
REMOVAL
(1) Disconnect and isolate the battery negative
battery cable.
(2) Remove the lens bezel.
(3) Remove the rear console screws (Fig. 21).
(4) Remove the rear A/C trim bezel.
(5) Disconnect A/C wire harness connector.
(6) Remove remaining mounting screws.
(7) Disconnect wire harness connectors.
INSTALLATION
(1) Connect wire harness connectors.
(2) Install front mounting screws.
(3) Install the rear A/C trim bezel.
(4) Install the rear mounting screws.
(5) Install the lens bezel.
(6) Connect the battery negative cable.
Fig. 21 VIDEO SCREEN
8A - 20 AUDIO/VIDEORS
SPEAKER (Continued)
Page 288 of 2339
The BCM utilizes integrated circuitry and informa-
tion carried on the Programmable Communications
Interface (PCI) data bus network along with many
hard wired inputs to monitor many sensor and
switch inputs throughout the vehicle. In response to
those inputs, the internal circuitry and programming
of the BCM allow it to control and integrate many
electronic functions and features of the vehicle
through both hard wired outputs and the transmis-
sion of electronic message outputs to other electronic
modules in the vehicle over the PCI data bus.
OPERATION
The Body Control Module (BCM) supplies vehicle
occupants with visual and audible information and
controls various vehicle functions. To provide and
receive information, the BCM is interfaced to the
vehicle's serial bus communications network, referred
to as the Programmable Communications Interface
(PCI) bus.
This network consists of the;
²Powertrain Control Module (PCM)
²Transmission Control Module (TCM)
²Mechanical Instrument Cluster (MIC)
²Occupant Restraint Controller (ORC)
²Compass/Mini-Trip Computer (CMTC)
²Electronic Vehicle Information Center (EVIC)
²Controller Antilock Brake (CAB)
²HVAC Control Module
²Sliding Door Control Modules (driver and pas-
senger side doors)
²Power Liftgate Module (PLG)
²Audio system equipped with RAZ, RBU, RBK,
and RBB radios.
²Sentry Key Remote Entry Module (SKREEM).
²Side Impact Airbag Control Module (SIACM)²Memory Seat Module (MSM)
²Sentry Key Immobilizer Module (SKIM)
The BCM is operational when battery power is
supplied to the module.
The BCM provides the following features:
²Power Door Locks
²Automatic Door Locks
²Battery Protection - The BCM will automatically
turn off all exterior lamps after 3 minutes, and all
interior lamps after 15 minutes after the ignition is
turned off, if they are not turned off by the driver.
²Chime Control
²Compass/Mini-Trip support.
²Interior Lighting (Courtesy/Reading Lamps)
²BCM Diagnostic Reporting
²Electronic Liftgate Release (with Power Door
Locks)
²Exterior Lighting
²Headlamp Time Delay (with/without Automatic
Headlamps)
²Illuminated Entry
²Fade to Off Interior Lamps - This feature dims
the interior lighting (courtesy lamps) gradually if the
BCM does not receive any new inputs that would
cause the interior lamps to remain on.
²Pulse Width Modulated Instrument Panel Dim-
ming
²Door Lock Inhibit - This feature disables the
door lock functions if the key is in the ignition and
either front door is ajar. Pressing the Remote Keyless
Entry (RKE) lock/unlock button under these condi-
tions result in normal lock/unlock activation.
The BCM has the ability to LEARN additional fea-
tures in the vehicle, provided the appropriate switch
input and PCI data bus messages are received. Refer
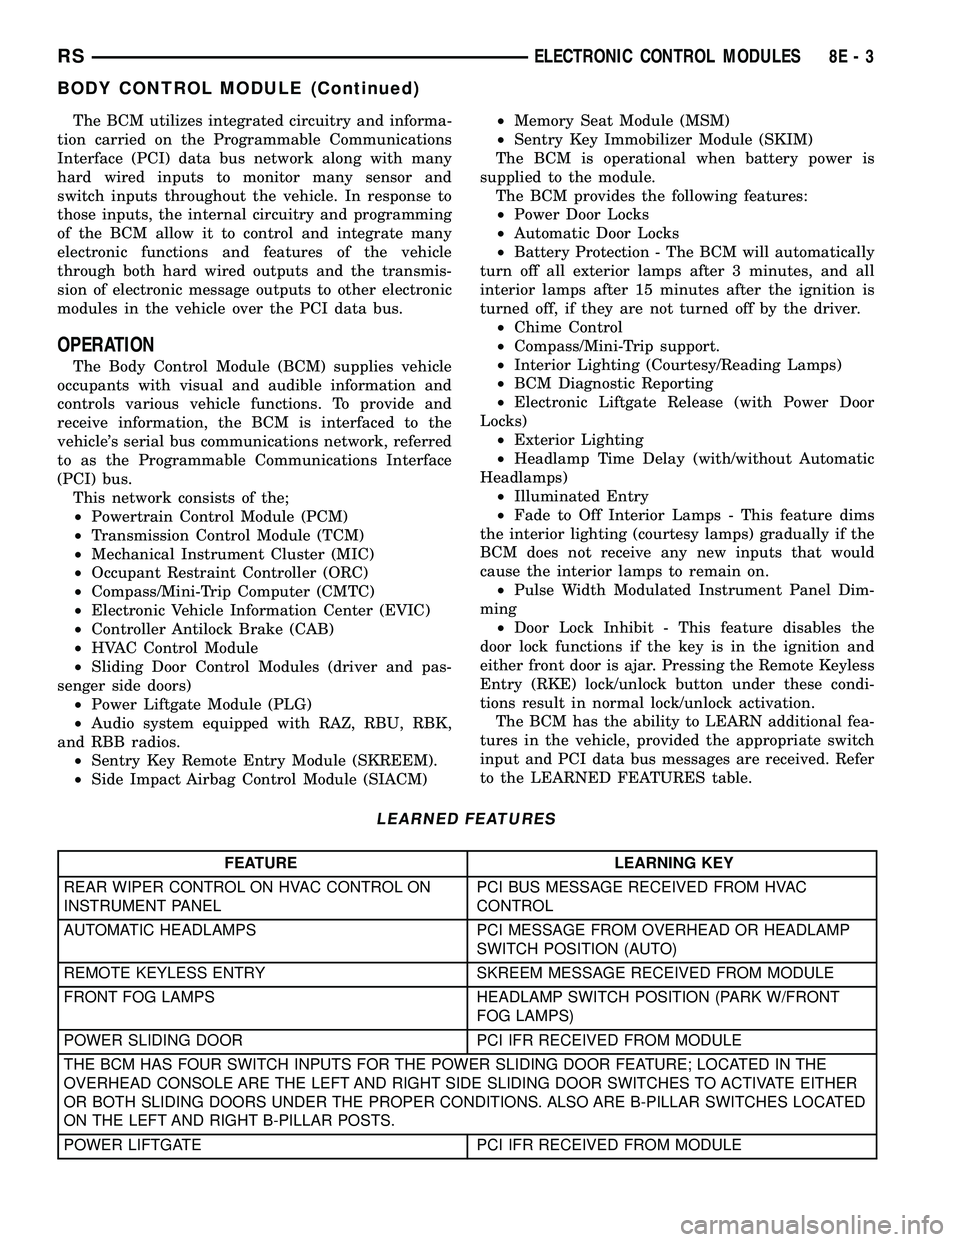
to the LEARNED FEATURES table.
LEARNED FEATURES
FEATURE LEARNING KEY
REAR WIPER CONTROL ON HVAC CONTROL ON
INSTRUMENT PANELPCI BUS MESSAGE RECEIVED FROM HVAC
CONTROL
AUTOMATIC HEADLAMPS PCI MESSAGE FROM OVERHEAD OR HEADLAMP
SWITCH POSITION (AUTO)
REMOTE KEYLESS ENTRY SKREEM MESSAGE RECEIVED FROM MODULE
FRONT FOG LAMPS HEADLAMP SWITCH POSITION (PARK W/FRONT
FOG LAMPS)
POWER SLIDING DOOR PCI IFR RECEIVED FROM MODULE
THE BCM HAS FOUR SWITCH INPUTS FOR THE POWER SLIDING DOOR FEATURE; LOCATED IN THE
OVERHEAD CONSOLE ARE THE LEFT AND RIGHT SIDE SLIDING DOOR SWITCHES TO ACTIVATE EITHER
OR BOTH SLIDING DOORS UNDER THE PROPER CONDITIONS. ALSO ARE B-PILLAR SWITCHES LOCATED
ON THE LEFT AND RIGHT B-PILLAR POSTS.
POWER LIFTGATE PCI IFR RECEIVED FROM MODULE
RSELECTRONIC CONTROL MODULES8E-3
BODY CONTROL MODULE (Continued)
Page 289 of 2339
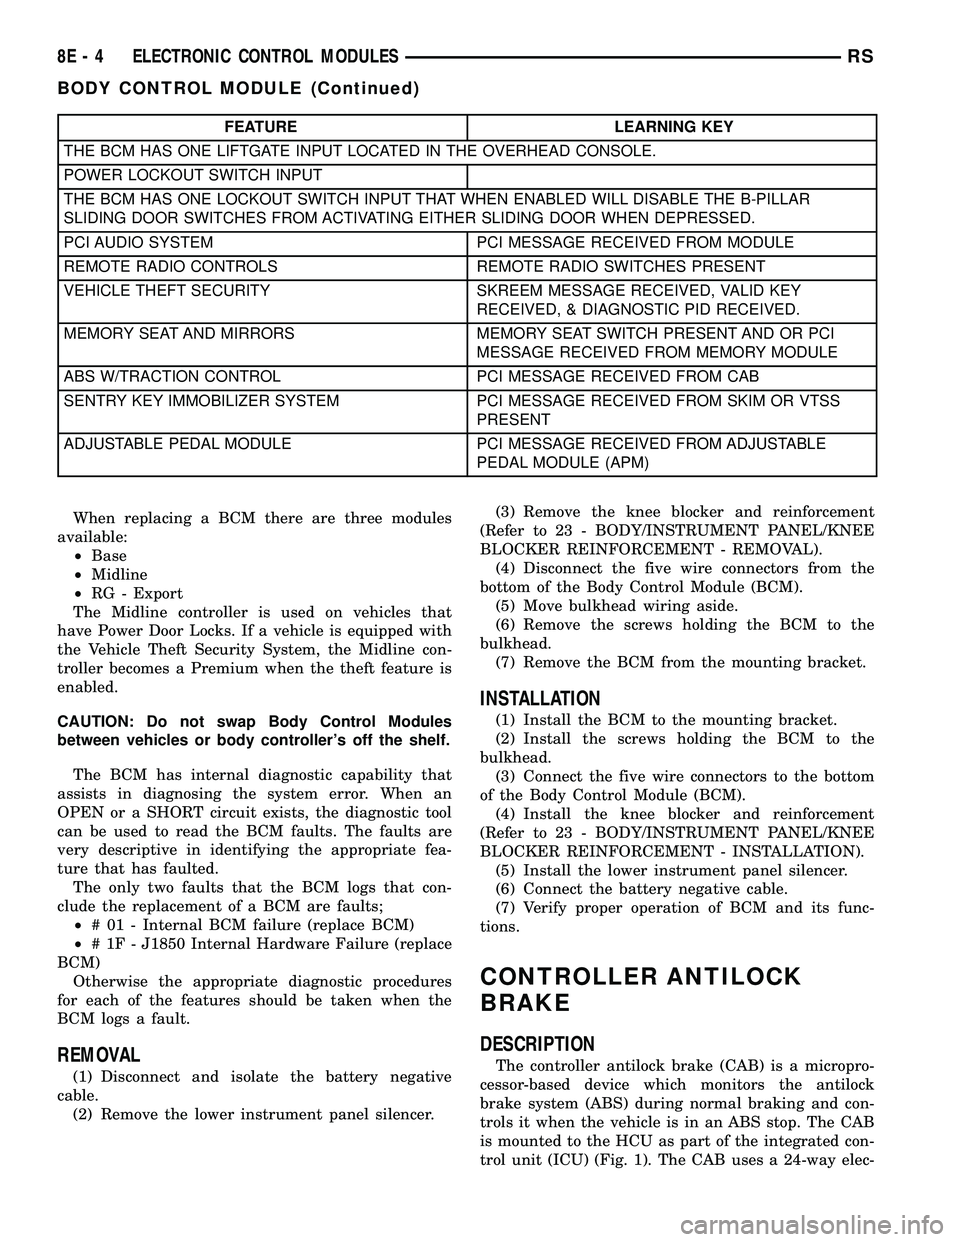
FEATURE LEARNING KEY
THE BCM HAS ONE LIFTGATE INPUT LOCATED IN THE OVERHEAD CONSOLE.
POWER LOCKOUT SWITCH INPUT
THE BCM HAS ONE LOCKOUT SWITCH INPUT THAT WHEN ENABLED WILL DISABLE THE B-PILLAR
SLIDING DOOR SWITCHES FROM ACTIVATING EITHER SLIDING DOOR WHEN DEPRESSED.
PCI AUDIO SYSTEM PCI MESSAGE RECEIVED FROM MODULE
REMOTE RADIO CONTROLS REMOTE RADIO SWITCHES PRESENT
VEHICLE THEFT SECURITY SKREEM MESSAGE RECEIVED, VALID KEY
RECEIVED, & DIAGNOSTIC PID RECEIVED.
MEMORY SEAT AND MIRRORS MEMORY SEAT SWITCH PRESENT AND OR PCI
MESSAGE RECEIVED FROM MEMORY MODULE
ABS W/TRACTION CONTROL PCI MESSAGE RECEIVED FROM CAB
SENTRY KEY IMMOBILIZER SYSTEM PCI MESSAGE RECEIVED FROM SKIM OR VTSS
PRESENT
ADJUSTABLE PEDAL MODULE PCI MESSAGE RECEIVED FROM ADJUSTABLE
PEDAL MODULE (APM)
When replacing a BCM there are three modules
available:
²Base
²Midline
²RG - Export
The Midline controller is used on vehicles that
have Power Door Locks. If a vehicle is equipped with
the Vehicle Theft Security System, the Midline con-
troller becomes a Premium when the theft feature is
enabled.
CAUTION: Do not swap Body Control Modules
between vehicles or body controller's off the shelf.
The BCM has internal diagnostic capability that
assists in diagnosing the system error. When an
OPEN or a SHORT circuit exists, the diagnostic tool
can be used to read the BCM faults. The faults are
very descriptive in identifying the appropriate fea-
ture that has faulted.
The only two faults that the BCM logs that con-
clude the replacement of a BCM are faults;
²# 01 - Internal BCM failure (replace BCM)
²# 1F - J1850 Internal Hardware Failure (replace
BCM)
Otherwise the appropriate diagnostic procedures
for each of the features should be taken when the
BCM logs a fault.
REMOVAL
(1) Disconnect and isolate the battery negative
cable.
(2) Remove the lower instrument panel silencer.(3) Remove the knee blocker and reinforcement
(Refer to 23 - BODY/INSTRUMENT PANEL/KNEE
BLOCKER REINFORCEMENT - REMOVAL).
(4) Disconnect the five wire connectors from the
bottom of the Body Control Module (BCM).
(5) Move bulkhead wiring aside.
(6) Remove the screws holding the BCM to the
bulkhead.
(7) Remove the BCM from the mounting bracket.
INSTALLATION
(1) Install the BCM to the mounting bracket.
(2) Install the screws holding the BCM to the
bulkhead.
(3) Connect the five wire connectors to the bottom
of the Body Control Module (BCM).
(4) Install the knee blocker and reinforcement
(Refer to 23 - BODY/INSTRUMENT PANEL/KNEE
BLOCKER REINFORCEMENT - INSTALLATION).
(5) Install the lower instrument panel silencer.
(6) Connect the battery negative cable.
(7) Verify proper operation of BCM and its func-
tions.
CONTROLLER ANTILOCK
BRAKE
DESCRIPTION
The controller antilock brake (CAB) is a micropro-
cessor-based device which monitors the antilock
brake system (ABS) during normal braking and con-
trols it when the vehicle is in an ABS stop. The CAB
is mounted to the HCU as part of the integrated con-
trol unit (ICU) (Fig. 1). The CAB uses a 24-way elec-
8E - 4 ELECTRONIC CONTROL MODULESRS
BODY CONTROL MODULE (Continued)
Page 292 of 2339
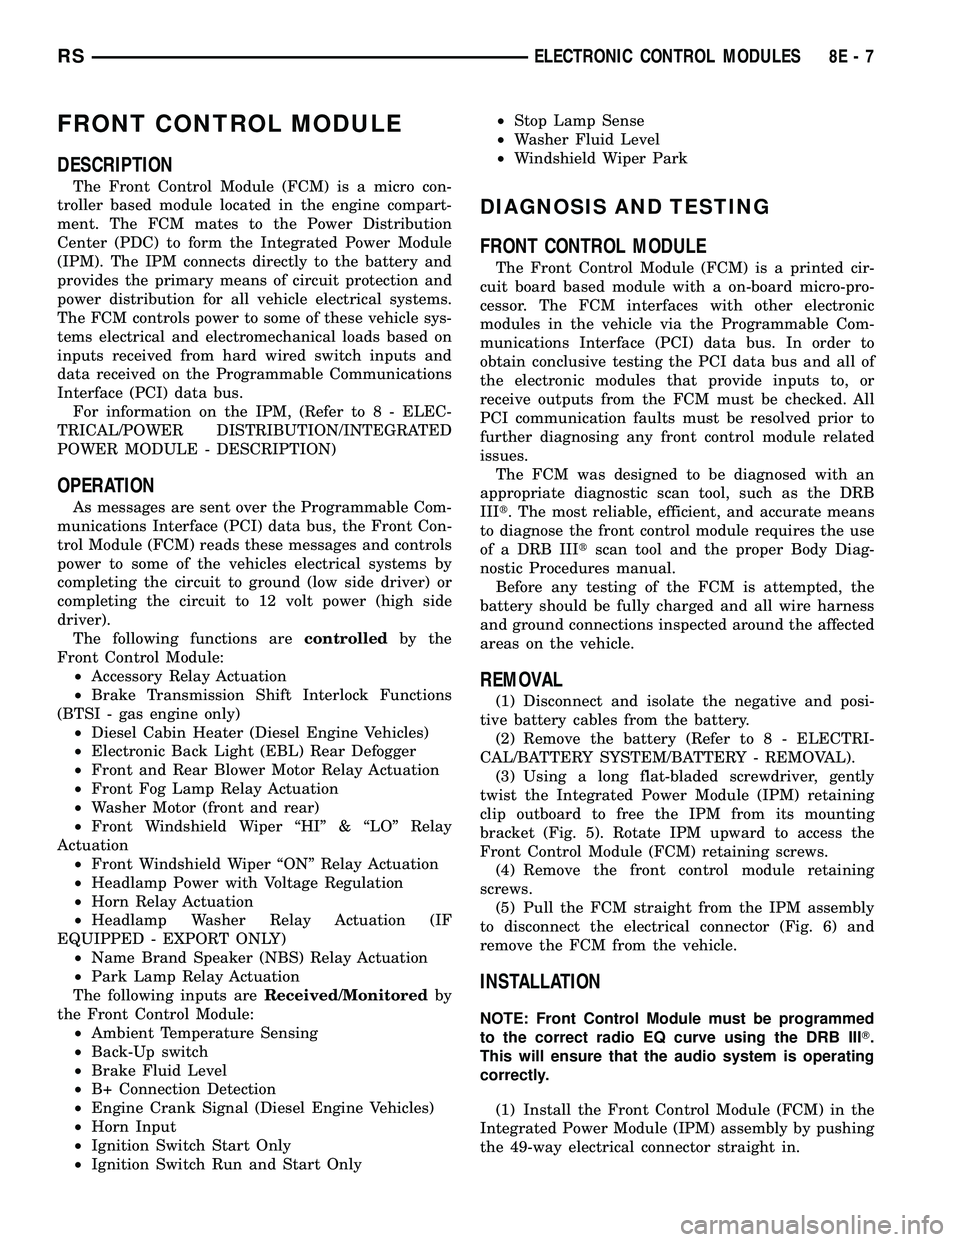
FRONT CONTROL MODULE
DESCRIPTION
The Front Control Module (FCM) is a micro con-
troller based module located in the engine compart-
ment. The FCM mates to the Power Distribution
Center (PDC) to form the Integrated Power Module
(IPM). The IPM connects directly to the battery and
provides the primary means of circuit protection and
power distribution for all vehicle electrical systems.
The FCM controls power to some of these vehicle sys-
tems electrical and electromechanical loads based on
inputs received from hard wired switch inputs and
data received on the Programmable Communications
Interface (PCI) data bus.
For information on the IPM, (Refer to 8 - ELEC-
TRICAL/POWER DISTRIBUTION/INTEGRATED
POWER MODULE - DESCRIPTION)
OPERATION
As messages are sent over the Programmable Com-
munications Interface (PCI) data bus, the Front Con-
trol Module (FCM) reads these messages and controls
power to some of the vehicles electrical systems by
completing the circuit to ground (low side driver) or
completing the circuit to 12 volt power (high side
driver).
The following functions arecontrolledby the
Front Control Module:
²Accessory Relay Actuation
²Brake Transmission Shift Interlock Functions
(BTSI - gas engine only)
²Diesel Cabin Heater (Diesel Engine Vehicles)
²Electronic Back Light (EBL) Rear Defogger
²Front and Rear Blower Motor Relay Actuation
²Front Fog Lamp Relay Actuation
²Washer Motor (front and rear)
²Front Windshield Wiper ªHIº & ªLOº Relay
Actuation
²Front Windshield Wiper ªONº Relay Actuation
²Headlamp Power with Voltage Regulation
²Horn Relay Actuation
²Headlamp Washer Relay Actuation (IF
EQUIPPED - EXPORT ONLY)
²Name Brand Speaker (NBS) Relay Actuation
²Park Lamp Relay Actuation
The following inputs areReceived/Monitoredby
the Front Control Module:
²Ambient Temperature Sensing
²Back-Up switch
²Brake Fluid Level
²B+ Connection Detection
²Engine Crank Signal (Diesel Engine Vehicles)
²Horn Input
²Ignition Switch Start Only
²Ignition Switch Run and Start Only²Stop Lamp Sense
²Washer Fluid Level
²Windshield Wiper Park
DIAGNOSIS AND TESTING
FRONT CONTROL MODULE
The Front Control Module (FCM) is a printed cir-
cuit board based module with a on-board micro-pro-
cessor. The FCM interfaces with other electronic
modules in the vehicle via the Programmable Com-
munications Interface (PCI) data bus. In order to
obtain conclusive testing the PCI data bus and all of
the electronic modules that provide inputs to, or
receive outputs from the FCM must be checked. All
PCI communication faults must be resolved prior to
further diagnosing any front control module related
issues.
The FCM was designed to be diagnosed with an
appropriate diagnostic scan tool, such as the DRB
IIIt. The most reliable, efficient, and accurate means
to diagnose the front control module requires the use
of a DRB IIItscan tool and the proper Body Diag-
nostic Procedures manual.
Before any testing of the FCM is attempted, the
battery should be fully charged and all wire harness
and ground connections inspected around the affected
areas on the vehicle.
REMOVAL
(1) Disconnect and isolate the negative and posi-
tive battery cables from the battery.
(2) Remove the battery (Refer to 8 - ELECTRI-
CAL/BATTERY SYSTEM/BATTERY - REMOVAL).
(3) Using a long flat-bladed screwdriver, gently
twist the Integrated Power Module (IPM) retaining
clip outboard to free the IPM from its mounting
bracket (Fig. 5). Rotate IPM upward to access the
Front Control Module (FCM) retaining screws.
(4) Remove the front control module retaining
screws.
(5) Pull the FCM straight from the IPM assembly
to disconnect the electrical connector (Fig. 6) and
remove the FCM from the vehicle.
INSTALLATION
NOTE: Front Control Module must be programmed
to the correct radio EQ curve using the DRB IIIT.
This will ensure that the audio system is operating
correctly.
(1) Install the Front Control Module (FCM) in the
Integrated Power Module (IPM) assembly by pushing
the 49-way electrical connector straight in.
RSELECTRONIC CONTROL MODULES8E-7
Page 560 of 2339
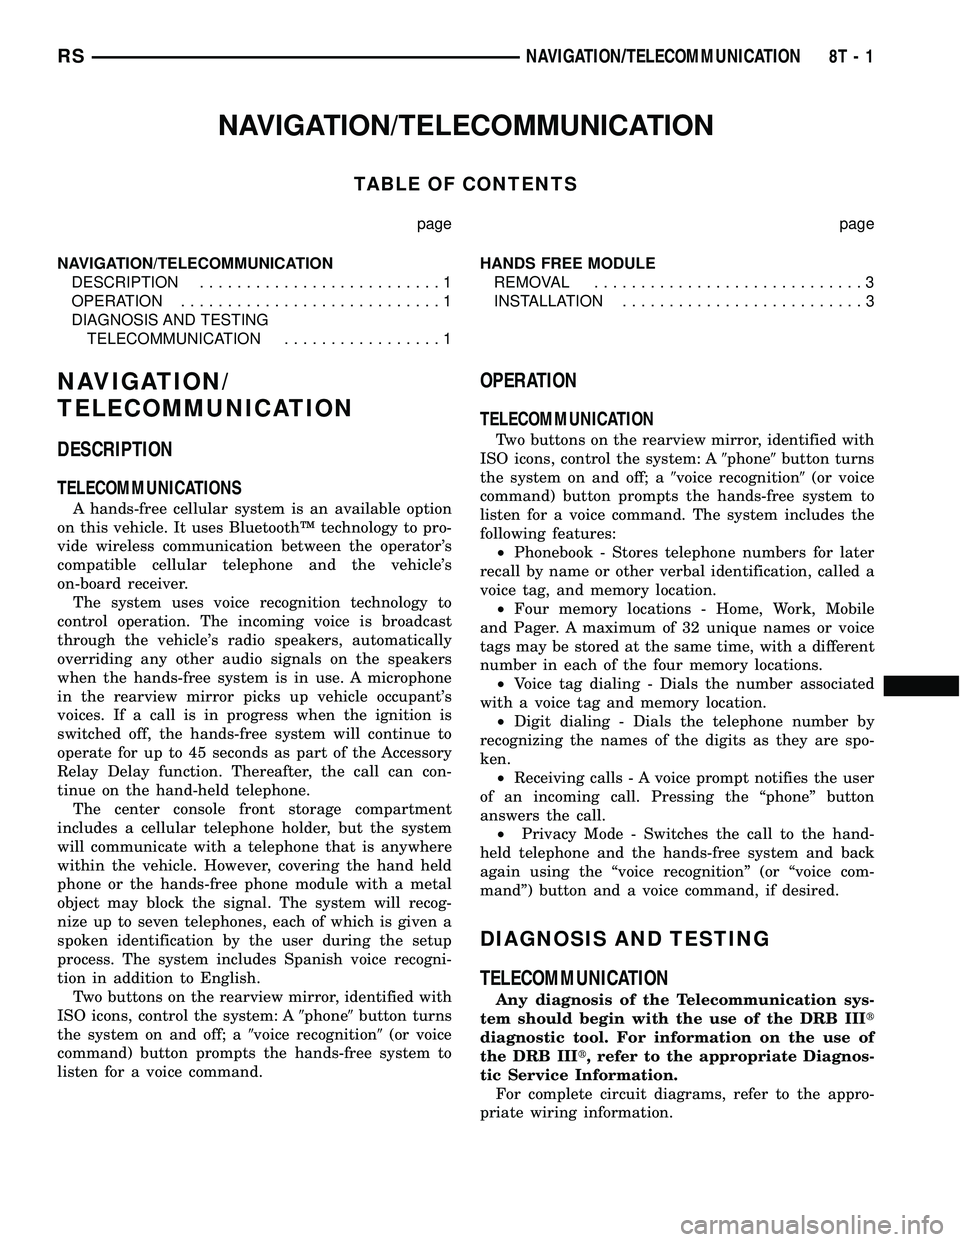
NAVIGATION/TELECOMMUNICATION
TABLE OF CONTENTS
page page
NAVIGATION/TELECOMMUNICATION
DESCRIPTION..........................1
OPERATION............................1
DIAGNOSIS AND TESTING
TELECOMMUNICATION.................1HANDS FREE MODULE
REMOVAL.............................3
INSTALLATION..........................3
NAVIGATION/
TELECOMMUNICATION
DESCRIPTION
TELECOMMUNICATIONS
A hands-free cellular system is an available option
on this vehicle. It uses BluetoothŸ technology to pro-
vide wireless communication between the operator's
compatible cellular telephone and the vehicle's
on-board receiver.
The system uses voice recognition technology to
control operation. The incoming voice is broadcast
through the vehicle's radio speakers, automatically
overriding any other audio signals on the speakers
when the hands-free system is in use. A microphone
in the rearview mirror picks up vehicle occupant's
voices. If a call is in progress when the ignition is
switched off, the hands-free system will continue to
operate for up to 45 seconds as part of the Accessory
Relay Delay function. Thereafter, the call can con-
tinue on the hand-held telephone.
The center console front storage compartment
includes a cellular telephone holder, but the system
will communicate with a telephone that is anywhere
within the vehicle. However, covering the hand held
phone or the hands-free phone module with a metal
object may block the signal. The system will recog-
nize up to seven telephones, each of which is given a
spoken identification by the user during the setup
process. The system includes Spanish voice recogni-
tion in addition to English.
Two buttons on the rearview mirror, identified with
ISO icons, control the system: A9phone9button turns
the system on and off; a9voice recognition9(or voice
command) button prompts the hands-free system to
listen for a voice command.
OPERATION
TELECOMMUNICATION
Two buttons on the rearview mirror, identified with
ISO icons, control the system: A9phone9button turns
the system on and off; a9voice recognition9(or voice
command) button prompts the hands-free system to
listen for a voice command. The system includes the
following features:
²Phonebook - Stores telephone numbers for later
recall by name or other verbal identification, called a
voice tag, and memory location.
²Four memory locations - Home, Work, Mobile
and Pager. A maximum of 32 unique names or voice
tags may be stored at the same time, with a different
number in each of the four memory locations.
²Voice tag dialing - Dials the number associated
with a voice tag and memory location.
²Digit dialing - Dials the telephone number by
recognizing the names of the digits as they are spo-
ken.
²Receiving calls - A voice prompt notifies the user
of an incoming call. Pressing the ªphoneº button
answers the call.
²Privacy Mode - Switches the call to the hand-
held telephone and the hands-free system and back
again using the ªvoice recognitionº (or ªvoice com-
mandº) button and a voice command, if desired.
DIAGNOSIS AND TESTING
TELECOMMUNICATION
Any diagnosis of the Telecommunication sys-
tem should begin with the use of the DRB IIIt
diagnostic tool. For information on the use of
the DRB IIIt, refer to the appropriate Diagnos-
tic Service Information.
For complete circuit diagrams, refer to the appro-
priate wiring information.
RSNAVIGATION/TELECOMMUNICATION8T-1
Page 562 of 2339
CONDITION POSSIBLE CAUSE CORRECTION
8. Other passengers
talking while customer is
attempting to use the
system8. Although designed for primary use by the driver, the
microphone will pick up passengers in any seat of the vehicle.
System performance is increased in low noise environments.
Phonebook
names not
recognized
consistently1. Phonebook names
recorded in high noise
conditions1. For increased system performance, it is recommended that the
phone book entries are recorded in a low noise environment. That
is, vehicle in park, with windows up.
2. Phonebook name(s)
short2. For increased performance it is recommended that the user
use both first and last name as a phonebook entry. Example9
Daniel James9as opposed to9Dan9.
3. Phonebook names
recorded by another user3. It is recommended that each user of the system record their
own phonebook entries. This will increase the recognition
performance.
4. Similar names in
phonebook4. For increased system performance it is recommended that the
user do not enter similar sounding names in the phonebook.
5. Object interfering with
microphone input5. Object interfering with microphone input.
Poor Phone
audio quality.1. Microphone failure 1. Use a scan tool, and check for Microphone faults.
2. Rear view mirror not
properly fixed to
mounting button2. Mirror must be firmly mounted to the mounting location. Tighten
mirror to the specified torque.
3. System being used in
high noise conditions3. System performance is increased when noise conditions in the
vehicle are lowered. Ideal conditions include windows closed.
No Phone Audio 1. Phone setting cause
phone audio to be routed
to handset.1. Route audio to9Hands free9device.
HANDS FREE MODULE
REMOVAL
(1) Disconnect and isolate the battery negative
cable.
(2) Remove the instrument panel lower console
(Refer to 23 - BODY/INSTRUMENT PANEL/STOR-
AGE BIN - REMOVAL).
(3) Remove the mounting fasteners (Fig. 1).
(4) Disconnect the electrical harness connector and
remove module.
INSTALLATION
(1) Connect electrical harness connector and posi-
tion module.
(2) Install mounting fasteners.
(3) Install instrument panel lower console (Refer to
23 - BODY/INSTRUMENT PANEL/STORAGE BIN -
INSTALLATION).(4) Connect battery negative cable.
Fig. 1 HANDS FREE MODULE
RSNAVIGATION/TELECOMMUNICATION8T-3
NAVIGATION/TELECOMMUNICATION (Continued)
Page 564 of 2339
WIRING
TABLE OF CONTENTS
page page
WIRING DIAGRAM INFORMATION....... 8W-01-1
COMPONENT INDEX.................. 8W-02-1
POWER DISTRIBUTION............... 8W-10-1
GROUND DISTRIBUTION.............. 8W-15-1
BUS COMMUNICATIONS.............. 8W-18-1
CHARGING SYSTEM.................. 8W-20-1
STARTING SYSTEM.................. 8W-21-1
FUEL/IGNITION SYSTEM.............. 8W-30-1
TRANSMISSION CONTROL SYSTEM..... 8W-31-1
VEHICLE SPEED CONTROL............ 8W-33-1
ANTILOCK BRAKES................... 8W-35-1
VEHICLE THEFT SECURITY SYSTEM..... 8W-39-1
INSTRUMENT CLUSTER............... 8W-40-1
HORN/CIGAR LIGHTER/POWER OUTLET . . 8W-41-1
AIR CONDITIONING-HEATER........... 8W-42-1
OCCUPANT RESTRAINT SYSTEM........ 8W-43-1
INTERIOR LIGHTING.................. 8W-44-1
BODY CONTROL MODULE............. 8W-45-1
MESSAGE CENTER................... 8W-46-1
AUDIO SYSTEM..................... 8W-47-1REAR WINDOW DEFOGGER............ 8W-48-1
OVERHEAD CONSOLE................. 8W-49-1
FRONT LIGHTING.................... 8W-50-1
REAR LIGHTING..................... 8W-51-1
TURN SIGNALS...................... 8W-52-1
WIPERS............................ 8W-53-1
TRAILER TOW....................... 8W-54-1
NAVIGATION/TELECOMMUNICATIONS.... 8W-55-1
CONVENIENCE SYSTEMS.............. 8W-56-1
POWER WINDOWS................... 8W-60-1
POWER DOOR LOCKS................ 8W-61-1
POWER MIRRORS................... 8W-62-1
POWER SEATS...................... 8W-63-1
POWER SUNROOF................... 8W-64-1
SPLICE INFORMATION................ 8W-70-1
CONNECTOR PIN-OUTS............... 8W-80-1
CONNECTOR/GROUND/SPLICE
LOCATION........................ 8W-91-1
POWER DISTRIBUTION SYSTEM........ 8W-97-1 RSWIRING
8W-1
Page 571 of 2339

DESCRIPTION - CIRCUIT FUNCTIONS
All circuits in the diagrams use an alpha/numeric
code to identify the wire and it's function. To identify
which circuit code applies to a system, refer to the
Circuit Identification Code Chart. This chart shows
the main circuits only and does not show the second-
ary codes that may apply to some models.
CIRCUIT IDENTIFICATION CODE CHART
CIRCUIT FUNCTION
A BATTERY FEED
B BRAKE CONTROLS
C CLIMATE CONTROLS
D DIAGNOSTIC CIRCUITS
E DIMMING ILLUMINATION
CIRCUITS
F FUSED CIRCUITS
G MONITORING CIRCUITS
(GAUGES)
H MULTIPLE
I NOT USED
J OPEN
K POWERTRAIN CONTROL
MODULE
L EXTERIOR LIGHTING
M INTERIOR LIGHTING
N MULTIPLE
O NOT USED
P POWER OPTION (BATTERY
FEED)
Q POWER OPTIONS (IGNITION
FEED)
R PASSIVE RESTRAINT
S SUSPENSION/STEERING
T TRANSMISSION/TRANSAXLE/
TRANSFER CASE
U OPEN
V SPEED CONTROL, WIPER/
WASHER
W WIPERS
X AUDIO SYSTEMS
Y TEMPORARY
Z GROUNDS
DESCRIPTION - SECTION IDENTIFICATION AND
INFORMATION
The wiring diagrams are grouped into individual
sections. If a component is most likely found in a par-
ticular group, it will be shown complete (all wires,
connectors, and pins) within that group. For exam-
ple, the Auto Shutdown Relay is most likely to be
found in Group 30, so it is shown there complete. It
can, however, be shown partially in another group if
it contains some associated wiring.
Splice diagrams in Section 8W-70 show the entire
splice and provide references to other sections the
splices serves. Section 8W-70 only contains splice dia-
grams that are not shown in their entirety some-
where else in the wiring diagrams.
Section 8W-80 shows each connector and the cir-
cuits involved with that connector. The connectors
are identified using the name/number on the dia-
gram pages.
WIRING SECTION CHART
GROUP TOPIC
8W-01 thru
8W-09General information and Diagram
Overview
8W-10 thru
8W-19Main Sources of Power and
Vehicle Grounding
8W-20 thru
8W-29Starting and Charging
8W-30 thru
8W-39Powertrain/Drivetrain Systems
8W-40 thru
8W-49Body Electrical items and A/C
8W-50 thru
8W-59Exterior Lighting, Wipers and
Trailer Tow
8W-60 thru
8W-69Power Accessories
8W-70 Splice Information
8W-80 Connector Pin Outs
8W-91 Connector, Ground and Splice
Locations
8W - 01 - 6 8W-01 WIRING DIAGRAM INFORMATIONRS
WIRING DIAGRAM INFORMATION (Continued)
Page 838 of 2339

8W-47 AUDIO SYSTEM
Component Page
Accessory Relay..................... 8W-47-2
Amplifier.................... 8W-47-2, 6, 7, 8
Antenna........................... 8W-47-2
Body Control Module............... 8W-47-2, 9
CD Changer................. 8W-47-10, 11, 12
Clockspring........................ 8W-47-9
Data Link Connector................. 8W-47-6
DVD Screen....................... 8W-47-14
DVD/CD Changer............. 8W-47-13, 14, 15
Front Cigar Lighter.................. 8W-47-2
Front Control Module................. 8W-47-2
Fuse 5............................ 8W-47-2
Fuse 14......................... 8W-47-2, 13
Fuse 20............................ 8W-47-6
G200............................. 8W-47-13
G202.............................. 8W-47-2Component Page
G302.............................. 8W-47-6
Hands Free Module.............. 8W-47-12, 15
Integrated Power Module......... 8W-47-2, 6, 13
Left Door Speaker.............. 8W-47-3, 4, 7, 8
Left Instrument Panel Speaker . . . 8W-47-3, 4, 7, 8
Left Rear Pillar Speaker............. 8W-47-7, 8
Left Rear Speaker............... 8W-47-5, 7, 8
Left Remote Radio Switch............. 8W-47-9
Overhead Console.................... 8W-47-6
Radio....... 8W-47-2, 3, 4, 5, 6, 10, 11, 12, 13, 15
Right Door Speaker............ 8W-47-3, 4, 7, 8
Right Instrument Panel Speaker . . 8W-47-3, 4, 7, 8
Right Rear Pillar Speaker........... 8W-47-7, 8
Right Rear Speaker.............. 8W-47-5, 7, 8
Right Remote Radio Switch............ 8W-47-9
Right Sliding Door Control Module...... 8W-47-6
RS8W-47 AUDIO SYSTEM8W-47-1
Page 970 of 2339

8W-80 CONNECTOR PIN-OUTS
Component Page
A/C Compressor Clutch............... 8W-80-6
A/C Pressure Sensor.................. 8W-80-6
A/C-Heater Control C1 (MTC).......... 8W-80-6
A/C-Heater Control C2 (MTC).......... 8W-80-7
Accelerator Pedal Position Sensor
(Diesel).......................... 8W-80-7
Adjustable Pedals Motor
(Except Export)................... 8W-80-7
Adjustable Pedals Relay (Except
Export/Except Memory)............. 8W-80-8
Adjustable Pedals Sensor
(Except Export)................... 8W-80-8
Adjustable Pedals Switch
(Except Export)................... 8W-80-8
Ambient Temperature Sensor........... 8W-80-8
Amplifier C1 (Highline Audio).......... 8W-80-9
Amplifier C2 (Highline Audio).......... 8W-80-9
ATC Remote Sensor (ATC)............ 8W-80-10
Auto Temp Control C1............... 8W-80-10
Auto Temp Control C2............... 8W-80-10
Auto Temp Control C3............... 8W-80-11
Back-Up Lamp Switch (MTX).......... 8W-80-11
Battery Temperature Sensor........... 8W-80-11
Belt Tension Sensor
(Occupant Sensing)................ 8W-80-11
Blower Motor Resistor C1 (MTC)....... 8W-80-12
Blower Motor Resistor C2 (MTC)....... 8W-80-12
Body Control Module C1.............. 8W-80-12
Body Control Module C2.............. 8W-80-13
Body Control Module C3.............. 8W-80-14
Body Control Module C4.............. 8W-80-15
Body Control Module C5.............. 8W-80-16
Boost Pressure Sensor (Diesel)......... 8W-80-16
Brake Fluid Level Switch............. 8W-80-17
Brake Lamp Switch................. 8W-80-17
Brake Transmission Shift Interlock
Solenoid........................ 8W-80-17
C100............................. 8W-80-17
C100............................. 8W-80-18
C101 (Diesel)...................... 8W-80-18
C101 (Diesel)...................... 8W-80-19
C101 (Gas)........................ 8W-80-19
C101 (Gas)........................ 8W-80-19
C102 (Gas)........................ 8W-80-19
C102 (Gas)........................ 8W-80-20
C103 (Diesel)...................... 8W-80-20
C103 (Diesel)...................... 8W-80-20
C104 (Except Export)................ 8W-80-20
C104 (Except Export)................ 8W-80-21
C106 (Export)...................... 8W-80-21
C106 (Export)...................... 8W-80-21
C107 (Export)...................... 8W-80-21Component Page
C107 (Export)...................... 8W-80-22
C111(EATX)....................... 8W-80-22
C111(EATX)....................... 8W-80-22
C112 (Gas)........................ 8W-80-22
C112 (Gas)........................ 8W-80-22
C200............................. 8W-80-23
C200............................. 8W-80-25
C202............................. 8W-80-27
C202............................. 8W-80-27
C204 (Premium).................... 8W-80-27
C204 (Premium).................... 8W-80-28
C206 (Except Base).................. 8W-80-28
C206 (Except Base).................. 8W-80-28
C207 (DVD)....................... 8W-80-28
C207 (Hands Free).................. 8W-80-29
C300 (LHD)....................... 8W-80-29
C300 (LHD)....................... 8W-80-29
C300 (RHD)....................... 8W-80-30
C300 (RHD)....................... 8W-80-30
C301 (Luxury/Export)................ 8W-80-30
C301 (Luxury/Export)................ 8W-80-30
C302 (Export)...................... 8W-80-31
C302 (Export)...................... 8W-80-31
C302 (Luxury/Except Export).......... 8W-80-31
C302 (Luxury/Except Export).......... 8W-80-31
C303 (LHD)....................... 8W-80-32
C303 (LHD)....................... 8W-80-32
C303 (RHD)....................... 8W-80-32
C303 (RHD)....................... 8W-80-33
C304 (LHD)....................... 8W-80-33
C304 (LHD)....................... 8W-80-33
C305............................. 8W-80-33
C305............................. 8W-80-34
C306 (RHD)....................... 8W-80-34
C306 (RHD)....................... 8W-80-34
C307............................. 8W-80-34
C307............................. 8W-80-35
C308 (Except Side Airbag)............ 8W-80-35
C308 (Side Airbag).................. 8W-80-35
C308 (Except Side Airbag)............ 8W-80-36
C308 (Side Airbag).................. 8W-80-36
C309 (Side Airbag).................. 8W-80-36
C309 (Side Airbag).................. 8W-80-37
C309 (Except Side Airbag)............ 8W-80-37
C309 (Except Side Airbag)............ 8W-80-37
C310 (Front Console)................ 8W-80-38
C310 (Front Console)................ 8W-80-38
C311 (3 Zone HVAC/Except
Side Airbag)..................... 8W-80-38
C311 (3 Zone HVAC/Except
Side Airbag)..................... 8W-80-38
C311 (3 Zone HVAC/Side Airbag)....... 8W-80-39
RS8W-80 CONNECTOR PIN-OUTS8W-80-1