mirror CHRYSLER PACIFICA 2004 1.G Owners Manual
[x] Cancel search | Manufacturer: CHRYSLER, Model Year: 2004, Model line: PACIFICA, Model: CHRYSLER PACIFICA 2004 1.GPages: 361, PDF Size: 5.21 MB
Page 65 of 361

UNDERSTANDING THE FEATURES OF YOUR VEHICLE
CONTENTS
mMirrors...............................69
NInside Day/Night Mirror.................69
NAutomatic Dimming Mirror Ð If Equipped....70
NDriver's Side Outside Mirror Auto Dimmer Ð If
Equipped............................70
NExterior Mirrors Folding Feature...........70
NOutside Mirror Ð Driver's Side............71
NOutside Mirror Ð Passenger's Side..........71
NPower Remote-Control Mirrors.............72NHeated Remote Control Mirrors............72
NIlluminated Vanity Mirrors................73
mHands±Free Communication (UConnectŸ) Ð If
Equipped.............................73
NOperation............................75
NPhone Call Features....................79
NAdvanced Phone Connectivity.............81
NUConnectŸ System Features..............82
3
Page 69 of 361

MIRRORS
Inside Day/Night Mirror
Adjust the mirror to center on the view through the rear
window. A two point pivot system allows for horizontal
and vertical adjustment of the mirror.Annoying headlight glare can be reduced by moving the
small control under the mirror to the night position
(toward rear of vehicle). The mirror should be adjusted
while set in the day position (toward windshield).
UNDERSTANDING THE FEATURES OF YOUR VEHICLE 69
3
Page 70 of 361

Automatic Dimming Mirror Ð If Equipped
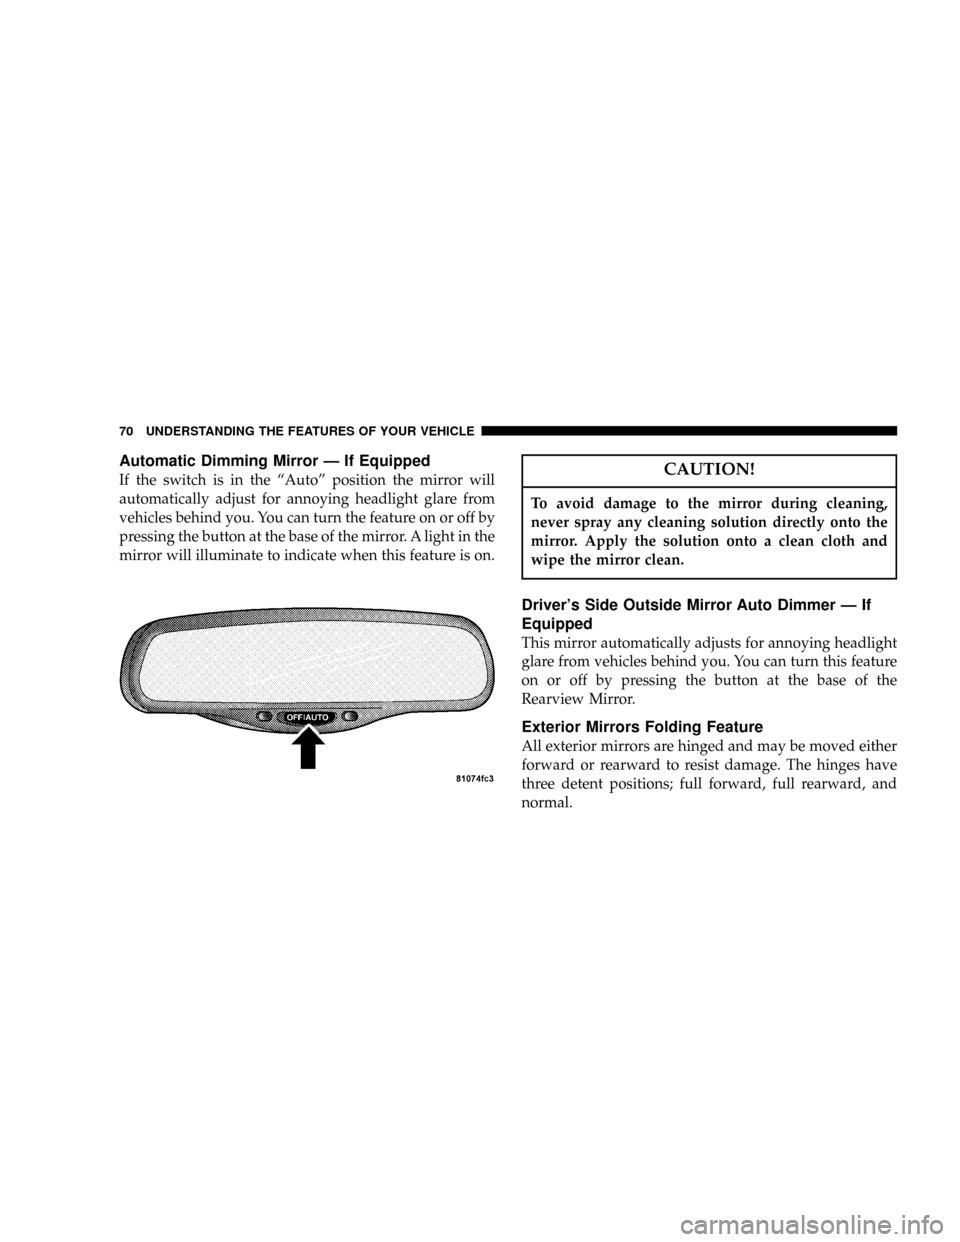
If the switch is in the ªAutoº position the mirror will
automatically adjust for annoying headlight glare from
vehicles behind you. You can turn the feature on or off by
pressing the button at the base of the mirror. A light in the
mirror will illuminate to indicate when this feature is on.CAUTION!
To avoid damage to the mirror during cleaning,
never spray any cleaning solution directly onto the
mirror. Apply the solution onto a clean cloth and
wipe the mirror clean.
Driver's Side Outside Mirror Auto Dimmer Ð If
Equipped
This mirror automatically adjusts for annoying headlight
glare from vehicles behind you. You can turn this feature
on or off by pressing the button at the base of the
Rearview Mirror.
Exterior Mirrors Folding Feature
All exterior mirrors are hinged and may be moved either
forward or rearward to resist damage. The hinges have
three detent positions; full forward, full rearward, and
normal.
70 UNDERSTANDING THE FEATURES OF YOUR VEHICLE
Page 71 of 361

Outside Mirror Ð Driver's Side
Adjust the outside mirror to center on the adjacent lane of
traffic, with a slight overlap of the view obtained on the
inside mirror.
Outside Mirror Ð Passenger's Side
Adjust the convex outside mirror so you can just see the
side of your vehicle in the portion of the mirror closest to
the vehicle. This type of mirror will give a much wider
view to the rear, and especially of the lane next to your
vehicle.
WARNING!
Vehicles and other objects seen in the right side
convex mirror will look smaller and farther away
than they really are. Relying too much on your right
side mirror could cause you to collide with another
vehicle or other object.
Use your inside mirror when judging the size or
distance of a vehicle seen in this convex mirror.
UNDERSTANDING THE FEATURES OF YOUR VEHICLE 71
3
Page 72 of 361

Power Remote-Control Mirrors
Use the mirror select switch, located on the driver's door
trim panel above the power window switches, to adjust
the view obtained in the outside mirrors.Press the rocker switch to the L or R for Left or Right
mirror selection. Use the center off position to guard
against accidentally moving a mirror position.
Select a mirror and press one of the four arrows for the
direction you want the mirror to move.
Power mirror preselected positions can be controlled by
the optional Memory Seat Feature. Refer to ªMemory
Seatº in section 3 of this manual.
Heated Remote Control Mirrors
These mirrors are heated to melt frost or ice. This feature
is activated whenever you turn on the Rear Window
Defrost.
72 UNDERSTANDING THE FEATURES OF YOUR VEHICLE
Page 73 of 361

Illuminated Vanity Mirrors
An illuminated vanity mirror is on the sun visor. To use
the mirror, rotate the sun visor down and swing the
mirror cover upward. The lights turn on automatically.
Closing the mirror cover turns off the lights.
Sun Visor Extension
This feature has a pull out extension on the sun visor for
increased coverage.
HANDS±FREE COMMUNICATION (UConnectŸ) Ð
IF EQUIPPED
UConnectŸ is a voice-activated, hands-free, in-vehicle
communications system. UConnectŸ; allows you to dial
your cellular phone using simple voice commands (e.g.,
ªCall Mike Workº or ªDial 248-555-1212º). Your cellular
phone's audio is transmitted through your vehicle's
stereo system; the system will automatically mute your
radio before receiving or sending a call.
UConnectŸ allows you to transfer calls between the
system and your cellular phone as you enter or exit your
vehicle, and enables you to mute the system's micro-
phone for private conversations.
UNDERSTANDING THE FEATURES OF YOUR VEHICLE 73
3
Page 74 of 361

The UConnectŸ; phone book enables you to store up to
32 names and four numbers per name. This system is
driven through your BluetoothŸ Hands-Free Profile
cellular phone. UConnectŸ features BluetoothŸ technol-
ogy - the global standard that enables different electronic
devices to connect to each other without wires or a
docking station, so UConnectŸ works no matter where
you stow your cellular phone (be it your purse, pocket, or
briefcase). UConnectŸ allows up to seven cellular
phones to be linked to the system, and it is available in
English, French, or Spanish formats (as equipped).
The rearview mirror contains the microphone for the
system and the control buttons that will enable you to
access the system. The diagram below shows the mirror
with the appropriate buttons. Individual button behavior
is discussed in the ªOperationº Section.The UConnectŸ system can be used with any Hands
Free Profile certified BluetoothŸ cellular phone. If your
cellular phone has a different profile (i.e. headset profile),
you will not be able to use any UConnectŸ features.
The UConnectŸ system is fully integrated into your
vehicle, including your vehicle's stereo system. All voice
74 UNDERSTANDING THE FEATURES OF YOUR VEHICLE
Page 88 of 361

NOTE:
²If the lights in the second row heated seat switch begin
to flash when the switch is pressed, it indicates that the
heated seat is not functioning properly and that ser-
vice is required. See your authorized dealer for service.
²Once a heat setting is selected, heat will be felt within
2 to 3 minutes.
²The heated seats will turn off when the ignition switch
is turned to the OFF position.
Memory Seat Ð If Equipped
If your vehicle is equipped with memory systems, your
remote keyless entry transmitter or memory seat buttons
on the driver's door panel can be used to recall the
driver's seat, outside mirrors, adjustable pedals (if
equipped) and radio station presets to saved positions.The memory seat buttons located on the driver's door
will always recall stored settings. The remote keyless
entry transmitter can be programmed to recall positions
when the UNLOCK button is pressed. Refer to the
following procedure on how to link a remote keyless
entry transmitter to a position.
88 UNDERSTANDING THE FEATURES OF YOUR VEHICLE
Page 89 of 361

NOTE:The vehicle must be in Park to recall memory
positions. If a recall is attempted when the vehicle is not
in Park, a message will be displayed in the Electronic
Vehicle Information Center (EVIC).
To recall memory positions press memory button number
1 if you are recalling the memory position for driver one
or press memory button number 2 if you are recalling the
memory position for driver two. A recall can be cancelled
by pressing any of the memory buttons during a recall.
When a recall is cancelled, the seat stops moving and a
delay of approximately one second will occur before any
other recalls can be selected.
Your vehicle has been delivered with two remote keyless
entry transmitters. One or both transmitters can be linked
to either memory position. Up to eight remote keyless
entry transmitters can be used with your vehicle. The
memory seat system can also accommodate up to eighttransmitters linked to either of the two stored seat
positions or any combination of the two positions.
To Program Memory Seat Buttons & RKE
Transmitters, Follow These Steps:
1. Turn the ignition switch to the ON position.
2. Select Remote Linked to Memory from the EVIC and
enter ªYesº.
3. Use the seat, mirror and adjustable pedal switches to
adjust the seat, recliner, side view mirrors and adjustable
pedals to the desired positions.
4. Set the radio station presets (up to 10 AM and 10 FM
stations can be set).
5. Turn the ignition switch to the OFF position and
remove the key.
UNDERSTANDING THE FEATURES OF YOUR VEHICLE 89
3
Page 149 of 361

Auto Unlock On Exit?
When this feature is selected all the vehicle's doors will
unlock when the driver's door is opened if the vehicle is
stopped and the transmission is in P (Park) or N (Neu-
tral) position. Pressing the STEP button when in this
display will select ªYesº or ªNo.º
Remote Unlock Driver's Door 1st?
When this feature is selected only the driver's door will
unlock on the first press of the remote keyless entry
unlock button and require a second press to unlock the
remaining locked doors and liftgate. WhenREMOTE
UNLOCK ALL DOORSis selected all of the doors and
the liftgate will unlock at the first press of the remote
keyless entry unlock button. Pressing the STEP button
when in this display will select DRIVER'S DOOR 1ST or
ALL DOORS.
Remote Linked To Memory? (Available with
Memory Seat Only)
When this feature is selected the memory seat, mirror,
and radio settings will return to the memory set position
when the remote keyless entry ªUnlockº button is
pressed. If this feature is not selected then the memory
seat, mirror, and radio settings can only return to the
memory set position using the door mounted switch.
Pressing the STEP button when in this display will select
ªYesº or ªNo.º
Sound Horn On Lock?
When this feature is selected a short horn sound will
occur when the remote keyless entry ªLockº button is
pressed. This feature may be selected with or without the
flash lights on lock/unlock feature. Pressing the STEP
button when in this display will select ªYesº or ªNo.º
UNDERSTANDING YOUR INSTRUMENT PANEL 149
4