CHRYSLER PACIFICA 2017 2.G Owners Manual
Manufacturer: CHRYSLER, Model Year: 2017, Model line: PACIFICA, Model: CHRYSLER PACIFICA 2017 2.GPages: 828, PDF Size: 7.58 MB
Page 101 of 828
Head Restraints — Front Seats
The front driver and passenger seats are equipped with
four-way head restraints.
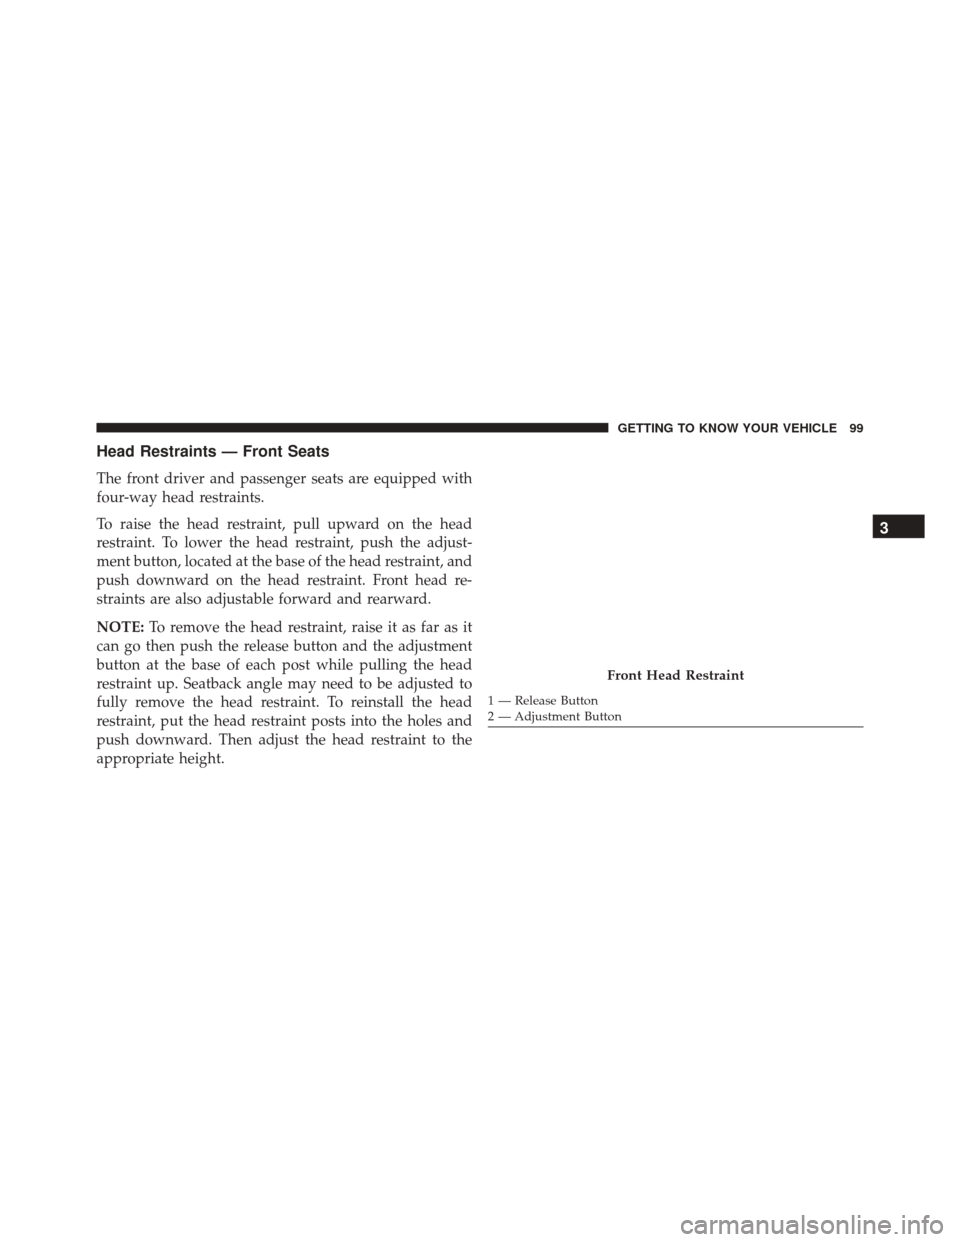
To raise the head restraint, pull upward on the head
restraint. To lower the head restraint, push the adjust-
ment button, located at the base of the head restraint, and
push downward on the head restraint. Front head re-
straints are also adjustable forward and rearward.
NOTE:To remove the head restraint, raise it as far as it
can go then push the release button and the adjustment
button at the base of each post while pulling the head
restraint up. Seatback angle may need to be adjusted to
fully remove the head restraint. To reinstall the head
restraint, put the head restraint posts into the holes and
push downward. Then adjust the head restraint to the
appropriate height.
Front Head Restraint
1 — Release Button
2 — Adjustment Button
3
GETTING TO KNOW YOUR VEHICLE 99
Page 102 of 828

WARNING!
•A loose head restraint thrown forward in a colli-
sion or hard stop could cause serious injury or
death to occupants of the vehicle. Always securely
stow removed head restraints in a location outside
the occupant compartment.
• ALL the head restraints MUST be reinstalled in the
vehicle to properly protect the occupants. Follow
the re-installation instructions above prior to oper-
ating the vehicle or occupying a seat.
Head Restraints — Second Row
The second row outboard head restraints are non-
adjustable. The removable 8th passenger seat (if
equipped) has an adjustable head restraint.
Head Restraints — Third Row
The outboard head restraints can be manually folded
forward for improved visibility while in reverse. Pull the
release strap to fold them forward.
Release Strap
100 GETTING TO KNOW YOUR VEHICLE
Page 103 of 828
NOTE:
•The head restraints must be raised manually when
occupying the third row.
• Do not fold if there are passengers seated in the third
row seats.
The head restraint in the center position can be raised and
lowered for tether routing or height adjustment. Refer to
“Occupant Restraints” in “Safety” for further informa-
tion.
Power Folding Third Row Head Restraints — If
Equipped
For improved visibility, the third row outboard head
restraints can be folded using the Uconnect System.
Press the “Controls” button located on the bottom of the
Uconnect display. Press the Head Restraint Fold button
to power fold
the third row head restraints.
NOTE:
• The head restraints can be folded downward using the
Head Restraint button or using the manual release
strap. The head restraints must be raised manually
when occupying the third row.
• Do not fold if there are passengers seated in the third
row seats.
STEERING WHEEL
Tilt/Telescoping Steering Column
This feature allows you to tilt the steering column
upward or downward. It also allows you to lengthen or
shorten the steering column. The tilt/telescoping lever is
located left of the steering wheel at the end of the steering
column.
3
GETTING TO KNOW YOUR VEHICLE 101
Page 104 of 828
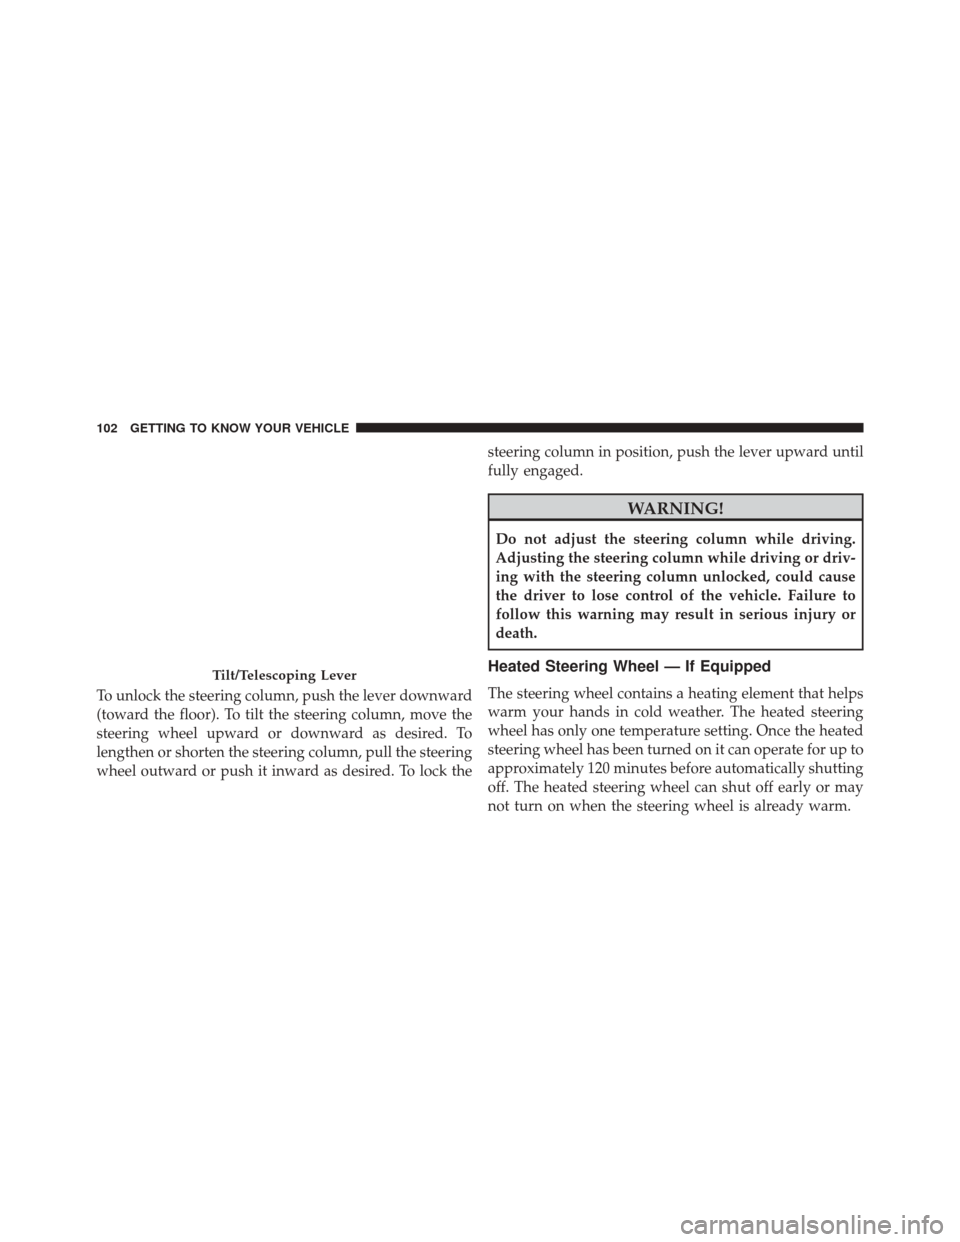
To unlock the steering column, push the lever downward
(toward the floor). To tilt the steering column, move the
steering wheel upward or downward as desired. To
lengthen or shorten the steering column, pull the steering
wheel outward or push it inward as desired. To lock thesteering column in position, push the lever upward until
fully engaged.
WARNING!
Do not adjust the steering column while driving.
Adjusting the steering column while driving or driv-
ing with the steering column unlocked, could cause
the driver to lose control of the vehicle. Failure to
follow this warning may result in serious injury or
death.
Heated Steering Wheel — If Equipped
The steering wheel contains a heating element that helps
warm your hands in cold weather. The heated steering
wheel has only one temperature setting. Once the heated
steering wheel has been turned on it can operate for up to
approximately 120 minutes before automatically shutting
off. The heated steering wheel can shut off early or may
not turn on when the steering wheel is already warm.
Tilt/Telescoping Lever
102 GETTING TO KNOW YOUR VEHICLE
Page 105 of 828
The heated steering wheel control button is located
within the Uconnect controls screen.
•Press the heated steering wheel button
once to
turn the heating element ON.
• Press the heated steering wheel buttona second
time to turn the heating element OFF.
NOTE: The engine must be running for the heated
steering wheel to operate.
Vehicles Equipped With Remote Start
On models that are equipped with remote start, the
heated steering wheel can be programed to come on
during a remote start. Refer to “Uconnect Settings” in
“Multimedia” for further information.
WARNING!
• Persons who are unable to feel pain to the skin
because of advanced age, chronic illness, diabetes,
spinal cord injury, medication, alcohol use, exhaus-
tion, or other physical conditions must exercise
care when using the steering wheel heater. It may
cause burns even at low temperatures, especially if
used for long periods.
• Do not place anything on the steering wheel that
insulates against heat, such as a blanket or steering
wheel covers of any type and material. This may
cause the steering wheel heater to overheat.
3
GETTING TO KNOW YOUR VEHICLE 103
Page 106 of 828
MIRRORS
Inside Day/Night Mirror — If Equipped
A single ball joint mirror is used to allow the driver to
adjust up, down and left, right. Mirror should be ad-
justed to center on the view through the rear window.
Headlight glare can be reduced by moving the small
control under the mirror to the night position (toward the
rear of the vehicle). The mirror should be adjusted while
set in the day position (toward the windshield).
Manual Rearview Mirror
104 GETTING TO KNOW YOUR VEHICLE
Page 107 of 828
Automatic Dimming Mirror — If Equipped
This mirror automatically adjusts for headlight glare
from vehicles behind you. You can turn the feature on or
off by pushing the button at the base of the mirror. A light
to the left of the button will illuminate to indicate when
the dimming feature is activated. The sensor to the right
of the button does not illuminate.
NOTE:This feature is disabled when the vehicle is in
reverse.
CAUTION!
To avoid damage to the mirror during cleaning, never
spray any cleaning solution directly onto the mirror.
Apply the solution onto a clean cloth and wipe the
mirror clean.
Automatic Dimming Mirror
3
GETTING TO KNOW YOUR VEHICLE 105
Page 108 of 828
Outside Mirrors
To receive maximum benefit, adjust the outside mirror(s)
to center on the adjacent lane of traffic with a slight
overlap of the view obtained on the inside mirror.
WARNING!
Vehicles and other objects seen in an outside convex
mirror will look smaller and farther away than they
really are. Relying too much on side convex mirrors
could cause you to collide with another vehicle or
other object. Use your inside mirror when judging
the size or distance of a vehicle seen in a side convex
mirror.
Driver’s Outside Automatic Dimming Mirror — If
Equipped
The driver ’s outside mirror will automatically adjust for
glare from vehicles behind you. This feature is controlledby the inside automatic dimming mirror and will auto-
matically adjust for headlight glare when the inside
mirror adjusts.
Outside Mirrors Folding Feature
All outside mirrors are hinged and may be moved either
forward or rearward to resist damage. The hinges have
three detent positions:
•
Full forward position
• Full rearward position
• Normal position
Power Mirrors — If Equipped
The power mirror controls are located on the driver-side
door trim panel.
106 GETTING TO KNOW YOUR VEHICLE
Page 109 of 828
The power mirror controls consist of mirror select but-
tons and a four-way mirror control switch. To adjust a
mirror, push either the L (left) or R (right) to select the
mirror that you want to adjust.
NOTE:A light in the selected button will illuminate
indicating the mirror is activated and can be adjusted. Using the mirror control switch, push on any of the four
arrows for the direction that you want the mirror to
move.
Left and Right side power mirror preselected positions
can be controlled by the optional Driver Memory Seat
Feature. Refer to “Driver Memory Seat” in “Seats” for
further information.
Heated Mirrors — If Equipped
These mirrors are heated to melt frost or ice. This
feature can be activated whenever you turn on the
rear window defroster (if equipped). Refer to “Climate
Controls” for further information.
Tilt Mirrors In Reverse (Available With Memory
Seat Only) — If Equipped
Tilt Mirrors in Reverse provides automatic outside mirror
positioning which will aid the driver ’s view of the
Power Mirror Controls
3
GETTING TO KNOW YOUR VEHICLE 107
Page 110 of 828
ground rearward of the front doors. The driver’s outside
mirror will move slightly downward from the present
position when the vehicle is shifted into REVERSE. The
driver’s outside mirror will then return to the original
position when the vehicle is shifted out of REVERSE
position. Each stored memory setting will have an asso-
ciated Tilt Mirrors in Reverse position.
NOTE:The Tilt Mirrors in Reverse feature is not enabled
when delivered from the factory. The Tilt Mirrors in
Reverse feature can be enabled or disabled in the Elec-
tronic Vehicle Information Center (EVIC) or Driver ’s
Information Display (DID). Refer to “Uconnect Settings”
in “Multimedia” for further information.
Power Folding Mirrors — If Equipped
The switch for the power folding mirrors is located
between the power mirror switches L (left) and R (right). Push the switch once and the mirrors will fold in,
pushing the switch a second time will return the mirrors
to the normal driving position.
NOTE:
If the vehicle speed is greater than 10 mph
(16 km/h) the folding feature will be disabled.Power Folding Mirror Switch
108 GETTING TO KNOW YOUR VEHICLE