can c CHRYSLER PACIFICA 2017 2.G Owner's Manual
[x] Cancel search | Manufacturer: CHRYSLER, Model Year: 2017, Model line: PACIFICA, Model: CHRYSLER PACIFICA 2017 2.GPages: 828, PDF Size: 7.58 MB
Page 51 of 828
NOTE:
•After pushing the door handle button, you must wait
two seconds before you can lock or unlock the doors,
using either Passive Entry door handle. This is done to
allow you to check if the vehicle is locked by pulling
the door handle, without the vehicle reacting and
unlocking.
• The Passive Entry system will not operate if the RKE
transmitter battery is dead.
The vehicle doors can also be locked by using the RKE
transmitter lock button, or the lock button located on the
vehicle’s interior door panel.
Manual Sliding Side Door
The sliding door may be opened from the inside or the
outside. Pull outward on the exterior handle to open the
sliding door. The sliding door inside handle functions by rocking forward and back. Rocking the handle back-
wards opens the door and rocking forward releases the
hold open latch in order to close the door.
To keep your door operating properly, observe the fol-
lowing guidelines:
•
Always open the door smoothly.
• Avoid high impacts against the door stop when open-
ing the door. This is very important when your vehicle
is parked on an incline as the door will slide faster in
the downhill direction.
• There is a hold-open latch that is activated when the
sliding door is fully opened. This latch will keep your
sliding door open on any incline. To close the sliding
door after the hold-open latch is activated, you must
rock the inside handle forward or pull outward on the
exterior handle.
3
GETTING TO KNOW YOUR VEHICLE 49
Page 52 of 828

Always make sure that the sliding door is fully latched
anytime the vehicle is in motion.
NOTE:The left side sliding door cannot be opened while
the fuel door is open.Power Sliding Side Door — If Equipped
Side Door Handle And Lock Functions1 — Door Handle
2 — Door Lock
50 GETTING TO KNOW YOUR VEHICLE
Page 54 of 828
the LED is lit, pushing the power sliding door power OFF
button will return the handles to power operation.
NOTE:Tones are sounded and the turn signals are
flashed with sliding door movements. These alerts can be
turned on or off in ‘Uconnect Settings’.
There are power sliding side door switches located on the
B-Pillar trim panel, just in front of the power sliding door
for the rear seat passengers.
Driver Side Power Sliding Side Door Switch
52 GETTING TO KNOW YOUR VEHICLE
Page 58 of 828
Child Locks
To provide a safer environment for small children riding
in the rear seats, the sliding doors are equipped with a
Child Protection Door Lock system.
NOTE:When the Child Safety Locks have been engaged
the sliding side doors can be unlocked from the outside
using the hands free RKE or Passive Entry system.
To Engage The Child Protection Door Lock
1. Open the sliding side door.
2. On the rear of the sliding door, slide the Child Protection Door Lock control inward (toward the
vehicle) to engage the Child Protection Door Lock.
Overhead Console Buttons
1 — Liftgate
2 — Right Sliding Door
3 — Power Door Power Off
4 — Left Sliding Door 56 GETTING TO KNOW YOUR VEHICLE
Page 60 of 828
LED is lit, the sliding door may not be power opened
or closed by pushing the buttons just inside the sliding
doors or pulling on the handles.
WARNING!
Avoid trapping anyone in the vehicle in a collision.
Remember that the sliding doors can only be opened
from the outside door handle or the switches located
on the B-Pillar trim panel just in front of the power
sliding door when the Child Protection Door Locks
are engaged.
To Disengage The Child Protection Door Lock
1. Open the sliding side door.
2. Slide the Child Protection Door Lock control outward (away from the vehicle) to disengage the Child Pro-
tection Door Lock. 3. Repeat Steps 1 and 2 on the opposite sliding door.
NOTE:
•
After disengaging (or engaging) the Child Protection
Door Lock, always test the inside door handle with the
sliding door closed to make certain the Child Protec-
tion Door Lock is in the desired position. The inside
door handle will open the sliding door when the Child
Protection Door Lock is disengaged.
SEATS
Seats are a part of the Occupant Restraint System of the
vehicle.
WARNING!
• It is dangerous to ride in a cargo area, inside or
outside of a vehicle. In a collision, people riding in
(Continued)
58 GETTING TO KNOW YOUR VEHICLE
Page 64 of 828
Seat Height Adjustment
The driver ’s seat height can be raised or lowered by
using a lever, located on the outboard side of the seat.
Pump the lever upward to raise the seat height, or pump
the lever downward to lower the seat height.
1 — Seat Height Adjustment Lever
2 — Recline Lever
62 GETTING TO KNOW YOUR VEHICLE
Page 67 of 828
•When returning the seat to the original position, the
headrest must be folded back to the original position.Easy Entry
Easy Tilt Seat — With Or Without Child Seat Installed
The 2nd row seats can be tilted forward for easy entry
into the third row with or without a child seat installed.
1. Located in the seatback of the second row seat is a handle that provides easier access to the third row by
tilting the seat forward.
Fold Headrest To Upward Position
3
GETTING TO KNOW YOUR VEHICLE 65
Page 69 of 828
WARNING!
Do not use this feature with a child in seat. Serious
injury or death my occur.
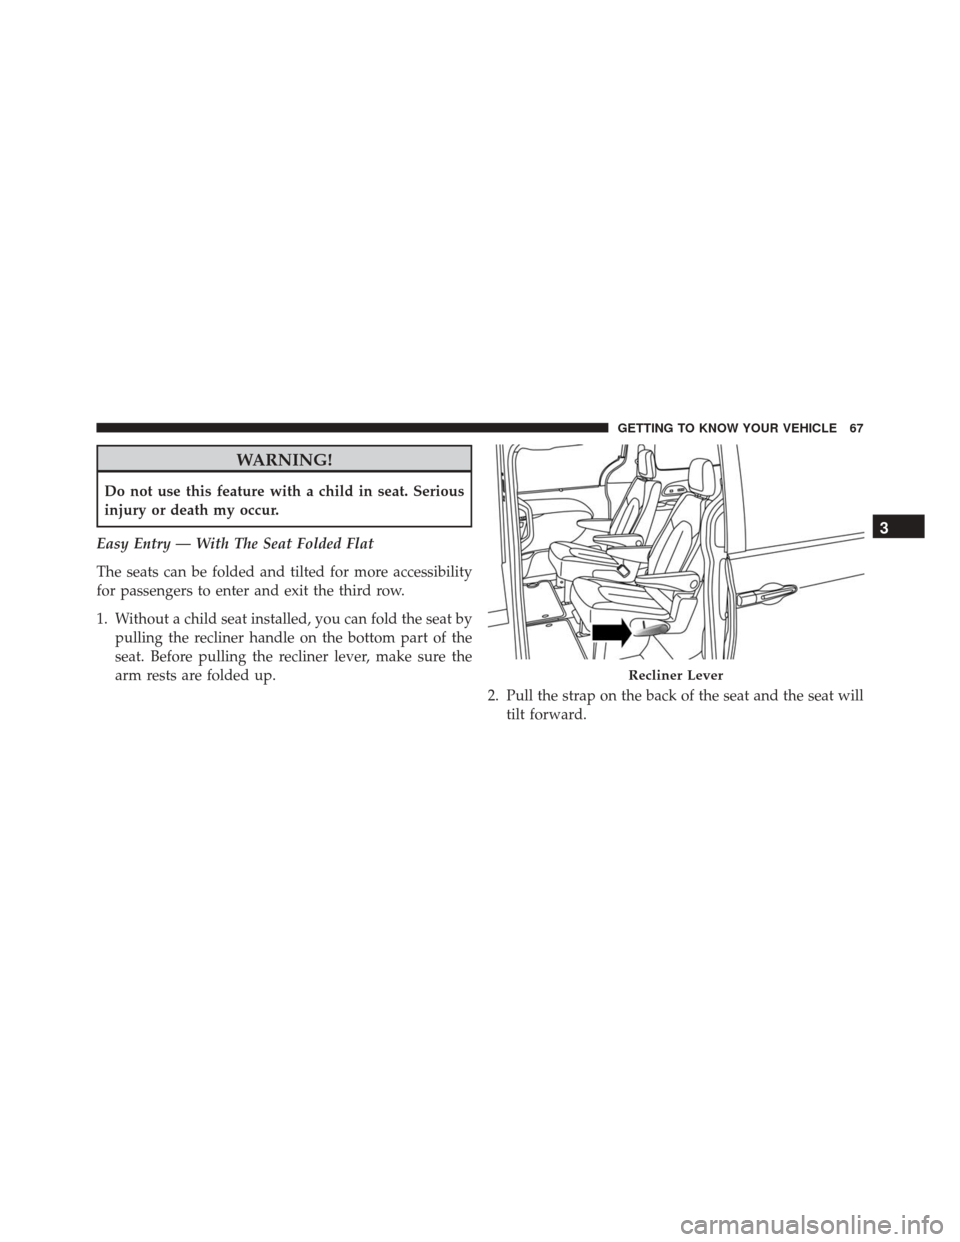
Easy Entry — With The Seat Folded Flat
The seats can be folded and tilted for more accessibility
for passengers to enter and exit the third row.
1. Without a child seat installed, you can fold the seat by pulling the recliner handle on the bottom part of the
seat. Before pulling the recliner lever, make sure the
arm rests are folded up.
2. Pull the strap on the back of the seat and the seat willtilt forward.
Recliner Lever
3
GETTING TO KNOW YOUR VEHICLE 67
Page 70 of 828
3. To put it back into position, pull back on the foldedseat and make sure that it locks into position. Then
pull the seatback toward the back and fold down the
arm rests. Exit For 3rd Row Passengers
For passengers seated in the third row, there is a pull
strap located on the outboard side of the seat near the
bottom of the seat back. Third row passengers can pull on
the strap and push the seat forward for folding the
seatback down and tilting the seat to the floor.
Pull Strap
Pull Strap For Third Row Passengers
68 GETTING TO KNOW YOUR VEHICLE
Page 71 of 828
NOTE:This process is for when there is no child seat
installed. Use the easy entry lever if a child seat is
installed.
Stow ’n Go Seating
On vehicles equipped with Stow ’n Go seating, the
second and third row seats can be folded into the floor for
convenient storage.
Stow ‘n Go Assist — If Equipped
On vehicles equipped with the Stow ‘n Go Assist feature,
the front seat will move forward automatically to a
location that will allow the second row Stow ‘n Go seat
movement, without interference by the front seat. After
the second row Stow ‘n Go seat movement is completed,
the front seat will automatically move back to the previ-
ous location once the Stow ‘n Go Assist button is pushed
again. The Stow ‘n Go Assist feature is available to both the
front driver and passenger power seats.
WARNING!
During power seat operation, personal injury or
cargo damage may occur. Ensure the front seat is not
occupied and the seat travel path is clear.
A one-touch Stow ‘n Go Assist button is located on the
B-pillar trim panel, just in front of the power sliding door.3
GETTING TO KNOW YOUR VEHICLE 69