change time CHRYSLER PACIFICA 2020 Owner's Guide
[x] Cancel search | Manufacturer: CHRYSLER, Model Year: 2020, Model line: PACIFICA, Model: CHRYSLER PACIFICA 2020Pages: 516, PDF Size: 28.69 MB
Page 353 of 516

SERVICING AND MAINTENANCE351
Pressure Washing
DEALER SERVICE
An authorized dealer has the qualified service
personnel, special tools, and equipment to
perform all service operations in an expert
manner. Service Manuals are available which
include detailed service information for your
vehicle. Refer to these Service Manuals before
attempting any procedure yourself.
NOTE:
Intentional tampering with emissions control
systems may void your warranty and could
result in civil penalties being assessed against
you.
Engine Oil
Change Engine Oil
Refer to “Scheduled Servicing” in this section
for the proper maintenance intervals.
NOTE:
Under no circumstances should oil change
intervals exceed 10,000 miles (16,000 km),
12 months or 350 hours of engine run time,
whichever comes first. The 350 hours of engine
run or idle time is generally only a concern for
fleet customers.
Gasoline Engine Oil Selection
For best performance and maximum protection
under all types of operating conditions, the
manufacturer only recommends engine oils
that are API Certified and meet the
requirements of FCA Material Standard
MS-6395.
CAUTION!
It is essential when replacing the cables on
the battery that the positive cable is
attached to the positive post and the nega -
tive cable is attached to the negative post.
Battery posts are marked positive (+) and
negative (-) and are identified on the battery
case. Cable clamps should be tight on the
terminal posts and free of corrosion.
If a “fast charger” is used while the battery
is in the vehicle, disconnect both vehicle
battery cables before connecting the
charger to the battery. Do not use a “fast
charger” to provide starting voltage.
CAUTION!
Cleaning the engine compartment with a high
pressure washer is not recommended.
Precautions have been taken to safeguard all
parts and connections however, the
pressures generated by these machines is
such that complete protection against water
ingress cannot be guaranteed.
WARNING!
You can be badly injured working on or
around a motor vehicle. Only do service work
for which you have the knowledge and the
proper equipment. If you have any doubt
about your ability to perform a service job,
take your vehicle to a competent mechanic.7
20_RU_OM_EN_US_t.book Page 351
Page 361 of 516

NOTE:
Resistance will be accompanied by an audible
snap.
4. Still grasping the bottom end of the wiper blade, move the wiper blade upward and
away from the")
SERVICING AND MAINTENANCE359
(Continued)
NOTE:
Resistance will be accompanied by an audible
snap.
4. Still grasping the bottom end of the wiper blade, move the wiper blade upward and
away from the wiper arm to disengage.
Wiper Blade Removed From Wiper Arm
5. Gently lower the tip of the wiper arm onto the glass. Installing The Rear Wiper
1. Lift the rear wiper arm pivot cap away from
the glass to allow the rear wiper blade to be
raised off of the glass.
NOTE:
The rear wiper arm cannot be fully raised off the
glass unless the wiper arm pivot cap is
unsnapped first. Attempting to fully raise the
rear wiper arm without unsnapping the wiper
arm pivot cap may damage the vehicle.
2. Lift the rear wiper arm fully off the glass.
3. Insert the wiper blade pivot pin into the opening on the end of the wiper arm. Grab
the bottom end of the wiper arm with one
hand, and press the wiper blade flush with
the wiper arm until it snaps into place.
4. Lower the wiper blade onto the glass and snap the wiper arm pivot cap back into
place.Exhaust System
The best protection against carbon monoxide
entry into the vehicle body is a properly
maintained engine exhaust system.
If you notice a change in the sound of the
exhaust system; or if the exhaust fumes can be
detected inside the vehicle; or when the
underside or rear of the vehicle is damaged;
have an authorized technician inspect the
complete exhaust system and adjacent body
areas for broken, damaged, deteriorated, or
mispositioned parts. Open seams or loose
connections could permit exhaust fumes to
seep into the passenger compartment. In
addition, have the exhaust system inspected
each time the vehicle is raised for lubrication or
oil change. Replace as required.
1 — Wiper Blade
2 — Wiper Blade Pivot Pin
3 — Wiper Arm Receptacle
4 — Wiper ArmWARNING!
Exhaust gases can injure or kill. They
contain carbon monoxide (CO), which is
colorless and odorless. Breathing it can
make you unconscious and can eventually
poison you. To avoid breathing CO, refer to
“Safety Tips” in “Safety” for further informa -
tion.
7
20_RU_OM_EN_US_t.book Page 359
Page 366 of 516

Maintain engine coolant (antifreeze) concen-
tration at a minimum of 50% OAT coolant
(conforming to MS.90032) and distilled
water for proper corrosion")
364SERVICING AND MAINTENANCE
(Continued)
Maintain engine coolant (antifreeze) concen-
tration at a minimum of 50% OAT coolant
(conforming to MS.90032) and distilled
water for proper corrosion protection of your
engine which contains aluminum compo -
nents.
Make sure that the coolant expansion bottle
overflow hoses are not kinked or obstructed.
Keep the front of the radiator clean. If your
vehicle is equipped with air conditioning,
keep the front of the condenser clean.
Do not change the thermostat for Summer or
Winter operation. If replacement is ever
necessary, install ONLY the correct type ther -
mostat. Other designs may result in unsatis -
factory engine coolant (antifreeze)
performance, poor gas mileage, and
increased emissions.
Brake System
In order to ensure brake system performance,
all brake system components should be
inspected periodically. Refer to the
“Maintenance Plan” in this section for the
proper maintenance intervals.
Brake Master Cylinder
The fluid in the master cylinder should be
checked when performing under hood services
or immediately if the “Brake Warning Light” is
illuminated.
Be sure to clean the top of the master cylinder
area before removing the cap. If necessary, add
fluid to bring the fluid level up to the requirements
described on the brake fluid reservoir. With disc
brakes, fluid level can be expected to fall as the
brake pads wear. Brake fluid level should be
checked when pads are replaced. However, low
fluid level may be caused by a leak and a checkup
may be needed.
Use only manufacturer's recommended brake
fluid. Refer to “Fluids And Lubricants” in
“Technical Specifications” for further information.
WARNING!
Riding the brakes can lead to brake failure
and possibly a collision. Driving with your foot
resting or riding on the brake pedal can result
in abnormally high brake temperatures,
excessive lining wear, and possible brake
damage. You would not have your full braking
capacity in an emergency.
WARNING!
Use only manufacturer's recommended
brake fluid. Refer to “Fluids And Lubricants”
in “Technical Specifications” for further infor-
mation. Using the wrong type of brake fluid
can severely damage your brake system
and/or impair its performance. The proper
type of brake fluid for your vehicle is also
identified on the original factory installed
hydraulic master cylinder reservoir.
To avoid contamination from foreign matter
or moisture, use only new brake fluid or fluid
that has been in a tightly closed container.
Keep the master cylinder reservoir cap
secured at all times. Brake fluid in a open
container absorbs moisture from the air
resulting in a lower boiling point. This may
cause it to boil unexpectedly during hard or
prolonged braking, resulting in sudden brake
failure. This could result in a collision.
20_RU_OM_EN_US_t.book Page 364
Page 400 of 516

398MULTIMEDIA
Privacy of any wireless and wired
communications cannot be assured. Third
parties may unlawfully intercept information
and private communications without your
consent. For further information, refer to “Data
Collection & Privacy” in your Uconnect Owner’s
Manual Supplement or “Onboard Diagnostic
System (OBD II) Cybersecurity” in “Getting To
Know Your Instrument Panel”.
UCONNECT SETTINGS
The Uconnect system uses a combination of
buttons on the touchscreen and buttons on the
faceplate located on the center of the
instrument panel. These buttons allow you to
access and change the Customer
Programmable Features. Many features can
vary by vehicle.
Buttons on the faceplate are located below
and/or beside the Uconnect system in the
center of the instrument panel. In addition,
there is a Scroll/Enter control knob located on
the right side. Turn the control knob to scroll
through menus and change settings. Push the
center of the control knob one or more times to
select or change a setting.
Your Uconnect system may also have Screen
Off and Mute buttons on the faceplate. Push the Screen Off button on the faceplate to
turn off the Uconnect screen. Push the button
again or tap the screen to turn the screen on.
Push the Back Arrow button to exit out of a
Menu or certain option on the Uconnect system.
Customer Programmable Features —
Uconnect 4 Settings
Uconnect 4 Buttons On The Touchscreen And Buttons
On The Faceplate
Press the Apps button then press the
Settings button on the touchscreen to
display the settings menu screen and press the
Up or Down Arrow buttons on the right side of the screen to move up or down through the
available settings. Settings gives you to access
all of the available programmable features.
NOTE:
Only one touchscreen area may be selected at
a time.
Depending on the vehicle options, feature
settings may vary.
To change features, select the desired feature.
This will bring you to the available options for
the feature. Change feature settings as desired
by pressing and releasing the preferred setting
option until a check-mark appears next to the
setting. Once the desired selection is made,
either press the Back Arrow or the X button on
the touchscreen to close the settings screen.
Pressing the Up or Down Arrow buttons on the
touchscreen allows you to toggle through the
available settings. The list of programmable
features include:
NOTE:
All settings should be changed with the ignition
in the “ON/RUN” position.
1 — Uconnect Buttons On The Touchscreen
2 — Uconnect Buttons On The Faceplate
20_RU_OM_EN_US_t.book Page 398
Page 403 of 516
MULTIMEDIA401
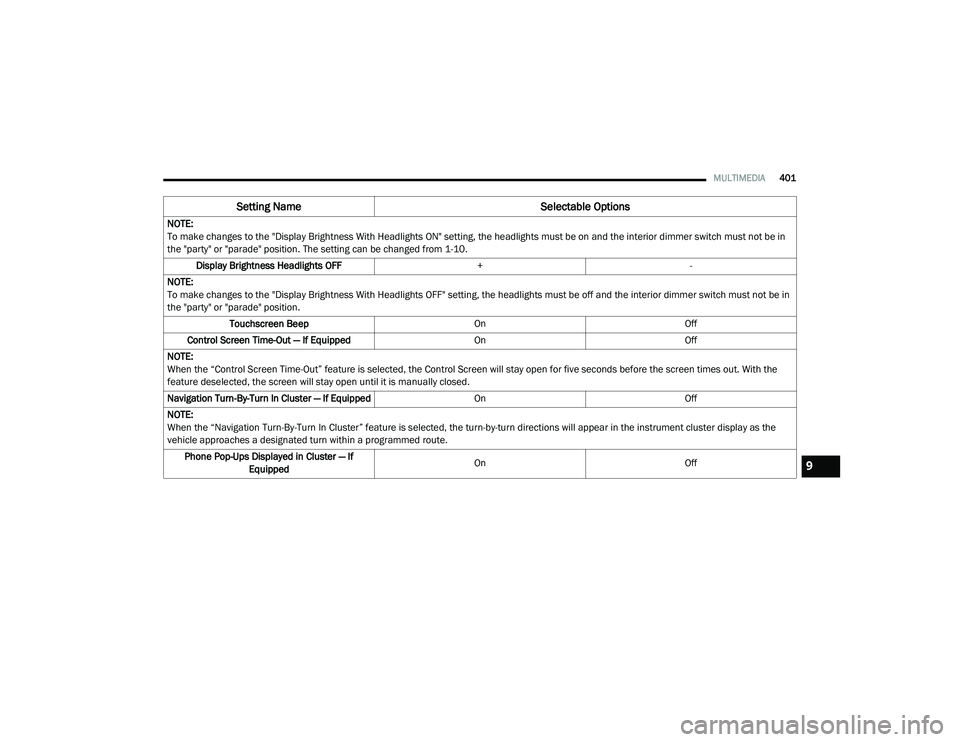
NOTE:
To make changes to the "Display Brightness With Headlights ON" setting, the headlights must be on and the interior dimmer switch must not be in
the "party" or "parade" position. The setting can be changed from 1-10.
Display Brightness Headlights OFF +-
NOTE:
To make changes to the "Display Brightness With Headlights OFF" setting, the headlights must be off and the interior dimmer switch must not be in
the "party" or "parade" position. Touchscreen Beep OnOff
Control Screen Time-Out — If Equipped OnOff
NOTE:
When the “Control Screen Time-Out” feature is selected, the Control Screen will stay open for five seconds before the screen times out. With the
feature deselected, the screen will stay open until it is manually closed.
Navigation Turn-By-Turn In Cluster — If Equipped OnOff
NOTE:
When the “Navigation Turn-By-Turn In Cluster” feature is selected, the turn-by-turn directions will appear in the instrument cluster display as the
vehicle approaches a designated turn within a programmed route. Phone Pop-Ups Displayed in Cluster — If Equipped On
Off
Setting Name Selectable Options
9
20_RU_OM_EN_US_t.book Page 401
Page 414 of 516

412MULTIMEDIA
Audio
After pressing the Audio button on the touchscreen, the following settings will be available:
Setting Name Selectable Options
EqualizerBassMidTreble
NOTE:
When in this display you may adjust the “Bass”, “Mid”, and “Treble” settings. Adjust the settings with the + and – setting buttons on the touchscreen
or by selecting any point on the scale between the + and – buttons on the touchscreen. Bass/Mid/Treble also allow you to simply slide your finger up
or down to change the setting, as well as press directly on the desired setting.
Balance/Fade Up Arrow
Button Down Arrow
Button Left Arrow
Button Right Arrow
Button Center “C” Button
NOTE:
When in this display you may adjust the “Balance/Fade” of the audio by using the Arrow button on the touchscreen to adjust the sound level from the
front and rear or right and left side speakers. Press the C Button on the touchscreen to reset the balance and fade to the factory setting. Speed Adjusted Volume Off123
Surround Sound — If Equipped OnOff
Loudness YesNo
NOTE:
This feature improves sound quality at lower volumes when enabled. AUX Volume Offset — If Equipped OnOff
NOTE:
This feature provides the ability to tune the audio level for portable devices connected through the AUX input. AutoPlay OnOff
NOTE:
The “AutoPlay” setting, when activated, automatically starts playing music off of a connect device as soon as it is connected.
20_RU_OM_EN_US_t.book Page 412
Page 421 of 516

MULTIMEDIA419
Display
After pressing the Display button on the touchscreen, the following settings will be available:
Setting Name Selectable Options
DisplayManual Auto
Display Brightness Headlights ON +-
NOTE:
To make changes to the "Display Brightness With Headlights ON" setting, the headlights must be on and the interior dimmer switch must not be in
the "party" or "parade" position. Display Brightness Headlights OFF +-
NOTE:
To make changes to the "Display Brightness With Headlights OFF" setting, the headlights must be off and the interior dimmer switch must not be in
the "party" or "parade" position. Set Theme On Off
NOTE:
When the “Set Theme” feature is selected, you may select the theme for the display screen. To make your selection, press the Set Theme button on
the touchscreen, then select the desired theme option button until a check-mark appears showing that the setting has been selected.
9
20_RU_OM_EN_US_t.book Page 419
Page 433 of 516

MULTIMEDIA431
Audio
After pressing the Audio button on the touchscreen, the following settings will be available:NOTE:
When the “Engine Off Power Delay” feature is selected, the power window switches, radio, Uconnect phone system (if equipped), DVD video system
(if equipped), power sunroof (if equipped), and power outlets will remain active for up to 10 minutes after the ignition is cycled to OFF. Opening either
front door will cancel this feature.
Headlight Off Delay 0 sec
30 sec
60 sec 90 sec
NOTE:
When the “Headlight Off Delay” feature is selected, it allows the adjustment of the amount of time the headlights remain on after the engine is shut off.
Setting Name Selectable Options
Setting NameSelectable Options
Balance/Fade Speaker Icon
NOTE:
When in this display you may adjust the “Balance/Fade” of the audio by pressing and dragging the Speaker Icon toward any location in the box. Equalizer BassMid Treble
NOTE:
When in this display you may adjust the “Bass”, “Mid”, and “Treble” settings. Adjust the settings with the + and – setting buttons on the touchscreen
or by selecting any point on the scale between the + and – buttons on the touchscreen. Bass/Mid/Treble also allow you to simply slide your finger up
or down to change the setting, as well as press directly on the desired setting. Speed Adjusted Volume Off123
Surround Sound — If Equipped OnOff
9
20_RU_OM_EN_US_t.book Page 431
Page 440 of 516
.
6. Phone Press the Phone button on the touc")
438MULTIMEDIA
5. Controls
Press the Controls button on the touch -
screen to adjust the heated and vented
seats or heated steering wheel (If
Equipped).
6. Phone Press the Phone button on the touchscreen
to access the Uconnect Phone feature.
7. Settings Press the Settings button on the touch -
screen to access the Uconnect Settings
menu.Drag & Drop Menu Bar
The Uconnect features and services in the main
menu bar are easily changed for your
convenience. Simply follow these steps:
Uconnect 4 Main Menu
1. Press the Apps button to open the App screen.
2. Press and hold, then drag the selected App to replace an existing shortcut in the main
menu bar. The new app shortcut, that was dragged down
onto the main menu bar, will now be an active
App/shortcut.
NOTE:
This feature is only available if the vehicle is in
PARK.
Radio Mode
Radio Controls
The radio is equipped with the following modes:
AM
FM
SiriusXM® Satellite Radio – If Equipped
Press the Radio button on the touchscreen,
bottom left corner, to enter the Radio Mode. The
different tuner modes, AM, FM, and SXM, can
then be selected by pressing the corresponding
buttons in the Radio mode.
20_RU_OM_EN_US_t.book Page 438
Page 443 of 516

MULTIMEDIA441
On the go — With a SiriusXM® Internet Radio
subscription included with the All Access trial,
you’ll get SiriusXM® on your computer,
smartphone, or tablet. Including:
A huge On Demand catalog
Xtra Channels featuring SiriusXM®
Latino – a collection of Spanish-language
channels
MySXM – allowing you to personalize
your favorite music channels
Go to siriusxm.com/getallaccess for more
information
SiriusXM® services require subscriptions, sold
separately after the 12-month trial included
with the new vehicle purchase. If you decide to
continue your service at the end of your trial
subscription, the plan you choose will
automatically renew and bill at then-current
rates until you call SiriusXM® at 866-635-2349
to cancel. See SiriusXM® Customer Agreement
for complete terms at www.siriusxm.com. All
fees and programming subject to change. Our
satellite service is available only to those at
least 18 and older in the 48 contiguous USA
and D.C. Our SiriusXM® satellite service is also available in PR (with coverage limitations). Our
Internet radio service is available throughout
our satellite service area and in AK. © 202
1
SiriusXM® Radio Inc. Sirius, XM and all related
marks and logos are trademarks of SiriusXM®
Radio Inc. Service available in Canada; see
www.siriusxm.ca.
This functionality is only available for radios
equipped with a Satellite receiver. In order to
receive satellite radio, the vehicle needs to be
outside with a clear view to the sky.
If the screen shows Acquiring Signal, you might
have to change the vehicle’s position in order to
receive a signal. In most cases, the satellite
radio does not receive a signa l in underground
parking garages or tunnels.
No Subscription
Radios equipped with a Satellite receiver,
require a subscription to the SiriusXM® Service.
When the Radio does not have the necessary
subscription, the Radio is able to receive the
Pre-View channel only.
Acquiring SiriusXM® Subscription
To activate the SiriusXM® Satellite Radio
subscription, US residents call:
1-800-643-2112
Canadian residents call:
1-877-438-9677
NOTE:
You will need to provide the SiriusXM® ID (RID)
located at the bottom of the Channel 0 screen.
The Satellite Mode is activated by a press of the
SXM button on the touchscreen.
When in Satellite mode:
The SXM button on the touchscreen is high -
lighted.
The SiriusXM® Presets are displayed at the
top of the screen.
The Genre is displayed below the Presets
Bar.
The SiriusXM® Channel Number is displayed
in the center.9
20_RU_OM_EN_US_t.book Page 441