ESP CHRYSLER PACIFICA 2023 Owners Manual
[x] Cancel search | Manufacturer: CHRYSLER, Model Year: 2023, Model line: PACIFICA, Model: CHRYSLER PACIFICA 2023Pages: 328, PDF Size: 16.37 MB
Page 2 of 328

The driver’s primary responsibility is the safe operation of the vehicle. Driving while distracted can result in loss of vehicle control, resulting in an accident and personal
injury. FCA US LLC strongly recommends that the driver use extreme caution when using any device or feature that may take their attention off the road. Use of any
electrical devices, such as cellular telephones, computers, portable radios, vehicle navigation or other devices, by the driver while the vehicle is moving is dangerous
and could lead to a serious accident. Texting while driving is also dangerous and should never be done while the vehicle is moving. If you find yourself unable to devote
your full attention to vehicle operation, pull off the road to a safe location and stop your vehicle. Some states or provinces prohibit the use of cellular telephones or
texting while driving. It is always the driver’s responsibility to comply with all local laws.
This Owner’s Manual has been prepared to help you get acquainted with your new Chrysler brand vehicle and to provide a convenient reference source for common
questions.
Not all features shown in this manual may apply to your vehicle. For additional information, visit mopar.com/om (USA), owners.mopar.ca (Canada) or your local Chrysler
brand dealer.
U.S. Residents: If you are the first registered retail owner of your vehicle, you may obtain a complimentary printed copy of the Warranty Booklet by calling
1-800-247-9753 or by contacting your dealer. Replacement kits can be purchased by visiting www.techauthority.com.
Canadian Residents: If you are the first registered retail owner of your vehicle, you may obtain a complimentary printed copy of the Warranty Booklet or purchase a
replacement kit by calling 1-800-387-1143 or by contacting your dealer.
WARNING: Operating, servicing and maintaining a passenger vehicle or off-highway motor vehicle can
expose you to chemicals including engine exhaust, carbon monoxide, phthalates, and lead, which are known to
the State of California to cause cancer and birth defects or other reproductive harm. To minimize exposure,
avoid breathing exhaust, do not idle the engine except as necessary, service your vehicle in a well-ventilated area
and wear gloves or wash your hands frequently when servicing your vehicle. For more information go to
www.P65Warnings.ca.gov/passenger-vehicle.
This Owner’s Manual illustrates and describes the operation of features and equipment that are either standard or optional on this vehicle. This manual may also include
a description of features and equipment that are no longer available or were not ordered on this vehicle. Please disregard any features and equipment described in this
manual that are not on this vehicle. FCA US LLC reserves the right to make changes in design and specifications, and/or make additions to or improvements to its
products without imposing any obligation upon itself to install them on pr\
oducts previously manufactured.
With respect to any vehicles sold in Canada, the name FCA US LLC shall be deemed to be deleted and the name FCA Canada Inc. used in substitution therefore.
This Owner’s Manual is intended to familiarize you with the important features of your vehicle. Your most up-to-date Owner’s Manual, Radio Instruction Manual and
Warranty Booklet can be found by visiting the website on the back cover.
DRIVING AND ALCOHOL
Drunk driving is one of the most frequent causes of accidents. Your driving ability can be seriously impaired with blood alcohol levels far below the legal minimum. If
you are drinking, don’t drive. Ride with a designated non-drinking driver, call a cab, a rideshare, a friend, or use public transportation.
WARNING
Driving after drinking can lead to an accident. Your perceptions are less sharp, your reflexes are slower and your judgment is impaired when you have been drinking.
Never drink and then drive.
ROADSIDE ASSISTANCE 24 HOURS, 7 DAYS A WEEK AT YOUR SERVICE. CALL 1-800-521-2779 OR VISIT CHRYSLER.RSAHELP.COM (USA) CALL 1-800-363-4869 OR VISIT FCA.ROADSIDEAID.COM (CANADA) SERVICES: Flat Tire Service, Out Of Gas/ Fuel Delivery, Battery Jump Assistance, Lockout Service and Towing Service
Please see the Customer Assistance chapter in this Owner’s Manual for further information.
FCA US LLC reserves the right to modify the terms or discontinue the Roadside Assistance Program at any time. The Roadside Assistance Program is subject to restrictions and conditions of use, that are determined solely by FCA US LLC.
Page 7 of 328
5
MULTIMEDIA
UCONNECT SYSTEMS ..................................................... 157
CYBERSECURITY ............................................................. 157
UCONNECT SETTINGS...................................................... 157Customer Programmable Features ........................ 158
REAR SEAT ENTERTAINMENT (RSE) WITH AMAZON
FIRE TV BUILT-IN — IF EQUIPPED .................................. 177 Overview .................................................................... 177Getting Started .......................................................... 177
Accessing Rear Seat Entertainment with Fire TV
built-in from the Front Radio Screen ....................... 178
Accessing Rear Seat Entertainment with Fire TV
built-in from the Rear Screens ................................. 178First Time Starting Up (Using the Rear Screens) .... 178Alexa Voice Control ................................................... 179
Listen Via Vehicle Speakers ..................................... 179
Quick Menu ............................................................... 179
Parental Controls (Using the Rear Screens)............ 179Voice Remote with Alexa Pairing (Using the Rear
Screens)..................................................................... 179Media Sources Input (Using the Front Radio and
Rear Screens)............................................................ 180
Voice Remote with Alexa .......................................... 180
Rear Seat Entertainment with Fire TV built-in streaming
(Using the Front Radio and Rear Screens) .................181
Play A Blu-ray™ or DVD —If Equipped ...................... 182
Fire TV Apps/Games (Using the Rear Screens) ...... 183 Using The Video USB Port ........................................ 183
Play Video Games ..................................................... 183
Headphones Operation ............................................ 183
Rear Climate Controls .............................................. 184
Legal & Compliance.................................................. 186
RADIO OPERATION AND MOBILE PHONES.................. 186 Regulatory And Safety Information.......................... 186
SAFETY
SAFETY FEATURES .......................................................... 187Anti-Lock Brake System (ABS) ................................ 187
Electronic Brake Control (EBC) System .................. 188
AUXILIARY DRIVING SYSTEMS ...................................... 192 Blind Spot Monitoring (BSM) — If Equipped............ 192
Forward Collision Warning (FCW) With Mitigation —
If Equipped ................................................................ 195Tire Pressure Monitoring System (TPMS) ............... 197
OCCUPANT RESTRAINT SYSTEMS ............................... 200 Occupant Restraint Systems Features ................... 200
Important Safety Precautions .................................. 200
Seat Belt Systems .................................................... 201
Supplemental Restraint Systems (SRS).................. 209
Child Restraints ........................................................ 219
SAFETY TIPS .................................................................... 233 Transporting Passengers ......................................... 233
Transporting Pets .................................................... 233
Connected Vehicles .................................................. 233Safety Checks You Should Make Inside
The Vehicle ............................................................... 233 Periodic Safety Checks You Should Make Outside
The Vehicle ................................................................ 234
Exhaust Gas ............................................................... 235
Carbon Monoxide Warnings ..................................... 235
IN CASE OF EMERGENCY
HAZARD WARNING FLASHERS ......................................236
SOS AND ASSIST MIRROR — IF EQUIPPED ..................236
JACKING AND TIRE CHANGING —IF EQUIPPED ...........239
Preparations For Jacking ......................................... 239
Jack And Spare Tire Location ................................... 240
Equipment Removal ................................................. 240
Jacking Instructions .................................................. 240
Road Tire Installation ................................................ 244
Portable Air Compressor —If Equipped .................... 244
Return Inflatable Spare Tire ..................................... 245
TIRE SERVICE KIT — IF EQUIPPED.................................. 245
JUMP STARTING ...............................................................251 Preparations For Jump Start..................................... 251
Jump Starting Procedure .......................................... 252
REFUELING IN EMERGENCY – IF EQUIPPED ................252
IF YOUR ENGINE OVERHEATS......................................... 253
MANUAL PARK RELEASE ...............................................254
FREEING A STUCK VEHICLE ........................................... 255
TOWING A DISABLED VEHICLE.......................................256 All Wheel Drive (AWD) Models .................................. 258
ENHANCED ACCIDENT RESPONSE SYSTEM (EARS) ..258
EVENT DATA RECORDER (EDR)......................................258
23_RUP_OM_EN_USC_t.book Page 5
Page 16 of 328
14GETTING TO KNOW YOUR VEHICLE
Programming And Requesting Additional
Key Fobs
Programming the key fob may be performed by an
authorized dealer.
NOTE:
Once a key fob is programmed to a vehicle, it cannot be
repurposed and reprogrammed to another vehicle.
Only key fobs that are programmed to the vehicle elec -
tronics can be used to start and operate the vehicle.
Once a key fob is programmed to a vehicle, it cannot be
programmed to any other vehicle. Duplication of key fobs may be performed at an authorized
dealer. This procedure consists of programming a blank
key fob to the vehicle electronics. A blank key fob is one
that has never been programmed.
NOTE:
When having the Sentry Key Immobilizer system
serviced, bring all vehicle keys with you to an autho -
rized dealer.
Keys must be ordered to the correct key cut to match
the vehicle locks.
KeySense Features — If Equipped
This feature provides the vehicle owner with the ability to
customize vehicle settings that can be applied to
determine the driving experience for other drivers of the
vehicle. The vehicle settings are protected by a unique
4-digit PIN, which the vehicle owner creates when
accessing the specific settings for the first time.
KeySense also has additional features that are always
enabled when the specific key fob is in use that cannot be
set by the vehicle owner. While this specific key fob is in
use, the vehicle will respond accordingly to the customized
vehicle settings and mandatory features. This includes enhanced driving assistance features, increased driver
alerts, and the locking of certain optional features. These
settings can be selected within the Uconnect system
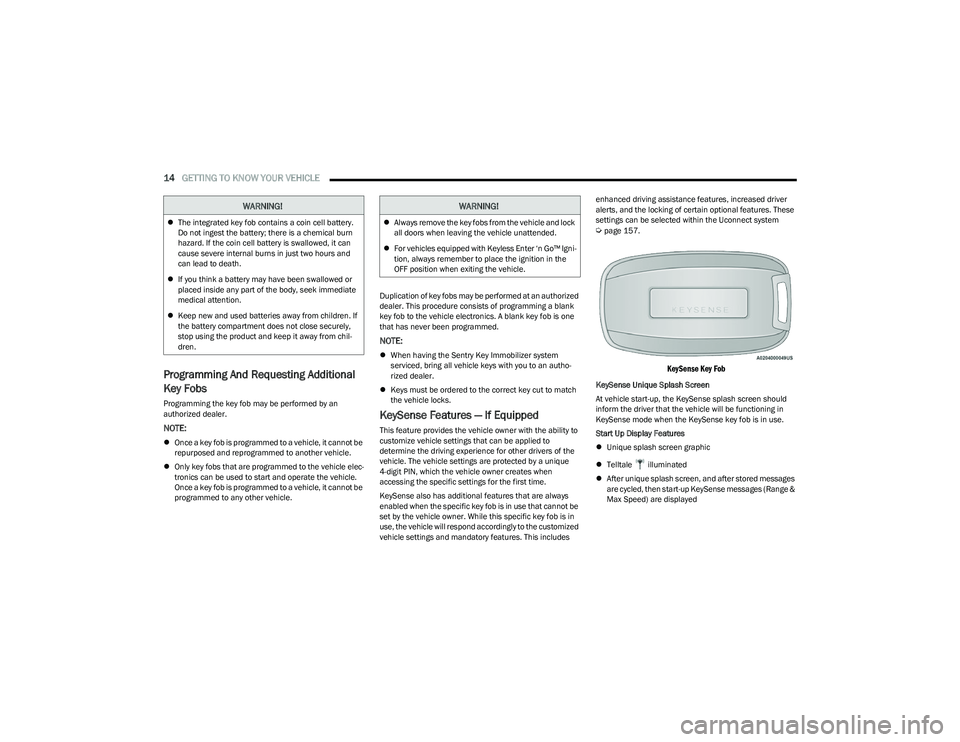
Úpage 157.
KeySense Key Fob
KeySense Unique Splash Screen
At vehicle start-up, the KeySense splash screen should
inform the driver that the vehicle will be functioning in
KeySense mode when the KeySense key fob is in use.
Start Up Display Features
Unique splash screen graphic
Telltale illuminated
After unique splash screen, and after stored messages
are cycled, then start-up KeySense messages (Range &
Max Speed) are displayed
WARNING!
The integrated key fob contains a coin cell battery.
Do not ingest the battery; there is a chemical burn
hazard. If the coin cell battery is swallowed, it can
cause severe internal burns in just two hours and
can lead to death.
If you think a battery may have been swallowed or
placed inside any part of the body, seek immediate
medical attention.
Keep new and used batteries away from children. If
the battery compartment does not close securely,
stop using the product and keep it away from chil -
dren.
WARNING!
Always remove the key fobs from the vehicle and lock
all doors when leaving the vehicle unattended.
For vehicles equipped with Keyless Enter ‘n Go™ Igni -
tion, always remember to place the ignition in the
OFF position when exiting the vehicle.
23_RUP_OM_EN_USC_t.book Page 14
Page 23 of 328
GETTING TO KNOW YOUR VEHICLE21
POWER DOOR LOCKS — IF EQUIPPED
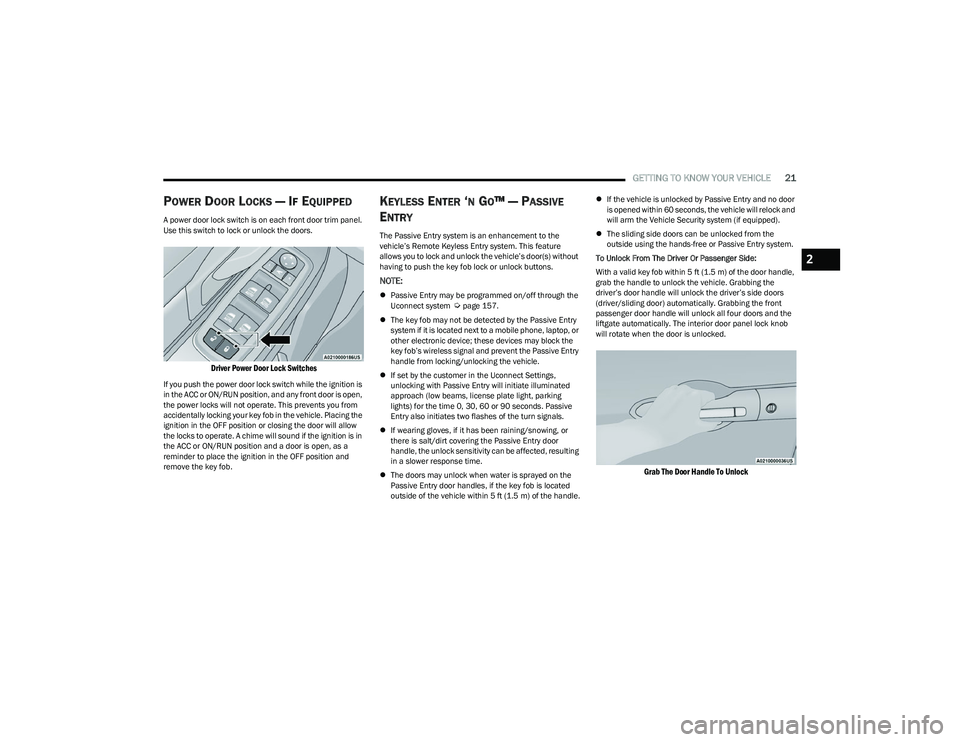
A power door lock switch is on each front door trim panel.
Use this switch to lock or unlock the doors.
Driver Power Door Lock Switches
If you push the power door lock switch while the ignition is
in the ACC or ON/RUN position, and any front door is open,
the power locks will not operate. This prevents you from
accidentally locking your key fob in the vehicle. Placing the
ignition in the OFF position or closing the door will allow
the locks to operate. A chime will sound if the ignition is in
the ACC or ON/RUN position and a door is open, as a
reminder to place the ignition in the OFF position and
remove the key fob.
KEYLESS ENTER ‘N GO™ — PASSIVE
E
NTRY
The Passive Entry system is an enhancement to the
vehicle’s Remote Keyless Entry system. This feature
allows you to lock and unlock the vehicle’s door(s) without
having to push the key fob lock or unlock buttons.
NOTE:
Passive Entry may be programmed on/off through the
Uconnect system Úpage 157.
The key fob may not be detected by the Passive Entry
system if it is located next to a mobile phone, laptop, or
other electronic device; these devices may block the
key fob’s wireless signal and prevent the Passive Entry
handle from locking/unlocking the vehicle.
If set by the customer in the Uconnect Settings,
unlocking with Passive Entry will initiate illuminated
approach (low beams, license plate light, parking
lights) for the time 0, 30, 60 or 90 seconds. Passive
Entry also initiates two flashes of the turn signals.
If wearing gloves, if it has been raining/snowing, or
there is salt/dirt covering the Passive Entry door
handle, the unlock sensitivity can be affected, resulting
in a slower response time.
The doors may unlock when water is sprayed on the
Passive Entry door handles, if the key fob is located
outside of the vehicle within 5 ft (1.5 m) of the handle.
If the vehicle is unlocked by Passive Entry and no door
is opened within 60 seconds, the vehicle will relock and
will arm the Vehicle Security system (if equipped).
The sliding side doors can be unlocked from the
outside using the hands-free or Passive Entry system.
To Unlock From The Driver Or Passenger Side:
With a valid key fob within 5 ft (1.5 m) of the door handle,
grab the handle to unlock the vehicle. Grabbing the
driver’s door handle will unlock the driver’s side doors
(driver/sliding door) automatically. Grabbing the front
passenger door handle will unlock all four doors and the
liftgate automatically. The interior door panel lock knob
will rotate when the door is unlocked.
Grab The Door Handle To Unlock
2
23_RUP_OM_EN_USC_t.book Page 21
Page 27 of 328
GETTING TO KNOW YOUR VEHICLE25
HANDS-FREE SLIDING DOORS —
I
F EQUIPPED
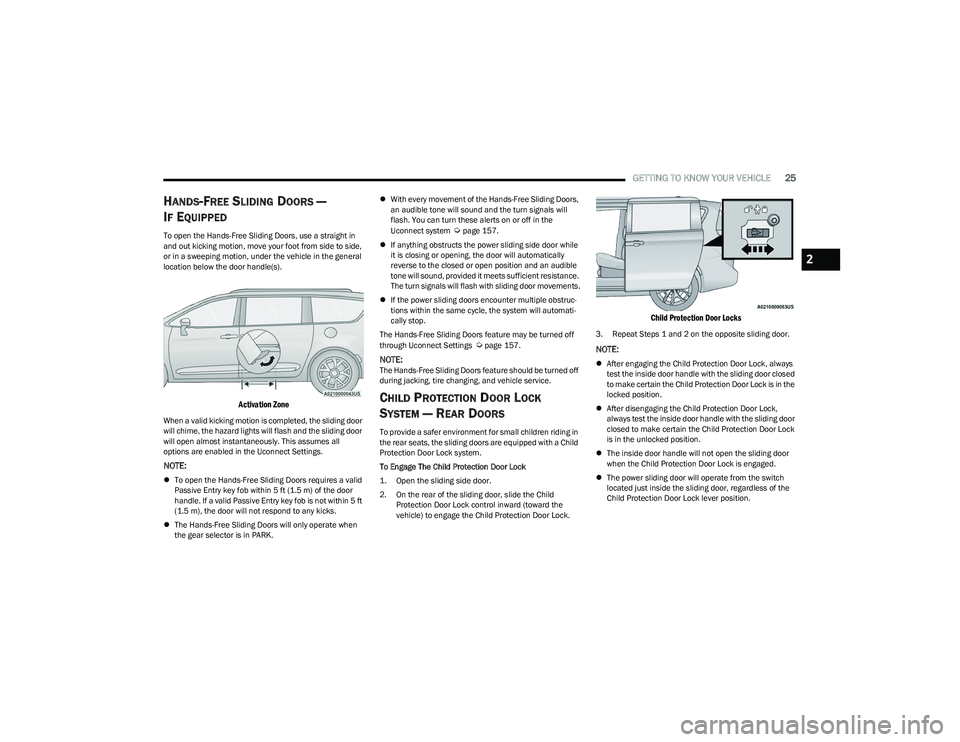
To open the Hands-Free Sliding Doors, use a straight in
and out kicking motion, move your foot from side to side,
or in a sweeping motion, under the vehicle in the general
location below the door handle(s).
Activation Zone
When a valid kicking motion is completed, the sliding door
will chime, the hazard lights will flash and the sliding door
will open almost instantaneously. This assumes all
options are enabled in the Uconnect Settings.
NOTE:
To open the Hands-Free Sliding Doors requires a valid
Passive Entry key fob within 5 ft (1.5 m) of the door
handle. If a valid Passive Entry key fob is not within 5 ft
(1.5 m), the door will not respond to any kicks.
The Hands-Free Sliding Doors will only operate when
the gear selector is in PARK.
With every movement of the Hands-Free Sliding Doors,
an audible tone will sound and the turn signals will
flash. You can turn these alerts on or off in the
Uconnect system
Úpage 157.
If anything obstructs the power sliding side door while
it is closing or opening, the door will automatically
reverse to the closed or open position and an audible
tone will sound, provided it meets sufficient resistance.
The turn signals will flash with sliding door movements.
If the power sliding doors encounter multiple obstruc -
tions within the same cycle, the system will automati -
cally stop.
The Hands-Free Sliding Doors feature may be turned off
through Uconnect Settings
Úpage 157.
NOTE:The Hands-Free Sliding Doors feature should be turned off
during jacking, tire changing, and vehicle service.
CHILD PROTECTION DOOR LOCK
S
YSTEM — REAR DOORS
To provide a safer environment for small children riding in
the rear seats, the sliding doors are equipped with a Child
Protection Door Lock system.
To Engage The Child Protection Door Lock
1. Open the sliding side door.
2. On the rear of the sliding door, slide the Child
Protection Door Lock control inward (toward the
vehicle) to engage the Child Protection Door Lock.
Child Protection Door Locks
3. Repeat Steps 1 and 2 on the opposite sliding door.
NOTE:
After engaging the Child Protection Door Lock, always
test the inside door handle with the sliding door closed
to make certain the Child Protection Door Lock is in the
locked position.
After disengaging the Child Protection Door Lock,
always test the inside door handle with the sliding door
closed to make certain the Child Protection Door Lock
is in the unlocked position.
The inside door handle will not open the sliding door
when the Child Protection Door Lock is engaged.
The power sliding door will operate from the switch
located just inside the sliding door, regardless of the
Child Protection Door Lock lever position.
2
23_RUP_OM_EN_USC_t.book Page 25
Page 29 of 328
GETTING TO KNOW YOUR VEHICLE27
NOTE:The engine must be running for the heated steering wheel
to operate.
For information on use with the Remote Start system, see
Úpage 18.
DRIVER MEMORY SETTINGS — IF EQUIPPED
This feature allows the driver to save up to two different
memory profiles for easy recall through a memory switch.
Each memory profile saves desired position settings for
the following features:
Driver’s seat
Easy Entry/Exit seat operation (if equipped)
Power steering wheel position (if equipped)
Side mirrors (if equipped)
A set of desired radio station presets
NOTE:
Your vehicle is equipped with two key fobs, each can be
linked to either memory position 1 or 2.
Memory settings will be linked to the driver profiles in
the Uconnect system, in addition to several other
features (radio presets, home screens, settings, navi -
gation, phone, etc.)
Úpage 157.
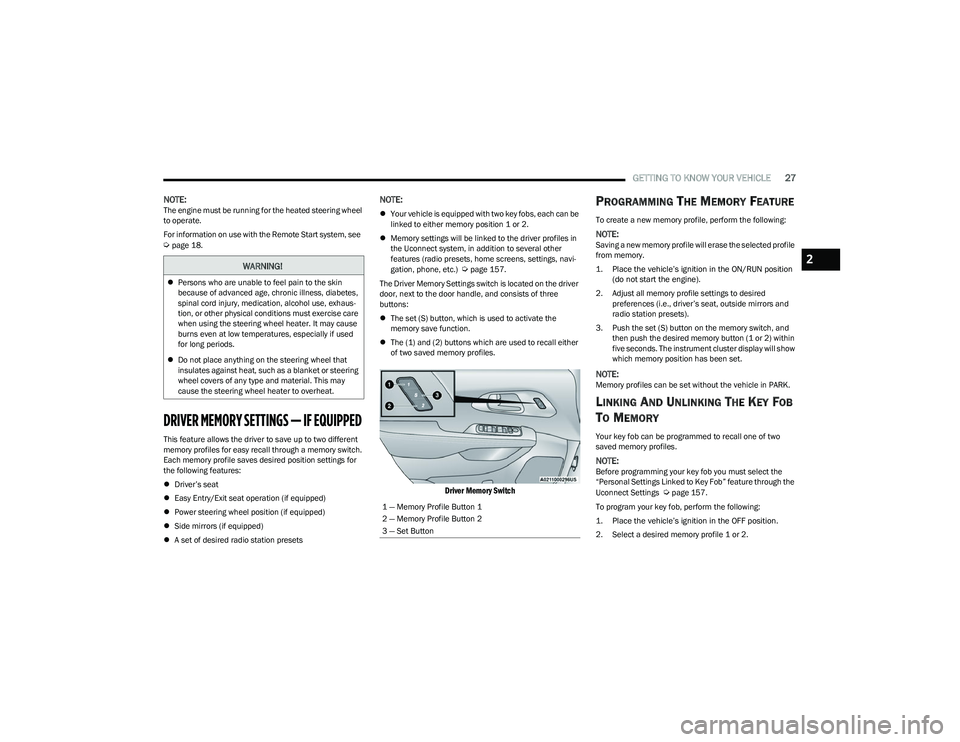
The Driver Memory Settings switch is located on the driver
door, next to the door handle, and consists of three
buttons:
The set (S) button, which is used to activate the
memory save function.
The (1) and (2) buttons which are used to recall either
of two saved memory profiles.
Driver Memory Switch
PROGRAMMING THE MEMORY FEATURE
To create a new memory profile, perform the following:
NOTE:Saving a new memory profile will erase the selected profile
from memory.
1. Place the vehicle’s ignition in the ON/RUN position
(do not start the engine).
2. Adjust all memory profile settings to desired preferences (i.e., driver’s seat, outside mirrors and
radio station presets).
3. Push the set (S) button on the memory switch, and then push the desired memory button (1 or 2) within
five seconds. The instrument cluster display will show
which memory position has been set.
NOTE:Memory profiles can be set without the vehicle in PARK.
LINKING AND UNLINKING THE KEY FOB
T
O MEMORY
Your key fob can be programmed to recall one of two
saved memory profiles.
NOTE:Before programming your key fob you must select the
“Personal Settings Linked to Key Fob” feature through the
Uconnect Settings
Úpage 157.
To program your key fob, perform the following:
1. Place the vehicle’s ignition in the OFF position.
2. Select a desired memory profile 1 or 2.
WARNING!
Persons who are unable to feel pain to the skin
because of advanced age, chronic illness, diabetes,
spinal cord injury, medication, alcohol use, exhaus -
tion, or other physical conditions must exercise care
when using the steering wheel heater. It may cause
burns even at low temperatures, especially if used
for long periods.
Do not place anything on the steering wheel that
insulates against heat, such as a blanket or steering
wheel covers of any type and material. This may
cause the steering wheel heater to overheat.
1 — Memory Profile Button 1
2 — Memory Profile Button 2
3 — Set Button
2
23_RUP_OM_EN_USC_t.book Page 27
Page 46 of 328
44GETTING TO KNOW YOUR VEHICLE
The level of heat selected will stay on until the operator
changes it.
NOTE:
Once a heat setting is selected, heat will be felt within
two to five minutes.
The engine must be running for the heated seats to
operate.
For information on use with the Remote Start system, see
Úpage 18.
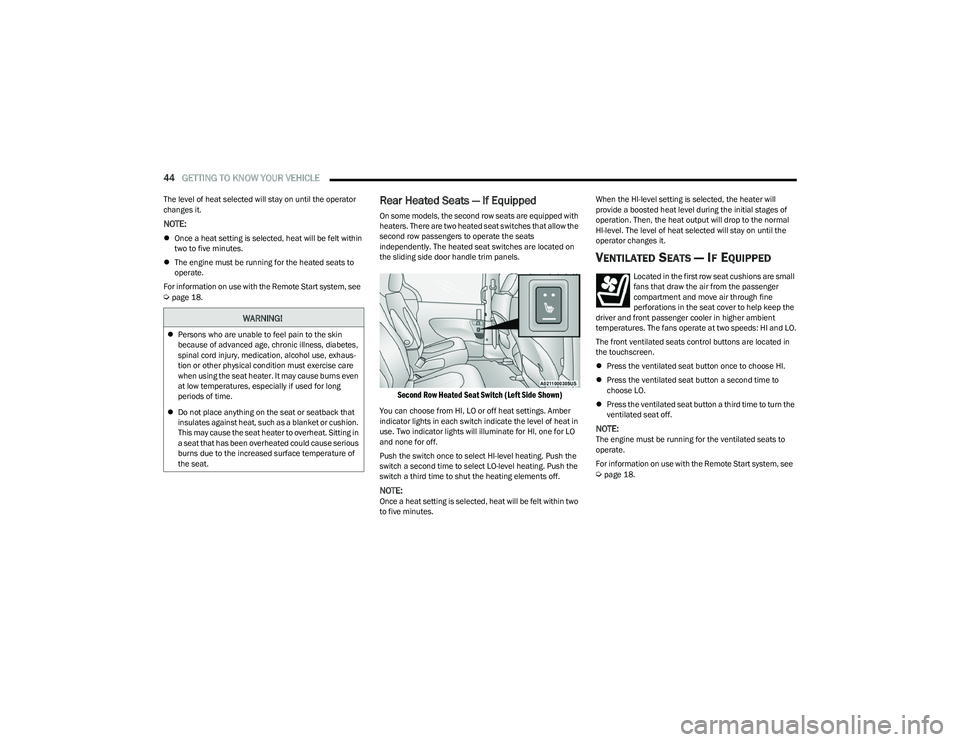
Rear Heated Seats — If Equipped
On some models, the second row seats are equipped with
heaters. There are two heated seat switches that allow the
second row passengers to operate the seats
independently. The heated seat switches are located on
the sliding side door handle trim panels.
Second Row Heated Seat Switch (Left Side Shown)
You can choose from HI, LO or off heat settings. Amber
indicator lights in each switch indicate the level of heat in
use. Two indicator lights will illuminate for HI, one for LO
and none for off.
Push the switch once to select HI-level heating. Push the
switch a second time to select LO-level heating. Push the
switch a third time to shut the heating elements off.
NOTE:Once a heat setting is selected, heat will be felt within two
to five minutes. When the HI-level setting is selected, the heater will
provide a boosted heat level during the initial stages of
operation. Then, the heat output will drop to the normal
HI-level. The level of heat selected will stay on until the
operator changes it.
VENTILATED SEATS — IF EQUIPPED
Located in the first row seat cushions are small
fans that draw the air from the passenger
compartment and move air through fine
perforations in the seat cover to help keep the
driver and front passenger cooler in higher ambient
temperatures. The fans operate at two speeds: HI and LO.
The front ventilated seats control buttons are located in
the touchscreen.
Press the ventilated seat button once to choose HI.
Press the ventilated seat button a second time to
choose LO.
Press the ventilated seat button a third time to turn the
ventilated seat off.
NOTE:The engine must be running for the ventilated seats to
operate.
For information on use with the Remote Start system, see
Úpage 18.
WARNING!
Persons who are unable to feel pain to the skin
because of advanced age, chronic illness, diabetes,
spinal cord injury, medication, alcohol use, exhaus -
tion or other physical condition must exercise care
when using the seat heater. It may cause burns even
at low temperatures, especially if used for long
periods of time.
Do not place anything on the seat or seatback that
insulates against heat, such as a blanket or cushion.
This may cause the seat heater to overheat. Sitting in
a seat that has been overheated could cause serious
burns due to the increased surface temperature of
the seat.
23_RUP_OM_EN_USC_t.book Page 44
Page 51 of 328
GETTING TO KNOW YOUR VEHICLE49
OUTSIDE MIRRORS
The outside mirror(s) can be adjusted to the center of the
adjacent lane of traffic to achieve the optimal view.
OUTSIDE MIRRORS WITH TURN SIGNAL —
I
F EQUIPPED
Driver and passenger outside mirrors with turn signal
lighting contain LEDs, which are located in the upper outer
corner of each mirror.
The LEDs are turn signal indicators, which flash with the
corresponding turn signal lights in the front and rear of the
vehicle. Turning on the Hazard Warning flashers will also
activate these LEDs.
DRIVER'S OUTSIDE AUTOMATIC
D
IMMING MIRROR — IF EQUIPPED
The driver’s outside mirror will automatically adjust for
glare from vehicles behind you. This feature is controlled
by the inside automatic dimming mirror and will
automatically adjust for headlight glare when the inside
mirror adjusts.
CONVERSATION MIRROR
Located in the overhead console there is a conversation
mirror to view all the passengers in the vehicle. Push the
panel to release the drop down mirror. Raise the mirror
and push to latch it back in the stowed position.
Conversation Mirror
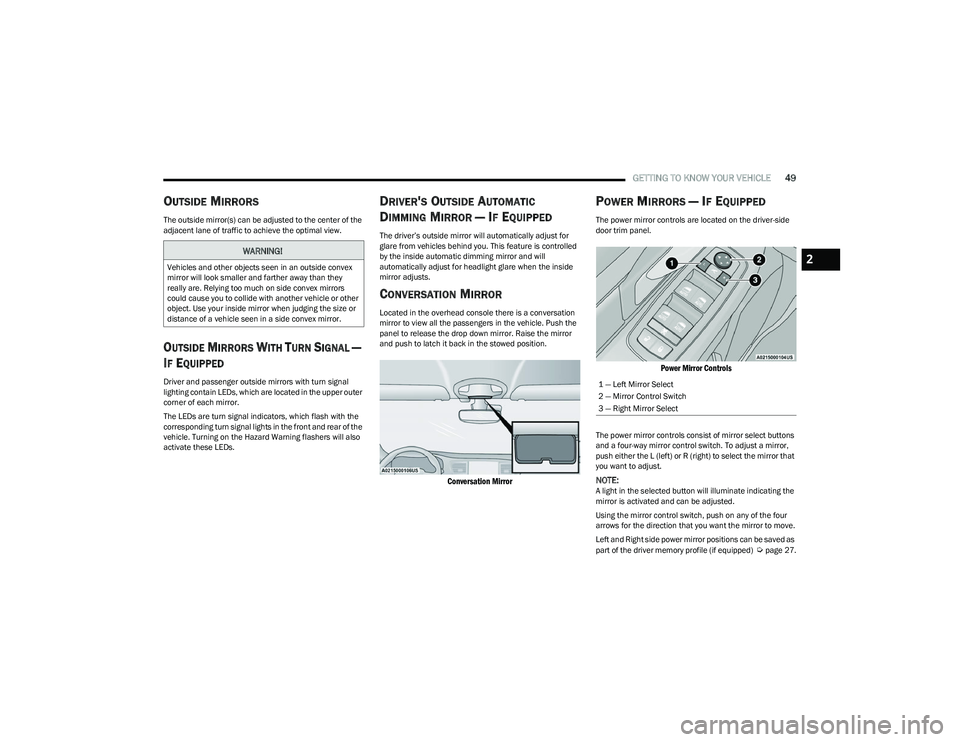
POWER MIRRORS — IF EQUIPPED
The power mirror controls are located on the driver-side
door trim panel.
Power Mirror Controls
The power mirror controls consist of mirror select buttons
and a four-way mirror control switch. To adjust a mirror,
push either the L (left) or R (right) to select the mirror that
you want to adjust.
NOTE:A light in the selected button will illuminate indicating the
mirror is activated and can be adjusted.
Using the mirror control switch, push on any of the four
arrows for the direction that you want the mirror to move.
Left and Right side power mirror positions can be saved as
part of the driver memory profile (if equipped)
Úpage 27.
WARNING!
Vehicles and other objects seen in an outside convex
mirror will look smaller and farther away than they
really are. Relying too much on side convex mirrors
could cause you to collide with another vehicle or other
object. Use your inside mirror when judging the size or
distance of a vehicle seen in a side convex mirror.
1 — Left Mirror Select
2 — Mirror Control Switch
3 — Right Mirror Select
2
23_RUP_OM_EN_USC_t.book Page 49
Page 53 of 328
GETTING TO KNOW YOUR VEHICLE51
TILT SIDE MIRRORS IN REVERSE —
I
F EQUIPPED
Tilt Side Mirrors In Reverse provides automatic outside
mirror positioning which will aid the driver’s view of the
ground rearward of the front doors. The driver's outside
mirror will move slightly downward from the present
position when the vehicle is shifted into REVERSE. The
driver's outside mirror will then return to the original
position when the vehicle is shifted out of the REVERSE
position. Each stored memory setting will have an
associated Tilt Side Mirrors In Reverse position.
NOTE:The Tilt Side Mirrors In Reverse feature can be enabled or
disabled through the Uconnect system Úpage 157.
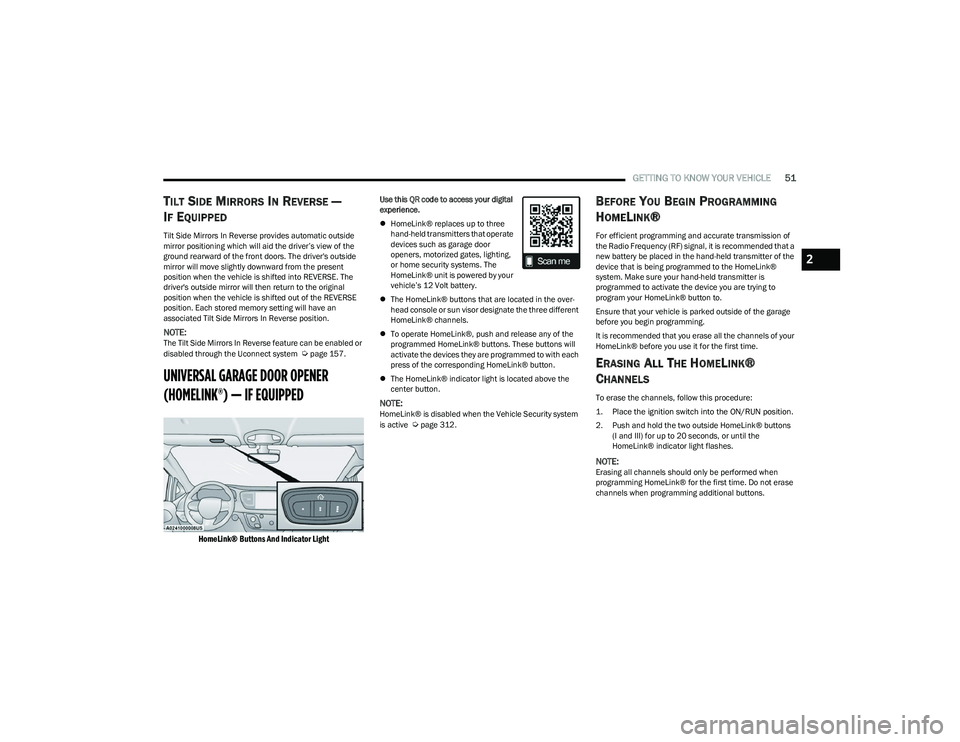
UNIVERSAL GARAGE DOOR OPENER
(HOMELINK®) — IF EQUIPPED
HomeLink® Buttons And Indicator Light
Use this QR code to access your digital
experience.
HomeLink® replaces up to three
hand-held transmitters that operate
devices such as garage door
openers, motorized gates, lighting,
or home security systems. The
HomeLink® unit is powered by your
vehicle’s 12 Volt battery.
The HomeLink® buttons that are located in the over -
head console or sun visor designate the three different
HomeLink® channels.
To operate HomeLink®, push and release any of the
programmed HomeLink® buttons. These buttons will
activate the devices they are programmed to with each
press of the corresponding HomeLink® button.
The HomeLink® indicator light is located above the
center button.
NOTE:HomeLink® is disabled when the Vehicle Security system
is active Úpage 312.
BEFORE YOU BEGIN PROGRAMMING
H
OMELINK®
For efficient programming and accurate transmission of
the Radio Frequency (RF) signal, it is recommended that a
new battery be placed in the hand-held transmitter of the
device that is being programmed to the HomeLink®
system. Make sure your hand-held transmitter is
programmed to activate the device you are trying to
program your HomeLink® button to.
Ensure that your vehicle is parked outside of the garage
before you begin programming.
It is recommended that you erase all the channels of your
HomeLink® before you use it for the first time.
ERASING ALL THE HOMELINK®
C
HANNELS
To erase the channels, follow this procedure:
1. Place the ignition switch into the ON/RUN position.
2. Push and hold the two outside HomeLink® buttons
(I and III) for up to 20 seconds, or until the
HomeLink® indicator light flashes.
NOTE:Erasing all channels should only be performed when
programming HomeLink® for the first time. Do not erase
channels when programming additional buttons.
2
23_RUP_OM_EN_USC_t.book Page 51
Page 87 of 328
GETTING TO KNOW YOUR VEHICLE85
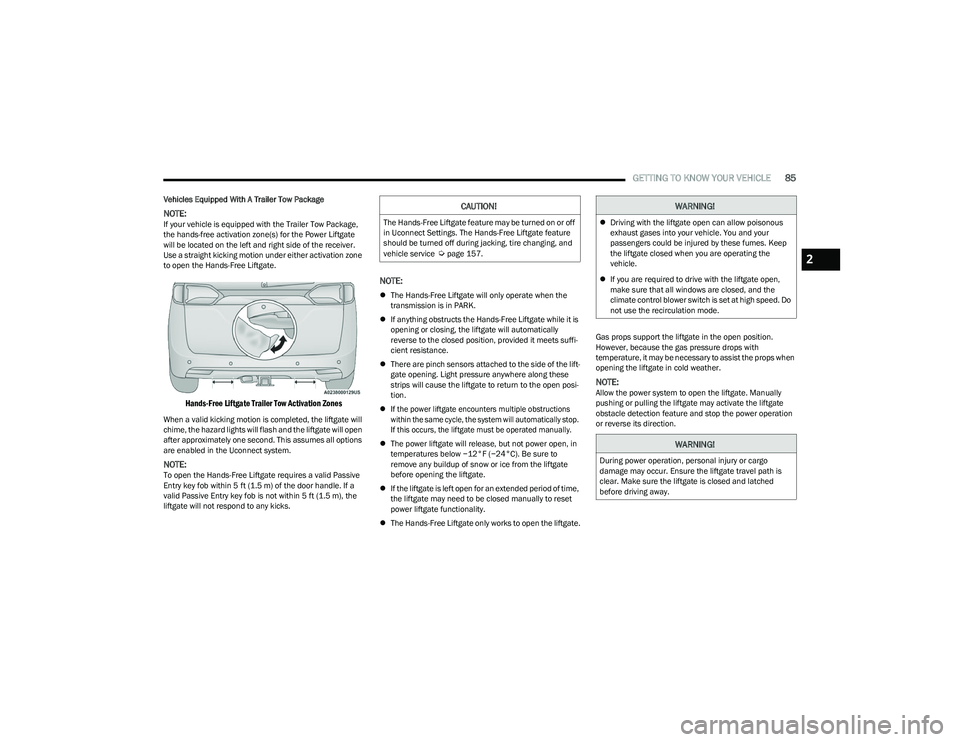
Vehicles Equipped With A Trailer Tow Package
NOTE:If your vehicle is equipped with the Trailer Tow Package,
the hands-free activation zone(s) for the Power Liftgate
will be located on the left and right side of the receiver.
Use a straight kicking motion under either activation zone
to open the Hands-Free Liftgate.
Hands-Free Liftgate Trailer Tow Activation Zones
When a valid kicking motion is completed, the liftgate will
chime, the hazard lights will flash and the liftgate will open
after approximately one second. This assumes all options
are enabled in the Uconnect system.
NOTE:To open the Hands-Free Liftgate requires a valid Passive
Entry key fob within 5 ft (1.5 m) of the door handle. If a
valid Passive Entry key fob is not within 5 ft (1.5 m), the
liftgate will not respond to any kicks.
NOTE:
The Hands-Free Liftgate will only operate when the
transmission is in PARK.
If anything obstructs the Hands-Free Liftgate while it is
opening or closing, the liftgate will automatically
reverse to the closed position, provided it meets suffi -
cient resistance.
There are pinch sensors attached to the side of the lift -
gate opening. Light pressure anywhere along these
strips will cause the liftgate to return to the open posi -
tion.
If the power liftgate encounters multiple obstructions
within the same cycle, the system will automatically stop.
If this occurs, the liftgate must be operated manually.
The power liftgate will release, but not power open, in
temperatures below −12°F (−24°C). Be sure to
remove any buildup of snow or ice from the liftgate
before opening the liftgate.
If the liftgate is left open for an extended period of time,
the liftgate may need to be closed manually to reset
power liftgate functionality.
The Hands-Free Liftgate only works to open the liftgate. Gas props support the liftgate in the open position.
However, because the gas pressure drops with
temperature, it may be necessary to assist the props when
opening the liftgate in cold weather.
NOTE:Allow the power system to open the liftgate. Manually
pushing or pulling the liftgate may activate the liftgate
obstacle detection feature and stop the power operation
or reverse its direction.
CAUTION!
The Hands-Free Liftgate feature may be turned on or off
in Uconnect Settings. The Hands-Free Liftgate feature
should be turned off during jacking, tire changing, and
vehicle service
Úpage 157.
WARNING!
Driving with the liftgate open can allow poisonous
exhaust gases into your vehicle. You and your
passengers could be injured by these fumes. Keep
the liftgate closed when you are operating the
vehicle.
If you are required to drive with the liftgate open,
make sure that all windows are closed, and the
climate control blower switch is set at high speed. Do
not use the recirculation mode.
WARNING!
During power operation, personal injury or cargo
damage may occur. Ensure the liftgate travel path is
clear. Make sure the liftgate is closed and latched
before driving away.
2
23_RUP_OM_EN_USC_t.book Page 85