CHRYSLER PACIFICA HYBRID 2020 Owners Manual
Manufacturer: CHRYSLER, Model Year: 2020, Model line: PACIFICA HYBRID, Model: CHRYSLER PACIFICA HYBRID 2020Pages: 516, PDF Size: 28.69 MB
Page 471 of 516
MULTIMEDIA469
UCONNECT THEATER — IF EQUIPPED
Uconnect Theater Overview
Your Uconnect Theater is designed to give your
family years of enjoyment.
There are multiple ways to interact with your
Uconnect Theater system;
Play your favorite CDs, DVDs, or Blu-ray™
Discs
Plug and play a variety of standard video
games or devices into the HDMI port
Listen to audio over the wireless headphones
Plug and play a variety of devices into the
Video USB port
Plug in standard headphones to listen to
audio
Project your mobile phone or tablet screen
onto the rear Uconnect Theater touchscreens
Please review this Owner's Manual to become
familiar with its features and operation.
Getting Started
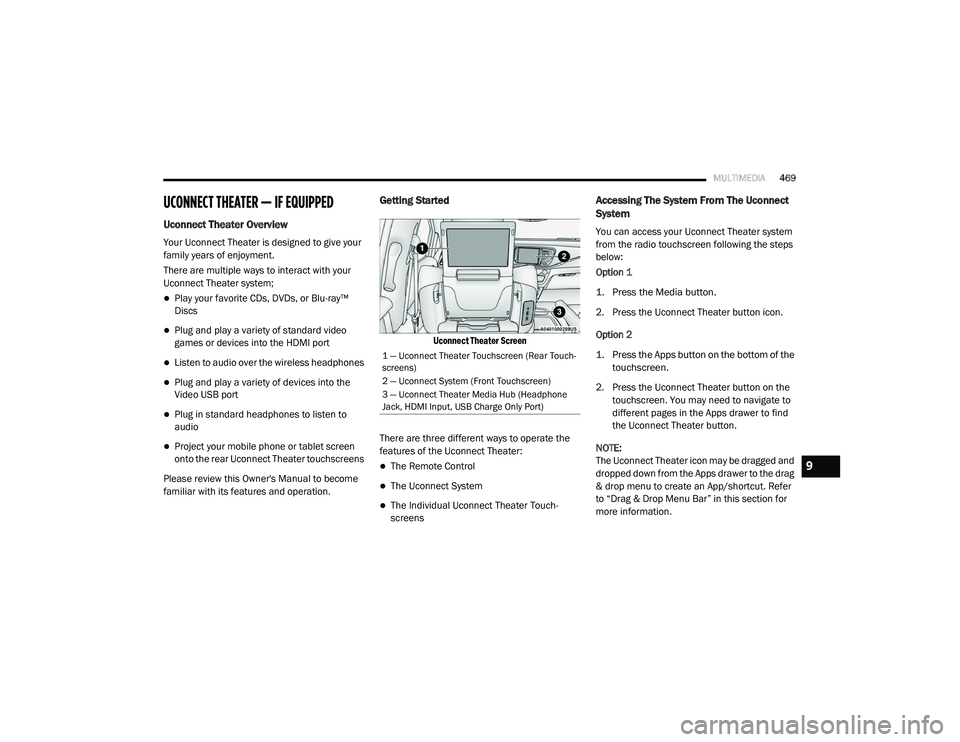
Uconnect Theater Screen
There are three different ways to operate the
features of the Uconnect Theater:
The Remote Control
The Uconnect System
The Individual Uconnect Theater Touch -
screens
Accessing The System From The Uconnect
System
You can access your Uconnect Theater system
from the radio touchscreen following the steps
below:
Option 1
1. Press the Media button.
2. Press the Uconnect Theater button icon.
Option 2
1. Press the Apps button on the bottom of the
touchscreen.
2. Press the Uconnect Theater button on the touchscreen. You may need to navigate to
different pages in the Apps drawer to find
the Uconnect Theater button.
NOTE:
The Uconnect Theater icon may be dragged and
dropped down from the Apps drawer to the drag
& drop menu to create an App/shortcut. Refer
to “Drag & Drop Menu Bar” in this section for
more information.
1 — Uconnect Theater Touchscreen (Rear Touch -
screens)
2 — Uconnect System (Front Touchscreen)
3 — Uconnect Theater Media Hub (Headphone
Jack, HDMI Input, USB Charge Only Port)
9
20_RU_OM_EN_US_t.book Page 469
Page 472 of 516
470MULTIMEDIA
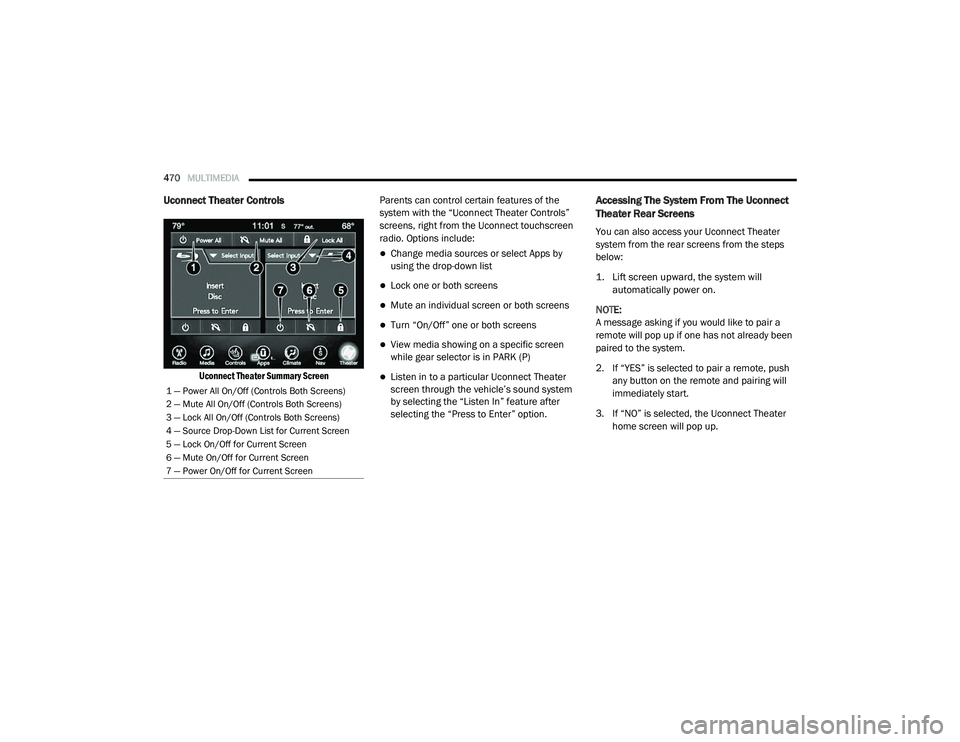
Uconnect Theater Controls
Uconnect Theater Summary Screen
Parents can control certain features of the
system with the “Uconnect Theater Controls”
screens, right from the Uconnect touchscreen
radio. Options include:
Change media sources or select Apps by
using the drop-down list
Lock one or both screens
Mute an individual screen or both screens
Turn “On/Off” one or both screens
View media showing on a specific screen
while gear selector is in PARK (P)
Listen in to a particular Uconnect Theater
screen through the vehicle’s sound system
by selecting the “Listen In” feature after
selecting the “Press to Enter” option.
Accessing The System From The Uconnect
Theater Rear Screens
You can also access your Uconnect Theater
system from the rear screens from the steps
below:
1. Lift screen upward, the system will
automatically power on.
NOTE:
A message asking if you would like to pair a
remote will pop up if one has not already been
paired to the system.
2. If “YES” is selected to pair a remote, push any button on the remote and pairing will
immediately start.
3. If “NO” is selected, the Uconnect Theater home screen will pop up.
1 — Power All On/Off (Controls Both Screens)
2 — Mute All On/Off (Controls Both Screens)
3 — Lock All On/Off (Controls Both Screens)
4 — Source Drop-Down List for Current Screen
5 — Lock On/Off for Current Screen
6 — Mute On/Off for Current Screen
7 — Power On/Off for Current Screen
20_RU_OM_EN_US_t.book Page 470
Page 473 of 516
MULTIMEDIA471
NOTE:
There will be a touchscreen notification
message when pairing is successful.
Test to make sure the remote is successfully
paired by dragging your finger across the
gesture pad. If you do not see the On-screen
Arrow, try using the Screen button on the
remote to switch between rear screen one
and rear screen two to make sure the remote
is controlling the intended screen. It may take
several seconds for the remote to react when
initially paired.
If remote does not pair, refer to “Pairing The
Remote” in this section for an alternative
pairing process.
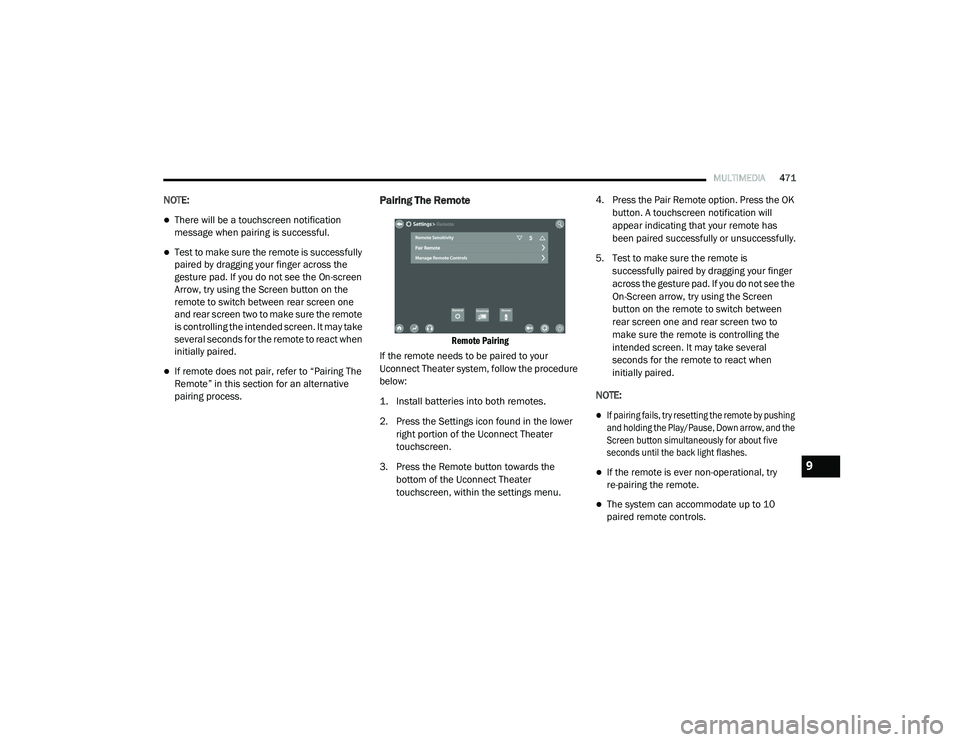
Pairing The Remote
Remote Pairing
If the remote needs to be paired to your
Uconnect Theater system, follow the procedure
below:
1. Install batteries into both remotes.
2. Press the Settings icon found in the lower right portion of the Uconnect Theater
touchscreen.
3. Press the Remote button towards the bottom of the Uconnect Theater
touchscreen, within the settings menu. 4. Press the Pair Remote option. Press the OK
button. A touchscreen notification will
appear indicating that your remote has
been paired successfully or unsuccessfully.
5. Test to make sure the remote is successfully paired by dragging your finger
across the gesture pad. If you do not see the
On-Screen arrow, try using the Screen
button on the remote to switch between
rear screen one and rear screen two to
make sure the remote is controlling the
intended screen. It may take several
seconds for the remote to react when
initially paired.
NOTE:
If pairing fails, try resetting the remote by pushing
and holding the Play/Pause, Down arrow, and the
Screen button simultaneously for about five
seconds until the back light flashes.
If the remote is ever non-operational, try
re-pairing the remote.
The system can accommodate up to 10
paired remote controls.
9
20_RU_OM_EN_US_t.book Page 471
Page 474 of 516
472MULTIMEDIA
Unpairing The Remote
In events such as updating the Uconnect
Theater software, or taking a remote to another
vehicle, the remote will need to be unpaired
from your Uconnect Theater system. To unpair
the remote:
1. Press the Settings icon found in the lower
right portion of the Uconnect Theater
touchscreen.
2. Press the Remote button towards the bottom of the Uconnect Theater
touchscreen, within the settings menu.
3. Select Manage Remote Controls from the Remote section of "Settings” and follow the
on-screen instructions to complete the
unpairing process.
4. Once complete, the remote will be ready to pair again. NOTE:
There will be a touchscreen notification
message when unpairing is successful. Repeat
the above steps to unpair a second remote.
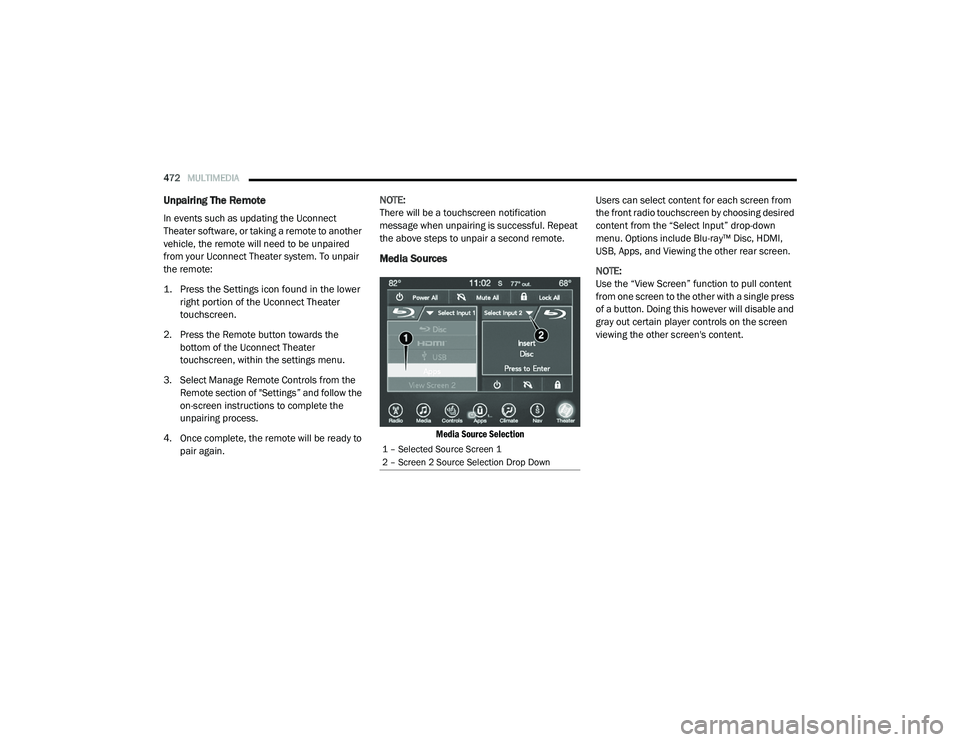
Media Sources
Media Source Selection
Users can select content for each screen from
the front radio touchscreen by choosing desired
content from the “Select Input” drop-down
menu. Options include Blu-ray™ Disc, HDMI,
USB, Apps, and Viewing the other rear screen.
NOTE:
Use the “View Screen” function to pull content
from one screen to the other with a single press
of a button. Doing this however will disable and
gray out certain player controls on the screen
viewing the other screen's content.
1 – Selected Source Screen 1
2 – Screen 2 Source Selection Drop Down
20_RU_OM_EN_US_t.book Page 472
Page 475 of 516
MULTIMEDIA473
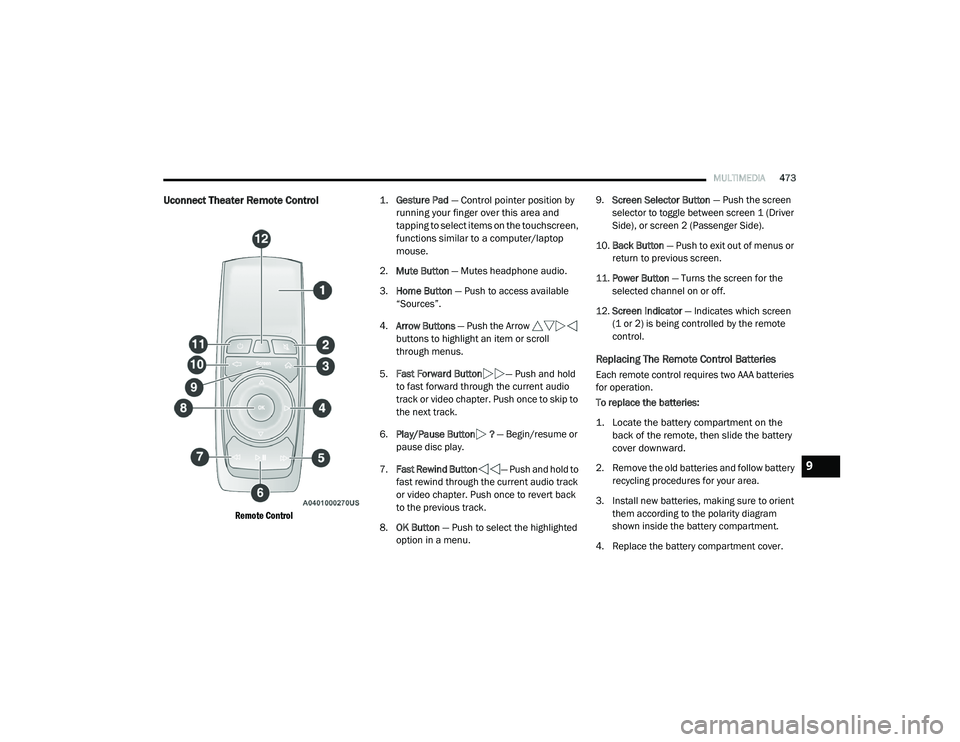
Uconnect Theater Remote Control
Remote Control
1.
Gesture Pad
— Control pointer position by
running your finger over this area and
tapping to select items on the touchscreen,
functions similar to a computer/laptop
mouse.
2. Mute Button — Mutes headphone audio.
3. Home Button — Push to access available
“Sources”.
4. Arrow Buttons — Push the Arrow
buttons to highlight an item or scroll
through menus.
5. Fast Forward Button — Push and hold
to fast forward through the current audio
track or video chapter. Push once to skip to
the next track.
6. Play/Pause Button ? — Begin/resume or
pause disc play.
7. Fast Rewind Button — Push and hold to
fast rewind through the current audio track
or video chapter. Push once to revert back
to the previous track.
8. OK Button — Push to select the highlighted
option in a menu. 9.
Screen Selector Button — Push the screen
selector to toggle between screen 1 (Driver
Side), or screen 2 (Passenger Side).
10. Back Button — Push to exit out of menus or
return to previous screen.
11. Power Button — Turns the screen for the
selected channel on or off.
12. Screen Indicator — Indicates which screen
(1 or 2) is being controlled by the remote
control.
Replacing The Remote Control Batteries
Each remote control requires two AAA batteries
for operation.
To replace the batteries:
1. Locate the battery compartment on the back of the remote, then slide the battery
cover downward.
2. Remove the old batteries and follow battery recycling procedures for your area.
3. Install new batteries, making sure to orient them according to the polarity diagram
shown inside the battery compartment.
4. Replace the battery compartment cover.
9
20_RU_OM_EN_US_t.book Page 473
Page 476 of 516
474MULTIMEDIA
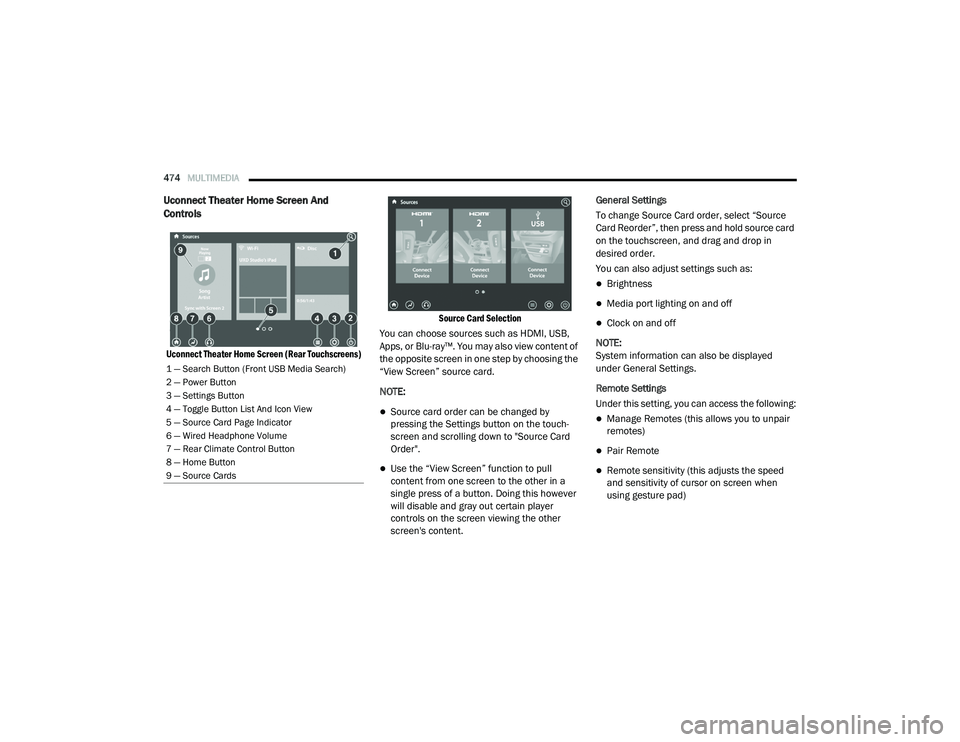
Uconnect Theater Home Screen And
Controls
Uconnect Theater Home Screen (Rear Touchscreens) Source Card Selection
You can choose sources such as HDMI, USB,
Apps, or Blu-ray™. You may also view content of
the opposite screen in one step by choosing the
“View Screen” source card.
NOTE:
Source card order can be changed by
pressing the Settings button on the touch -
screen and scrolling down to "Source Card
Order".
Use the “View Screen” function to pull
content from one screen to the other in a
single press of a button. Doing this however
will disable and gray out certain player
controls on the screen viewing the other
screen's content. General Settings
To change Source Card order, select “Source
Card Reorder”, then press and hold source card
on the touchscreen, and drag and drop in
desired order.
You can also adjust settings such as:
Brightness
Media port lighting on and off
Clock on and off
NOTE:
System information can also be displayed
under General Settings.
Remote Settings
Under this setting, you can access the following:
Manage Remotes (this allows you to unpair
remotes)
Pair Remote
Remote sensitivity (this adjusts the speed
and sensitivity of cursor on screen when
using gesture pad)
1 — Search Button (Front USB Media Search)
2 — Power Button
3 — Settings Button
4 — Toggle Button List And Icon View
5 — Source Card Page Indicator
6 — Wired Headphone Volume
7 — Rear Climate Control Button
8 — Home Button
9 — Source Cards
20_RU_OM_EN_US_t.book Page 474
Page 477 of 516
MULTIMEDIA475
General Information
The following regulatory statement applies to all
Radio Frequency (RF) devices equipped in this
vehicle:
This device complies with Part 15 of the FCC
Rules and with Innovation, Science and
Economic Development Canada license-exempt
RSS standard(s). Operation is subject to the
following two conditions:
1. This device may not cause harmful
interference, and
2. This device must accept any interference received, including interference that may
cause undesired operation.
Brand: Delphi
Model: FCA REMOTE
Le présent appareil est conforme aux CNR
d`Innovation, Science and Economic
Development applicables aux appareils radio
exempts de licence. L'exploitation est autorisée
aux deux conditions suivantes:
1. l'appareil ne doit pas produire de
brouillage, et
2. l'utilisateur de l'appareil doit accepter tout brouillage radioélectrique subi, même si le
brouillage est susceptible d'en compro -
mettre le fonctionnement.
Marque: Delphi
Modèle: FCA REMOTE
La operación de este equipo está sujeta a las
siguientes dos condiciones:
1. es posible que este equipo o dispositivo no cause interferencia perjudicial y
2. este equipo o dispositivo debe aceptar cualquier interferencia, incluyendo la que
pueda causar su operación no deseada.
Marca: Delphi
Modelo: FCA REMOTE
NOTE:
Changes or modifications not expressly
approved by the party responsible for compli -
ance could void the user’s authority to operate
the equipment.
Play A DVD/Blu-ray™ Or USB Media File
From Uconnect System
1. Insert a Blu-ray™ Disc or DVD disc into the disc player with the label facing up, or
insert a USB drive into rear Video USB port.
NOTE:
The DVD/Blu-ray™ Disc player and Video USB
port are both located under the radio controls in
the instrument panel.
2. Press the Uconnect Theater button on the radio touchscreen.
Refer to “Accessing The System From The
Uconnect System” in this section for further
information.
3. Select Disc or USB from the source controls (i.e. select the desired source from the
“Select Input 1” or “Select Input 2” menu
for the respective screen).
9
20_RU_OM_EN_US_t.book Page 475
Page 478 of 516
476MULTIMEDIA
4. For DVD/Blu-ray™ disc — press the Press to
Enter feature in the Movie Snapshot on the
radio touchscreen, then press “OK” on the
following screen. The steps to start a DVD
are dependent on the steps required by that
specific DVD. For USB Media Files — Press
“Music”, “Movie”, or “Folders”, then select
media title from list(s).
5. To play a DVD/Blu-ray™ disc on both screens simultaneously, select “Disc” from
both screen drop downs, or choose “Disc
Source” on one screen and push the View
Screen button on the other.
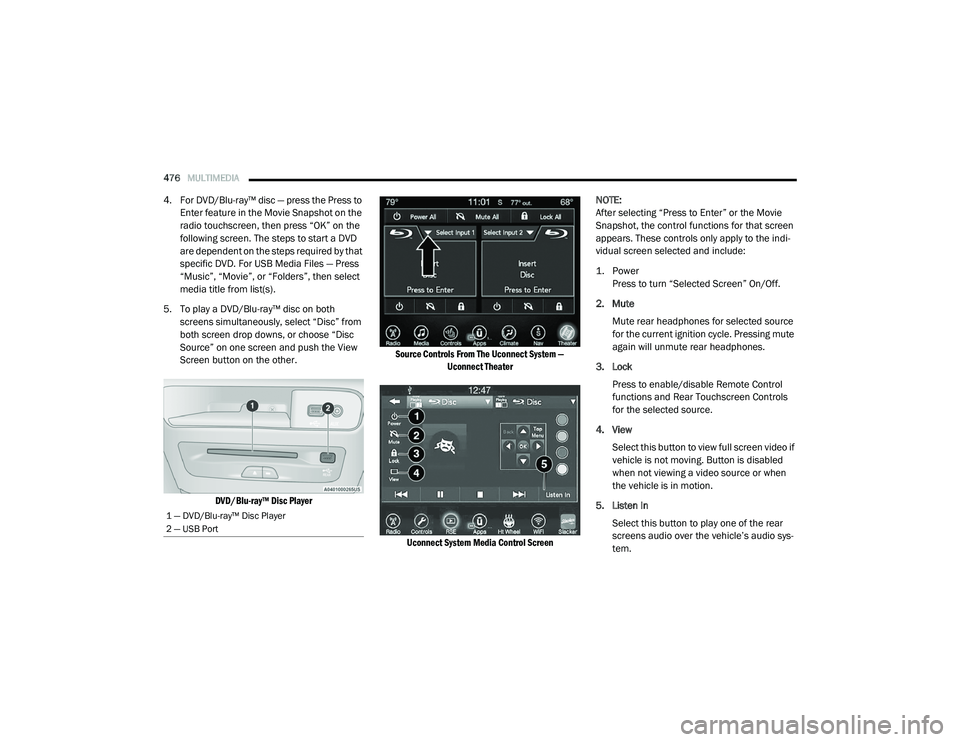
DVD/Blu-ray™ Disc Player Source Controls From The Uconnect System —
Uconnect Theater
Uconnect System Media Control Screen
NOTE:
After selecting “Press to Enter” or the Movie
Snapshot, the control functions for that screen
appears. These controls only apply to the indi
-
vidual screen selected and include:
1. Power
Press to turn “Selected Screen” On/Off.
2. Mute Mute rear headphones for selected source
for the current ignition cycle. Pressing mute
again will unmute rear headphones.
3. Lock Press to enable/disable Remote Control
functions and Rear Touchscreen Controls
for the selected source.
4. View Select this button to view full screen video if
vehicle is not moving. Button is disabled
when not viewing a video source or when
the vehicle is in motion.
5. Listen In Select this button to play one of the rear
screens audio over the vehicle’s audio sys -
tem.
1 — DVD/Blu-ray™ Disc Player
2 — USB Port
20_RU_OM_EN_US_t.book Page 476
Page 479 of 516
MULTIMEDIA477
NOTE:
To view video content on the radio screen, bring
the vehicle to a stop.
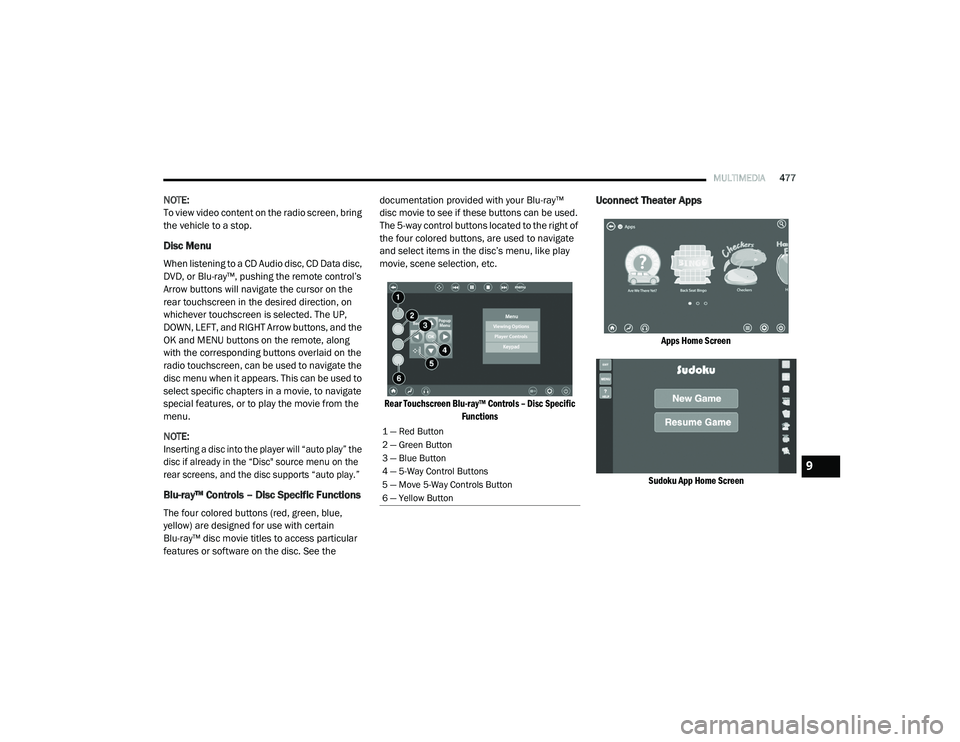
Disc Menu
When listening to a CD Audio disc, CD Data disc,
DVD, or Blu-ray™, pushing the remote control’s
Arrow buttons will navigate the cursor on the
rear touchscreen in the desired direction, on
whichever touchscreen is selected. The UP,
DOWN, LEFT, and RIGHT Arrow buttons, and the
OK and MENU buttons on the remote, along
with the corresponding buttons overlaid on the
radio touchscreen, can be used to navigate the
disc menu when it appears. This can be used to
select specific chapters in a movie, to navigate
special features, or to play the movie from the
menu.
NOTE:
Inserting a disc into the player will “auto play” the
disc if already in the “Disc" source menu on the
rear screens, and the disc supports “auto play.”
Blu-ray™ Controls – Disc Specific Functions
The four colored buttons (red, green, blue,
yellow) are designed for use with certain
Blu-ray™ disc movie titles to access particular
features or software on the disc. See the documentation provided with your Blu-ray™
disc movie to see if these buttons can be used.
The 5-way control buttons located to the right of
the four colored buttons, are used to navigate
and select items in the disc’s menu, like play
movie, scene selection, etc.
Rear Touchscreen Blu-ray™ Controls – Disc Specific Functions
Uconnect Theater Apps
Apps Home Screen
Sudoku App Home Screen
1 — Red Button
2 — Green Button
3 — Blue Button
4 — 5-Way Control Buttons
5 — Move 5-Way Controls Button
6 — Yellow Button
9
20_RU_OM_EN_US_t.book Page 477
Page 480 of 516
478MULTIMEDIA
Select the Apps source card to play pre-loaded
games. Pressing the Help button teaches users
how to play each game. Pick from games:
Back Seat Bingo
Checkers
Hanging Fruit
License Plate Game
Math Flash Cards
Solitaire
Sudoku
Tic Tac Toe
NOTE:
To exit a game, press Exit button then Back
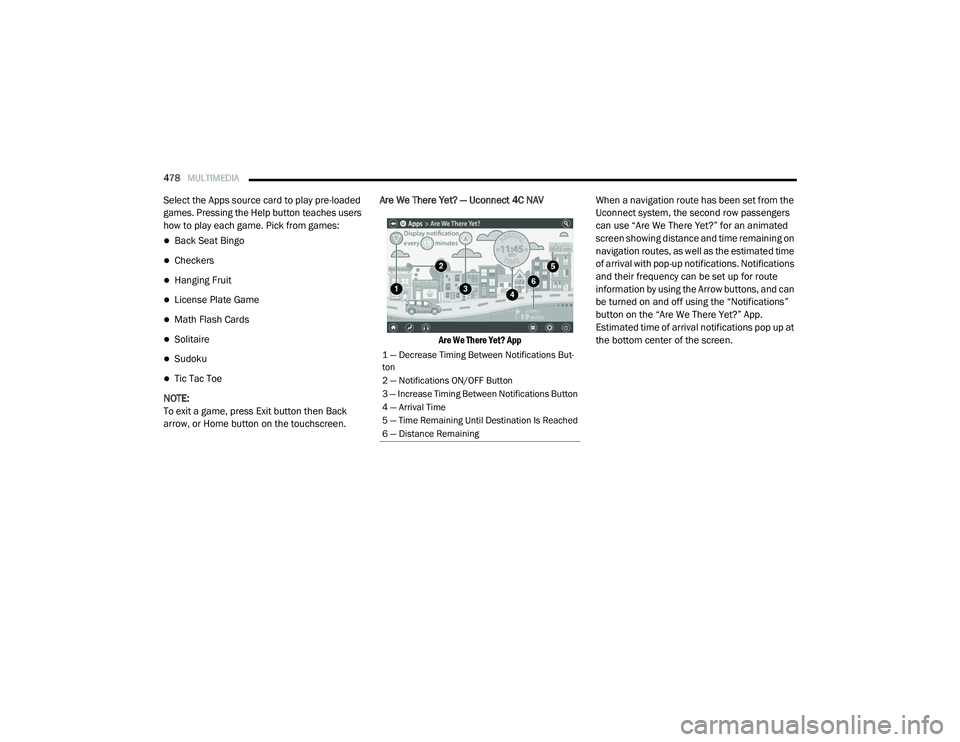
arrow, or Home button on the touchscreen. Are We There Yet? — Uconnect 4C NAV
Are We There Yet? App
When a navigation route has been set from the
Uconnect system, the second row passengers
can use “Are We There Yet?” for an animated
screen showing distance and time remaining on
navigation routes, as well as the estimated time
of arrival with pop-up notifications. Notifications
and their frequency can be set up for route
information by using the Arrow buttons, and can
be turned on and off using the “Notifications”
button on the “Are We There Yet?” App.
Estimated time of arrival notifications pop up at
the bottom center of the screen.
1 — Decrease Timing Between Notifications But
-
ton
2 — Notifications ON/OFF Button
3 — Increase Timing Between Notifications Button
4 — Arrival Time
5 — Time Remaining Until Destination Is Reached
6 — Distance Remaining
20_RU_OM_EN_US_t.book Page 478