roof rack CHRYSLER PACIFICA HYBRID 2022 Owners Manual
[x] Cancel search | Manufacturer: CHRYSLER, Model Year: 2022, Model line: PACIFICA HYBRID, Model: CHRYSLER PACIFICA HYBRID 2022Pages: 384, PDF Size: 23.92 MB
Page 5 of 384
3
UNIVERSAL GARAGE DOOR OPENER
(HOMELINK®) ....................................................... 61 Before You Begin Programming
HomeLink®.......................................................61
Erasing All The HomeLink® Channels ............61
Identifying Whether You Have A Rolling
Code Or Non-Rolling Code Device ...................62
Programming HomeLink® To A Garage
Door Opener .....................................................62
Programming HomeLink® To A
Miscellaneous Device ......................................63
Reprogramming A Single HomeLink®
Button ...............................................................63
Canadian/Gate Operator Programming .........63
Security .............................................................64
Troubleshooting Tips ........................................64
EXTERIOR LIGHTS.................................................. 65
Multifunction Lever ..........................................65
Headlight Switch...............................................65
Daytime Running Lights (DRLs) —
If Equipped........................................................66
High/Low Beam Switch....................................66
Automatic High Beam — If Equipped .............66
Flash-To-Pass ...................................................67
Automatic Headlights — If Equipped ..............67
Headlights On With Wipers —
If Equipped........................................................67
Headlight Time Delay — If Equipped ...............67
Lights-On Reminder..........................................67 Front Fog Lights — If Equipped .......................68
Turn Signals ......................................................68
Lane Change Assist — If Equipped ..................68
Battery Saver ...................................................68
INTERIOR LIGHTS ..................................................69
Interior Courtesy Lights ...................................69
WINDSHIELD WIPER AND WASHERS .................70
Windshield Wiper Operation ............................70
Rain Sensing Wipers — If Equipped ................71
Rear Wiper And Washer...................................71
CLIMATE CONTROLS .............................................72
Automatic Climate Control Descriptions
And Functions ...................................................72
Manual Climate Control Descriptions
And Functions ...................................................77
Automatic Temperature Control (ATC) —
If Equipped .......................................................82
Climate Voice Commands................................83
Operating Tips .................................................83
INTERIOR STORAGE AND EQUIPMENT ............... 84
Storage..............................................................84
Sun Screens — If Equipped..............................87
USB/AUX Control ..............................................87
Power Outlets ...................................................89
Power Inverter — If Equipped .........................91
Wireless Charging Pad — If Equipped .............91 WINDOWS .............................................................. 92
Power Windows ................................................ 92
Automatic Window Features ........................... 93
Reset Auto-Up................................................... 93
Wind Buffeting.................................................. 94
PANORAMIC SUNROOF — IF EQUIPPED ............. 94
Opening And Closing The Sunroof .................. 94
Opening And Closing The Power
Sunshade — If Equipped .................................. 95
Pinch Protect Feature ...................................... 95
Venting Sunroof................................................ 95
Ignition Off Operation....................................... 96
Sunroof Maintenance ...................................... 96
HOOD....................................................................... 96
Opening............................................................. 96
Closing ..............................................................96
LIFTGATE ................................................................. 97
To Unlock/Open The Liftgate .......................... 97
To Lock/Close The Liftgate.............................. 97
Power Liftgate — If Equipped........................... 97
Hands-Free Liftgate — If Equipped.................. 99
Cargo Area Features ................................. 100
STOW ‘N PLACE ROOF RACK —
IF EQUIPPED ........................................................ 106
Deploying The Crossbars .............................. 106
Stowing The Crossbars ................................. 108
22_RUP_OM_EN_USC_t.book Page 3
Page 98 of 384
96GETTING TO KNOW YOUR VEHICLE
IGNITION OFF OPERATION
The power sunroof switch will remain active for up
to approximately 10 minutes after the ignition
switch is placed in the OFF position. Opening either
front door will cancel this feature.
NOTE:Ignition off time is programmable through the
Uconnect system Úpage 188.
SUNROOF MAINTENANCE
Use only a non-abrasive cleaner and a soft cloth to
clean the glass panel. Periodically check for and
clear out any debris that may have collected in the
tracks.
HOOD
OPENING
If applicable, refer to the “Hybrid Supplement” for
additional information.
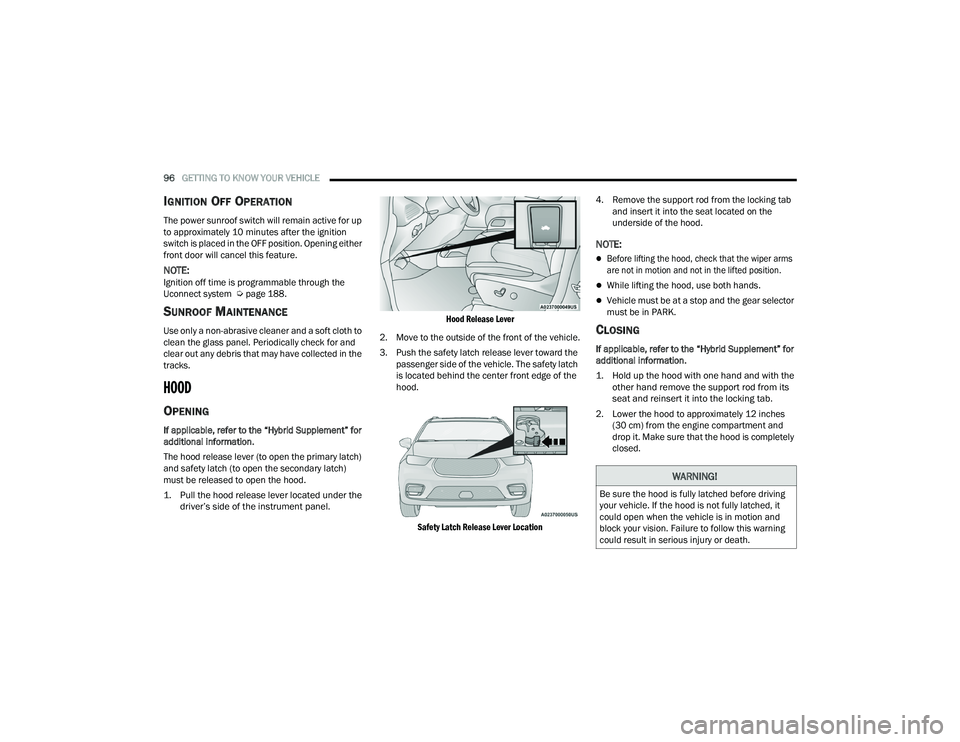
The hood release lever (to open the primary latch)
and safety latch (to open the secondary latch)
must be released to open the hood.
1. Pull the hood release lever located under the
driver’s side of the instrument panel.
Hood Release Lever
2. Move to the outside of the front of the vehicle.
3. Push the safety latch release lever toward the passenger side of the vehicle. The safety latch
is located behind the center front edge of the
hood.
Safety Latch Release Lever Location
4. Remove the support rod from the locking tab
and insert it into the seat located on the
underside of the hood.
NOTE:
Before lifting the hood, check that the wiper arms
are not in motion and not in the lifted position.
While lifting the hood, use both hands.
Vehicle must be at a stop and the gear selector
must be in PARK.
CLOSING
If applicable, refer to the “Hybrid Supplement” for
additional information.
1. Hold up the hood with one hand and with the other hand remove the support rod from its
seat and reinsert it into the locking tab.
2. Lower the hood to approximately 12 inches (30 cm) from the engine compartment and
drop it. Make sure that the hood is completely
closed.
WARNING!
Be sure the hood is fully latched before driving
your vehicle. If the hood is not fully latched, it
could open when the vehicle is in motion and
block your vision. Failure to follow this warning
could result in serious injury or death.
22_RUP_OM_EN_USC_t.book Page 96
Page 108 of 384
106GETTING TO KNOW YOUR VEHICLE
STOW ‘N PLACE ROOF RACK — IF EQUIPPED
The crossbars and side rails are designed to carry
weight on vehicles equipped with a luggage rack.
The load must not exceed 150 lb (68 kg), and
should be uniformly distributed over the luggage
rack crossbars.
The crossbars on your vehicle are delivered stowed
within the roof rack side rails. Crossbars should
always be used whenever cargo is placed on the
roof rack. Check the straps frequently to be sure
that the load remains securely attached.
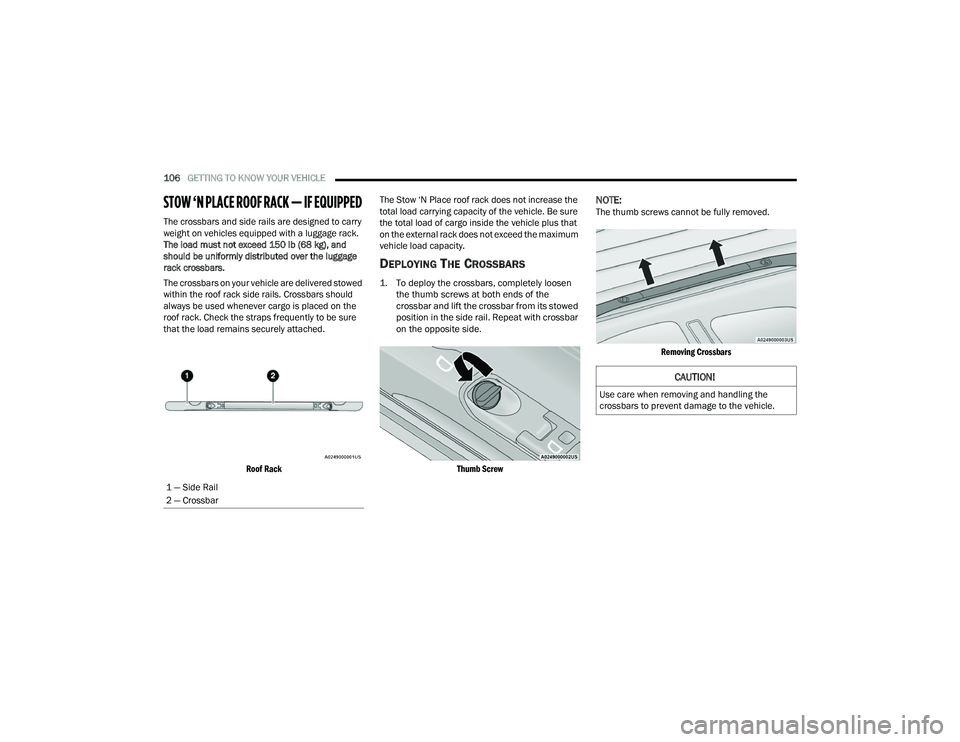
Roof Rack
The Stow ‘N Place roof rack does not increase the
total load carrying capacity of the vehicle. Be sure
the total load of cargo inside the vehicle plus that
on the external rack does not exceed the maximum
vehicle load capacity.
DEPLOYING THE CROSSBARS
1. To deploy the crossbars, completely loosen
the thumb screws at both ends of the
crossbar and lift the crossbar from its stowed
position in the side rail. Repeat with crossbar
on the opposite side.
Thumb Screw
NOTE:The thumb screws cannot be fully removed.
Removing Crossbars
1 — Side Rail
2 — Crossbar
CAUTION!
Use care when removing and handling the
crossbars to prevent damage to the vehicle.
22_RUP_OM_EN_USC_t.book Page 106
Page 111 of 384
GETTING TO KNOW YOUR VEHICLE109
(Continued)
NOTE:
To help control wind noise, stow the crossbars in
the side rails when they are not in use.
If any metallic object is placed over the satellite
radio antenna (if equipped), you may experience
interruption of satellite radio reception.
WARNING!
Cargo must be securely tied down before driving
your vehicle. Improperly secured loads can fly off
the vehicle, particularly at high speeds, resulting
in personal injury or property damage. Follow
the roof rack cautions when carrying cargo on
your roof rack.
CAUTION!
To prevent damage to the roof of your vehicle,
DO NOT carry any loads on the roof rack
without the crossbars deployed. The load
should be secured and placed on top of the
crossbars, not directly on the roof. If it is
necessary to place the load on the roof, place
a blanket or other protective layer between
the load and the roof surface.
To avoid damage to the roof rack and vehicle,
do not exceed the maximum roof rack load
capacity of 150 lb (68 kg). Always distribute
heavy loads as evenly as possible and secure
the load appropriately.
Load should always be secured to cross bars
first, with tie down loops used as additional
securing points if needed. Tie loops are
intended as supplementary tie down points
only. Do not use ratcheting mechanisms with
the tie loops. Check the straps and thumb
wheels frequently to be sure that the load
remains securely attached.
Long loads that extend over the windshield,
such as wood panels or surfboards, or loads
with large frontal area should be secured to
both the front and rear of the vehicle.
Travel at reduced speeds and turn corners
carefully when carrying large or heavy loads
on the roof rack. Wind forces, due to natural
causes or nearby truck traffic, can add sudden
upward lift to a load. This is especially true on
large flat loads and may result in damage to
the cargo or your vehicle.
CAUTION!
2
22_RUP_OM_EN_USC_t.book Page 109
Page 260 of 384
258SAFETY
The SABIC deploys downward, covering the side
windows. An inflating SABIC pushes the outside
edge of the headliner out of the way and covers the
window. The SABICs inflate with enough force to
injure occupants if they are not belted and seated
properly, or if items are positioned in the area
where the SABICs inflate. Children are at an even
greater risk of injury from a deploying air bag.
The SABICs may help reduce the risk of partial or
complete ejection of vehicle occupants through
side windows in certain side impact events. Side Impacts
The Side Air Bags are designed to activate in
certain side impacts. The Occupant Restraint
Controller (ORC) determines whether the
deployment of the Side Air Bags in a particular
impact event is appropriate, based on the severity
and type of collision. The side impact sensors aid
the ORC in determining the appropriate response
to impact events. The system is calibrated to
deploy the Side Air Bags on the impact side of the
vehicle during impacts that require Side Air Bag
occupant protection. In side impacts, the Side Air
Bags deploy independently; a left side impact
deploys the left Side Air Bags only and a right-side
impact deploys the right Side Air Bags only. Vehicle
damage by itself is not a good indicator of whether
or not Side Air Bags should have deployed.
The Side Air Bags will not deploy in all side
collisions, including some collisions at certain
angles, or some side collisions that do not impact
the area of the passenger compartment. The Side
Air Bags may deploy during angled or offset frontal
collisions where the front air bags deploy.
Side Air Bags are a supplement to the seat belt
restraint system. Side Air Bags deploy in less time
than it takes to blink your eyes.
WARNING!
Do not mount equipment, or stack luggage or
other cargo up high enough to block the
deployment of the SABICs. The trim covering
above the side windows where the SABIC and
its deployment path are located should
remain free from any obstructions.
In order for the SABICs to work as intended, do
not install any accessory items in your vehicle
which could alter the roof. Do not add an after
-
market sunroof to your vehicle. Do not add
roof racks that require permanent attach -
ments (bolts or screws) for installation on the
vehicle roof. Do not drill into the roof of the
vehicle for any reason.
WARNING!
Occupants, including children, who are up
against or very close to Side Air Bags can be
seriously injured or killed. Occupants,
including children, should never lean on or
sleep against the door, side windows, or area
where the side air bags inflate, even if they are
in an infant or child restraint.
Seat belts (and child restraints where appro -
priate) are necessary for your protection in all
collisions. They also help keep you in position,
away from an inflating Side Air Bag. To get the
best protection from the Side Air Bags, occu -
pants must wear their seat belts properly and
sit upright with their backs against the seats.
Children must be properly restrained in a child
restraint or booster seat that is appropriate for
the size of the child.
22_RUP_OM_EN_USC_t.book Page 258
Page 380 of 384
378 Reformulated Gasoline
.................................. 361Refrigerant.................................................... 318Release, Hood................................................. 96Reminder, Lights On........................................ 65Reminder, Seat Belt...................................... 240Remote Control Starting System........................................... 19Remote Keyless EntryArm The Alarm............................................. 22Disarm The Alarm........................................ 22Programming Additional Key Fobs.............. 16Remote StartingExit Remote Start Mode.............................. 20Remote Starting System.................................. 19Replacement Bulbs....................................... 337Replacement Tires......................................... 349Reporting Safety Defects............................... 369Restraints, Child............................................ 262Restraints, Head.............................................. 52Roof Luggage Rack........................................ 106Rotation, Tires............................................... 355
S
Safety Checks Inside Vehicle......................... 279Safety Checks Outside Vehicle...................... 280Safety Defects, Reporting.............................. 369Safety Information, Tire................................. 339Safety Tips..................................................... 278Safety, Exhaust Gas....................................... 281
Schedule, Maintenance................................ 309Seat Belt Reminder....................................... 124Seat Belts............................................ 240, 279Adjustable Shoulder Belt.......................... 244Adjustable Upper Shoulder Anchorage..... 244Adjustable Upper Shoulder Belt Anchorage..................................... 244Automatic Locking Retractor (ALR)........... 247Child Restraints........................................ 262Energy Management Feature................... 247Extender................................................... 246Front Seat............................... 240, 241, 243Inspection................................................. 279Lap/Shoulder Belt Operation.................... 243Lap/Shoulder Belt Untwisting................... 243Lap/Shoulder Belts.................................. 241Operating Instructions.............................. 243Pregnant Women...................................... 247Pretensioners........................................... 247Rear Seat................................................. 241Reminder.................................................. 240Seat Belt Extender.................................... 246Seat Belt Pretensioner............................. 247Untwisting Procedure............................... 243Seat Belts Maintenance............................... 358Seats................................................. 33, 47, 51Adjustment............................. 33, 34, 35, 47Bench.......................................................... 35Heated......................................................... 51
Memory.......................................................32Power....................................................47, 49Rear Folding................................................33Reclining......................................................34Seatback Release.......................... 33, 34, 35Stow ‘n Go (Fold in Floor).............................42Tilting....................................................33, 34Security Alarm............................................... 124Arm The System...........................................22Disarm The System......................................22Selection Of Coolant (Antifreeze).................. 365Sentry Key (Immobilizer)..................................17Service Assistance........................................ 367Service Contract............................................ 368Service Manuals........................................... 370ShiftingAutomatic Transmission........................... 140Shoulder Belts.............................................. 241Side View Mirror Adjustment............................57Signals, Turn........................ 65, 128, 281, 338SmartBeams....................................................66Snow Chains (Tire Chains)............................ 353Snow Tires.................................................... 350Spare Tire Changing...................................... 286Spare Tire Stowage....................................... 294Spare Tires........................ 287, 350, 351, 352Spark Plugs................................................... 365
22_RUP_OM_EN_USC_t.book Page 378