CHRYSLER PACIFICA HYBRID 2023 Owners Manual
Manufacturer: CHRYSLER, Model Year: 2023, Model line: PACIFICA HYBRID, Model: CHRYSLER PACIFICA HYBRID 2023Pages: 328, PDF Size: 16.37 MB
Page 181 of 328
MULTIMEDIA179
Account Sign-in
The next step will be the option to sign in to your Amazon
account.
There are two options to sign into the system:
I already have an Amazon account: Sign in with an
already existing Amazon account
I am new to Amazon: Create a new Amazon Account
If “I am new to Amazon” is selected, follow the on-screen
steps to set up an Amazon account with the system.
Parental Controls
Another feature that will appear during this first time set
up is parental controls.
When the parental controls page appears, it will give the
options “Enable Parental Controls” and “No Parental
Controls”. If “Enable Parental Controls” is selected, follow
the on-screen steps to set up parental controls for the
system.
ALEXA VOICE CONTROL
A feature with Rear Seat Entertainment with Fire TV
built-in that enhances your experience is Alexa. It is simple
to get started using this feature. Push the Microphone
button at the top of the Voice Remote with Alexa to
activate Alexa and get started.
LISTEN VIA VEHICLE SPEAKERS
A feature within Rear Seat Entertainment with Fire TV
built-in is the front radio Listen feature. On the front radio
Home screen for Fire TV, select the Listen button in the top
right corner on either card for Screen 1 or 2. This will allow
you to have either rear screen play audio through all the
speakers in the vehicle.
QUICK MENU
Accessing the quick menu will give you more options for
Fire TV.
To access the quick menu, tap the screen and it will
appear. The quick menu is also accessible by pushing the
Gear/Settings button on the Voice Remote with Alexa.
Some options of the quick menu are:
Power — This will power the screen off.
On-Screen Remote — This will bring up the on-screen
remote to use with the system.
Back — This will let you go back a page.
Home — This will take you to the Home screen.
Gear/Settings — This will let you access certain settings
in the system. For more setting options, select
“Settings” within the on-screen Gear/Settings menu.
Vehicle — This will bring up the Vehicle menu. From
here you can adjust rear climate controls and the Are
We There Yet? app.
PARENTAL CONTROLS (USING THE REAR
S
CREENS)
If parental controls were not set during the first time start
up of the system, they can be set by following these steps:
1. Push the Gear/Settings button on the Voice Remote
with Alexa or tap the screen to access Settings in the
“quick menu”.
2. Select the Gear/Settings icon on the screen.
3. Select “Settings” on the screen.
4. While in Settings, select “Preferences”.
5. Select “Parental Controls”; from here you can turn Parental Controls on or off and set up a PIN for the
controls using the Voice Remote with Alexa.
VOICE REMOTE WITH ALEXA PAIRING
(U
SING THE REAR SCREENS)
If the Voice Remote with Alexa needs to be paired again or
a new remote is being paired, follow these procedures:
1. Install batteries into the remote.
2. Tap the screen and Select the Gear/Settings icon on
the screen.
3. Select “Settings” on the screen.
4. In Settings, select “Controllers & Bluetooth® Devices”.
5. From this menu, select “Add New Remote”.
6. Follow the on-screen steps for Voice Remote with Alexa pairing.
5
23_RUP_OM_EN_USC_t.book Page 179
Page 182 of 328
180MULTIMEDIA
A long press on the Home button can also re-pair a Voice
Remote with Alexa that has become disconnected.
NOTE:Your vehicle is included with two Voice Remotes with
Alexa. A Voice Remote with Alexa can be paired to each
rear screen. It will function with the rear screen it was
paired with. The pairing steps will need to be done for each
rear screen.
MEDIA SOURCES INPUT (USING THE
F
RONT RADIO AND REAR SCREENS)
Front Radio Screen
Inputs available within Launch Source under “Inputs” are
“Fire TV”, “HDMI”, “Blu-ray™”, “DVD”, and “USB”.
Rear Screens
To select inputs on the rear screen, scroll down on the Fire
TV Home screen and select your desired input under
“Input”.
Inputs can also be selected from the Brand tab in the top
menu. While in this tab, scroll down to “Inputs” for
selection options.
NOTE:The Brand tab naming in the top menu will depend on the
naming of the vehicle’s brand.
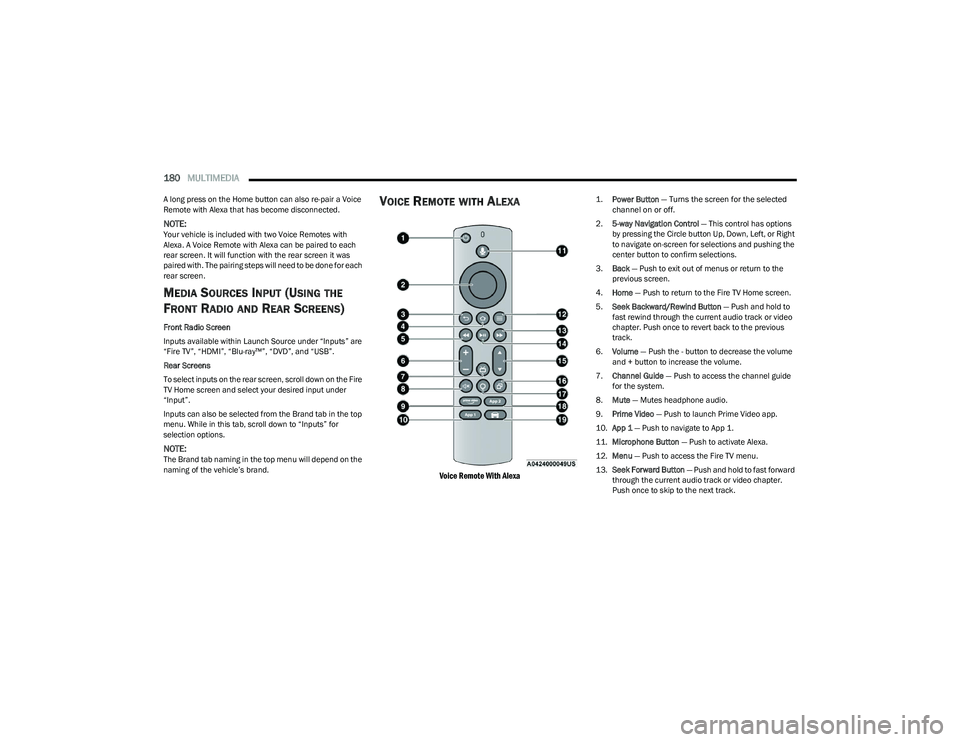
VOICE REMOTE WITH ALEXA
Voice Remote With Alexa
1.
Power Button
— Turns the screen for the selected
channel on or off.
2. 5-way Navigation Control — This control has options
by pressing the Circle button Up, Down, Left, or Right
to navigate on-screen for selections and pushing the
center button to confirm selections.
3. Back — Push to exit out of menus or return to the
previous screen.
4. Home — Push to return to the Fire TV Home screen.
5. Seek Backward/Rewind Button — Push and hold to
fast rewind through the current audio track or video
chapter. Push once to revert back to the previous
track.
6. Volume — Push the - button to decrease the volume
and + button to increase the volume.
7. Channel Guide — Push to access the channel guide
for the system.
8. Mute — Mutes headphone audio.
9. Prime Video — Push to launch Prime Video app.
10. App 1 — Push to navigate to App 1.
11. Microphone Button — Push to activate Alexa.
12. Menu — Push to access the Fire TV menu.
13. Seek Forward Button — Push and hold to fast forward
through the current audio track or video chapter.
Push once to skip to the next track.
23_RUP_OM_EN_USC_t.book Page 180
Page 183 of 328
MULTIMEDIA181
14.Play/Pause Button ‖ — Begin/resume or pause disc
play.
15. Channel +/- — Push the up or down arrow button on
the Channel button to browse channels available in
Fire TV.
16. Recent — Push to access recently viewed content on
Fire TV.
17. Gear/Settings — Push to bring up setting options for
Fire TV.
18. App 2 — Push to launch App 2.
19. Vehicle Button — Push to activate the Vehicle menu.
Replacing the Voice Remote with Alexa
Batteries
Each Voice Remote with Alexa requires two AAA batteries
for operation.
To replace the batteries:
1. Locate the battery compartment on the back of the
Voice Remote with Alexa, then slide the battery
cover downward.
2. Remove the old batteries and follow battery recycling procedures for your area.
3. Install new batteries, making sure to orient them according to the polarity diagram shown inside the
battery compartment.
4. Slide the battery compartment cover back on.
REAR SEAT ENTERTAINMENT WITH FIRE
TV
BUILT-IN STREAMING (USING THE
F
RONT RADIO AND REAR SCREENS)
Access Using Launch Source
To access Rear Seat Entertainment with Fire TV built-in
from the front radio, press the Media tab located on the
bottom menu bar. Then select the Rear Seat option
located on the top menu bar. Select “Launch Source”, and
then under “Inputs” select “Fire TV Home”.
Access Using Browse Media
Selecting “Browse Media” on the front radio screen will
give access to different media within Rear Seat
Entertainment with Fire TV built-in.
These options will be in the top menu of “Browse Media”
and include:
Fire TV — Selecting “Fire TV” will show streaming
options for categories and to select apps. This option
will be selectable on the left slider menu in “Browse
Media”. While in “Browse Media” under Fire TV, it will
display recent activity under “Recent”. This will display
recent videos viewed from Fire TV and recent down -
loads as well.
USB Video — Under “USB Videos”, videos will appear
that are options with a USB device connected to Rear
Seat Entertainment with Fire TV built-in.
USB Music — Under “USB Music”, music will appear
that are options with a USB device connected to Rear
Seat Entertainment with Fire TV built-in. Access Using the Voice Remote with Alexa and Rear
Screens
Rear passengers will be able to access some options for
streaming by pressing the “Prime Video”, “App 1”, or
“App 2” button on the Voice Remote with Alexa. Selecting
one of those buttons on the Voice Remote with Alexa will
take you to the home page for that respective streaming
service. Turning on either of the rear screens will launch
Fire TV. By default, the rear screens will always launch in
Fire TV. More streaming options can be selected on the
Fire TV home page.
Fire TV
Fire TV is your source for online streaming with Rear Seat
Entertainment with Fire TV built-in.
NOTE:A data source needs to be connected to the system for
streaming to be accessible. This can be set up when Fire
TV is turned on for the first time from the rear screens.
Some of these options can be an in-vehicle 4G Wi-Fi hot
spot, capable Wi-Fi hot spot from a mobile device, or Wi-Fi
from an outside source like a home or a garage.
To access Fire TV on the front screen, select “Launch
Source” on the front touchscreen, rear seat screen, and
then “Fire TV Home” under “Inputs”.
Viewing from the front radio screen mirrors or controls the
Fire TV experience from one of the rear Fire TV displays.
The menu bar for Fire TV will have the options for “Home”,
“Find”, “Library”, “Brand”, and “Live”.
Below the menu bar will be streaming options linked to
your Prime account like “Prime Video”.
5
23_RUP_OM_EN_USC_t.book Page 181
Page 184 of 328
182MULTIMEDIA
The front radio screen offers some options:
Power — This will turn Fire TV on or off.
Screen 1 and Screen 2 Toggle — This toggles between
the Rear Screens (for use with front radio screen only).
Collapse — While viewing on the front radio screen, this
will collapse the screen to dashboard view.
Source Drawer — This will open the “Source Drawer”
and the source logo will be displayed on the icon.
Browse Media — This will open the “Browse Media”
pop-up.
Back — This will let you go back the previous page.
Fire TV Home — This will take you back to the Fire TV
home page.
Menu — This will open the Fire TV menu.
Remote icon — This will display the on-screen remote.
NOTE:Front radio screen mirroring and watching can only be
done when the vehicle is in PARK. The vehicle must be in
an active and usable cellular range and properly equipped
with a Uconnect 5 NAV system and Rear Seat Enter -
tainment with Fire TV package. For streaming, a Wi-Fi
connection and registered Amazon account are required
to run Fire TV in the vehicle. Streaming service subscrip -
tions are not included. Services and features are subject
to change or withdrawal at any time, may not be available
in all areas and languages, and may require separate
subscriptions.
PLAY A BLU-RAY™ OR DVD —
I
F EQUIPPED
Playing a Blu-ray™ or DVD from the Front Radio Screen
1. Insert a Blu-ray™ disc or DVD disc into the disc
player with the label facing up.
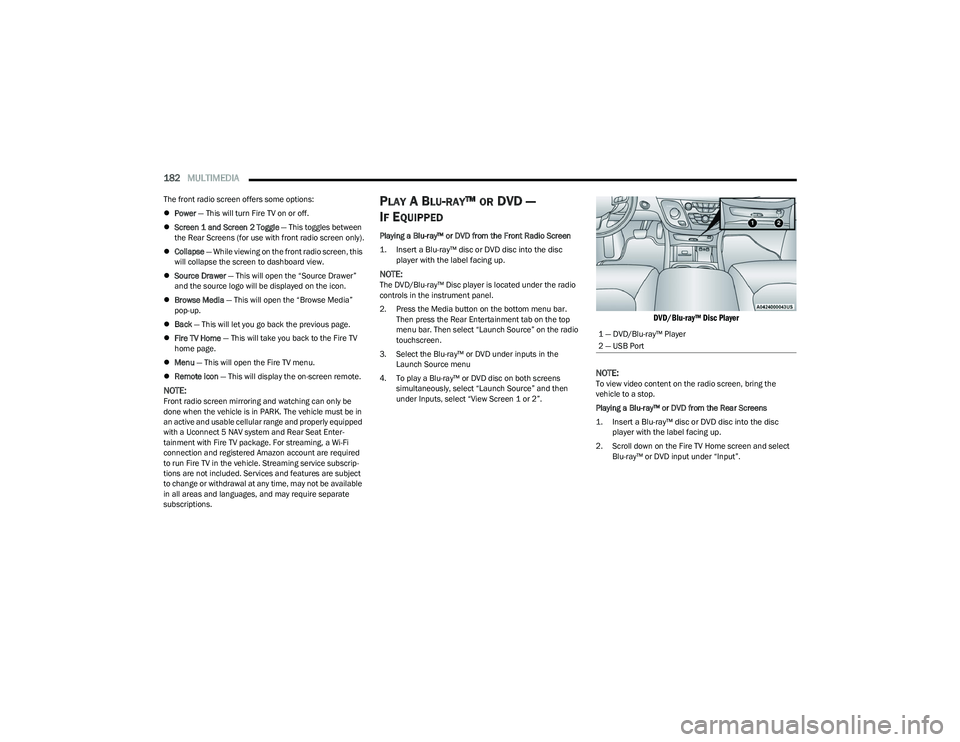
NOTE:The DVD/Blu-ray™ Disc player is located under the radio
controls in the instrument panel.
2. Press the Media button on the bottom menu bar. Then press the Rear Entertainment tab on the top
menu bar. Then select “Launch Source” on the radio
touchscreen.
3. Select the Blu-ray™ or DVD under inputs in the Launch Source menu
4. To play a Blu-ray™ or DVD disc on both screens simultaneously, select “Launch Source” and then
under Inputs, select “View Screen 1 or 2”.
DVD/Blu-ray™ Disc Player
NOTE:
To view video content on the radio screen, bring the
vehicle to a stop.
Playing a Blu-ray™ or DVD from the Rear Screens
1. Insert a Blu-ray™ disc or DVD disc into the disc player with the label facing up.
2. Scroll down on the Fire TV Home screen and select Blu-ray™ or DVD input under “Input”.
1 — DVD/Blu-ray™ Player
2 — USB Port
23_RUP_OM_EN_USC_t.book Page 182
Page 185 of 328
MULTIMEDIA183
FIRE TV APPS/GAMES (USING THE
R
EAR SCREENS)
Apps and games can be accessed using Rear Seat
Entertainment with Fire TV built-in.
To access Apps on the rear screen, turn on the system and
select “Find” in the top menu. On the Find page, select
“App store®”. Within the App store® you can purchase
apps and games. From here you can also select from all
the apps and games that have been purchased.
USING THE VIDEO USB PORT
Plug in a USB drive or mass storage device and play your
favorite music or movies.
NOTE:To view USB media on the rear screens, insert a USB drive
into the port next to the DVD/Blu-ray™ Disc player. The
USB drive port is located under the radio controls in the
instrument panel.
On the rear screen you can browse the content of the USB
device by going to the USB source in the inputs. Use the
search feature to find your media faster.
PLAY VIDEO GAMES
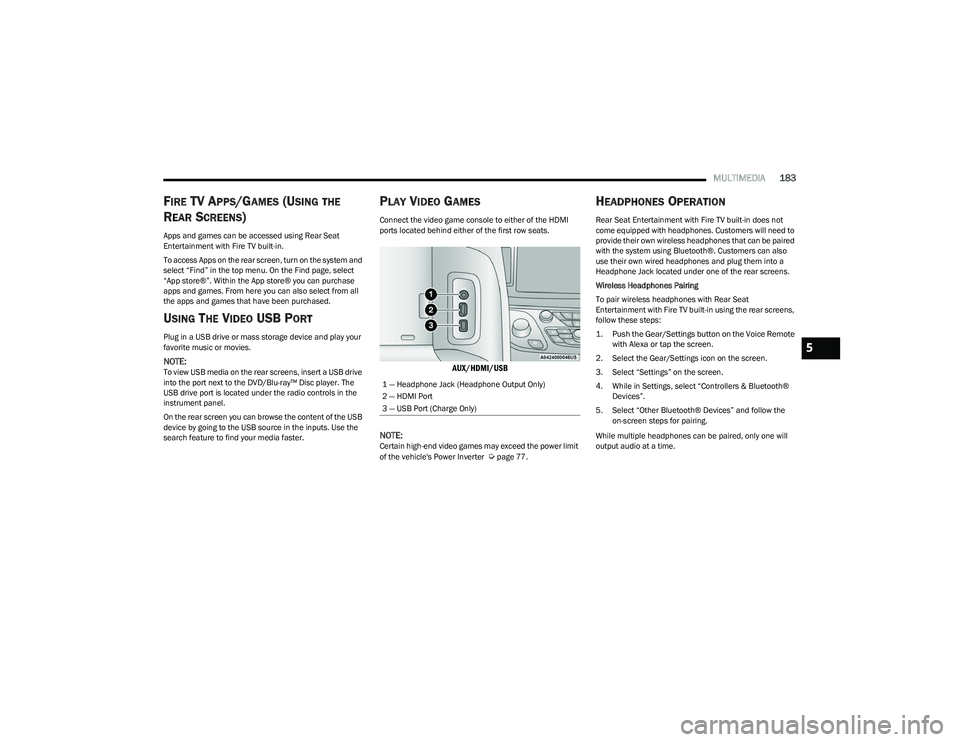
Connect the video game console to either of the HDMI
ports located behind either of the first row seats.
AUX/HDMI/USB
NOTE:
Certain high-end video games may exceed the power limit
of the vehicle's Power Inverter Úpage 77.
HEADPHONES OPERATION
Rear Seat Entertainment with Fire TV built-in does not
come equipped with headphones. Customers will need to
provide their own wireless headphones that can be paired
with the system using Bluetooth®. Customers can also
use their own wired headphones and plug them into a
Headphone Jack located under one of the rear screens.
Wireless Headphones Pairing
To pair wireless headphones with Rear Seat
Entertainment with Fire TV built-in using the rear screens,
follow these steps:
1. Push the Gear/Settings button on the Voice Remote with Alexa or tap the screen.
2. Select the Gear/Settings icon on the screen.
3. Select “Settings” on the screen.
4. While in Settings, select “Controllers & Bluetooth® Devices”.
5. Select “Other Bluetooth® Devices” and follow the on-screen steps for pairing.
While multiple headphones can be paired, only one will
output audio at a time.
1 — Headphone Jack (Headphone Output Only)
2 — HDMI Port
3 — USB Port (Charge Only)
5
23_RUP_OM_EN_USC_t.book Page 183
Page 186 of 328
184MULTIMEDIA
REAR CLIMATE CONTROLS
The Rear Climate Controls can also be controlled using Rear Seat Entertainment with Fire TV built-in Úpage 60.
Rear Climate Controls can be accessed by using the Vehicle menu. Tap on either rear screen and select the Vehicle icon or press the Vehicle button on the Voice Remote with Alexa.
Then select the Rear Climate Controls option.
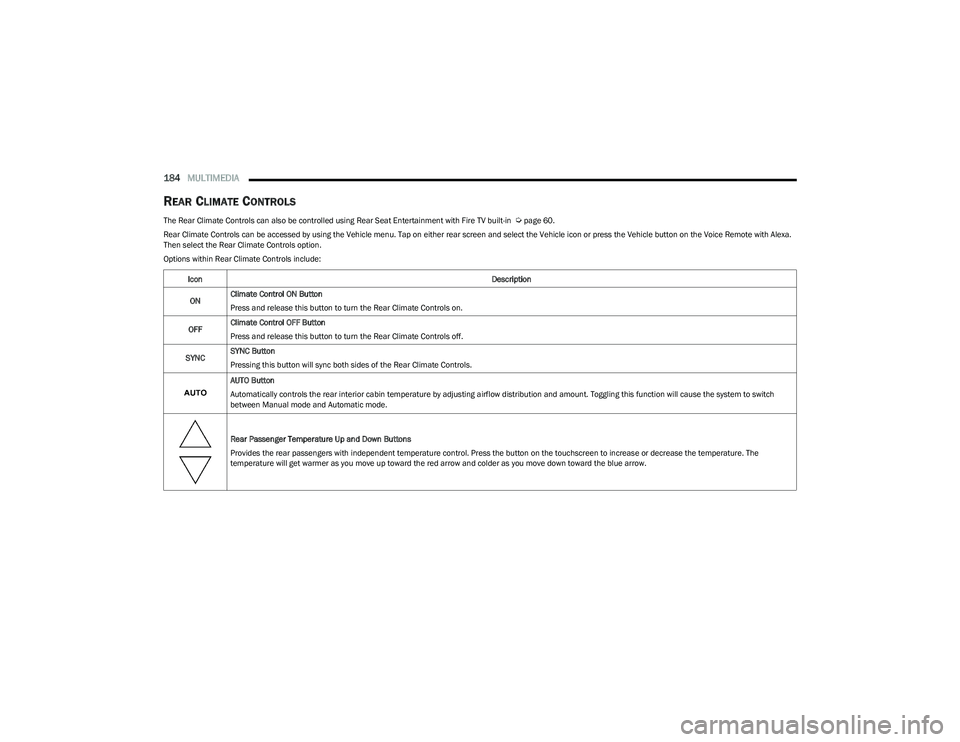
Options within Rear Climate Controls include:
Icon Description
ON Climate Control ON Button
Press and release this button to turn the Rear Climate Controls on.
OFF Climate Control OFF Button
Press and release this button to turn the Rear Climate Controls off.
SYNC SYNC Button
Pressing this button will sync both sides of the Rear Climate Controls.
AUTO Button
Automatically controls the rear interior cabin temperature by adjusting airflow distribution and amount. Toggling this function will cause the system to switch
between Manual mode and Automatic mode.
Rear Passenger Temperature Up and Down Buttons
Provides the rear passengers with independent temperature control. Press the button on the touchscreen to increase or decrease the temperature. The
temperature will get warmer as you move up toward the red arrow and colder as you move down toward the blue arrow.
23_RUP_OM_EN_USC_t.book Page 184
Page 187 of 328
MULTIMEDIA185
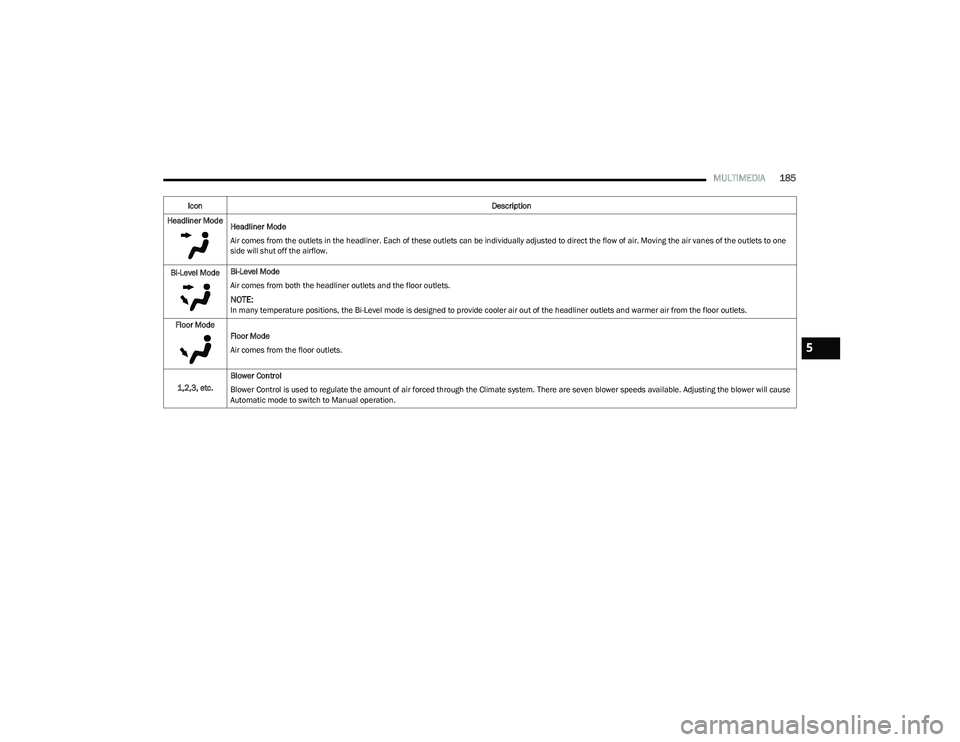
Headliner Mode
Headliner Mode
Air comes from the outlets in the headliner. Each of these outlets can be individually adjusted to direct the flow of air. Moving the air vanes of the outlets to one
side will shut off the airflow.
Bi-Level Mode Bi-Level Mode
Air comes from both the headliner outlets and the floor outlets.
NOTE:In many temperature positions, the Bi-Level mode is designed to provide cooler air out of the headliner outlets and warmer air from the floor outlets.
Floor Mode Floor Mode
Air comes from the floor outlets.
1,2,3, etc. Blower Control
Blower Control is used to regulate the amount of air forced through the Climate system. There are seven blower speeds available. Adjusting the blower will cause
Automatic mode to switch to Manual operation.
Icon
Description
5
23_RUP_OM_EN_USC_t.book Page 185
Page 188 of 328
186MULTIMEDIA
LEGAL & COMPLIANCE
To access Legal and Compliance information about Rear
Seat Entertainment with Fire TV built-in from the rear
screens, follow these steps:
1. Push the Gear/Settings button on the Voice Remote
with Alexa or tap the screen.
2. Select the Gear/Settings icon on the screen.
3. Select “Settings” on the screen.
4. While in the Settings menu, select “My Fire TV” and then “Legal & Compliance”.
RADIO OPERATION AND MOBILE PHONES
Under certain conditions, the mobile phone being on in
your vehicle can cause erratic or noisy performance from
your radio. This condition may be lessened or eliminated
by repositioning the mobile phone within the vehicle. This
condition is not harmful to the radio. If your radio
performance does not satisfactorily improve from
repositioning the mobile phone, it is recommended that
the volume be turned down or off during mobile phone
operation when not using the Uconnect system.
REGULATORY AND SAFETY
I
NFORMATION
US/CANADA
Exposure to Radio Frequency Radiation
The radiated output power of the internal wireless radio is
far below the FCC and IC radio frequency exposure limits.
Nevertheless, the wireless radio will be used in such a
manner that the radio is 8 inches (20 cm) or further from
the human body.
The internal wireless radio operates within guidelines
found in radio frequency safety standards and
recommendations, which reflect the consensus of the
scientific community.
The radio manufacturer believes the internal wireless
radio is safe for use by consumers. The level of energy
emitted is far less than the electromagnetic energy
emitted by wireless devices such as mobile phones.
However, the use of wireless radios may be restricted in
some situations or environments, such as aboard
airplanes. If you are unsure of restrictions, you are
encouraged to ask for authorization before turning on the
wireless radio
Úpage 312.
23_RUP_OM_EN_USC_t.book Page 186
Page 189 of 328
187
(Continued)
SAFETY
SAFETY FEATURES
ANTI-LOCK BRAKE SYSTEM (ABS)
If applicable, refer to the “Hybrid Supplement” for
additional information.
The ABS provides increased vehicle stability and brake
performance under most braking conditions. The system
automatically prevents wheel lock and enhances vehicle
control during braking.
The ABS performs a self-check cycle to ensure that the
ABS is working properly each time the vehicle is started
and driven. During this self-check, you may hear a slight
clicking sound as well as some related motor noises.
The ABS is activated during braking when the system
detects one or more wheels are beginning to lock. Road
conditions such as ice, snow, gravel, bumps, railroad
tracks, loose debris, or panic stops may increase the
likelihood of ABS activation(s).
You also may experience the following normal
characteristics when the ABS activates:
ABS motor noise or clicking sounds (you may continue
to hear for a short time after the stop)
Brake pedal pulsations
A slight drop of the brake pedal at the end of the stop The ABS is designed to function with the Original
Equipment Manufacturer (OEM) tires. Modification may
result in degraded ABS performance.
Anti-Lock Brake System (ABS) Warning
Light
The yellow ABS Warning Light will turn on when the ignition
is placed in the ON/RUN mode and may stay on for as long
as four seconds.
If the ABS Warning Light remains on or comes on while
driving, it indicates that the anti-lock portion of the brake
system is not functioning and that service is required.
However, the conventional brake system will continue to
operate normally if the ABS Warning Light is on.
If the ABS Warning Light is on, the brake system should be
serviced as soon as possible to restore the benefits of
Anti-Lock Brakes. If the ABS Warning Light does not come
on when the ignition is placed in the ON/RUN mode, have
the light repaired as soon as possible.
WARNING!
The ABS contains sophisticated electronic equip -
ment that may be susceptible to interference caused
by improperly installed or high output radio transmit -
ting equipment. This interference can cause possible
loss of anti-lock braking capability. Installation of
such equipment should be performed by qualified
professionals.
Pumping of the Anti-Lock Brakes will diminish their
effectiveness and may lead to a collision. Pumping
makes the stopping distance longer. Just press firmly
on your brake pedal when you need to slow down or
stop.
The ABS cannot prevent the natural laws of physics
from acting on the vehicle, nor can it increase
braking or steering efficiency beyond that afforded
by the condition of the vehicle brakes and tires or the
traction afforded.
The ABS cannot prevent collisions, including those
resulting from excessive speed in turns, following
another vehicle too closely, or hydroplaning.
The capabilities of an ABS equipped vehicle must
never be exploited in a reckless or dangerous
manner that could jeopardize the user’s safety or the
safety of others.
WARNING!
6
23_RUP_OM_EN_USC_t.book Page 187
Page 190 of 328
188SAFETY
ELECTRONIC BRAKE CONTROL (EBC)
S
YSTEM
Your vehicle is equipped with an advanced Electronic
Brake Control (EBC) system. This system includes
Anti-Lock Brake System (ABS), Brake Assist System (BAS),
Electronic Brake Force Distribution (EBD), Electronic Roll
Mitigation (ERM), Electronic Stability Control (ESC), Hill
Start Assist (HSA), and Traction Control System
(TCS).These systems work together to enhance both
vehicle stability and control in various driving conditions.
Your vehicle may also be equipped with Dynamic Steering
Torque (DST), Ready Alert Braking (RAB), Rain Brake
Support (RBS) and Trailer Sway Control (TSC).
Brake Assist System (BAS)
The BAS is designed to optimize the vehicle’s braking
capability during emergency braking maneuvers. The
system detects an emergency braking situation by sensing
the rate and amount of brake application and then applies
optimum pressure to the brakes. This can help reduce
braking distances. The BAS complements the Anti-Lock
Brake System (ABS). Applying the brakes very quickly
results in the best BAS assistance. To receive the benefit
of the system, you must apply continuous braking
pressure during the stopping sequence (do not “pump”
the brakes). Do not reduce brake pedal pressure unless
braking is no longer desired. Once the brake pedal is
released, the BAS is deactivated.
Brake System Warning Light
The red Brake System Warning Light will turn on when the
ignition is placed in the ON/RUN mode and may stay on for
as long as four seconds.
If the Brake System Warning Light remains on or comes on
while driving, it indicates that the brake system is not
functioning properly and that immediate service is
required. If the Brake System Warning Light does not
come on when the ignition is placed in the ON/RUN mode,
have the light repaired as soon as possible.
Dynamic Steering Torque (DST)
DST is a feature of the ESC and Electric Power Steering
(EPS) modules that provides torque at the steering wheel
for certain driving conditions in which the ESC module is
detecting vehicle instability. The torque that the steering
wheel receives is only meant to help the driver realize
optimal steering behavior in order to reach/maintain vehicle stability. The only notification the driver receives
that the feature is active, is the torque applied to the
steering wheel.
NOTE:The DST feature is only meant to help the driver realize the
correct course of action through small torques on the
steering wheel, which means the effectiveness of the DST
feature is highly dependent on the driver’s sensitivity and
overall reaction to the applied torque. It is very important
to realize that this feature will not steer the vehicle,
meaning the driver is still responsible for steering the
vehicle.
Electronic Brake Force Distribution (EBD)
The EBD function manages the distribution of the braking
torque between the front and rear axles by limiting braking
pressure to the rear axle. This is done to prevent overslip
of the rear wheels to avoid vehicle instability, and to
prevent the rear axle from entering the Anti-Lock Brake
System (ABS) before the front axle.
Electronic Roll Mitigation (ERM)
ERM anticipates the potential for wheel lift by monitoring
the driver’s steering wheel input and the speed of the
vehicle. When ERM determines that the rate of change of
the steering wheel angle and vehicle’s speed are
sufficient to potentially cause wheel lift, it then applies the
appropriate brake and may also reduce engine power to
lessen the chance that wheel lift will occur. ERM can only
reduce the chance of wheel lift occurring during severe or
evasive driving maneuvers; it cannot prevent wheel lift
due to other factors, such as road conditions, leaving the
roadway, striking objects or other vehicles.
WARNING!
The Brake Assist System (BAS) cannot prevent the
natural laws of physics from acting on the vehicle, nor
can it increase the traction afforded by prevailing road
conditions. BAS cannot prevent collisions, including
those resulting from excessive speed in turns, driving
on very slippery surfaces, or hydroplaning. The
capabilities of a BAS-equipped vehicle must never be
exploited in a reckless or dangerous manner, which
could jeopardize the user's safety or the safety of
others.
23_RUP_OM_EN_USC_t.book Page 188