CHRYSLER SEBRING COUPE 2005 2.G Owners Manual
Manufacturer: CHRYSLER, Model Year: 2005, Model line: SEBRING COUPE, Model: CHRYSLER SEBRING COUPE 2005 2.GPages: 394, PDF Size: 2.47 MB
Page 321 of 394
BATTERY
The condition of the battery is very important for quick
starting and to keep the vehicle's electrical system work-
ing properly. Check the battery regularly.
If battery performance is suspect, have the battery and
charging system tested by an authorized Mitsubishi
dealer.
NOTE
(1) After replacing the battery, the electronic control
system data for the automatic transaxle, etc., will be
erased. As a result, shifting may be rough.
Shifting will become smoother after several changes
in speed.
(2) Memory data for settings made by the user may be
erased when the battery is replaced. If this happens,
establish the settings again using the relevant proce-
dures.
Checking battery electrolyte level
Use the following procedure to check the battery electro-
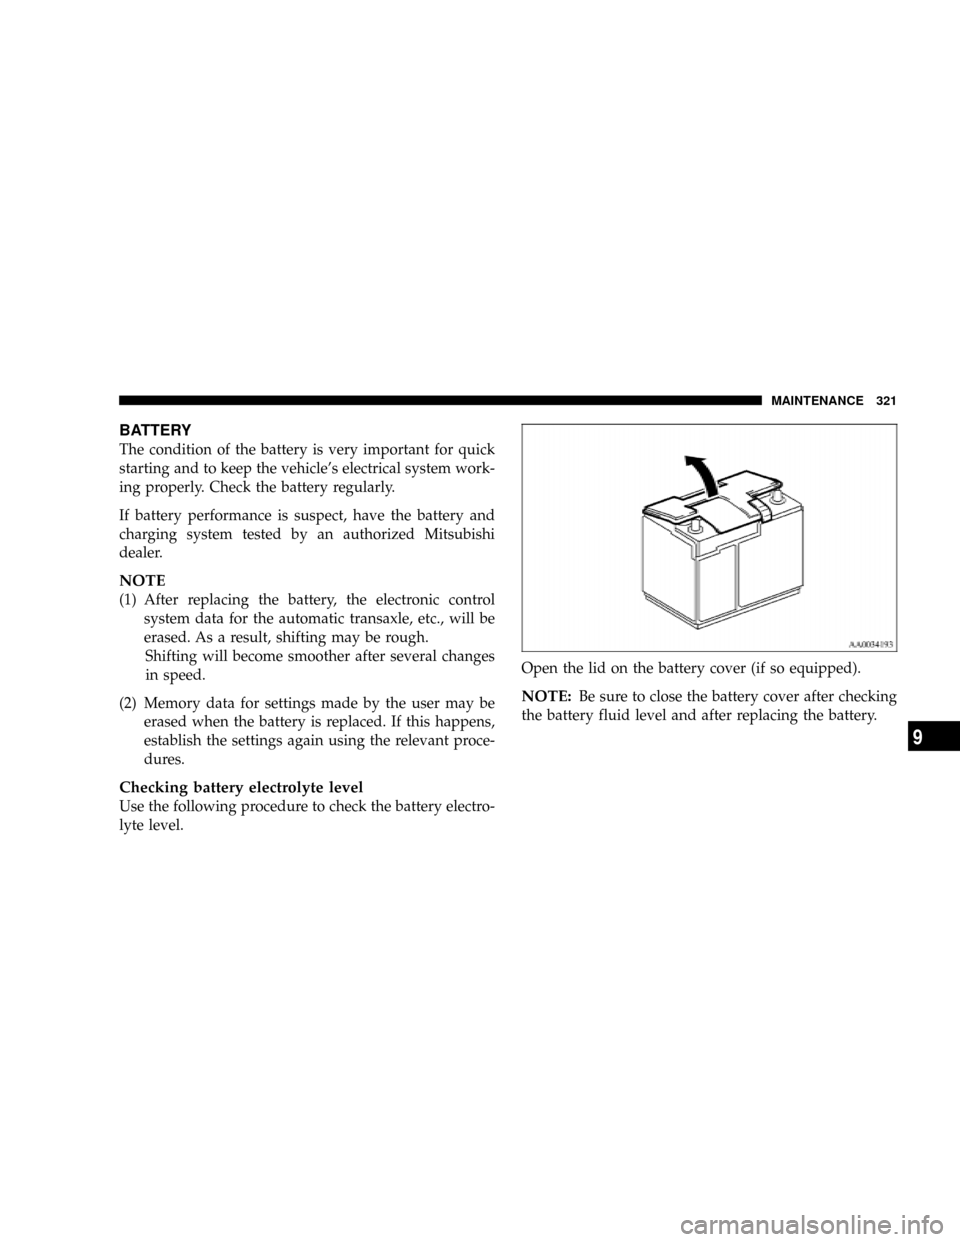
lyte level.Open the lid on the battery cover (if so equipped).
NOTE:Be sure to close the battery cover after checking
the battery fluid level and after replacing the battery.
MAINTENANCE 321
9
Page 322 of 394
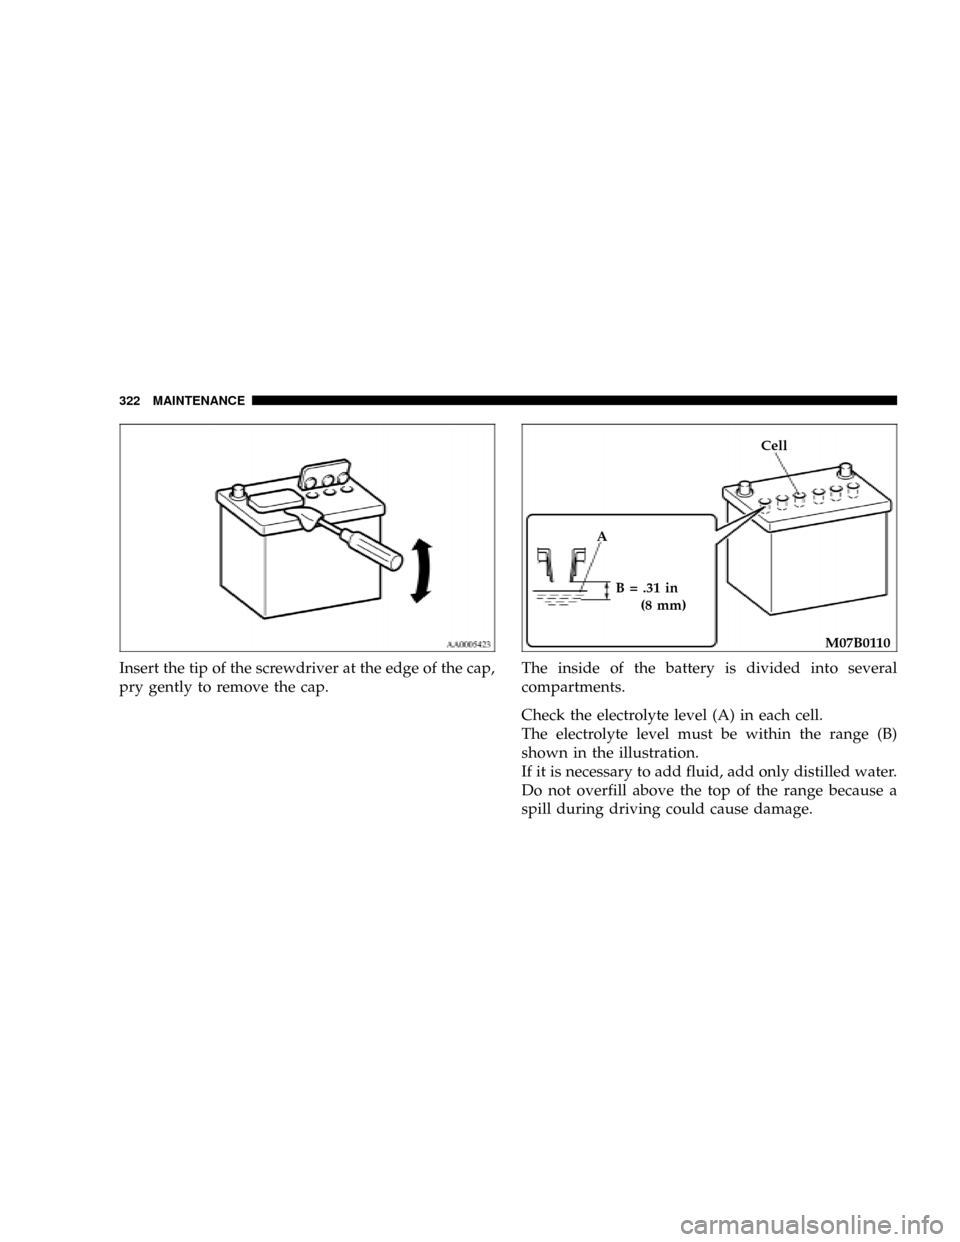
Insert the tip of the screwdriver at the edge of the cap,
pry gently to remove the cap.The inside of the battery is divided into several
compartments.
Check the electrolyte level (A) in each cell.
The electrolyte level must be within the range (B)
shown in the illustration.
If it is necessary to add fluid, add only distilled water.
Do not overfill above the top of the range because a
spill during driving could cause damage.
Cell
A
B = .31 in
(8 mm)
M07B0110
322 MAINTENANCE
Page 323 of 394
WARNING!
²If the battery goes flat, be sure to check the battery
electrolyte level before connecting booster cables.
²After checking the battery electrolyte level, make
sure the caps are fitted securely.
²If any of the caps has a loose fit, replace the
battery.
During cold weather
The capacity of the battery is reduced at low tempera-
tures. This is the result of its chemical and physical
properties and this is why a very cold battery, particu-
larly one that is not fully charged, will only deliver a
fraction of the starter current that is normally available.
It is recommended that you have the battery checked by
an authorized dealer before the start of cold weather and,
if necessary, have it charged or replaced. This not only
ensures reliable starting, but prolongs battery life.
Disconnection and connection
To disconnect the battery cable, stop the engine, discon-
nect the negative terminal first, then the positive termi-
nal. To reconnect the battery, first connect the positive
terminal and then the negative terminal, before starting
the vehicle.
MAINTENANCE 323
9
Page 324 of 394
WARNING!
²Never disconnect the battery while the engine is
running; doing so could damage the vehicle's
electrical components.
²Never short-circuit the battery; doing so could
cause it to overheat and be damaged.
²Keep sparks, cigarettes and flames away from the
battery because the battery may produce an explo-
sion.
²Electrolyte (battery acid) is corrosive diluted sul-
furic acid. If electrolyte comes in contact with,
your hands, eyes, clothes, or the coated surface of
your vehicle, thoroughly flush the area with wa-
ter. If electrolyte gets in your eyes, flush them
with water immediately and get prompt medical
attention.
WARNING!
²Ventilate the area when charging or using the
battery in an enclosed space.
²Always wear protective clothing and goggles
when working with the battery, or have a skilled
technician do it.
²If the battery is to be quick-charged, first discon-
nect the battery cables from the vehicle.
²In order to prevent a short circuit, be sure to
disconnect the negative(-) terminal first, and re-
connect it last.
²If the electrolyte level is very low, have the battery
checked at an authorized dealer.
²Battery posts, terminals and related accessories
contain lead and lead compounds. Wash hands
after handling.
324 MAINTENANCE
Page 325 of 394

NOTE
1. Check each battery terminal for corrosion. If necessary,
neutralize corrosion by washing with a solution of bak-
ing soda and water. Apply grease to posts and clamps
after cleaning or tightening.
2. Before cleaning the battery, tighten all filler port caps
to prevent foreign matter from entering the battery.
3. Check to see if the battery is securely installed and
cannot be moved. Also check each terminal for tightness.
4. When the vehicle is to be left unused for a long period
of time, remove the battery and store it in a place where
the battery fluid will not freeze. The battery should be
stored only in a fully charged condition.
AUTOMATIC TRANSAXLE
The automatic transaxle should be maintained and ser-
viced by an authorized dealer to obtain the best perfor-
mance and maximize life. It is important that the trans-
axle fluid be maintained at the level prescribed.
M05A0530
Good
MAINTENANCE 325
9
Page 326 of 394

To check the fluid level
The fluid level should be checked when the engine
temperature gauge indicates a normal warmed up con-
dition and the fluid in the transaxle is heated to its
normal operating temperature. Operation with an im-
proper fluid level will greatly reduce the life of the
transaxle and the fluid.
Procedure for checking the fluid level
1. With the parking brake engaged and the engine idling,
select each gear momentarily, ending with the selector
lever in the ªNº (NEUTRAL) position.
2. The fluid level should be at the HOT mark, but never
above the HOT mark when the engine is at its normal
warmed up condition. Add or drain as necessary to bring
the fluid to this prescribed level.
3. Make certain that the dipstick cap is reseated properly
to prevent dirt and water from entering the transaxle.
WARNING!
Transaxle fluid is extremely flammable and poison-
ous. Do not spill fluid when adding or draining.
To add or change the fluid
Use only recommended Mopar ATF+4 automatic trans-
mission fluid to ensure optimum transaxle performance.
M05A0460
Drain plug
326 MAINTENANCE
Page 327 of 394

Special additives
DaimlerChrysler does not recommend the addition of
any fluid additives to the transaxle.
MANUAL TRANSAXLE
Add oil to maintain the proper level. Refill or change oil
according to the scheduled maintenance table.
Lubricant Gear Oil Classification GL-4
Viscosity range SAE75W-90 or 75W-85W
DISC BRAKE PADS, REAR DRUM BRAKE
LININGS AND REAR WHEEL CYLINDERS
Proper brakes are essential to safe operation of your
vehicle. Check brake pads and rear brake linings for
wear, and check rear wheel cylinders for leakage.
For proper braking performance, replace brake pads with
original equipment type pads.
BRAKE HOSES
Brake hoses and tubing should be checked for:
1. Severe surface cracking, scuffing or worn spots. If the
casing of the hose is exposed by cracks or abrasions in therubber hose cover, the hose should be replaced. Deterio-
ration of the hose could cause brake failure.
2. Faulty installation may cause twisting, or wheel, tire
or chassis interference.
BALL JOINT, STEERING LINKAGE SEAL AND
DRIVE SHAFT BOOTS
Check the following parts for damage and grease leak-
age:
1. Ball joint boots of the front suspension and steering
linkage
2. Bellows on both ends of the drive shaft
SUPPLEMENTAL RESTRAINT SYSTEM (SRS)
The entire SRS system must be inspected by an autho-
rized dealer 10 years after the vehicle manufacture date
shown on the certification label. [See ªSRS servicingº on
page 100.]
MAINTENANCE 327
9
Page 328 of 394
HOOD LOCK RELEASE MECHANISM AND
SAFETY CATCH
The hood lock release mechanism and hood safety catch
should be inspected, cleaned, and lubricated as required
to maintain ease of operation and to provide protection
against rust and wear. Apply Multipurpose Grease NLGI
Grade 2 sparingly to all sliding contact areas of the hood
latch and release lever. Work lubricant into the hood lock
mechanism until all frictional surfaces are covered.
Also, apply a film of the same lubricant to the pivot
contact areas of the safety catch.
EXHAUST SYSTEM
WARNING!
Carbon monoxide gas found in the vehicle's exhaust
is poisonous. Inhalation of exhaust fumes can cause
unconsciousness or death.
The best protection against carbon monoxide entry into
the vehicle interior is a properly maintained engine
exhaust system.Whenever a change is noticed in the sound of the exhaust
system; when exhaust fumes can be detected inside the
vehicle; or when the underside or rear of the vehicle is
damaged, have a competent technician inspect the com-
plete exhaust system and adjacent body areas for broken,
damaged, deteriorated, or mispositioned parts.
In addition inspect the exhaust system each time the
vehicle is raised for lubrication or oil change. Replace as
required.
Open seams or loose connections could permit danger-
ous exhaust fumes to seep into the trunk and passenger
compartments.
Do this service when performing underbody service.
Check for any of the following conditions:
1. Check for holes or exhaust gas leakage caused by
corrosion or damage.
2. Check the joints and connections for looseness or
exhaust gas leakage.
3. Check the rubber hangers and brackets for damage.
328 MAINTENANCE
Page 329 of 394

WINDSHIELD WIPER BLADES
Check the wiper blades occasionally. Periodic cleaning of
the wiper blades is suggested to remove the accumula-
tion of salt and road film. The wiper blade arms and glass
areas should be cleaned with a sponge or cloth and a
mild detergent or non-abrasive cleaner.
If the blades continue to streak or smear, they should be
replaced.
NOTE: Do not operate wipers for long periods on dry
glass; this accelerates deterioration of the rubber and
could scratch the glass.
Windshield washers
The windshield washer reservoir is in the engine com-
partment. Check the fluid level at regular intervals and
replenish the fluid if necessary.
NOTE: When freezing weather is anticipated flush out
the water in the reservoir by operating the pump. Fill the
reservoir with windshield antifreeze (not radiator anti-
freeze) and operate the system for a few seconds to flush
out any residual water.
M31A0730
MAINTENANCE 329
9
Page 330 of 394

PARKING BRAKE
Check the parking brake lever travel occasionally. To
check, pull the lever slowly and count the number of
clicks of the ratchet.
For vehicles with rear drum brakes:
You should feel the parking brake take hold between 5 to
7 clicks.For vehicles with rear disc brakes:
You should feel the parking brake take hold between 3 to
5 clicks. Also check to see if the lever is properly engaged
with the ratchet, when pulled.
I27A0100
330 MAINTENANCE