ignition CHRYSLER TOWN AND COUNTRY 2008 5.G Repair Manual
[x] Cancel search | Manufacturer: CHRYSLER, Model Year: 2008, Model line: TOWN AND COUNTRY, Model: CHRYSLER TOWN AND COUNTRY 2008 5.GPages: 531, PDF Size: 4.51 MB
Page 240 of 531
Oil Change Required
Your vehicle is equipped with an engine oil change
indicator system. The ªOil Change Requiredº message
will flash in the Electronic Vehicle Information Center
(EVIC) display for approximately 10 seconds after a
single chime has sounded to indicate the next scheduled
oil change interval. The engine oil change indicator
system is duty cycle based, which means the engine oil
change interval may fluctuate dependent upon your
personal driving style.
Unless reset, this message will continue to display each
time you turn the ignition switch to the ON/RUN
position. To turn off the message temporarily, press and
release the Menu button. To reset the oil change indicator
system (after performing the scheduled maintenance)
refer to the following procedure.
1. Turn the ignition switch to the ON position (Do not
start the engine).2. Fully depress the accelerator pedal slowly three times
within 10 seconds.
3. Turn the ignition switch to the OFF/LOCK position.
NOTE:If the indicator message illuminates when you
start the vehicle, the oil change indicator system did not
reset. If necessary repeat this procedure.
27. Compass Mini-Trip Computer (CMTC) Display
Button
Press the left reset button to scroll through sub menus
(i.e., Trip Functions: AVG Fuel Economy, DTE, Elapsed
Time, and Units.
NOTE:For more detailed operation, refer to ªCompass
Mini-Trip Computerº later in this section.
238 UNDERSTANDING YOUR INSTRUMENT PANEL
Page 242 of 531
Compass Mini-Trip Computer (CMTC) Reset
Buttons
CMTC Reset Button
Press the left reset button located on the instrument
cluster to scroll through the sub menus (i.e., Trip Func-
tions: AVG Fuel Economy, DTE, Elapsed Time, and
Units).
To reset the display shown, turn the ignition switch to the
ON position, then press and hold the reset button for
approximately two seconds.When the appropriate conditions exist, the following
odometer messages will display:
NE. Eight-point compass headings are displayed (N, S, E,
W, NE, NW, SE, SW)
14ÉF............ Temperature (Fahrenheit or Celsius)
AV G......... AverageFuel Economy (U.S. or Metric)
DTE.......................Distance to Empty
ET............................Elapsed Time
P.......................... ParkAssist On/Off
Should this wrench symbol display with the
letterPnext to it, your Park Assist System
needs servicing. Contact your authorized
dealer.
NOTE:Temperature and Average Fuel Economy can be
changed from U.S. or Metric by pressing and holding the
left CMTC Reset Button located on the instrument cluster.
240 UNDERSTANDING YOUR INSTRUMENT PANEL
Page 247 of 531
²Left Rear Turn Signal Light Out
²Right Front Turn Signal Light Out
²Right Rear Turn Signal Light Out
²Park Assist Disabled
²Service Park Assist System
²Personal Settings Not Available ± Vehicle Not in Park
Oil Change Required
Your vehicle is equipped with an engine oil change
indicator system. TheOil Change Requiredmessage will
flash in the EVIC display for approximately 10 seconds
after a single chime has sounded to indicate the next
scheduled oil change interval. The engine oil change
indicator system is duty cycle based, which means the
engine oil change interval may fluctuate dependent upon
your personal driving style.Unless reset, this message will continue to display each
time you turn the ignition switch to the ON/RUN
position. To turn off the message temporarily, press and
release the Menu button. To reset the oil change indicator
system (after performing the scheduled maintenance)
refer to the following procedure.
1. Turn the ignition switch to the ON position (Do not
start the engine).
2. Fully depress the accelerator pedal slowly three times
within 10 seconds.
3. Turn the ignition switch to the OFF/LOCK position.
NOTE:If the indicator message illuminates when you
start the vehicle, the oil change indicator system did not
reset. If necessary repeat this procedure.
UNDERSTANDING YOUR INSTRUMENT PANEL 245
4
Page 248 of 531
TRIP FUNCTIONS
Press and release the MENU button until one of the
following Trip Functions displays in the EVIC:
Press the STEP button to scroll through all the Trip
Computer functions.
The Trip Functions mode displays the following informa-
tion:
Average Fuel Economy
Shows the average fuel economy since the last reset.
When the fuel economy is reset, the display will read
ªRESETº or show dashes for two seconds. Then, the
history information will be erased, and the averaging will
continue from the last fuel average reading before the
reset.
Distance To Empty (DTE)
Shows the estimated distance that can be traveled with
the fuel remaining in the tank. This estimated distance isdetermined by a weighted average of the instantaneous
and average fuel economy, according to the current fuel
tank level.
NOTE:Significant changes in driving style or vehicle
loading will greatly affect the actual drivable distance of
the vehicle, regardless of the DTE displayed value.
When the DTE value is less than 30 miles (48 km)
estimated driving distance, the DTE display will change
to a text display of9LOW FUEL.9This display will
continue until the vehicle runs out of fuel. Adding a
significant amount of fuel to the vehicle will turn off the
9LOW FUEL9text and a new DTE value will display.
Elapsed Time
Shows the total elapsed time of travel since the last reset
when the ignition switch is in the ACC position. Elapsed
time will increment when the ignition switch is in the ON
or START position.
246 UNDERSTANDING YOUR INSTRUMENT PANEL
Page 249 of 531
Display Units of Measure in:
To make your selection, press and release the STEP
button until ªUSº or ªMETRICº appears.
To Reset The Display
Reset will only occur while a resettable function is being
displayed. Press and release the RESET button once to
clear the resettable function being displayed. To reset all
resettable functions, press and release the RESET button
a second time within three seconds of resetting the
currently displayed function (Reset ALL will display
during this three-second window).
COMPASS DISPLAY
The compass readings indicate the direction
the vehicle is facing. Press and release the
compass button to display one of eight com-
pass readings and the outside temperature.
Automatic Compass Calibration
This compass is self-calibrating, which eliminates the
need to manually reset the compass. When the vehicle is
new, the compass may appear erratic and the EVIC will
display CAL until the compass is calibrated. You may
also calibrate the compass by completing one or more
360É turns (in an area free from large metal or metallic
objects) until the CAL indicator displayed in the EVIC
turns off. The compass will now function normally.
Manual Compass Calibration
If the compass appears erratic and the CAL indicator
does not appear in the EVIC display, you must put the
compass into the Calibration Mode manually as follows:
1. Turn on the ignition switch.
2. Press the MENU button until Personal Settings (Cus-
tomer Programmable Features) menu is reached.
UNDERSTANDING YOUR INSTRUMENT PANEL 247
4
Page 251 of 531
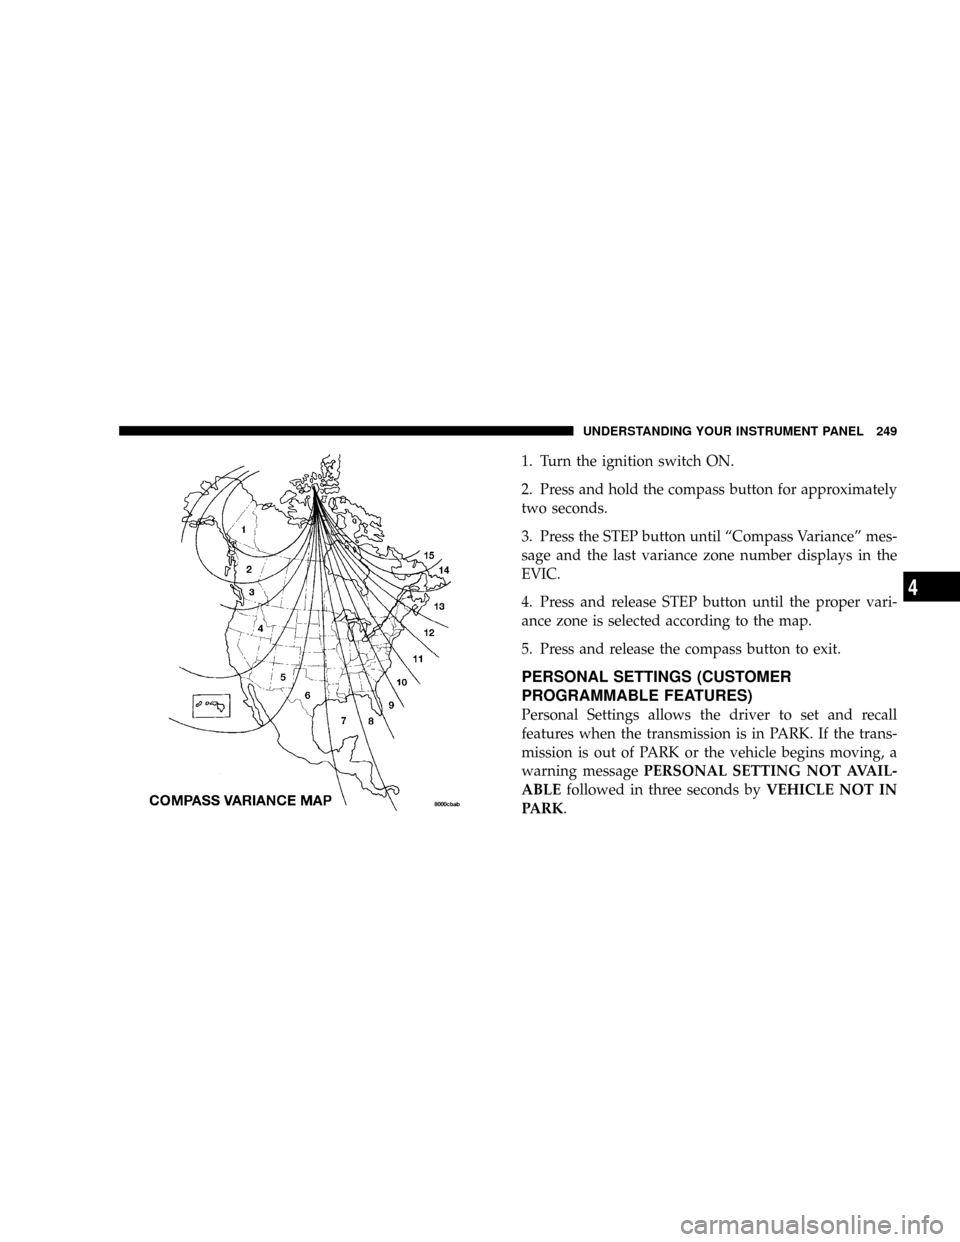
1. Turn the ignition switch ON.
2. Press and hold the compass button for approximately
two seconds.
3. Press the STEP button until ªCompass Varianceº mes-
sage and the last variance zone number displays in the
EVIC.
4. Press and release STEP button until the proper vari-
ance zone is selected according to the map.
5. Press and release the compass button to exit.
PERSONAL SETTINGS (CUSTOMER
PROGRAMMABLE FEATURES)
Personal Settings allows the driver to set and recall
features when the transmission is in PARK. If the trans-
mission is out of PARK or the vehicle begins moving, a
warning messagePERSONAL SETTING NOT AVAIL-
ABLEfollowed in three seconds byVEHICLE NOT IN
PARK.
UNDERSTANDING YOUR INSTRUMENT PANEL 249
4
Page 254 of 531
when exiting the vehicle. To make your selection, press
and release the RESET button until 0, 30, 60, or 90
appears.
Turn Headlights On with Remote Key Unlock
When this feature is selected, the headlights will activate
and remain on for up to 90 seconds when the doors are
unlocked with the remote keyless entry transmitter. To
make your selection, press and release the RESET button
until OFF, 30 sec., 60 sec., or 90 sec. appears.
Delay Power Off to Accessories Until Exit
When this feature is selected, the power window
switches, radio, hands±free system (if equipped), DVD
video system (if equipped), power sunroof (if equipped),
and power outlets will remain active for up to 10 minutes
after the ignition switch is turned off. Opening a vehicle
door will cancel this feature. To make your selection,
press and release the RESET button until Off, 45 sec., 5
min., or 10 min. appears.
Rear Park Assist System Ð If Equipped
When ENABLE is selected, the Rear Park Assist System is
activated. When DISABLE is selected, the System is
deactivated and, the instrument cluster will display the
9PARK ASSIST DISABLED9message.
Display Units of Measure in
The EVIC, odometer, and navigation system (if
equipped) can be changed between English and Metric
units of measure. To make your selection, press and
release the RESET button until US or METRIC appears.
RADIO GENERAL INFORMATION
RADIO BROADCAST SIGNALS
Your radio will provide excellent reception under most
operating conditions. Like any system, however, car
radios have performance limitations, due to mobile op-
eration and natural phenomena, which might lead you to
believe your sound system is malfunctioning. To help
252 UNDERSTANDING YOUR INSTRUMENT PANEL
Page 255 of 531
you understand and save you concern about these ªap-
parentº malfunctions, you must understand a point or
two about the transmission and reception of radio sig-
nals.
Two Types of Signals
There are two basic types of radio signals:
1. AM or Amplitude Modulation, in which the transmit-
ted sound causes the amplitude, or height, of the radio
waves to vary.
2. FM or Frequency Modulation, in which the frequency
of the wave is varied to carry the sound.
AM Reception
AM sound is based on wave amplitude, so AM reception
can be disrupted by such things as lightning, power lines
and neon signs.
FM Reception
Because FM transmission is based on frequency varia-
tions, interference that consists of amplitude variations
can be filtered out, leaving the reception relatively clear,
which is the major feature of FM radio.
NOTE:The radio, steering wheel radio controls (if
equipped), and six-disc CD/DVD changer (if equipped)
will remain active for up to 90 seconds after the ignition
switch has been turned OFF, depending upon the EVIC,
Accessory Delay setting. Opening a vehicle front door
will cancel this feature.
Electrical Disturbances
Radio waves may pick up electrical disturbances during
transmission. They mainly affect the wave amplitude,
and thus remain a part of the AM reception. They
interfere very little with the frequency variations that
carry the FM signal.
UNDERSTANDING YOUR INSTRUMENT PANEL 253
4
Page 256 of 531
SALES CODE REQ Ð AM/FM STEREO RADIO
AND 6±DISC CD/DVD CHANGER (MP3/WMA AUX
JACK)
NOTE:The radio sales code is located on the lower right
side of your radio faceplate.
Operating Instructions - Radio Mode
NOTE:The ignition switch must be in the ON or ACC
position to operate the radio.
Power Switch/Volume Control (Rotary)
Push the On/Volume control knob to turn on the radio.
Press the control knob a second time to turn off the radio.
Electronic Volume Control
The electronic volume control turns continuously (360
degrees) in either direction without stopping. Turning the
On/Volume control knob to the right increases the vol-
ume and to the left decreases it.When the audio system is turned on, the sound will be
set at the same volume level as last played.
SEEK Buttons
Press and release the SEEK buttons to search for the next
listenable station in AM/FM mode. Press the right switch
to seek up and the left switch to seek down. The radio
will remain tuned to the new station until you make
another selection. Holding either button will bypass
stations without stopping until you release it.
SCAN Button
Pressing the SCAN button causes the tuner to search for
the next listenable station, in AM, FM or Satellite (if
equipped) frequencies, pausing for five seconds at each
listenable station before continuing to the next. To stop
the search, press the SCAN button a second time.
254 UNDERSTANDING YOUR INSTRUMENT PANEL
Page 264 of 531
Every time a preset button is used, a corresponding
button number will display.
Buttons1-6
These buttons tune the radio to the stations that you
commit to pushbutton memory {12 AM, 12 FM, and 12
Satellite (if equipped) stations}.
DISC Button
Pressing the DISC button will allow you to switch from
AM/FM modes to Disc modes.
Operation Instructions - (DISC MODE for CD and
MP3/WMA Audio Play, DVD-VIDEO)
The radio DVD player and many DVD discs are coded by
geographic region. These region codes must match in
order for the disc to play. If the region code for the DVD
disc does not match the region code for the radio DVD
player, it will not play the disc. Customers may take their
vehicle to an authorized dealer to change the region code
of the player a maximum of five times.
CAUTION!
The radio may shut down during extremely hot
conditions. When this occurs, the radio will indicate
ªDisc Hotº and shut off until a safe temperature is
reached. This shutdown is necessary to protect the
optics of the DVD player and other radio internal
components.
NOTE:The ignition switch must be in the ON or ACC
position to operate the radio.
LOAD Button Ð Loading Compact Disc(s)
Press the LOAD button and the pushbutton with the
corresponding number (1-6) where the CD is being
loaded. The radio will display PLEASE WAIT and
prompt when to INSERT DISC. After the radio displays
9INSERT DISC,9insert the CD into the player.
262 UNDERSTANDING YOUR INSTRUMENT PANEL