eco button CHRYSLER TOWN AND COUNTRY 2015 5.G Owner's Manual
[x] Cancel search | Manufacturer: CHRYSLER, Model Year: 2015, Model line: TOWN AND COUNTRY, Model: CHRYSLER TOWN AND COUNTRY 2015 5.GPages: 164, PDF Size: 22.47 MB
Page 48 of 164

THREE ZONE MANUAL CLIMATE CONTROLS
Air Recirculation
• Use Recirculation for maximum A/C operation.
• For window defogging, turn the Recirculation button off.
•Recirculationisallowedinflooranddefrost/floor(mixmodes)forapproximatelyfiveminutes.
Heated Mirrors
The mirrors are heated to melt frost or ice. This feature is activated whenever you turn on the rear
window defroster.
Three Zone Manual Climate Controls
1—PushModeControlButtons2 — Push A/C Button3—RotateDriverTemp.Control4 — Push Air Recirc. Button5 — Rotate Front Blower Control6 — Rotate Passenger Temp. Control
7—PushModeControlButton8 — Push Front Defrost Button9 — Push Rear Window Defrost Button10 — Rotate Rear Temp. Control11 — Rotate Rear Blower Control
OPERATING YOUR VEHICLE
46
Page 49 of 164

Rear Window Defroster
•Pushing the rear window defroster button will turn on the defroster for approximately 10 minutes.
An indicator in the button will illuminate when the rear window defroster is on. For an additional
10 minutes of operation, Push the button a second time.
Activating Rear Passenger Climate Controls
•Rotatetherearblowercontrol,locatedonthemainclimatecontrolintheinstrumentpanelto
the “REAR” position. This enables the rear passenger climate controls located in the headliner
above the second row seats.
Rear Passenger Climate Controls
1 — Rotate Rear Blower Control2 — Rotate Rear Temperature Control3—RotateRearModeControl
OPERATING YOUR VEHICLE
47
Page 50 of 164

THREE ZONE AUTOMATIC TEMPERATURE
CONTROLS (ATC )
Automatic Operation
•PushtheAUTOmodebuttontoactivatetheATCsystem.
•Selectthedesiredtemperaturebypressingthetemperaturecontrolbuttonsforthedriveror
passenger.
•Thesystemwillmaintainthesettemperatureautomatically.
Air Conditioning (A/C)
• If the air conditioning button is pushed while in AUTO mode, the indicator light will flash three
times to indicate the cabin air is being controlled automatically.
Three Zone Automatic Temperature Controls (ATC)
1—PushDriverTemp.ControlUp2 — Push Air Recirc. Button3 — Push A/C Button4—PushModeControlButton5 — Push AUTO Button6 — Push Front Window Defrost Button7 — Push Rear Window Defrost Button8 — Push Passenger Temp. Control Up
9 — Push Passenger Temp. Control Down10 — Push Rear Control Button11 — Push Rear Lock Button12 — Push OFF Button13 — Rotate Blower Control14 — Push SYNC Button15 — Push Driver Temp. Control Down
OPERATING YOUR VEHICLE
48
Page 51 of 164

SYNC Temperature Button
•PushtheSYNCbuttononcetocontroldriverandpassengertemperaturessimultaneously.
Push the SYNC button a second time to control the temperatures individually.
Air Recirculation
• Use Recirculation for maximum A/C operation.
• For window defogging, turn the Recirculation button off.
•IftheRecirculationbuttonispressedwhenthesystemisinDefrostmodetheRecirculation
LED indicator will flash three times to indicate Recirculation mode is not allowed.
Heated Mirrors
The mirrors are heated to melt frost or ice. This feature is activated whenever you turn on the rear
window defroster.
Rear Window Defroster
•Pushing the rear window defroster button will turn on the defroster for approximately 10 minutes.
An indicator in the button will illuminate when the rear window defroster is on. For an additional
10 minutes of operation, Push the button a second time.
OPERATING YOUR VEHICLE
49
Page 52 of 164
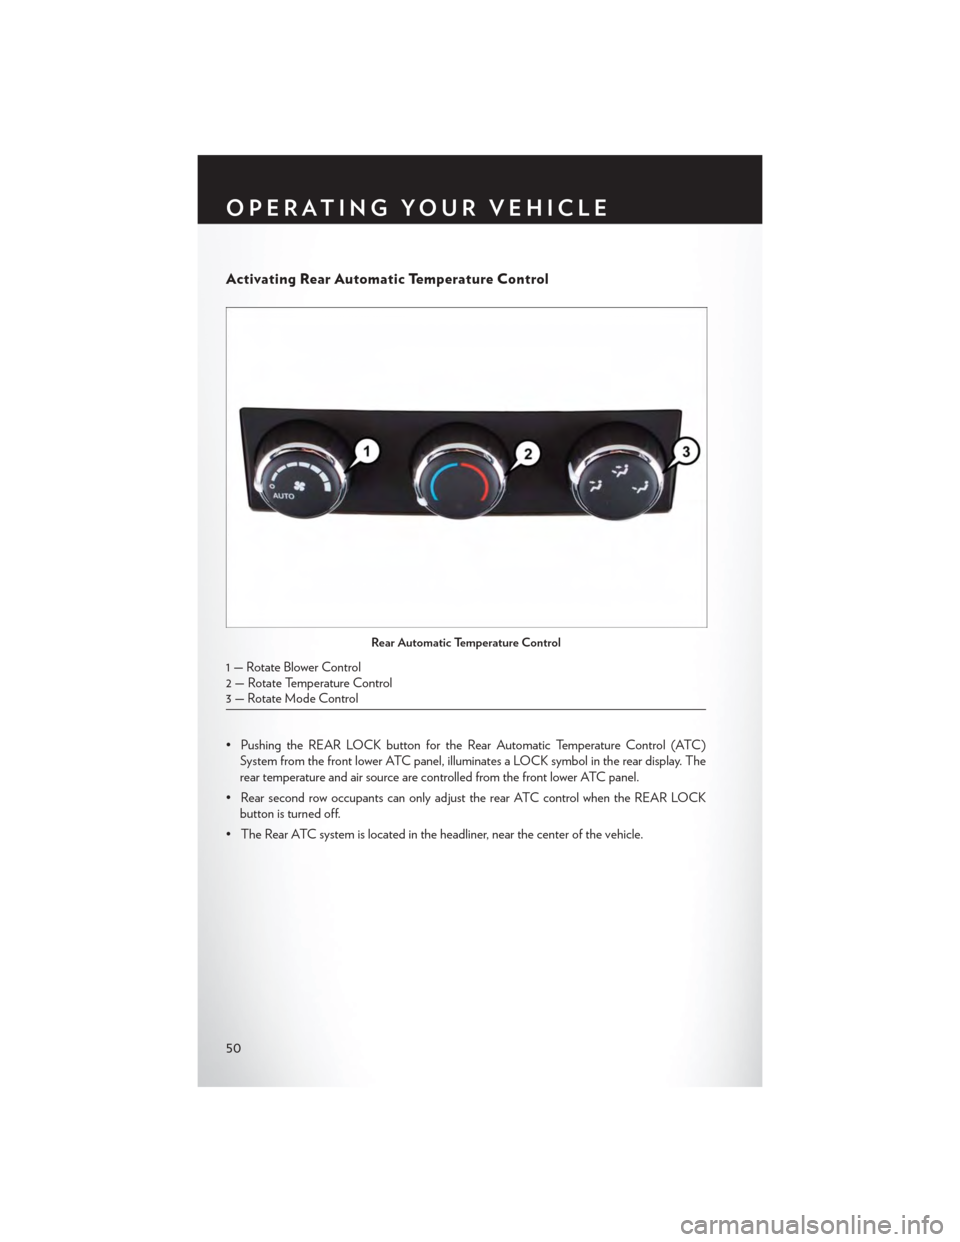
Activating Rear Automatic Temperature Control
• Pushing the REAR LOCK button for the Rear Automatic Temperature Control (ATC)
System from the front lower ATC panel, illuminates a LOCK symbol in the rear display. The
rear temperature and air source are controlled from the front lower ATC panel.
•RearsecondrowoccupantscanonlyadjusttherearATCcontrolwhentheREARLOCK
button is turned off.
•TheRearATCsystemislocatedintheheadliner,nearthecenterofthevehicle.
Rear Automatic Temperature Control
1 — Rotate Blower Control2 — Rotate Temperature Control3—RotateModeControl
OPERATING YOUR VEHICLE
50
Page 54 of 164
POWER SLIDING SIDE DOORS
Automatic/Manual Operation
• The power sliding door may be opened or closed manually or by using the buttons on the Key
Fob, overhead console switch, or rear door switch.
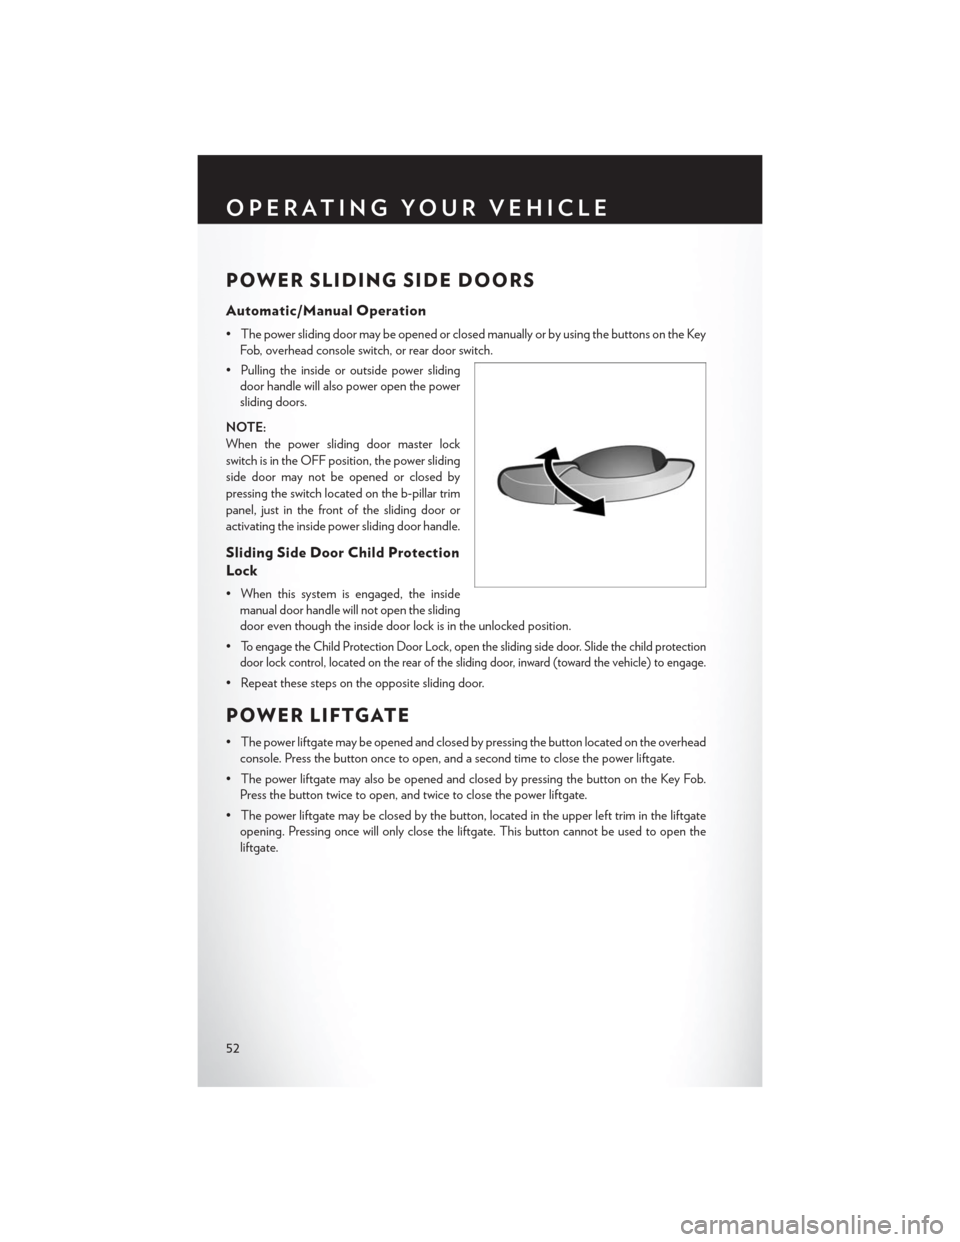
• Pulling the inside or outside power sliding
door handle will also power open the power
sliding doors.
NOTE:
When the power sliding door master lock
switch is in the OFF position, the power sliding
side door may not be opened or closed by
pressing the switch located on the b-pillar trim
panel, just in the front of the sliding door or
activating the inside power sliding door handle.
Sliding Side Door Child Protection
Lock
•Whenthissystemisengaged,theinside
manual door handle will not open the sliding
door even though the inside door lock is in the unlocked position.
•To engage the Child Protection Door Lock, open the sliding side door. Slide the child protection
door lock control, located on the rear of the sliding door, inward (toward the vehicle) to engage.
• Repeat these steps on the opposite sliding door.
POWER LIFTGATE
•Thepowerliftgatemaybeopenedandclosedbypressingthebuttonlocatedontheoverhead
console. Press the button once to open, and a second time to close the power liftgate.
• The power liftgate may also be opened and closed by pressing the button on the Key Fob.
Press the button twice to open, and twice to close the power liftgate.
• The power liftgate may be closed by the button, located in the upper left trim in the liftgate
opening. Pressing once will only close the liftgate. This button cannot be used to open the
liftgate.
OPERATING YOUR VEHICLE
52
Page 55 of 164
POWER SUNROOF
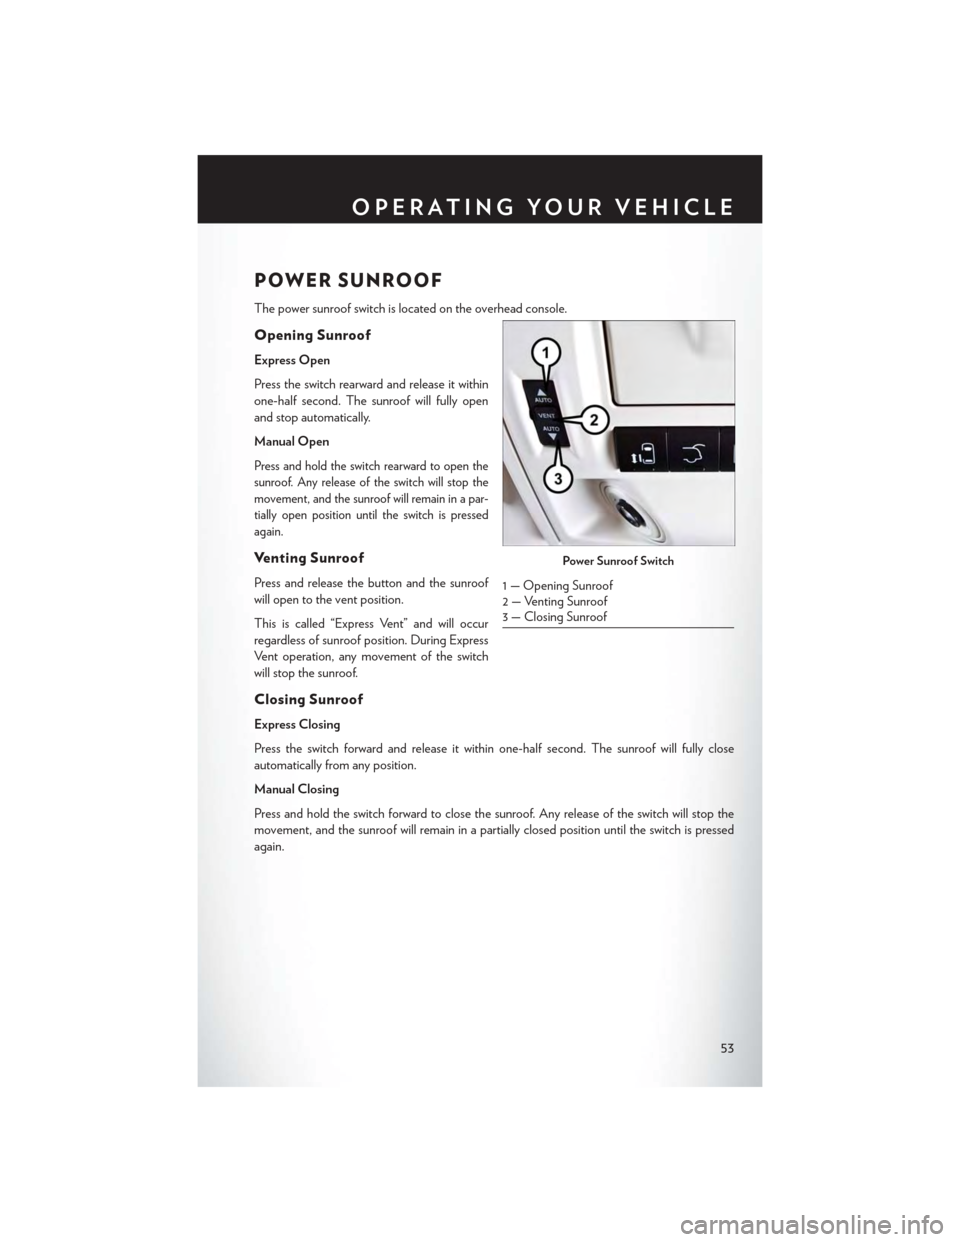
The power sunroof switch is located on the overhead console.
Opening Sunroof
Express Open
Press the switch rearward and release it within
one-half second. The sunroof will fully open
and stop automatically.
Manual Open
Press and hold the switch rearward to open the
sunroof. Any release of the switch will stop the
movement, and the sunroof will remain in a par-
tially open position until the switch is pressed
again.
Ve n t i n g S u n r o o f
Press and release the button and the sunroof
will open to the vent position.
This is called “Express Vent” and will occur
regardless of sunroof position. During Express
Ve n t o p e r a t i o n , a n y m o v e m e n t o f t h e s w i t c h
will stop the sunroof.
Closing Sunroof
Express Closing
Press the switch forward and release it within one-half second. The sunroof will fully close
automatically from any position.
Manual Closing
Press and hold the switch forward to close the sunroof. Any release of the switch will stop the
movement, and the sunroof will remain in a partially closed position until the switch is pressed
again.
Power Sunroof Switch
1 — Opening Sunroof2 — Venting Sunroof3 — Closing Sunroof
OPERATING YOUR VEHICLE
53
Page 60 of 164
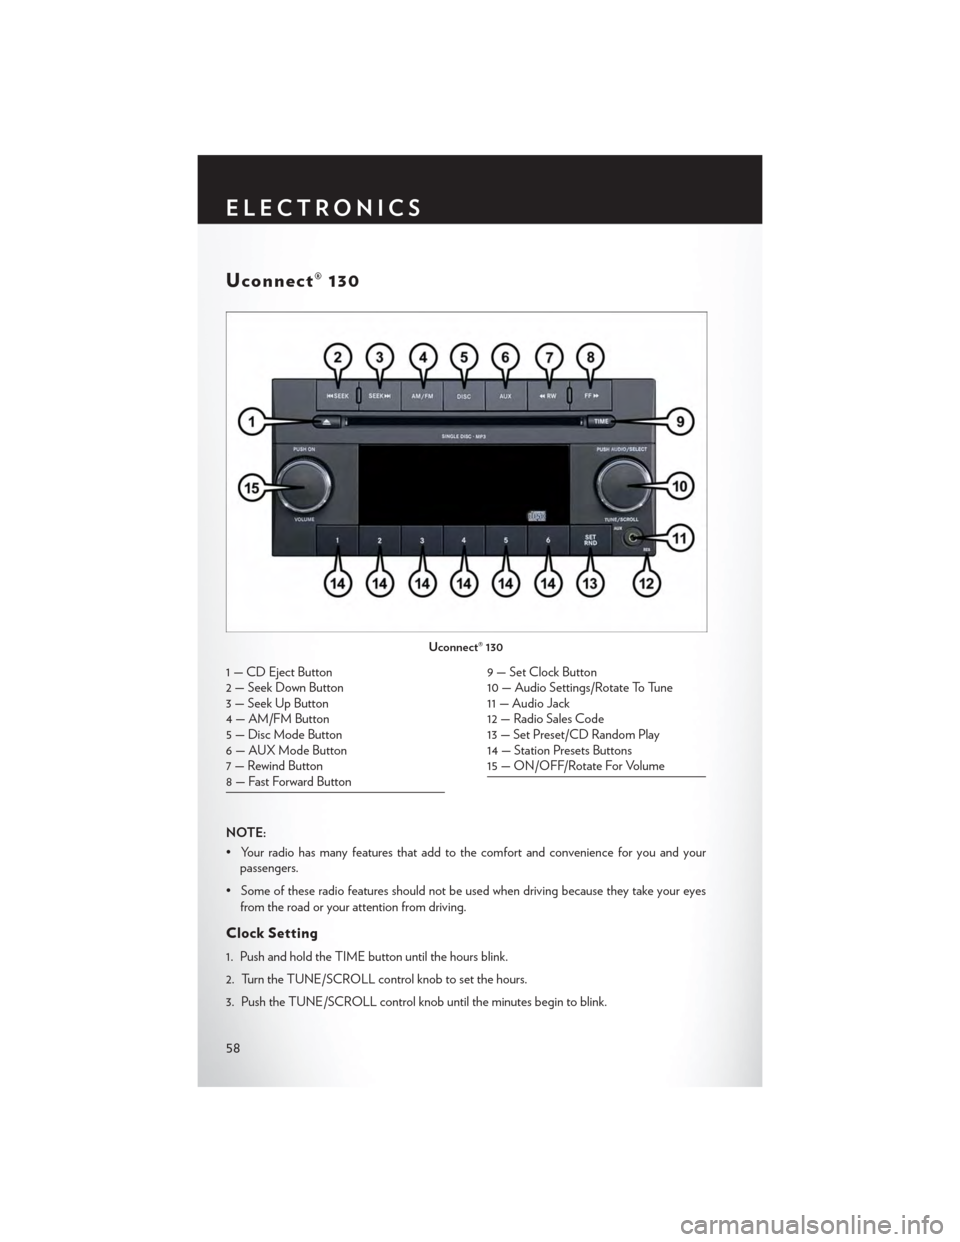
Uconnect® 130
NOTE:
•Yourradiohasmanyfeaturesthataddtothecomfortandconvenienceforyouandyourpassengers.
•Someoftheseradiofeaturesshouldnotbeusedwhendrivingbecausetheytakeyoureyes
from the road or your attention from driving.
Clock Setting
1. Push and hold the TIME button until the hours blink.
2. Turn the TUNE/SCROLL control knob to set the hours.
3. Push the TUNE/SCROLL control knob until the minutes begin to blink.
Uconnect® 130
1 — CD Eject Button2 — Seek Down Button3 — Seek Up Button4 — AM/FM Button5—DiscModeButton6—AUXModeButton7 — Rewind Button8 — Fast Forward Button
9 — Set Clock Button10 — Audio Settings/Rotate To Tune11 — Audio Jack12 — Radio Sales Code13 — Set Preset/CD Random Play14 — Station Presets Buttons15 — ON/OFF/Rotate For Volume
ELECTRONICS
58
Page 61 of 164
4. Turn the TUNE/SCROLL control knob to set the minutes.
5. Push the TUNE/SCROLL control knob to save the changes.
6. Push any button/knob or wait five seconds to exit.
Equalizer, Balance And Fade
1. Push the TUNE/SCROLL control knob and “BASS” will display.
2. Rotate the TUNE/SCROLL control knob to select the desired setting.
3. Continue pushing the TUNE/SCROLL control knob to display and set “MID RANGE,”
“TREBLE,” “BALANCE” and “FADE.”
Radio Operation
Seek Up/Down Buttons
•PushtoseekthroughradiostationsinAMorFMbands.
•Holdeitherbuttontobypassstationswithoutstopping.
Store Radio Presets
• Push the SET/RND or SET (depending on the radio) button once and SET 1 will show in the
display. Then select a preset button (1–6).
• A second station may be added to each push button. Push the SET/RND or SET (depending
on the radio) button twice and SET 2 will show in the display. Then select a preset button (1–6).
CD/DISC Operation
Seek Up/Down Buttons
• Push to seek through CD tracks.
•Holdeitherbuttontobypasstrackswithoutstopping.
SET/RND Or RND (Depending On Radio) Button (Random Play)
•PushthisbuttonwhiletheCDisplayingtoactivateRandomPlay.
•ThisfeatureplaystheselectionsontheCDinrandomordertoprovideaninterestingchange
of pace.
Audio Jack Operation
The AUX/Audio Jack provides a means to connect a portable audio device, such as an MP3
player or an iPod®, to the vehicle’s sound system. This requires the use of a 3.5 mm stereo audio
patch cable.
•Pushing the AUX button will change the mode to auxiliary device if the Audio Jack is connected,
allowing the music from your portable device to play through the vehicle's speakers.
The functions of the portable device are controlled using the device buttons, not the buttons on
the radio. However, the volume may be controlled using the radio or portable device.
ELECTRONICS
59
Page 62 of 164
Uconnect® 130 WITH SiriusXM SATELLITE RADIO
NOTE:
• Your radio may not be equipped with the Uconnect® Voice Command and Uconnect® Phone
features. To determine if your radio has these features, push the Voice Command button on
the radio. You will hear a voice prompt if you have the feature, or see a message on the radio
stating “Uconnect Phone not available” if you do not.
•Yourradiohasmanyfeaturesthataddtothecomfortandconvenienceofyouandyour
passengers. Some of these radio features should not be used when driving because they take
your eyes from the road or your attention from driving.
Uconnect® 130 With SiriusXM Satellite Radio
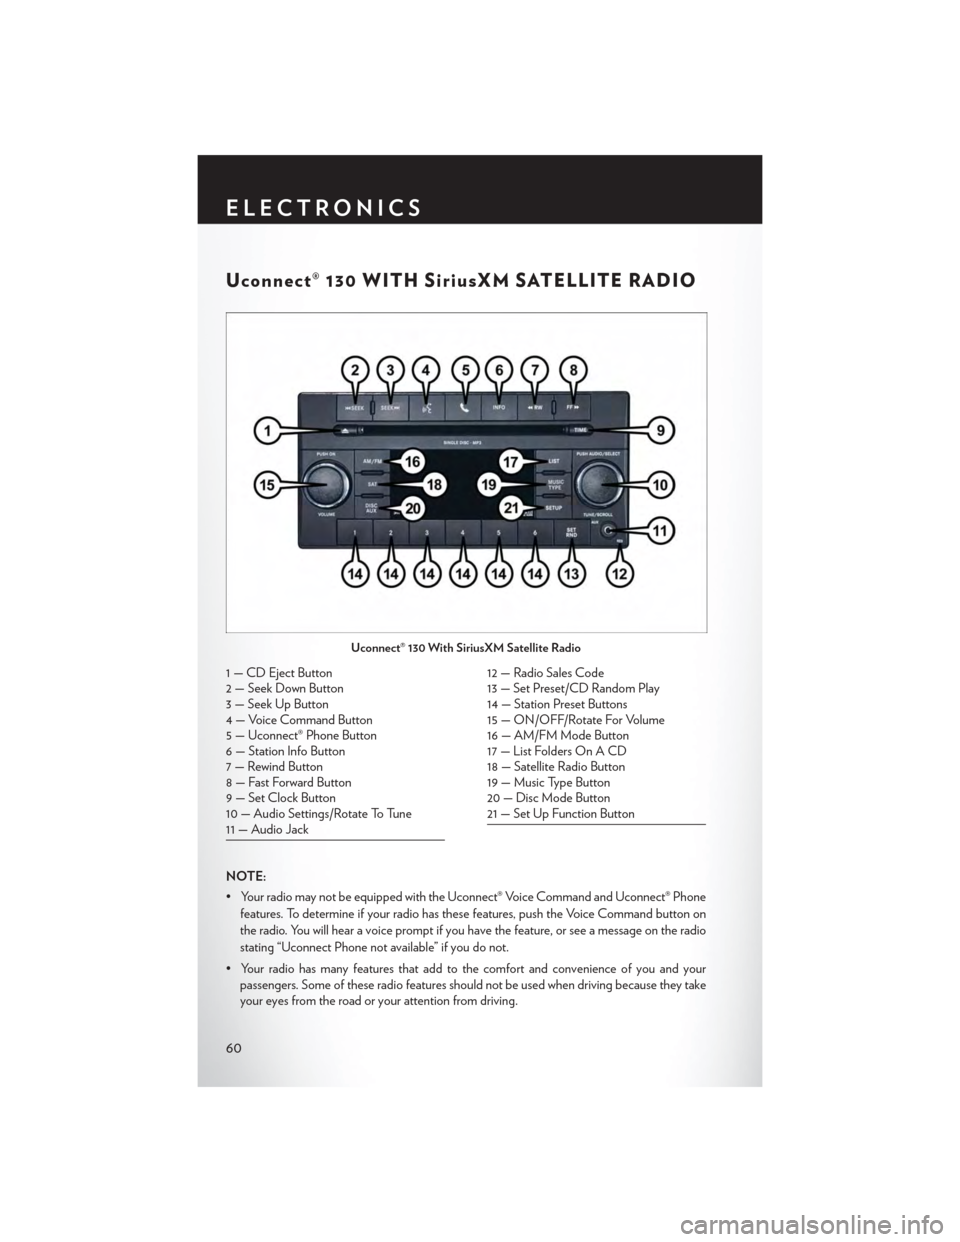
1 — CD Eject Button2 — Seek Down Button3 — Seek Up Button4 — Voice Command Button5 — Uconnect® Phone Button6 — Station Info Button7 — Rewind Button8 — Fast Forward Button9 — Set Clock Button10 — Audio Settings/Rotate To Tune11 — Audio Jack
12 — Radio Sales Code13 — Set Preset/CD Random Play14 — Station Preset Buttons15 — ON/OFF/Rotate For Volume16 — AM/FM Mode Button17 — List Folders On A CD18 — Satellite Radio Button19 — Music Type Button20 — Disc Mode Button21 — Set Up Function Button
ELECTRONICS
60