ESC CHRYSLER TOWN AND COUNTRY 2015 5.G User Guide
[x] Cancel search | Manufacturer: CHRYSLER, Model Year: 2015, Model line: TOWN AND COUNTRY, Model: CHRYSLER TOWN AND COUNTRY 2015 5.GPages: 164, PDF Size: 22.47 MB
Page 3 of 164
INTRODUCTION/WELCOME
WELCOME FROM CHRYSLERGROUP LLC . . . . . . . . . . . . . . . . . . 3
CONTROLS AT A GLANCE
DRIVER COCKPIT...............6INSTRUMENT CLUSTER...........8
GETTING STARTED
KEY FOB . . . . . . . . . . . . . . . . . . . . 10REMOTE START...............12KEYLESS ENTER-N-GO™..........12VEHICLE SECURITY ALARM........16SEAT BELT SYSTEMS.............17SUPPLEMENTAL RESTRAINTSYSTEM (SRS) — AIR BAGS.........18CHILD RESTRAINTS.............21HEAD RESTRAINTS.............25FRONT SEATS . . . . . . . . . . . . . . . . 27REAR SEATS..................29HEATED SEATS . . . . . . . . . . . . . . . . 34HEATED STEERING WHEEL........35TILT/TELESCOPING STEERINGCOLUMN . . . . . . . . . . . . . . . . . . . 35ADJUSTABLE PEDALS............36
OPERATING YOUR VEHICLE
ENGINE BREAK-INRECOMMENDATIONS............37TURN SIGNAL/WIPER/WASHER/HIGHBEAM LEVER.................38HEADLIGHT SWITCH AND HALOLIGHT SWITCH . . . . . . . . . . . . . . . . 40ELECTRONIC SPEED CONTROL......41ELECTRONIC RANGE SELECTION (ERS) . . 43FUEL ECONOMY (ECON) MODE.....44MANUAL CLIMATE CONTROLS......45THREE ZONE MANUAL CLIMATECONTROLS..................46THREE ZONE AUTOMATICTEMPERATURE CONTROLS (ATC)....48PA R K S E N S E ® R E A R PA R K A S S I S T.....51PA R K V I E W ® R E A R B AC K- U P C A M E R A . . 5 1BLIND SPOT MONITORING WITHREAR CROSS PATH . .............51POWER SLIDING SIDE DOORS .......52POWER LIFTGATE . . . . . . . . . . . . . . 52POWER SUNROOF.............53WIND BUFFETING..............55
ELECTRONICS
YO U R V E H I C L E ' S S O U N D SYS T E M....56Uconnect® 130..................58Uconnect® 130 WITH SiriusXM SATELLITERADIO.....................60Uconnect® 430/430N..............63
SiriusXM SATELLITE RADIO/TRAVELLINK . . . . . . . . . . . . . . . . . . . . . . . 73STEERING WHEEL AUDIO CONTROLS..78SETTING THE ANALOG CLOCK . . . . . 78iPod®/USB/MP3 CONTROL.........79Uconnect® Phone ................80Uconnect® VOICE COMMAND . . . . . . . 82Bluetooth® STREAMING AUDIO . . . . . . 85VIDEO ENTERTAINMENTSYSTEM (VES™)................85ELECTRONIC VEHICLE INFORMATIONCENTER (EVIC) ................87PROGRAMMABLE FEATURES.......88UNIVERSAL GARAGE DOOR OPENER(HomeLink®)..................89POWER INVERTER..............92POWER OUTLETS..............93
UTILITY
IN-FLOOR STORAGE — STOW'N GO® . . 95ROOF LUGGAGE RACK..........95TRAILER TOWING WEIGHTS(MAXIMUM TRAILER WEIGHTRATINGS) . . . . . . . . . . . . . . . . . . . 96RECREATIONAL TOWING(BEHIND MOTORHOME, ETC.)......97
WHAT TO DO IN EMERGENCIES
ROADSIDE ASSISTANCE..........98INSTRUMENT CLUSTER WARNINGLIGHTS . . . . . . . . . . . . . . . . . . . . . 98INSTRUMENT CLUSTER INDICATORLIGHTS . . . . . . . . . . . . . . . . . . . . 102IF YOUR ENGINE OVERHEATS . . . . . . 104TIRE SERVICE KIT . . . . . . . . . . . . . . 104JACKING AND TIRE CHANGING . . . . . 110JUMP-STARTING..............122SHIFT LEVER OVERRIDE..........124TOWING A DISABLED VEHICLE.....124FREEING A STUCK VEHICLE . ......125EVENT DATA RECORDER (EDR).....126
MAINTAINING YOUR VEHICLE
OPENING THE HOOD...........127ENGINE COMPARTMENT.........128FLUID CAPACITIES . . . . . . . . . . . . . 130FLUIDS, LUBRICANTS ANDGENUINE PARTS . .............130MAINTENANCE PROCEDURES . . . . . . 132MAINTENANCE SCHEDULE . . .....132MAINTENANCE RECORD.........136FUSES.....................137TIRE PRESSURES...............141SPARE TIRES — IF EQUIPPED.......142ADDING FUEL................143WHEEL AND WHEEL TRIM CARE . . . . . 144REPLACEMENT BULBS...........145
TA B L E O F CO N T E N TS
Page 5 of 164
WELCOME FROM CHRYSLER GROUP LLC
Congratulations on selecting your new Chrysler Group LLC vehicle. Be assured that it represents
precision workmanship, distinctive styling, and high quality - all essentials that are traditional to
our vehicles.
Yo u r n e w C h r y s l e r G r o u p L L C v e h i c l e h a s c h a r a c t e r i s t i c s t o e n h a n c e t h e d r i v e r ' s c o n t r o l u n d e r
some driving conditions. These are to assist the driver and are never a substitute for attentive
driving. They can never take the driver's place. Always drive carefully.
Yo u r n e w v e h i c l e h a s m a n y f e a t u r e s f o r t h e c o m f o r t a n d c o n v e n i e n c e o f y o u a n d y o u r p a s s e n g e r s .
Some of these should not be used when driving because they take your eyes from the road or
your attention from driving. Never text while driving or take your eyes more than momentarily off
the road.
This guide illustrates and describes the operation of features and equipment that are either
standard or optional on this vehicle. This guide may also include a description of features and
equipment that are no longer available or were not ordered on this vehicle. Please disregard any
features and equipment described in this guide that are not available on this vehicle. Chrysler
Group LLC reserves the right to make changes in design and specifications and/or make
additions to or improvements to its products without imposing any obligation upon itself to install
them on products previously manufactured.
This User Guide has been prepared to help you quickly become acquainted with the important
features of your vehicle. It contains most things you will need to operate and maintain the vehicle,
including emergency information.
The DVD includes a computer application containing detailed owner's information which can be
viewed on a personal computer or MAC computer. The multimedia DVD also includes videos
which can be played on any standard DVD player (including the Uconnect® Touchscreen Radios
if equipped with DVD player capabilities). Additional DVD operational information is located on
the back of the DVD sleeve.
For complete owner information, refer to your Owner's Manual on the DVD in the owner’s
kit provided at the time of new vehicle purchase.For your convenience, the information
contained on the DVD may also be printed and saved for future reference.
Chrysler Group LLC is committed to protecting our environment and natural resources. By
converting from paper to electronic delivery for the majority of the user information for your
vehicle, together we greatly reduce the demand for tree-based products and lessen the stress on
our environment.
INTRODUCTION/WELCOME
3
Page 9 of 164
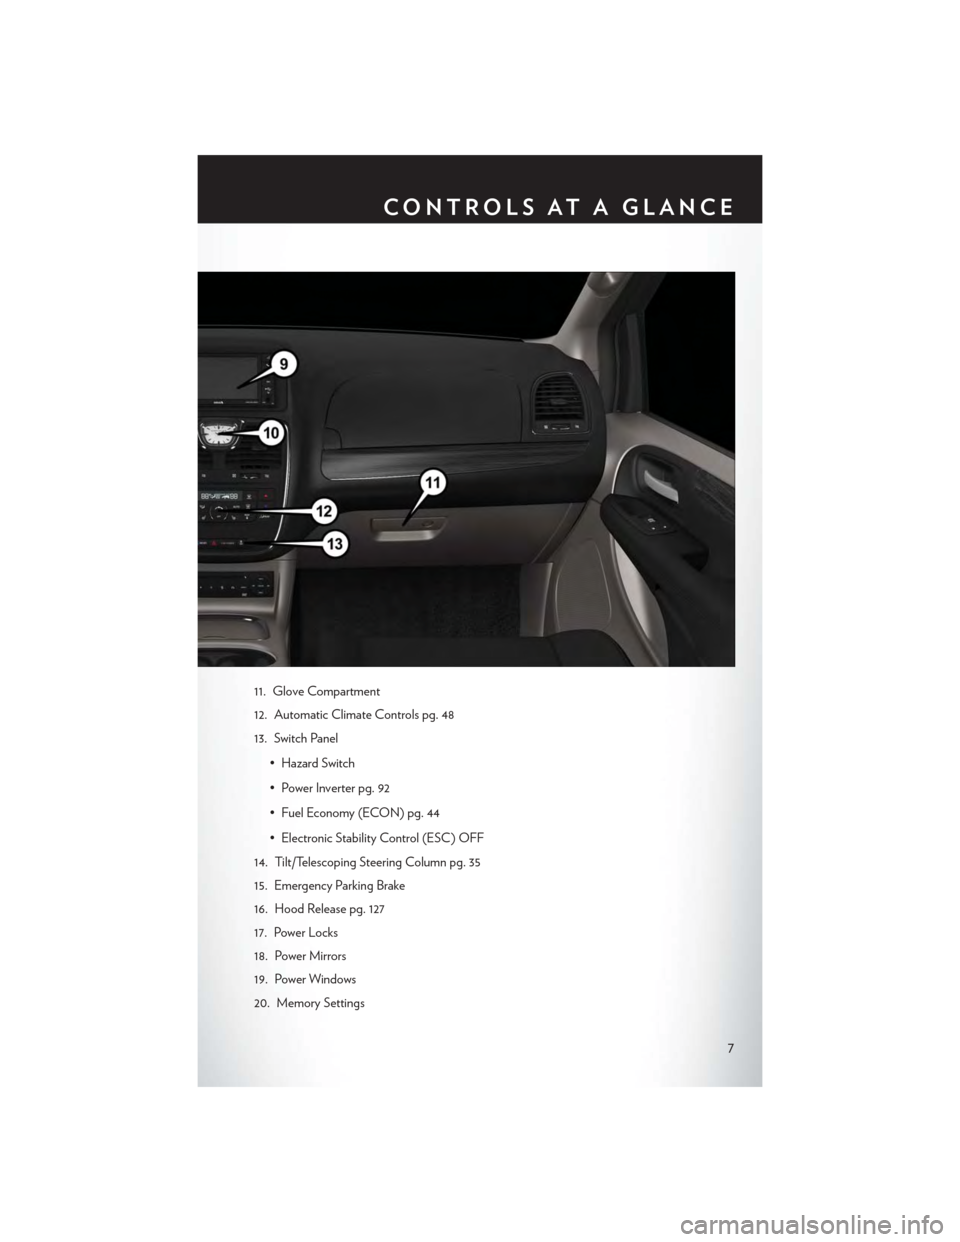
11. Glove Compartment
12. Automatic Climate Controls pg. 48
13. Switch Panel
• Hazard Switch
•PowerInverterpg.92
• Fuel Economy (ECON) pg. 44
• Electronic Stability Control (ESC) OFF
14. Tilt/Telescoping Steering Column pg. 35
15. Emergency Parking Brake
16. Hood Release pg. 127
17. Power Locks
18. Power Mirrors
19. Power Windows
20. Memory Settings
CONTROLS AT A GLANCE
7
Page 37 of 164
HEATED STEERING WHEEL
The steering wheel contains a heating element
that heats the steering wheel to one temperature
setting.
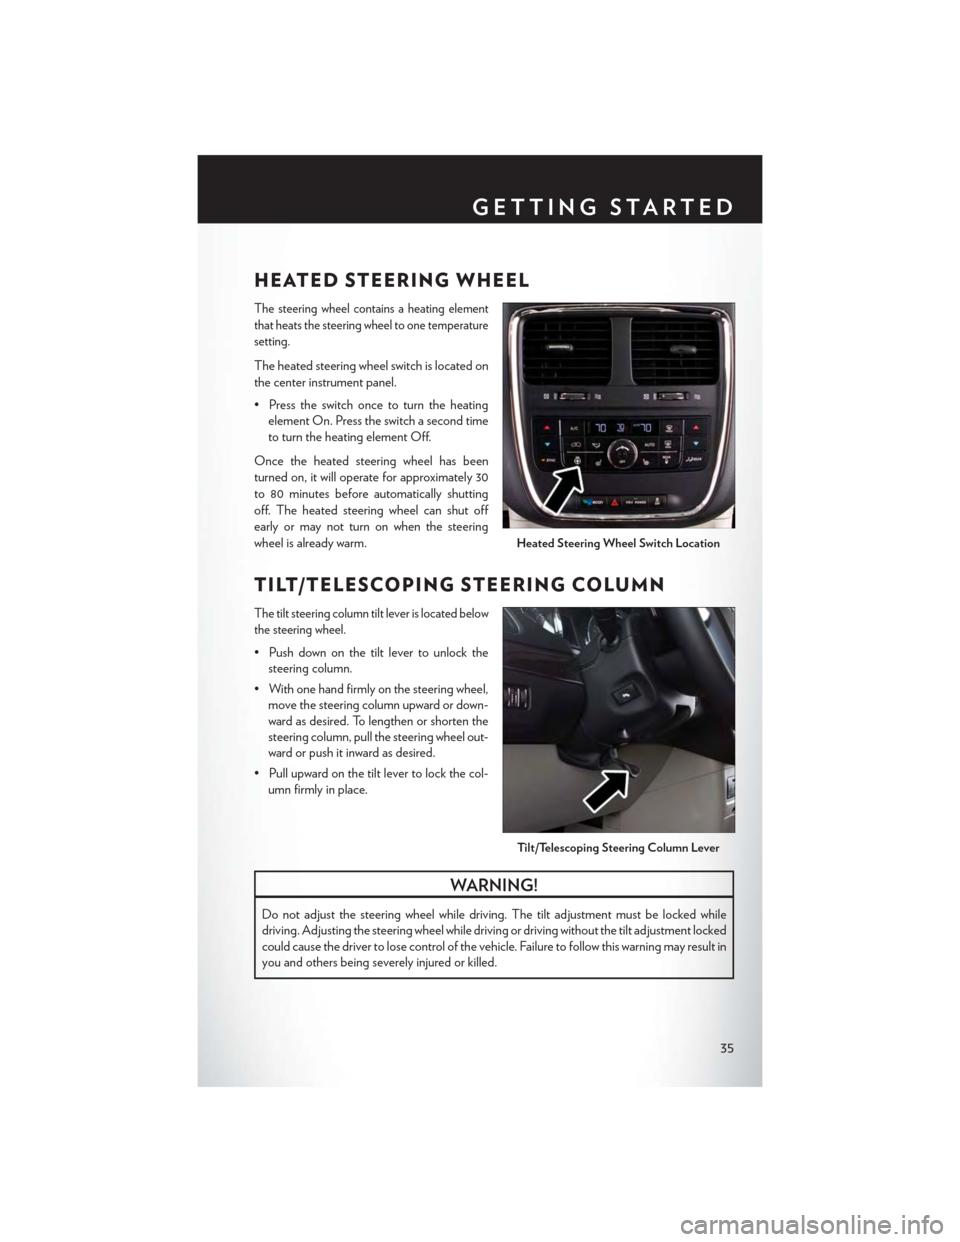
The heated steering wheel switch is located on
the center instrument panel.
• Press the switch once to turn the heating
element On. Press the switch a second time
to turn the heating element Off.
Once the heated steering wheel has been
turned on, it will operate for approximately 30
to 80 minutes before automatically shutting
off. The heated steering wheel can shut off
early or may not turn on when the steering
wheel is already warm.
TILT/TELESCOPING STEERING COLUMN
The tilt steering column tilt lever is located below
the steering wheel.
•Pushdownonthetiltlevertounlockthe
steering column.
• With one hand firmly on the steering wheel,
move the steering column upward or down-
ward as desired. To lengthen or shorten the
steering column, pull the steering wheel out-
ward or push it inward as desired.
•Pullupwardonthetiltlevertolockthecol-
umn firmly in place.
WARNING!
Do not adjust the steering wheel while driving. The tilt adjustment must be locked while
driving. Adjusting the steering wheel while driving or driving without the tilt adjustment locked
could cause the driver to lose control of the vehicle. Failure to follow this warning may result in
you and others being severely injured or killed.
Heated Steering Wheel Switch Location
Ti l t / Te l e s c o p i n g S t e e r i n g Co l u m n Le v e r
GETTING STARTED
35
Page 57 of 164
WIND BUFFETING
Wind buffeting can be described as a helicopter-type percussion sound. If buffeting occurs with
the rear windows open, adjust the front and rear windows together.
If buffeting occurs with the sunroof open, adjust the sunroof opening, or adjust any window. This
will minimize buffeting.
OPERATING YOUR VEHICLE
55
Page 68 of 164
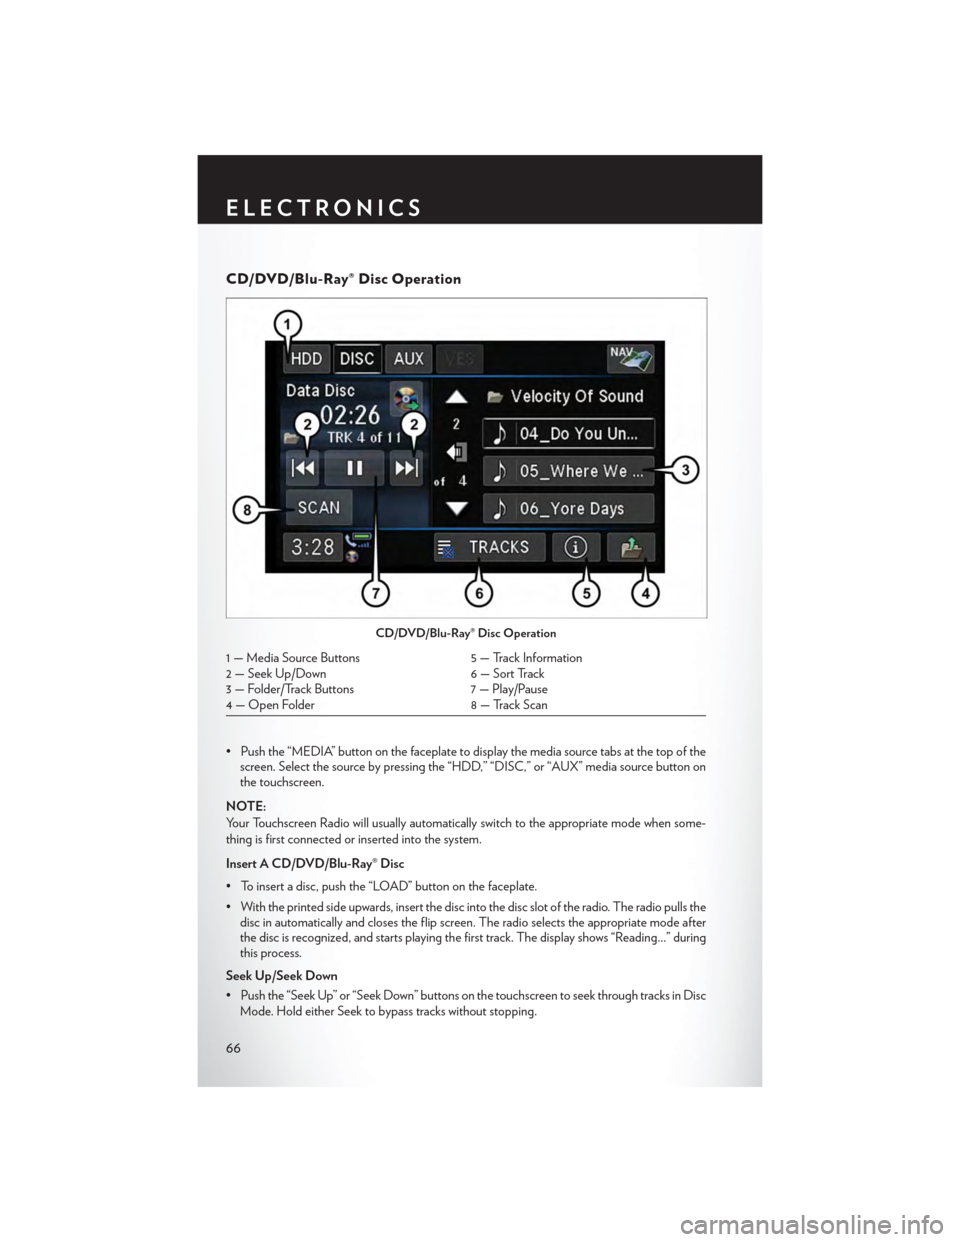
CD/DVD/Blu-Ray® Disc Operation
• Push the “MEDIA” button on the faceplate to display the media source tabs at the top of thescreen. Select the source by pressing the “HDD,” “DISC,” or “AUX” media source button onthe touchscreen.
NOTE:
Yo u r To u c h s c r e e n R a d i o w i l l u s u a l l y a u t o m a t i c a l l y s w i t c h t o t h e a p p r o p r i a t e m o d e w h e n s o m e -
thing is first connected or inserted into the system.
Insert A CD/DVD/Blu-Ray® Disc
• To insert a disc, push the “LOAD” button on the faceplate.
• With the printed side upwards, insert the disc into the disc slot of the radio. The radio pulls thedisc in automatically and closes the flip screen. The radio selects the appropriate mode afterthe disc is recognized, and starts playing the first track. The display shows “Reading...” duringthis process.
Seek Up/Seek Down
• Push the “Seek Up” or “Seek Down” buttons on the touchscreen to seek through tracks in Disc
Mode. Hold either Seek to bypass tracks without stopping.
CD/DVD/Blu-Ray® Disc Operation
1 — Media Source Buttons5 — Track Information2 — Seek Up/Down6 — Sort Track3 — Folder/Track Buttons7 — Play/Pause4 — Open Folder8 — Track Scan
ELECTRONICS
66
Page 69 of 164
Audio Jack Operation
The AUX/Audio Jack provides a means to connect a portable audio device, such as an MP3
player or an iPod®, to the vehicle’s sound system. This requires the use of a 3.5 mm stereo audio
patch cable.
• Push the MEDIA button on the faceplate then the “AUX” button on the touchscreen tochange the mode to auxiliary device if the Audio Jack is connected, allowing the music fromyour portable device to play through the vehicle's speakers.
NOTE:
The functions of the portable device are controlled using the device itself, not the buttons on the
radio. However, the volume may be controlled using the radio or portable device.
Hard Disk Drive (HDD) Operation
•TheHardDiskDrive(HDD)modegivesyouaccesstotheaudiofilesontheinternalharddisk
drive. It functions similar to a CD player, with the exception that the internal HDD can hold
more tracks.
•Itisalsopossibletoimportdisplaypicturestotheinternalharddiskdrive.Thepicturescanbe
displayed on the right half of the radio screen.
• Before using the HDD mode, you will need to copy songs and pictures to the internal
hard drive. Songs and pictures can be added to the hard drive by using a CD or USB device
(e.g. thumb drive or memory stick).
NOTE:
• HDD supports only .jpg/JPEG formats for photos.
•WMA/MP3FilesandSelectiveSongsfromaCDcanalsobeaddedtotheHDD.Seethe
Uconnect® 430/430N Supplement Manual for more information.
Copying Music From CD
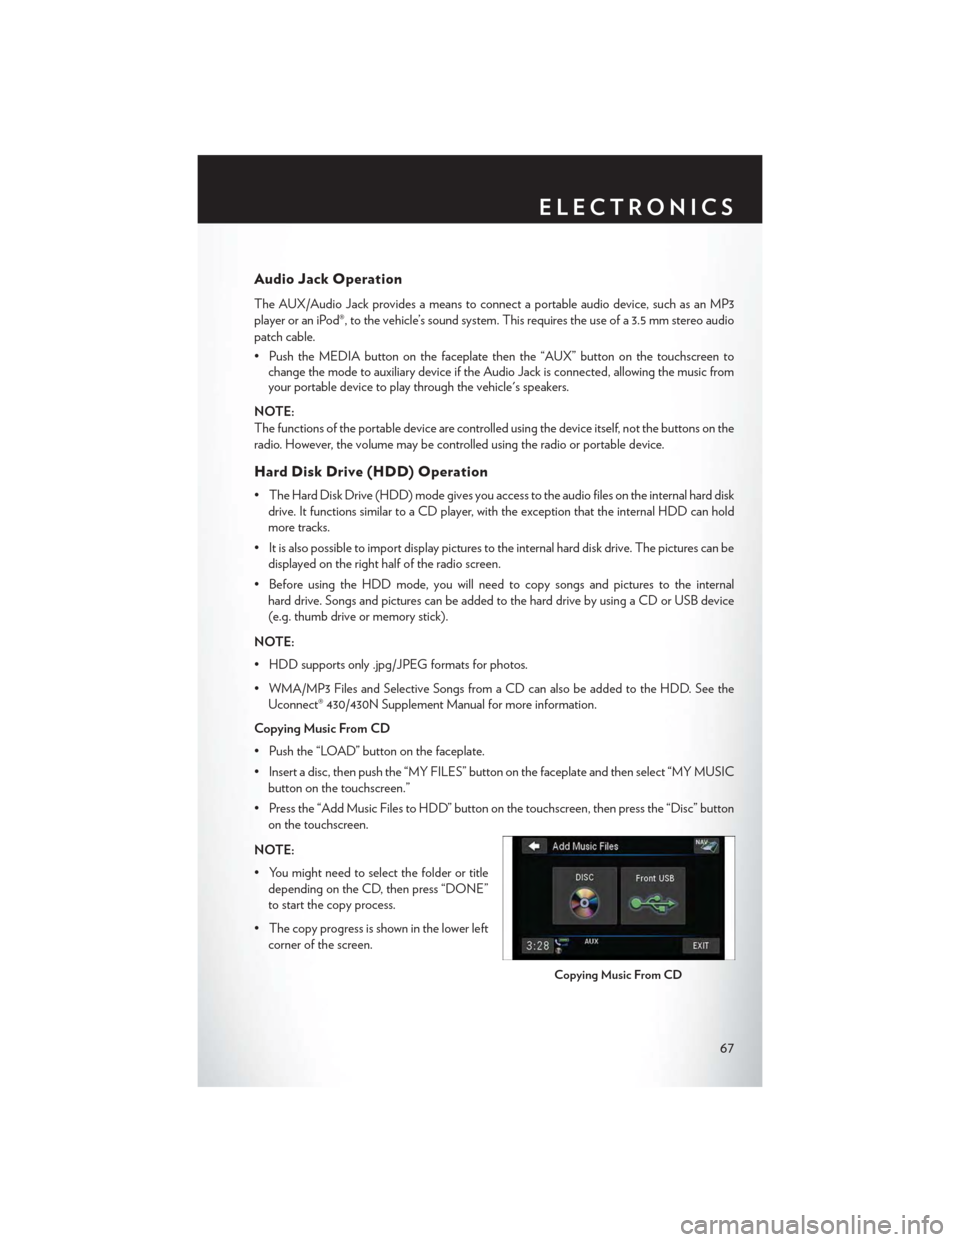
• Push the “LOAD” button on the faceplate.
• Insert a disc, then push the “MY FILES” button on the faceplate and then select “MY MUSIC
button on the touchscreen.”
•Pressthe“AddMusicFilestoHDD”buttononthetouchscreen,thenpressthe“Disc”button
on the touchscreen.
NOTE:
• You might need to select the folder or title
depending on the CD, then press “DONE”
to start the copy process.
• The copy progress is shown in the lower left
corner of the screen.
Copying Music From CD
ELECTRONICS
67
Page 75 of 164
Taking A Detour
To t a k e a d e t o u r y o u m u s t b e n a v i g a t i n g a r o u t e .
•Pressthe“backarrow”iconbuttononthetouchscreenmultipletimestoreturntotheMain
Navigation menu.
• Press the “Detour” button on the touchscreen.
NOTE:
If the route you are currently taking is the only reasonable option, the device might not calculate
a detour.
Acquiring Satellites
The GPS Satellite strength bars indicate the strength of your satellite reception.
•Acquiringsatellitesignalscantakeafewminutes.Whenatleastoneofthebarsisgreen,your
device has acquired satellite signals.
•Youmayexperiencedelaysreceivingsatellitesignalswheninareaswithanobstructedviewto
the sky, such as garages, tunnels, or large cities with tall buildings.
SiriusXM SATELLITE RADIO/TRAVEL LINK
•SiriusXMTravelLinkrequiresasubscription,soldseparatelyafterthefive(5)yeartrial
subscription included with your vehicle purchase.
•SiriusXMTravelLinkisonlyavailableintheUnitedStates.
•ThefollowingdescribesfeaturesthatareavailablewheninSiriusXMSatelliteRadiomode.
•ToaccessSiriusXMSatelliteRadio,pushtheRADIO/MEDIAorRADIObuttononthe
faceplate, then press the “SAT” button on the touchscreen.
Info
• Press the “i” button on the touchscreen to view detailed information about the current Sirius
XM Satellite channel.
SiriusXM Parental Controls
• SiriusXM offers the option to permanently block selected channels. Call 1-888-539-7474 and
request the Family Package.
•Uconnect® 430/430N and 730N:Push the “MENU” button on the faceplate while in
SiriusXM™ Satellite Radio Mode, then press the “Channel Lock” to enable and/or disable
desired channels. The SEEK and SCAN function will then only display channels without
Channel lock.
ELECTRONICS
73
Page 78 of 164
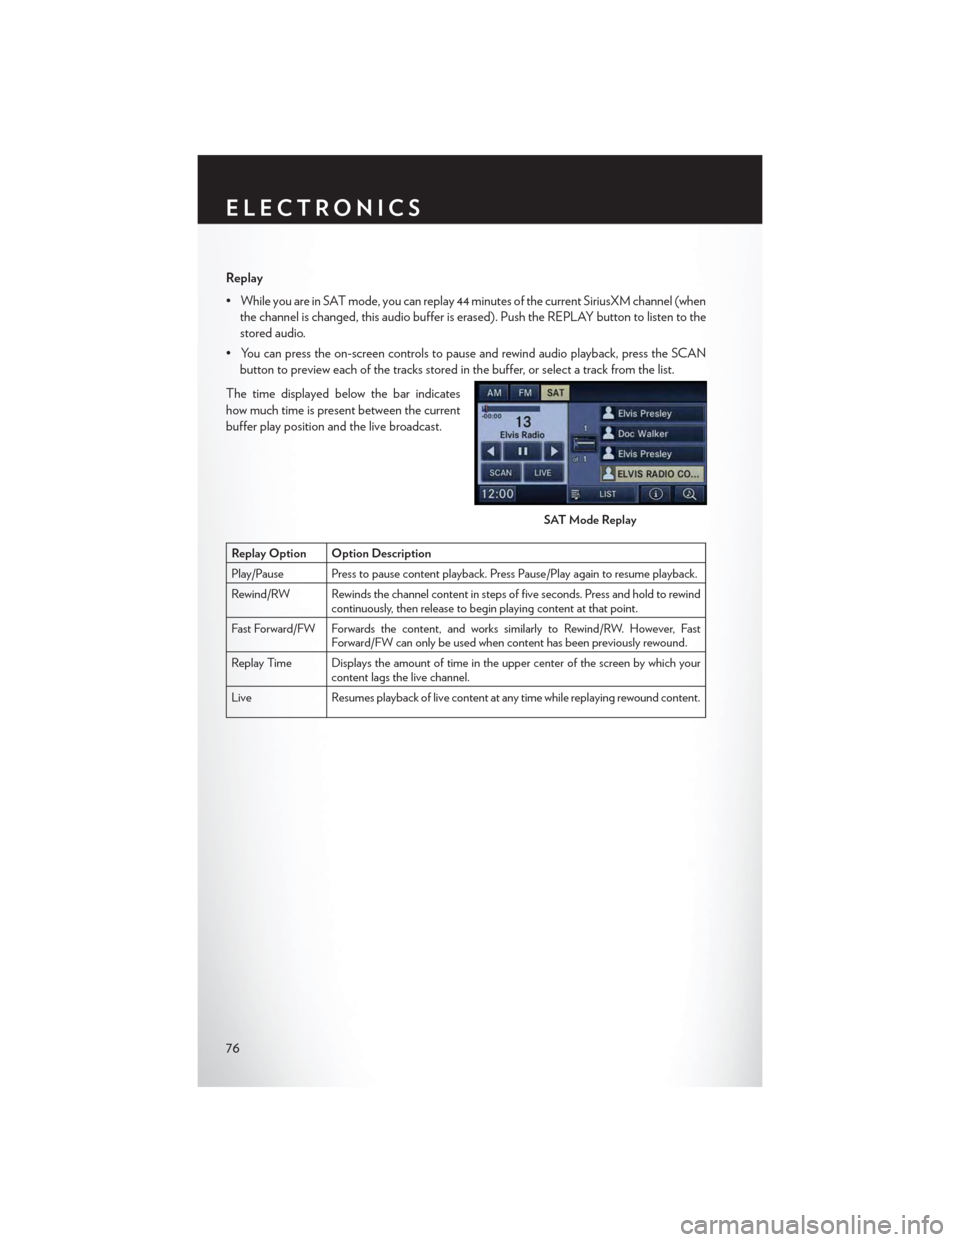
Replay
•WhileyouareinSATmode,youcanreplay44minutesofthecurrentSiriusXMchannel(when
the channel is changed, this audio buffer is erased). Push the REPLAY button to listen to the
stored audio.
•Youcanpresstheon-screencontrolstopauseandrewindaudioplayback,presstheSCAN
button to preview each of the tracks stored in the buffer, or select a track from the list.
The time displayed below the bar indicates
how much time is present between the current
buffer play position and the live broadcast.
Replay Option Option Description
Play/Pause Press to pause content playback. Press Pause/Play again to resume playback.
Rewind/RW Rewinds the channel content in steps of five seconds. Press and hold to rewindcontinuously, then release to begin playing content at that point.
Fast For ward/FW For wards the content, and works similarly to Rewind/RW. However, FastForward/FW can only be used when content has been previously rewound.
Replay Time Displays the amount of time in the upper center of the screen by which yourcontent lags the live channel.
Live Resumes playback of live content at any time while replaying rewound content.
SAT Mode Replay
ELECTRONICS
76
Page 87 of 164
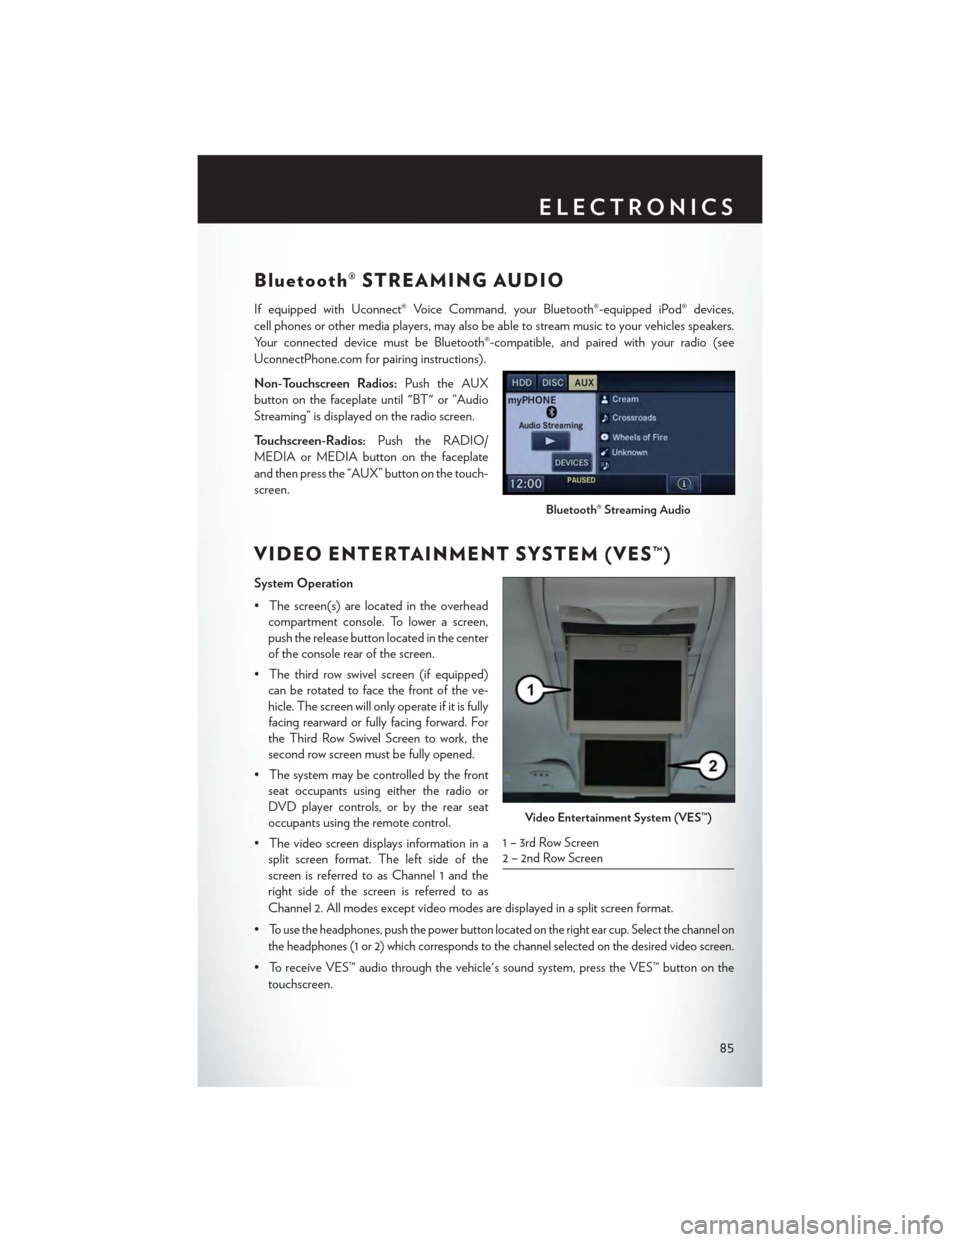
Bluetooth® STREAMING AUDIO
If equipped with Uconnect® Voice Command, your Bluetooth®-equipped iPod® devices,
cell phones or other media players, may also be able to stream music to your vehicles speakers.
Yo u r c o n n e c t e d d e v i c e m u s t b e B l u e t o o t h ® - c o m p a t i b l e , a n d p a i r e d w i t h y o u r r a d i o ( s e e
UconnectPhone.com for pairing instructions).
Non-Touchscreen Radios:Push the AUX
button on the faceplate until "BT" or “Audio
Streaming” is displayed on the radio screen.
To u c h s c r e e n - R a d i o s :Push the RADIO/
MEDIA or MEDIA button on the faceplate
and then press the “AUX” button on the touch-
screen.
VIDEO ENTERTAINMENT SYSTEM (VES™)
System Operation
•Thescreen(s)arelocatedintheoverhead
compartment console. To lower a screen,
push the release button located in the center
of the console rear of the screen.
•Thethirdrowswivelscreen(ifequipped)
can be rotated to face the front of the ve-
hicle. The screen will only operate if it is fully
facing rearward or fully facing forward. For
the Third Row Swivel Screen to work, the
second row screen must be fully opened.
•Thesystemmaybecontrolledbythefront
seat occupants using either the radio or
DVD player controls, or by the rear seat
occupants using the remote control.
•Thevideoscreendisplaysinformationina
split screen format. The left side of the
screen is referred to as Channel 1 and the
right side of the screen is referred to as
Channel 2. All modes except video modes are displayed in a split screen format.
•To use the headphones, push the power button located on the right ear cup. Select the channel on
the headphones (1 or 2) which corresponds to the channel selected on the desired video screen.
•ToreceiveVES™audiothroughthevehicle'ssoundsystem,presstheVES™buttononthe
touchscreen.
Bluetooth® Streaming Audio
Video Entertainment System (VES™)
1 – 3rd Row Screen2 – 2nd Row Screen
ELECTRONICS
85