height adjustment CHRYSLER VOYAGER 1996 User Guide
[x] Cancel search | Manufacturer: CHRYSLER, Model Year: 1996, Model line: VOYAGER, Model: CHRYSLER VOYAGER 1996Pages: 1938, PDF Size: 55.84 MB
Page 101 of 1938
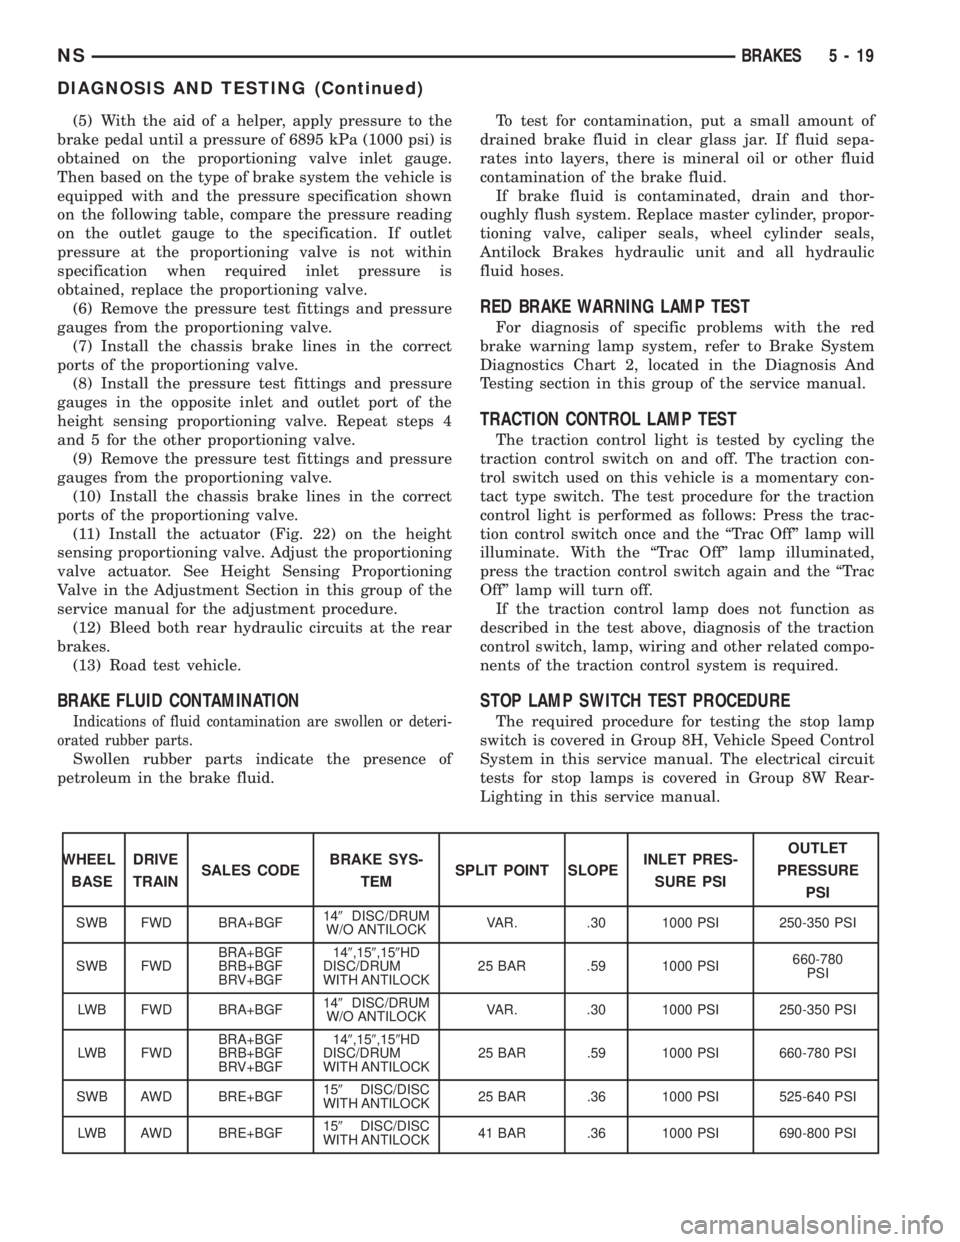
(5) With the aid of a helper, apply pressure to the
brake pedal until a pressure of 6895 kPa (1000 psi) is
obtained on the proportioning valve inlet gauge.
Then based on the type of brake system the vehicle is
equipped with and the pressure specification shown
on the following table, compare the pressure reading
on the outlet gauge to the specification. If outlet
pressure at the proportioning valve is not within
specification when required inlet pressure is
obtained, replace the proportioning valve.
(6) Remove the pressure test fittings and pressure
gauges from the proportioning valve.
(7) Install the chassis brake lines in the correct
ports of the proportioning valve.
(8) Install the pressure test fittings and pressure
gauges in the opposite inlet and outlet port of the
height sensing proportioning valve. Repeat steps 4
and 5 for the other proportioning valve.
(9) Remove the pressure test fittings and pressure
gauges from the proportioning valve.
(10) Install the chassis brake lines in the correct
ports of the proportioning valve.
(11) Install the actuator (Fig. 22) on the height
sensing proportioning valve. Adjust the proportioning
valve actuator. See Height Sensing Proportioning
Valve in the Adjustment Section in this group of the
service manual for the adjustment procedure.
(12) Bleed both rear hydraulic circuits at the rear
brakes.
(13) Road test vehicle.
BRAKE FLUID CONTAMINATION
Indications of fluid contamination are swollen or deteri-
orated rubber parts.
Swollen rubber parts indicate the presence of
petroleum in the brake fluid.To test for contamination, put a small amount of
drained brake fluid in clear glass jar. If fluid sepa-
rates into layers, there is mineral oil or other fluid
contamination of the brake fluid.
If brake fluid is contaminated, drain and thor-
oughly flush system. Replace master cylinder, propor-
tioning valve, caliper seals, wheel cylinder seals,
Antilock Brakes hydraulic unit and all hydraulic
fluid hoses.
RED BRAKE WARNING LAMP TEST
For diagnosis of specific problems with the red
brake warning lamp system, refer to Brake System
Diagnostics Chart 2, located in the Diagnosis And
Testing section in this group of the service manual.
TRACTION CONTROL LAMP TEST
The traction control light is tested by cycling the
traction control switch on and off. The traction con-
trol switch used on this vehicle is a momentary con-
tact type switch. The test procedure for the traction
control light is performed as follows: Press the trac-
tion control switch once and the ªTrac Offº lamp will
illuminate. With the ªTrac Offº lamp illuminated,
press the traction control switch again and the ªTrac
Offº lamp will turn off.
If the traction control lamp does not function as
described in the test above, diagnosis of the traction
control switch, lamp, wiring and other related compo-
nents of the traction control system is required.
STOP LAMP SWITCH TEST PROCEDURE
The required procedure for testing the stop lamp
switch is covered in Group 8H, Vehicle Speed Control
System in this service manual. The electrical circuit
tests for stop lamps is covered in Group 8W Rear-
Lighting in this service manual.
WHEEL
BASEDRIVE
TRAINSALES CODEBRAKE SYS-
TEMSPLIT POINT SLOPEINLET PRES-
SURE PSIOUTLET
PRESSURE
PSI
SWB FWD BRA+BGF149DISC/DRUM
W/O ANTILOCKVAR. .30 1000 PSI 250-350 PSI
SWB FWDBRA+BGF
BRB+BGF
BRV+BGF149,159,159HD
DISC/DRUM
WITH ANTILOCK25 BAR .59 1000 PSI660-780
PSI
LWB FWD BRA+BGF149DISC/DRUM
W/O ANTILOCKVAR. .30 1000 PSI 250-350 PSI
LWB FWDBRA+BGF
BRB+BGF
BRV+BGF149,159,159HD
DISC/DRUM
WITH ANTILOCK25 BAR .59 1000 PSI 660-780 PSI
SWB AWD BRE+BGF159DISC/DISC
WITH ANTILOCK25 BAR .36 1000 PSI 525-640 PSI
LWB AWD BRE+BGF159DISC/DISC
WITH ANTILOCK41 BAR .36 1000 PSI 690-800 PSI
NSBRAKES 5 - 19
DIAGNOSIS AND TESTING (Continued)
Page 139 of 1938
INSTALL
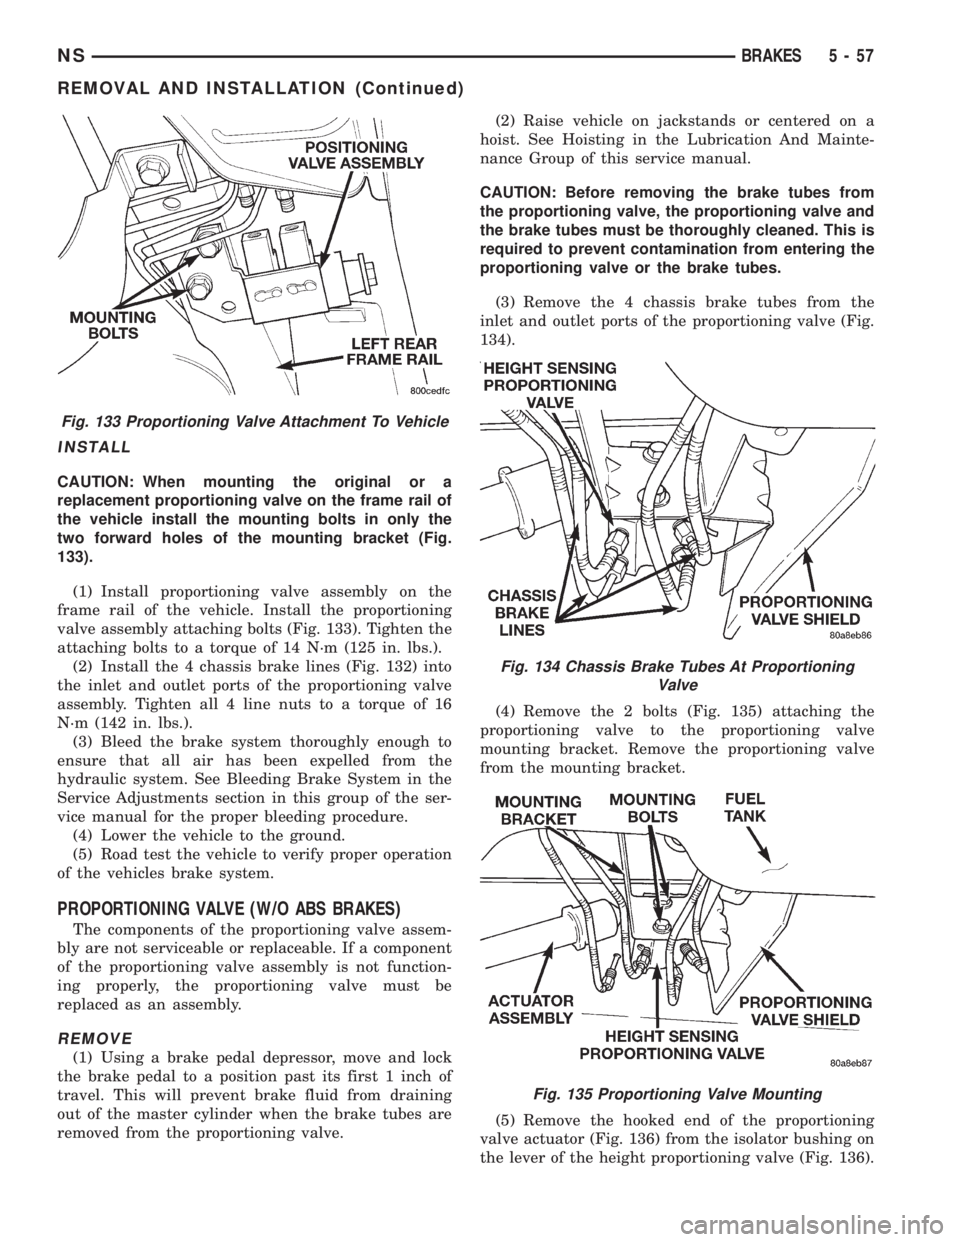
CAUTION: When mounting the original or a
replacement proportioning valve on the frame rail of
the vehicle install the mounting bolts in only the
two forward holes of the mounting bracket (Fig.
133).
(1) Install proportioning valve assembly on the
frame rail of the vehicle. Install the proportioning
valve assembly attaching bolts (Fig. 133). Tighten the
attaching bolts to a torque of 14 N´m (125 in. lbs.).
(2) Install the 4 chassis brake lines (Fig. 132) into
the inlet and outlet ports of the proportioning valve
assembly. Tighten all 4 line nuts to a torque of 16
N´m (142 in. lbs.).
(3) Bleed the brake system thoroughly enough to
ensure that all air has been expelled from the
hydraulic system. See Bleeding Brake System in the
Service Adjustments section in this group of the ser-
vice manual for the proper bleeding procedure.
(4) Lower the vehicle to the ground.
(5) Road test the vehicle to verify proper operation
of the vehicles brake system.
PROPORTIONING VALVE (W/O ABS BRAKES)
The components of the proportioning valve assem-
bly are not serviceable or replaceable. If a component
of the proportioning valve assembly is not function-
ing properly, the proportioning valve must be
replaced as an assembly.
REMOVE
(1) Using a brake pedal depressor, move and lock
the brake pedal to a position past its first 1 inch of
travel. This will prevent brake fluid from draining
out of the master cylinder when the brake tubes are
removed from the proportioning valve.(2) Raise vehicle on jackstands or centered on a
hoist. See Hoisting in the Lubrication And Mainte-
nance Group of this service manual.
CAUTION: Before removing the brake tubes from
the proportioning valve, the proportioning valve and
the brake tubes must be thoroughly cleaned. This is
required to prevent contamination from entering the
proportioning valve or the brake tubes.
(3) Remove the 4 chassis brake tubes from the
inlet and outlet ports of the proportioning valve (Fig.
134).
(4) Remove the 2 bolts (Fig. 135) attaching the
proportioning valve to the proportioning valve
mounting bracket. Remove the proportioning valve
from the mounting bracket.
(5) Remove the hooked end of the proportioning
valve actuator (Fig. 136) from the isolator bushing on
the lever of the height proportioning valve (Fig. 136).
Fig. 133 Proportioning Valve Attachment To Vehicle
Fig. 134 Chassis Brake Tubes At Proportioning
Valve
Fig. 135 Proportioning Valve Mounting
NSBRAKES 5 - 57
REMOVAL AND INSTALLATION (Continued)
Page 140 of 1938
INSTALL
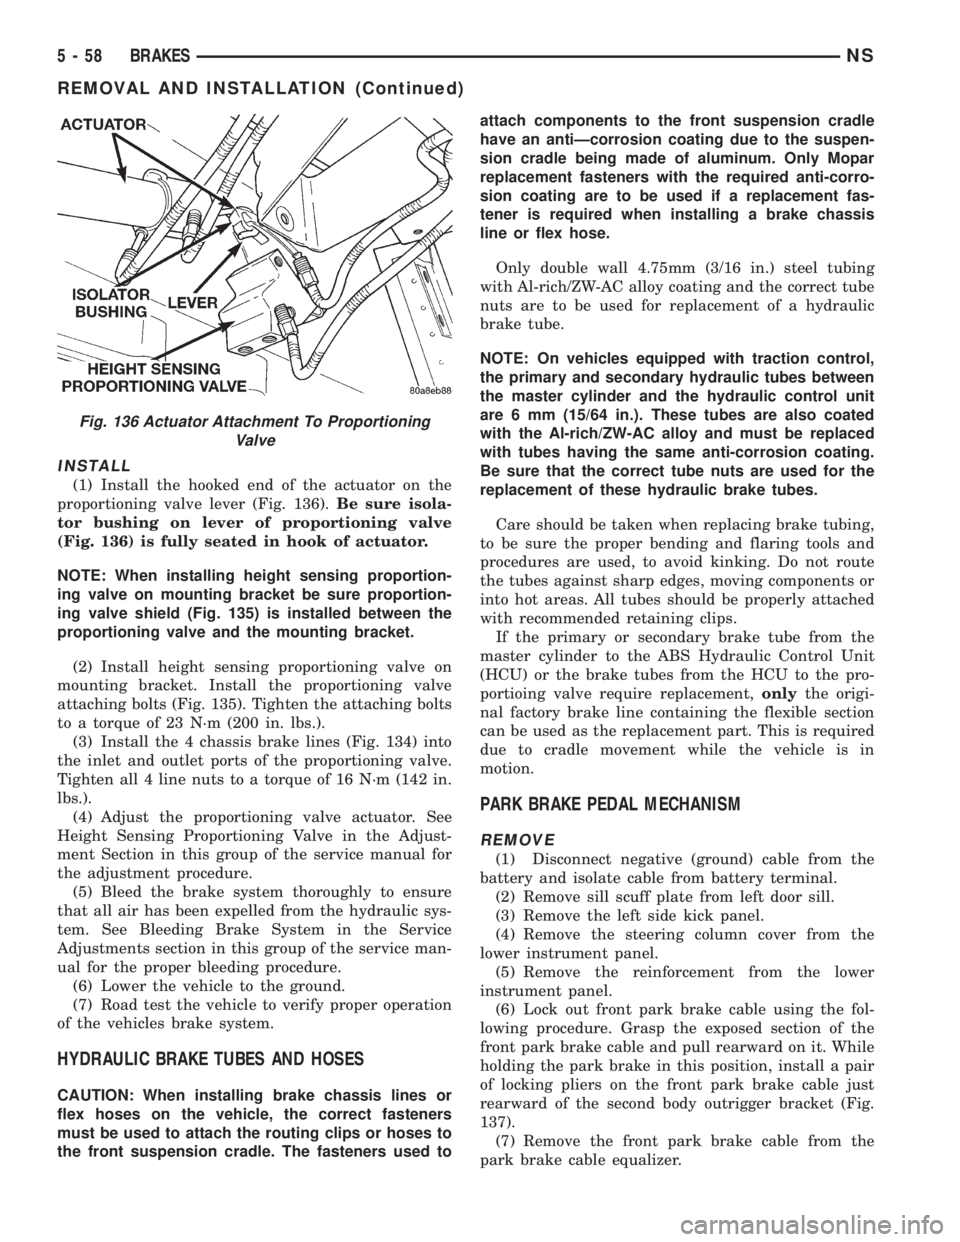
(1) Install the hooked end of the actuator on the
proportioning valve lever (Fig. 136).Be sure isola-
tor bushing on lever of proportioning valve
(Fig. 136) is fully seated in hook of actuator.
NOTE: When installing height sensing proportion-
ing valve on mounting bracket be sure proportion-
ing valve shield (Fig. 135) is installed between the
proportioning valve and the mounting bracket.
(2) Install height sensing proportioning valve on
mounting bracket. Install the proportioning valve
attaching bolts (Fig. 135). Tighten the attaching bolts
to a torque of 23 N´m (200 in. lbs.).
(3) Install the 4 chassis brake lines (Fig. 134) into
the inlet and outlet ports of the proportioning valve.
Tighten all 4 line nuts to a torque of 16 N´m (142 in.
lbs.).
(4) Adjust the proportioning valve actuator. See
Height Sensing Proportioning Valve in the Adjust-
ment Section in this group of the service manual for
the adjustment procedure.
(5) Bleed the brake system thoroughly to ensure
that all air has been expelled from the hydraulic sys-
tem. See Bleeding Brake System in the Service
Adjustments section in this group of the service man-
ual for the proper bleeding procedure.
(6) Lower the vehicle to the ground.
(7) Road test the vehicle to verify proper operation
of the vehicles brake system.
HYDRAULIC BRAKE TUBES AND HOSES
CAUTION: When installing brake chassis lines or
flex hoses on the vehicle, the correct fasteners
must be used to attach the routing clips or hoses to
the front suspension cradle. The fasteners used toattach components to the front suspension cradle
have an antiÐcorrosion coating due to the suspen-
sion cradle being made of aluminum. Only Mopar
replacement fasteners with the required anti-corro-
sion coating are to be used if a replacement fas-
tener is required when installing a brake chassis
line or flex hose.
Only double wall 4.75mm (3/16 in.) steel tubing
with Al-rich/ZW-AC alloy coating and the correct tube
nuts are to be used for replacement of a hydraulic
brake tube.
NOTE: On vehicles equipped with traction control,
the primary and secondary hydraulic tubes between
the master cylinder and the hydraulic control unit
are 6 mm (15/64 in.). These tubes are also coated
with the Al-rich/ZW-AC alloy and must be replaced
with tubes having the same anti-corrosion coating.
Be sure that the correct tube nuts are used for the
replacement of these hydraulic brake tubes.
Care should be taken when replacing brake tubing,
to be sure the proper bending and flaring tools and
procedures are used, to avoid kinking. Do not route
the tubes against sharp edges, moving components or
into hot areas. All tubes should be properly attached
with recommended retaining clips.
If the primary or secondary brake tube from the
master cylinder to the ABS Hydraulic Control Unit
(HCU) or the brake tubes from the HCU to the pro-
portioing valve require replacement,onlythe origi-
nal factory brake line containing the flexible section
can be used as the replacement part. This is required
due to cradle movement while the vehicle is in
motion.
PARK BRAKE PEDAL MECHANISM
REMOVE
(1) Disconnect negative (ground) cable from the
battery and isolate cable from battery terminal.
(2) Remove sill scuff plate from left door sill.
(3) Remove the left side kick panel.
(4) Remove the steering column cover from the
lower instrument panel.
(5) Remove the reinforcement from the lower
instrument panel.
(6) Lock out front park brake cable using the fol-
lowing procedure. Grasp the exposed section of the
front park brake cable and pull rearward on it. While
holding the park brake in this position, install a pair
of locking pliers on the front park brake cable just
rearward of the second body outrigger bracket (Fig.
137).
(7) Remove the front park brake cable from the
park brake cable equalizer.
Fig. 136 Actuator Attachment To Proportioning
Valve
5 - 58 BRAKESNS
REMOVAL AND INSTALLATION (Continued)
Page 163 of 1938
group of the service manual for the installation pro-
cedure.
(13) Install wheel and tire.
(14) Tighten the wheel mounting nuts in the
proper sequence until all nuts are torqued to half the
specified torque. Then repeat the tightening sequence
to the full specified torque of 129 N´m (95 ft. lbs.).
(15) Lower vehicle.
(16) Apply and release the park brake pedal one
time. This will seat and correctly adjust the park
brake cables.
CAUTION: Before moving vehicle, pump brake
pedal several times to ensure the vehicle has a firm
enough pedal to stop the vehicle.
(17) Road test the vehicle to ensure proper func-
tion of the vehicle's brake system.
PARK BRAKE CABLE ADJUSTMENT
The park brake cables on this vehicle have an
automatic self adjuster built into the park brake
pedal mechanism. When the foot operated park brake
pedal is in its released (upward most) position, a
clock spring automatically adjusts the park brake
cables. The park brake cables are adjusted (ten-
sioned) just enough to remove all the slack from the
cables. The automatic adjuster system will not over
adjust the cables causing rear brake drag.
Due to the automatic adjust feature of the park
brake pedal, adjustment of the parking brake cables
on these vehicles relies on proper drum brake and
park brake shoe adjustment. See Rear Brake Adjust-
ment and Park Brake Shoe Adjustment in the Ser-
vice Adjustments Section in this group of the service
manual.
When the park brake pedal is applied the self
adjuster is by-passed and the pedal operates nor-
mally to engage the park brakes.
When a service procedure needs to be performed on
the park brake pedal or the park brake cables, the
automatic self adjuster can be manually locked out
by the service technician.
PROPORTIONING VALVE (HEIGHT SENSING)
Proportioning valve actuator adjustment will be
required if there is a complaint of premature rear
wheel lockup and the front and rear brake shoe lin-
ings checked OK during inspection, the height sens-
ing proportioning valve required replacement, or
there is a complaint of excessive pedal effort and the
vacuum booster and brake pedal checked OK. Make
sure the proportioning valve and the mounting
bracket are firmly attached to the vehicle. Then, pro-
ceed with the following procedure to perform the
adjustment of the actuator.(1) Raise vehicle. Vehicle is to be raised and sup-
ported on jackstands or with a frame contact type
hoist so the rear suspension of the vehicle is hanging
free. See hoisting in the Lubrication And Mainte-
nance section of this service manual.
(2) Remove rear wheels/tires.
(3) Using an appropriate jack, support the rear
axle prior to the removal of the track bar and shock
absorber bolts from the rear axle.
(4) Unbolt the track bar from the rear axle.
(5) Unbolt both shock absorbers from the rear
axle.
(6) Loosen (do not remove) both of the leaf spring
to front spring hanger pivot bolts.
NOTE: When lowering the rear axle be sure that the
leaf springs do not come in contact with the hoist
limiting the downward movement of the axle. If this
occurs an improper adjustment of the actuator may
result.
(7) Lower the rear axle so it is at its farthest point
of downward movement.
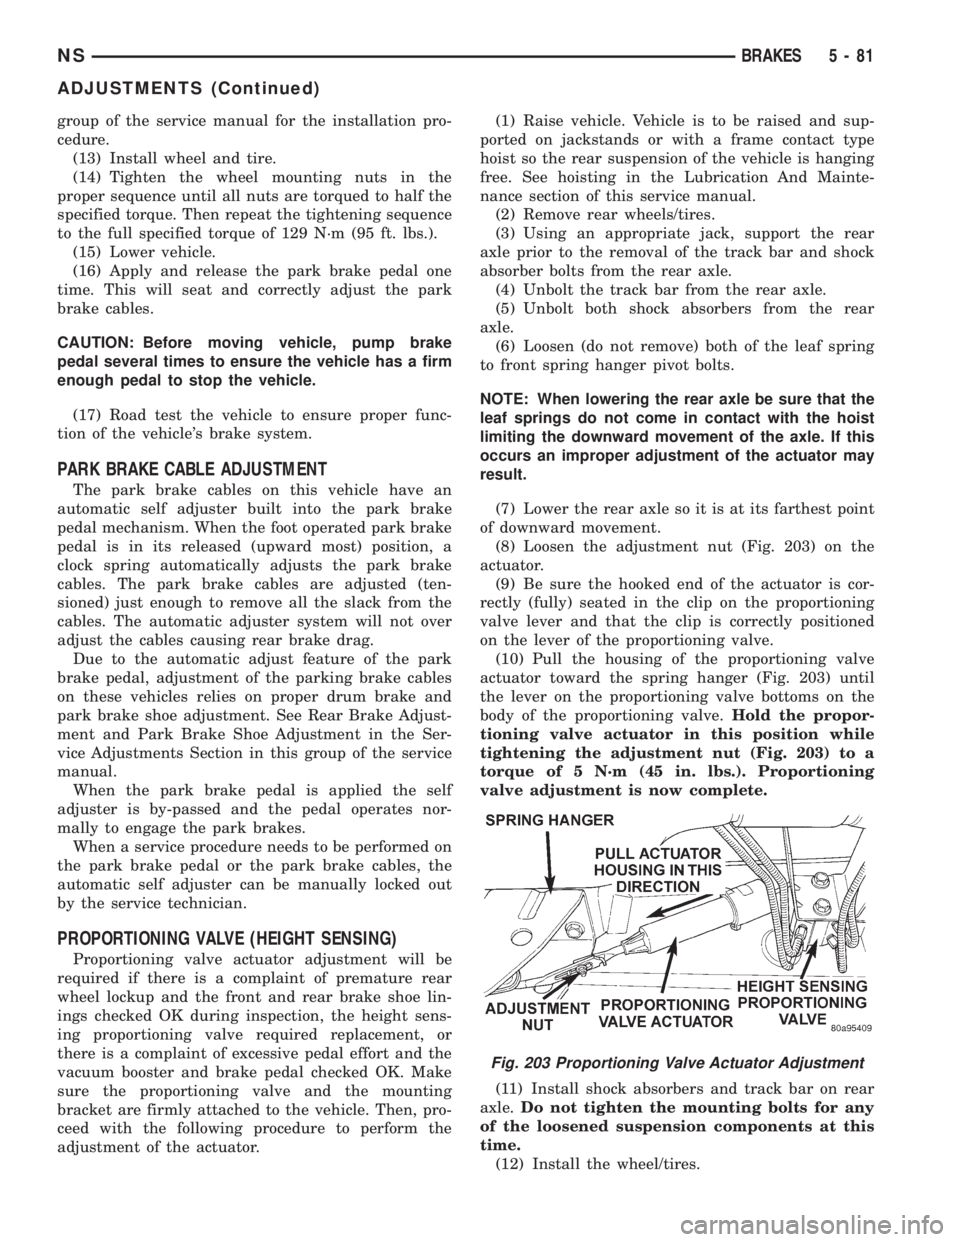
(8) Loosen the adjustment nut (Fig. 203) on the
actuator.
(9) Be sure the hooked end of the actuator is cor-
rectly (fully) seated in the clip on the proportioning
valve lever and that the clip is correctly positioned
on the lever of the proportioning valve.
(10) Pull the housing of the proportioning valve
actuator toward the spring hanger (Fig. 203) until
the lever on the proportioning valve bottoms on the
body of the proportioning valve.Hold the propor-
tioning valve actuator in this position while
tightening the adjustment nut (Fig. 203) to a
torque of 5 N´m (45 in. lbs.). Proportioning
valve adjustment is now complete.
(11) Install shock absorbers and track bar on rear
axle.Do not tighten the mounting bolts for any
of the loosened suspension components at this
time.
(12) Install the wheel/tires.
Fig. 203 Proportioning Valve Actuator Adjustment
NSBRAKES 5 - 81
ADJUSTMENTS (Continued)
Page 165 of 1938
BRAKE ACTUATION SYSTEM
ACTUATION:
Vacuum Operated Power Brakes.........Standard
Hydraulic System...........Dual-Diagonally Split
Antilock Brake Sytem (Teves Mark-20)...........
MASTER CYLINDER ASSEMBLY:
Supplier..............................Bosch
Type For Non-ABSAnd
ABS Brakes. . . .Conventional Compensating Port
Type For ABS Brakes
With Traction Control . . .Dual Center Port Design
Body Material...............Anodized Aluminum
Reservoir Material................Polypropelene
MASTER CYLINDER BORE /
STROKE AND SPLIT:
ABS W/Disc/Drum Brakes......23.8 mm x 36 mm
(.937 in. x 1.47 in.)
AWD W/Disc/Disc Brakes........25.4 mm x 39 mm
(1.00 in. x 1.50 in.)
Displacement Split.....................50/50
MASTER CYLINDER FLUID OUTLET PORTS:
Non-ABS And ABS . . .Primary 7/16±24 Secondary 7/
16±24
ABS With Traction Control.......Primary M12 x 1
Secondary M12 x 1
Outlet Fitting Type Non-ABS
AndABS...........Double Wall Inverted Flare
Outlet Fitting Type ABS With
Traction Control...................ISO Flare
ABS HYDRAULIC CONTROL UNIT:
Hydraulic Tube Fitting Type............ISO Flare
BOOSTER:
Make/Type.................Bosch Vacuum Assist
Mounting Studs.....................M8x1.25
Type .........................270 ZLT RSMV
Boost At 20 inches Of
Manifold Vacuum...........3800 N´m (850 lbs.)
PROPORTIONING VALVE:
Material...........................Aluminum
Function....................Hydraulic Pressure
Proportioning To Rear Brakes
BRAKE PEDAL
Pedal Ratio.............................3.36
BRAKE FASTENER TORQUE SPECIFICATIONS
DESCRIPTION TORQUE
BRAKE TUBES:
Tube Nuts To Fittings And
Components..............17N´m(145 in. lbs.)
BRAKE HOSE:
To Caliper Banjo Bolt..........48N´m(35ft.lbs.)
Intermediate Bracket.........12N´m(105 in. lbs.)
MASTER CYLINDER:
To Vacuum Booster
Mounting Nut............25N´m(225 in. lbs.)
FIXED PROPORTIONING VALVE:
To Frame Rail Attaching
Bolts....................14N´m(125 in. lbs.)
HEIGHT SENSING PROPORTIONING VALVE:
To Mounting Bracket
Attaching Bolts...........23N´m(200 in. lbs.)
Actuator Assembly
Adjustment Nut.............5N´m(45in.lbs.)
Mounting Bracket To Frame
Rail Bolts................17N´m(150 in. lbs.)
JUNCTION BLOCK (NON-ABS BRAKES)
To Suspension Cradle
Mounting Bolt............28N´m(250 in. lbs.)
VACUUM BOOSTER:
To Dash Panel Mounting
Nuts....................28N´m(250 in. lbs.)
REAR WHEEL CYLINDER:
To Support Plate Mounting
Bolts.....................8N´m(75in.lbs.)
Bleeder Screw...............10N´m(80in.lbs.)
BRAKE SUPPORT PLATE:
To Rear Axle Mounting Bolts . . .130 N´m (95 ft. lbs.)
DISC BRAKE CALIPER:
Guide Pin Bolts..............41N´m(30ft.lbs.)
Bleeder Screw..............15N´m(125 in. lbs.)
ABS HYDRAULIC CONTROL UNIT:
Mounting Bracket To
Suspension Cradle Bolts.....28N´m(250 in. lbs.)
To Mounting Bracket Isolator
Attaching Bolts............11N´m(97in.lbs.)
CAB To HCU Mounting Screws . . .2 N´m (17 in. lbs.)
WHEEL SPEED SENSOR:
To Axle Or Steering Knuckle
Mounting Bolt............12N´m(105 in. lbs.)
PARKING BRAKE:
Pedal Assembly Mounting
Bolts....................28N´m(250 in. lbs.)
REAR HUB AND BEARING:
To Axle Mounting Bolts........129 N´m (95 ft. lbs.)
WHEEL:
Stud Lug Nut........115±156 N´m (84-115 ft. lbs.)
NSBRAKES 5 - 83
SPECIFICATIONS (Continued)
Page 194 of 1938
SPECIFICATIONS
SPEED SENSOR TONE WHEEL RUNOUT
The total indicator runout allowed for both the
front and rear tone wheel measured using a dial indi-
cator is 0.15 mm (.006 in.).
WHEEL SPEED SENSOR TO TONE WHEEL
CLEARANCE
FRONT WHEEL
Minimum Clearance .35mm (.014 in.)
Maxamum Clearance 1.2 mm (.047 in.)
REAR WHEEL
Minimum Clearance .40mm (.016 in.)
Maxamum Clearance 1.2 mm (.047 in.)
BRAKE FASTENER TORQUE SPECIFICATIONS
DESCRIPTION TORQUE
BRAKE TUBES:
Tube Nuts To Fittings And
Components..............17N´m(145 in. lbs.)
BRAKE HOSE:
To Caliper Banjo Bolt..........48N´m(35ft.lbs.)
Intermediate Bracket.........12N´m(105 in. lbs.)
MASTER CYLINDER:
To Vacuum Booster
Mounting Nut............25N´m(225 in. lbs.)
FIXED PROPORTIONING VALVE:
To Frame Rail Attaching
Bolts....................14N´m(125 in. lbs.)
HEIGHT SENSING PROPORTIONING VALVE:
To Mounting Bracket
Attaching Bolts...........23N´m(200 in. lbs.)
Actuator Assembly
Adjustment Nut.............5N´m(45in.lbs.)
Mounting Bracket To
Frame Rail Bolts..........17N´m(150 in. lbs.)
JUNCTION BLOCK (NON-ABS BRAKES)
To Suspension Cradle
Mounting Bolt............28N´m(250 in. lbs.)
VACUUM BOOSTER:
To Dash Panel Mounting
Nuts....................28N´m(250 in. lbs.)DESCRIPTION TORQUE
REAR WHEEL CYLINDER:
To Support Plate Mounting
Bolts.....................8N´m(75in.lbs.)
Bleeder Screw...............10N´m(80in.lbs.)
BRAKE SUPPORT PLATE:
To Rear Axle Mounting Bolts . . .130 N´m (95 ft. lbs.)
DISC BRAKE CALIPER:
Guide Pin Bolts..............41N´m(30ft.lbs.)
Bleeder Screw..............15N´m(125 in. lbs.)
ABS HYDRAULIC CONTROL UNIT:
Mounting Bracket To
Suspension Cradle Bolts.....28N´m(250 in. lbs.)
To Mounting Bracket Isolator
Attaching Bolts............11N´m(97in.lbs.)
CAB To HCU Mounting Screws . . .2 N´m (17 in. lbs.)
WHEEL SPEED SENSOR:
To Axle Or Steering Knuckle
Mounting Bolt............12N´m(105 in. lbs.)
PARKING BRAKE:
Pedal Assembly Mounting
Bolts....................28N´m(250 in. lbs.)
REAR HUB AND BEARING:
To Axle Mounting Bolts........129 N´m (95 ft. lbs.)
WHEEL:
Stud Lug Nut........115±156 N´m (84-115 ft. lbs.)
5 - 112 BRAKESNS
Page 457 of 1938
HEADLAMP ALIGNMENT
INDEX
page page
GENERAL INFORMATION
HEADLAMP ALIGNMENT................... 5
SERVICE PROCEDURES
HEADLAMP ALIGNMENT PREPARATION....... 5ADJUSTMENTS
HEADLAMP/FOG LAMP ADJUSTMENT USING
ALIGNMENT SCREEN.................... 5
GENERAL INFORMATION
HEADLAMP ALIGNMENT
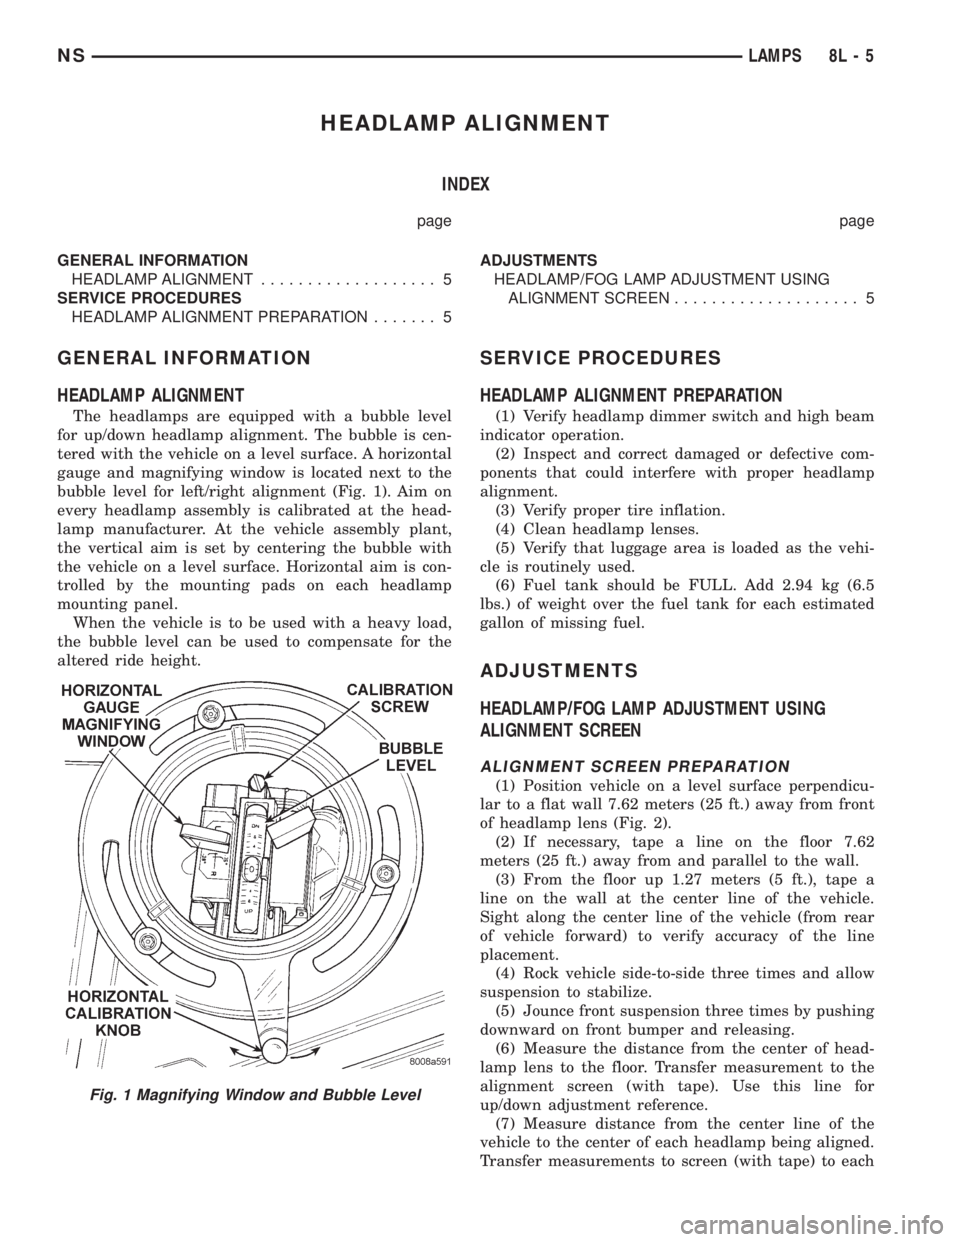
The headlamps are equipped with a bubble level
for up/down headlamp alignment. The bubble is cen-
tered with the vehicle on a level surface. A horizontal
gauge and magnifying window is located next to the
bubble level for left/right alignment (Fig. 1). Aim on
every headlamp assembly is calibrated at the head-
lamp manufacturer. At the vehicle assembly plant,
the vertical aim is set by centering the bubble with
the vehicle on a level surface. Horizontal aim is con-
trolled by the mounting pads on each headlamp
mounting panel.
When the vehicle is to be used with a heavy load,
the bubble level can be used to compensate for the
altered ride height.
SERVICE PROCEDURES
HEADLAMP ALIGNMENT PREPARATION
(1) Verify headlamp dimmer switch and high beam
indicator operation.
(2) Inspect and correct damaged or defective com-
ponents that could interfere with proper headlamp
alignment.
(3) Verify proper tire inflation.
(4) Clean headlamp lenses.
(5) Verify that luggage area is loaded as the vehi-
cle is routinely used.
(6) Fuel tank should be FULL. Add 2.94 kg (6.5
lbs.) of weight over the fuel tank for each estimated
gallon of missing fuel.
ADJUSTMENTS
HEADLAMP/FOG LAMP ADJUSTMENT USING
ALIGNMENT SCREEN
ALIGNMENT SCREEN PREPARATION
(1) Position vehicle on a level surface perpendicu-
lar to a flat wall 7.62 meters (25 ft.) away from front
of headlamp lens (Fig. 2).
(2) If necessary, tape a line on the floor 7.62
meters (25 ft.) away from and parallel to the wall.
(3) From the floor up 1.27 meters (5 ft.), tape a
line on the wall at the center line of the vehicle.
Sight along the center line of the vehicle (from rear
of vehicle forward) to verify accuracy of the line
placement.
(4) Rock vehicle side-to-side three times and allow
suspension to stabilize.
(5) Jounce front suspension three times by pushing
downward on front bumper and releasing.
(6) Measure the distance from the center of head-
lamp lens to the floor. Transfer measurement to the
alignment screen (with tape). Use this line for
up/down adjustment reference.
(7) Measure distance from the center line of the
vehicle to the center of each headlamp being aligned.
Transfer measurements to screen (with tape) to each
Fig. 1 Magnifying Window and Bubble Level
NSLAMPS 8L - 5
Page 483 of 1938
HEADLAMP ALIGNMENT
INDEX
page page
SERVICE PROCEDURES
HEADLAMP ALIGNMENT PREPARATION...... 5ADJUSTMENTS
HEADLAMP/FOG LAMP ADJUSTMENT USING
ALIGNMENT SCREEN.................. 5
SERVICE PROCEDURES
HEADLAMP ALIGNMENT PREPARATION
(1) Verify headlamp dimmer switch and high beam
indicator operation.
(2) Verify that the headlamp leveling switch is in
the ª0º position.
(3) Inspect and correct damaged or defective com-
ponents that could interfere with proper headlamp
alignment.
(4) Verify proper tire inflation.
(5) Clean headlamp lenses.
(6) Verify that luggage area is loaded as the vehi-
cle is routinely used.
(7) Fuel tank should be FULL. Add 2.94 kg (6.5
lbs.) of weight over the fuel tank for each estimated
gallon of missing fuel.
ADJUSTMENTS
HEADLAMP/FOG LAMP ADJUSTMENT USING
ALIGNMENT SCREEN
ALIGNMENT SCREEN PREPARATION
(1) Position vehicle on a level surface perpendicu-
lar to a flat wall 10 meters (32.8 ft.) away from front
of headlamp lens (Fig. 1).
(2) Place 75 kg in the driver's seat to simulate the
ride height of the vehicle when driven.
(3) If necessary, tape a line on the floor 10 meters
(32.8 ft) away from and parallel to the wall.
(4) From the floor up 1.27 meters (5 ft), tape a line
on the wall at the centerline of the vehicle. Sight
along the centerline of the vehicle (from rear of vehi-
cle forward) to verify accuracy of the line placement.
NS/GSLAMPS 8L - 5
Page 1112 of 1938
front seal is retained in the oil pump case and the
rear is retained in a block-mounted housing.
PISTONS:Are aluminum alloy with a steel strut,
short height, and thin wall so as to be autothermic
and light weight. The piston head with valve
recesses, in combination with the cylinder head,
forms a compact spherical head with clearance for
total valve lift with pistons at top dead center. The
piston skirt, top and second ring lands are finished to
a tapered roughness for oil retention and high resis-
tance to scuffing. Piston pins, pressed into place, join
the pistons to the connecting rods.
CYLINDER HEAD:The alloy cylinder heads fea-
ture cross-flow type intake and exhaust ports. Valve
guides and inserts are hardened cast iron. Valves of
heat resistance steel are arranged in a V with each
camshaft on center. To improve combustion speed the
chambers are a compact spherical design with a
squish area of approximately 30 percent of the piston
top area. The cylinder heads are common to either
cylinder bank by reversing the direction of installa-
tion.
CAMSHAFTS:Two overhead camshafts provide
valve actuation, one front (radiator side of cylinder
bank) and one rear. The front camshaft is provided
with a distributor drive and is longer. Both cam-
shafts are supported by four bearing journals, thrust
for the front camshaft is taken at journal two and
the rear at journal three. Front and rear camshaft
driving sprockets are interchangeable. The sprockets
and the engine water pump are driven by a single
notched timing belt.
ROCKER ARM SHAFTS:The shafts are retained
by the camshaft bearing journal caps. Four shafts are
used, one for each intake and exhaust rocker arm
assembly on each cylinder head. The hollow shafts
provide a duct for lubricating oil flow from the cylin-
der head to the valve mechanisms.
ROCKER ARMS:Are of light weight die-cast with
roller type follower operating against the cam shaft.
The valve actuating end of the rocker arms are
machined to retain hydraulic lash adjusters, elimi-
nating valve lash adjustment.
VALVES:Are made of heat resistant steel, valve
springs are especially designed to be short. The valve
spring wire cross-section is oval shaped and provides
the same spring tension as longer springs. Valve
spring retainers, locks and seals are conventional.
INTAKE MANIFOLD:The aluminum alloy mani-
fold is a cross type with long runners to improve
inertia. The runners, attaching below at the cylinder
head, also attach above and support an air plenum.
The air plenum chamber absorbs air pulsations cre-
ated during the suction phase of each cylinder.
EXHAUST MANIFOLDS:Both manifolds are a
log style made of ductile cast iron. Exhaust gasses,collected from the front cylinder bank, leave the front
manifold through an end outlet and are fed through
an upper crossover tube to the rear manifold. The
collected exhaust from both manifolds are combined,
and exit to the exhaust pipe through an articulated
joint.
DIAGNOSIS AND TESTING
CHECKING ENGINE OIL PRESSURE
Check oil pressure using gauge at oil pressure
switch location. Oil pressure should be 41 kPa ( 6
psi.) at idle or 241 to 517 kPa (35 to 75 psi.) at 3000
RPM.
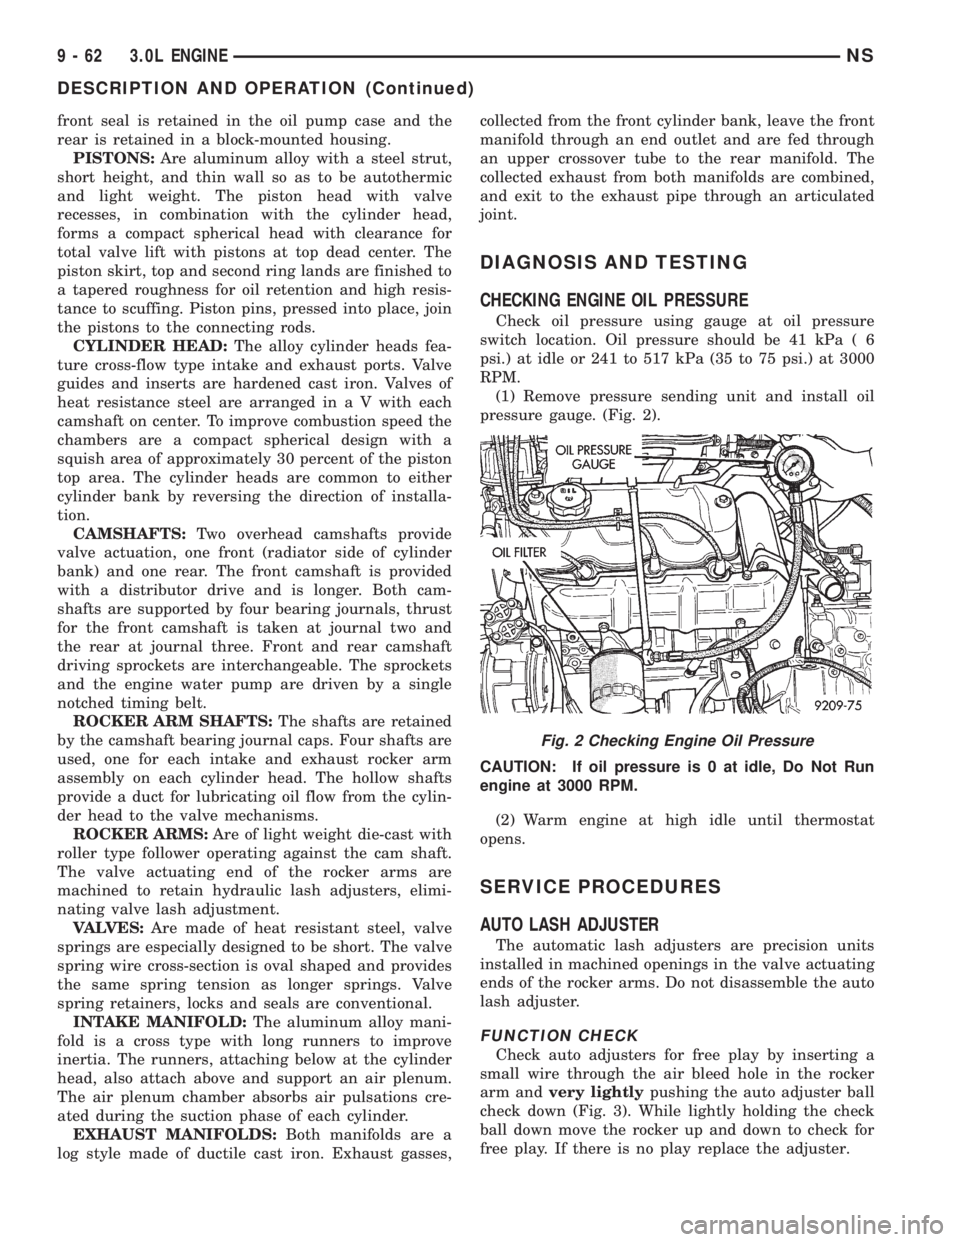
(1) Remove pressure sending unit and install oil
pressure gauge. (Fig. 2).
CAUTION: If oil pressure is 0 at idle, Do Not Run
engine at 3000 RPM.
(2) Warm engine at high idle until thermostat
opens.
SERVICE PROCEDURES
AUTO LASH ADJUSTER
The automatic lash adjusters are precision units
installed in machined openings in the valve actuating
ends of the rocker arms. Do not disassemble the auto
lash adjuster.
FUNCTION CHECK
Check auto adjusters for free play by inserting a
small wire through the air bleed hole in the rocker
arm andvery lightlypushing the auto adjuster ball
check down (Fig. 3). While lightly holding the check
ball down move the rocker up and down to check for
free play. If there is no play replace the adjuster.
Fig. 2 Checking Engine Oil Pressure
9 - 62 3.0L ENGINENS
DESCRIPTION AND OPERATION (Continued)
Page 1208 of 1938
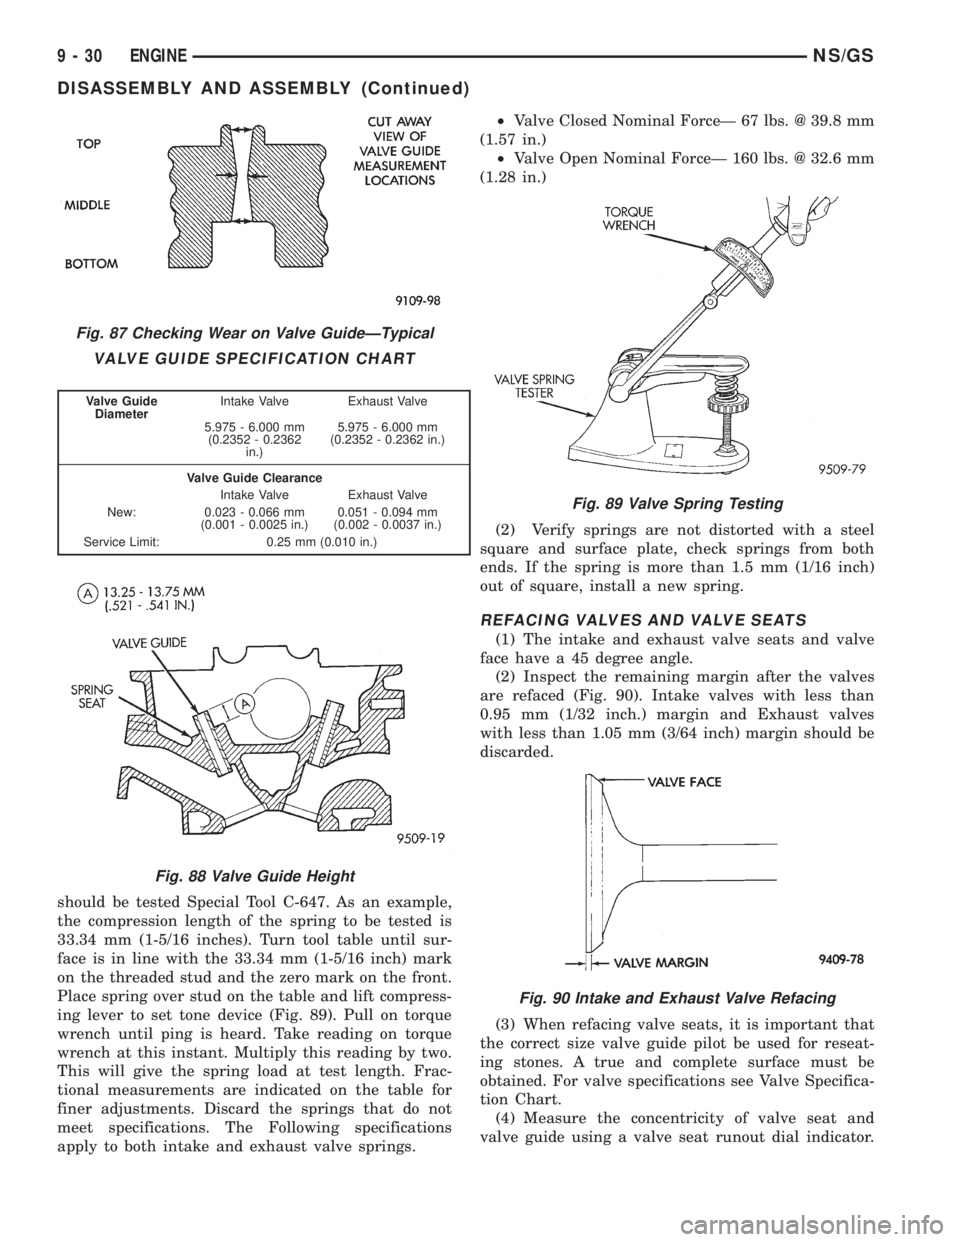
should be tested Special Tool C-647. As an example,
the compression length of the spring to be tested is
33.34 mm (1-5/16 inches). Turn tool table until sur-
face is in line with the 33.34 mm (1-5/16 inch) mark
on the threaded stud and the zero mark on the front.
Place spring over stud on the table and lift compress-
ing lever to set tone device (Fig. 89). Pull on torque
wrench until ping is heard. Take reading on torque
wrench at this instant. Multiply this reading by two.
This will give the spring load at test length. Frac-
tional measurements are indicated on the table for
finer adjustments. Discard the springs that do not
meet specifications. The Following specifications
apply to both intake and exhaust valve springs.²Valve Closed Nominal ForceÐ 67 lbs. @ 39.8 mm
(1.57 in.)
²Valve Open Nominal ForceÐ 160 lbs. @ 32.6 mm
(1.28 in.)
(2) Verify springs are not distorted with a steel
square and surface plate, check springs from both
ends. If the spring is more than 1.5 mm (1/16 inch)
out of square, install a new spring.
REFACING VALVES AND VALVE SEATS
(1) The intake and exhaust valve seats and valve
face have a 45 degree angle.
(2) Inspect the remaining margin after the valves
are refaced (Fig. 90). Intake valves with less than
0.95 mm (1/32 inch.) margin and Exhaust valves
with less than 1.05 mm (3/64 inch) margin should be
discarded.
(3) When refacing valve seats, it is important that
the correct size valve guide pilot be used for reseat-
ing stones. A true and complete surface must be
obtained. For valve specifications see Valve Specifica-
tion Chart.
(4) Measure the concentricity of valve seat and
valve guide using a valve seat runout dial indicator.
Fig. 87 Checking Wear on Valve GuideÐTypical
VALVE GUIDE SPECIFICATION CHART
Valve Guide
DiameterIntake Valve Exhaust Valve
5.975 - 6.000 mm
(0.2352 - 0.2362
in.)5.975 - 6.000 mm
(0.2352 - 0.2362 in.)
Valve Guide Clearance
Intake Valve Exhaust Valve
New: 0.023 - 0.066 mm
(0.001 - 0.0025 in.)0.051 - 0.094 mm
(0.002 - 0.0037 in.)
Service Limit: 0.25 mm (0.010 in.)
Fig. 88 Valve Guide Height
Fig. 89 Valve Spring Testing
Fig. 90 Intake and Exhaust Valve Refacing
9 - 30 ENGINENS/GS
DISASSEMBLY AND ASSEMBLY (Continued)