engine CHRYSLER VOYAGER 2001 Service Manual
[x] Cancel search | Manufacturer: CHRYSLER, Model Year: 2001, Model line: VOYAGER, Model: CHRYSLER VOYAGER 2001Pages: 4284, PDF Size: 83.53 MB
Page 2796 of 4284
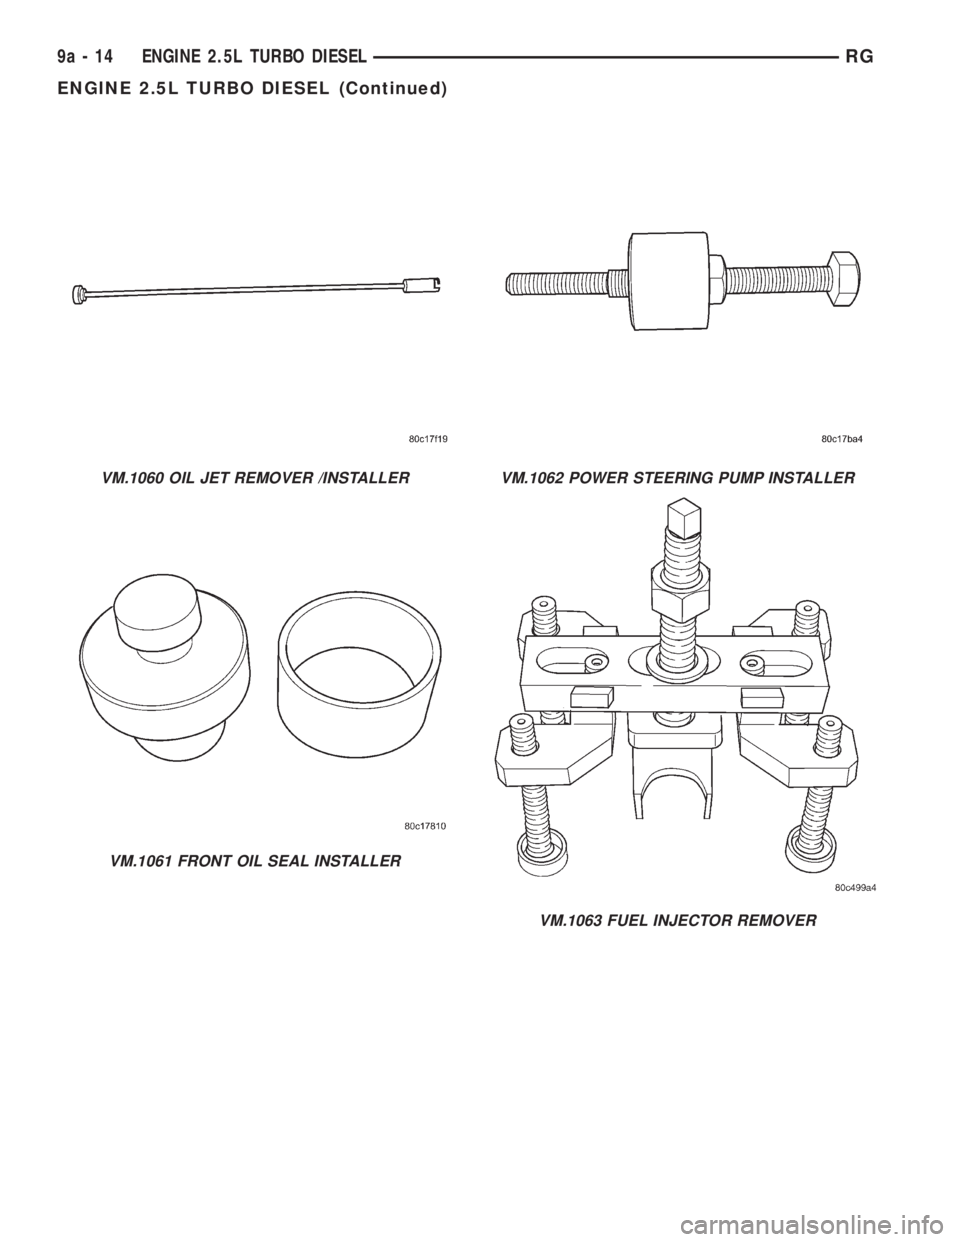
VM.1060 OIL JET REMOVER /INSTALLER
VM.1061 FRONT OIL SEAL INSTALLER
VM.1062 POWER STEERING PUMP INSTALLER
VM.1063 FUEL INJECTOR REMOVER
9a - 14 ENGINE 2.5L TURBO DIESELRG
ENGINE 2.5L TURBO DIESEL (Continued)
Page 2797 of 4284
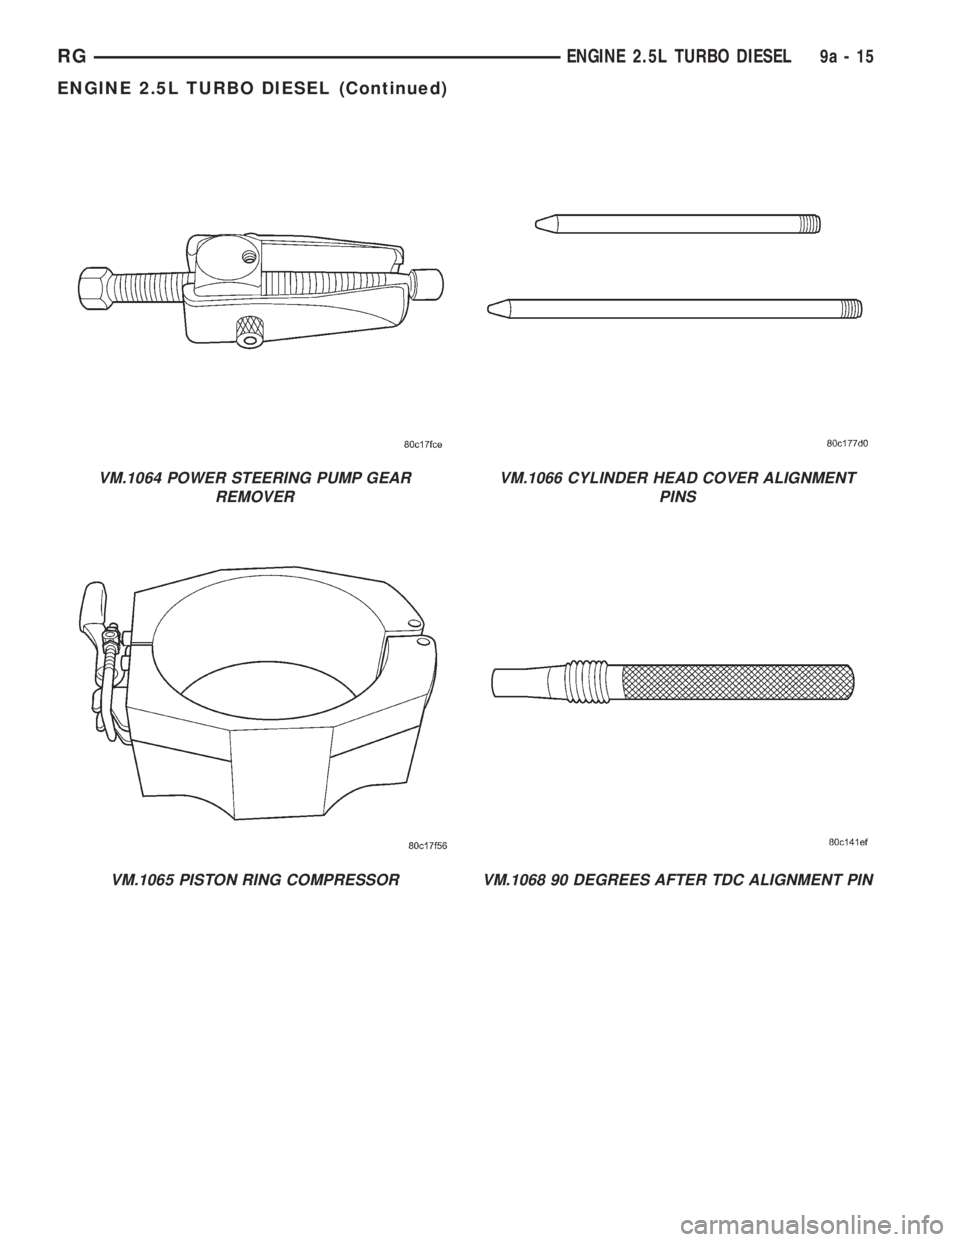
VM.1064 POWER STEERING PUMP GEAR
REMOVER
VM.1065 PISTON RING COMPRESSOR
VM.1066 CYLINDER HEAD COVER ALIGNMENT
PINS
VM.1068 90 DEGREES AFTER TDC ALIGNMENT PIN
RGENGINE 2.5L TURBO DIESEL9a-15
ENGINE 2.5L TURBO DIESEL (Continued)
Page 2798 of 4284
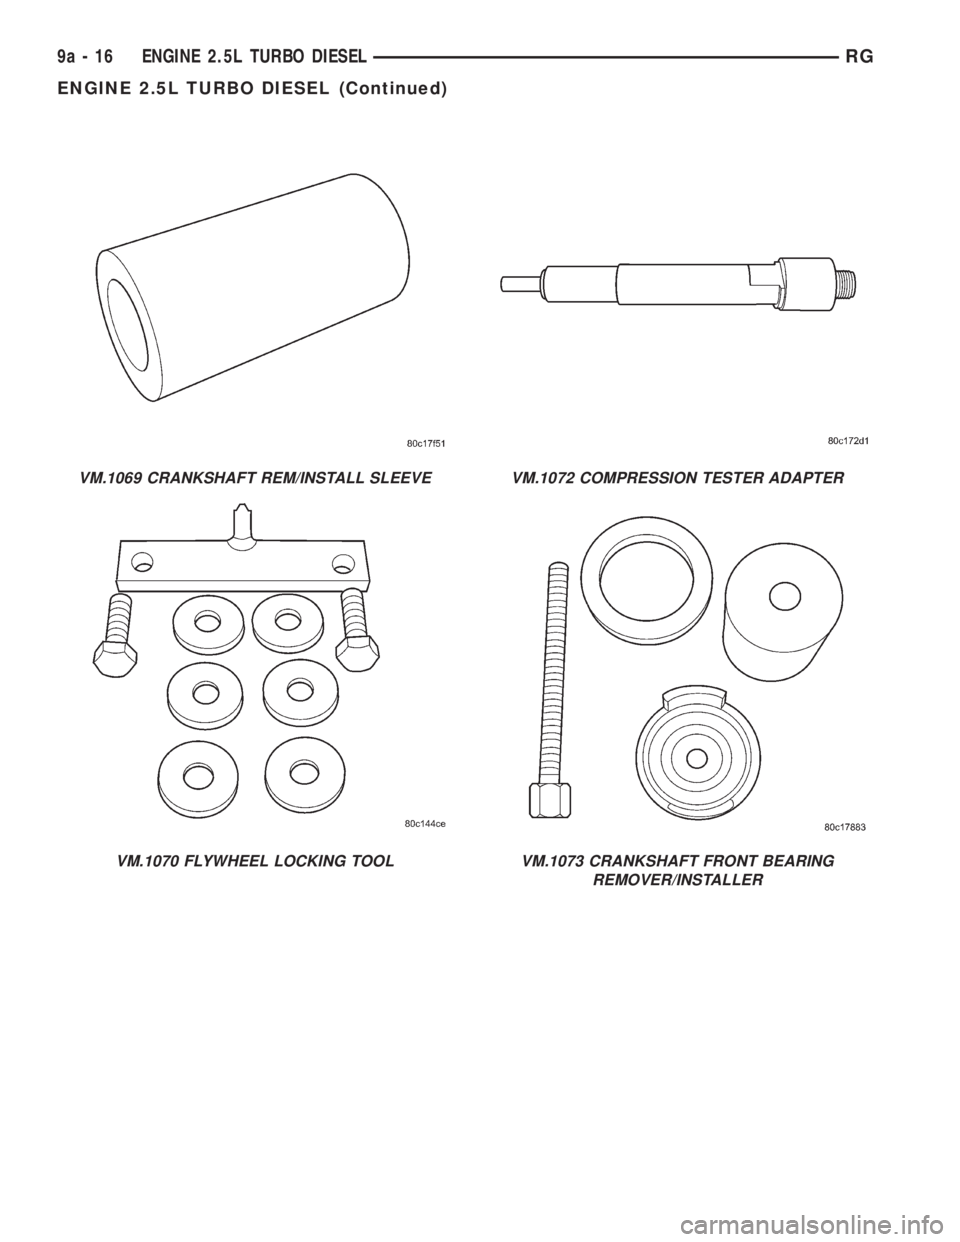
VM.1069 CRANKSHAFT REM/INSTALL SLEEVE
VM.1070 FLYWHEEL LOCKING TOOL
VM.1072 COMPRESSION TESTER ADAPTER
VM.1073 CRANKSHAFT FRONT BEARING
REMOVER/INSTALLER
9a - 16 ENGINE 2.5L TURBO DIESELRG
ENGINE 2.5L TURBO DIESEL (Continued)
Page 2799 of 4284
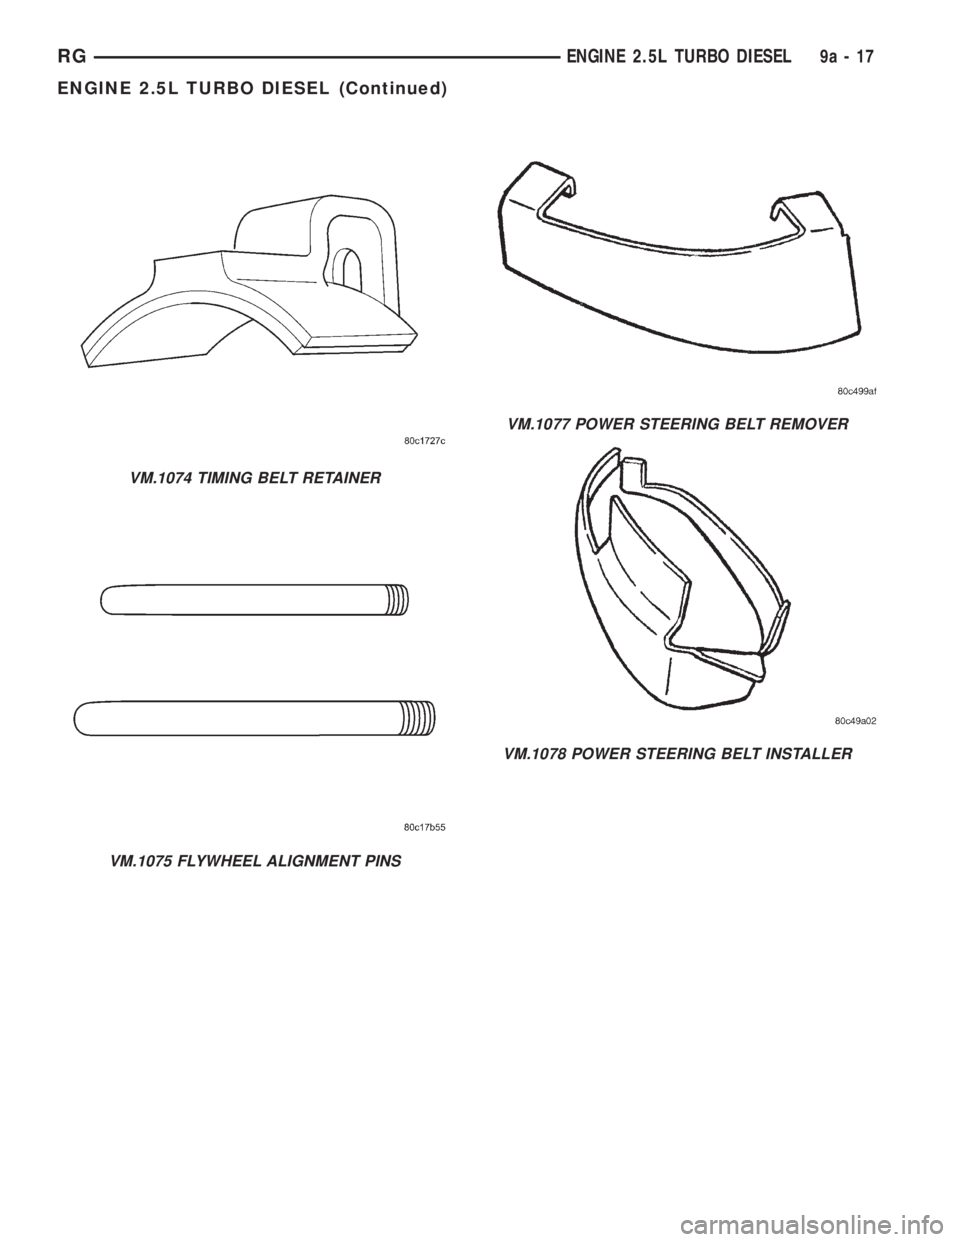
VM.1074 TIMING BELT RETAINER
VM.1075 FLYWHEEL ALIGNMENT PINS
VM.1077 POWER STEERING BELT REMOVER
VM.1078 POWER STEERING BELT INSTALLER
RGENGINE 2.5L TURBO DIESEL9a-17
ENGINE 2.5L TURBO DIESEL (Continued)
Page 2800 of 4284
CYLINDER HEAD
STANDARD PROCEDURE - VALVE SERVICE
This procedure is done with the engine cylinder
head removed from the block.
DISASSEMBLY
(1) Remove the engine cylinder head from the cyl-
inder block. Refer to cylinder head removal and
installation in this section.
(2) Use Valve Spring Compressor Tool and com-
press each valve spring.
(3) Remove the valve locks, retainers, and springs.
(4) Use an Arkansas smooth stone or a jewelers
file to remove any burrs on the top of the valve stem,
especially around the groove for the locks.
(5) Remove the valves, and place them in a rack in
the same order as removed.
VALVE CLEANING
(1) Clean all carbon deposits from the combustion
chambers, valve ports, valve stems, valve stem
guides and head.
(2) Clean all grime and gasket material from the
engine cylinder head machined gasket surface.
INSPECTION
(1) Inspect for cracks in the combustion chambers
and valve ports.
(2) Inspect for cracks on the exhaust seat.
(3) Inspect for cracks in the gasket surface at each
coolant passage.
(4) Inspect valves for burned, cracked or warped
heads.
(5) Inspect for scuffed or bent valve stems.
(6) Replace valves displaying any damage.
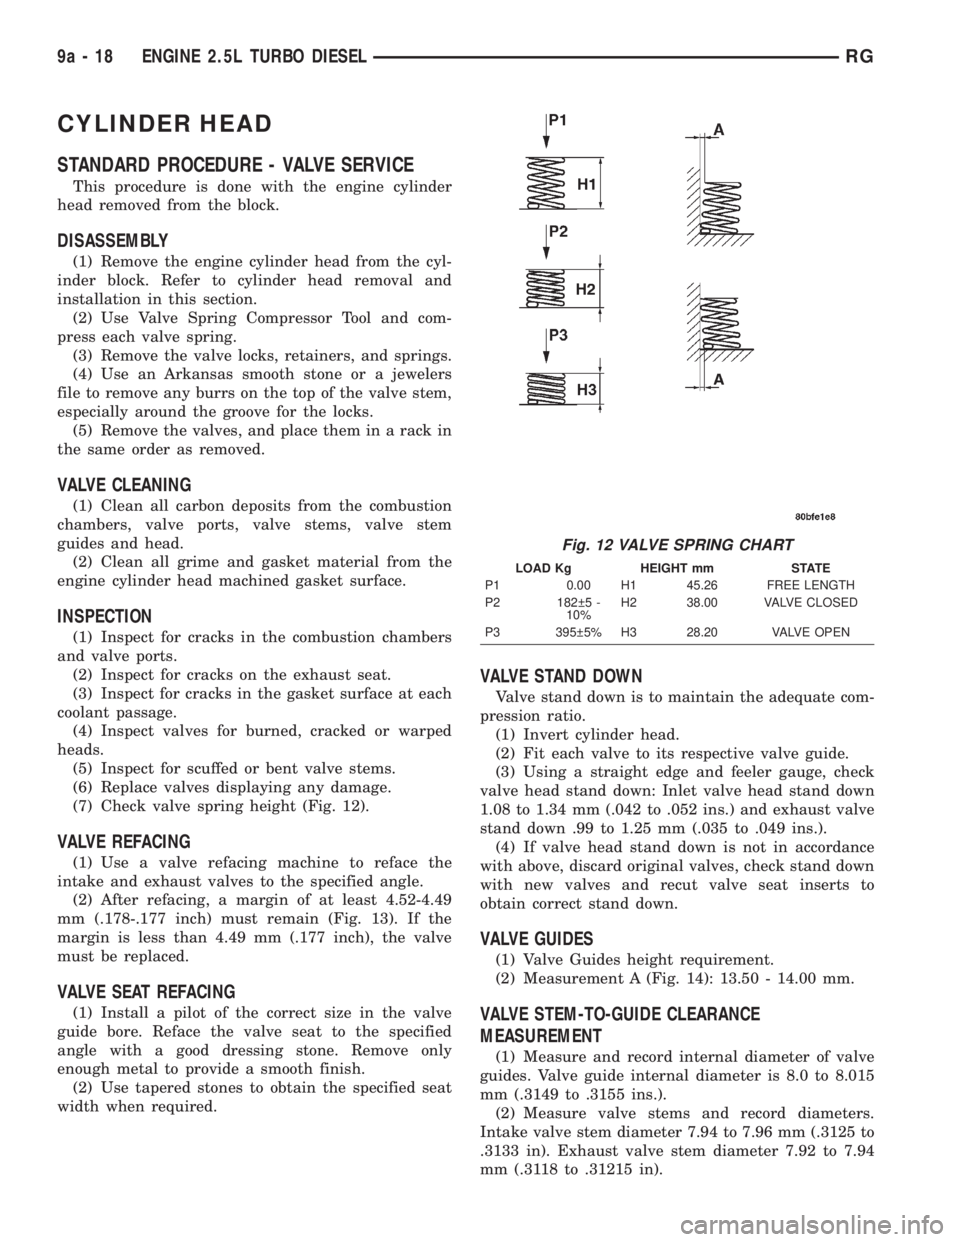
(7) Check valve spring height (Fig. 12).
VALVE REFACING
(1) Use a valve refacing machine to reface the
intake and exhaust valves to the specified angle.
(2) After refacing, a margin of at least 4.52-4.49
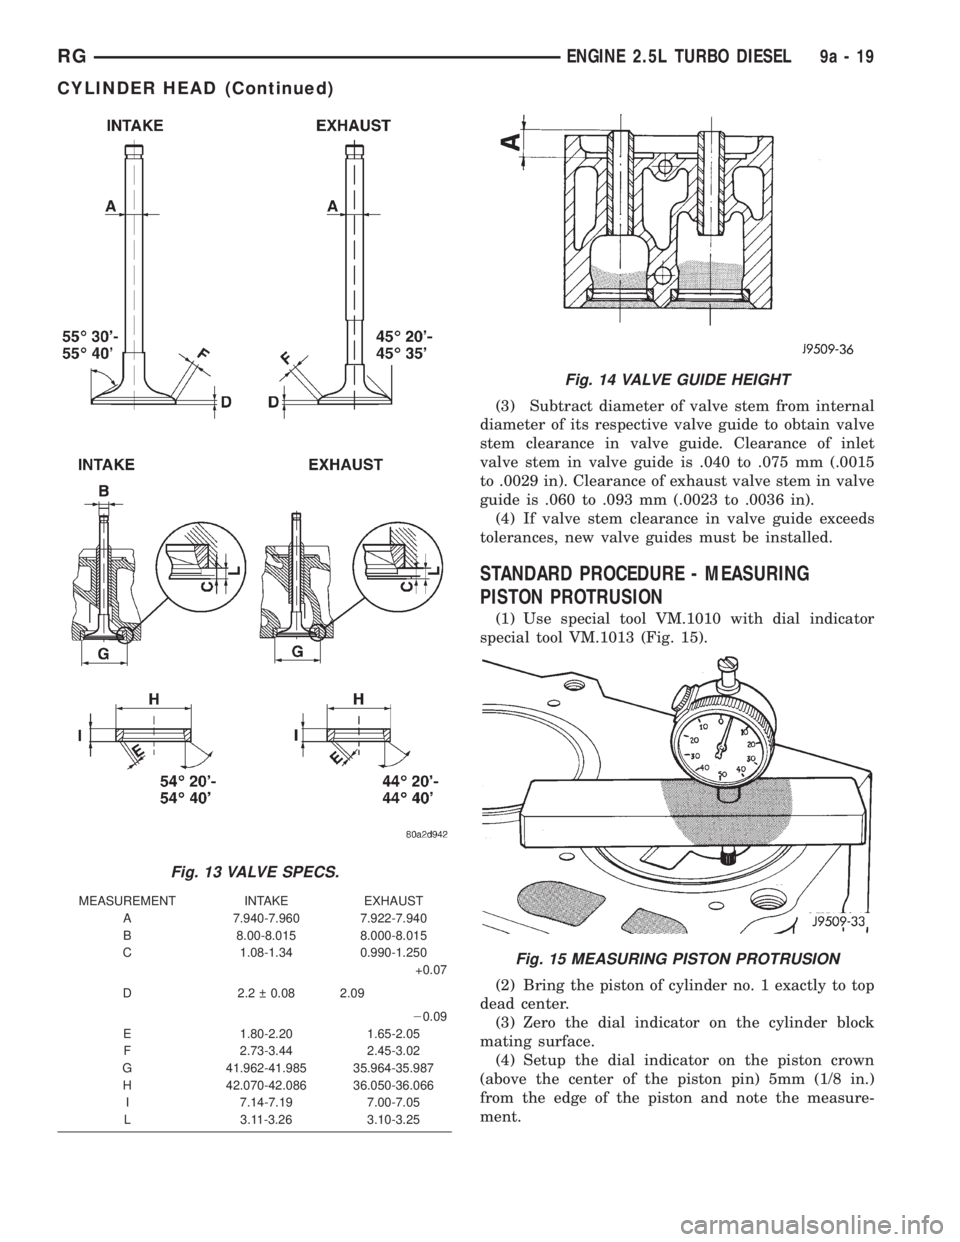
mm (.178-.177 inch) must remain (Fig. 13). If the
margin is less than 4.49 mm (.177 inch), the valve
must be replaced.
VALVE SEAT REFACING
(1) Install a pilot of the correct size in the valve
guide bore. Reface the valve seat to the specified
angle with a good dressing stone. Remove only
enough metal to provide a smooth finish.
(2) Use tapered stones to obtain the specified seat
width when required.
VALVE STAND DOWN
Valve stand down is to maintain the adequate com-
pression ratio.
(1) Invert cylinder head.
(2) Fit each valve to its respective valve guide.
(3) Using a straight edge and feeler gauge, check
valve head stand down: Inlet valve head stand down
1.08 to 1.34 mm (.042 to .052 ins.) and exhaust valve
stand down .99 to 1.25 mm (.035 to .049 ins.).
(4) If valve head stand down is not in accordance
with above, discard original valves, check stand down
with new valves and recut valve seat inserts to
obtain correct stand down.
VALVE GUIDES
(1) Valve Guides height requirement.
(2) Measurement A (Fig. 14): 13.50 - 14.00 mm.
VALVE STEM-TO-GUIDE CLEARANCE
MEASUREMENT
(1) Measure and record internal diameter of valve
guides. Valve guide internal diameter is 8.0 to 8.015
mm (.3149 to .3155 ins.).
(2) Measure valve stems and record diameters.
Intake valve stem diameter 7.94 to 7.96 mm (.3125 to
.3133 in). Exhaust valve stem diameter 7.92 to 7.94
mm (.3118 to .31215 in).
Fig. 12 VALVE SPRING CHART
LOAD Kg HEIGHT mm STATE
P1 0.00 H1 45.26 FREE LENGTH
P2 182 5 -
10%H2 38.00 VALVE CLOSED
P3 395 5% H3 28.20 VALVE OPEN
9a - 18 ENGINE 2.5L TURBO DIESELRG
Page 2801 of 4284
(3) Subtract diameter of valve stem from internal
diameter of its respective valve guide to obtain valve
stem clearance in valve guide. Clearance of inlet
valve stem in valve guide is .040 to .075 mm (.0015
to .0029 in). Clearance of exhaust valve stem in valve
guide is .060 to .093 mm (.0023 to .0036 in).
(4) If valve stem clearance in valve guide exceeds
tolerances, new valve guides must be installed.
STANDARD PROCEDURE - MEASURING
PISTON PROTRUSION
(1) Use special tool VM.1010 with dial indicator
special tool VM.1013 (Fig. 15).
(2) Bring the piston of cylinder no. 1 exactly to top
dead center.
(3) Zero the dial indicator on the cylinder block
mating surface.
(4) Setup the dial indicator on the piston crown
(above the center of the piston pin) 5mm (1/8 in.)
from the edge of the piston and note the measure-
ment.
Fig. 13 VALVE SPECS.
MEASUREMENT INTAKE EXHAUST
A 7.940-7.960 7.922-7.940
B 8.00-8.015 8.000-8.015
C 1.08-1.34 0.990-1.250
+0.07
D 2.2 0.08 2.09
20.09
E 1.80-2.20 1.65-2.05
F 2.73-3.44 2.45-3.02
G 41.962-41.985 35.964-35.987
H 42.070-42.086 36.050-36.066
I 7.14-7.19 7.00-7.05
L 3.11-3.26 3.10-3.25
Fig. 14 VALVE GUIDE HEIGHT
Fig. 15 MEASURING PISTON PROTRUSION
RGENGINE 2.5L TURBO DIESEL9a-19
CYLINDER HEAD (Continued)
Page 2802 of 4284
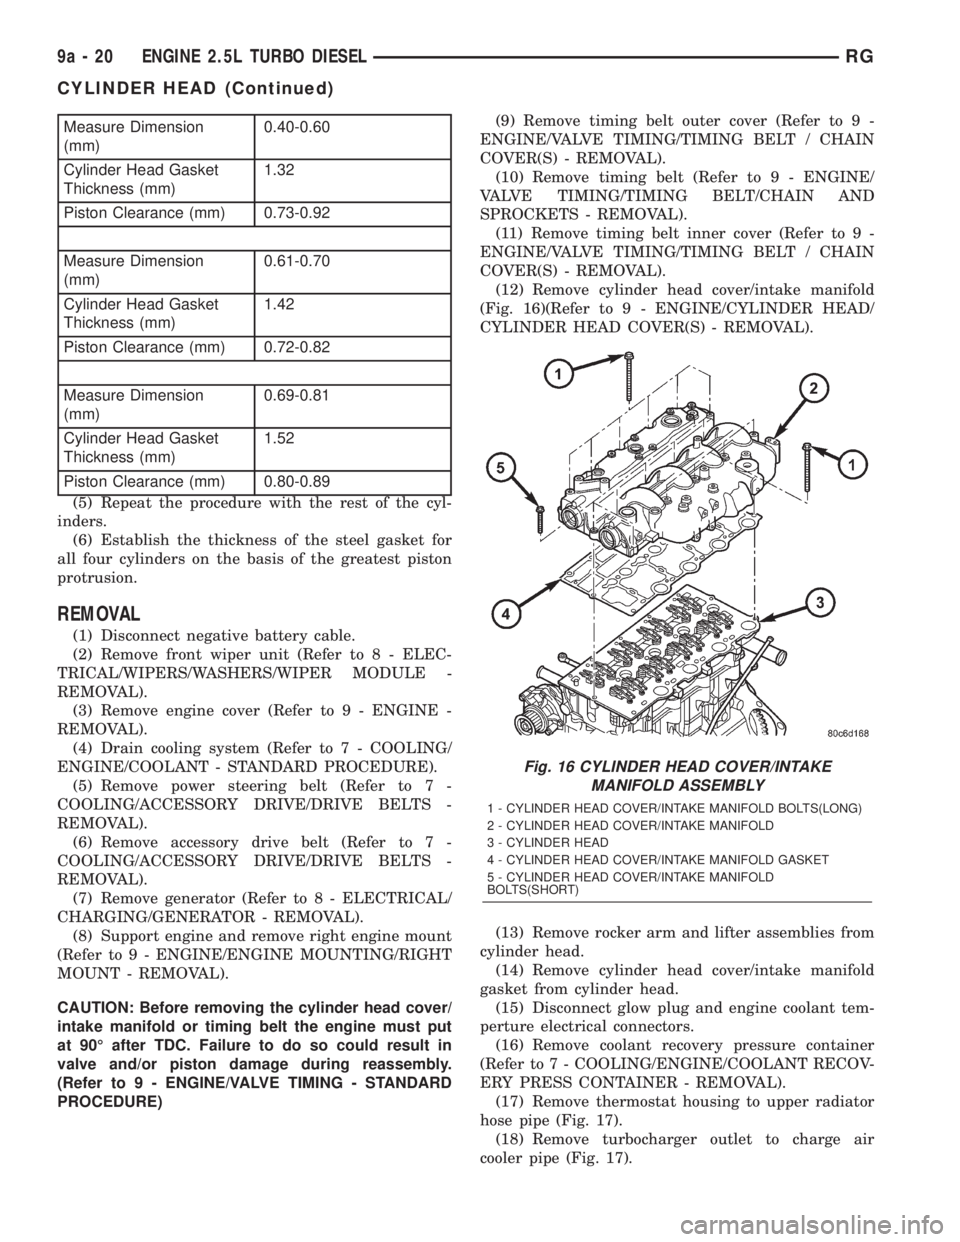
Measure Dimension
(mm)0.40-0.60
Cylinder Head Gasket
Thickness (mm)1.32
Piston Clearance (mm) 0.73-0.92
Measure Dimension
(mm)0.61-0.70
Cylinder Head Gasket
Thickness (mm)1.42
Piston Clearance (mm) 0.72-0.82
Measure Dimension
(mm)0.69-0.81
Cylinder Head Gasket
Thickness (mm)1.52
Piston Clearance (mm) 0.80-0.89
(5) Repeat the procedure with the rest of the cyl-
inders.
(6) Establish the thickness of the steel gasket for
all four cylinders on the basis of the greatest piston
protrusion.
REMOVAL
(1) Disconnect negative battery cable.
(2) Remove front wiper unit (Refer to 8 - ELEC-
TRICAL/WIPERS/WASHERS/WIPER MODULE -
REMOVAL).
(3) Remove engine cover (Refer to 9 - ENGINE -
REMOVAL).
(4) Drain cooling system (Refer to 7 - COOLING/
ENGINE/COOLANT - STANDARD PROCEDURE).
(5) Remove power steering belt (Refer to 7 -
COOLING/ACCESSORY DRIVE/DRIVE BELTS -
REMOVAL).
(6) Remove accessory drive belt (Refer to 7 -
COOLING/ACCESSORY DRIVE/DRIVE BELTS -
REMOVAL).
(7) Remove generator (Refer to 8 - ELECTRICAL/
CHARGING/GENERATOR - REMOVAL).
(8) Support engine and remove right engine mount
(Refer to 9 - ENGINE/ENGINE MOUNTING/RIGHT
MOUNT - REMOVAL).
CAUTION: Before removing the cylinder head cover/
intake manifold or timing belt the engine must put
at 90É after TDC. Failure to do so could result in
valve and/or piston damage during reassembly.
(Refer to 9 - ENGINE/VALVE TIMING - STANDARD
PROCEDURE)(9) Remove timing belt outer cover (Refer to 9 -
ENGINE/VALVE TIMING/TIMING BELT / CHAIN
COVER(S) - REMOVAL).
(10) Remove timing belt (Refer to 9 - ENGINE/
VALVE TIMING/TIMING BELT/CHAIN AND
SPROCKETS - REMOVAL).
(11) Remove timing belt inner cover (Refer to 9 -
ENGINE/VALVE TIMING/TIMING BELT / CHAIN
COVER(S) - REMOVAL).
(12) Remove cylinder head cover/intake manifold
(Fig. 16)(Refer to 9 - ENGINE/CYLINDER HEAD/
CYLINDER HEAD COVER(S) - REMOVAL).
(13) Remove rocker arm and lifter assemblies from
cylinder head.
(14) Remove cylinder head cover/intake manifold
gasket from cylinder head.
(15) Disconnect glow plug and engine coolant tem-
perture electrical connectors.
(16) Remove coolant recovery pressure container
(Refer to 7 - COOLING/ENGINE/COOLANT RECOV-
ERY PRESS CONTAINER - REMOVAL).
(17) Remove thermostat housing to upper radiator
hose pipe (Fig. 17).
(18) Remove turbocharger outlet to charge air
cooler pipe (Fig. 17).
Fig. 16 CYLINDER HEAD COVER/INTAKE
MANIFOLD ASSEMBLY
1 - CYLINDER HEAD COVER/INTAKE MANIFOLD BOLTS(LONG)
2 - CYLINDER HEAD COVER/INTAKE MANIFOLD
3 - CYLINDER HEAD
4 - CYLINDER HEAD COVER/INTAKE MANIFOLD GASKET
5 - CYLINDER HEAD COVER/INTAKE MANIFOLD
BOLTS(SHORT)
9a - 20 ENGINE 2.5L TURBO DIESELRG
CYLINDER HEAD (Continued)
Page 2803 of 4284
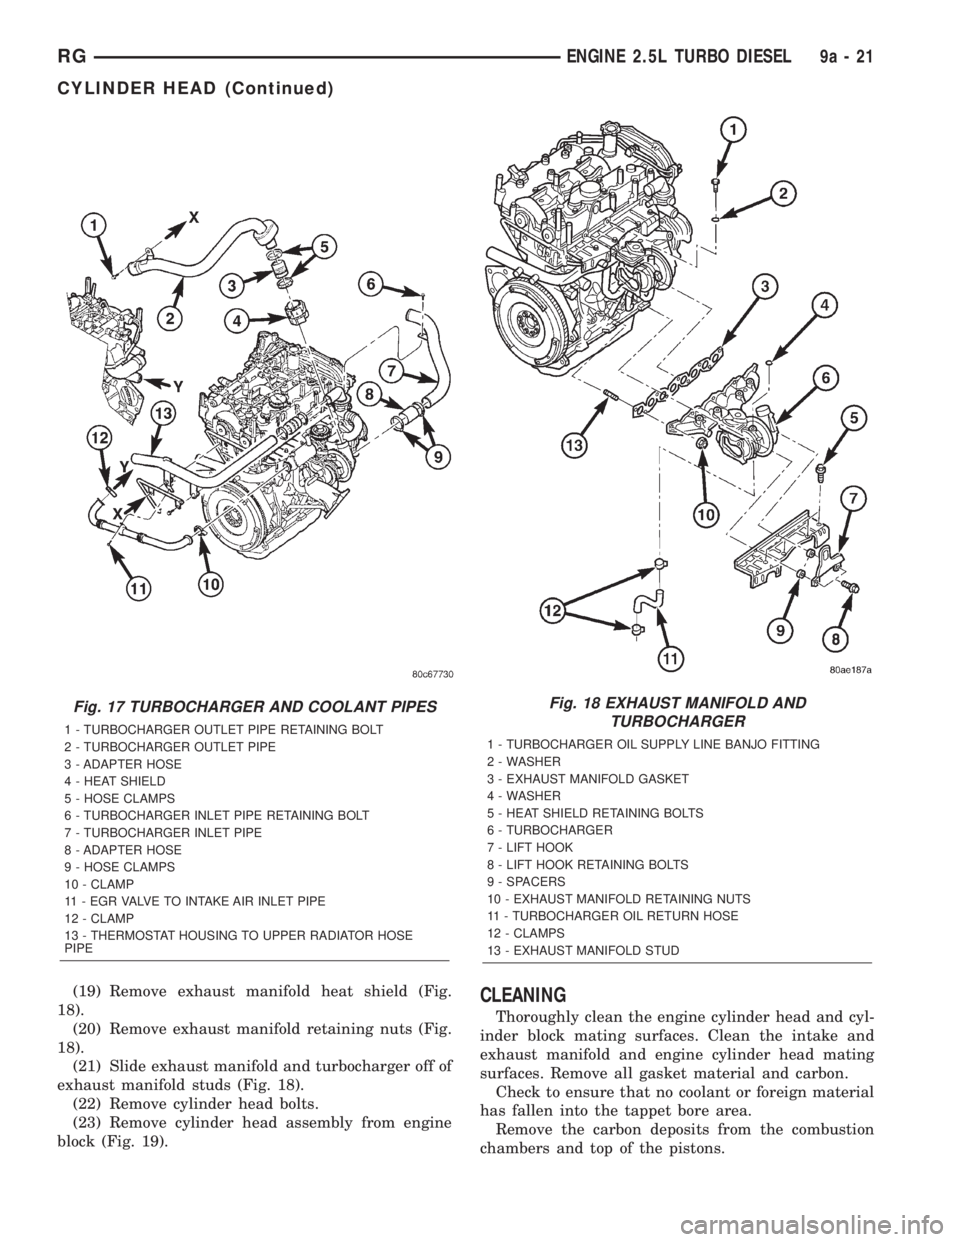
(19) Remove exhaust manifold heat shield (Fig.
18).
(20) Remove exhaust manifold retaining nuts (Fig.
18).
(21) Slide exhaust manifold and turbocharger off of
exhaust manifold studs (Fig. 18).
(22) Remove cylinder head bolts.
(23) Remove cylinder head assembly from engine
block (Fig. 19).CLEANING
Thoroughly clean the engine cylinder head and cyl-
inder block mating surfaces. Clean the intake and
exhaust manifold and engine cylinder head mating
surfaces. Remove all gasket material and carbon.
Check to ensure that no coolant or foreign material
has fallen into the tappet bore area.
Remove the carbon deposits from the combustion
chambers and top of the pistons.
Fig. 17 TURBOCHARGER AND COOLANT PIPES
1 - TURBOCHARGER OUTLET PIPE RETAINING BOLT
2 - TURBOCHARGER OUTLET PIPE
3 - ADAPTER HOSE
4 - HEAT SHIELD
5 - HOSE CLAMPS
6 - TURBOCHARGER INLET PIPE RETAINING BOLT
7 - TURBOCHARGER INLET PIPE
8 - ADAPTER HOSE
9 - HOSE CLAMPS
10 - CLAMP
11 - EGR VALVE TO INTAKE AIR INLET PIPE
12 - CLAMP
13 - THERMOSTAT HOUSING TO UPPER RADIATOR HOSE
PIPE
Fig. 18 EXHAUST MANIFOLD AND
TURBOCHARGER
1 - TURBOCHARGER OIL SUPPLY LINE BANJO FITTING
2 - WASHER
3 - EXHAUST MANIFOLD GASKET
4 - WASHER
5 - HEAT SHIELD RETAINING BOLTS
6 - TURBOCHARGER
7 - LIFT HOOK
8 - LIFT HOOK RETAINING BOLTS
9 - SPACERS
10 - EXHAUST MANIFOLD RETAINING NUTS
11 - TURBOCHARGER OIL RETURN HOSE
12 - CLAMPS
13 - EXHAUST MANIFOLD STUD
RGENGINE 2.5L TURBO DIESEL9a-21
CYLINDER HEAD (Continued)
Page 2804 of 4284
INSPECTION
Use a straightedge and feeler gauge to check the
flatness of the engine cylinder head and block mating
surfaces.
The minimum cylinder head thickness is 89.95mm
(3.541 in.).
INSTALLATION
CAUTION: Piston protrusion must be measured to
determine cylinder head gasket thickness if one or
more cylinder liners have benn replaced (Refer to 9
- ENGINE/CYLINDER HEAD - STANDARD PROCE-
DURE).
NOTE: If cylinder liner(s) have not been removed,
the same thickness head gasket that was removed
can be used.(1) Clean and inspect gasket mating surfaces.
(2) Position correct head gasket on engine block.
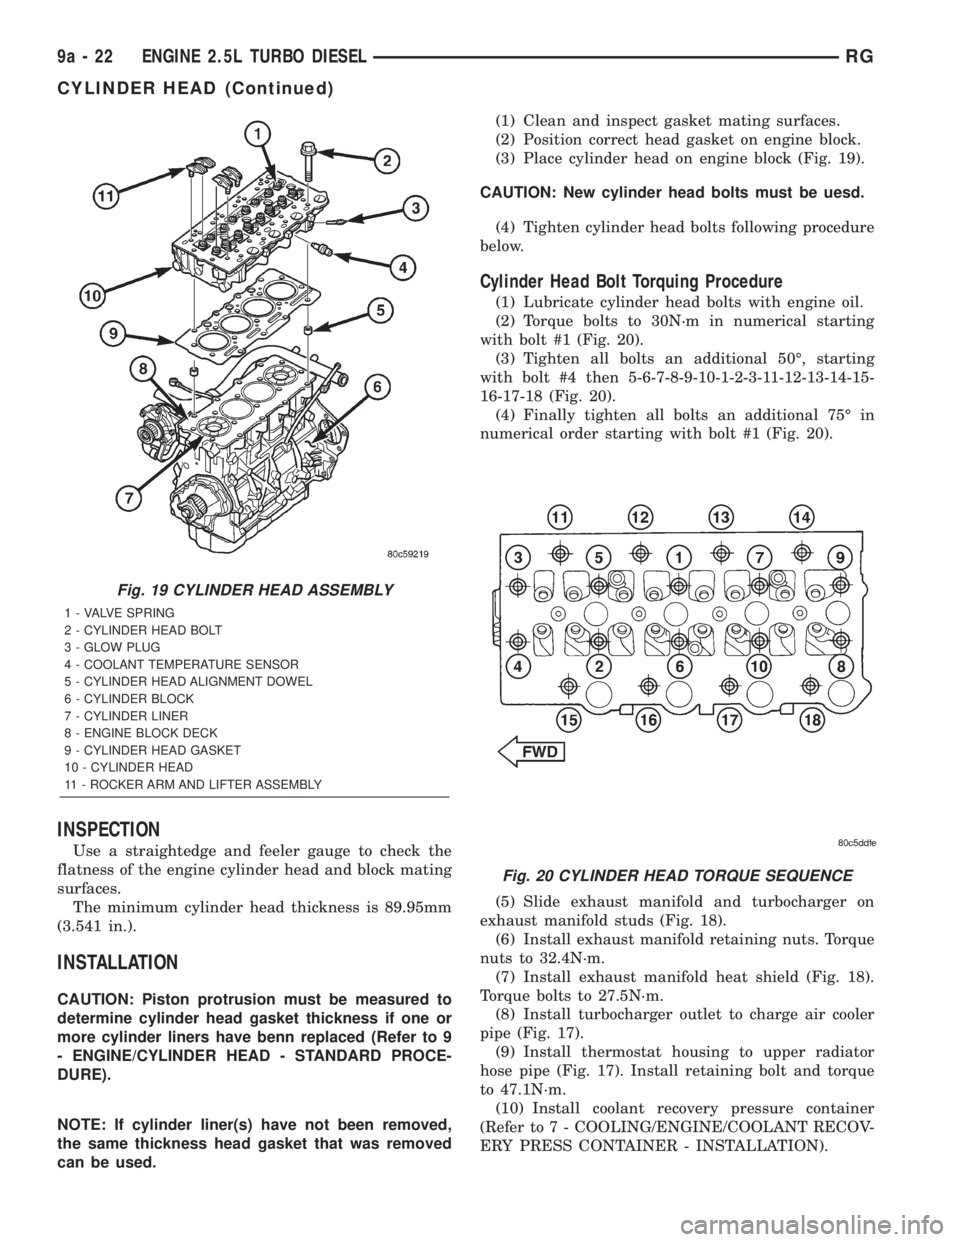
(3) Place cylinder head on engine block (Fig. 19).
CAUTION: New cylinder head bolts must be uesd.
(4) Tighten cylinder head bolts following procedure
below.
Cylinder Head Bolt Torquing Procedure
(1) Lubricate cylinder head bolts with engine oil.
(2) Torque bolts to 30N´m in numerical starting
with bolt #1 (Fig. 20).
(3) Tighten all bolts an additional 50É, starting
with bolt #4 then 5-6-7-8-9-10-1-2-3-11-12-13-14-15-
16-17-18 (Fig. 20).
(4) Finally tighten all bolts an additional 75É in
numerical order starting with bolt #1 (Fig. 20).
(5) Slide exhaust manifold and turbocharger on
exhaust manifold studs (Fig. 18).
(6) Install exhaust manifold retaining nuts. Torque
nuts to 32.4N´m.
(7) Install exhaust manifold heat shield (Fig. 18).
Torque bolts to 27.5N´m.
(8) Install turbocharger outlet to charge air cooler
pipe (Fig. 17).
(9) Install thermostat housing to upper radiator
hose pipe (Fig. 17). Install retaining bolt and torque
to 47.1N´m.
(10) Install coolant recovery pressure container
(Refer to 7 - COOLING/ENGINE/COOLANT RECOV-
ERY PRESS CONTAINER - INSTALLATION).
Fig. 19 CYLINDER HEAD ASSEMBLY
1 - VALVE SPRING
2 - CYLINDER HEAD BOLT
3 - GLOW PLUG
4 - COOLANT TEMPERATURE SENSOR
5 - CYLINDER HEAD ALIGNMENT DOWEL
6 - CYLINDER BLOCK
7 - CYLINDER LINER
8 - ENGINE BLOCK DECK
9 - CYLINDER HEAD GASKET
10 - CYLINDER HEAD
11 - ROCKER ARM AND LIFTER ASSEMBLY
Fig. 20 CYLINDER HEAD TORQUE SEQUENCE
9a - 22 ENGINE 2.5L TURBO DIESELRG
CYLINDER HEAD (Continued)
Page 2805 of 4284
(11) Connect glow plug and coolant temperature
sensor electrical connectors.
(12) Install new cylinder head cover/intake mani-
fold gasket.
(13) Install rocker arm and lifter assemblies.Be
sure to put rocker arm and lifter assemblies in
same location as removed.
(14) Install cylinder head cover/intake manifold
(Fig. 16)(Refer to 9 - ENGINE/CYLINDER HEAD/
CYLINDER HEAD COVER(S) - INSTALLATION).
(15) Install timing belt inner cover (Refer to 9 -
ENGINE/VALVE TIMING/TIMING BELT / CHAIN
COVER(S) - INSTALLATION).
(16) Install timing belt (Refer to 9 - ENGINE/
VALVE TIMING/TIMING BELT/CHAIN AND
SPROCKETS - INSTALLATION) .
(17) Install timing belt outer cover (Refer to 9 -
ENGINE/VALVE TIMING/TIMING BELT / CHAIN
COVER(S) - INSTALLATION).
(18)Remove crankshaft and both camshaft
locking pins at this time(Refer to 9 - ENGINE/
VALVE TIMING - STANDARD PROCEDURE).
(19) Install generator (Refer to 8 - ELECTRICAL/
CHARGING/GENERATOR - INSTALLATION).
(20) Install accessory drive belt (Refer to 7 -
COOLING/ACCESSORY DRIVE/DRIVE BELTS -
INSTALLATION).
(21) Install power steering belt (Refer to 7 -
COOLING/ACCESSORY DRIVE/DRIVE BELTS -
INSTALLATION).
(22) Install right engine mount (Refer to 9 -
ENGINE/ENGINE MOUNTING/RIGHT MOUNT -
INSTALLATION).
(23) Install air cleaner housing assembly.
(24) Refill cooling system (Refer to 7 - COOLING/
ENGINE/COOLANT - STANDARD PROCEDURE).
(25) Install engine cover (Refer to 9 - ENGINE -
INSTALLATION).
(26) Install front wiper unit (Refer to 8 - ELEC-
TRICAL/WIPERS/WASHERS/WIPER MODULE -
INSTALLATION).
(27) Connect negative battery cable.
CAMSHAFT(S)
DESCRIPTION
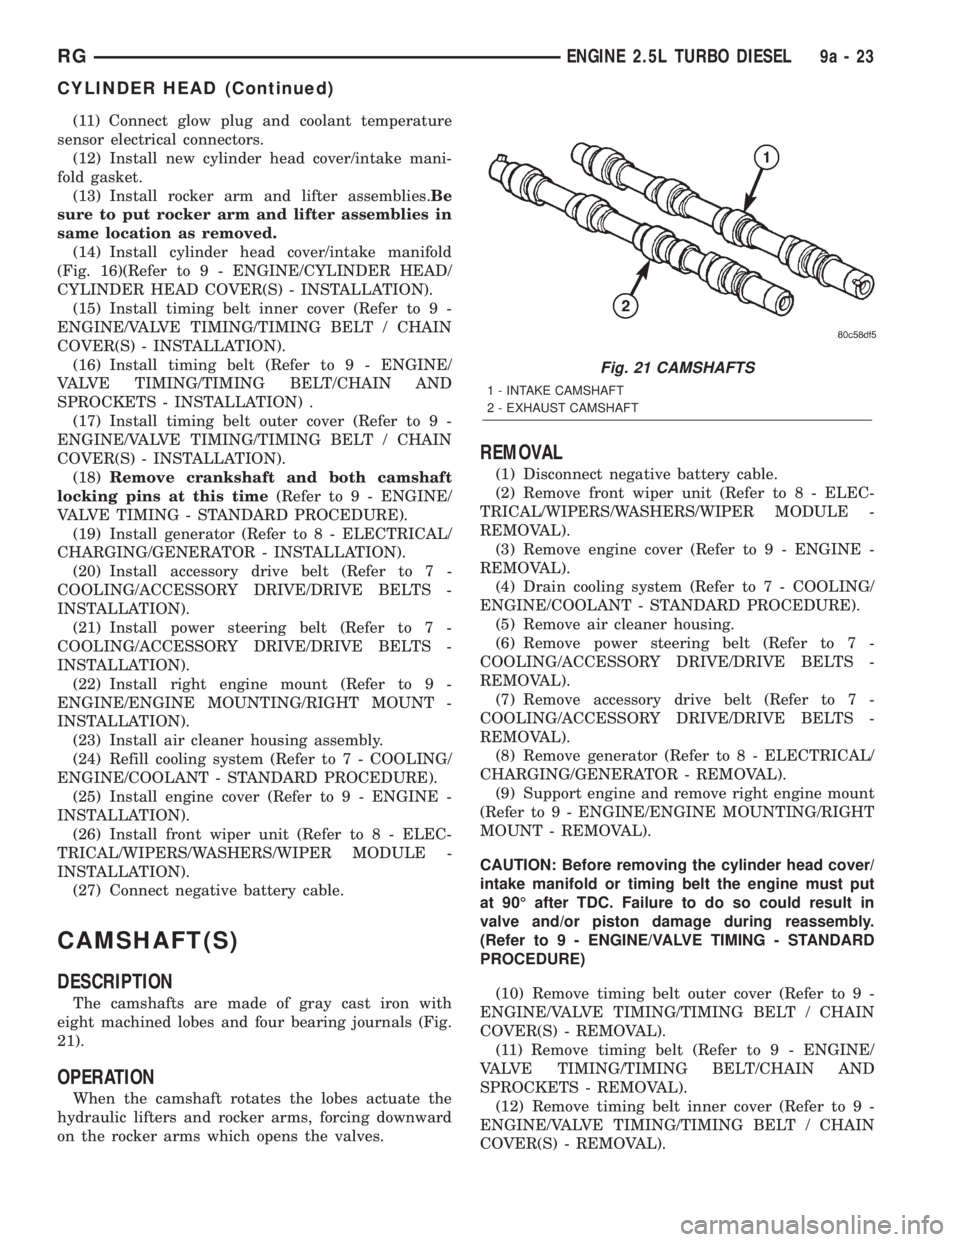
The camshafts are made of gray cast iron with
eight machined lobes and four bearing journals (Fig.
21).
OPERATION
When the camshaft rotates the lobes actuate the
hydraulic lifters and rocker arms, forcing downward
on the rocker arms which opens the valves.
REMOVAL
(1) Disconnect negative battery cable.
(2) Remove front wiper unit (Refer to 8 - ELEC-
TRICAL/WIPERS/WASHERS/WIPER MODULE -
REMOVAL).
(3) Remove engine cover (Refer to 9 - ENGINE -
REMOVAL).
(4) Drain cooling system (Refer to 7 - COOLING/
ENGINE/COOLANT - STANDARD PROCEDURE).
(5) Remove air cleaner housing.
(6) Remove power steering belt (Refer to 7 -
COOLING/ACCESSORY DRIVE/DRIVE BELTS -
REMOVAL).
(7) Remove accessory drive belt (Refer to 7 -
COOLING/ACCESSORY DRIVE/DRIVE BELTS -
REMOVAL).
(8) Remove generator (Refer to 8 - ELECTRICAL/
CHARGING/GENERATOR - REMOVAL).
(9) Support engine and remove right engine mount
(Refer to 9 - ENGINE/ENGINE MOUNTING/RIGHT
MOUNT - REMOVAL).
CAUTION: Before removing the cylinder head cover/
intake manifold or timing belt the engine must put
at 90É after TDC. Failure to do so could result in
valve and/or piston damage during reassembly.
(Refer to 9 - ENGINE/VALVE TIMING - STANDARD
PROCEDURE)
(10) Remove timing belt outer cover (Refer to 9 -
ENGINE/VALVE TIMING/TIMING BELT / CHAIN
COVER(S) - REMOVAL).
(11) Remove timing belt (Refer to 9 - ENGINE/
VALVE TIMING/TIMING BELT/CHAIN AND
SPROCKETS - REMOVAL).
(12) Remove timing belt inner cover (Refer to 9 -
ENGINE/VALVE TIMING/TIMING BELT / CHAIN
COVER(S) - REMOVAL).
Fig. 21 CAMSHAFTS
1 - INTAKE CAMSHAFT
2 - EXHAUST CAMSHAFT
RGENGINE 2.5L TURBO DIESEL9a-23
CYLINDER HEAD (Continued)